Compositing VRay Render Elements Advanced Beauty in NUKE


Compositing V-Ray Render Elements: Advanced Beauty in NUKE

Lesson Introduction – Orientation • This presentation will discuss the process of compositing advanced V-Ray Render Elements • This information centers around compositing Raw Render Elements in what is called an “Advanced Back to Beauty” composite • The lesson topic is approximately 40 minutes in length and follows closely with the example scene/render made available • Presentation covers all 3 Learning Cycles for the Lesson Topic – Lecture, Demonstration, and Activity

Lesson Topic: Compositing Beauty • Objective – We will composite the advanced Render Elements and use them to create a final composite in NUKE • Outcome – You will understand how to composite multiple advanced render passes/elements back together to produce a professionally composited final image

Lesson Topic: Compositing Beauty • Separate the multi-channel EXR into individual nodes • Use a Read node to bring the Raw_Render_Elements_Beauty. exr into your Node Graph • Shuffle out the different passes, like the Background Render Element from the Read node to have shuffle nodes for all the rendered element passes • It’s good practice to name your Shuffle and/or Read nodes to help keep things straight when there’s multiple Shuffle nodes in the Node Graph • If you rendered in separate files and not multi-channel EXR, you do not need to use the Shuffle node, but instead will have separate Read nodes to bring in each element’s image file(s) → EXR render as beauty Background Render Element

Lesson Topic: Compositing Beauty • Assemble the Light pass in your Composite • Using the appropriate Shuffle or Read nodes, Multiply the Diffuse and Raw Lighting together to create the same result as the basic Lighting Render Element • Having these nodes separated out before combining them together means they can be adjusted/manipulated before creating the Lighting Render Element • Make sure that the standard Lighting Render Element is included in the render of the scene along with Raw Lighting, for proper calculation of the passes x Diffuse Render Element = Raw Lighting Render Element

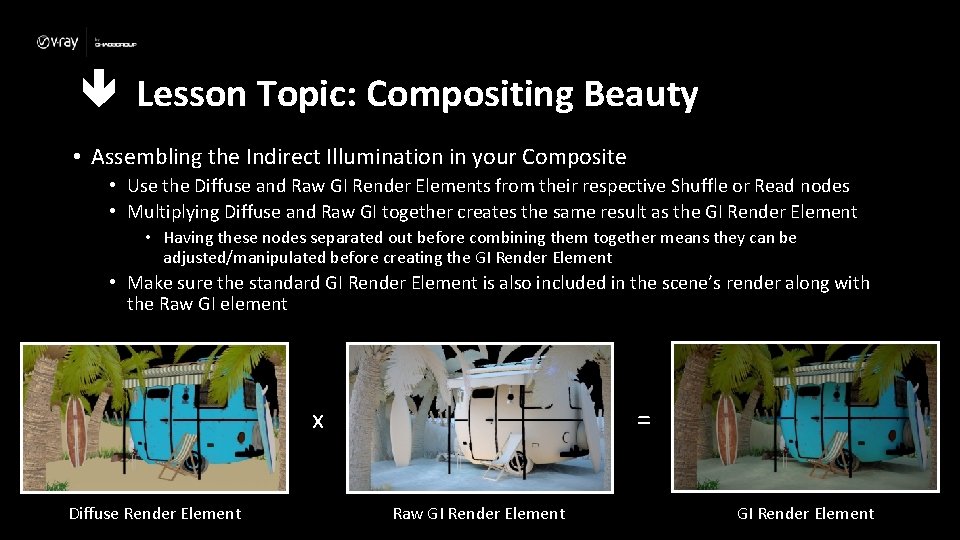
Lesson Topic: Compositing Beauty • Assembling the Indirect Illumination in your Composite • Use the Diffuse and Raw GI Render Elements from their respective Shuffle or Read nodes • Multiplying Diffuse and Raw GI together creates the same result as the GI Render Element • Having these nodes separated out before combining them together means they can be adjusted/manipulated before creating the GI Render Element • Make sure the standard GI Render Element is also included in the scene’s render along with the Raw GI element x Diffuse Render Element = Raw GI Render Element

Lesson Topic: Compositing Beauty • Assembling the Reflections • Use the Raw Reflection and Reflection Filter Render Elements • The Raw Reflection gives a 100% strong reflection for all reflective surfaces in the scene, despite the amount of reflection set in the shader • The Reflection Filter sets how much of the reflection is supposed to come through • Multiplying them together creates the same result as the basic Reflection Render Element • Having these nodes separated out before combining them together means they can be adjusted/manipulated before creating the Reflection Render Element • Make sure the standard Reflection Render Element is included in the scene’s render along with the Raw Reflection and Reflection Filter elements x Raw Reflection Render Element = Reflection Filter Render Element Reflection Render Elements

Lesson Topic: Compositing Beauty • Assembling the Refractions • Use the Raw Refraction and Refraction Filter Render Elements • Multiplying them together creates the same result as the basic Refraction Render Element • Having these nodes separated out before combining them together means they can be adjusted/manipulated before creating the Refraction Render Element • Make sure the standard Refraction Render Element is included in the scene’s render along with the Raw Refraction and Refraction Filter x Raw Refraction Render Element = Refraction Filter Render Element Refraction Render Elements

Lesson Topic: Compositing Beauty • Adding the loose ends • The Atmosphere, Background, and Specular Render Elements all get added to the composite, but don’t have advanced/raw versions • They can be manipulated and combined into the composite at any point in the process • Other passes that would need to be added to the comp if they are present in your scene/renders are Subsurface Scattering and Self Illumination + Atmosphere Render Element + Background Render Element Specular Render Element

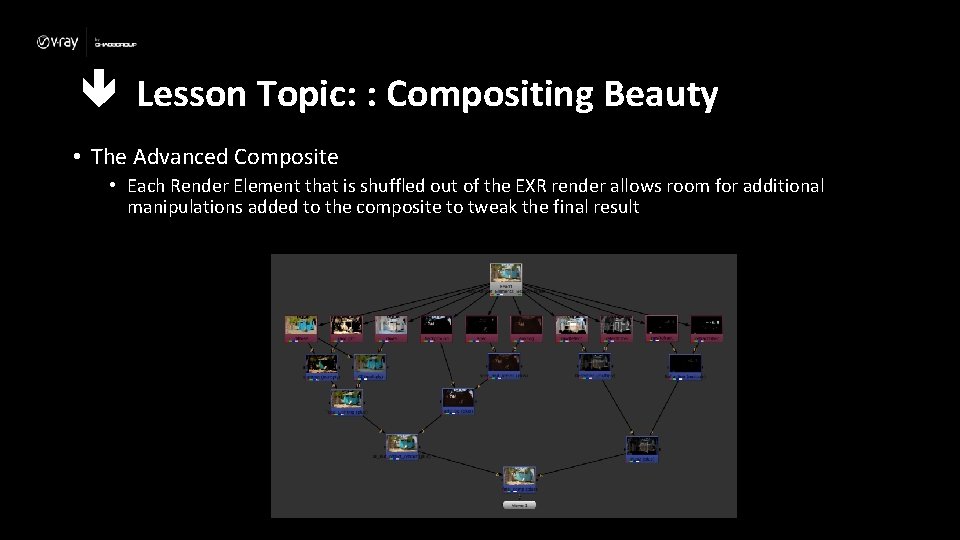
Lesson Topic: : Compositing Beauty • The Advanced Composite • Each Render Element that is shuffled out of the EXR render allows room for additional manipulations added to the composite to tweak the final result

Lesson Topic: Compositing Beauty • Tips • • The effect of any pass can be reduced by adding a Grade node and lowering the Gain amount When merging two render elements together, use the Mix amount to adjust the blending Each render element layer can be color corrected independently Try turning the opacity of the GI layer down to 30% and changing its color slightly using a Color Correction node to affect the light quality of the scene Original Render Tweaks to Advanced passes in comp

Time to see it work! • Demonstration Cycle! • Watch while I demonstrate how to composite the render elements together to create our Beauty pass in Nuke

Time to do it yourself! • Activity Cycle! • Now it’s your turn!! • Use the provided EXR render to build this composite in NUKE • The next slide some specific values I used for your reference

Dialing in the right settings • • • Grade node added to Raw GI Color Correction node added to Lighting node Color Correction node added to GI node Color Correction node added to Spec node Color Correction node added to env. Fog node Grade node added to Raw Reflection node

- Slides: 16