Company Profile Shin Duk Electronics v Address 410

- Slides: 40

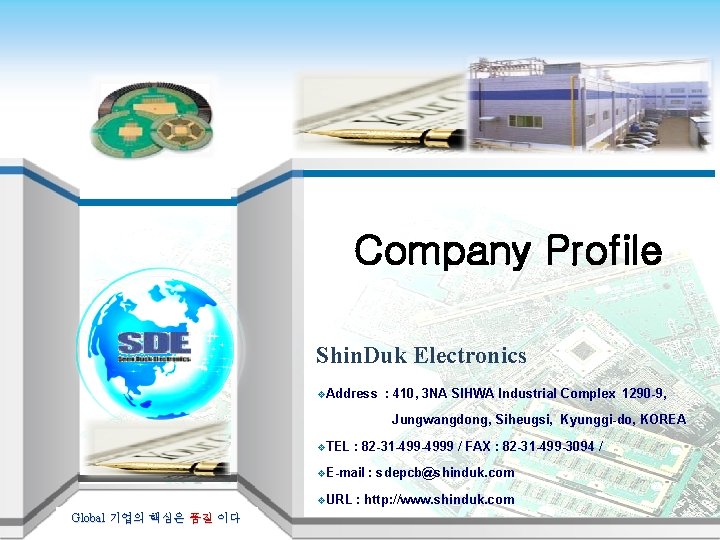
Company Profile Shin. Duk Electronics v. Address : 410, 3 NA SIHWA Industrial Complex 1290 -9, Jungwangdong, Siheugsi, Kyunggi-do, KOREA v. TEL : 82 -31 -4999 / FAX : 82 -31 -499 -3094 / v. E-mail v. URL Global 기업의 핵심은 품질 이다 : sdepcb@shinduk. com : http: //www. shinduk. com

u Contents § General Information § Organization Chart § Financial Status § Sales Revenue Status § Manufacturing Status § Quality Status § Supply Chain Status page 2

General Information page 3

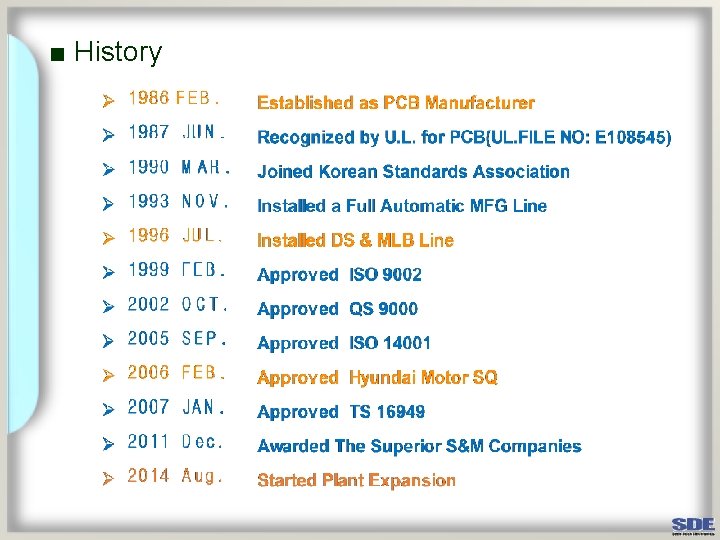
■ History

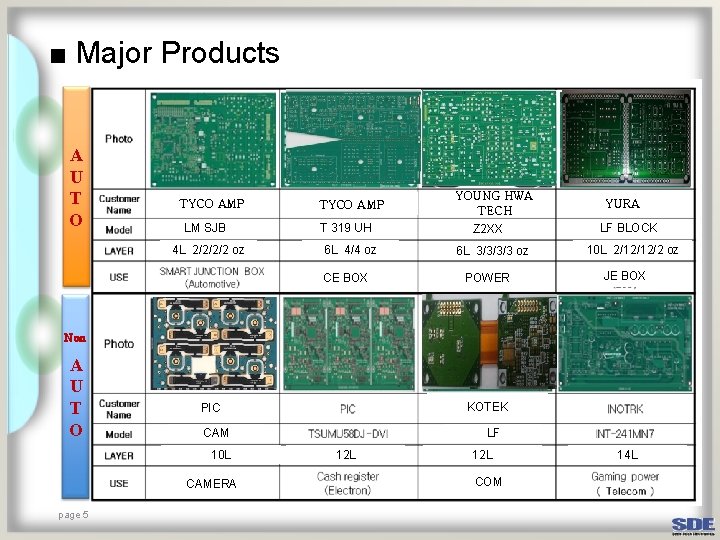
■ Major Products A U T O TYCO AMP LM SJB 4 L 2/2/2/2 oz TYCO AMP T 319 UH 6 L 4/4 oz CE BOX YOUNG HWA TECH Z 2 XX 6 L 3/3/3/3 oz POWER YURA LF BLOCK 10 L 2/12/12/2 oz JE BOX Non A U T O CAM 10 L CAMERA page 5 KOTEK PIC LF 12 L COM 14 L

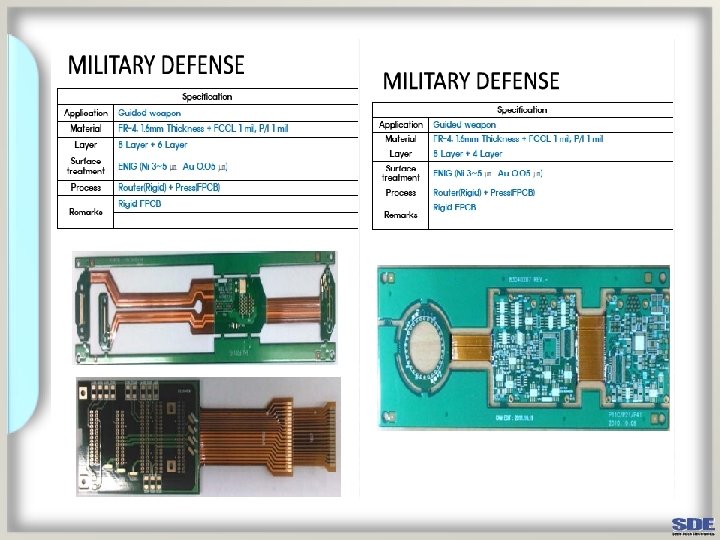
■ Major Products

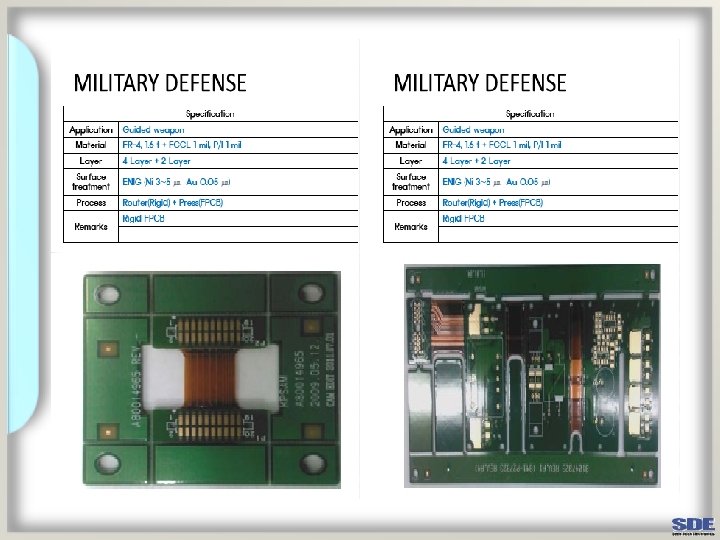
■ Major Products

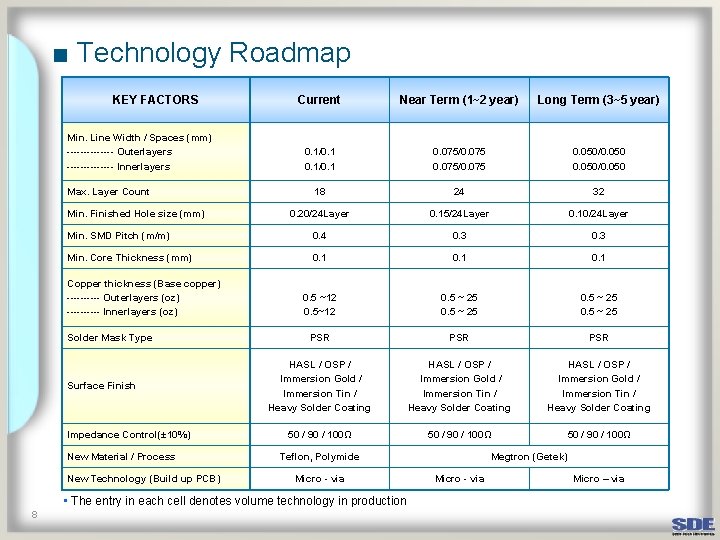
■ Technology Roadmap KEY FACTORS Current Near Term (1~2 year) Long Term (3~5 year) 0. 1/0. 1 0. 075/0. 075 0. 050/0. 050 18 24 32 0. 20/24 Layer 0. 15/24 Layer 0. 10/24 Layer Min. SMD Pitch (m/m) 0. 4 0. 3 Min. Core Thickness (mm) 0. 1 0. 5 ~12 0. 5 ~ 25 PSR PSR HASL / OSP / Immersion Gold / Immersion Tin / Heavy Solder Coating 50 / 90 / 100Ω Min. Line Width / Spaces (mm) ------- Outerlayers ------- Innerlayers Max. Layer Count Min. Finished Hole size (mm) Copper thickness (Base copper) ----- Outerlayers (oz) ----- Innerlayers (oz) Solder Mask Type Surface Finish Impedance Control(± 10%) New Material / Process New Technology (Build up PCB) Teflon, Polymide Micro - via • The entry in each cell denotes volume technology in production 8 Megtron (Getek) Micro - via Micro – via

Organization Chart

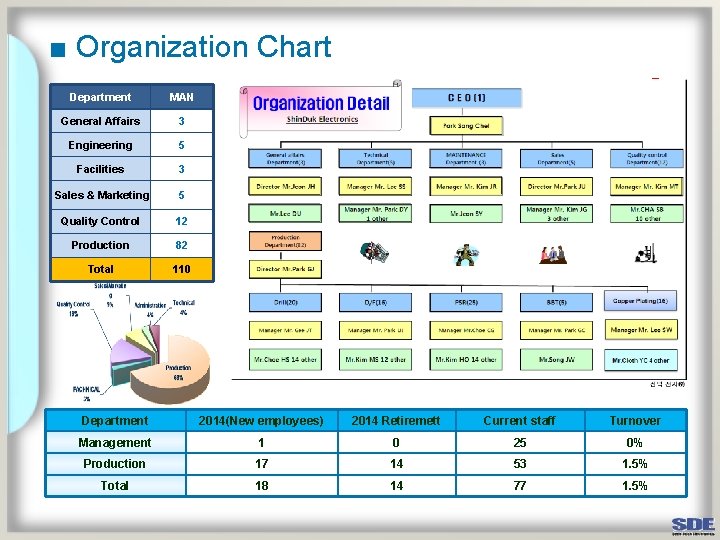
■ Organization Chart Department MAN General Affairs 3 Engineering 5 Facilities 3 Sales & Marketing 5 Quality Control 12 Production 82 Total 110 Department 2014(New employees) 2014 Retiremett Current staff Turnover Management 1 0 25 0% Production 17 14 53 1. 5% Total 18 14 77 1. 5%

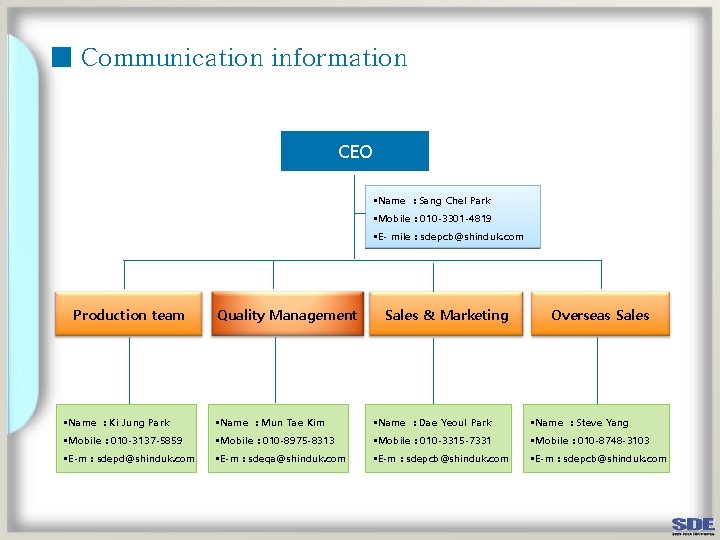
■ Communication information CEO §Name : Sang Chel Park §Mobile : 010 -3301 -4819 §E- mile : sdepcb@shinduk. com Production team Quality Management Sales & Marketing Overseas Sales §Name : Ki Jung Park §Name : Mun Tae Kim §Name : Dae Yeoul Park §Name : Steve Yang §Mobile : 010 -3137 -5859 §Mobile : 010 -8975 -8313 §Mobile : 010 -3315 -7331 §Mobile : 010 -8748 -3103 §E-m : sdepd@shinduk. com §E-m : sdeqa@shinduk. com §E-m : sdepcb@shinduk. com

Sales Revenue Status

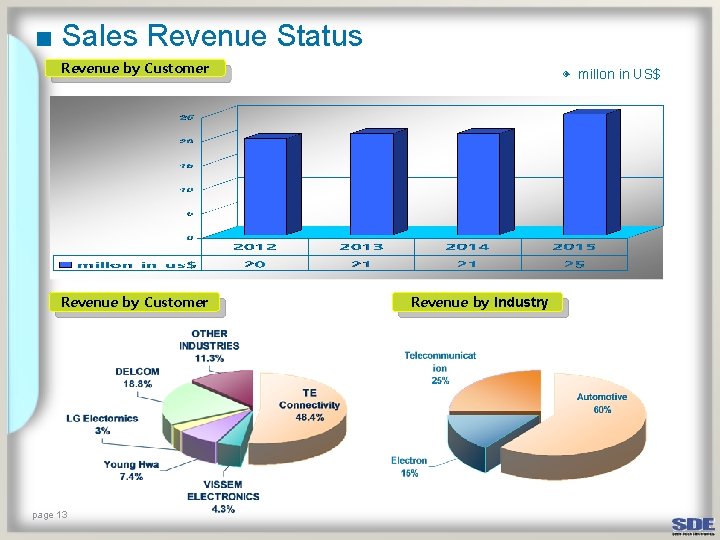
■ Sales Revenue Status Revenue by Customer page 13 ◈ millon in US$ Revenue by Industry

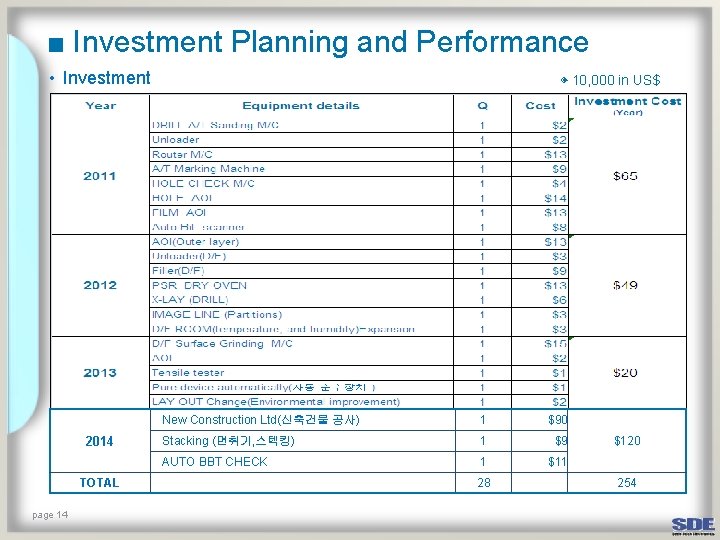
■ Investment Planning and Performance • Investment 2014 TOTAL page 14 ◈ 10, 000 in ◈ US$ millon New Construction Ltd(신축건물 공사) 1 $90 Stacking (면취기, 스텍킹) 1 $9 AUTO BBT CHECK 1 $11 28 $120 254

Manufacturing Status

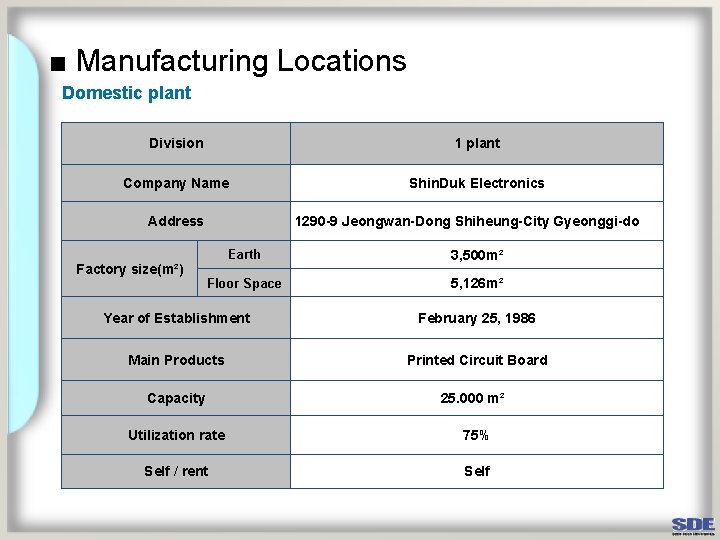
■ Manufacturing Locations Domestic plant Division 1 plant Company Name Shin. Duk Electronics Address Factory size(m²) 1290 -9 Jeongwan-Dong Shiheung-City Gyeonggi-do Earth 3, 500 m² Floor Space 5, 126 m² Year of Establishment February 25, 1986 Main Products Printed Circuit Board Capacity 25. 000 m² Utilization rate 75% Self / rent Self

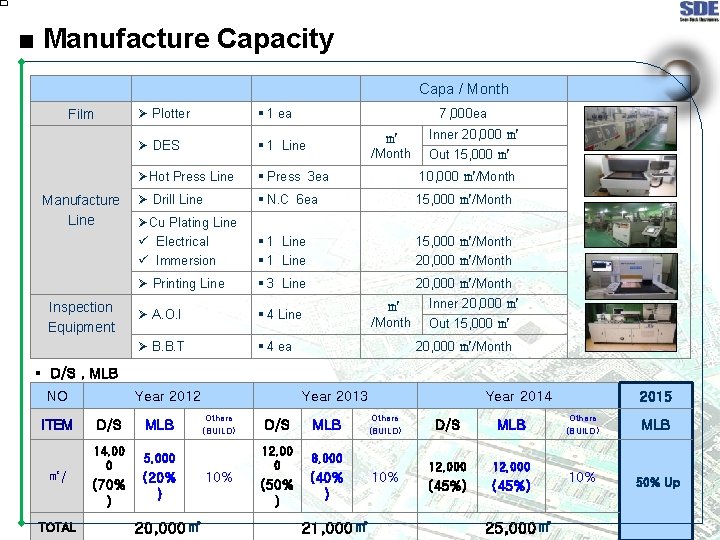
■ Manufacture Capacity Capa / Month Film Manufacture Line Inspection Equipment Ø Plotter § 1 ea Ø DES § 1 Line ØHot Press Line § Press 3 ea 10, 000 ㎡/Month Ø Drill Line § N. C 6 ea 15, 000 ㎡/Month ØCu Plating Line ü Electrical ü Immersion § 1 Line 15, 000 ㎡/Month 20, 000 ㎡/Month Ø Printing Line § 3 Line 20, 000 ㎡/Month Ø A. O. I § 4 Line Ø B. B. T § 4 ea 7, 000 ea ㎡ /Month Inner 20, 000 ㎡ Out 15, 000 ㎡ 20, 000 ㎡/Month § D/S , MLB NO ITEM ㎡/ TOTAL Year 2012 D/S MLB 14, 00 0 5, 000 (70% ) (20% ) 20, 000㎡ Year 2013 Others (BUILD) 10% D/S MLB 12, 00 0 8, 000 (50% ) Year 2014 Others (BUILD) (40% ) 21, 000㎡ 10% D/S MLB 12, 000 (45%) 25, 000㎡ 2015 Others (BUILD) MLB 10% 50% Up

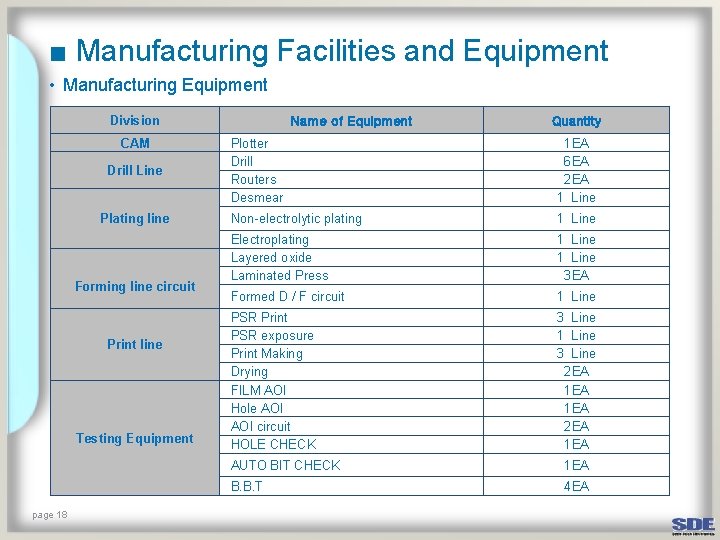
■ Manufacturing Facilities and Equipment • Manufacturing Equipment Division CAM Drill Line Plating line Forming line circuit Print line Testing Equipment page 18 Name of Equipment Quantity Plotter Drill Routers Desmear 1 EA 6 EA 2 EA 1 Line Non-electrolytic plating 1 Line Electroplating Layered oxide Laminated Press 1 Line 3 EA Formed D / F circuit 1 Line PSR Print PSR exposure Print Making Drying FILM AOI Hole AOI circuit HOLE CHECK 3 Line 1 Line 3 Line 2 EA 1 EA AUTO BIT CHECK 1 EA B. B. T 4 EA

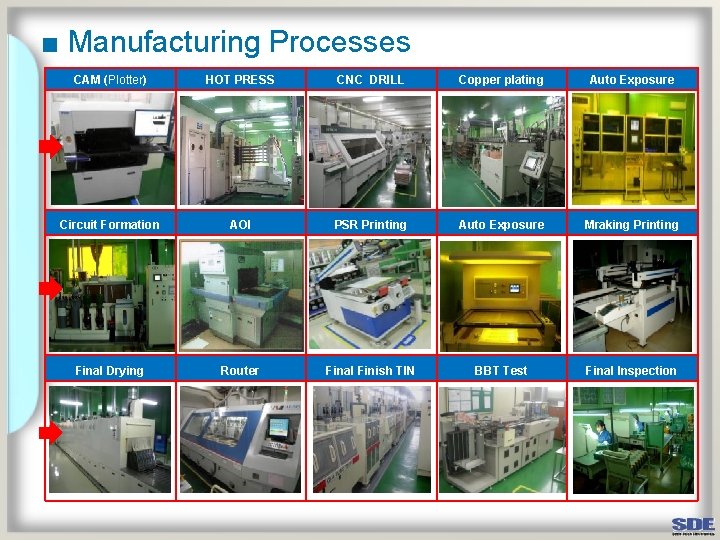
■ Manufacturing Processes CAM (Plotter) HOT PRESS CNC DRILL Copper plating Auto Exposure Circuit Formation AOI PSR Printing Auto Exposure Mraking Printing Final Drying Router Final Finish TIN BBT Test Final Inspection

QUALITY SYSTEM

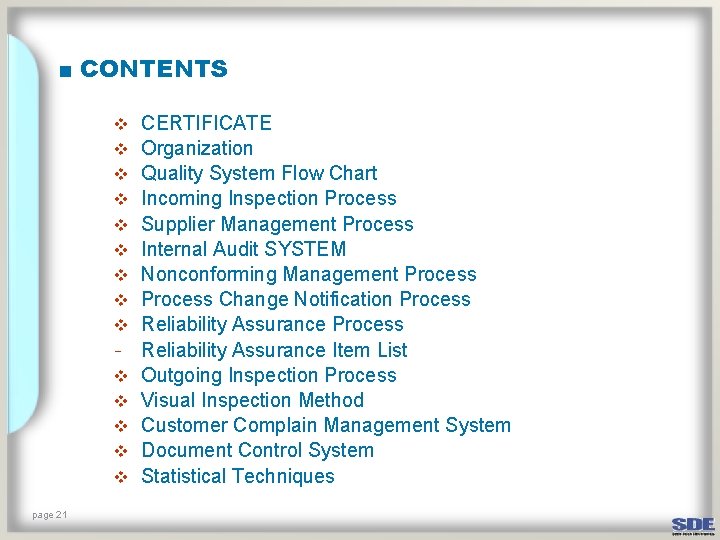
■ CONTENTS v v v v page 21 CERTIFICATE Organization Quality System Flow Chart Incoming Inspection Process Supplier Management Process Internal Audit SYSTEM Nonconforming Management Process Change Notification Process Reliability Assurance Item List Outgoing Inspection Process Visual Inspection Method Customer Complain Management System Document Control System Statistical Techniques

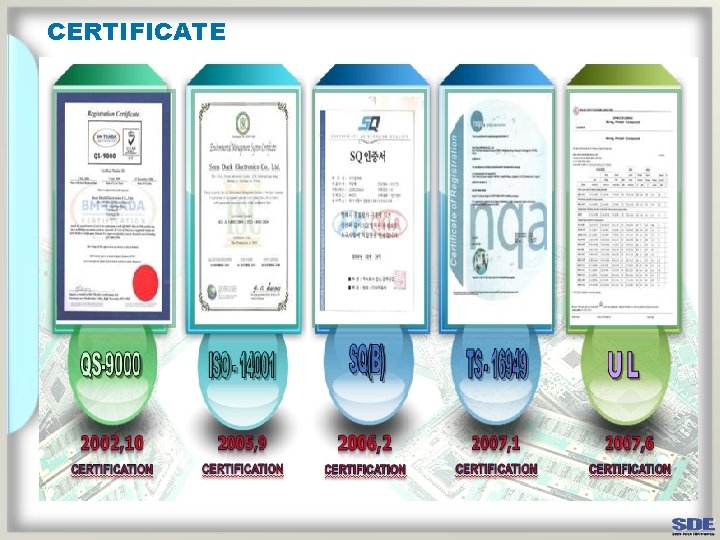
CERTIFICATE

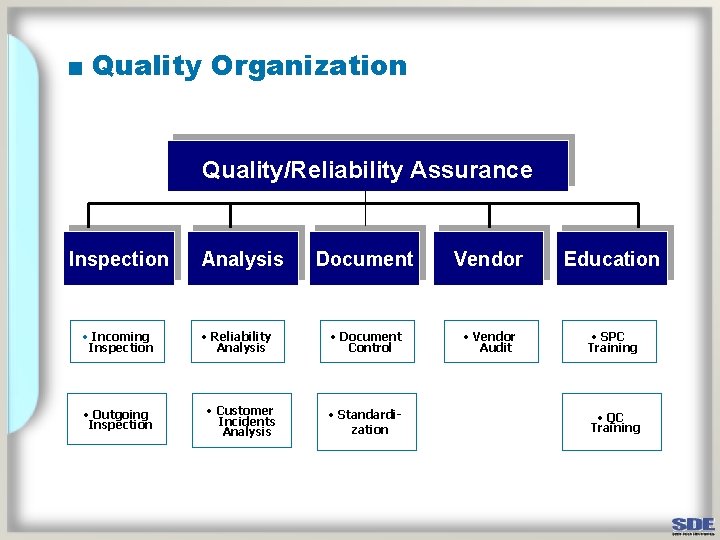
■ Quality Organization Quality/Reliability Assurance Inspection • Incoming Inspection • Outgoing Inspection Analysis • Reliability Analysis • Customer Incidents Analysis Document Vendor Education • Document Control • Vendor Audit • SPC Training • Standardization • QC Training

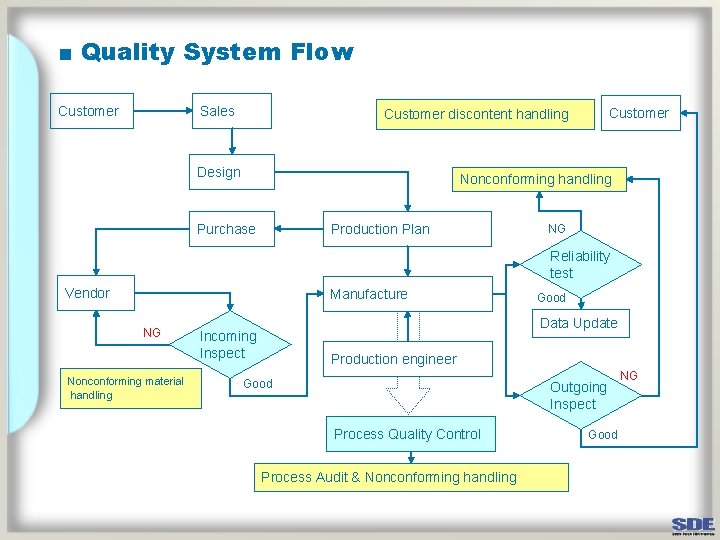
■ Quality System Flow Customer Sales Customer discontent handling Design Nonconforming handling Purchase Production Plan NG Reliability test Vendor Manufacture NG Nonconforming material handling Good Data Update Incoming Inspect Production engineer Good Outgoing Inspect Process Quality Control Process Audit & Nonconforming handling Good NG

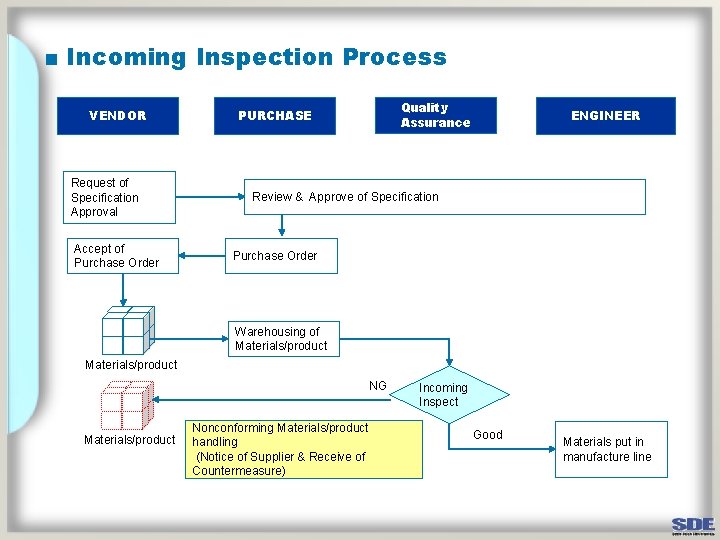
■ Incoming Inspection Process VENDOR Request of Specification Approval Accept of Purchase Order Quality Assurance PURCHASE ENGINEER Review & Approve of Specification Purchase Order Warehousing of Materials/product NG Materials/product Nonconforming Materials/product handling (Notice of Supplier & Receive of Countermeasure) Incoming Inspect Good Materials put in manufacture line

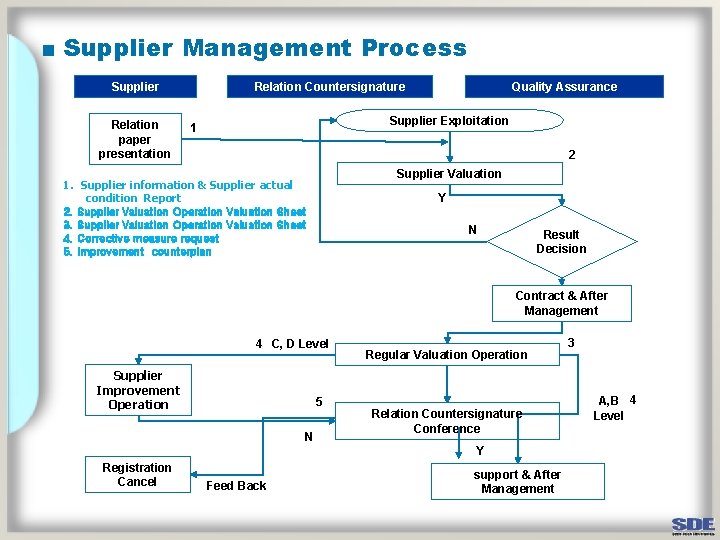
■ Supplier Management Process Supplier Relation paper presentation Quality Assurance Relation Countersignature Supplier Exploitation 1 2 Supplier Valuation 1. Supplier information & Supplier actual condition Report 2. Supplier Valuation Operation Valuation Sheet 3. Supplier Valuation Operation Valuation Sheet 4. Corrective measure request 5. Improvement counterplan Y N Result Decision Contract & After Management 4 C, D Level Supplier Improvement Operation 5 N Regular Valuation Operation Relation Countersignature Conference Y Registration Cancel Feed Back support & After Management 3 A, B 4 Level

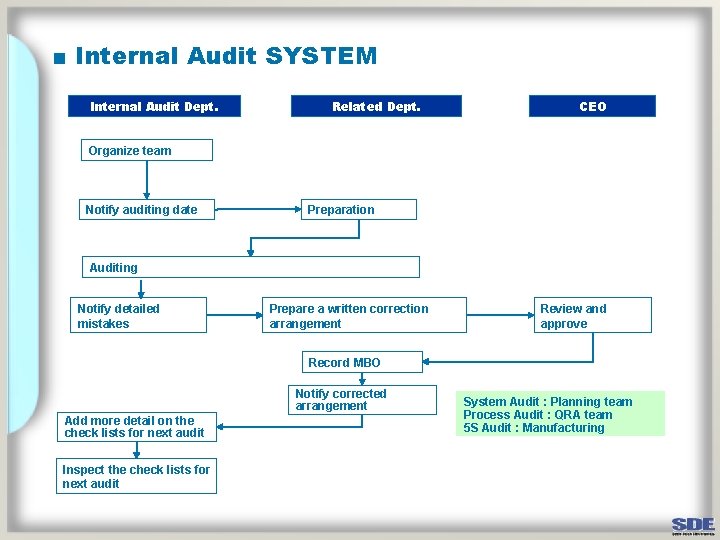
■ Internal Audit SYSTEM Internal Audit Dept. Related Dept. CEO Organize team Notify auditing date Preparation Auditing Notify detailed mistakes Prepare a written correction arrangement Review and approve Record MBO Notify corrected arrangement Add more detail on the check lists for next audit Inspect the check lists for next audit System Audit : Planning team Process Audit : QRA team 5 S Audit : Manufacturing

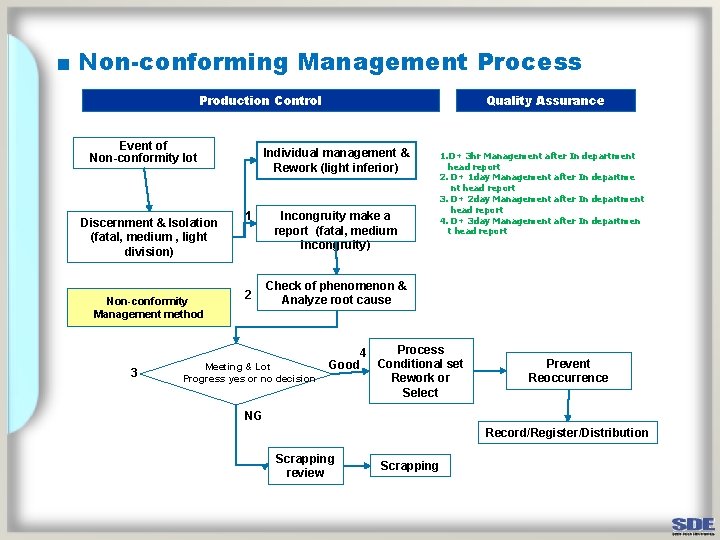
■ Non-conforming Management Process Production Control Event of Non-conformity lot Discernment & Isolation (fatal, medium , light division) Non-conformity Management method 3 Quality Assurance Individual management & Rework (light inferior) 1 2 Incongruity make a report (fatal, medium incongruity) 1. D+ 3 hr Management after In department head report 2. D+ 1 day Management after In departme nt head report 3. D+ 2 day Management after In department head report 4. D+ 3 day Management after In departmen t head report Check of phenomenon & Analyze root cause Meeting & Lot Progress yes or no decision Good 4 Process Conditional set Rework or Select Prevent Reoccurrence NG Record/Register/Distribution Scrapping review Scrapping

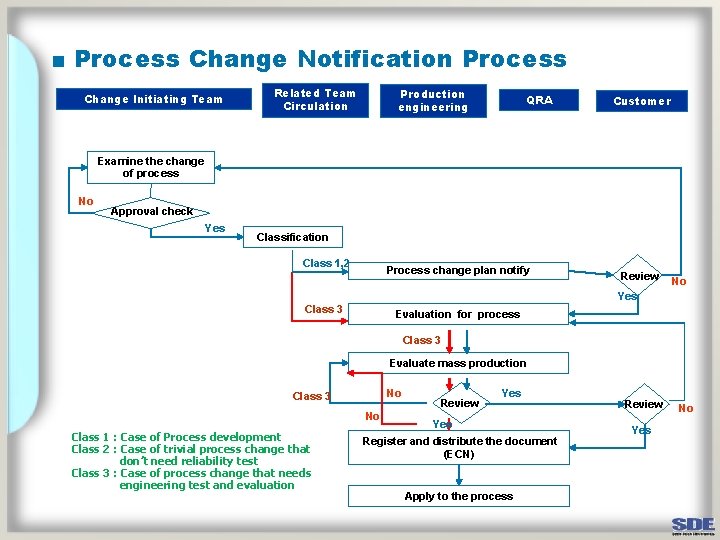
■ Process Change Notification Process Change Initiating Team Related Team Circulation Production engineering QRA Customer Examine the change of process No Approval check Yes Classification Class 1, 2 Process change plan notify Review No Yes Class 3 Evaluation for process Class 3 Evaluate mass production No Class 3 No Class 1 : Case of Process development Class 2 : Case of trivial process change that don’t need reliability test Class 3 : Case of process change that needs engineering test and evaluation Review Yes Register and distribute the document (ECN) Apply to the process Review Yes No

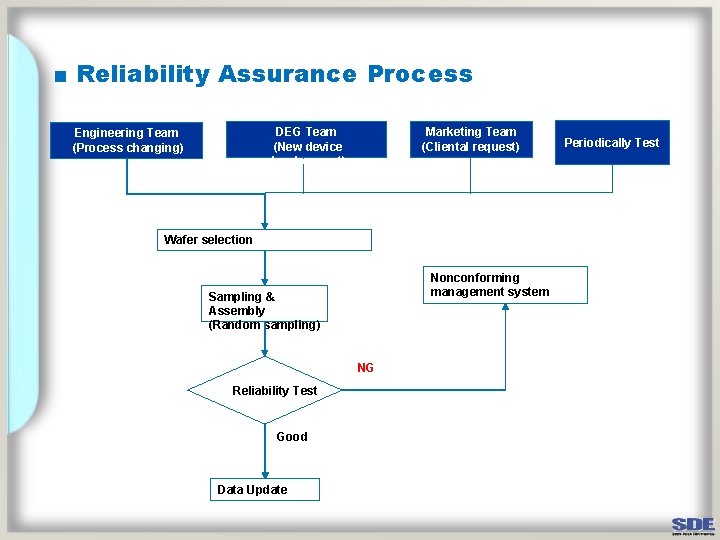
■ Reliability Assurance Process DEG Team (New device development) Engineering Team (Process changing) Marketing Team (Cliental request) Wafer selection Nonconforming management system Sampling & Assembly (Random sampling) NG Reliability Test Good Data Update Periodically Test

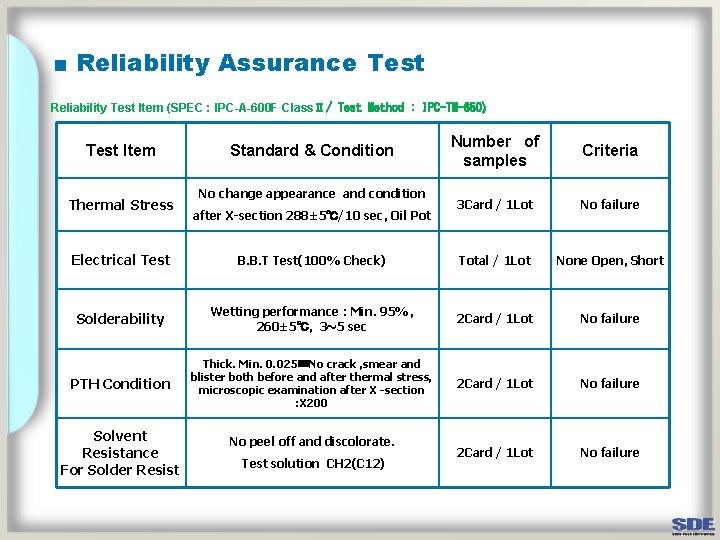
■ Reliability Assurance Test Reliability Test Item (SPEC : IPC-A-600 F ClassⅡ/ Test Method : IPC-TM-650)) Test Item Thermal Stress Standard & Condition No change appearance and condition after X-section 288± 5℃/10 sec, Oil Pot Number of samples Criteria 3 Card / 1 Lot No failure Electrical Test B. B. T Test(100% Check) Total / 1 Lot None Open, Short Solderability Wetting performance : Min. 95%, 260± 5℃, 3~5 sec 2 Card / 1 Lot No failure PTH Condition Thick. Min. 0. 025㎜No crack , smear and blister both before and after thermal stress, microscopic examination after X -section : X 200 2 Card / 1 Lot No failure Solvent Resistance For Solder Resist No peel off and discolorate. Test solution CH 2(C 12)

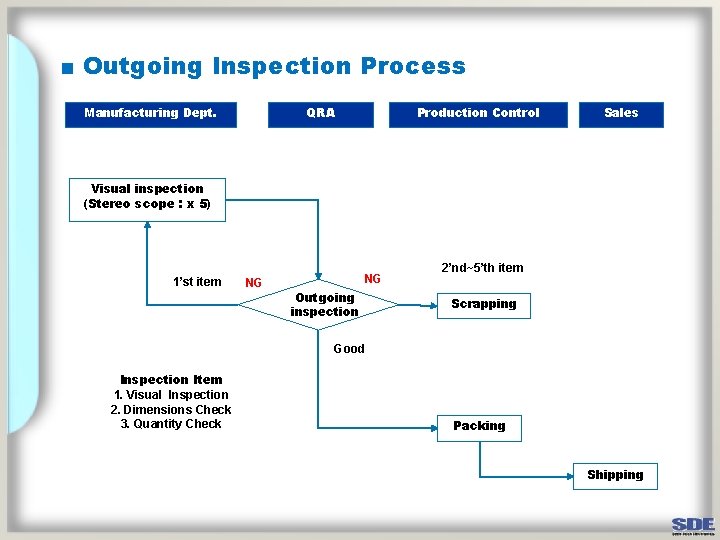
■ Outgoing Inspection Process Manufacturing Dept. QRA Production Control Sales 2 Sales Visual inspection (Stereo scope : x 5) 1’st item NG NG Outgoing inspection 2’nd~5’th item Scrapping Good Inspection Item 1. Visual Inspection 2. Dimensions Check 3. Quantity Check Packing Shipping

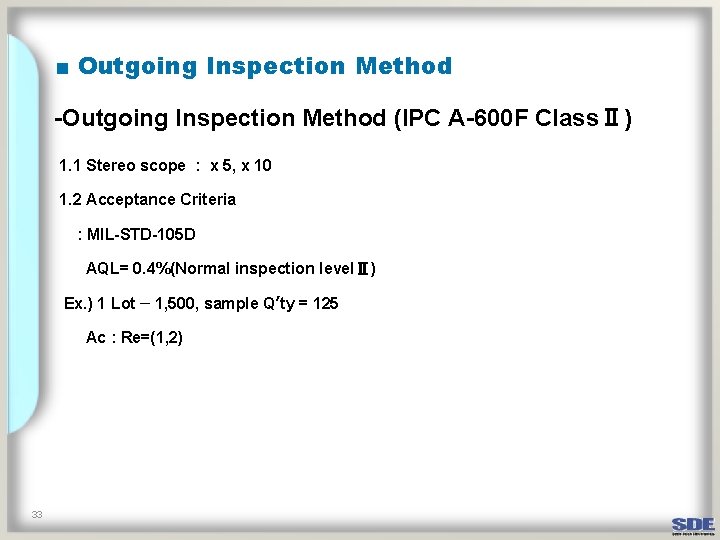
■ Outgoing Inspection Method -Outgoing Inspection Method (IPC A-600 F ClassⅡ) 1. 1 Stereo scope : x 5, x 10 1. 2 Acceptance Criteria : MIL-STD-105 D AQL= 0. 4%(Normal inspection levelⅡ) Ex. ) 1 Lot – 1, 500, sample Q’ty = 125 Ac : Re=(1, 2) 33

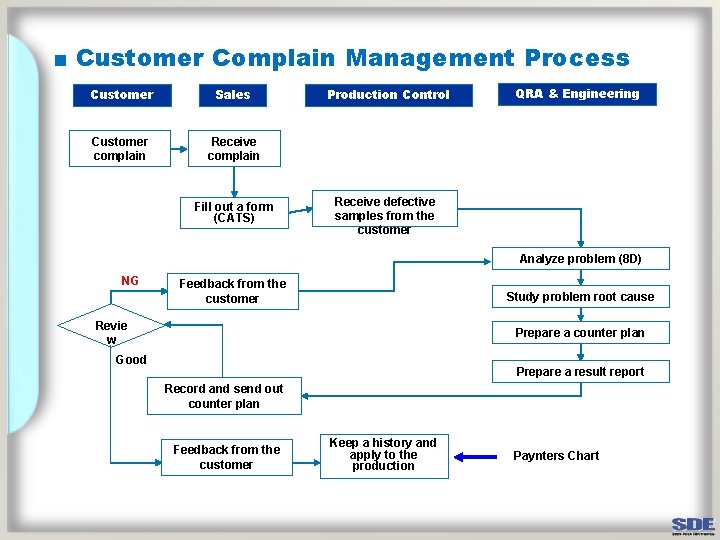
■ Customer Complain Management Process Customer Sales Customer complain Receive complain Fill out a form (CATS) Production Control QRA & Engineering Receive defective samples from the customer Analyze problem (8 D) NG Feedback from the customer Study problem root cause Revie w Prepare a counter plan Good Prepare a result report Record and send out counter plan Feedback from the customer Keep a history and apply to the production Paynters Chart

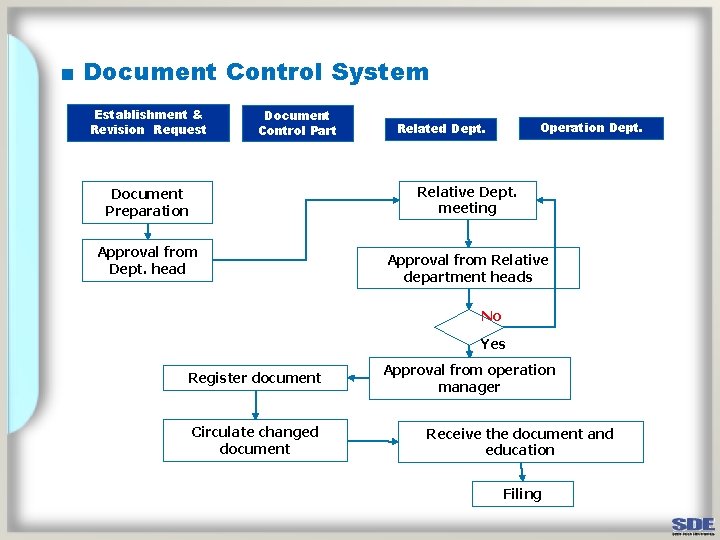
■ Document Control System Establishment & Revision Request Document Control Part Operation Dept. Related Dept. Relative Dept. meeting Document Preparation Approval from Dept. head Approval from Relative department heads No Yes Register document Circulate changed document Approval from operation manager Receive the document and education Filing

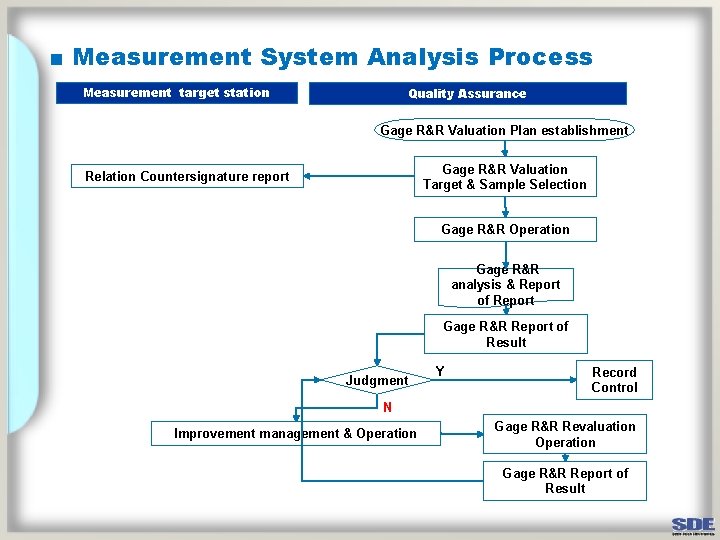
■ Measurement System Analysis Process Measurement target station Quality Assurance Gage R&R Valuation Plan establishment Gage R&R Valuation Target & Sample Selection Relation Countersignature report Gage R&R Operation Gage R&R analysis & Report of Report Gage R&R Report of Result Judgment Y Record Control N Improvement management & Operation Gage R&R Revaluation Operation Gage R&R Report of Result

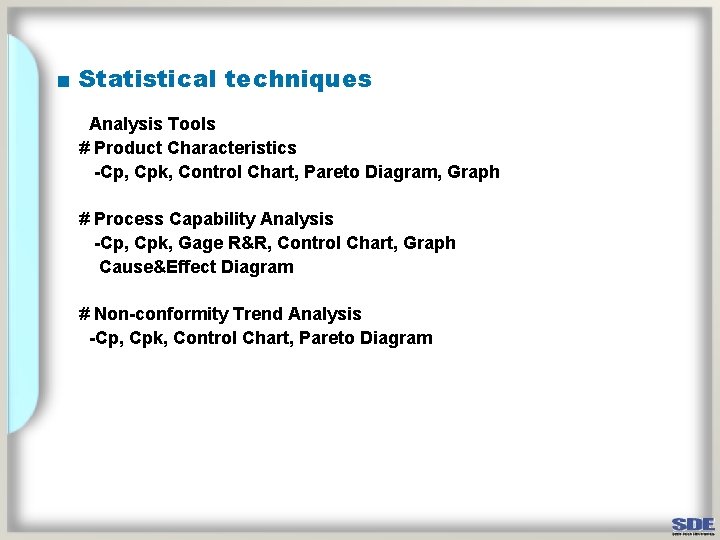
■ Statistical techniques Analysis Tools # Product Characteristics -Cp, Cpk, Control Chart, Pareto Diagram, Graph # Process Capability Analysis -Cp, Cpk, Gage R&R, Control Chart, Graph Cause&Effect Diagram # Non-conformity Trend Analysis -Cp, Cpk, Control Chart, Pareto Diagram

Supply Chain Status

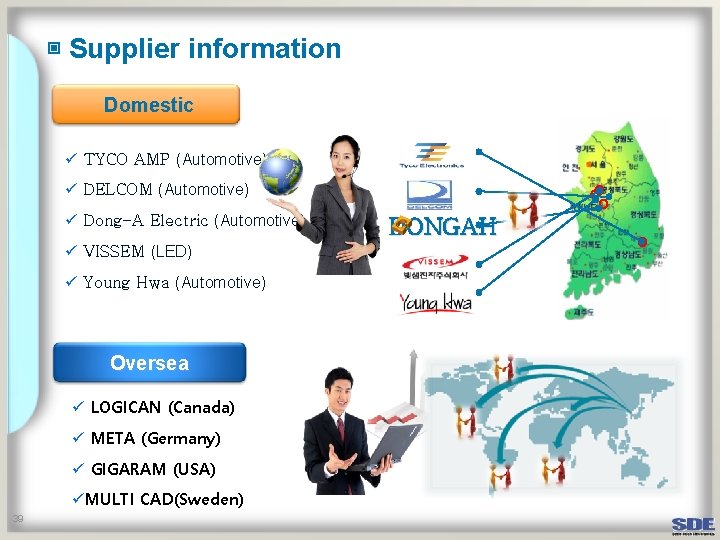
▣ Supplier information Domestic ü TYCO AMP (Automotive) ü DELCOM (Automotive) ü Dong-A Electric (Automotive) ü VISSEM (LED) ü Young Hwa (Automotive) Oversea ü LOGICAN (Canada) ü META (Germany) ü GIGARAM (USA) üMULTI CAD(Sweden) 39 DONGAH

Thank You