Coating Adhesion Testing Methods and Equipment Bill Corbett
Coating Adhesion Testing Methods and Equipment Bill Corbett KTA-Tator, Inc.

Coating Adhesion Testing Methods and Equipment Webinar Content: Why Measure Adhesion Properties? What is Being Measured? Selecting an Adhesion Testing Method Measuring Adhesion by the Tape Test Measuring Adhesion by the Knife Test Measuring Pull-off Adhesion Fixed Alignment – Mechanical Self-Aligning – Hydraulic (3 devices) Self Aligning – Pneumatic Special Requirements for Testing Concrete Coating Adhesion Common Pitfalls When Testing Coating Adhesion Reporting

Learning Outcomes Completion of this webinar will enable the participant to: Explain the purpose of testing the adhesion properties of coatings Describe the two types of adhesion testing mechanisms List four standard test methods used to test the adhesion of coating systems Describe the difference between shear adhesion and tensile adhesion Measure the adhesion of coating systems using the tape method Measure the adhesion of coating systems using the knife method
Learning Outcomes, continued Describe the difference between fixed alignment and self aligning adhesion testers Explain the differences between testing the pull-off strength of coatings applied to steel and concrete surfaces Measure the tensile (pull-off) strength of coating systems using mechanical, hydraulic and pneumatically-operated testing devices List common pitfalls associated with adhesion testing of coatings Evaluate potential locations of break, including adhesion, cohesion and glue Describe the reporting requirements for adhesion testing
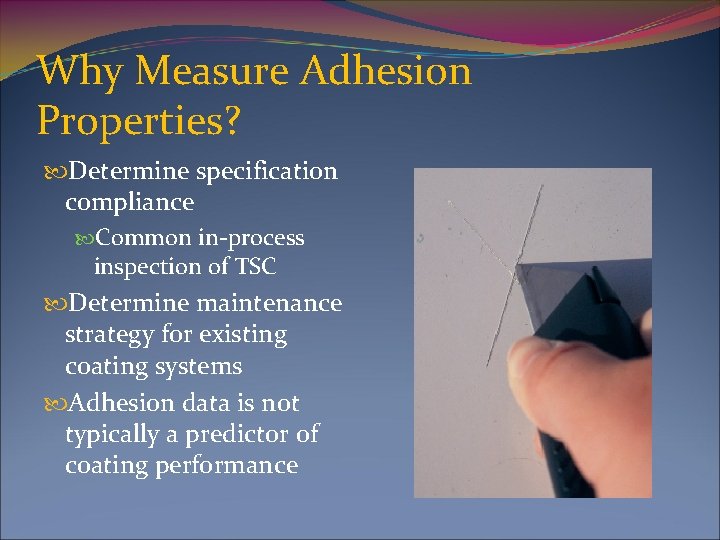
Why Measure Adhesion Properties? Determine specification compliance Common in-process inspection of TSC Determine maintenance strategy for existing coating systems Adhesion data is not typically a predictor of coating performance
What is Being Measured? Measuring Coating Strength at Different Planes Adhesion Strength Bond strength between the substrate and the coating and/or the coating layers to one another Cohesion Strength Inner-strength of a coating layer Adhesion strength is highly variable No industry-wide adhesion acceptance value Minimum adhesion values may be on a PDS or in a specification
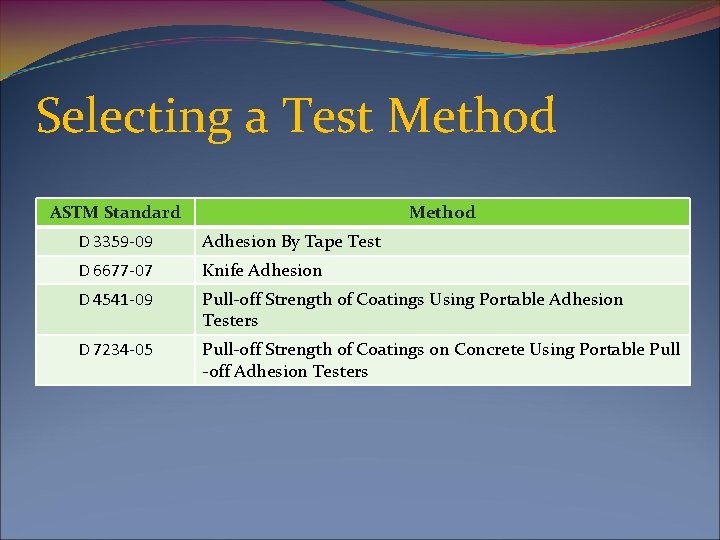
Selecting a Test Method ASTM Standard Method D 3359 -09 Adhesion By Tape Test D 6677 -07 Knife Adhesion D 4541 -09 Pull-off Strength of Coatings Using Portable Adhesion Testers D 7234 -05 Pull-off Strength of Coatings on Concrete Using Portable Pull -off Adhesion Testers
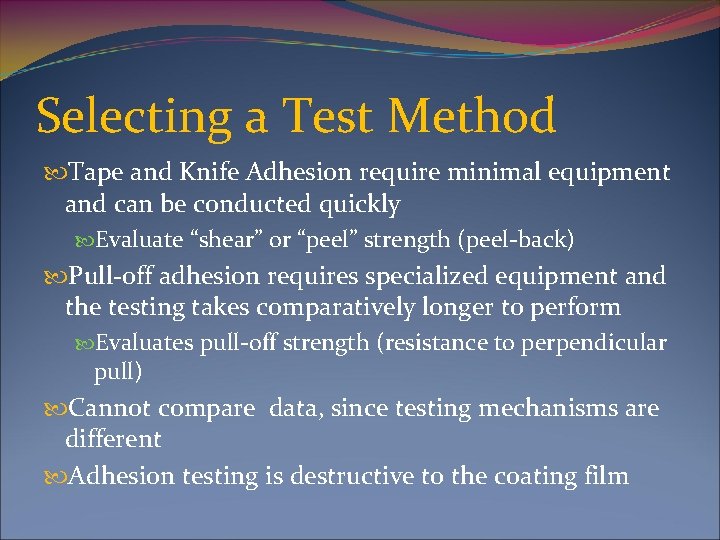
Selecting a Test Method Tape and Knife Adhesion require minimal equipment and can be conducted quickly Evaluate “shear” or “peel” strength (peel-back) Pull-off adhesion requires specialized equipment and the testing takes comparatively longer to perform Evaluates pull-off strength (resistance to perpendicular pull) Cannot compare data, since testing mechanisms are different Adhesion testing is destructive to the coating film
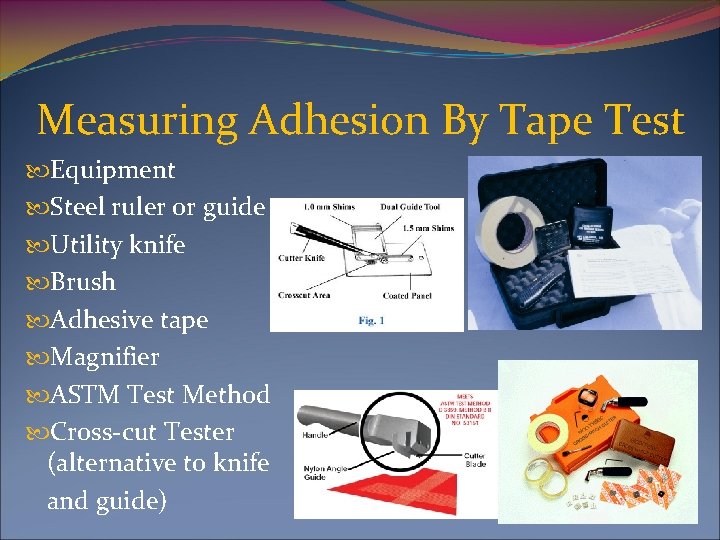
Measuring Adhesion By Tape Test Equipment Steel ruler or guide Utility knife Brush Adhesive tape Magnifier ASTM Test Method Cross-cut Tester (alternative to knife and guide)
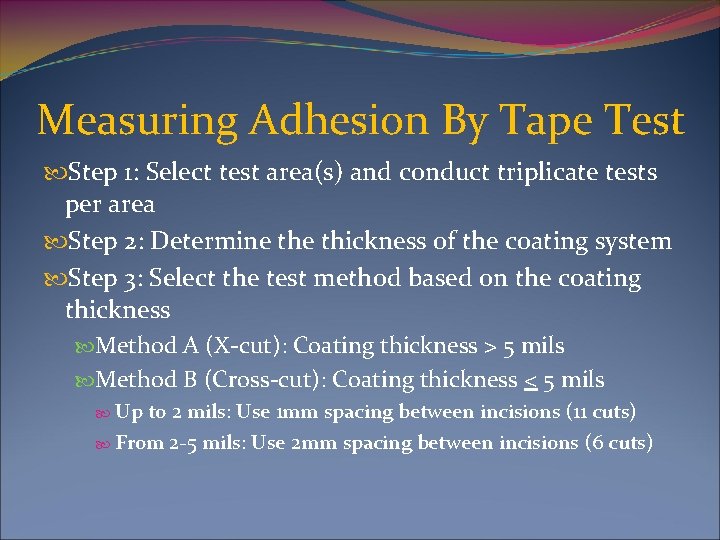
Measuring Adhesion By Tape Test Step 1: Select test area(s) and conduct triplicate tests per area Step 2: Determine thickness of the coating system Step 3: Select the test method based on the coating thickness Method A (X-cut): Coating thickness > 5 mils Method B (Cross-cut): Coating thickness < 5 mils Up to 2 mils: Use 1 mm spacing between incisions (11 cuts) From 2 -5 mils: Use 2 mm spacing between incisions (6 cuts)
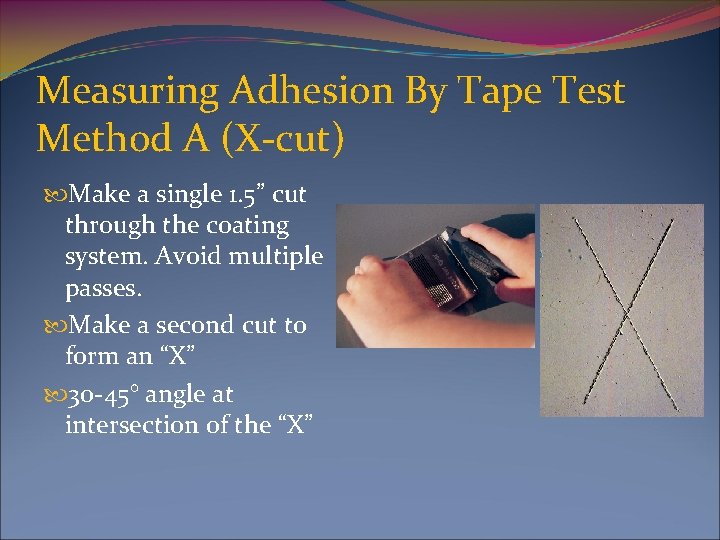
Measuring Adhesion By Tape Test Method A (X-cut) Make a single 1. 5” cut through the coating system. Avoid multiple passes. Make a second cut to form an “X” 30 -45° angle at intersection of the “X”

Measuring Adhesion By Tape Test Method A (X-cut) Remove cutting debris Remove 2 laps of tape (discard) Apply 3” piece of tape to X-cut Cover all of X-cut Assure good tape contact Remove tape within 90 +/- 30 seconds Remove tape 180° back across X-cut (do not pull upwards)
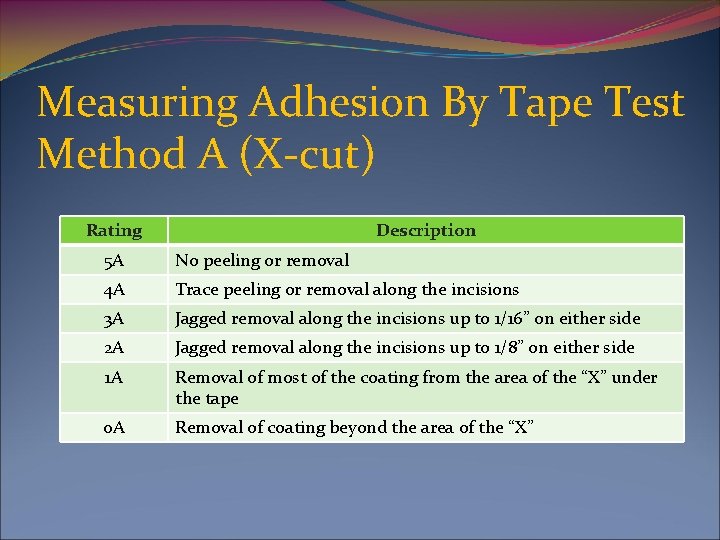
Measuring Adhesion By Tape Test Method A (X-cut) Rating Description 5 A No peeling or removal 4 A Trace peeling or removal along the incisions 3 A Jagged removal along the incisions up to 1/16” on either side 2 A Jagged removal along the incisions up to 1/8” on either side 1 A Removal of most of the coating from the area of the “X” under the tape 0 A Removal of coating beyond the area of the “X”

Measuring Adhesion By Tape Test Method B (Cross-cut) Make series of 6 or 11 parallel incisions through the coating system. Avoid multiple passes. Make a second series of incisions perpendicular to first series
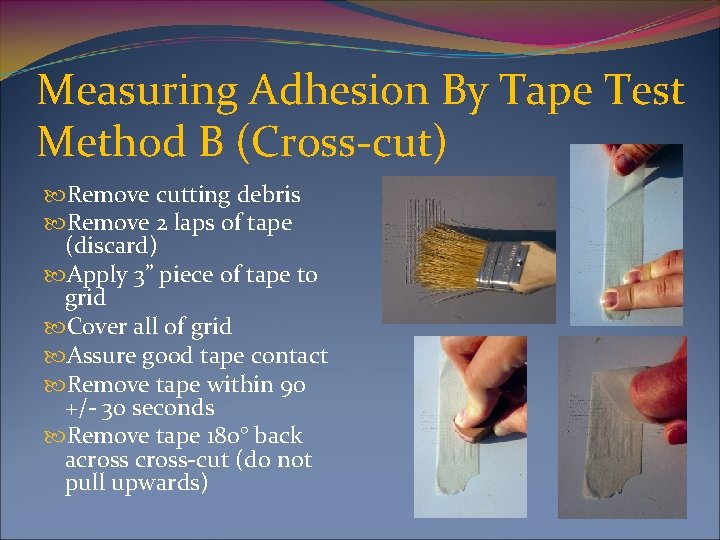
Measuring Adhesion By Tape Test Method B (Cross-cut) Remove cutting debris Remove 2 laps of tape (discard) Apply 3” piece of tape to grid Cover all of grid Assure good tape contact Remove tape within 90 +/- 30 seconds Remove tape 180° back across-cut (do not pull upwards)

Measuring Adhesion By Tape Test Method B (Cross-cut) Rating % Description 5 B 0% Edges of cuts completely smooth 4 B <5% Small flakes of coating detached at intersections 3 B 6 -15% Small flakes of coating detached along edges & at intersections 2 B 16 -35% Coating flaked along edges and parts of squares 1 B 36 -65% Coating flaked along edges in large ribbons and whole squares detached 0 B >65% Flaking & detaching worse than 1 B

Measuring Adhesion By Knife Test Equipment Steel ruler or guide Utility knife ASTM Test Method
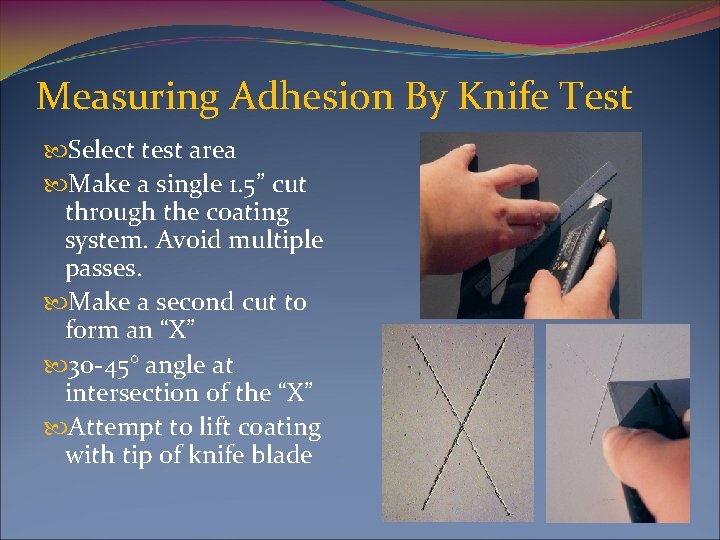
Measuring Adhesion By Knife Test Select test area Make a single 1. 5” cut through the coating system. Avoid multiple passes. Make a second cut to form an “X” 30 -45° angle at intersection of the “X” Attempt to lift coating with tip of knife blade
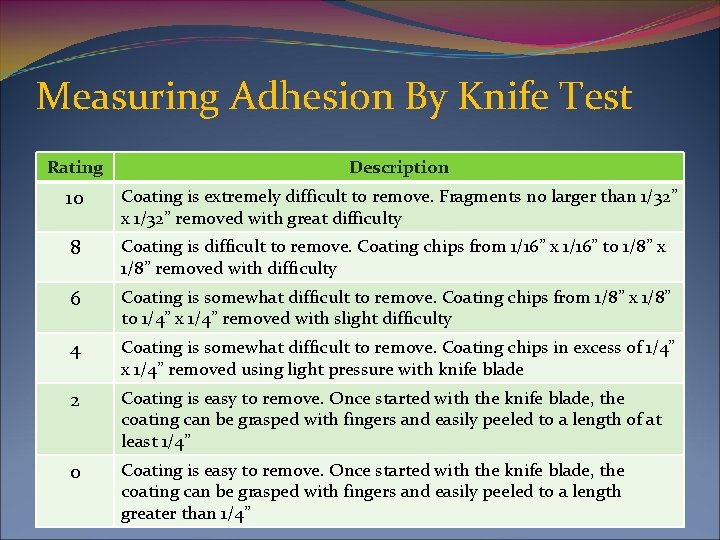
Measuring Adhesion By Knife Test Rating Description 10 Coating is extremely difficult to remove. Fragments no larger than 1/32” x 1/32” removed with great difficulty 8 Coating is difficult to remove. Coating chips from 1/16” x 1/16” to 1/8” x 1/8” removed with difficulty 6 Coating is somewhat difficult to remove. Coating chips from 1/8” x 1/8” to 1/4” x 1/4” removed with slight difficulty 4 Coating is somewhat difficult to remove. Coating chips in excess of 1/4” x 1/4” removed using light pressure with knife blade 2 Coating is easy to remove. Once started with the knife blade, the coating can be grasped with fingers and easily peeled to a length of at least 1/4” 0 Coating is easy to remove. Once started with the knife blade, the coating can be grasped with fingers and easily peeled to a length greater than 1/4”
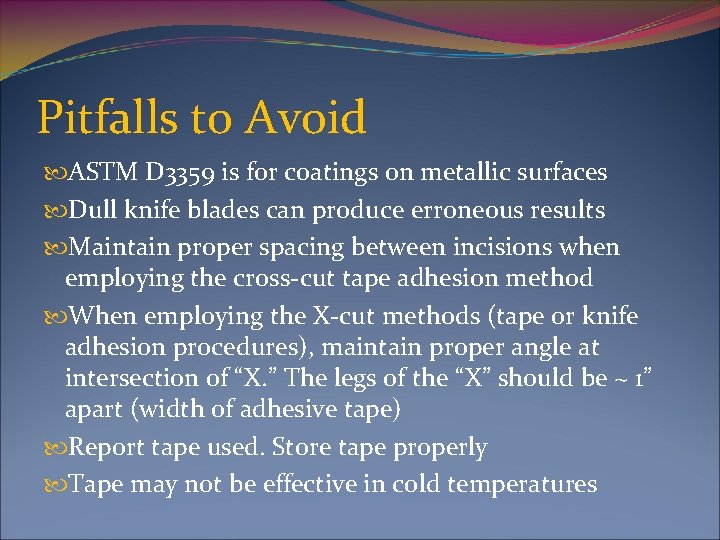
Pitfalls to Avoid ASTM D 3359 is for coatings on metallic surfaces Dull knife blades can produce erroneous results Maintain proper spacing between incisions when employing the cross-cut tape adhesion method When employing the X-cut methods (tape or knife adhesion procedures), maintain proper angle at intersection of “X. ” The legs of the “X” should be ~ 1” apart (width of adhesive tape) Report tape used. Store tape properly Tape may not be effective in cold temperatures
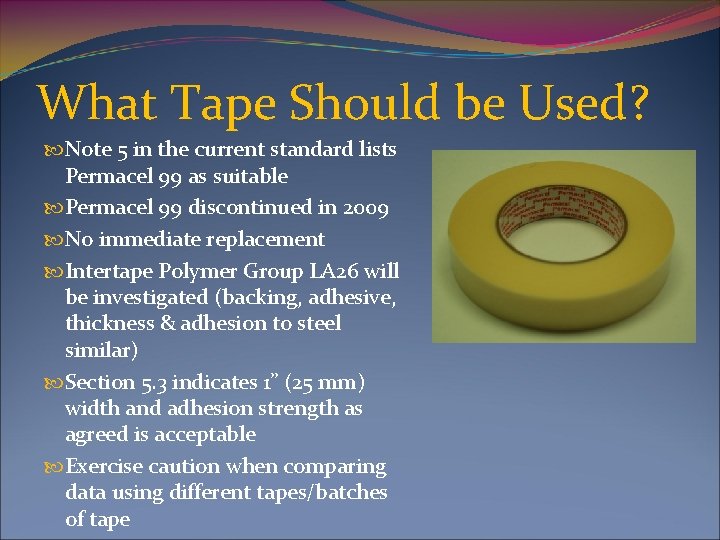
What Tape Should be Used? Note 5 in the current standard lists Permacel 99 as suitable Permacel 99 discontinued in 2009 No immediate replacement Intertape Polymer Group LA 26 will be investigated (backing, adhesive, thickness & adhesion to steel similar) Section 5. 3 indicates 1” (25 mm) width and adhesion strength as agreed is acceptable Exercise caution when comparing data using different tapes/batches of tape
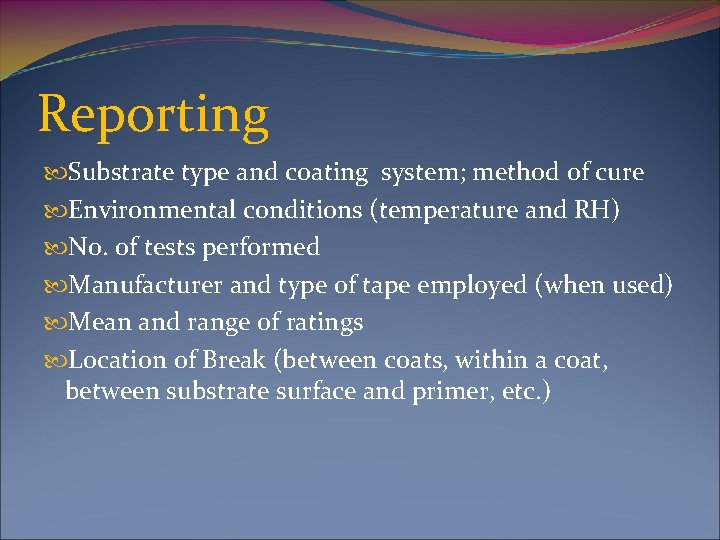
Reporting Substrate type and coating system; method of cure Environmental conditions (temperature and RH) No. of tests performed Manufacturer and type of tape employed (when used) Mean and range of ratings Location of Break (between coats, within a coat, between substrate surface and primer, etc. )
Measuring Pull-off Adhesion ASTM D 4541, “Pull-off Strength of Coatings Using Portable Adhesion Testers” Annex A 1: Fixed Alignment Type II (mechanical) Annex A 2: Self Aligning Type III (hydraulic) Annex A 3: Self Aligning Type IV (pneumatic) Annex A 4: Self Aligning Type V( hydraulic) Annex A 5: Self Aligning Type VI (hydraulic) Note: Different testers may yield different pull-off values
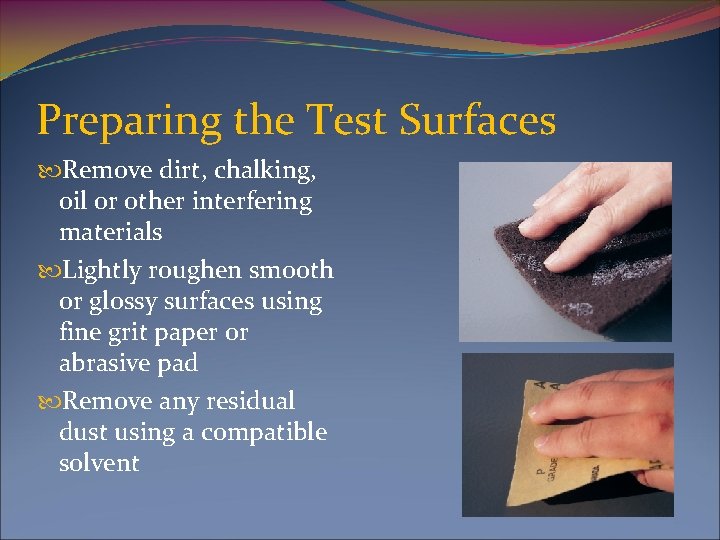
Preparing the Test Surfaces Remove dirt, chalking, oil or other interfering materials Lightly roughen smooth or glossy surfaces using fine grit paper or abrasive pad Remove any residual dust using a compatible solvent
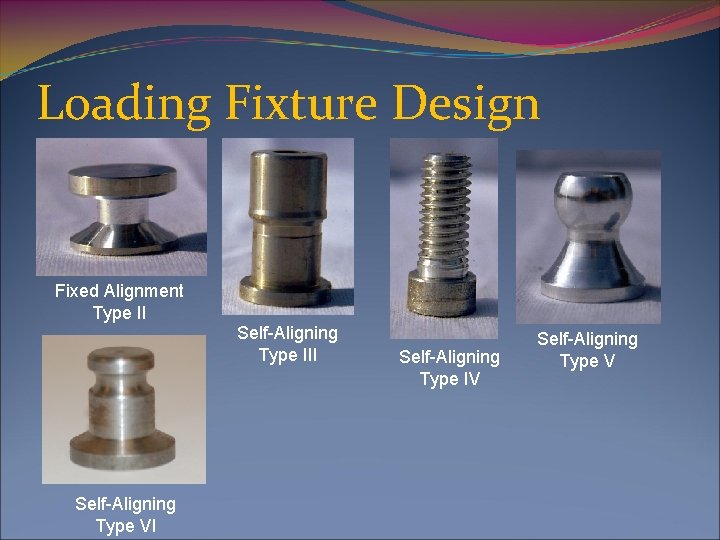
Loading Fixture Design Fixed Alignment Type II Self-Aligning Type III Self-Aligning Type VI Self-Aligning Type IV Self-Aligning Type V

Preparing the Loading Fixtures Loading fixtures for Type II and Type IV testers are available preabraded Loading fixtures for other testers may need to be abraded to enhance bond to surface (recommended) Clean fixtures before use
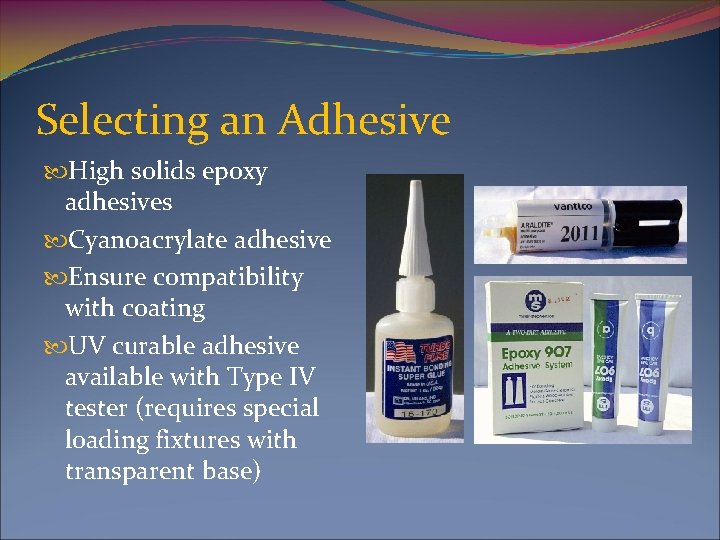
Selecting an Adhesive High solids epoxy adhesives Cyanoacrylate adhesive Ensure compatibility with coating UV curable adhesive available with Type IV tester (requires special loading fixtures with transparent base)
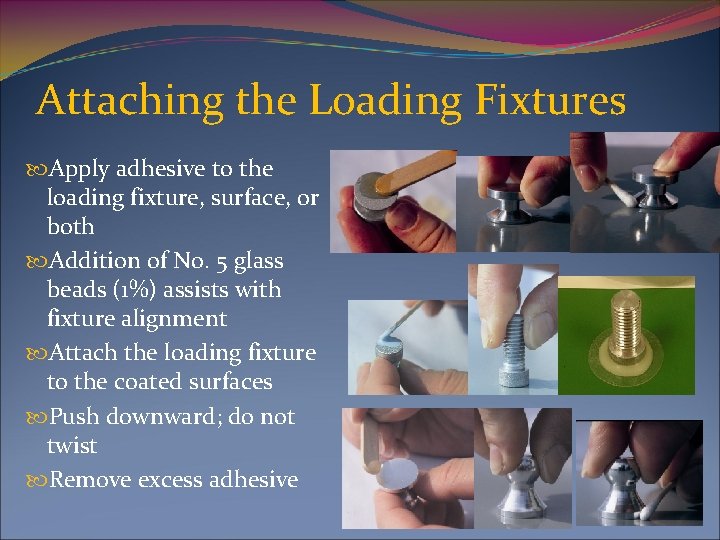
Attaching the Loading Fixtures Apply adhesive to the loading fixture, surface, or both Addition of No. 5 glass beads (1%) assists with fixture alignment Attach the loading fixture to the coated surfaces Push downward; do not twist Remove excess adhesive
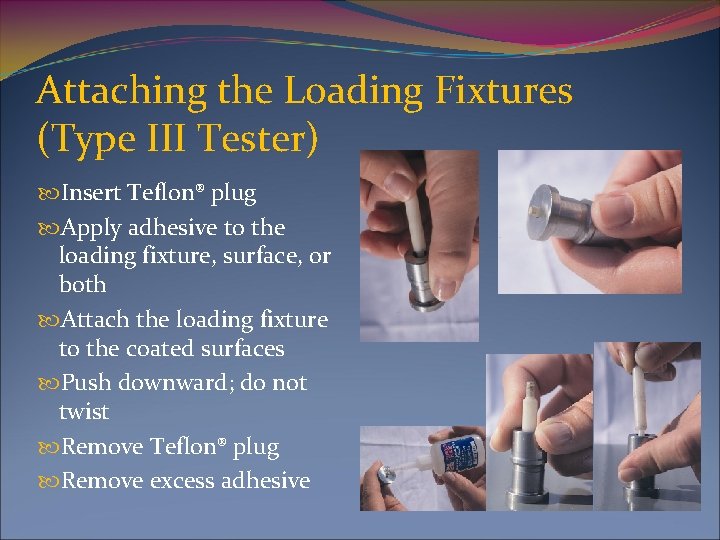
Attaching the Loading Fixtures (Type III Tester) Insert Teflon® plug Apply adhesive to the loading fixture, surface, or both Attach the loading fixture to the coated surfaces Push downward; do not twist Remove Teflon® plug Remove excess adhesive
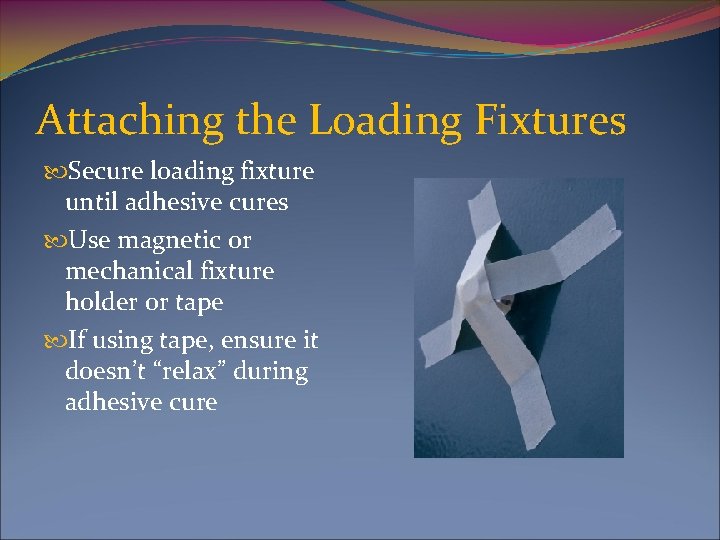
Attaching the Loading Fixtures Secure loading fixture until adhesive cures Use magnetic or mechanical fixture holder or tape If using tape, ensure it doesn’t “relax” during adhesive cure
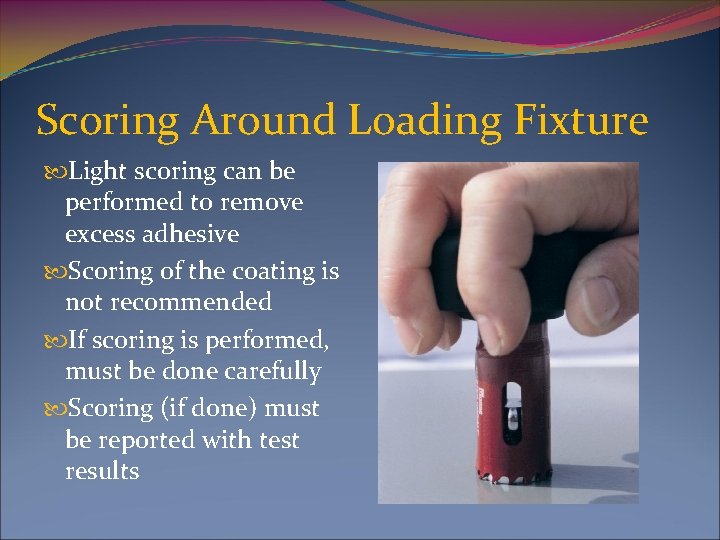
Scoring Around Loading Fixture Light scoring can be performed to remove excess adhesive Scoring of the coating is not recommended If scoring is performed, must be done carefully Scoring (if done) must be reported with test results

Measuring Pull-off Adhesion Using the Type II Tester Model No. Range 106/1 0 -500 psi 106/2 (shown) 0 -1000 psi 106/3 0 -2000 psi (uses wrench) 106/4 0 -3200 psi (uses wrench) 106/4 A Use w/ 2” diameter pull stubs (uses wrench) 106/5 0 -30 psi
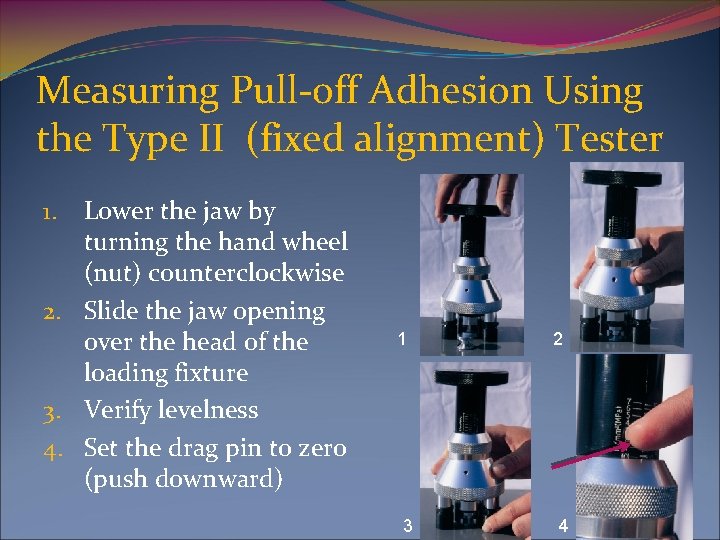
Measuring Pull-off Adhesion Using the Type II (fixed alignment) Tester Lower the jaw by turning the hand wheel (nut) counterclockwise 2. Slide the jaw opening over the head of the loading fixture 3. Verify levelness 4. Set the drag pin to zero (push downward) 1. 1 3 2 4
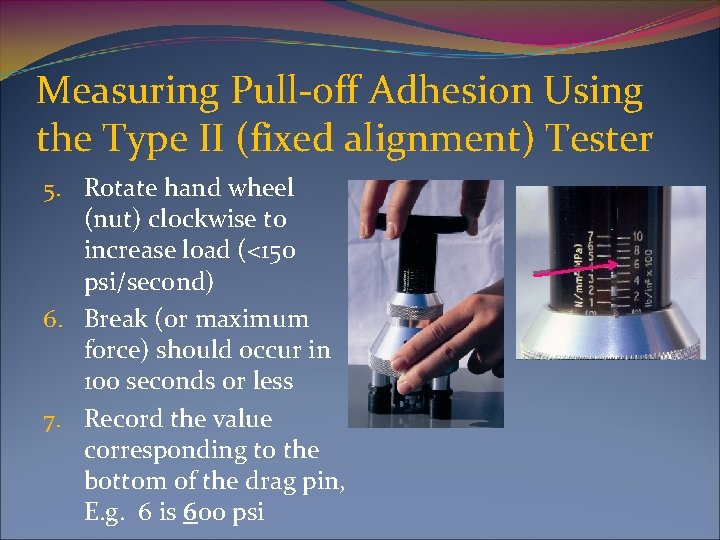
Measuring Pull-off Adhesion Using the Type II (fixed alignment) Tester 5. Rotate hand wheel (nut) clockwise to increase load (<150 psi/second) 6. Break (or maximum force) should occur in 100 seconds or less 7. Record the value corresponding to the bottom of the drag pin, E. g. 6 is 600 psi
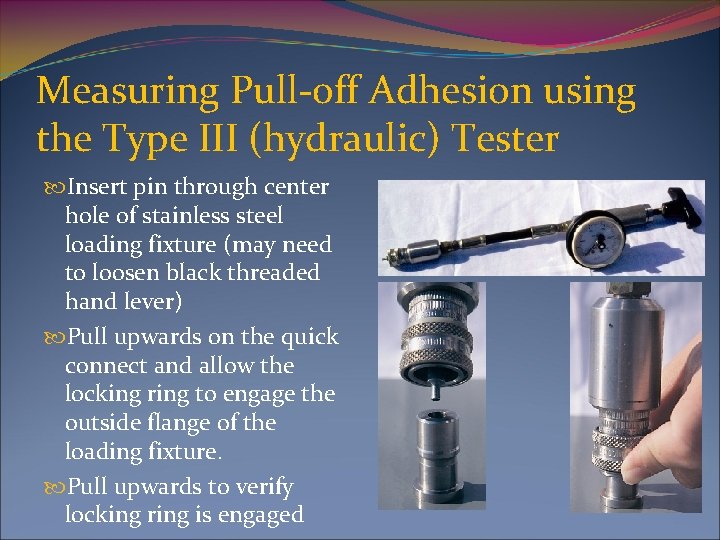
Measuring Pull-off Adhesion using the Type III (hydraulic) Tester Insert pin through center hole of stainless steel loading fixture (may need to loosen black threaded hand lever) Pull upwards on the quick connect and allow the locking ring to engage the outside flange of the loading fixture. Pull upwards to verify locking ring is engaged
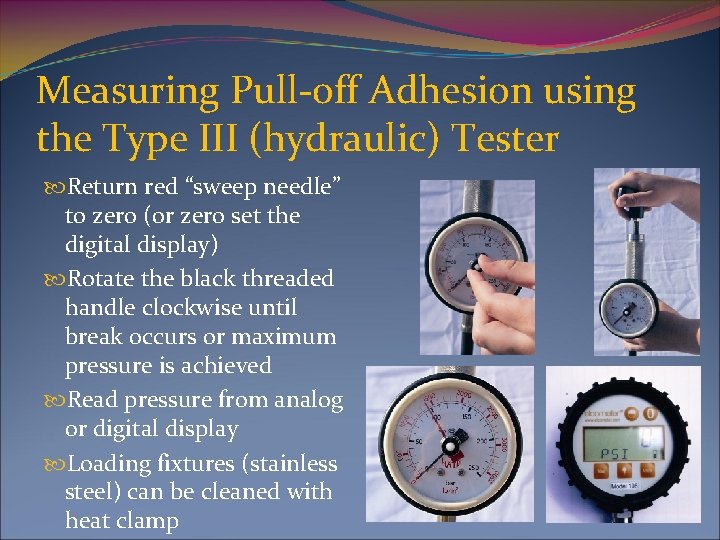
Measuring Pull-off Adhesion using the Type III (hydraulic) Tester Return red “sweep needle” to zero (or zero set the digital display) Rotate the black threaded handle clockwise until break occurs or maximum pressure is achieved Read pressure from analog or digital display Loading fixtures (stainless steel) can be cleaned with heat clamp
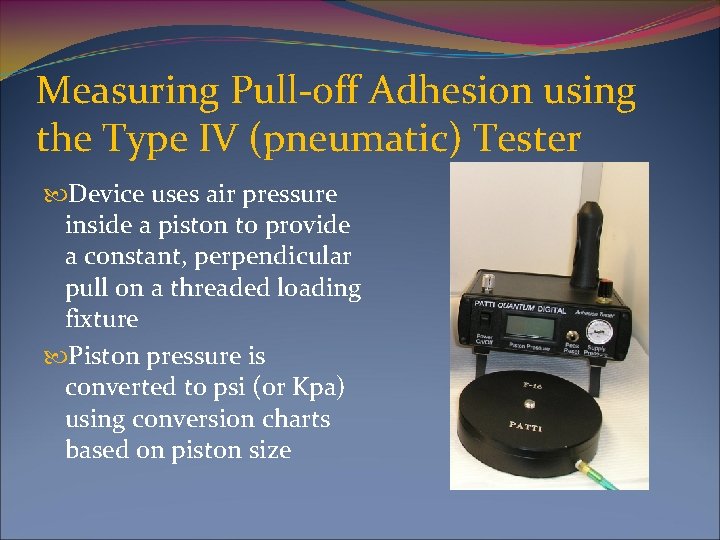
Measuring Pull-off Adhesion using the Type IV (pneumatic) Tester Device uses air pressure inside a piston to provide a constant, perpendicular pull on a threaded loading fixture Piston pressure is converted to psi (or Kpa) using conversion charts based on piston size
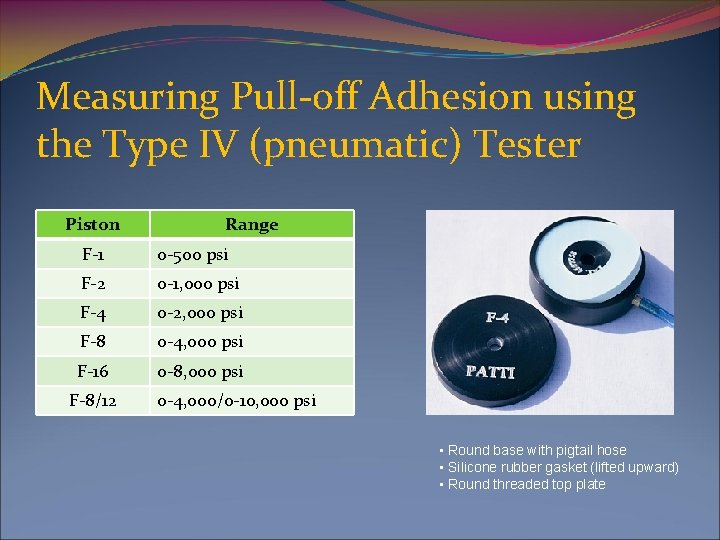
Measuring Pull-off Adhesion using the Type IV (pneumatic) Tester Piston Range F-1 0 -500 psi F-2 0 -1, 000 psi F-4 0 -2, 000 psi F-8 0 -4, 000 psi F-16 0 -8, 000 psi F-8/12 0 -4, 000/0 -10, 000 psi • Round base with pigtail hose • Silicone rubber gasket (lifted upward) • Round threaded top plate
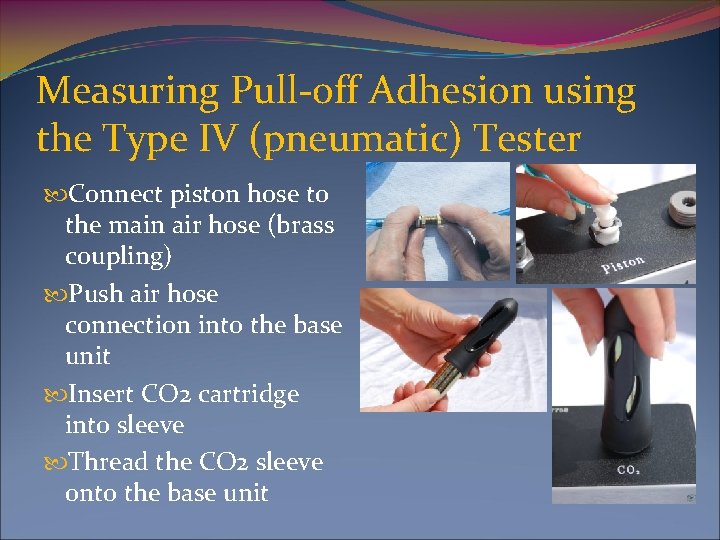
Measuring Pull-off Adhesion using the Type IV (pneumatic) Tester Connect piston hose to the main air hose (brass coupling) Push air hose connection into the base unit Insert CO 2 cartridge into sleeve Thread the CO 2 sleeve onto the base unit
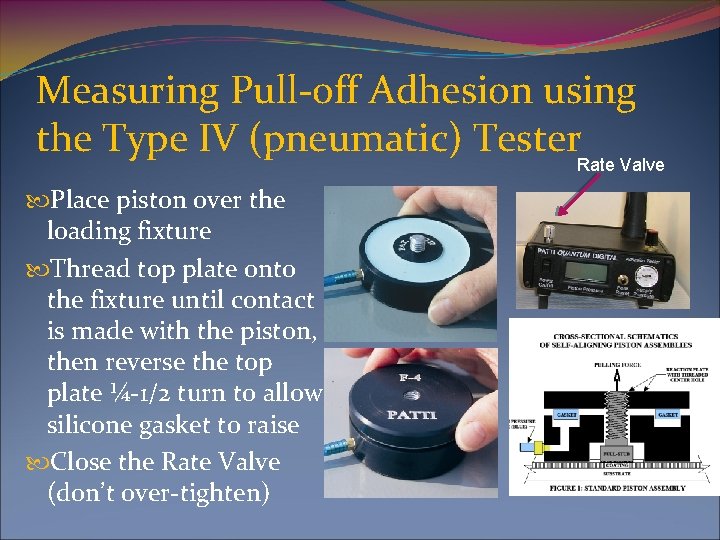
Measuring Pull-off Adhesion using the Type IV (pneumatic) Tester. Rate Valve Place piston over the loading fixture Thread top plate onto the fixture until contact is made with the piston, then reverse the top plate ¼-1/2 turn to allow silicone gasket to raise Close the Rate Valve (don’t over-tighten)
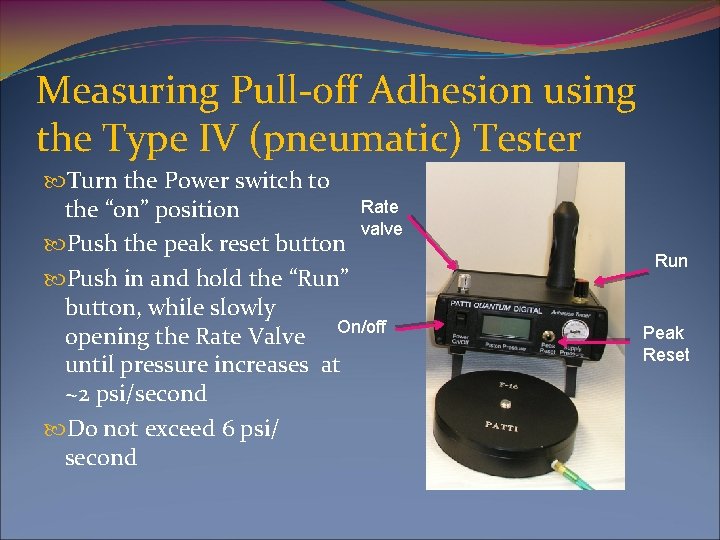
Measuring Pull-off Adhesion using the Type IV (pneumatic) Tester Turn the Power switch to Rate the “on” position valve Push the peak reset button Push in and hold the “Run” button, while slowly opening the Rate Valve On/off until pressure increases at ~2 psi/second Do not exceed 6 psi/ second Run Peak Reset
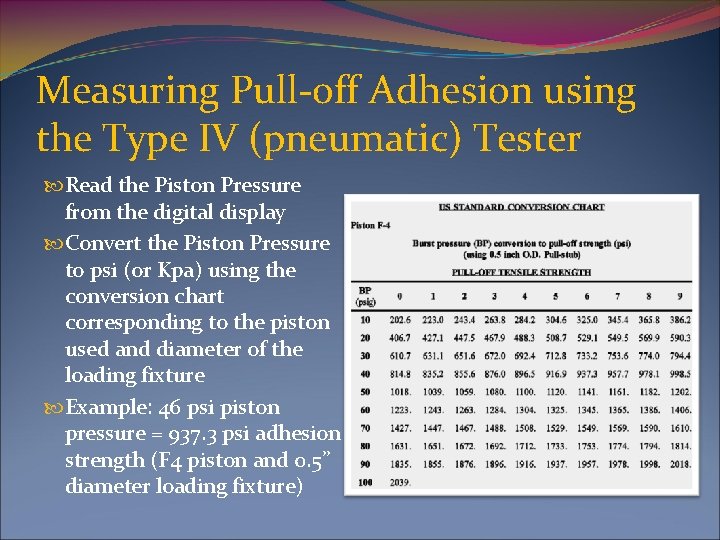
Measuring Pull-off Adhesion using the Type IV (pneumatic) Tester Read the Piston Pressure from the digital display Convert the Piston Pressure to psi (or Kpa) using the conversion chart corresponding to the piston used and diameter of the loading fixture Example: 46 psi piston pressure = 937. 3 psi adhesion strength (F 4 piston and 0. 5” diameter loading fixture)
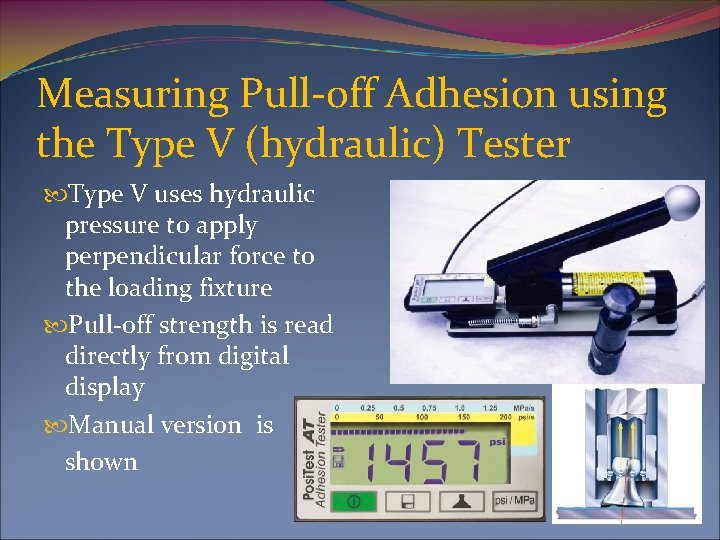
Measuring Pull-off Adhesion using the Type V (hydraulic) Tester Type V uses hydraulic pressure to apply perpendicular force to the loading fixture Pull-off strength is read directly from digital display Manual version is shown
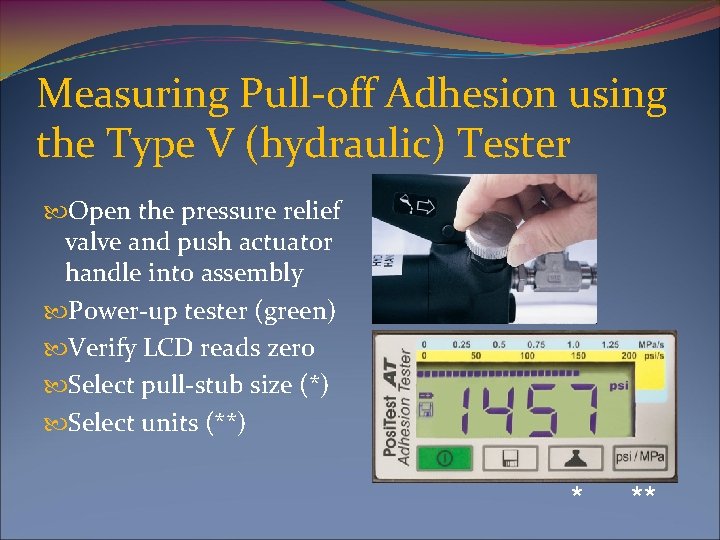
Measuring Pull-off Adhesion using the Type V (hydraulic) Tester Open the pressure relief valve and push actuator handle into assembly Power-up tester (green) Verify LCD reads zero Select pull-stub size (*) Select units (**) * **
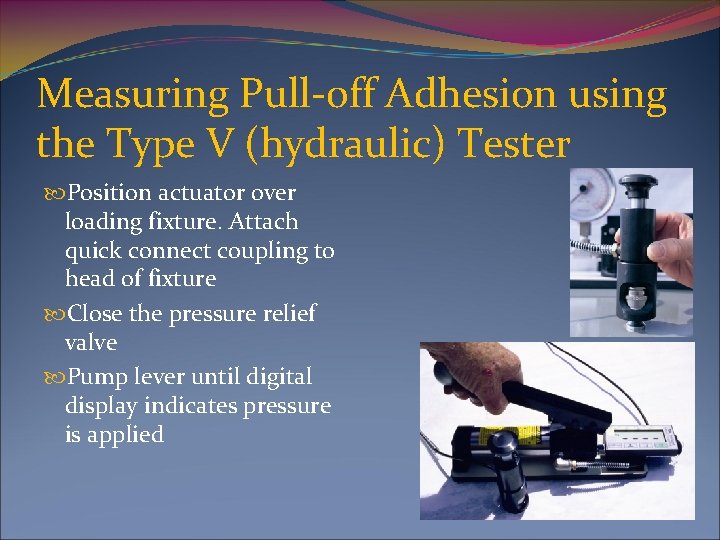
Measuring Pull-off Adhesion using the Type V (hydraulic) Tester Position actuator over loading fixture. Attach quick connect coupling to head of fixture Close the pressure relief valve Pump lever until digital display indicates pressure is applied
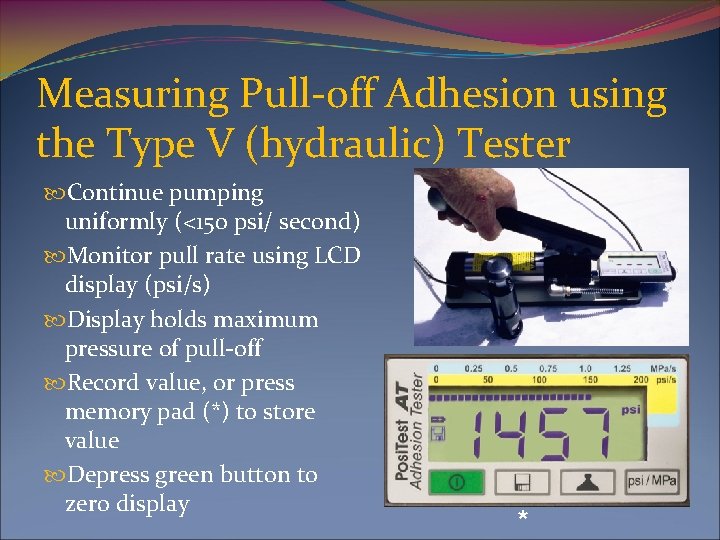
Measuring Pull-off Adhesion using the Type V (hydraulic) Tester Continue pumping uniformly (<150 psi/ second) Monitor pull rate using LCD display (psi/s) Display holds maximum pressure of pull-off Record value, or press memory pad (*) to store value Depress green button to zero display *
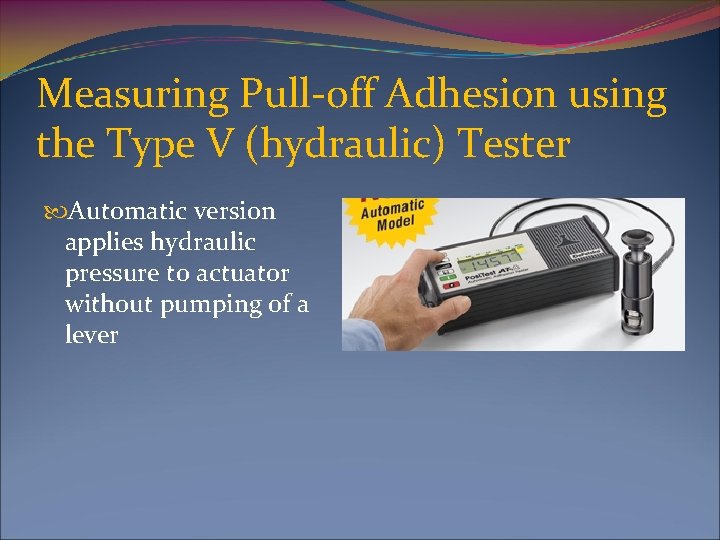
Measuring Pull-off Adhesion using the Type V (hydraulic) Tester Automatic version applies hydraulic pressure to actuator without pumping of a lever
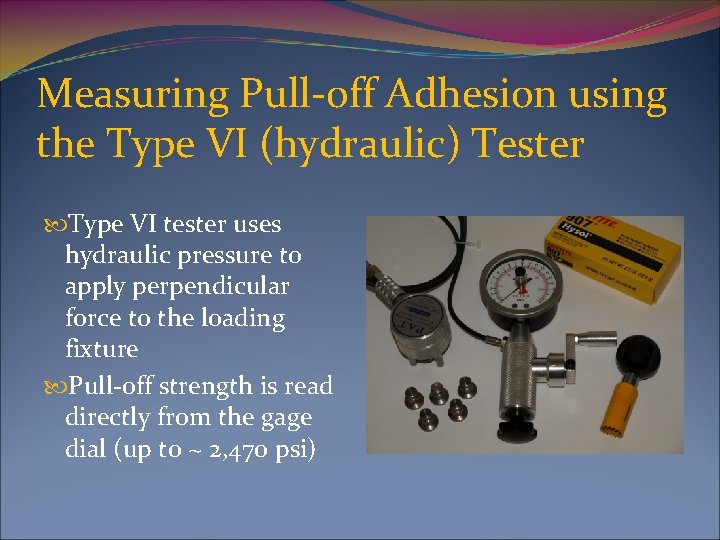
Measuring Pull-off Adhesion using the Type VI (hydraulic) Tester Type VI tester uses hydraulic pressure to apply perpendicular force to the loading fixture Pull-off strength is read directly from the gage dial (up to ~ 2, 470 psi)
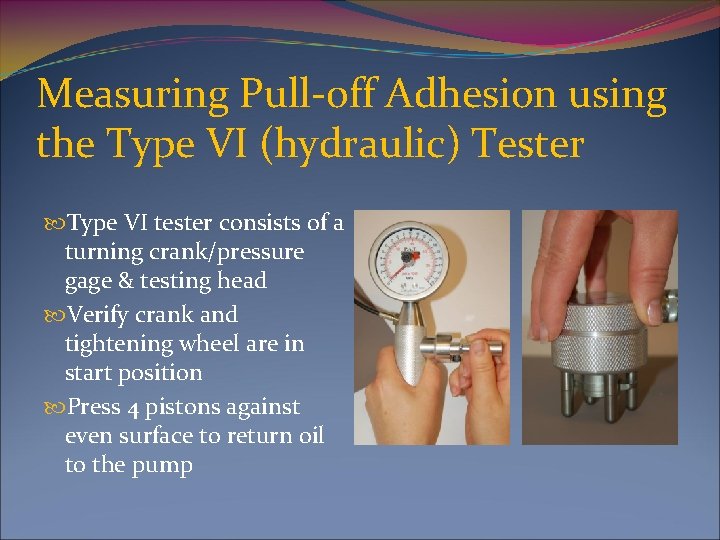
Measuring Pull-off Adhesion using the Type VI (hydraulic) Tester Type VI tester consists of a turning crank/pressure gage & testing head Verify crank and tightening wheel are in start position Press 4 pistons against even surface to return oil to the pump
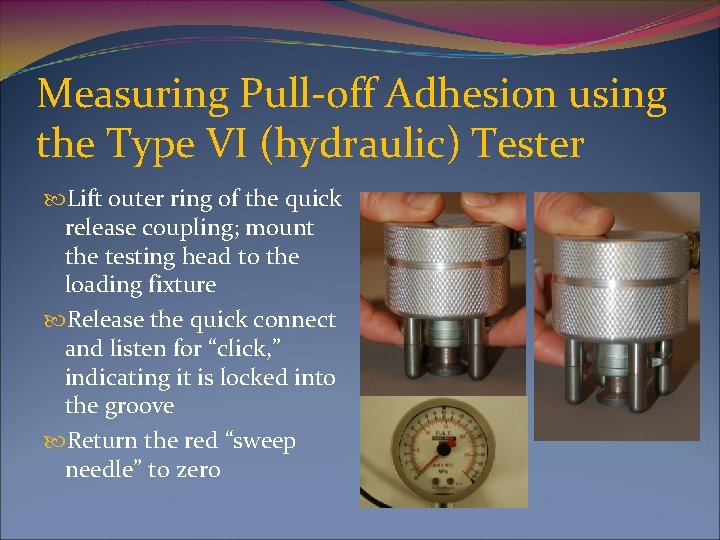
Measuring Pull-off Adhesion using the Type VI (hydraulic) Tester Lift outer ring of the quick release coupling; mount the testing head to the loading fixture Release the quick connect and listen for “click, ” indicating it is locked into the groove Return the red “sweep needle” to zero
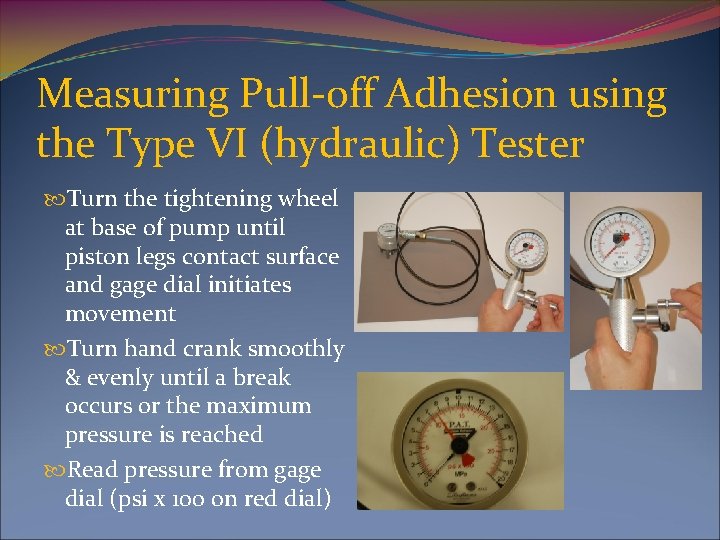
Measuring Pull-off Adhesion using the Type VI (hydraulic) Tester Turn the tightening wheel at base of pump until piston legs contact surface and gage dial initiates movement Turn hand crank smoothly & evenly until a break occurs or the maximum pressure is reached Read pressure from gage dial (psi x 100 on red dial)
Special Requirements for Pull-off Adhesion of Coatings on Concrete Standard Test Method ASTM D 7234 -05 SSPC SP 13/NACE No. 6, Appendix A 1. 6 describes procedures for testing concrete coating adhesion Testing procedures are similar; minor differences in equipment and test procedures This section is not comprehensive SSPC CCI (Concrete Coating Inspector) Training Program contains more detail Four considerations described
Special Requirements for Pull-off Adhesion of Coatings on Concrete 1. Scoring the coating Thick film coatings (>20 mils) have lateral bond strength May produce misleading pull-off values (false, high) Scoring through coating (down to the concrete surface) is typically performed Scoring is done prior to attachment of loading fixture (except if loading fixture is square) Scoring coatings <20 mils may also be required When attaching loading fixture, verify adhesive does not flow into groove
Special Requirements for Pull-off Adhesion of Coatings on Concrete 2. Loading Fixture Size Unlike steel, concrete is non-uniform and contains cement and aggregate Round loading fixture diameter should be 2” (50 mm) to ensure test is performed over a representative area Square loading fixtures are used with some testers 3. Loading Rate The pressure loading rate should be 30 psi/second; the test should be completed in 5 -30 seconds
Special Requirements for Pull-off Adhesion of Coatings on Concrete 4. Compressive Vs. Tensile Strength Concrete has high compressive strength (i. e. , 4000 psi), but low tensile strength (i. e. , 400 psi) Low pull-off values common Plane of fracture commonly within the concrete When fracture occurs in the concrete, report the minimum coating tensile adhesion properties; actual coating tensile strength remains unknown
Recording the Type and Location of Break Adhesion Break: A break between coating layers or between the substrate and first coating layer Cohesion Break: A break within a single coating layer Glue Break: Coating adhesion and/or cohesion strength exceeds bonding strength of the adhesive If multiple locations of break occur, estimate the percentage of each (e. g. , 75% cohesion within primer; 25% adhesion between primer and intermediate coats)
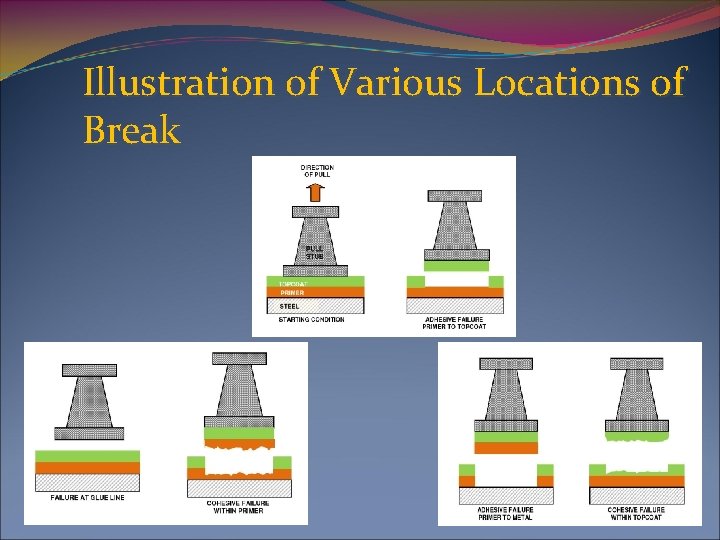
Illustration of Various Locations of Break
Recording the Type and Location of Break Disregard any test where glue break represents more than 50% If glue break occurs and the pull-off value is greater than the acceptance value, re-attachment is not necessary (report “pass with pull-off strength > X psi”)
Pitfalls to Avoid Determine which tester to use. Different testers generate different pull-off values on the same coating Verify testing equipment has current calibration Perform testing in triplicate The rigidity of the substrate can affect the testing Clean the surface and the loading fixtures to reduce the possibility of glue failures. Use care when abrading the surface to prevent introduction of surface flaws Verify adhesive is compatible with the coating Allow the adhesive to cure. Conducting pull tests before adhesive is cured often results in glue breaks Verify perpendicular pull Support pull-off device on vertical surfaces
Reporting General Nature of Test Substrate type and coating system (thickness, type, surface orientation) Field or laboratory testing Air temperature and relative humidity Testing apparatus employed; loading fixture type/dimensions Adhesive type employed No. of tests performed Load applied (pull-off values, in psi, KPa or MPa) Mean and range of pull-off values Location of break (between coats, within a coat, between substrate surface and primer, etc. ) Note scoring, if employed (and any other deviations from procedure)
Coating Adhesion Testing Methods and Equipment THE END
- Slides: 61