CMS Pixel Mechanical FPIX Half Disk Design Updates


- Slides: 40

CMS Pixel Mechanical FPIX Half Disk Design Updates C. M. Lei Joe Howell Simon Kwan 10/28/2009 C. M. Lei CMS Pixel Mech Upgrade Workshop 10/28/09

FPIX Half Disk Layout Requirements 1. Fits within Phase 1 FPIX envelope definition 2. Modules oriented radially (requires only 2 x 8 modules, and slightly improves resolution compared to the layout of the current detector) 3. Locates all outer radius sensors as far forward and out in radius as possible (to minimize the gap in 4 -hit coverage between the end of the 4 th-barrel layer and the forward-most disk) 4. Maximize 4 -hit coverage between end of 4 th layer barrel up to eta = 2. 5, for particles originating at the IP +/-5 cm, using a minimum number of modules 5. Keep the same 20 degree tilt as the current detector 6. Individual modules and/or module-support substrates to be removable and replaceable without disassembling other modules on the disks 7. Identical substrates (blades are the same) 8. Minimizes the amount of material required for cooling and module support (assuming cooling using CO 2) 9. Delta T < 5 C across a single module (Highly desirable) 10. Separate inner from outer ring assembly for easier replacement of blades on the inner ring (with earlier radiation damaged modules). (Desirable) C. M. Lei CMS Pixel Mech Upgrade Workshop 10/28/09 2

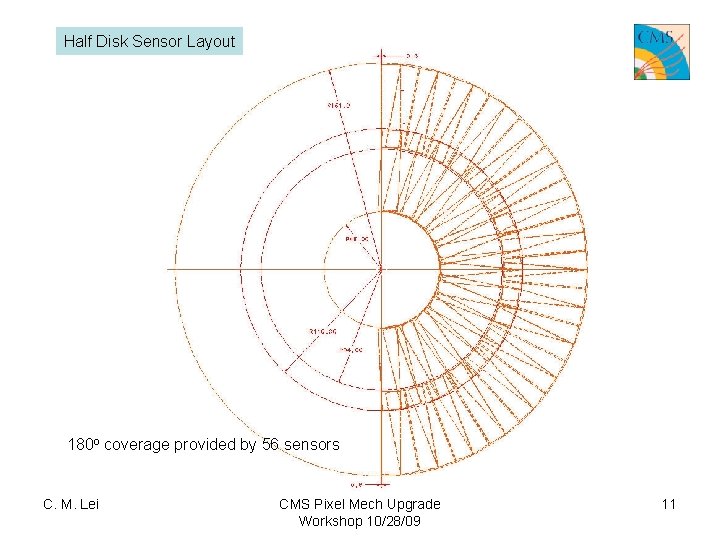
FPix Phase 1 Upgrade Plans Baseline: 3 disks in each endcap Use only ONE kind of module 2 x 8, and ONE identical blade. • All modules are arranged radially and placed between r=45 mm to 161 mm (total 56 modules per half disk or 896 ROCs) • Modules divided into an outer ring of 34 modules and inner ring of 22 modules • Keep the same 20 degree rotation but for the inner assembly, add a 12 degree tilt to the IP (inverted cone geometry) C 02 cooling ; Use thin-walled SS tubing 316 L and the size is tentatively chosen (1. 638 mm OD, 1. 435 mm ID) based on getting a continuous loop providing enough cooling power for each blade assembly. Use ultra light weight materials for mechanical support and cooling (aim at material reduction of about a factor of 2) C. M. Lei CMS Pixel Mech Upgrade Workshop 10/28/09 3

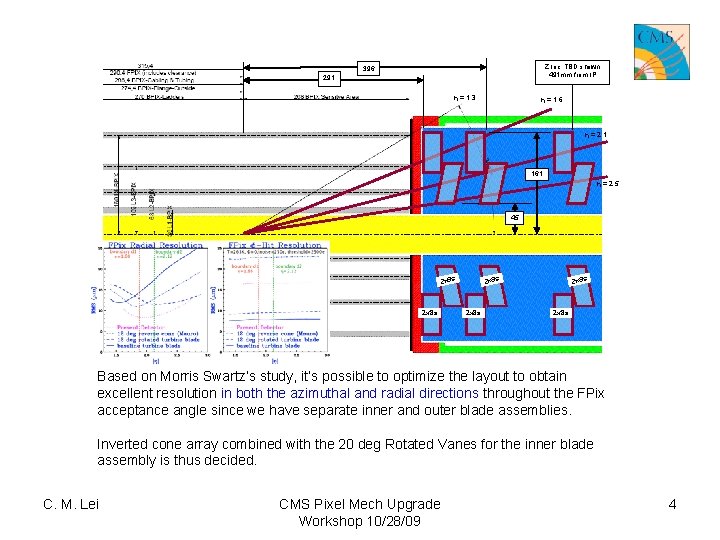
Z loc. TBD shown 491 mm from IP 396 291 η = 1. 3 η = 1. 6 η = 2. 1 161 η = 2. 5 45 2 x 8 s 2 x 8 s Based on Morris Swartz’s study, it’s possible to optimize the layout to obtain excellent resolution in both the azimuthal and radial directions throughout the FPix acceptance angle since we have separate inner and outer blade assemblies. Inverted cone array combined with the 20 deg Rotated Vanes for the inner blade assembly is thus decided. C. M. Lei CMS Pixel Mech Upgrade Workshop 10/28/09 4

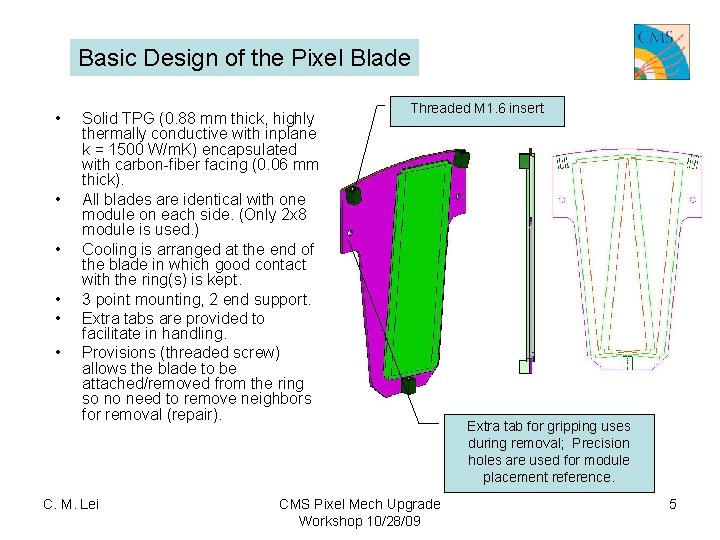
Basic Design of the Pixel Blade • • • Solid TPG (0. 88 mm thick, highly thermally conductive with inplane k = 1500 W/m. K) encapsulated with carbon-fiber facing (0. 06 mm thick). All blades are identical with one module on each side. (Only 2 x 8 module is used. ) Cooling is arranged at the end of the blade in which good contact with the ring(s) is kept. 3 point mounting, 2 end support. Extra tabs are provided to facilitate in handling. Provisions (threaded screw) allows the blade to be attached/removed from the ring so no need to remove neighbors for removal (repair). C. M. Lei Threaded M 1. 6 insert CMS Pixel Mech Upgrade Workshop 10/28/09 Extra tab for gripping uses during removal; Precision holes are used for module placement reference. 5

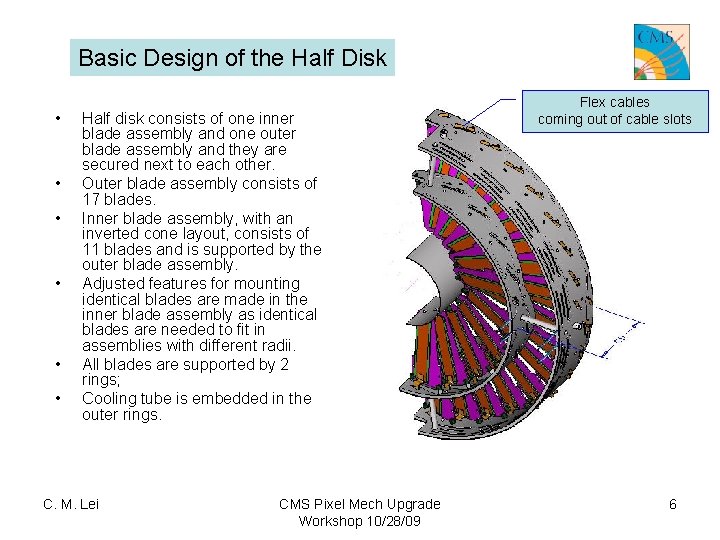
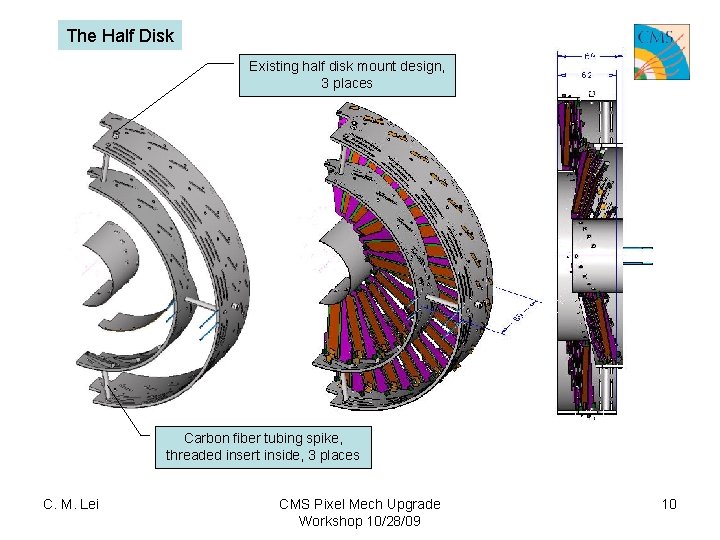
Basic Design of the Half Disk • • • Half disk consists of one inner blade assembly and one outer blade assembly and they are secured next to each other. Outer blade assembly consists of 17 blades. Inner blade assembly, with an inverted cone layout, consists of 11 blades and is supported by the outer blade assembly. Adjusted features for mounting identical blades are made in the inner blade assembly as identical blades are needed to fit in assemblies with different radii. All blades are supported by 2 rings; Cooling tube is embedded in the outer rings. C. M. Lei CMS Pixel Mech Upgrade Workshop 10/28/09 Flex cables coming out of cable slots 6

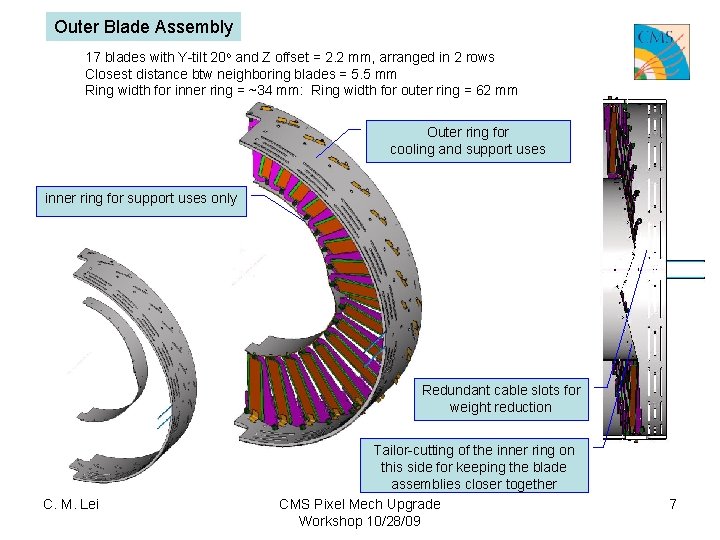
Outer Blade Assembly 17 blades with Y-tilt 20 o and Z offset = 2. 2 mm, arranged in 2 rows Closest distance btw neighboring blades = 5. 5 mm Ring width for inner ring = ~34 mm: Ring width for outer ring = 62 mm Outer ring for cooling and support uses inner ring for support uses only Redundant cable slots for weight reduction C. M. Lei Tailor-cutting of the inner ring on this side for keeping the blade assemblies closer together CMS Pixel Mech Upgrade Workshop 10/28/09 7

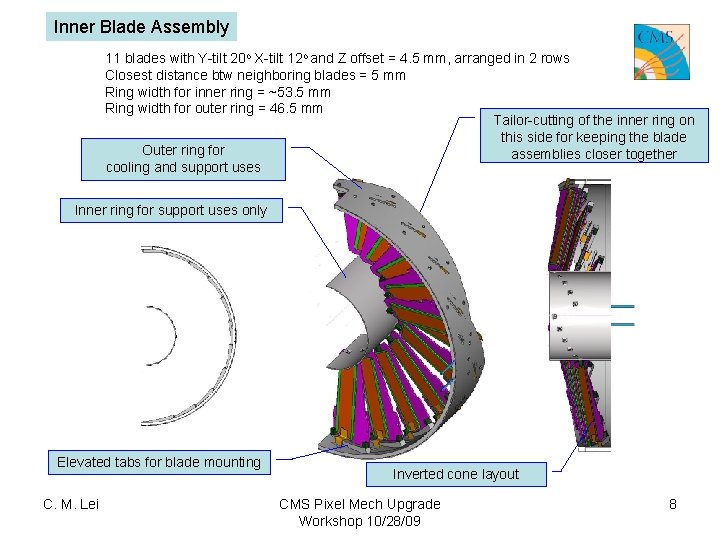
Inner Blade Assembly 11 blades with Y-tilt 20 o X-tilt 12 o and Z offset = 4. 5 mm, arranged in 2 rows Closest distance btw neighboring blades = 5 mm Ring width for inner ring = ~53. 5 mm Ring width for outer ring = 46. 5 mm Tailor-cutting of the inner ring on this side for keeping the blade Outer ring for assemblies closer together cooling and support uses Inner ring for support uses only Elevated tabs for blade mounting C. M. Lei Inverted cone layout CMS Pixel Mech Upgrade Workshop 10/28/09 8

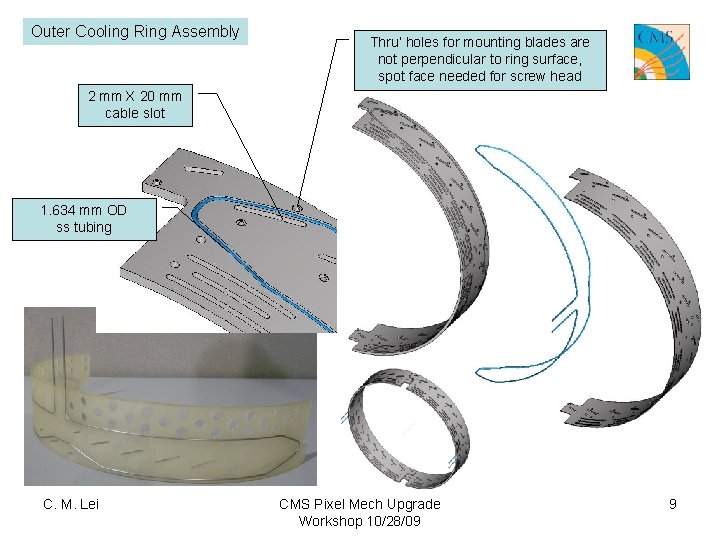
Outer Cooling Ring Assembly Thru’ holes for mounting blades are not perpendicular to ring surface, spot face needed for screw head 2 mm X 20 mm cable slot 1. 634 mm OD ss tubing C. M. Lei CMS Pixel Mech Upgrade Workshop 10/28/09 9

The Half Disk Existing half disk mount design, 3 places Carbon fiber tubing spike, threaded insert inside, 3 places C. M. Lei CMS Pixel Mech Upgrade Workshop 10/28/09 10

Half Disk Sensor Layout 180 o coverage provided by 56 sensors C. M. Lei CMS Pixel Mech Upgrade Workshop 10/28/09 11

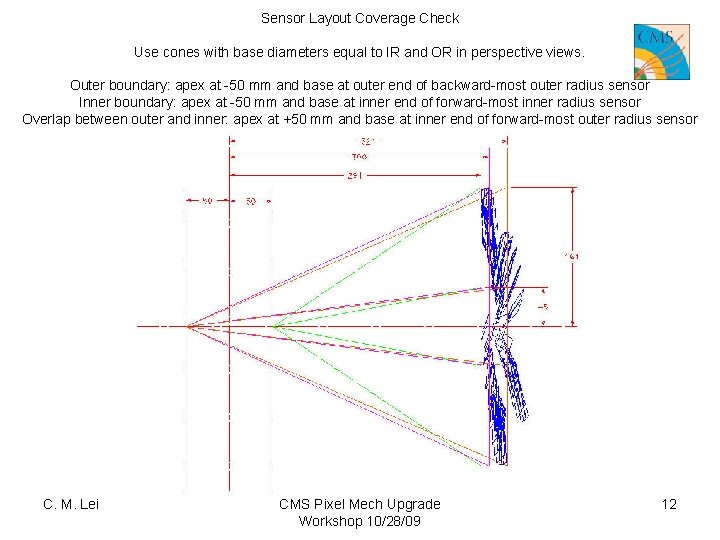
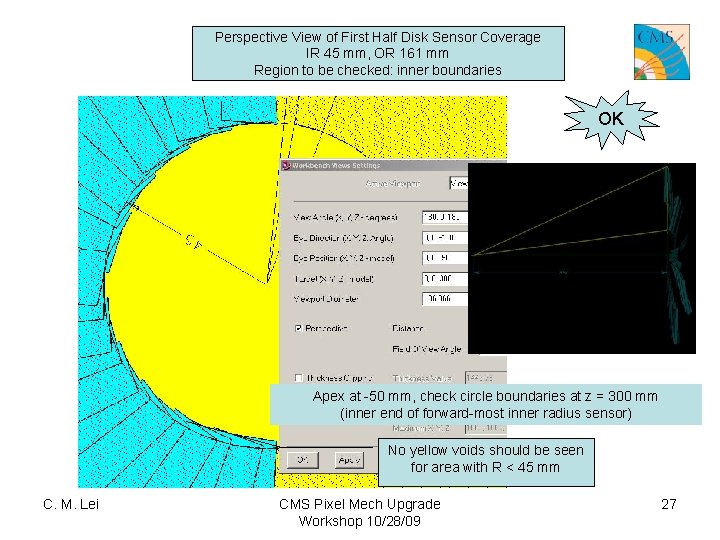
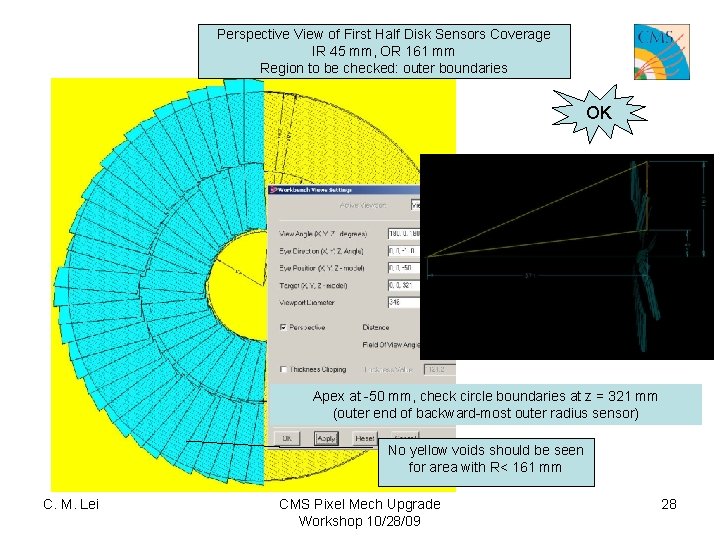
Sensor Layout Coverage Check Use cones with base diameters equal to IR and OR in perspective views. Outer boundary: apex at -50 mm and base at outer end of backward-most outer radius sensor Inner boundary: apex at -50 mm and base at inner end of forward-most inner radius sensor Overlap between outer and inner: apex at +50 mm and base at inner end of forward-most outer radius sensor C. M. Lei CMS Pixel Mech Upgrade Workshop 10/28/09 12

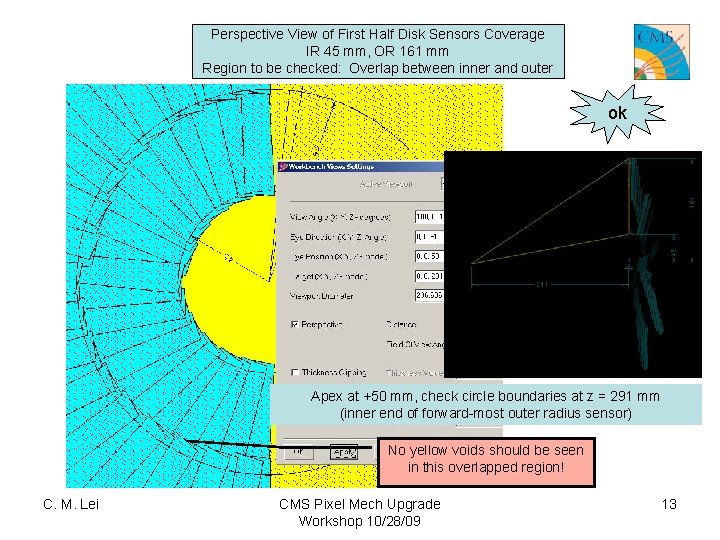
Perspective View of First Half Disk Sensors Coverage IR 45 mm, OR 161 mm Region to be checked: Overlap between inner and outer ok Apex at +50 mm, check circle boundaries at z = 291 mm (inner end of forward-most outer radius sensor) No yellow voids should be seen in this overlapped region! C. M. Lei CMS Pixel Mech Upgrade Workshop 10/28/09 13

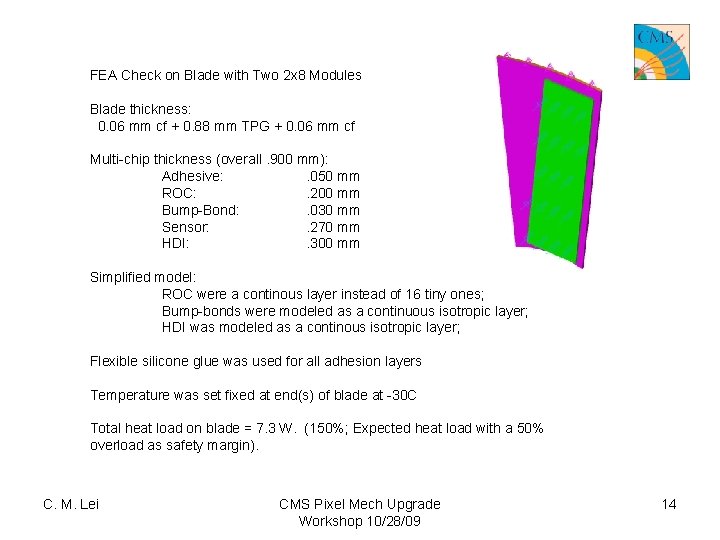
FEA Check on Blade with Two 2 x 8 Modules Blade thickness: 0. 06 mm cf + 0. 88 mm TPG + 0. 06 mm cf Multi-chip thickness (overall. 900 mm): Adhesive: . 050 mm ROC: . 200 mm Bump-Bond: . 030 mm Sensor: . 270 mm HDI: . 300 mm Simplified model: ROC were a continous layer instead of 16 tiny ones; Bump-bonds were modeled as a continuous isotropic layer; HDI was modeled as a continous isotropic layer; Flexible silicone glue was used for all adhesion layers Temperature was set fixed at end(s) of blade at -30 C Total heat load on blade = 7. 3 W. (150%; Expected heat load with a 50% overload as safety margin). C. M. Lei CMS Pixel Mech Upgrade Workshop 10/28/09 14

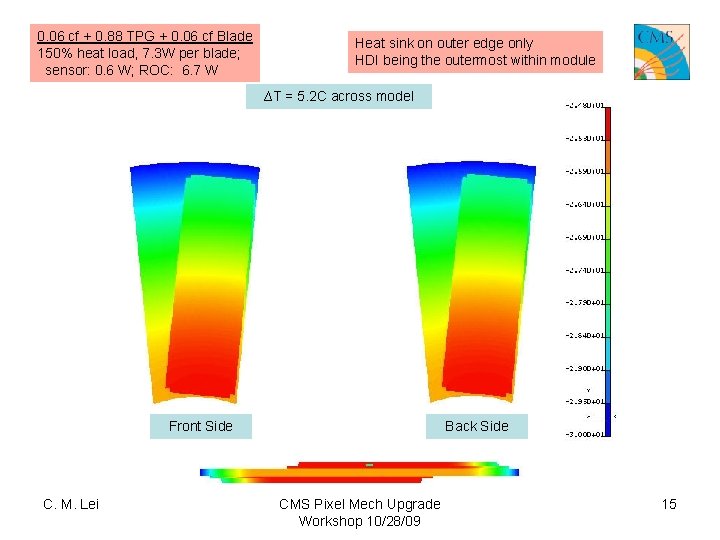
0. 06 cf + 0. 88 TPG + 0. 06 cf Blade 150% heat load, 7. 3 W per blade; sensor: 0. 6 W; ROC: 6. 7 W Heat sink on outer edge only HDI being the outermost within module ∆T = 5. 2 C across model Front Side C. M. Lei Back Side CMS Pixel Mech Upgrade Workshop 10/28/09 15

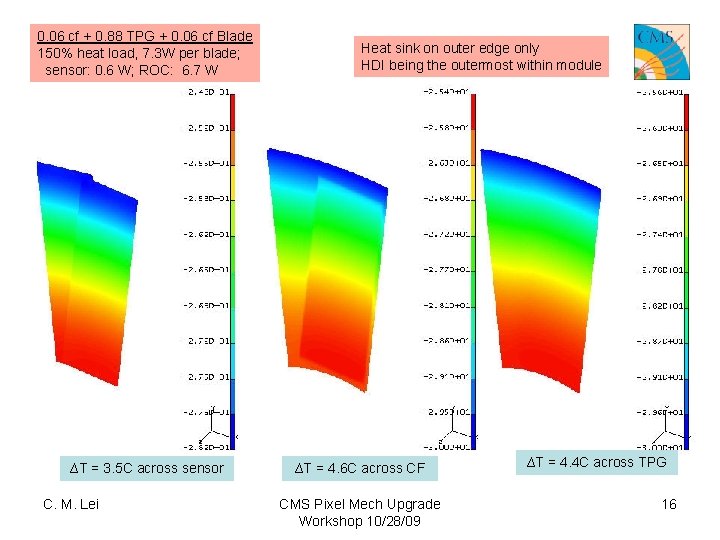
0. 06 cf + 0. 88 TPG + 0. 06 cf Blade 150% heat load, 7. 3 W per blade; sensor: 0. 6 W; ROC: 6. 7 W ∆T = 3. 5 C across sensor C. M. Lei Heat sink on outer edge only HDI being the outermost within module ∆T = 4. 6 C across CF CMS Pixel Mech Upgrade Workshop 10/28/09 ∆T = 4. 4 C across TPG 16

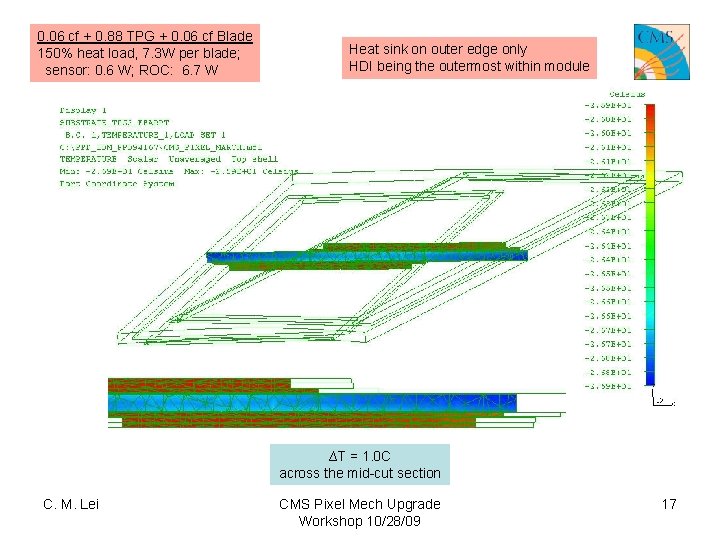
0. 06 cf + 0. 88 TPG + 0. 06 cf Blade 150% heat load, 7. 3 W per blade; sensor: 0. 6 W; ROC: 6. 7 W Heat sink on outer edge only HDI being the outermost within module ∆T = 1. 0 C across the mid-cut section C. M. Lei CMS Pixel Mech Upgrade Workshop 10/28/09 17

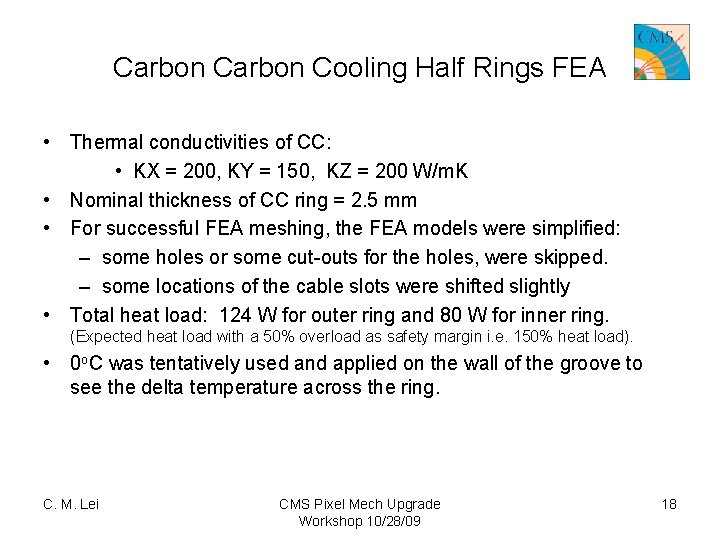
Carbon Cooling Half Rings FEA • Thermal conductivities of CC: • KX = 200, KY = 150, KZ = 200 W/m. K • Nominal thickness of CC ring = 2. 5 mm • For successful FEA meshing, the FEA models were simplified: – some holes or some cut-outs for the holes, were skipped. – some locations of the cable slots were shifted slightly • Total heat load: 124 W for outer ring and 80 W for inner ring. (Expected heat load with a 50% overload as safety margin i. e. 150% heat load). • 0 o. C was tentatively used and applied on the wall of the groove to see the delta temperature across the ring. C. M. Lei CMS Pixel Mech Upgrade Workshop 10/28/09 18

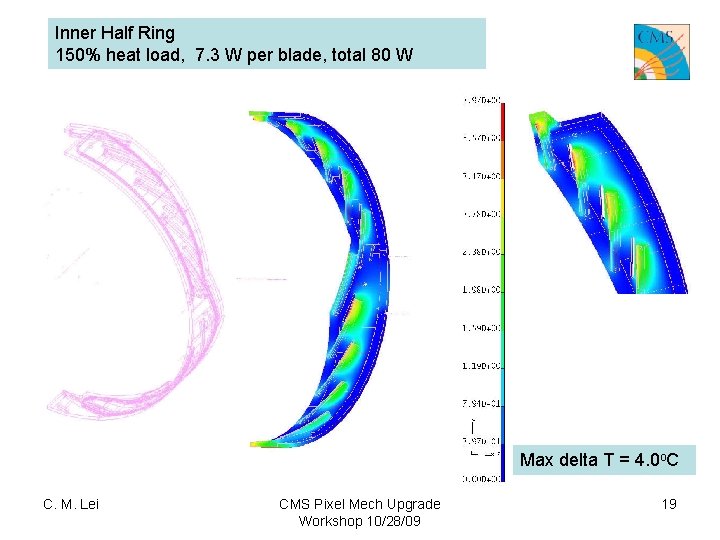
Inner Half Ring 150% heat load, 7. 3 W per blade, total 80 W Max delta T = 4. 0 o. C C. M. Lei CMS Pixel Mech Upgrade Workshop 10/28/09 19

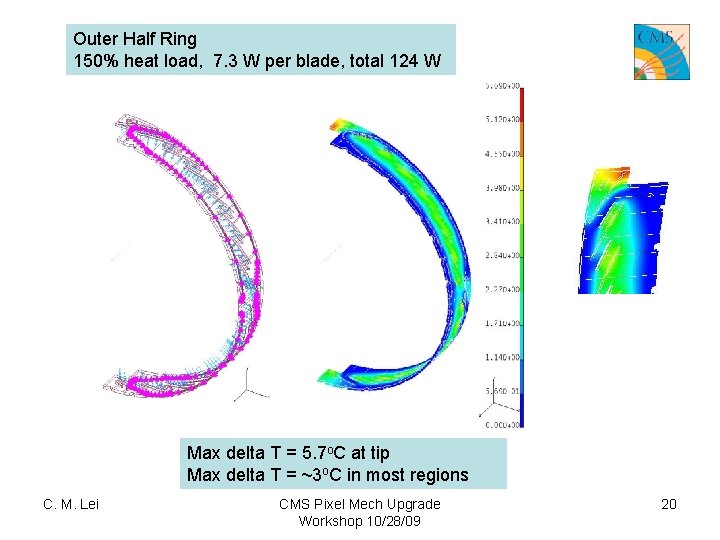
Outer Half Ring 150% heat load, 7. 3 W per blade, total 124 W Max delta T = 5. 7 o. C at tip Max delta T = ~3 o. C in most regions C. M. Lei CMS Pixel Mech Upgrade Workshop 10/28/09 20

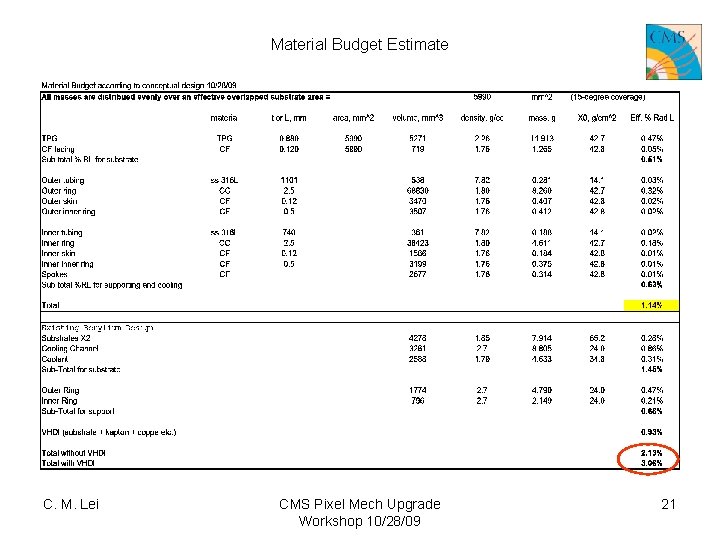
Material Budget Estimate C. M. Lei CMS Pixel Mech Upgrade Workshop 10/28/09 21

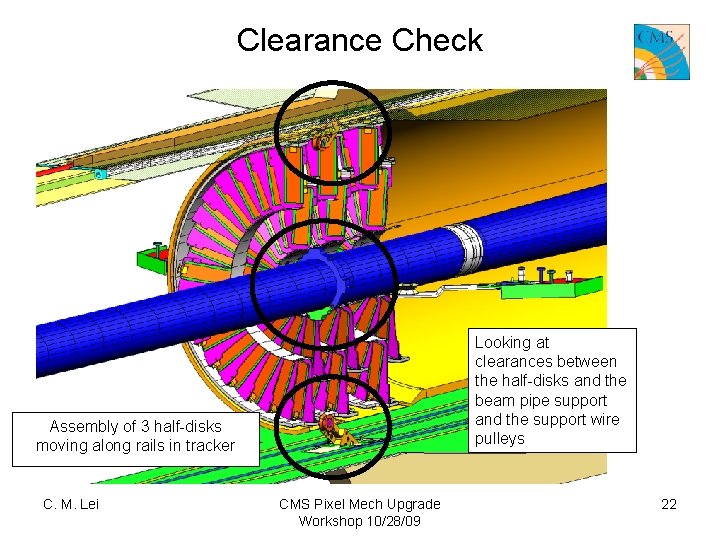
Clearance Check Looking at clearances between the half-disks and the beam pipe support and the support wire pulleys Assembly of 3 half-disks moving along rails in tracker C. M. Lei CMS Pixel Mech Upgrade Workshop 10/28/09 22

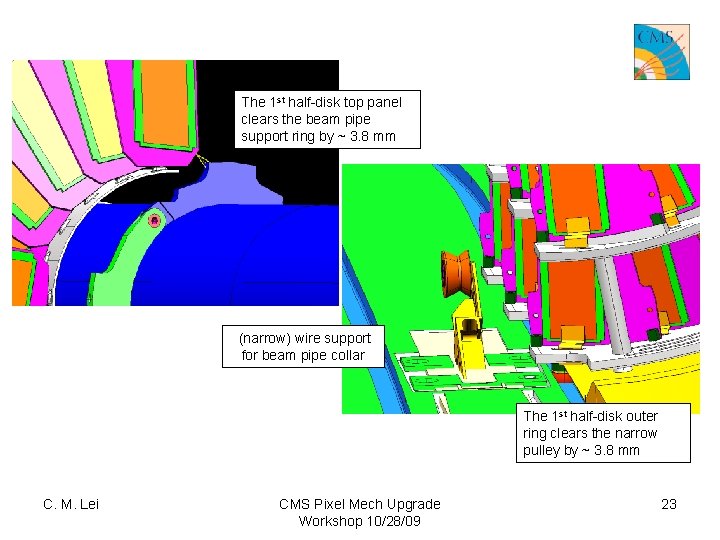
The 1 st half-disk top panel clears the beam pipe support ring by ~ 3. 8 mm (narrow) wire support for beam pipe collar The 1 st half-disk outer ring clears the narrow pulley by ~ 3. 8 mm C. M. Lei CMS Pixel Mech Upgrade Workshop 10/28/09 23

Summary • A conceptual design was made. • Some FEAs were run to verify thermal performance. • Some prototypes like the TPG substrate, and parts for the outer ring assembly including rings and ss tubing were made. C. M. Lei CMS Pixel Mech Upgrade Workshop 10/28/09 24

Next Steps • Optimize the CC ring design to reduce the weight further. • Run FEA to verify stresses and distortions on TPG substrate etc. • Run flow test. • Fabricate more prototypes including CC ring prototypes. • Conduct thermal test on TPG substrate, and CC ring. C. M. Lei CMS Pixel Mech Upgrade Workshop 10/28/09 25

Back Up Slides C. M. Lei CMS Pixel Mech Upgrade Workshop 10/28/09

Perspective View of First Half Disk Sensor Coverage IR 45 mm, OR 161 mm Region to be checked: inner boundaries OK Apex at -50 mm, check circle boundaries at z = 300 mm (inner end of forward-most inner radius sensor) No yellow voids should be seen for area with R < 45 mm C. M. Lei CMS Pixel Mech Upgrade Workshop 10/28/09 27

Perspective View of First Half Disk Sensors Coverage IR 45 mm, OR 161 mm Region to be checked: outer boundaries OK Apex at -50 mm, check circle boundaries at z = 321 mm (outer end of backward-most outer radius sensor) No yellow voids should be seen for area with R< 161 mm C. M. Lei CMS Pixel Mech Upgrade Workshop 10/28/09 28

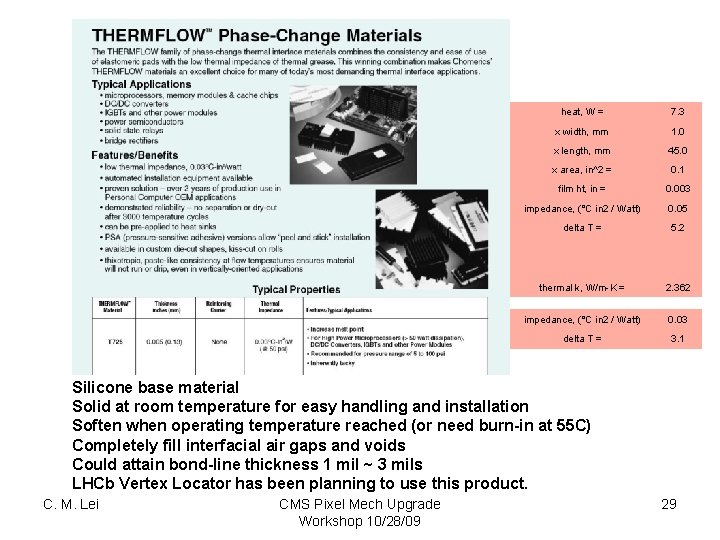
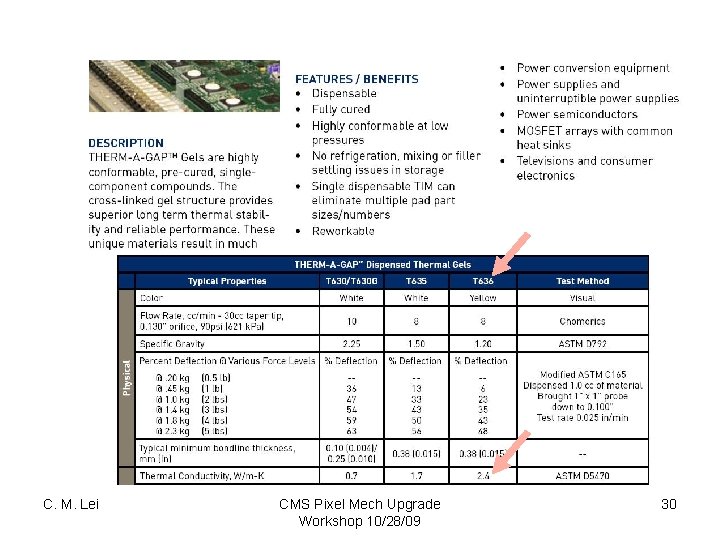
heat, W = 7. 3 x width, mm 1. 0 x length, mm 45. 0 x area, in^2 = 0. 1 film ht, in = 0. 003 impedance, (°C in 2 / Watt) 0. 05 delta T = 5. 2 thermal k, W/m-K = 2. 362 impedance, (°C in 2 / Watt) 0. 03 delta T = 3. 1 Silicone base material Solid at room temperature for easy handling and installation Soften when operating temperature reached (or need burn-in at 55 C) Completely fill interfacial air gaps and voids Could attain bond-line thickness 1 mil ~ 3 mils LHCb Vertex Locator has been planning to use this product. C. M. Lei CMS Pixel Mech Upgrade Workshop 10/28/09 29

C. M. Lei CMS Pixel Mech Upgrade Workshop 10/28/09 30

Rapid Prototyping • • • Stereolithography (SLA) is often considered the pioneer of the Rapid Prototyping industry with the first commercial system introduced in 1988 by 3 D Systems. The system consists of an Ultra-Violet Laser, a vat of photocurable liquid resin, and a controlling system. A platform is lowered into the resin (via an elevator system), such that the surface of the platform is a layer-thickness below the surface of the resin. The laser beam then traces the boundaries and fills in a two-dimensional cross section of the model, solidifying the resin wherever it touches. Once a layer is complete, the platform descends a layer thickness, resin flows over the first layer, and the next layer is built. This process continues until the model is complete. Once the model is complete, the platform rises out of the vat and the excess resin is drained. The model is then removed from the platform, washed of excess resin, and then placed in a UV oven for a final curing. The model is then finished by smoothing the "stair-steps. " Maximum dimensions for instant quotes: 25"x 21". SLA Layer Thickness: High Resolution: 0. 002” - 0. 004”; Standard Resolution: 0. 005” - 0. 006”. C. M. Lei CMS Pixel Mech Upgrade Workshop 10/28/09 31

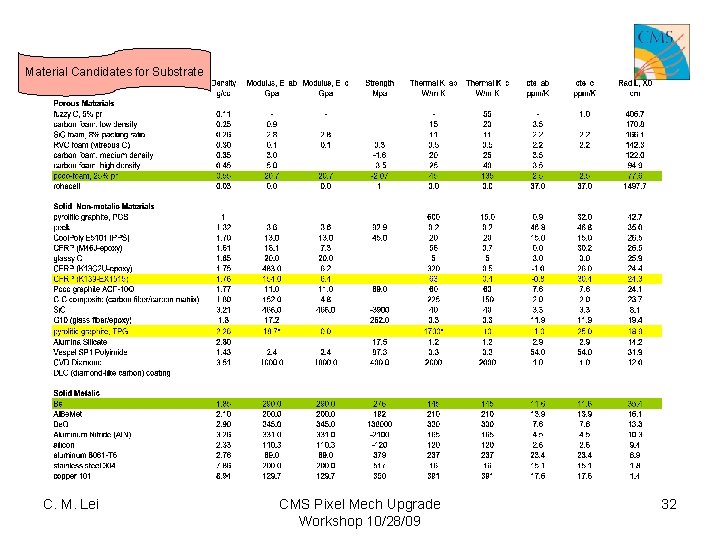
Material Candidates for Substrate C. M. Lei CMS Pixel Mech Upgrade Workshop 10/28/09 32

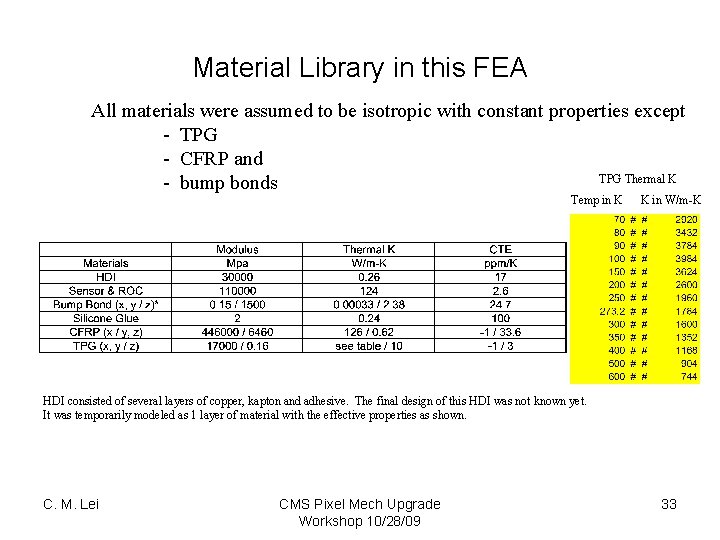
Material Library in this FEA All materials were assumed to be isotropic with constant properties except - TPG - CFRP and TPG Thermal K - bump bonds Temp in K K in W/m-K HDI consisted of several layers of copper, kapton and adhesive. The final design of this HDI was not known yet. It was temporarily modeled as 1 layer of material with the effective properties as shown. C. M. Lei CMS Pixel Mech Upgrade Workshop 10/28/09 33

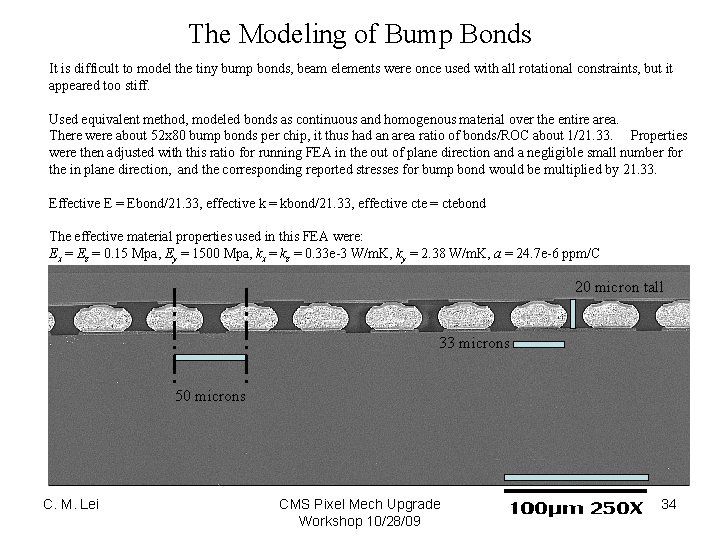
The Modeling of Bump Bonds It is difficult to model the tiny bump bonds, beam elements were once used with all rotational constraints, but it appeared too stiff. Used equivalent method, modeled bonds as continuous and homogenous material over the entire area. There were about 52 x 80 bump bonds per chip, it thus had an area ratio of bonds/ROC about 1/21. 33. Properties were then adjusted with this ratio for running FEA in the out of plane direction and a negligible small number for the in plane direction, and the corresponding reported stresses for bump bond would be multiplied by 21. 33. Effective E = Ebond/21. 33, effective k = kbond/21. 33, effective cte = ctebond The effective material properties used in this FEA were: Ex = Ez = 0. 15 Mpa, Ey = 1500 Mpa, kx = kz = 0. 33 e-3 W/m. K, ky = 2. 38 W/m. K, a = 24. 7 e-6 ppm/C 20 micron tall 33 microns 50 microns C. M. Lei CMS Pixel Mech Upgrade Workshop 10/28/09 34

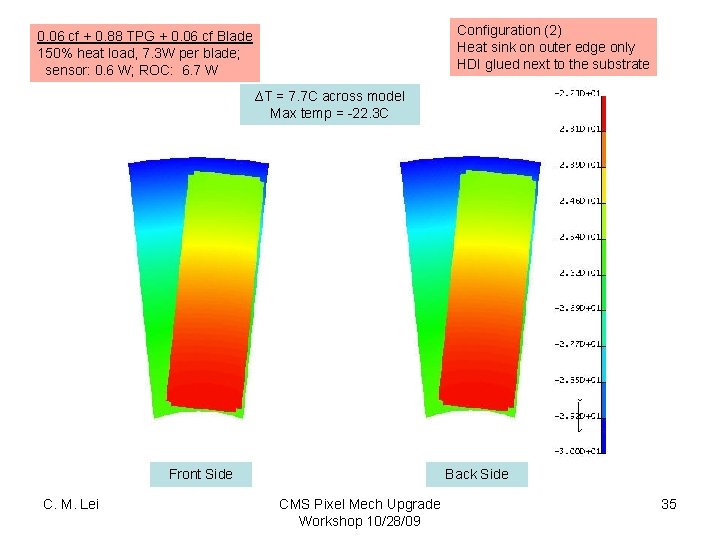
Configuration (2) Heat sink on outer edge only HDI glued next to the substrate 0. 06 cf + 0. 88 TPG + 0. 06 cf Blade 150% heat load, 7. 3 W per blade; sensor: 0. 6 W; ROC: 6. 7 W ∆T = 7. 7 C across model Max temp = -22. 3 C Front Side C. M. Lei Back Side CMS Pixel Mech Upgrade Workshop 10/28/09 35

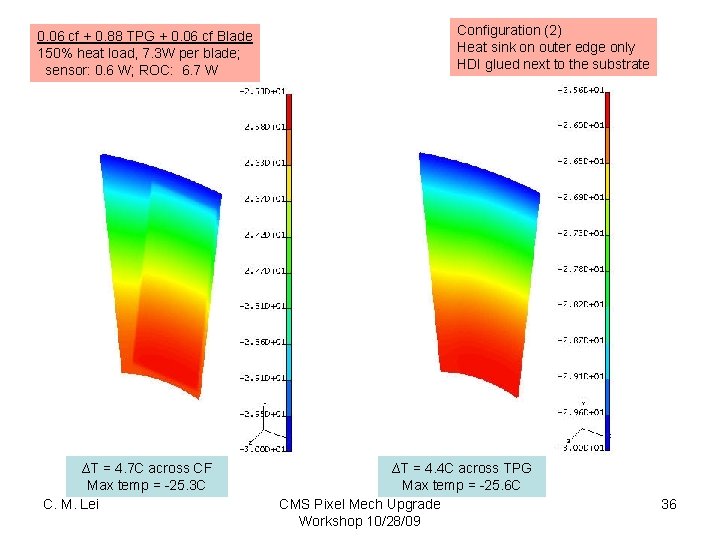
0. 06 cf + 0. 88 TPG + 0. 06 cf Blade 150% heat load, 7. 3 W per blade; sensor: 0. 6 W; ROC: 6. 7 W ∆T = 4. 7 C across CF Max temp = -25. 3 C C. M. Lei Configuration (2) Heat sink on outer edge only HDI glued next to the substrate ∆T = 4. 4 C across TPG Max temp = -25. 6 C CMS Pixel Mech Upgrade Workshop 10/28/09 36

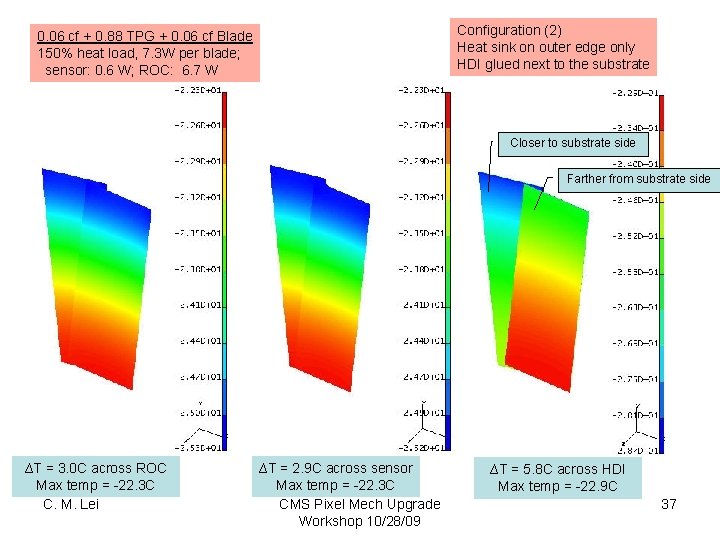
Configuration (2) Heat sink on outer edge only HDI glued next to the substrate 0. 06 cf + 0. 88 TPG + 0. 06 cf Blade 150% heat load, 7. 3 W per blade; sensor: 0. 6 W; ROC: 6. 7 W Closer to substrate side Farther from substrate side ∆T = 3. 0 C across ROC Max temp = -22. 3 C C. M. Lei ∆T = 2. 9 C across sensor Max temp = -22. 3 C CMS Pixel Mech Upgrade Workshop 10/28/09 ∆T = 5. 8 C across HDI Max temp = -22. 9 C 37

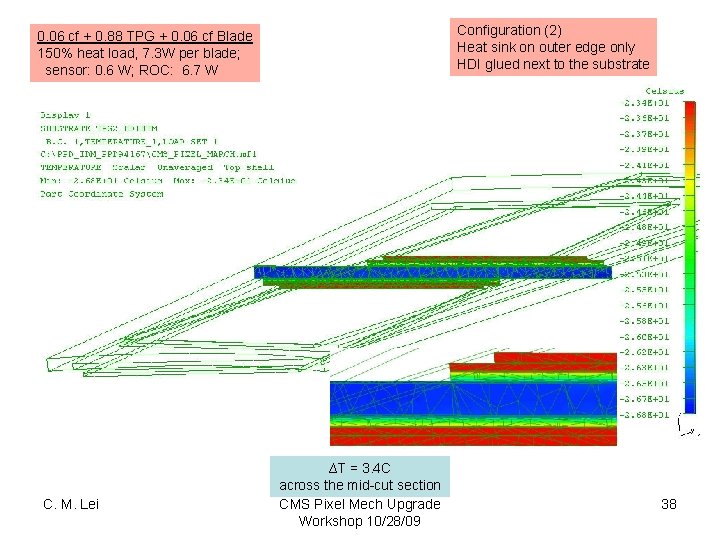
Configuration (2) (3) Heat sink on outer edge only HDI glued next to the substrate 0. 06 cf + 0. 88 TPG + 0. 06 cf Blade 150% heat load, 7. 3 W per blade; sensor: 0. 6 W; ROC: 6. 7 W C. M. Lei ∆T = 3. 4 C across the mid-cut section CMS Pixel Mech Upgrade Workshop 10/28/09 38

Thermal Pyrolytic Graphite (TPG) • • • A unique form of pyrolytic graphite Made by the decomposition of a hydrocarbon gas within vacuum furnace Exceptionally high thermal conductivity (in-plane k = up to 1700 W/m -K, out-of-plane k = 10 W/m-K at room temperature) Low CTE (in-plane = -1 ppm/C, out-of-plane = 25 ppm/C) Low density = 2. 26 g/cc Long X 0 = 18. 9 cm (X 0*k = 321 W/K vs 51 W/K of Be) Only available in rigid but brittle sheet, non-bendable. Friable, needs encapsulation; carbon fiber composite is chosen for needed rigidity within material budget constraint. Vendors: • Momentive Performance Materials (http: //advceramics. com/) • Mi. NTEQ (http: //pyrographite. com/) C. M. Lei CMS Pixel Mech Upgrade Workshop 10/28/09 39

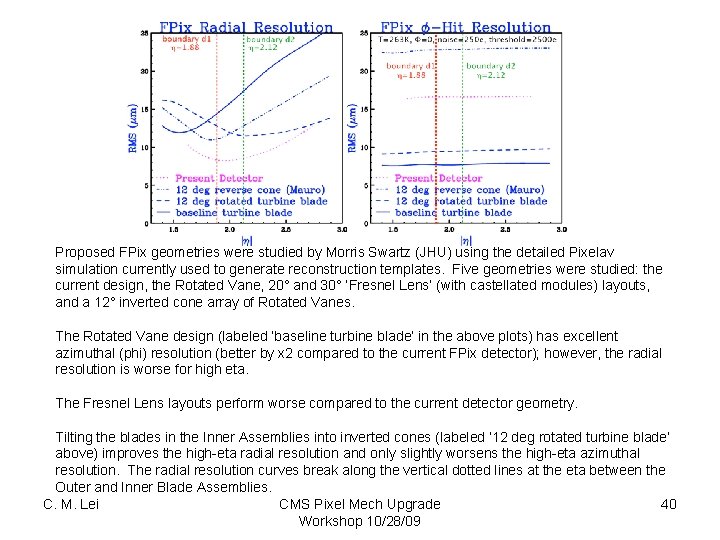
Proposed FPix geometries were studied by Morris Swartz (JHU) using the detailed Pixelav simulation currently used to generate reconstruction templates. Five geometries were studied: the current design, the Rotated Vane, 20° and 30° ‘Fresnel Lens’ (with castellated modules) layouts, and a 12° inverted cone array of Rotated Vanes. The Rotated Vane design (labeled ‘baseline turbine blade’ in the above plots) has excellent azimuthal (phi) resolution (better by x 2 compared to the current FPix detector); however, the radial resolution is worse for high eta. The Fresnel Lens layouts perform worse compared to the current detector geometry. Tilting the blades in the Inner Assemblies into inverted cones (labeled ‘ 12 deg rotated turbine blade’ above) improves the high-eta radial resolution and only slightly worsens the high-eta azimuthal resolution. The radial resolution curves break along the vertical dotted lines at the eta between the Outer and Inner Blade Assemblies. C. M. Lei CMS Pixel Mech Upgrade 40 Workshop 10/28/09