Clic Vertex Thermal Setup and stave studies 23092013

- Slides: 14

Clic Vertex Thermal Setup and stave studies 23/09/2013 Francois-Xavier NUIRY Andrea Catinaccio CERN PH/DT/EO 1

Overview • Thermo-mechanical setup progress. • Stave prototype: measure of the bending stiffness. 2

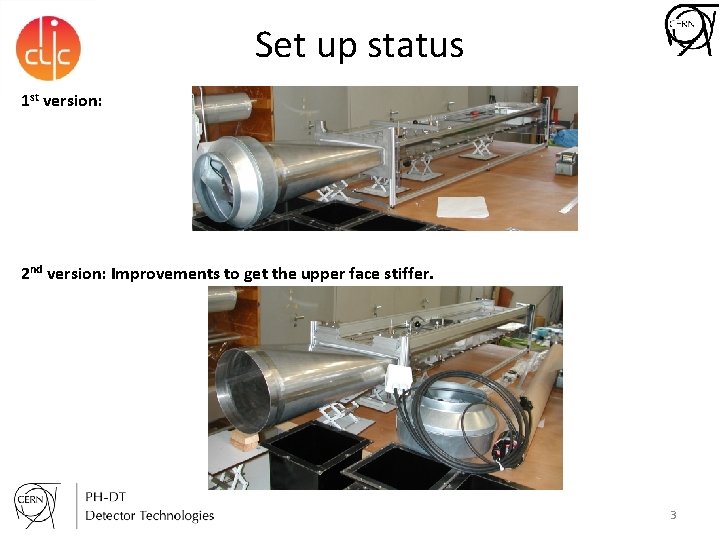
Set up status 1 st version: 2 nd version: Improvements to get the upper face stiffer. picture 3

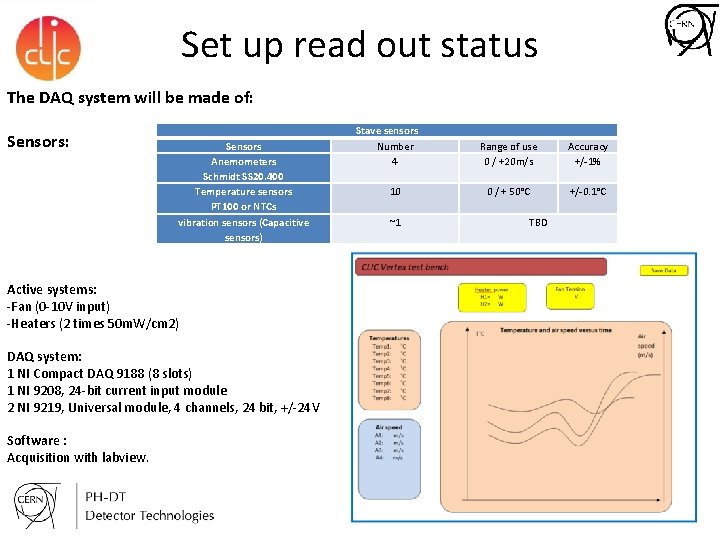
Set up read out status The DAQ system will be made of: Sensors: Sensors Anemometers Schmidt SS 20. 400 Temperature sensors PT 100 or NTCs vibration sensors (Capacitive sensors) Stave sensors Number 4 10 ~1 Range of use 0 / +20 m/s Accuracy +/-1% 0 / + 50°C +/-0. 1°C TBD Active systems: -Fan (0 -10 V input) -Heaters (2 times 50 m. W/cm 2) DAQ system: 1 NI Compact DAQ 9188 (8 slots) 1 NI 9208, 24 -bit current input module 2 NI 9219, Universal module, 4 channels, 24 bit, +/-24 V Software : Acquisition with labview. 4

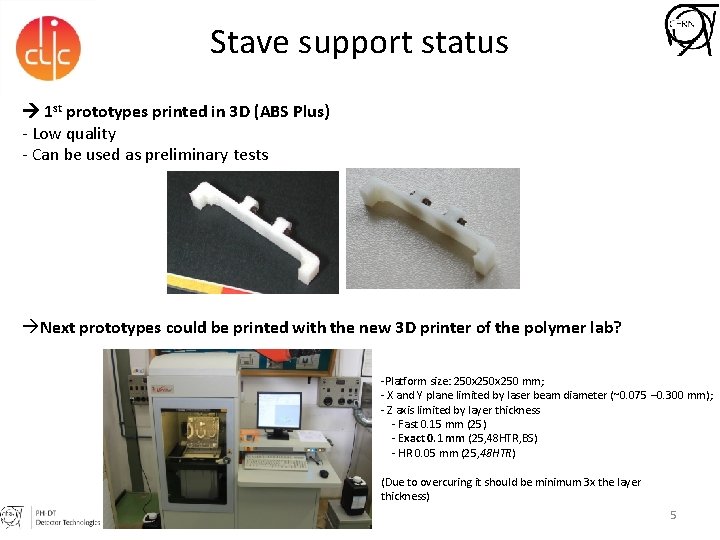
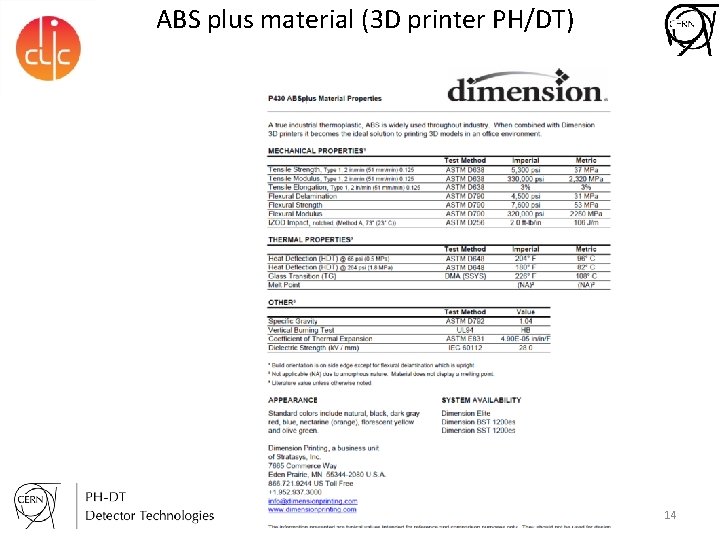
Stave support status 1 st prototypes printed in 3 D (ABS Plus) - Low quality - Can be used as preliminary tests Next prototypes could be printed with the new 3 D printer of the polymer lab? picture -Platform size: 250 x 250 mm; - X and Y plane limited by laser beam diameter (~0. 075 – 0. 300 mm); - Z axis limited by layer thickness - Fast 0. 15 mm (25) - Exact 0. 1 mm (25, 48 HTR, BS) - HR 0. 05 mm (25, 48 HTR) (Due to overcuring it should be minimum 3 x the layer thickness) 5

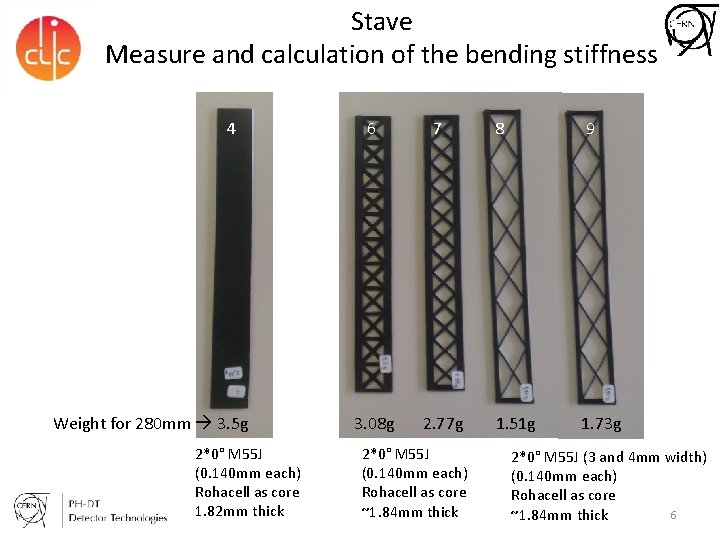
Stave Measure and calculation of the bending stiffness 3 4 5 6 7 8 9 Weight for 280 mm 3. 5 g 3. 08 g 2. 77 g 1. 51 g 2*0° M 55 J (0. 140 mm each) Rohacell as core 1. 82 mm thick 2*0° M 55 J (0. 140 mm each) Rohacell as core ~1. 84 mm thick 1. 73 g 2*0° M 55 J (3 and 4 mm width) (0. 140 mm each) Rohacell as core 6 ~1. 84 mm thick

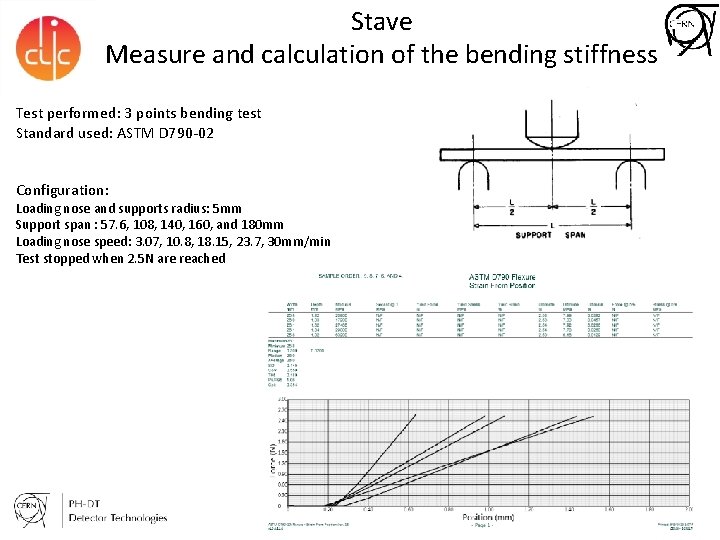
Stave Measure and calculation of the bending stiffness Test performed: 3 points bending test Standard used: ASTM D 790 -02 Configuration: Loading nose and supports radius: 5 mm Support span : 57. 6, 108, 140, 160, and 180 mm Loading nose speed: 3. 07, 10. 8, 18. 15, 23. 7, 30 mm/min Test stopped when 2. 5 N are reached 7

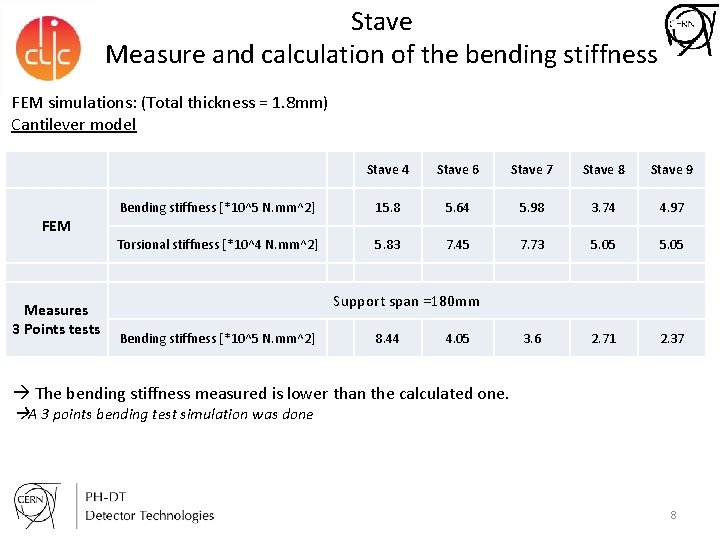
Stave Measure and calculation of the bending stiffness FEM simulations: (Total thickness = 1. 8 mm) Cantilever model Stave 4 Stave 6 Stave 7 Stave 8 Stave 9 Bending stiffness [*10^5 N. mm^2] 15. 8 5. 64 5. 98 3. 74 4. 97 Torsional stiffness [*10^4 N. mm^2] 5. 83 7. 45 7. 73 5. 05 3. 6 2. 71 2. 37 FEM Measures 3 Points tests Support span =180 mm Bending stiffness [*10^5 N. mm^2] 8. 44 4. 05 The bending stiffness measured is lower than the calculated one. A 3 points bending test simulation was done 8

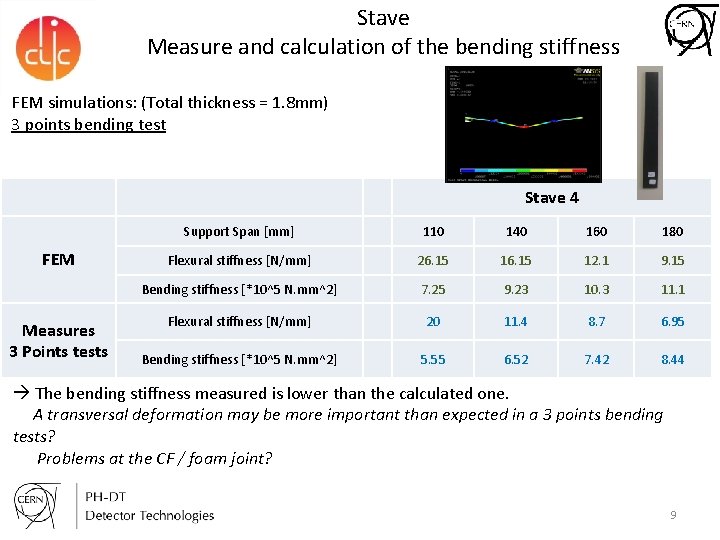
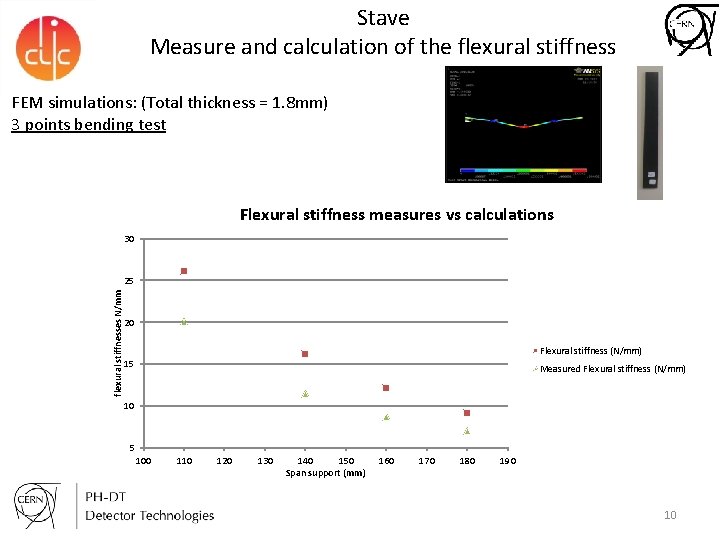
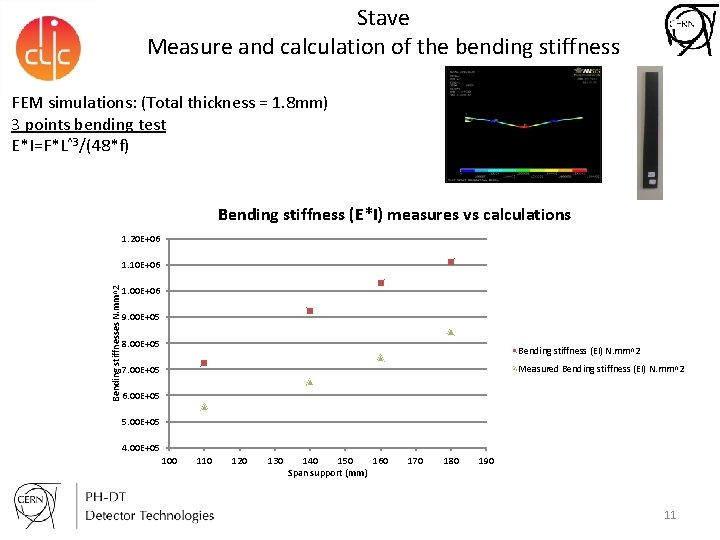
Stave Measure and calculation of the bending stiffness FEM simulations: (Total thickness = 1. 8 mm) 3 points bending test Stave 4 Support Span [mm] FEM Measures 3 Points tests 110 140 160 180 Flexural stiffness [N/mm] 26. 15 12. 1 9. 15 Bending stiffness [*10^5 N. mm^2] 7. 25 9. 23 10. 3 11. 1 Flexural stiffness [N/mm] 20 11. 4 8. 7 6. 95 Bending stiffness [*10^5 N. mm^2] 5. 55 6. 52 7. 42 8. 44 The bending stiffness measured is lower than the calculated one. A transversal deformation may be more important than expected in a 3 points bending tests? Problems at the CF / foam joint? 9

Stave Measure and calculation of the flexural stiffness FEM simulations: (Total thickness = 1. 8 mm) 3 points bending test Flexural stiffness measures vs calculations 30 flexural stiffnesses N/mm 25 20 Flexural stiffness (N/mm) 15 Measured Flexural stiffness (N/mm) 10 5 100 110 120 130 140 150 Span support (mm) 160 170 180 190 10

Stave Measure and calculation of the bending stiffness FEM simulations: (Total thickness = 1. 8 mm) 3 points bending test E*I=F*L^3/(48*f) Bending stiffness (E*I) measures vs calculations 1. 20 E+06 Bending stiffnesses N. mm^2 1. 10 E+06 1. 00 E+06 9. 00 E+05 8. 00 E+05 Bending stiffness (EI) N. mm^2 Measured Bending stiffness (EI) N. mm^2 7. 00 E+05 6. 00 E+05 5. 00 E+05 4. 00 E+05 100 110 120 130 140 150 160 Span support (mm) 170 180 190 11

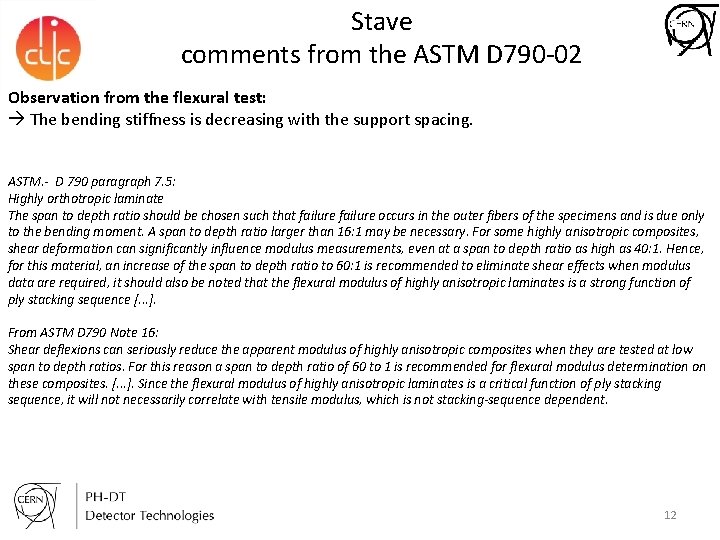
Stave comments from the ASTM D 790 -02 Observation from the flexural test: The bending stiffness is decreasing with the support spacing. ASTM. - D 790 paragraph 7. 5: Highly orthotropic laminate The span to depth ratio should be chosen such that failure occurs in the outer fibers of the specimens and is due only to the bending moment. A span to depth ratio larger than 16: 1 may be necessary. For some highly anisotropic composites, shear deformation can significantly influence modulus measurements, even at a span to depth ratio as high as 40: 1. Hence, for this material, an increase of the span to depth ratio to 60: 1 is recommended to eliminate shear effects when modulus data are required, it should also be noted that the flexural modulus of highly anisotropic laminates is a strong function of ply stacking sequence [. . . ]. From ASTM D 790 Note 16: Shear deflexions can seriously reduce the apparent modulus of highly anisotropic composites when they are tested at low span to depth ratios. For this reason a span to depth ratio of 60 to 1 is recommended for flexural modulus determination on these composites. [. . . ]. Since the flexural modulus of highly anisotropic laminates is a critical function of ply stacking sequence, it will not necessarily correlate with tensile modulus, which is not stacking-sequence dependent. 12

Summary Set up: Next steps: Installing the system in a new laboratory (Waiting for Wolfgang and Mar) Installing the read out system (hardware + software) to start first measurements Staves: Next steps: Going on calculation / measurement comparisons: -Stave torsional measurements? Elaboration of a first design in view of the manufacturing of new prototypes (CERN and outside? ) Printing of new stave supports 13

ABS plus material (3 D printer PH/DT) 14