Clawbot with Controller Program the VEX Controller to

Clawbot with Controller Program the VEX Controller to direct the Clawbot through several engaging challenges using the concept of loops.

Discover new hands-on builds and programming opportunities to further your understanding of a subject matter.

The Completed Look of the Build Completed VEX V 5 Clawbot The VEX V 5 Clawbot is an extension of the VEX Speedbot that can be programmed to move around and interact with objects.

Parts Needed: Part 1 Can be built with: VEX V 5 Classroom Starter Kit

Parts Needed: Part 2

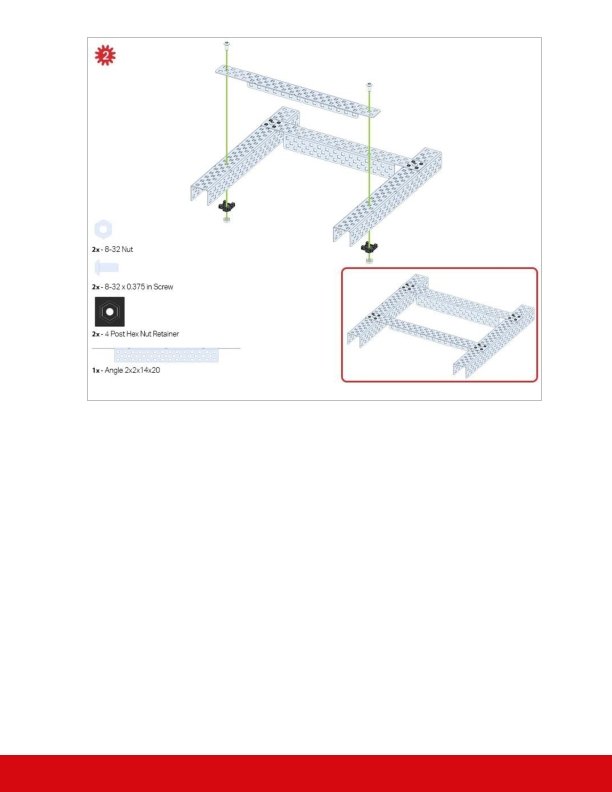
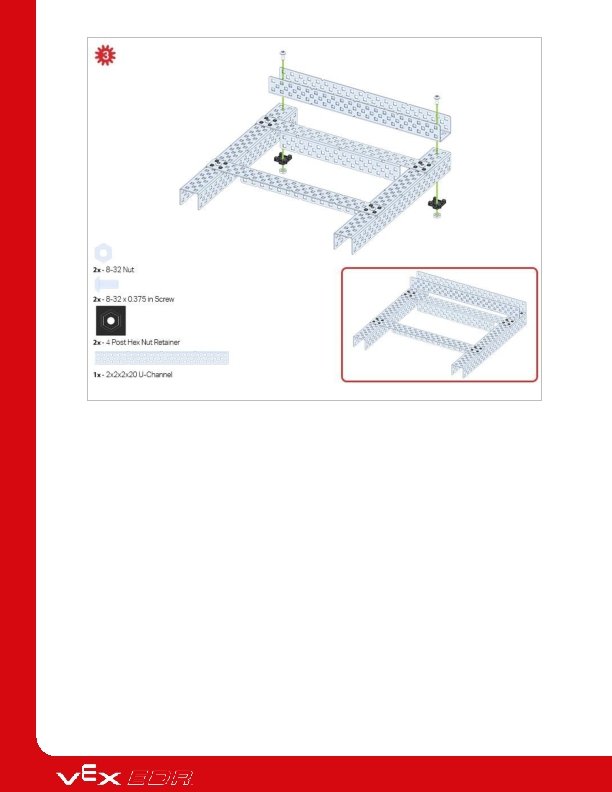
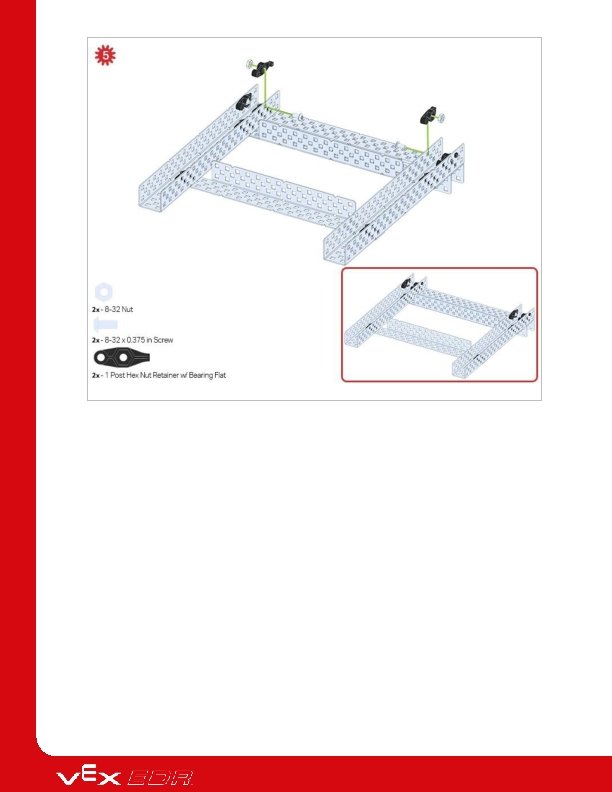
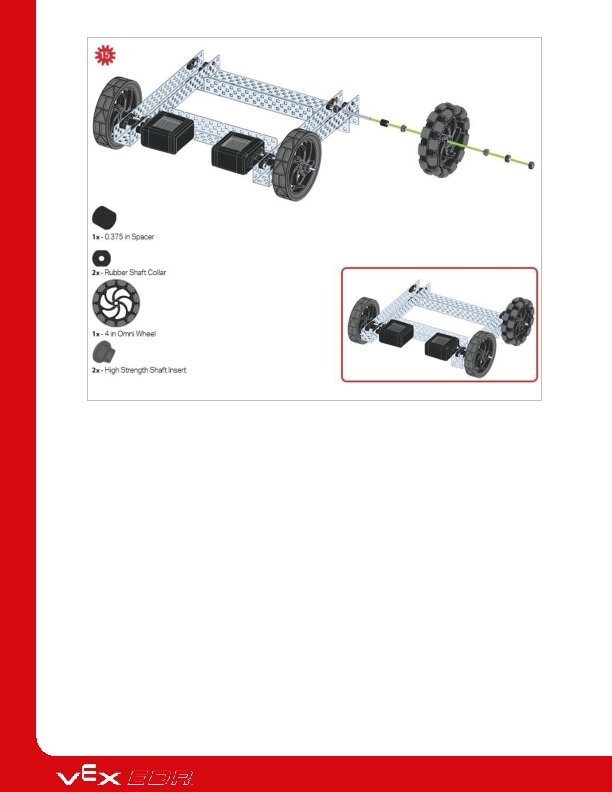
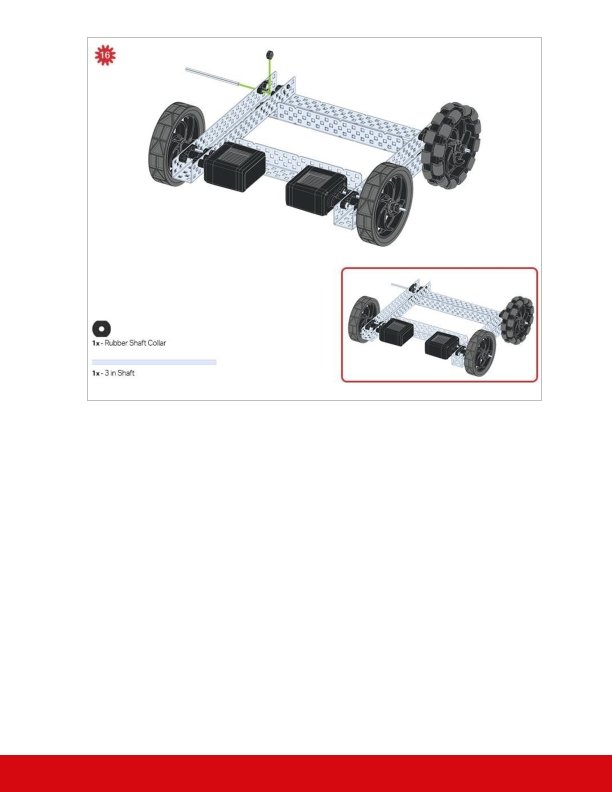
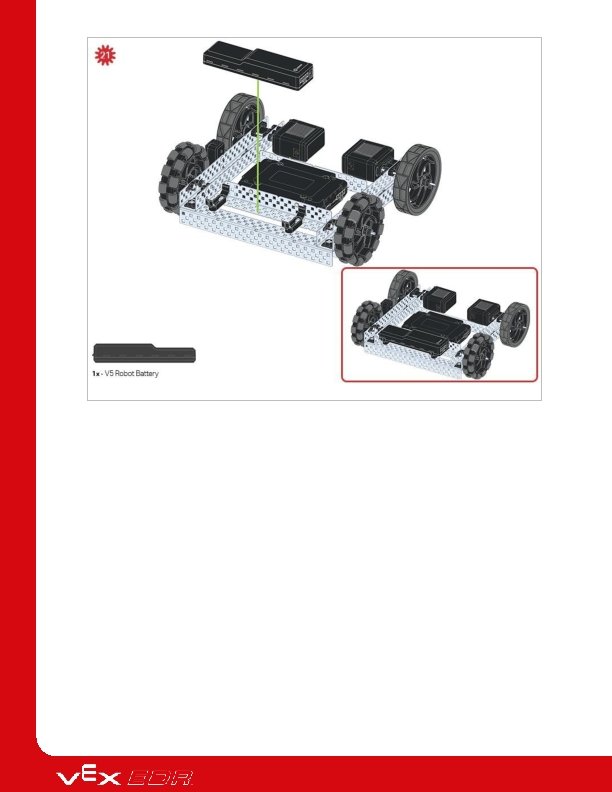
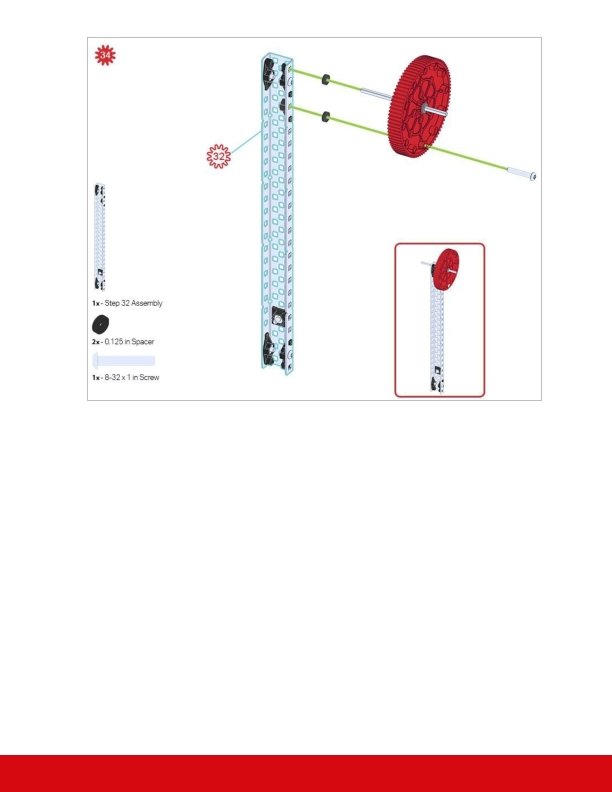
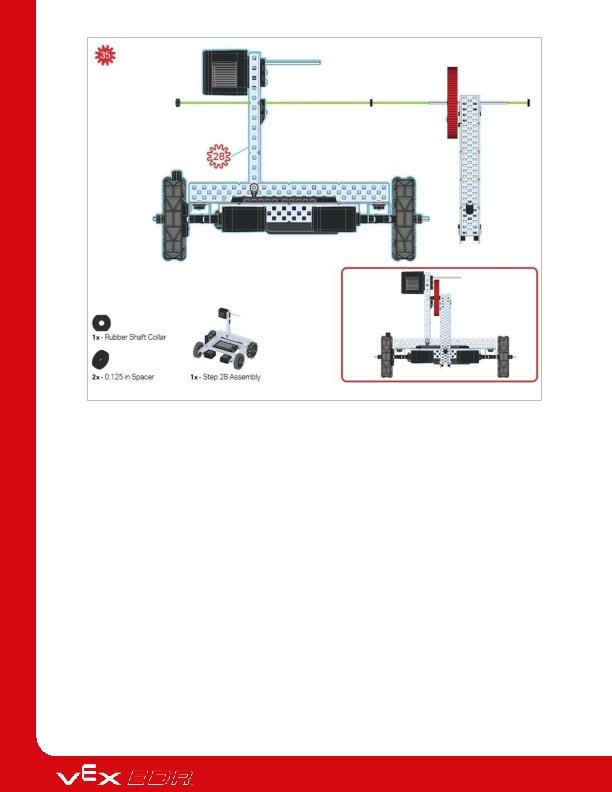
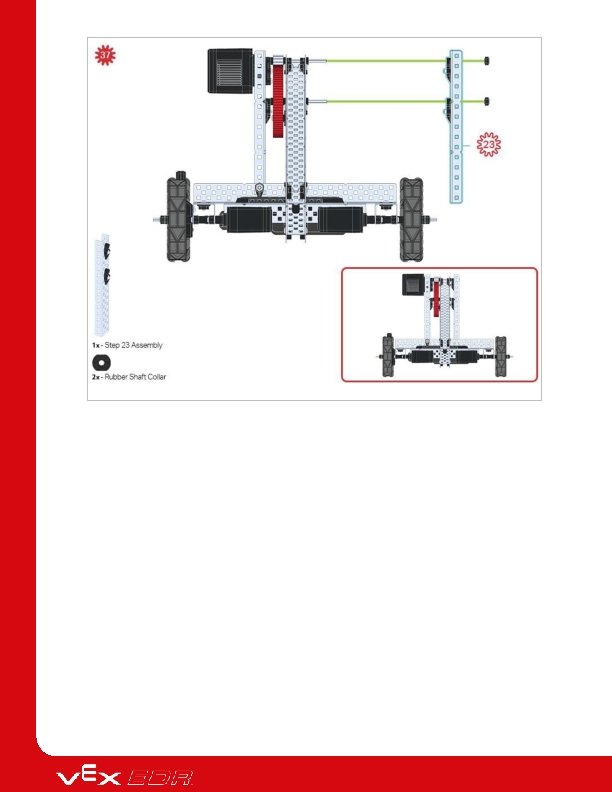
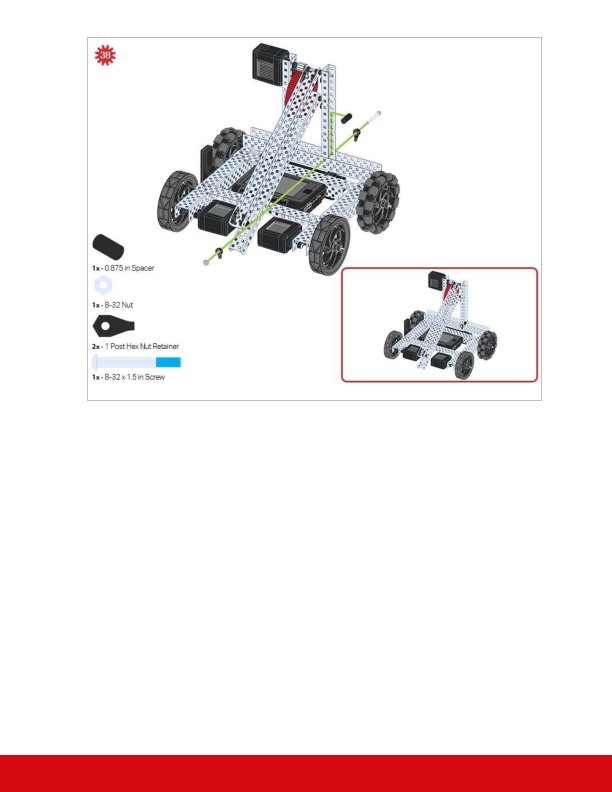
Build Instructions
.")
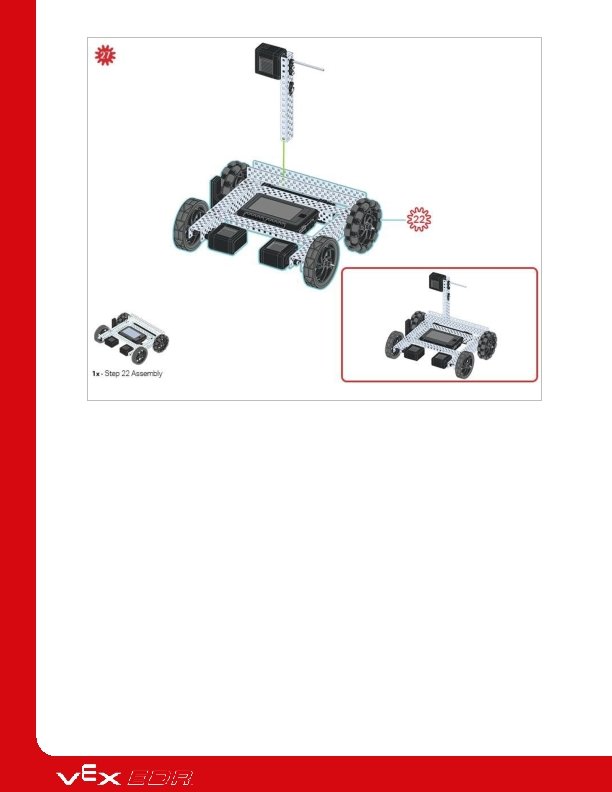
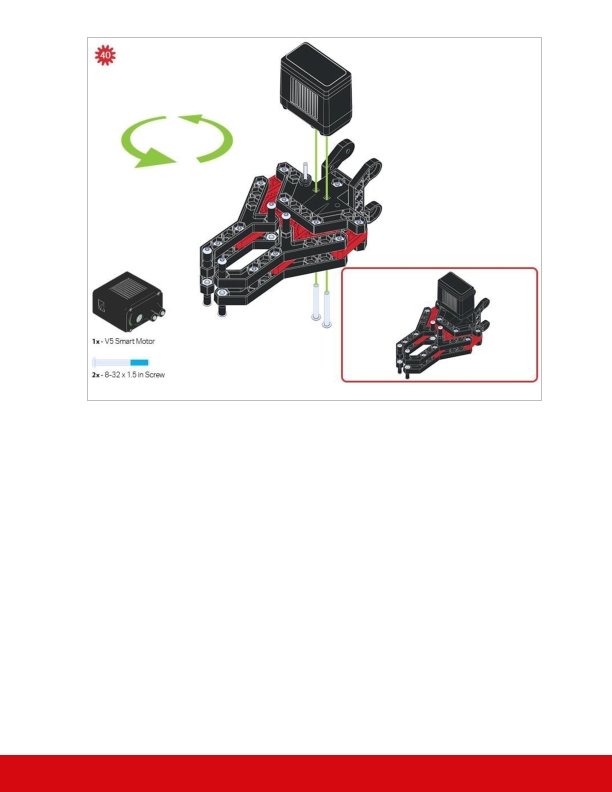
The green icon indicates that the build needs to be flipped over (upside down).

Only one of the two sub-assemblies made in this step is used right now. The other will be used later in step 9.

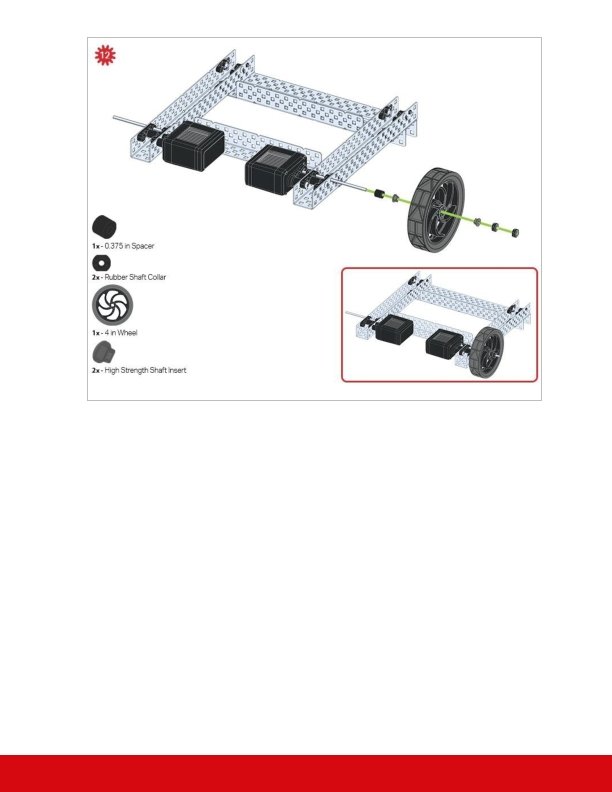
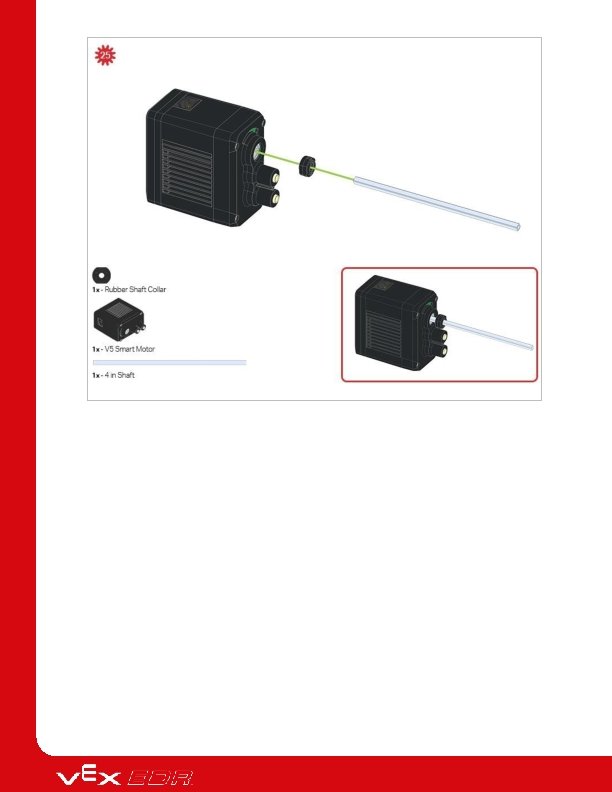
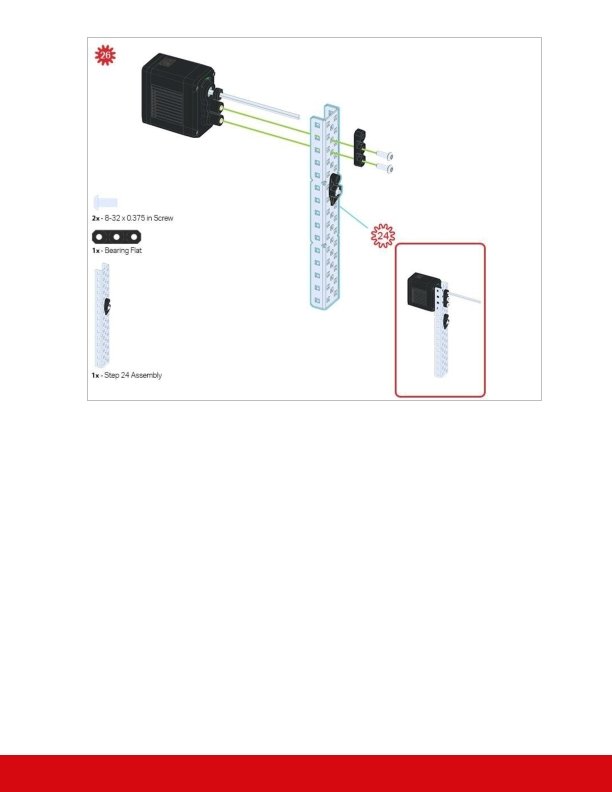
Make sure your Smart Motors are oriented in the correct direction (screw holes facing the outside of the build and the shaft hole towards the inside).
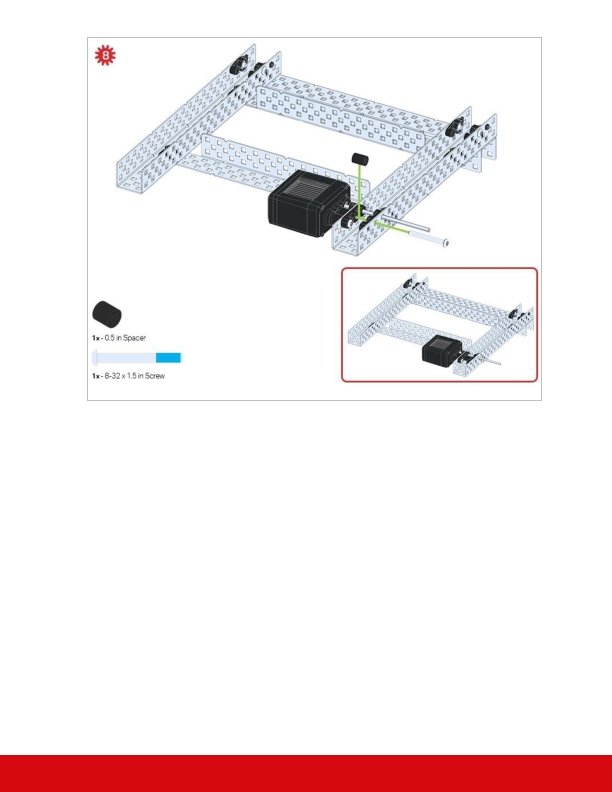
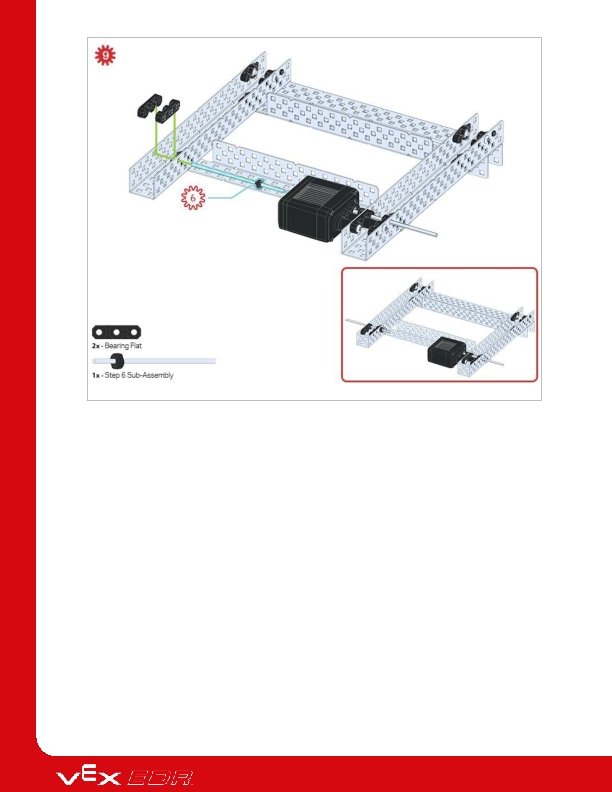

Make sure your Smart Motors are oriented in the correct direction (screw holes facing the outside of the build and the shaft hole towards the inside).


.")
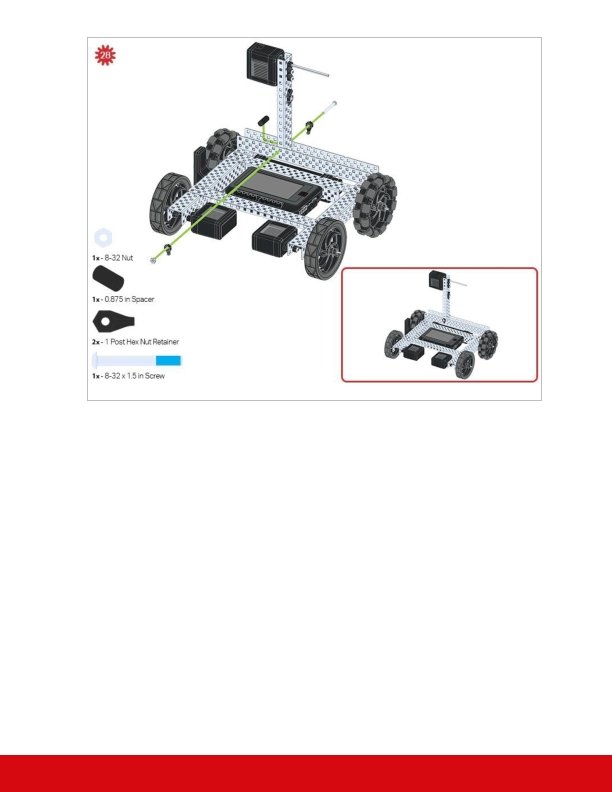
The green icon indicates that the build needs to be rotated (180 degrees).
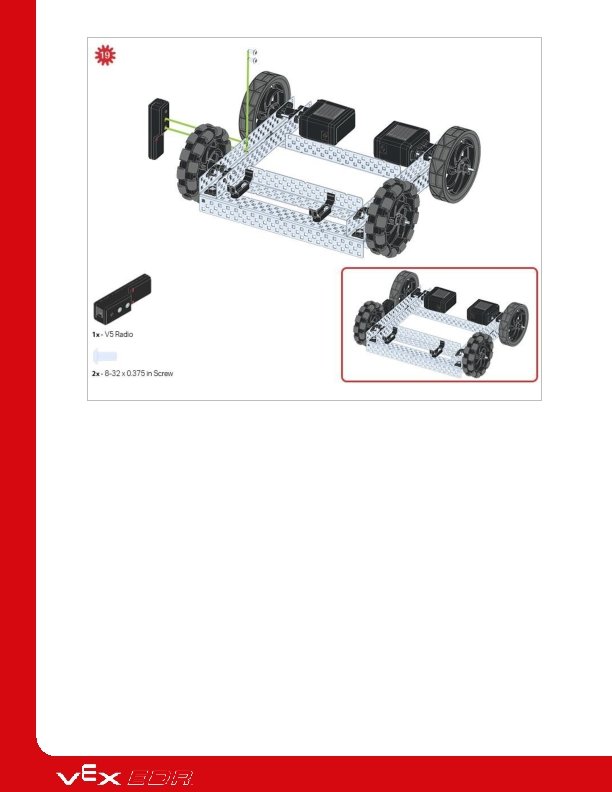

The blue call out shows what the orientation of the Robot Brain should be if the build were flipped right side up. Make sure the 3 wire ports on the Robot Brain are facing the V 5 Radio!

The green call outs indicate which port on the Robot Brain to plug each device into using their respective cable.
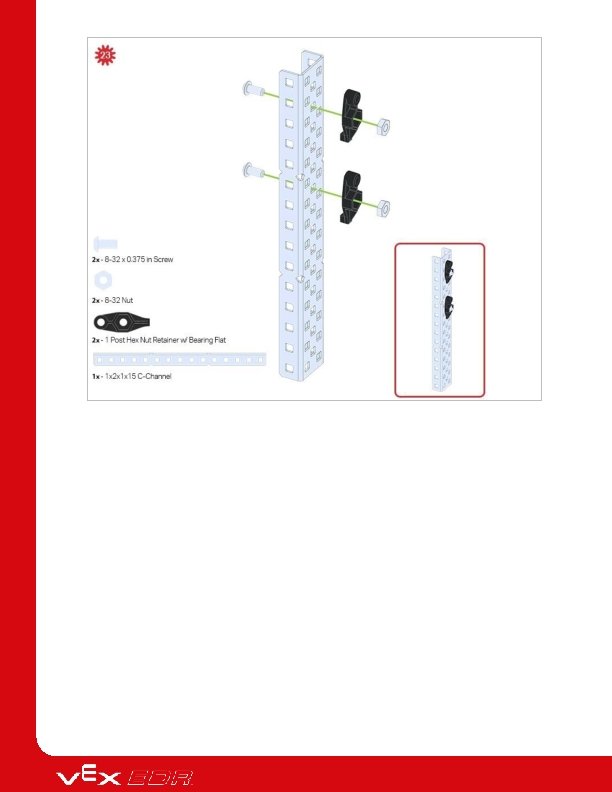

Be sure to make two assemblies in this step!

This step adds onto the two assemblies started in Step 29.

Make sure to add this to only one of the two sub-assemblies you just made.


Make sure the 12 - tooth gear is installed on the right side of the claw.

Make sure that the port on the Smart Motor is facing the right side of the robot when the claw is installed (the same side as the V 5 Radio).


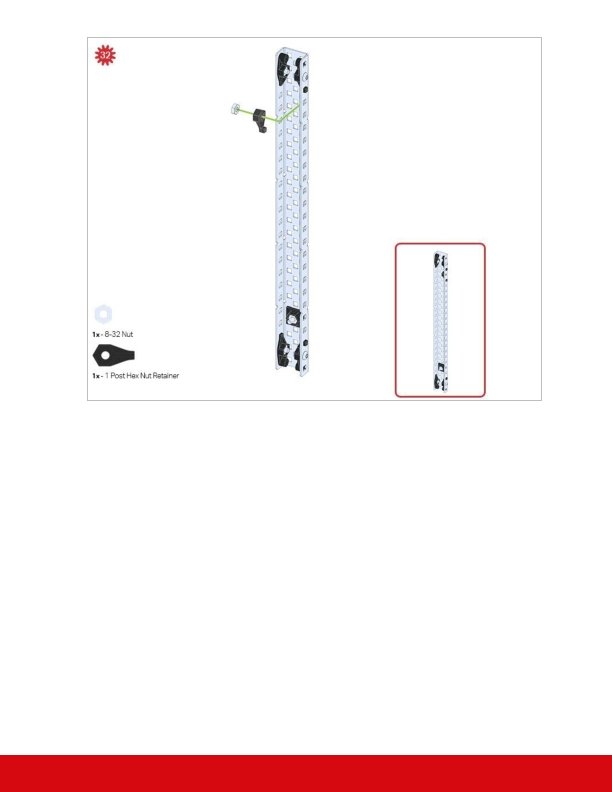
Build Instruction Tips Check the Appendix for information on how to use the new Hex Nut Retainers.

Exploration Now that you've finished the build, test what it does. Explore your build and then answer these questions in your engineering notebook. Notice how the front wheels of the Clawbot are powered by motors. Think about the weight distribution on the Clawbot. What if the velocity of the Left and Right motors were increased and the robot was being controlled using a Controller? If the robot was asked to drive in reverse quickly, what could possibly happen and why? Think about where the weight of the arm, claw, battery and Brain are on the robot.

Test your build, observe how it functions, and fuel your logic and reasoning skills through imaginative, creative play.

Loops: Simplifying Repetitive Action-VEXcode V 5 Blocks Simplify Projects with Loops We, as humans, repeat many behaviors in our daily lives. From eating and sleeping to brushing our teeth and walking our dogs, much of what we do each day is repetitive. In math class, we know that multiplying a number by zero, will always equal zero, or that multiplying a number by one will always equal itself, no matter how many times we do it. While we have a tendency to repeat our behaviors, our instructions can sometimes be simplified. For example, if you’re using a recipe to bake a cake, it wouldn’t tell you to “add 1 cup of sugar, add 1 cup of sugar. ” Instead, it would simply tell you to add four cups of sugar and you would scoop out 1 cup of sugar four times. With robots, Loops help us simplify our projects. Instead of adding the same block four times, for example, we can use a Loop to tell the robot to perform the same behavior four times, saving time and space as we build our projects. Imagine a task that a robot might perform that would require repetition to complete the task. Those behaviors, along with a Loop block from the Control block category, are what you would need to project to achieve the task.

Controller: Tank Drive Exploration. VEXcode V 5 Blocks Hardware/Software Required: Quantity Hardware/Other Items 1 VEX V 5 Classroom Starter Kit (with up-to-date firmware) 1 VEXcode V 5 Blocks (latest version, Windows, Mac. OS, Chromebook) 1 Engineering Notebook 1 Using Loops (Tutorial) 1 Tank Drive example project 2 or more Classroom items to be used as obstacles This activity will give you the tools to program your Controller. You can use the Help information inside of VEXcode V 5 Blocks to learn about the blocks. For guidance in using the Help feature, see the Using Help tutorial. 1. Let's start programming the Controller. Start by watching the Using Loops tutorial video. Open the Tank Drive example project.

Do the following in your engineering notebook: Predict what the project will have the Clawbot do. Explain more than the fact that the project utilizes the Controller. How do the joysticks move the robot? What is the Clawbot doing? Save, download, and run the Tank Drive example project. For help, see the tutorial in VEXcode V 5 Blocks that explains how to Download and Run a Project. Check your explanations of the project in your engineering notebook and add notes to correct them as needed. 2. Controller: Tank Drive What are the benefits of using the forever block? Here is our project without the forever block: What do you think would happen if this program were run? Discuss as a group. Write down your prediction in the engineering notebook.

3. Navigate a Slalom Course! Slaloms are courses which the participant must navigate around the set flags, or markers. Ski slaloms are a popular winter sport and are included in the Winter Olympics. Now that the Controller is paired and the project is downloaded, you are ready to move your Clawbot using the Controller! Collect the four classroom items you will use as flags in your slalom from the teacher. Collaborate to set the flags in place for the Driver to navigate the Clawbot around, according to the slalom diagram. Download Tank Drive Example project. If there any questions about how to download a project, check out the Download and Run a Project tutorial.

4. Robo-Slalom Use the Controller to move your Clawbot along the outside of each “flag. ” The robot’s path must prevent it from touching any flag, and allow it to cross the finish line.

Run the project and drive the Clawbot forward and reverse, and turn left and right using both Joysticks. Time how long it takes for the Clawbot to complete the course. Document the times in the engineering notebook. How fast can you get Clawbot through the Slalom course?

Loops: Simplifying Repetitive Action- VEXcode V 5 Text Simplify Projects with Loops We, as humans, repeat many behaviors in our daily lives. From eating and sleeping to brushing our teeth and walking our dogs, much of what we do each day is repetitive. In math class, we know that multiplying a number by zero, will always equal zero, or that multiplying a number by one will always equal itself, no matter how many times we do it. While we have a tendency to repeat our behaviors, our instructions can sometimes be simplified. For example, if you’re using a recipe to bake a cake, it wouldn’t tell you to “add 1 cup of sugar, add 1 cup of sugar. ” Instead, it would simply tell you to add four cups of sugar and you would scoop out 1 cup of sugar four times. With robots, Loops help us simplify our projects. Instead of adding the same instruction four times, for example, we can use a Loop to tell the robot to perform the same behavior four times, saving time and space as we build our projects. Imagine a task that a robot might perform that would require repetition to complete the task. Those behaviors, along with a

Loop from the Control category, are what you would need for the project to achieve the task.

Controller: Tank Drive Exploration. VEXcode V 5 Text Hardware/Software Required: Quantity Hardware/Other Items 1 VEX V 5 Classroom Starter Kit (with up-to-date firmware) 1 VEXcode V 5 Text (latest version, Windows, Mac. OS) 1 Engineering Notebook 1 Using Loops (Tutorial) 1 Tank Drive example project 2 or more Classroom items to be used as obstacles This activity will give you the tools to program your Controller. 1. Let's start programming the Controller. Open the Tank Drive example project.

Do the following in your engineering notebook: Predict what the project will have the Clawbot do. Explain more than the fact that the project utilizes the Controller. How do the joysticks move the robot? What is the Clawbot doing?

Save, download, and run the Tank Drive example project. Check your explanations of the project in your engineering notebook and add notes to correct them as needed. 2. Controller: Tank Drive What are the benefits of using the forever structure? Here is our project without the forever structure:

What do you think would happen if this program were run? Discuss as a group. Write down your prediction in the engineering notebook.

3. Navigate a Slalom Course! Slaloms are courses which the participant must navigate around the set flags, or markers. Ski slaloms are a popular winter sport and are included in the Winter Olympics. Now that the Controller is paired and the project is downloaded, you are ready to move your Clawbot using the Controller! Collect the four classroom items you will use as flags in your slalom from the teacher. Collaborate to set the flags in place for the Driver to navigate the Clawbot around, according to the slalom diagram. Download Tank Drive Example project. If there any questions about how to download a project, check out the Download and Run a Project tutorial.

4. Robo-Slalom Use the Controller to move your Clawbot along the outside of each “flag. ” The robot’s path must prevent it from touching any flag, and allow it to cross the finish line.

Run the project and drive the Clawbot forward and reverse, and turn left and right using both Joysticks. Time how long it takes for the Clawbot to complete the course. Document the times in the engineering notebook. How fast can you get Clawbot through the Slalom course?

Become a 21 st century problem solver by applying the core skills and concepts you learned to other problems.

Using Loops to Make Candy A conveyor belt moves chocolates along a mechanical assembly line. Loops in Manufacturing Robots are capable of doing the same task over and over by using loops. There are many advantages to having robots do repetitive tasks. Robots do not get tired, and do not need breaks (as long as they have constant power). For this reason, robots have become instrumental in manufacturing where robots can continuously do tasks which would be more difficult, or even dangerous, for humans. An example of an industry which has benefited from robots doing repetitive tasks is the candy industry. Robots such as ABB’s Flexpicker can use a vacuum attachment to pick up hundreds of candies per minute. Robots can be programmed to exert the right amount of force for very delicate candies so they don’t get crushed. Robots on the assembly line can also use vision sensors to identify candies which are misshapen and not pick them up. Programming robots with loops can help make manufacturing, like the candy industry, more efficient.

Competition Connection: Driver Control VRC 2019 -2020 game - Tower Takeover field Tower Takeover Using loops to control the Clawbot with the Controller has allowed the driver to navigate the slalom course. Practicing driving the Clawbot is a useful task which can help you prepare for one of the challenges in the VEX Robotics World Championship. The 2019 -2020 VRC (VEX Robotics Competition) game is called Tower Takeover. In this game, the teams must have their robot pick up and move certain colored cubes into goals or towers. Teams will begin with a 15 second autonomous period where the robot cannot receive any help from the driver. In this period, the robot is being challenged to score on their own side of the field without any help from the driver. After the autonomous period, the teams then engage in a 1 minute and 45 second drivercontrol period where the teams manipulate their robot using a controller. Teams attempt to score as many points as they can during this period.

Being able to use and program the controller is an extremely important factor in performing well in competition.

Is there a more efficient way to come to the same conclusion? Take what you’ve learned and try to improve it.

Event-Based Programming: Communication Among Blocks Event-based programming If your dog brings you his leash or sits by the door, he’s letting you know that he needs to go outside. In school, when your teacher asks a question and sees you raise your hand, they believe you know the answer and would like to answer the question. These behaviors are also known as “triggers. ” Your dog knows that bringing you his leash or sitting by the door is the trigger that lets you know he needs to go outside. So, when you see him sitting by the door with his leash, you react to the trigger by taking him outside. Raising your hand is the trigger that lets the teacher know you would like to answer the question. The teacher then reacts to the trigger by calling upon you. Event-based programming in robotics is when certain robot behaviors trigger the robot to do certain things or react to certain triggers. Controller: Clawbot Control Now, you’re ready to download the example project and use the Controller to operate the Clawbot, its Arm, and its Claw, all at the same time! Ensure you have the hardware required and your engineering notebook. Open VEXcode V 5 Blocks.

Hardware/Software Required: Quantity Hardware/Other Items 1 Clawbot 1 Charged Robot Battery 1 VEX V 5 Radio 1 Controller 1 Tether Cable 1 VEXcode V 5 Blocks 1 USB Cable (if using a computer) 1 Engineering Notebook Before you begin the activity. . . Do you have each of these items ready? The Builder should check each of the following: Are all the motors and sensors plugged into the correct port? Are the smart cables fully inserted into all of the motors? Is the battery fully charged? Is the Controller paired with the Robot Brain?

Prepare for the Remix Challenges. VEXcode V 5 Blocks Before you begin your project, select the correct example project. The Clawbot Control example project contains the Clawbot motors and sensors configuration. If the template is not used, your robot will not run the project correctly. Go to the file menu, Open Examples, then select the Clawbot Control example project. Save the project. Check to make sure the project name Clawbot Control is now in the window in the center of the toolbar. The Clawbot is now properly configured, and the Clawbot Control project is ready for use. Now, take a look at how the blocks are being used in this project. In your engineering notebooks, make the following predictions: What’s happening when you run this project? What will the Clawbot be able to do? What would happen if we didn’t use the not block in this project?

Remix Challenges: Clawbot Control. VEXcode V 5 Blocks Grab an object! The goal of this activity is to grab and release an object with the Clawbot using the Controller. Here are some steps to guide your group: Place your group’s object on the floor and make sure your Clawbot has enough space to move without interfering with other groups. List the steps the Clawbot will need to grab the object. Be sure to include which buttons you’ll use to accomplish this task! Write the steps the Driver lists in the engineering notebook. Click the Download button in the Toolbar to download the Clawbot Control project to the Robot Brain. Check to make sure your project has downloaded to the Clawbot’s Brain by looking at the Robot Brain’s screen. The project name, Clawbot Control, should be listed in slot 1. Run the project on the Clawbot. Grab and release an object with the Clawbot using the Controller. Congratulations! You have grabbed an object with your Clawbot using the Controller!

Were there any differences between your predictions and the actions you took during the activity? If so, add them to your engineering notebook. Colored Gems The goal of this activity is to use your Clawbot skills to collect several objects, one at a time, and return them to a location faster than the other groups in your class. Good luck! Here are some steps to guide your team: Move your group’s objects behind the object retrieval area your teacher has established, and make sure your Clawbot has space to move without interfering with other groups. List the steps the Clawbot will need to grab each object and return them to home base. Be sure to include which buttons you’ll use to accomplish this task! Write the steps the Driver lists in the engineering notebook. Using the classroom clock or a watch, keep time and record it in your engineering notebook. Retrieve each object as quickly as you can. Congratulations! You have collected all three of your group’s objects, returned them to home base with your Clawbot using the Controller! Relay Race! The goal of this activity is to use your Clawbot and teamwork skills in a relay race. The group will be responsible for moving an object across a three meter course in the fastest time possible. Player 1: Pick the object and carry it to the one meter line. Drop the object.

Player 2: Pick up the object and carry from the one to the two meter line. Drop the object. Player 3: Pick up the object and carry from the two meter line to the finish line. Drop the object in the goal area. Player 4: Monitor the time and ensure the Clawbot does not obstruct any other drivers or students. Ensure the robot places the object far enough over the line.

Remix Questions-VEXcode V 5 Blocks Answer the following questions in your engineering notebook after completing the three activities. The set motor stopping block is set to “hold” for both the Arm Motor and the Claw Motor. What would happen if those blocks were removed? The spin and stop blocks that control the Arm and Claw Motors are nearly identical. If you were to create this project yourself, how could you save time and avoid dragging every individual block into the workspace over and over?

Event-Based Programming: Communication Among Instructions Event-based programming If your dog brings you his leash or sits by the door, he’s letting you know that he needs to go outside. In school, when your teacher asks a question and sees you raise your hand, they believe you know the answer and would like to answer the question. These behaviors are also known as “triggers. ” Your dog knows that bringing you his leash or sitting by the door is the trigger that lets you know he needs to go outside. So, when you see him sitting by the door with his leash, you react to the trigger by taking him outside. Raising your hand is the trigger that lets the teacher know you would like to answer the question. The teacher then reacts to the trigger by calling upon you. Event-based programming in robotics is when certain robot behaviors trigger the robot to do certain things or react to certain triggers. Controller: Clawbot Control Now, you’re ready to download the example project and use the Controller to operate the Clawbot, its Arm, and its Claw, all at the same time! Ensure you have the hardware required and your engineering notebook. Open VEXcode V 5 Text.

Hardware/Software Required: Quantity Hardware/Other Items 1 Clawbot 1 Charged Robot Battery 1 VEX V 5 Radio 1 Controller 1 Tether Cable 1 VEXcode V 5 Text 1 USB Cable (if using a computer) 1 Engineering Notebook Before you begin the activity. . . Do you have each of these items ready? The Builder should check each of the following: Are all the motors and sensors plugged into the correct port? Are the smart cables fully inserted into all of the motors? Is the battery fully charged? Is the Controller paired with the Robot Brain?

Prepare for the Remix Challenges. VEXcode V 5 Text Before you begin your project, select the correct example project. The Clawbot Control example project contains the Clawbot motors and sensors configuration. If the template is not used, your robot will not run the project correctly. Go to the file menu, Open Examples, then select the Clawbot Control example project. Save the project. Check to make sure the project name Clawbot Control is now in the window in the center of the toolbar. The Clawbot is now properly configured, and the Clawbot Control project is ready for use. Now, take a look at how the instructions are being used in this project. In your engineering notebooks, make the following predictions: What’s happening when you run this project? What will the Clawbot be able to do? What would happen if we didn’t use the not(!) instruction in this project?

Remix Challenges: Clawbot Control. VEXcode V 5 Text Grab an object! The goal of this activity is to grab and release an object with the Clawbot using the Controller. Here are some steps to guide your group: Place your group’s object on the floor and make sure your Clawbot has enough space to move without interfering with other groups. List the steps the Clawbot will need to grab the object. Be sure to include which buttons you’ll use to accomplish this task! Write the steps the Driver lists in the engineering notebook. Click the Download button in the Toolbar to download the Clawbot Control project to the Robot Brain. Check to make sure your project has downloaded to the Clawbot’s Brain by looking at the Robot Brain’s screen. The project name, Clawbot Control, should be listed in slot 1. Run the project on the Clawbot. Grab and release an object with the Clawbot using the Controller. Congratulations! You have grabbed an object with your Clawbot using the Controller!

Were there any differences between your predictions and the actions you took during the activity? If so, add them to your engineering notebook. Colored Gems The goal of this activity is to use your Clawbot skills to collect several objects, one at a time, and return them to a location faster than the other groups in your class. Good luck! Here are some steps to guide your team: Move your group’s objects behind the object retrieval area your teacher has established, and make sure your Clawbot has space to move without interfering with other groups. List the steps the Clawbot will need to grab each object and return them to home base. Be sure to include which buttons you’ll use to accomplish this task! Write the steps the Driver lists in the engineering notebook. Using the classroom clock or a watch, keep time and record it in your engineering notebook. Retrieve each object as quickly as you can. Congratulations! You have collected all three of your group’s objects, returned them to home base with your Clawbot using the Controller! Relay Race! The goal of this activity is to use your Clawbot and teamwork skills in a relay race. The group will be responsible for moving an object across a three meter course in the fastest time possible. Player 1: Pick the object and carry it to the one meter line. Drop the object.

Player 2: Pick up the object and carry from the one to the two meter line. Drop the object. Player 3: Pick up the object and carry from the two meter line to the finish line. Drop the object in the goal area. Player 4: Monitor the time and ensure the Clawbot does not obstruct any other drivers or students. Ensure the robot places the object far enough over the line.

Remix Questions-VEXcode V 5 Text Answer the following questions in your engineering notebook after completing the three activities. The Arm. Motor. stop() is set to “hold” the Arm Motor. What would happen if that instruction was removed? The spin and stop text instructions that control the Arm and Claw Motors are nearly identical. If you were to create this project yourself, how could you save time and avoid writing every individual instruction into the workspace over and over?

Understand the core concepts and how to apply them to different situations. This review process will fuel motivation to learn.

Review-VEXcode V 5 Blocks You have accomplished a lot in this STEM Lab! The following questions will help you think back over everything you have learned. You can only answer once, so think carefully before you submit! 1. Which of the following is true about the forever block? o It will repeat a robot’s actions forever. o It will repeat a robot’s actions a set number of times. o It will stop after a certain amount of time has passed. o It can only be used when programming the Controller. 2. Mitchel wants to program his Clawbot to continuously run in a square path around the room without stopping. Which is the best block to use to accomplish this? o The wait until block o The repeat block o The forever block o The repeat until block 3. Amy has created a project to make her Clawbot drive forward, raise and then lower the arm, and then turn right. She wants to repeat this series of behaviors 4 times. How many total mm has the Clawbot traveled when the loop is complete?

o 104 o 100 o 400 o 90 4. Terrance is using a repeat block with 4 blocks inside of it. The repeat block is set to repeat 11 times. What is the right mathematical notation which describes how many total blocks the robot will run through in the project, including the repeat block? o 1 + (4 x 11) o 4 x 11 o 4 + 11 o 1 + 4 + 11 5. Which of the following words best completes the following sentence: The Joystick, L buttons, and R buttons are all for event-driven programming in the Clawbot Control example project. o Triggers o Comments o Loops o Stacks 6. In the following project, what function does the set motor stopping blocks do?

o They stop the motors from moving after the loop has ended. o They do not allow Controller to move the Arm and Claw. o They allow the motors to spin freely. o They prevent the Arm from dropping and/or the Claw from closing when the buttons that control their motors are released.

Review-VEXcode V 5 Text You have accomplished a lot in this STEM Lab! The following questions will help you think back over everything you have learned. You can only answer once, so think carefully before you submit! 7. Which of the following is true about the forever loop? o It will repeat a robot’s actions forever. o It will repeat a robot’s actions a set number of times. o It will stop after a certain amount of time has passed. o It can only be used when programming the Controller. 8. Mitchel wants to program his Clawbot to continuously run in a square path around the room without stopping. Which is the best instruction to use to accomplish this? o The wait until instruction o The repeat instruction o The forever instruction o The repeat until instruction 9. Amy has created a project to make her Clawbot drive forward, raise and then lower the arm, and then turn right. She wants to repeat this series of behaviors 4 times. How many total mm has the Clawbot traveled when the loop is complete?

o 104 o 100 o 400 o 90 10. Terrance is using a repeat structure with 4 instructions inside of it. The repeat structure is set to repeat 11 times. What is the right mathematical notation which describes how many total instruction the robot will run through in the project, including the repeat structure? o 1 + (4 x 11) o 4 x 11 o 4 + 11 o 1 + 4 + 11 11. Which of the following words best completes the following sentence: The Joystick, L buttons, and R buttons are all for event-driven programming in the Clawbot Control example project. o Triggers o Comments o Loops o Stacks

12. In the following project, what function does the set motor stopping instructions do? o They stop the motors from moving after the loop has ended. o They do not allow Controller to move the Arm and Claw. o They allow the motors to spin freely. o They prevent the Arm from dropping and/or the Claw from closing when the buttons that control their motors are released.

Additional information, resources, and materials.

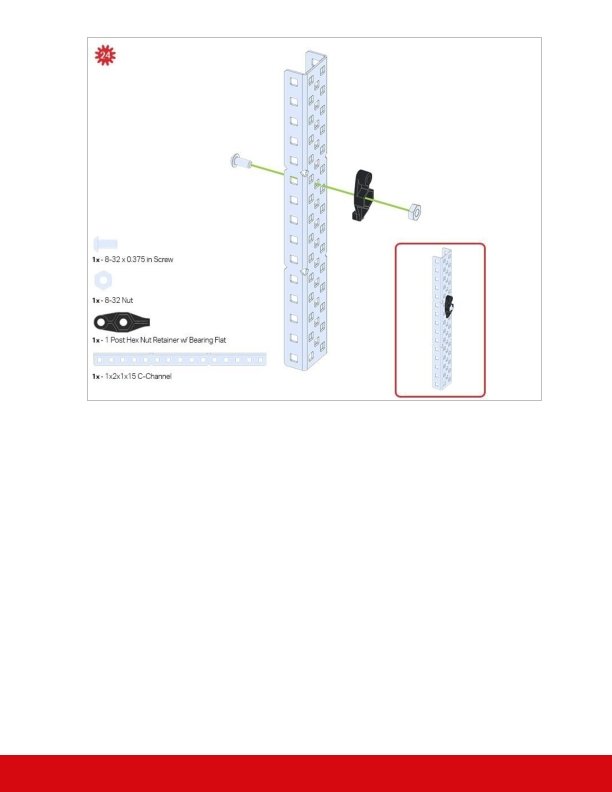
Using the 1 Post Hex Nut Retainer w/ Bearing Flat The 1 Post Hex Nut Retainer w/ Bearing Flat allows shafts to spin smoothly through holes in structural components. When mounted, it provides two points of contact on structural components for stability. One end of the retainer contains a post sized to securely fit in the square hole of a structural component. The center hole of the retainer is sized and slotted to securely fit a hex nut, allowing a 8 -32 screw to easily be tightened without the need for a wrench or pliers. The hole on the end of the Retainer is intended for shafts or screws to pass through. To make use of the retainer: Align it on a VEX structural component such that the end hole is in the desired location, and the center and end sections are also backed by the structural component.

Insert the square post extruding from the retainer into the structural component to help keep it in place. Insert a hex nut into the center section of the retainer so that it is flush with the rest of the component. Align any additional structural components to the back of the main structural component, if applicable. Use an 8 -32 screw of appropriate length to secure the structural component(s) to the retainer through the center hole and hex nut.

Using the 4 Post Hex Nut Retainer The 4 Post Hex Nut Retainer provides five points of contact for creating a strong connection between two structural components using one screw and nut. Each corner of the retainer contains a post sized to securely fit in a square hole within a structural component. The center of the retainer is sized and slotted to securely fit a hex nut, allowing a 8 -32 screw to easily be tightened without the need for a wrench or pliers. To make use of the retainer: Align it on a VEX structural component such that the center hole is in the desired location, and each corner is also backed by the structural component. Insert the square posts extruding from the retainer into the structural component to help keep it in place. Insert a hex nut into the center section of the retainer so that it is flush with the rest of the component.

Align any additional structural components to the back of the main structural component, if applicable. Use an 8 -32 screw of appropriate length to secure the structural component(s) to the retainer through the center hole and hex nut.

Using the 1 Post Hex Nut Retainer The 1 Post Hex Nut Retainer provides two points of contact for connecting a structural component to another piece using one screw and nut. One end of the retainer contains a post sized to securely fit in the square hole of a structural component. The other end of the retainer is sized and slotted to securely fit a hex nut, allowing a 8 -32 screw to easily be tightened without the need for a wrench or pliers. To make use of the retainer: Align it on a VEX structural component such that both ends are backed by the structural component and positioned to secure the second piece. Insert the square post extruding from the retainer into the structural component to help keep it in place. If the retainer is being used to secure two structural components, insert a hex nut into the other end of the retainer so that it is flush with the rest of the component. If used to secure

a different type of component, such as a standoff, it may be appropriate to insert the screw through this side. Align any additional components to the back of the main structural component, if applicable. If the retainer is being used to connect two structural components, use an 8 -32 screw of appropriate length to secure the structural components through the hole and hex nut. If used to connect a different type of component, such as a standoff, secure it directly or with a hex nut.

Engineering Notebooks Alexander Graham Bell's notebook entry from a successful experiment with his first telephone An Engineering Notebook Documents your Work Not only do you use an engineering notebook to organize and document your work, it is also a place to reflect on activities and projects. When working in a team, each team member will maintain their own journal to help with collaboration. Your engineering notebook should have the following: An entry for each day or session that you worked on the solution Entries that are chronological, with each entry dated Clear, neat, and concise writing and organization Labels so that a reader understands all of your notes and how they fit into your iterative design process An entry might include: Brainstorming ideas Sketches or pictures of prototypes

Pseudocode and flowcharts for planning Any worked calculations or algorithms used Answers to guiding questions Notes about observations and/or conducted tests Notes about and reflections on your different iterations
- Slides: 100