Class III Cavity Preparation Alaa Sabrah BDS MSD

Class III Cavity Preparation Alaa Sabrah, BDS, MSD, Ph. D 11 Dec, 2014

Goals and Objectives 1. 2. 3. 4. 5. What is the definition of class III cavity? Identify the different types of class III cavity Preparation? Compare and contrast different approaches to caries for class III ? Compare the design and retention form for the different types of class III cavity Preparation? Describe the clinical technique for treating class III carious lesion?

Definition �Class III- Smooth surface, involves proximal surface of anterior tooth H. Devlin Operative Dentistry, Springer-Verlag Berlin Heidelberg 2006

Type of Approach Facial Approach • Lingual Approach Depends or caries location, extent of caries, access to carious lesion Facial approach: caries location, � Lingual approach preferred: more alignment of teeth, replacement esthetic, conserves facial enamel restoration � use unless it would remove excessive amount of tooth structure � staining less visible if it occurs

Clinical Technique 1. 2. 3. 4. 5. 6. 7. Anesthesia (Pt comfort, decrease salivary flow). Occlusal assessment (determine design, adjust the restoration function). Shade selection (before dehydration). Isolation (visibility, effective bonding). Tooth preparation. Pulp Protection. Restoration.

Tooth Preparation Class III Conventional Beveled Conventional Modified Conventional

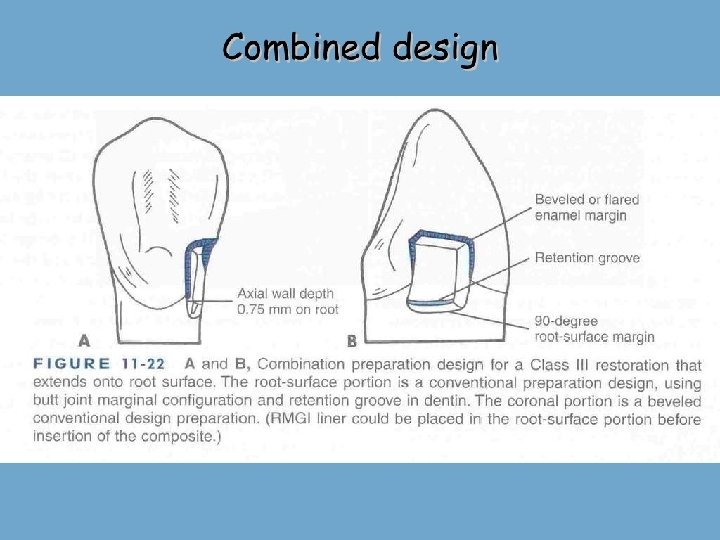
Tooth Preparation � Indication: restoration of 0. 75 mm Axial wall External wall Root surface root surface. � Why? No enamel margin � Design: Butt Joint margins. � Walls = walls for amalgam � Cavosurface margin=90˚ � External walls ┴ root surface. � Uniform depth.

Tooth Preparation steps Outline form: No. ½, 1, or 2 round carbide bur or diamond bur. Initial depth 0. 75 mm. 2. Remove caries: pulpal depth dictated by carious lesion or existing restoration. 1. 0. 75 mm Caries removal Root surface External wall
 increase retention, b) decrease effect")
Tooth Preparation steps Retention: � Retention grooves can a) increase retention, b) decrease effect of polymerization shrinkage, c) increase marginal seal by resisting tooth flexural forces. 3.

Tooth Preparation steps Retention: � Retention grooves placement: o No. ¼ round bur o Internal portion or the external wall. o 0. 25 mm from root surface. o 0. 25 mm depth. 3. 0. 25 mm from root surface 0. 25 mm depth

Tooth Preparation steps Retention: �Retention grooves location: o The bisector of the angle formed by the junction between axial wall and external wall. 3.

Tooth Preparation Class III Conventional Beveled Conventional Modified Conventional

Tooth Preparation steps � Indication: restoration of large carious lesion or replacing defective restoration in the crown. � Why? More retention/resistance are needed � Design: some beveled enamel margins with conventional wall design. � Cavosurface margin=45˚ on beveled, 90˚ on non beveled margins. � External walls ┴ enamel surface

Tooth Preparation steps Outline form: No. ½, 1, or 2 round carbide bur or diamond bur. � Point of entry: a) Within inciso-gingival dimension of carious lesion or defective restoration. b) Instrument ┴ enamel surface. c) Neck of the bur as far into the embrasure as possible. 1.

Tooth Preparation steps Outline form: No. ½, 1, or 2 round carbide bur or diamond bur. � Point of entry: d) Incorrect entry: overextend the lingual outline into potential stress areas (marginal ridges) and unnecessarily weakens the tooth. 1.

Tooth Preparation steps Outline form: No. ½, 1, or 2 round carbide bur or diamond bur. � Axial wall: a) Initial depth 0. 2 mm into dentin. b) Outwardly convex: following normal external tooth contour and DEJ inciso-ginigivally and facio-lingual. 1.

Tooth Preparation steps Remove caries: undermined enamel can be left in non-stress area. 3. Retention: � Enamel bevel or flare � Retention groves 2. Externa Axial wall Enamel surface l wall
 Increase surface area. b) Flame shaped or")
Tooth Preparation steps Retention: � Bevel a) Increase surface area. b) Flame shaped or round diamond bur. c) 45˚ to the external tooth surface. d) 0. 25 -0. 5 mm width. e) All accessible enamel margin except gingival margin. f) Avoid on lingual margin if the margin is subjected to occlusion. Enamel surface 3. 45˚

 Not necessary unless the cavity")
Tooth Preparation steps 3. Retention: � Retention grooves a) Not necessary unless the cavity is too large. b) Along incio-axial and gingivo-axial line angle. c) No. ¼ round bur.
 0. 2 mm inside DEJ.")
Tooth Preparation steps 3. Retention: � Retention grooves a) 0. 2 mm inside DEJ. b) 0. 25 mm depth. c) Bisect the angle formed by the junction of axial wall and external wall.

Tooth Preparation Class III Conventional Beveled Conventional Modified Conventional

Tooth Preparation � Indications: small and moderate lesions or faults designed to be as conservative as possible in the crown. � Why? All enamel margins � Design: scooped or concaved � Cavosurface margin ≥ 90˚ � External walls = no shape. � Only include caries or defective restoration.

Tooth Preparation steps 1. Outline form: No. ½, 1, or 2 round carbide bur or diamond bur. � Point of entry: a) Within inciso-gingival dimension of carious lesion or defective restoration. b) Instrument ┴ enamel surface. c) Neck of the bur as far into the embrasure as possible. � Axial wall not uniform in depth.

Tooth Preparation steps Remove caries: undermined enamel can be left in non-stress area. 3. Retention: � Enamel bevel or flare 2. Externa Axial wall Enamel surface l wall

Combined cavity preparation design �What if the caries extends on both crown and root surface?

Pulp Protection � Place calcium hydroxide in deep caries on the axial wall. � Add RMGIC linear to protect the calcium hydroxide from being dissolved by Acid etch application.
 contraindicated for is almost always restoration")
Restorative Procedure. �Anterior teeth: Aesthetic �Composite restoration (composite) contraindicated for is almost always restoration extended on indicated. root surfaces.

Restorative Procedure. �Add RMGIC linear to. Decrease microleakage 1. on root surface 2. Decrease gap formation. 3. Decrease recurrent caries formation.

Class III Resin Restoration

Class III Resin Restoration �Use clear Mylar strip to provide “proximal wall” to restore against �Place wedge between the teeth gingivally to seal the cervical margin, and protect the adjacent teeth.

Class III Resin Restoration �Etching: �Manufacture instruction. �Placed 0. 5 mm beyond the prepared margins. � 15 -30 s. �Wash and dry. �Dentin should remain moist (NO over drying or polling of excess water I allowed).

Class III Resin Restoration � Place bonding agent according to manufacturer instructions. � Air dry to remove any solvent. � Light cure for 10 -20 s.

Class III Resin Restoration �Restore with resin composite. �Contour with resin placement instrument �Adapt and hold mylar strip and cure

Class III Resin Restoration � Finish and Polish Restoration �Finishing burs, strips for interproximal, discs to contour and polish, #12 scalpel blade for gingival flash

Class III Resin Restoration � Maintain Proximal Contact �Wedge slightly separates teeth, aids in creating proximal contact with resin �Use finishing burs, stones or scalpel for contouring

Class III Resin Restoration Finishing discs Finishing Strips

Class III Resin Restoration � Proximal finishing strips and discs �Finishing and polishing �Use strips in “S” motion, do not remove proximal contact

Class III Resin Restoration �#12 scalpel works well to finish flash at cervical margin, use with care �Polish surface with Soflex discs

Class III Resin Restoration
- Slides: 41