Chemistry Laboratory Safety Rules Basic Safety Rules Follow

Chemistry Laboratory Safety Rules

Basic Safety Rules Follow all written and verbal instructions. Do not touch any chemicals or materials unless directed to do so. Read all procedures before entering the lab.

Basic Safety Rules Use common sense. No horseplay. Handle chemicals/glassware with respect. Do not wander around the room. All experiments must be personally monitored.

• All books, coats, and other personal effects should remain separate from the experiment area. 4

Do not apply cosmetics, eat, or drink in the lab. • These activities are ways by which you can accidentally ingest harmful chemicals

Do not taste any chemical!

• Never, under any circumstances, attempt unauthorized experiments. Accidents and trouble will be avoided by following this simple rule. 7

Carry out only the experiments assigned by your teacher I wonder what he’s planning to do with that thing.

Never remove chemicals from the laboratory This guy put chemicals in his locker!

Never work alone in the lab • In case of a problem, you may need another person to prevent injury or even save your life!

Work with volatile chemicals under a fume hood.

Check glassware for stars or cracks.

• Beware of hot glass, which is indistinguishable from cold glass. Watch for small chips and cracks on glassware. • Pyrex or Kimax to heat 13

Protect Your Eyes • Appropriate eye protection must be worn at all times! • Inform your teacher if you wear contact lenses.

• Always wear protective goggles when in the laboratory from the moment you enter the lab to collect materials until the time you have finished cleaning up. Contact lens wearers must know the added dangers of contact lenses. 15

Wear appropriate protective clothing • Your clothing should cover your legs – shorts/capris/skirts are not appropriate for the laboratory • Lab aprons can be used to protect good clothing • Loose clothing should not be worn because it may dip into chemicals or fall into a flame and catch fire

Wear shoes that cover your feet. • Sandals/flats and open-toed shoes do not protect your feet from broken glass that is frequently found in the lab • Also, leather shoes protect your feet from chemical spills – canvas shoes do not.

Chemical Burns Flammable Health Reactive Special Chemical burns on feet. Skin burned by chemicals

Tie Back Loose Hair • Dangling hair can fall into the Bunsen burner and catch fire or can fall into a chemical solution • P. S. Burning hair REALLY STINKS! Jewelry

Know how to respond to an emergency

Do not pipet solutions by mouth! • Use a rubber suction bulb or other device to fill a pipet.

Wash your hands with soap and water before leaving. • This rule applies even if you have been wearing gloves!

Know the hazards of the materials being used. • Read and reread • Know how to labels carefully to interpret data make sure that from a MSDS. you are using the right chemical.

• • Always read the labels twice before taking anything from a bottle, since many chemicals have similar names. Use as little chemical as is convenient to perform your experiment or fill your apparatus; you can always come back for more 24

• NEVER return unused chemicals to the dispensing bottle to prevent contamination. • Put the lids back on chemical containers when you are finished with them.

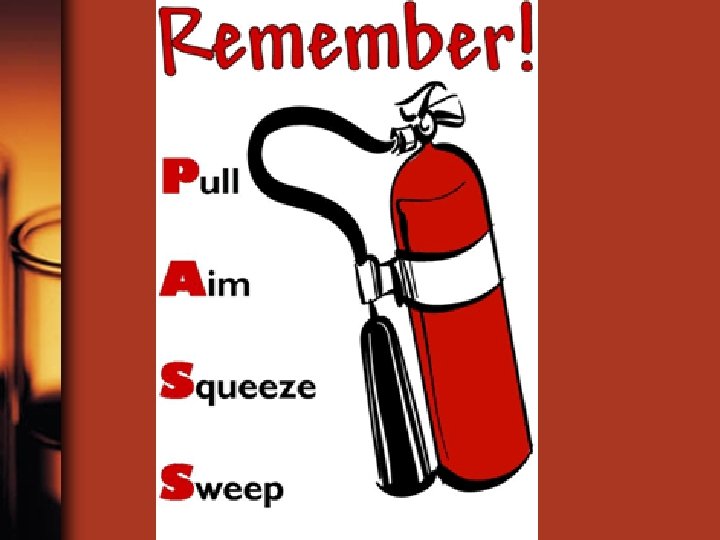
Know the safety equipment • Eye wash fountain • Safety shower • Fire extinguisher • Emergency exits
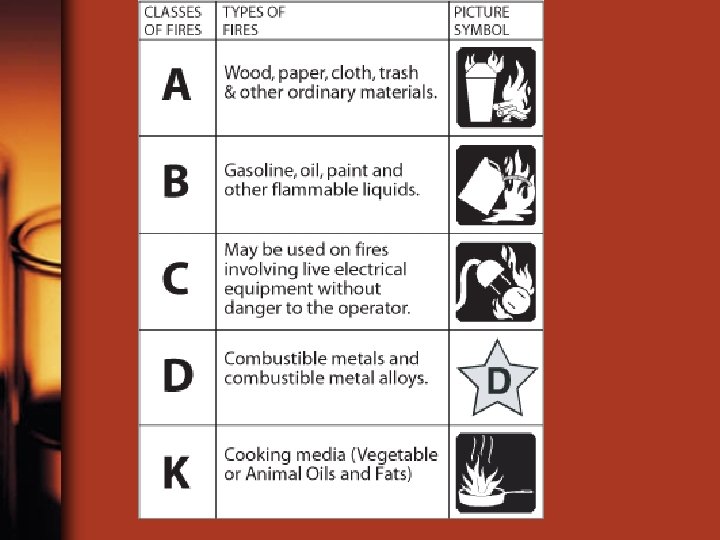

Safety Equipment Safety Goggles Fire Extinguisher Type A Type B Type C Fire Blanket Safety Shower

Know how to use the safety equipment • Eye wash Fountain • Safety Shower • Fire extinguisher • Emergency Exit

• If an acid or other chemical is spilled on your skin, wash it off immediately with water. • If an acid or base is spilled on the counter or on your clothing, neutralize it and then wipe it up with water. – Acid on clothing…use baking soda (a weak base) to neutralize. – Base on clothing…use vinegar (a weak acid) to neutralize. 31

Safety Symbols SAFETY CLOTHING This symbol is to remind you to wear a laboratory apron over your street clothes to protect your skin and clothing from spills. SAFETY GOGGLES This symbol is to remind you that safety goggles are to worn at all times when working in the laboratory. For some activities, your teacher may also instruct you to wear protective gloves. GLOVES This symbol is to remind you to wear gloves to protect your hands from contact with corrosive substances, broken glass, or hot objects. HEATING This symbol indicates that you should be careful not to touch hot objects with your bare hands. Use either tongs or heat-proof gloves to pick up hot objects. . FIRE This symbol indicates the presence of an open flame. Loose hair should be tied back or covered, and bulky or loose clothing should be secured in some manner. DANGEROUS VAPORS This symbol indicates the presence of or production of poisonous or noxious vapors. Use the fume hood when directed to do so. Care should be taken not to inhale vapors directly. When testing an odor, use a wafting motion to direct the vapor toward your nose. EXPLOSION This symbol indicates that the potential for an explosive situation is present. When you see this symbol, read the instructions carefully and follow them exactly. . POISON This symbol indicates the presence of a poisonous substance. Do not let such a substance come in contact with your skin and do not inhale its vapors. ELECTRICAL SHOCK This symbol indicates that the potential for an electrical shock exists. Read all instructions carefully. Disconnect all apparatus when not in use. RADIATION This symbol indicates a radioactive substance. Follow your teacher's instructions as to proper handling of such substances. . CORROSIVE SUBSTANCE This symbol indicates a caustic or corrosive substance - most frequently an acid. Avoid contact with skin, eyes, and clothing. Do not inhale vapors. DISPOSAL This symbol indicates that a chemical should be disposed of in a special way. Dispose of these chemicals as directed by your teacher. BREAKAGE This symbol indicates an activity in which the likelihood of breakage is greater than usual, such as working with glass tubing, funnels and so forth. HYGIENE This symbol is to remind you to always wash your hands after completing a laboratory investigation. Never touch your face or eyes during a laboratory investigation.

Remember that the lab is a place for serious work! Careless behavior may endanger yourself and others and will not be tolerated!

• Keep an eye on your neighbor while in the laboratory to see that she or he is also obeying the rules. The accident that harms you may not be your own. 34

Demonstrate safe behavior • Obey all safety instructions given by your teacher or found in you experimental procedure. • Clean up spills immediately; IF you know how. If you are uncertain how to clean up a spill or if a large spill occurs, notify your teacher immediately.

Demonstrate safe behavior • Before leaving the lab: – Return equipment and chemicals to their proper places. Never return unused chemicals to their original containers. – Be sure to replace the lids to all containers – Clean up your work area

Know how to dispose of waste • Dispose of all waste materials according to your instructional procedure or your teacher’s instructions ? ?

• Throw all solids to be discarded into waste containers or as directed by teacher, never into the sinks where it will clog the drains. Acids and bases only are emptied into the sinks and washed down with water. Metal solids and ions should not be put down the drain. Special waste containers will be indicated. 38

Report any accidents or unsafe conditions immediately!

• ALL accidents, no matter how minor, should be reported to your teacher.

SAFETY in the Science Classroom – Use common sense – No unauthorized experiments – Wear safety glasses – Safety is an attitude! – Don’t take anything out of lab – Read and follow all instructions – http: //www. nclark. net/Chemistry – http: //www. baruch. cuny. edu/tutori als/weissman/chemlab/

Lab Equipment

Beakers hold solids or liquids that will not release gases when reacted or are unlikely to splatter if stirred or heated.

Erlenmeyer Flask Erlenmeyer flasks hold solids or liquids that may release gases during a reaction or that are likely to splatter if stirred or heated.

Florence Flask Rarely used in first year chemistry, it is used for the mixing of chemicals. Narrow neck prevents splash exposure.

Graduated Cylinder A graduated cylinder is used to measure volumes of liquids.

Gas Collecting Bottle We use gas collecting bottles when large volumes of gases are produced, and must be collected by the displacement of water.

Test Tubes 13 x 100 mm test tubes Ignition tube 10 x 75 mm test tubes

Test Tube Holder A test tube holder is useful for holding a test tube which is too hot to handle.

Test Tube Brushes Test tube brushes are used to clean test tubes and graduated cylinders. Forcing a large brush into a small test tube will often break the tube.

Test Tube Racks Test tube racks are for holding and organizing test tubes on the laboratory counter. Plastic racks may melt in contact with very hot test tubes.

Rubber Stoppers Rubber stoppers are used to close containers to avoid spillage or contamination. Containers should never be heated when there is a stopper in place.

Spot Plates Spot plates are used when we want to perform many small scale reactions at one time. We will use these many times during the year.

Watch Glass A watch glass is used to hold a small amount of solid, such as the product of a reaction.

Glass Stir Rod A glass rod is used to manually stir solutions. It can also be used to transfer a single drop of a solution.

Medicine Dropper A medicine dropper is used to transfer a small volume of liquid (less than one m. L). On top of each medicine dropper is a “rubber bulb”

Litmus Paper Red litmus paper is used to identify bases. Blue litmus paper is used to identify acids.
 are used to pick up small objects.")
Forceps (or tweezers) are used to pick up small objects.

Funnel A funnel is used to aid in the transfer of liquid from one vessel to another.

Mohr Pipet A Mohr pipet measures and delivers exact volumes of liquids.

Wash Bottle A wash bottle has a spout that delivers a wash solution to a specific area. Distilled water is the only liquid that should be used in a wash bottle.

Weighing Boat Weighing boats are used to weigh solids that will be transferred to another vessel.

Spatulas are used to dispense solid chemicals from their containers. Chemicals should never be transferred with your bare hands.

Beaker Tongs Beaker tongs are used to move beakers containing hot liquids

Bunsen Burner Bunsen burners are used for the heating of nonvolatile liquids and solids.

Evaporating Dish The evaporating dish is used for the heating of stable solid compounds and elements.

Crucibles are used for heating certain solids, particularly metals, to very high temperatures.

Clay Triangle The clay triangle is used as a support for porcelein crucibles when being heated over a Bunsen burner.

Crucible Tongs For handling hot crucibles; also used to pick up other hot objects. NOT to be used for picking up beakers!

Glass Plates Glass plates provide a surface for semi-micro scale experiments, such as drop reactions and testing of acids and bases.

Triangular File Triangular files are used primarily to cut glass rod, a skill that your instructor will share with you when it becomes useful.

Ringstands and their Components Ringstands are a safe and convenient way to perform reactions that require heating using a Bunsen burner.

Ringstands and their Components Iron Rings Iron rings connect to a ringstand provide a stable, elevated platform for the reaction.

Ringstands and their Components Utility Clamps Utility clamps are used to secure test tubes, distillation columns, and burets to the ringstand.

Ringstands and their Components Double Buret Clamps Double Buret clamps are used to burets – long graduated tubes used in titration.

Ringstands and their Components Wire Gauze Wire gauze sits on the iron ring to provide a place to stand a beaker. On older wire gauze, the white material is asbestos!

Pressed Fiber Pad A 4” x 4” square of ceramic fiber, it provides a surface for hot beakers so that the beaker does not come in contact with a cold countertop and shatter.

Strikers are used to light Bunsen burners. The flints on strikers are expensive. Do not operate the striker repeatedly just to see the sparks!

Lab Techniques

• Do not touch, taste, or smell chemicals unless directed to do so. When observing the odor of a substance, do not hold your face directly over the container. Fan a little of the vapor toward yourself by sweeping your hand over the top of the container (a. k. a. wafting. ) 80

Do not smell any chemicals directly! • Smell chemicals only if your teacher specifically tells you to do so, then use your hand to fan the vapor to your nose.

Pour from large containers to smaller ones. Away from the body at arms length.

Always ADD ACID to water acid water

• When diluting concentrated acid, pour the acid slowly and carefully into the water with constant stirring to dissipate the heat of solution that can cause the solution to boil and splatter. Never add the water to the acid, add acid to water. AAA’s

Hold your hand over the label while pouring.

Heat test tubes at an angle.

• When heating a test tube, start heating gently by moving the tube in and out of the heat source. Be aware of how easily liquids start to boil. Do not point your test tube at your neighbor or yourself when heating substances therein. A suddenly formed bubble of vapor may eject the contents violently and dangerously. 87

Handle hot glassware with gloves or beaker tongs.

Use a sparker to light a bunsen burner #1 cause of fires in Chem Lab is____

• For all chemicals, take only what you need. • If you take too much and have some left over, DO NOT put it back in the bottle

• • • Burner Glass Manipulations Handling Solids Balance Filtering Decant & Transfer Liquids Heat Stuff Pour Liquids Mortar & Pestle
- Slides: 91