CHAPTER TWO Fundamentals of Metal Cutting 2 FUNDAMENTALS
- Slides: 22

CHAPTER TWO : Fundamentals of Metal Cutting 2 FUNDAMENTALS OF METAL CUTTING CONTENTS The Selection of Manufacturing Engineering Process; By Dr. Saied. M. Darwish

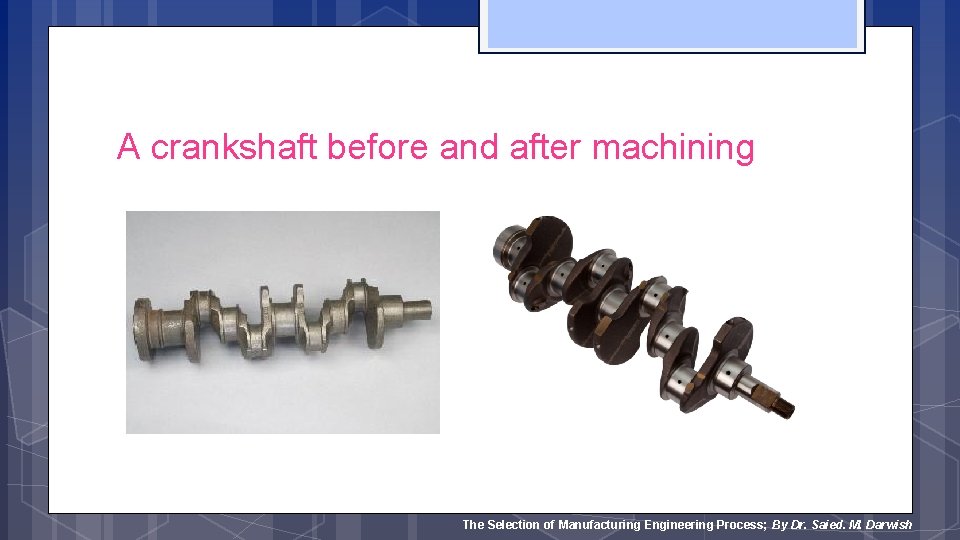
A crankshaft before and after machining The Selection of Manufacturing Engineering Process; By Dr. Saied. M. Darwish

Principle of metal cutting • Difference in hardness of tool and workpiece • Metal cutting is a chip removal process The Selection of Manufacturing Engineering Process; By Dr. Saied. M. Darwish

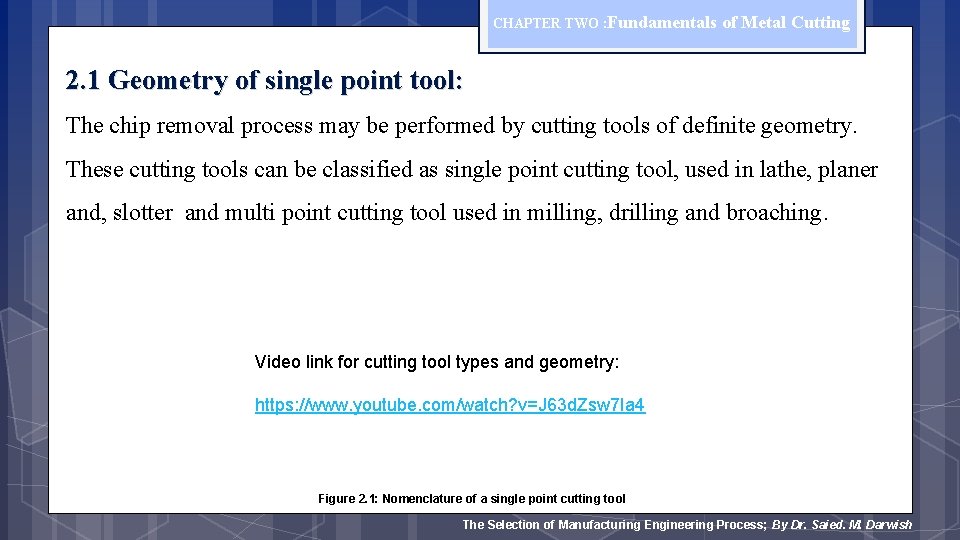
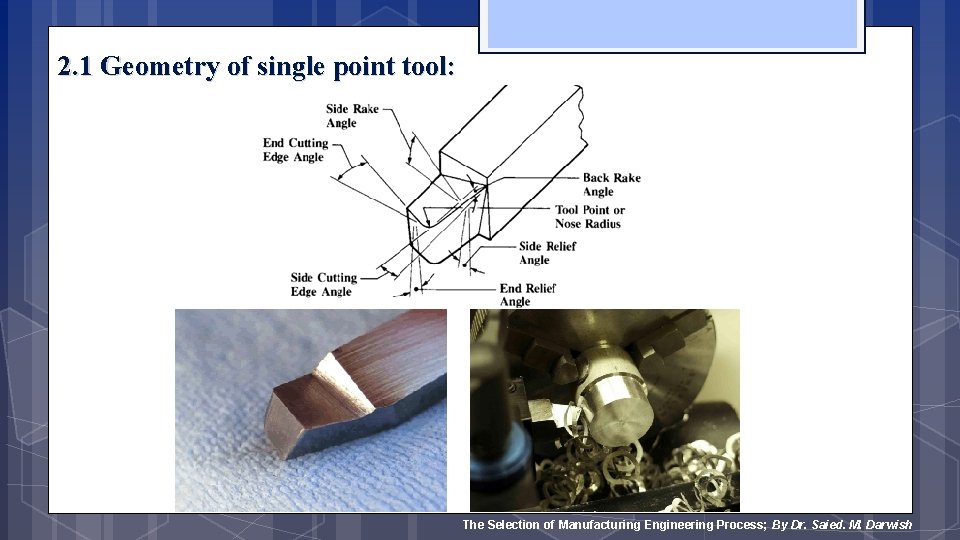
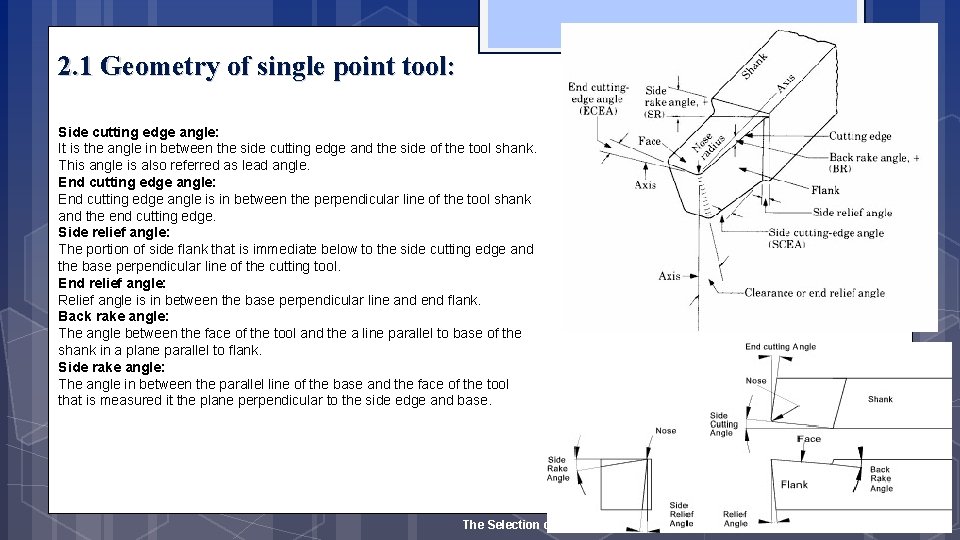
CHAPTER TWO : Fundamentals of Metal Cutting 2. 1 Geometry of single point tool: The chip removal process may be performed by cutting tools of definite geometry. These cutting tools can be classified as single point cutting tool, used in lathe, planer and, slotter and multi point cutting tool used in milling, drilling and broaching. Video link for cutting tool types and geometry: https: //www. youtube. com/watch? v=J 63 d. Zsw 7 Ia 4 Figure 2. 1: Nomenclature of a single point cutting tool The Selection of Manufacturing Engineering Process; By Dr. Saied. M. Darwish

2. 1 Geometry of single point tool: The Selection of Manufacturing Engineering Process; By Dr. Saied. M. Darwish

2. 1 Geometry of single point tool: Rake End The Selection of Manufacturing Engineering Process; By Dr. Saied. M. Darwish

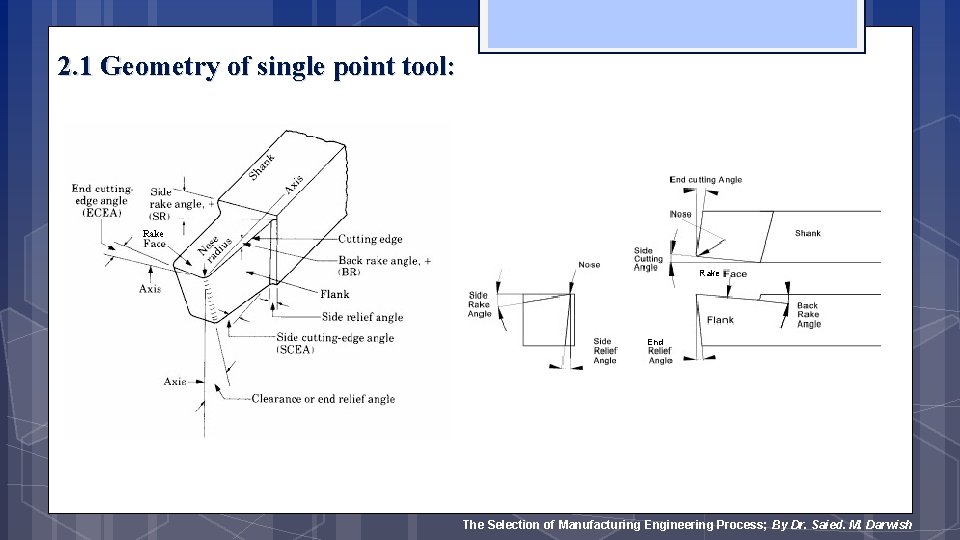
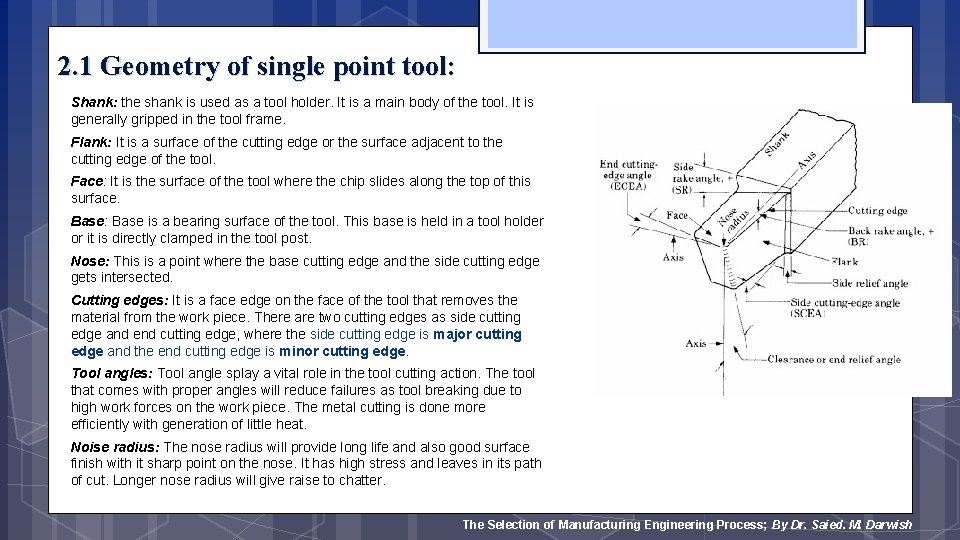
2. 1 Geometry of single point tool: Shank: the shank is used as a tool holder. It is a main body of the tool. It is generally gripped in the tool frame. Flank: It is a surface of the cutting edge or the surface adjacent to the cutting edge of the tool. Face: It is the surface of the tool where the chip slides along the top of this surface. Base: Base is a bearing surface of the tool. This base is held in a tool holder or it is directly clamped in the tool post. Nose: This is a point where the base cutting edge and the side cutting edge gets intersected. Cutting edges: It is a face edge on the face of the tool that removes the material from the work piece. There are two cutting edges as side cutting edge and end cutting edge, where the side cutting edge is major cutting edge and the end cutting edge is minor cutting edge. Tool angles: Tool angle splay a vital role in the tool cutting action. The tool that comes with proper angles will reduce failures as tool breaking due to high work forces on the work piece. The metal cutting is done more efficiently with generation of little heat. Noise radius: The nose radius will provide long life and also good surface finish with it sharp point on the nose. It has high stress and leaves in its path of cut. Longer nose radius will give raise to chatter. The Selection of Manufacturing Engineering Process; By Dr. Saied. M. Darwish

Video link for understanding tool geometry and metal cutting https: //www. youtube. com/watch? v=Mn 9 jpq. I 8 rao https: //www. youtube. com/watch? v=b. Urp 8 JMRwx 4 The Selection of Manufacturing Engineering Process; By Dr. Saied. M. Darwish

2. 1 Geometry of single point tool: Side cutting edge angle: It is the angle in between the side cutting edge and the side of the tool shank. This angle is also referred as lead angle. End cutting edge angle: End cutting edge angle is in between the perpendicular line of the tool shank and the end cutting edge. Side relief angle: The portion of side flank that is immediate below to the side cutting edge and the base perpendicular line of the cutting tool. End relief angle: Relief angle is in between the base perpendicular line and end flank. Back rake angle: The angle between the face of the tool and the a line parallel to base of the shank in a plane parallel to flank. Side rake angle: The angle in between the parallel line of the base and the face of the tool that is measured it the plane perpendicular to the side edge and base. The Selection of Manufacturing Engineering Process; By Dr. Saied. M. Darwish

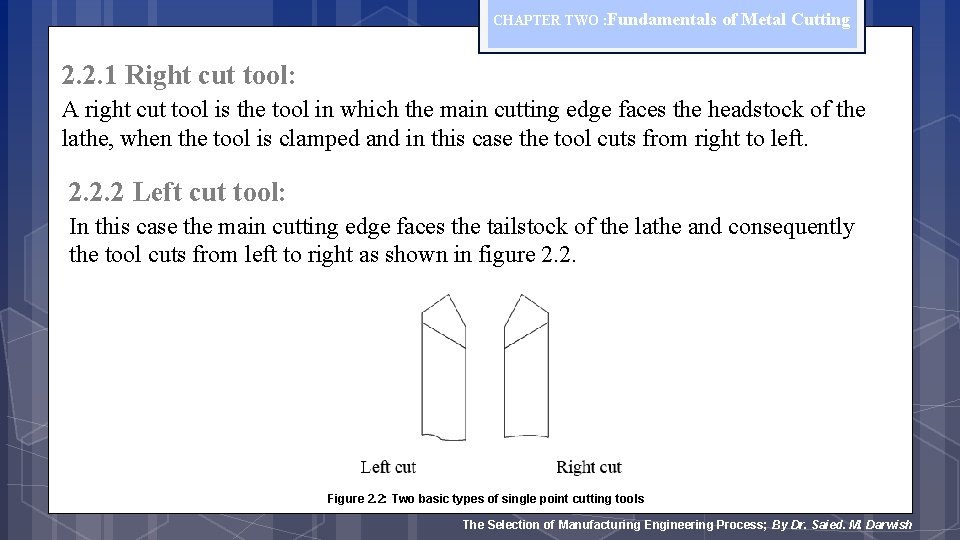
CHAPTER TWO : Fundamentals of Metal Cutting 2. 2. 1 Right cut tool: A right cut tool is the tool in which the main cutting edge faces the headstock of the lathe, when the tool is clamped and in this case the tool cuts from right to left. 2. 2. 2 Left cut tool: In this case the main cutting edge faces the tailstock of the lathe and consequently the tool cuts from left to right as shown in figure 2. 2. Figure 2. 2: Two basic types of single point cutting tools The Selection of Manufacturing Engineering Process; By Dr. Saied. M. Darwish

CHAPTER TWO : Fundamentals of Metal Cutting 2. 3 Requirements of tool materials: 1. High hardness and high hot hardness 2. High wear resistance 3. High strength and toughness (impact resistance) 4. High thermal conductivity 5. Low cost The Selection of Manufacturing Engineering Process; By Dr. Saied. M. Darwish

CHAPTER TWO : Fundamentals of Metal Cutting 2. 4 Common tool materials 1. Tool carbon steels (It contain 0. 6 – 1. 4 percent carbon and low percentages of Mn, Si, S, P, and heat treated, it withstand temperatures < 250°C) 2. Alloy tool steels (The cutting performance of steel can be improved by adding alloying elements such as chromium (Cr), vanadium (V), molybdenum (Mo) and tungsten (Tn). When these steels properly heat treated, they can work at temperatures up to 300°C. ) 3. High speed steels (It contain 8 – 19% tungsten and 3. 8 – 4. 6% chromium. They can withstand temperatures up to 600°C) 4. Cemented carbides 2. 4. 4. 1 Straight tungsten cemented carbide: 2. 4. 4. 2 Titanium -Tungsten cemented carbides: 2. 4. 4. 3 Titanium – Tantalum – Tungsten cemented carbides: The Selection of Manufacturing Engineering Process; By Dr. Saied. M. Darwish

CHAPTER TWO : Fundamentals of Metal Cutting 2. 4. 5 Ceramic tool materials Ceramic materials are made by compacting followed by sintering of aluminum oxides (or other ceramics) at high temperature (1700°C). They are able to machine all materials at very high cutting speeds with higher surface finish and no coolant is required. 2. 4. 6 Diamonds are the hardest materials; they can work up to 1500°C. It is found in nature or synthetically produced from ordinary graphite by subjecting it to extremely high pressures and temperatures. The Selection of Manufacturing Engineering Process; By Dr. Saied. M. Darwish

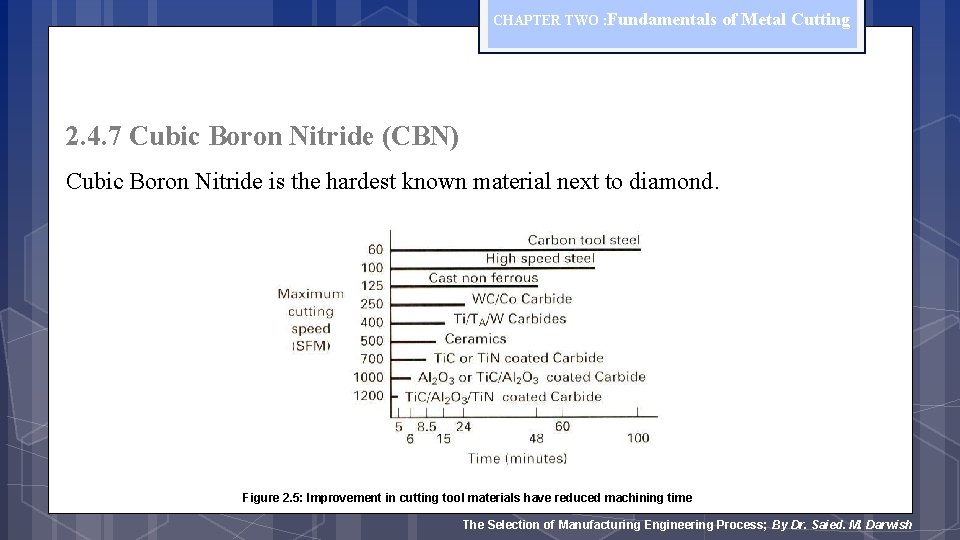
CHAPTER TWO : Fundamentals of Metal Cutting 2. 4. 7 Cubic Boron Nitride (CBN) Cubic Boron Nitride is the hardest known material next to diamond. Figure 2. 5: Improvement in cutting tool materials have reduced machining time The Selection of Manufacturing Engineering Process; By Dr. Saied. M. Darwish

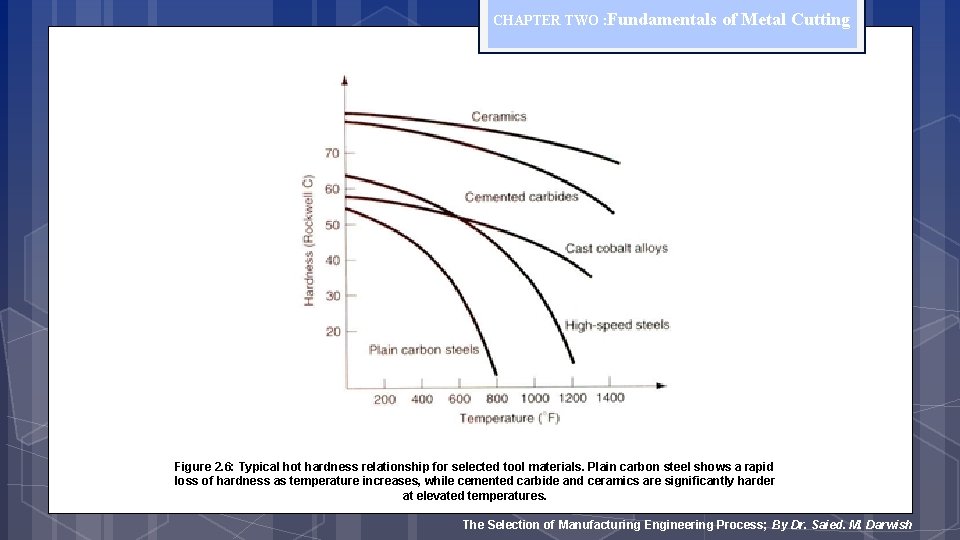
CHAPTER TWO : Fundamentals of Metal Cutting Figure 2. 6: Typical hot hardness relationship for selected tool materials. Plain carbon steel shows a rapid loss of hardness as temperature increases, while cemented carbide and ceramics are significantly harder at elevated temperatures. The Selection of Manufacturing Engineering Process; By Dr. Saied. M. Darwish

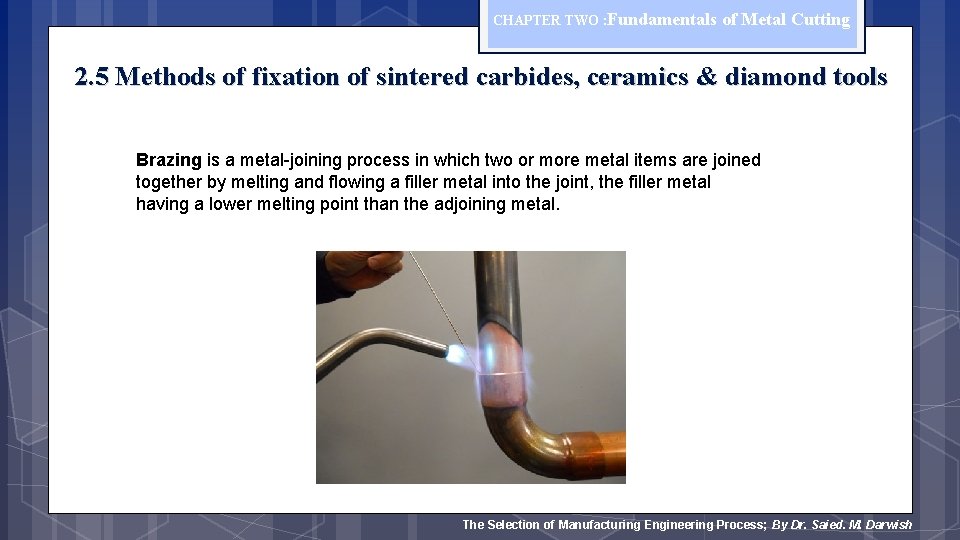
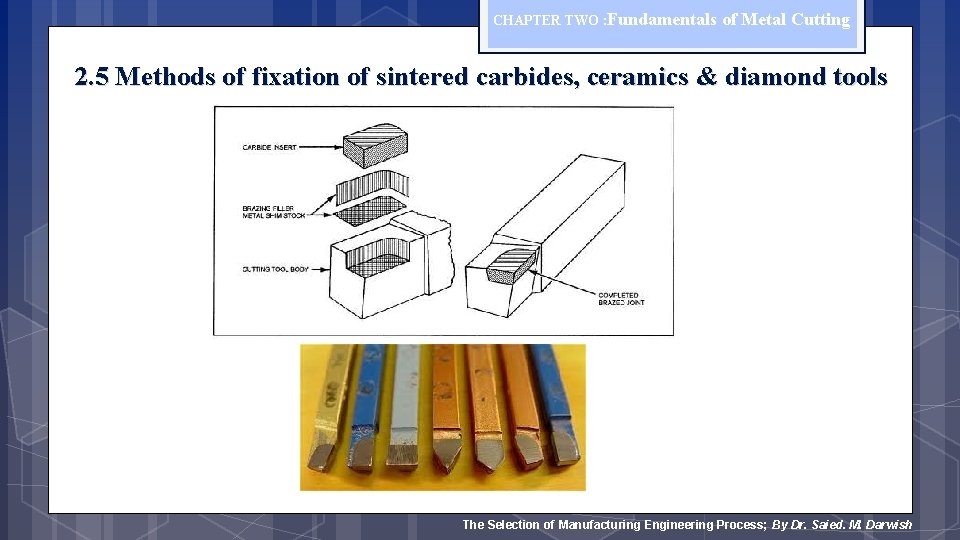
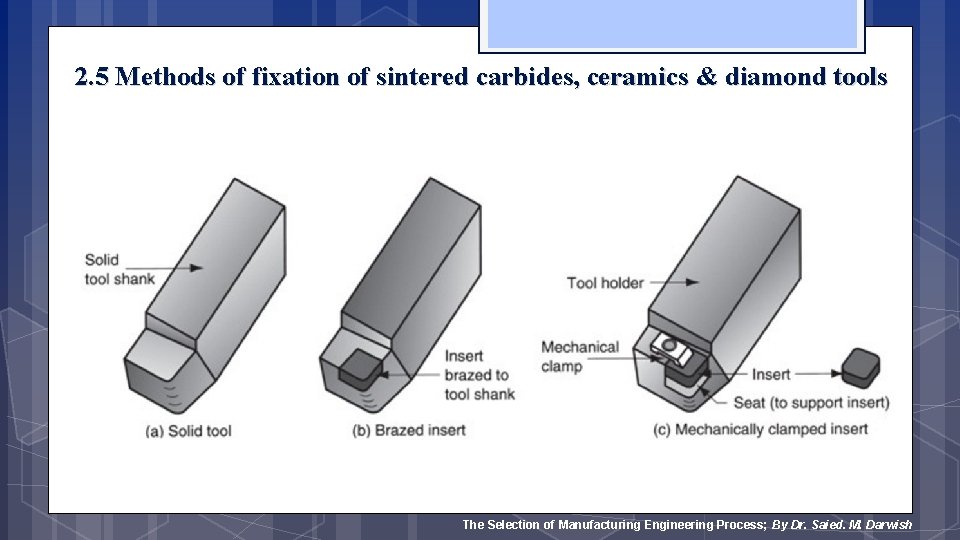
CHAPTER TWO : Fundamentals of Metal Cutting 2. 5 Methods of fixation of sintered carbides, ceramics & diamond tools The cutting tools made from sintered carbides, ceramic and diamonds are available in the form of tips (inserts). 2. 5. 1 Mechanical clamping is used for cemented carbides, ceramics, and other hard materials. In this method the cemented carbide, ceramic, and diamond inserts clamped mechanically with the tool shank. 2. 5. 2 Brazing In this method of fixation, the tool bits are bonded with the shank by applying soldering/brazing materials. The Selection of Manufacturing Engineering Process; By Dr. Saied. M. Darwish

CHAPTER TWO : Fundamentals of Metal Cutting 2. 5 Methods of fixation of sintered carbides, ceramics & diamond tools Brazing is a metal-joining process in which two or more metal items are joined together by melting and flowing a filler metal into the joint, the filler metal having a lower melting point than the adjoining metal. The Selection of Manufacturing Engineering Process; By Dr. Saied. M. Darwish

CHAPTER TWO : Fundamentals of Metal Cutting 2. 5 Methods of fixation of sintered carbides, ceramics & diamond tools The Selection of Manufacturing Engineering Process; By Dr. Saied. M. Darwish

2. 5 Methods of fixation of sintered carbides, ceramics & diamond tools The Selection of Manufacturing Engineering Process; By Dr. Saied. M. Darwish

CHAPTER TWO : Fundamentals of Metal Cutting 2. 6 Disadvantages of mechanical clamping • Mechanical clamping of cutting inserts does not always ensure a contact stiffness that is sufficiently high to prevent vibrations which develop in machining. • These vibrations shorten the life of the insert and often produce machined surfaces with poor finish. • The clamping arrangement is often of comparatively large size, which in many cases limits the cutting parameters of the tool such as depth of cut, width of cut. The Selection of Manufacturing Engineering Process; By Dr. Saied. M. Darwish

CHAPTER TWO : Fundamentals of Metal Cutting 2. 7 Disadvantages of brazing • Micro cracks are often produced due to the high temperature of the brazing operation. The proportion of rejects due to cracks in tips is 10 – 40%. • High skills is required for brazing. • Difficulty in changing the worn insert. The Selection of Manufacturing Engineering Process; By Dr. Saied. M. Darwish

Useful links • https: //www. youtube. com/watch? v=v. Ao 0 xm. DQ-k. I&feature=youtu. be • https: //youtu. be/Za 0 t 2 Rfjewg • https: //youtu. be/w 46 cnvj. IJz. A The Selection of Manufacturing Engineering Process; By Dr. Saied. M. Darwish