CHAPTER TWO 2 Geometric Tolerances Main references http
- Slides: 36

CHAPTER TWO : 2 Geometric Tolerances Main references: http: //www. gdandtbasics. com/gdt-symbols/ http: //www. engineeringessentials. com/gdt/ CONTENTS

CHAPTER TWO : Geometric Tolerances Dimension A dimension is "a numerical value expressed in appropriate units of measure and indicated on a drawing and in other documents along with lines, symbols, and notes to define the size or geometric characteristic, or both, of a part or part feature" Dimensions on part drawings represent nominal or basic sizes of the part and its features. The dimension indicates the part size desired by the designer, if the part could be made with no errors or variations in the manufacturing process

CHAPTER TWO : Geometric Tolerances A tolerance is "the total amount by which a specific dimension is permitted to vary. The tolerance is the difference between the maximum and minimum limits" Variations occur in any manufacturing process, which are manifested as variations in part size Tolerances are used to define the limits of the allowed variation

CHAPTER TWO : Geometric Tolerances Types of Tolerances A Dimensional tolerance is the total amount a specific dimension is permitted to vary, which is the difference between maximum and minimum permitted limits of size. A Geometric tolerance is the maximum or minimum variation from true geometric form or position that may be permitted in manufacture. Geometric tolerance should be employed only for those requirements of a part critical to its functioning or interchangeability. These much more difficult to measure/verify as compared to dimensional tolerances.

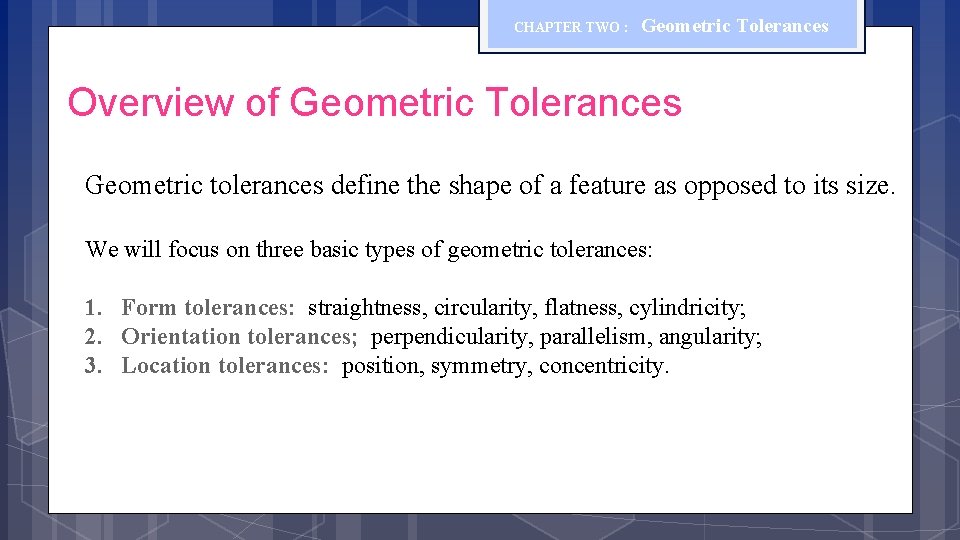
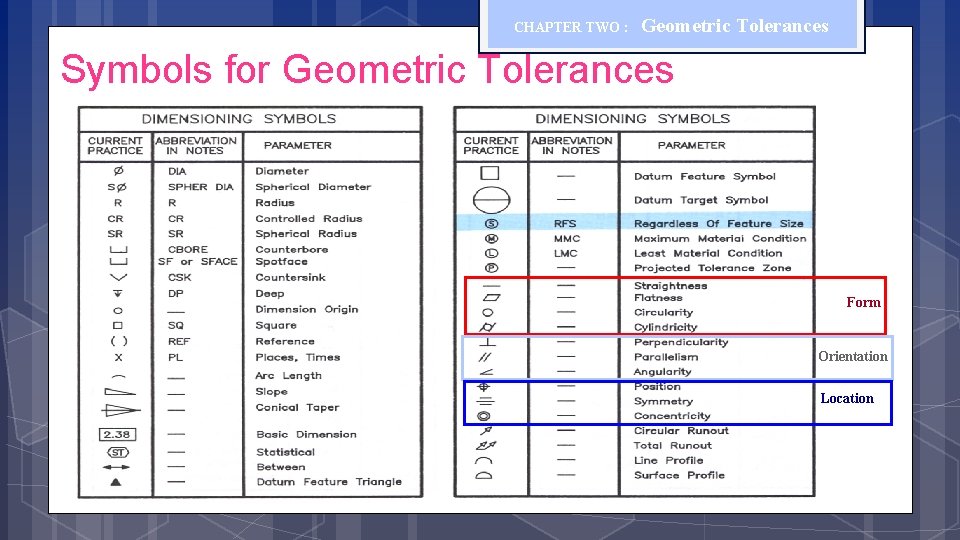
CHAPTER TWO : Geometric Tolerances Overview of Geometric Tolerances Geometric tolerances define the shape of a feature as opposed to its size. We will focus on three basic types of geometric tolerances: 1. Form tolerances: straightness, circularity, flatness, cylindricity; 2. Orientation tolerances; perpendicularity, parallelism, angularity; 3. Location tolerances: position, symmetry, concentricity.

CHAPTER TWO : Geometric Tolerances Symbols for Geometric Tolerances Form Orientation Location

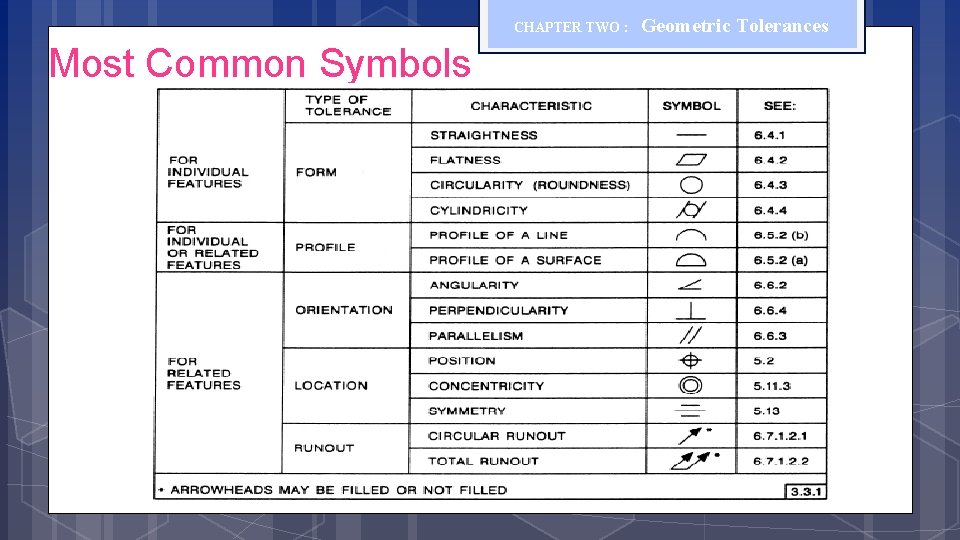
CHAPTER TWO : Most Common Symbols Geometric Tolerances

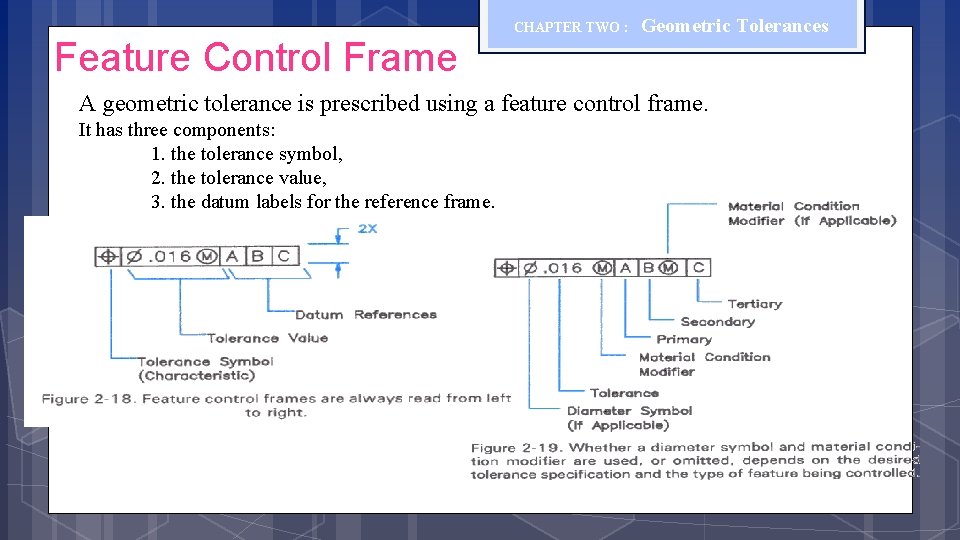
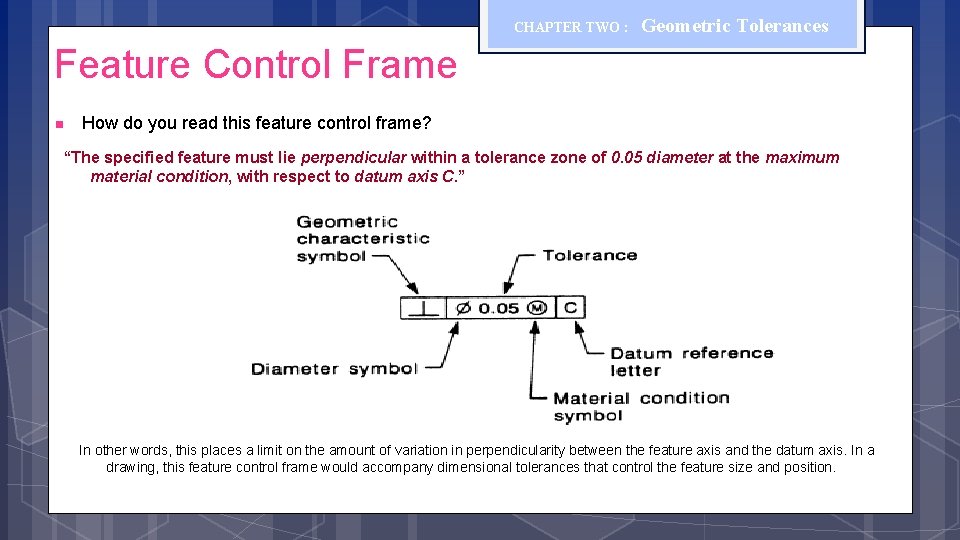
Feature Control Frame CHAPTER TWO : Geometric Tolerances A geometric tolerance is prescribed using a feature control frame. It has three components: 1. the tolerance symbol, 2. the tolerance value, 3. the datum labels for the reference frame.

CHAPTER TWO : Geometric Tolerances Feature Control Frame n How do you read this feature control frame? “The specified feature must lie perpendicular within a tolerance zone of 0. 05 diameter at the maximum material condition, with respect to datum axis C. ” In other words, this places a limit on the amount of variation in perpendicularity between the feature axis and the datum axis. In a drawing, this feature control frame would accompany dimensional tolerances that control the feature size and position.

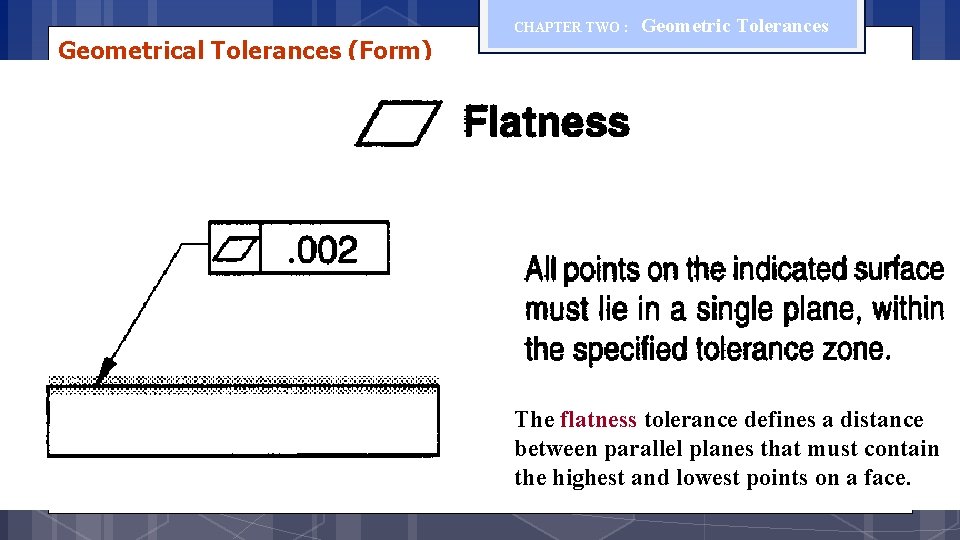
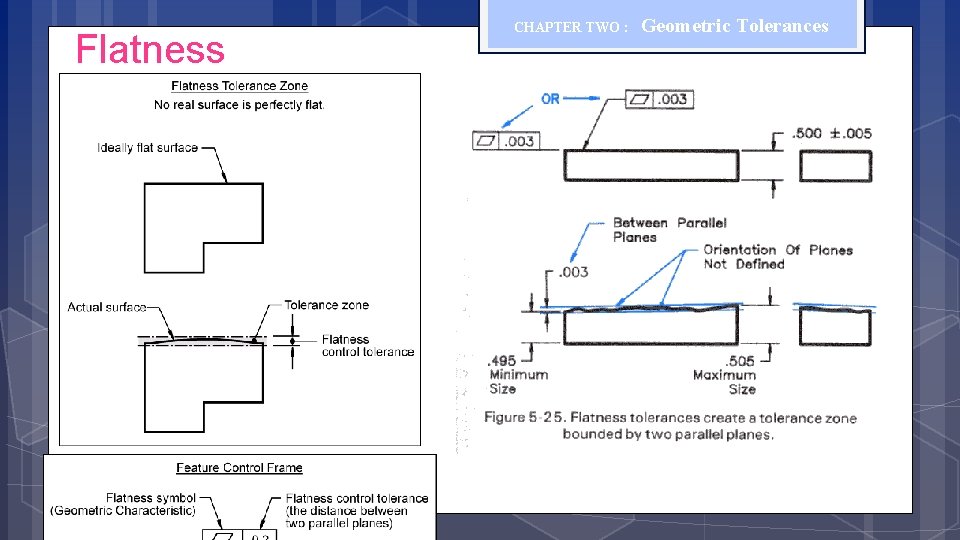
Geometrical Tolerances (Form) CHAPTER TWO : Geometric Tolerances The flatness tolerance defines a distance between parallel planes that must contain the highest and lowest points on a face.

Flatness CHAPTER TWO : Geometric Tolerances

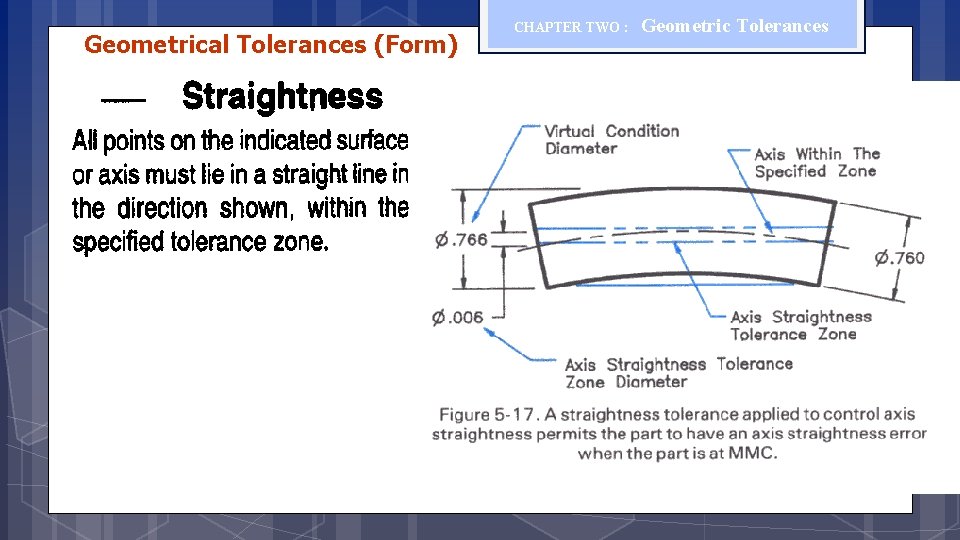
Geometrical Tolerances (Form) CHAPTER TWO : Geometric Tolerances

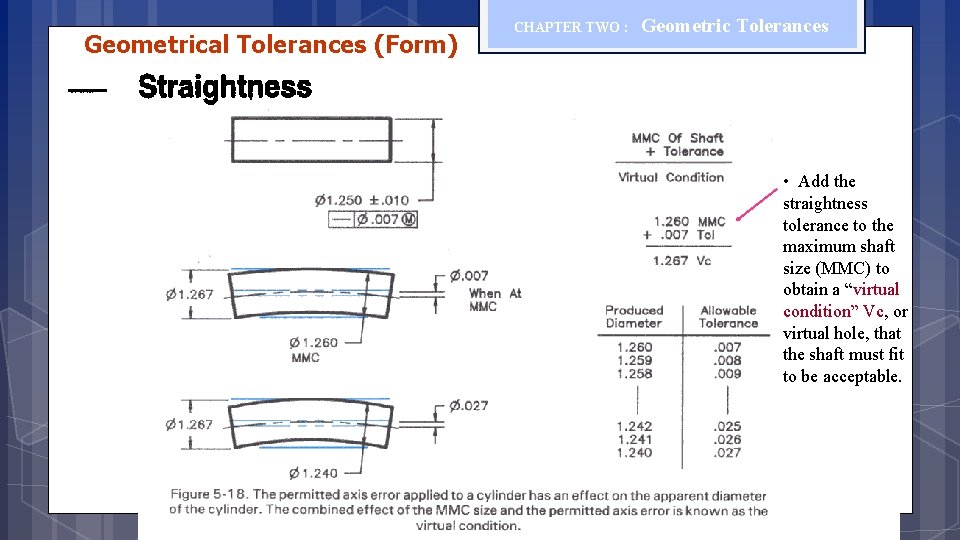
Geometrical Tolerances (Form) CHAPTER TWO : Geometric Tolerances • Add the straightness tolerance to the maximum shaft size (MMC) to obtain a “virtual condition” Vc, or virtual hole, that the shaft must fit to be acceptable.

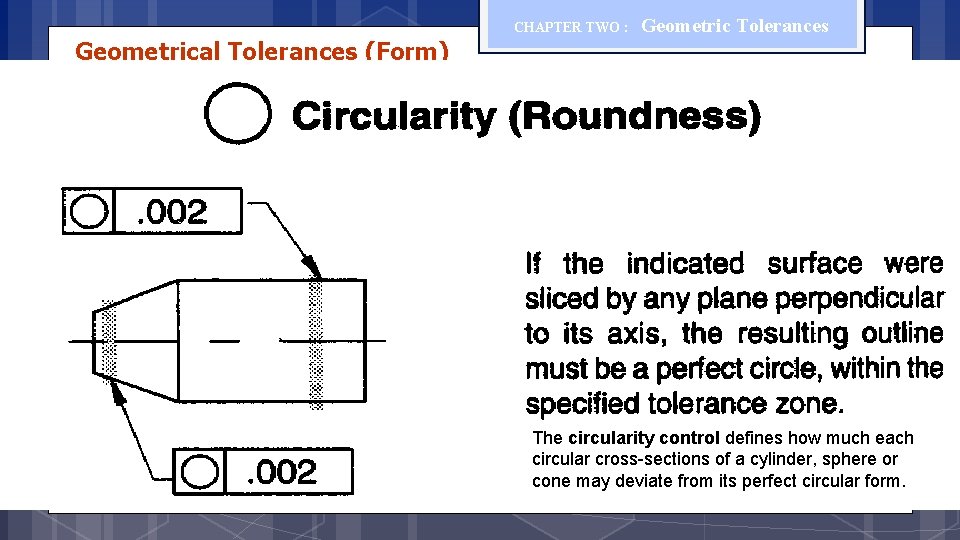
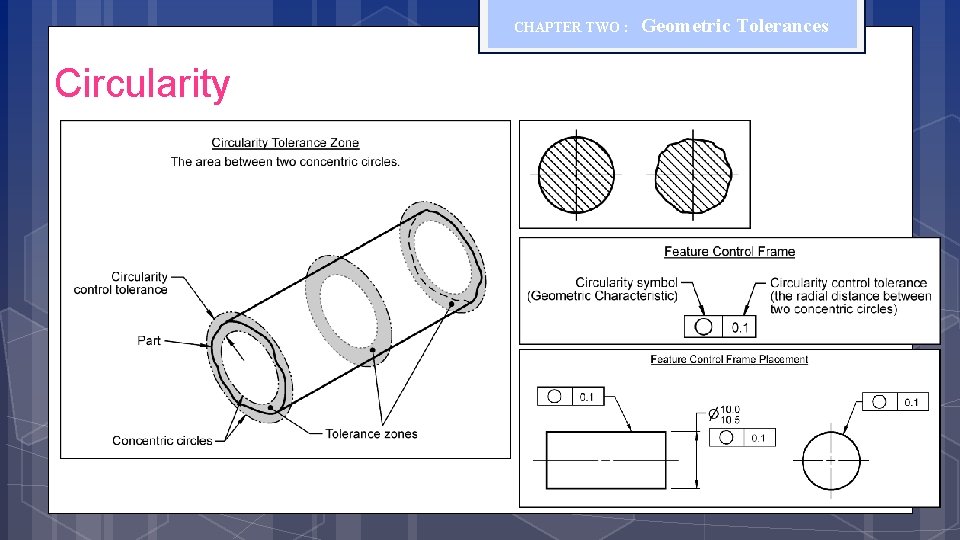
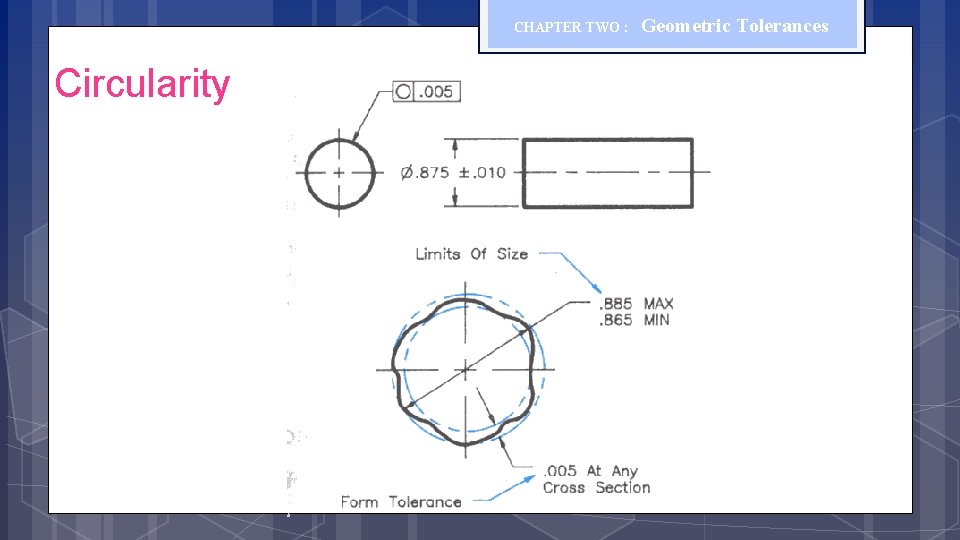
CHAPTER TWO : Geometrical Tolerances (Form) Geometric Tolerances The circularity control defines how much each circular cross-sections of a cylinder, sphere or cone may deviate from its perfect circular form.

CHAPTER TWO : Circularity Geometric Tolerances

CHAPTER TWO : Circularity Geometric Tolerances

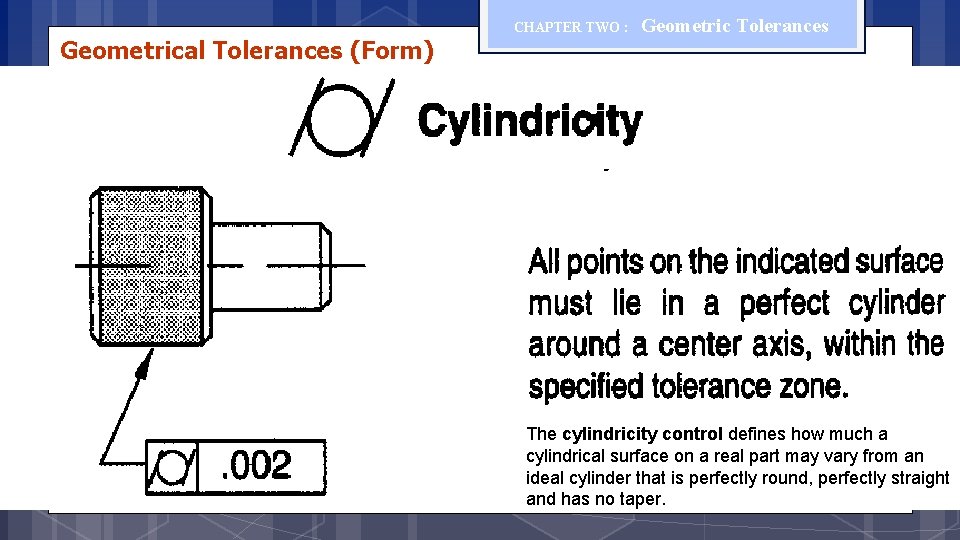
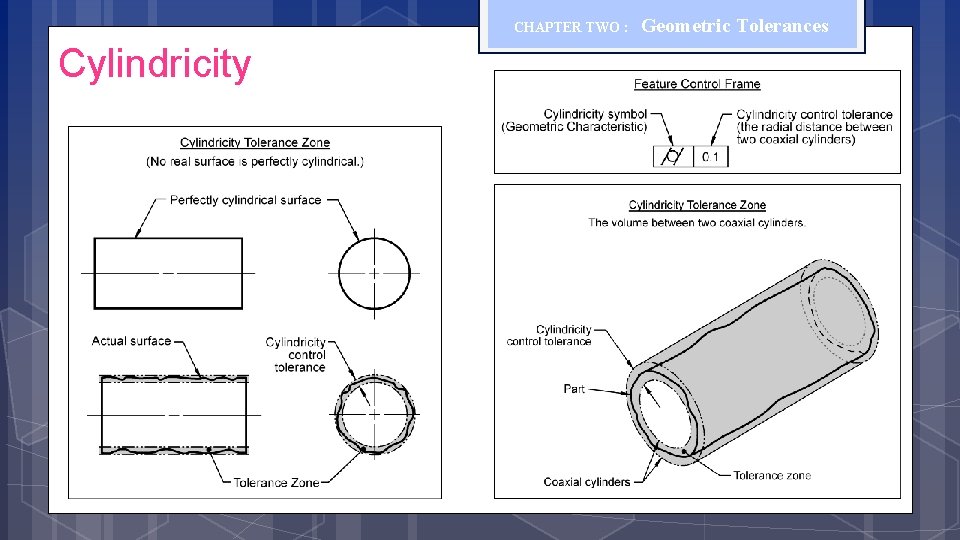
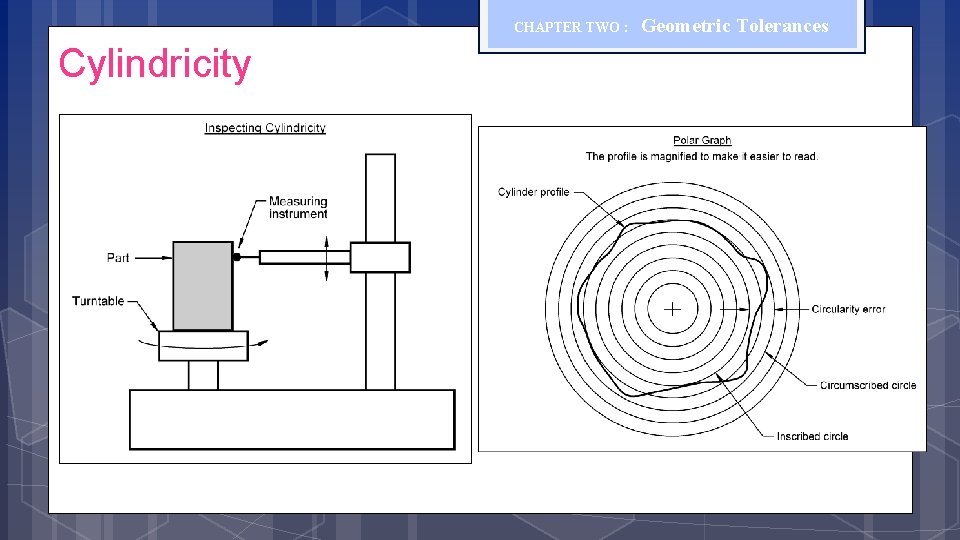
Geometrical Tolerances (Form) CHAPTER TWO : Geometric Tolerances The cylindricity control defines how much a cylindrical surface on a real part may vary from an ideal cylinder that is perfectly round, perfectly straight and has no taper.

CHAPTER TWO : Cylindricity Geometric Tolerances

CHAPTER TWO : Cylindricity Geometric Tolerances

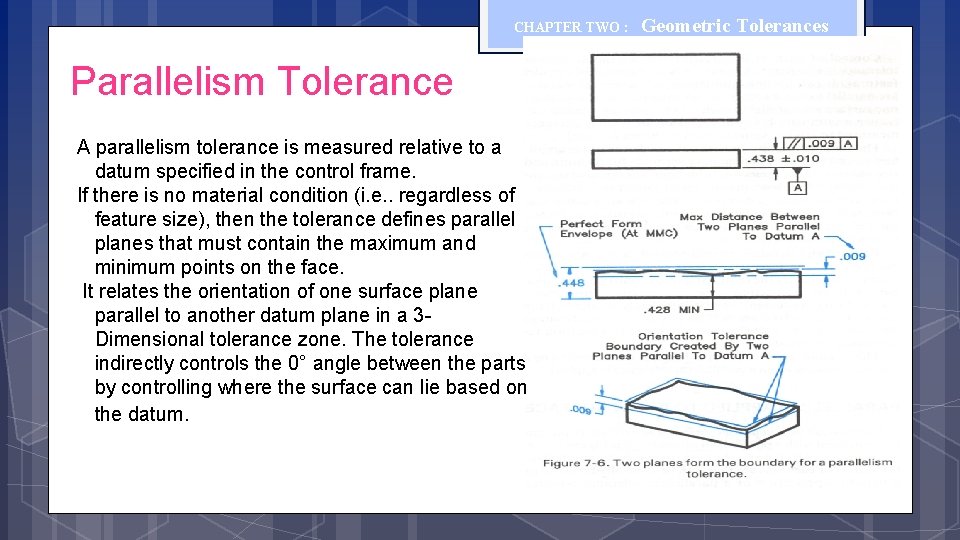
CHAPTER TWO : Parallelism Tolerance A parallelism tolerance is measured relative to a datum specified in the control frame. If there is no material condition (i. e. . regardless of feature size), then the tolerance defines parallel planes that must contain the maximum and minimum points on the face. It relates the orientation of one surface plane parallel to another datum plane in a 3 Dimensional tolerance zone. The tolerance indirectly controls the 0° angle between the parts by controlling where the surface can lie based on the datum. Geometric Tolerances

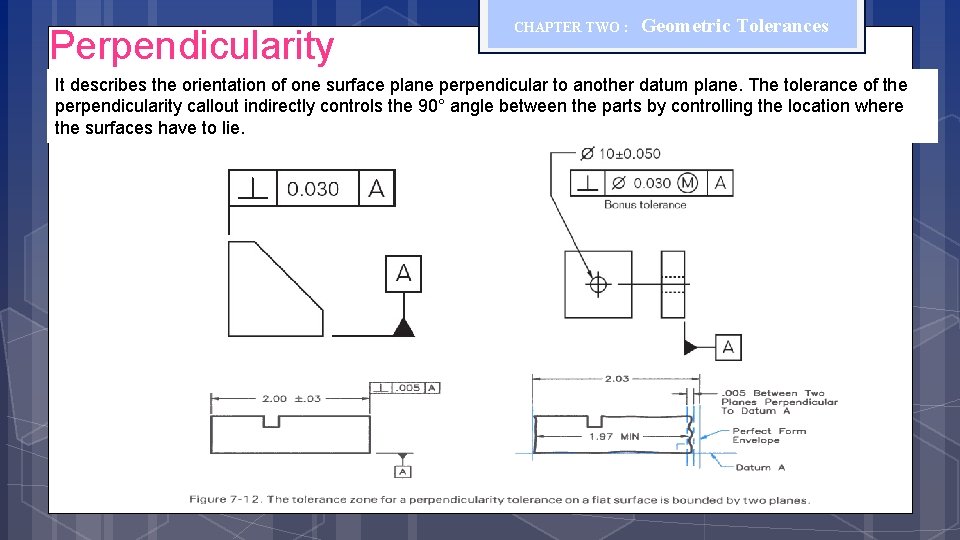
Perpendicularity CHAPTER TWO : Geometric Tolerances It describes the orientation of one surface plane perpendicular to another datum plane. The tolerance of the perpendicularity callout indirectly controls the 90° angle between the parts by controlling the location where the surfaces have to lie.

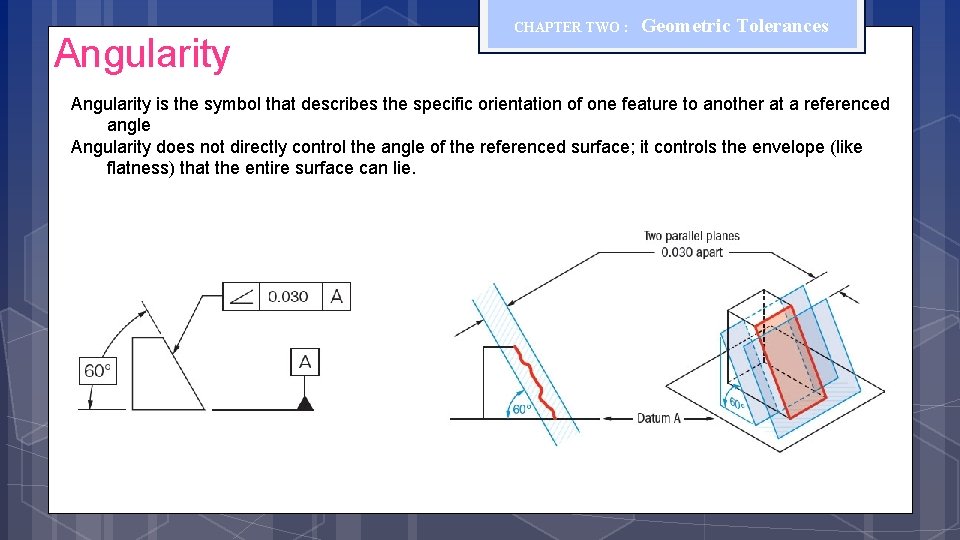
Angularity CHAPTER TWO : Geometric Tolerances Angularity is the symbol that describes the specific orientation of one feature to another at a referenced angle Angularity does not directly control the angle of the referenced surface; it controls the envelope (like flatness) that the entire surface can lie.

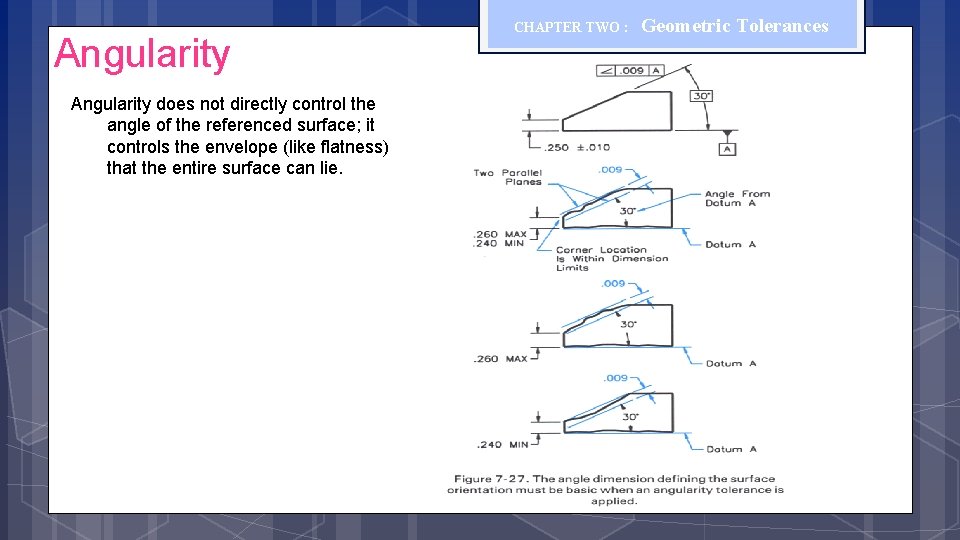
Angularity does not directly control the angle of the referenced surface; it controls the envelope (like flatness) that the entire surface can lie. CHAPTER TWO : Geometric Tolerances

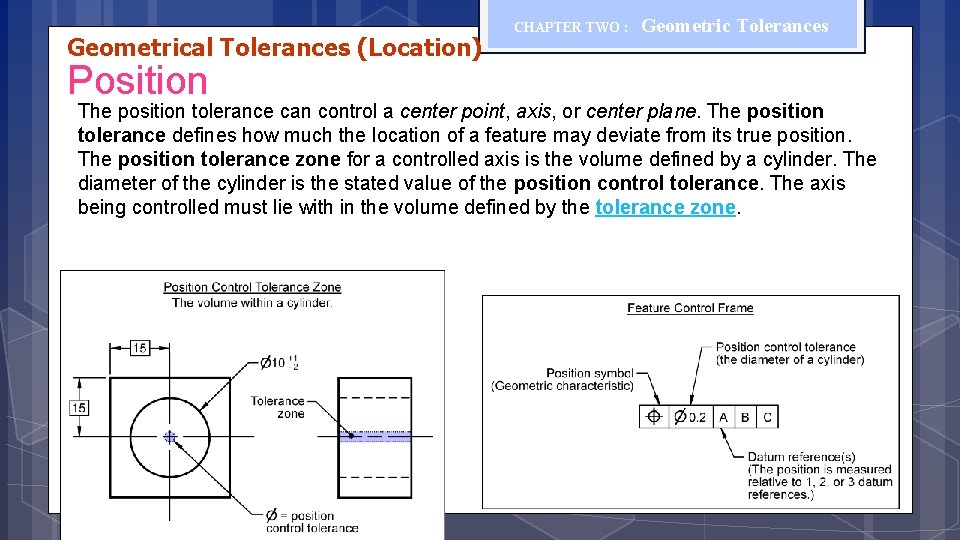
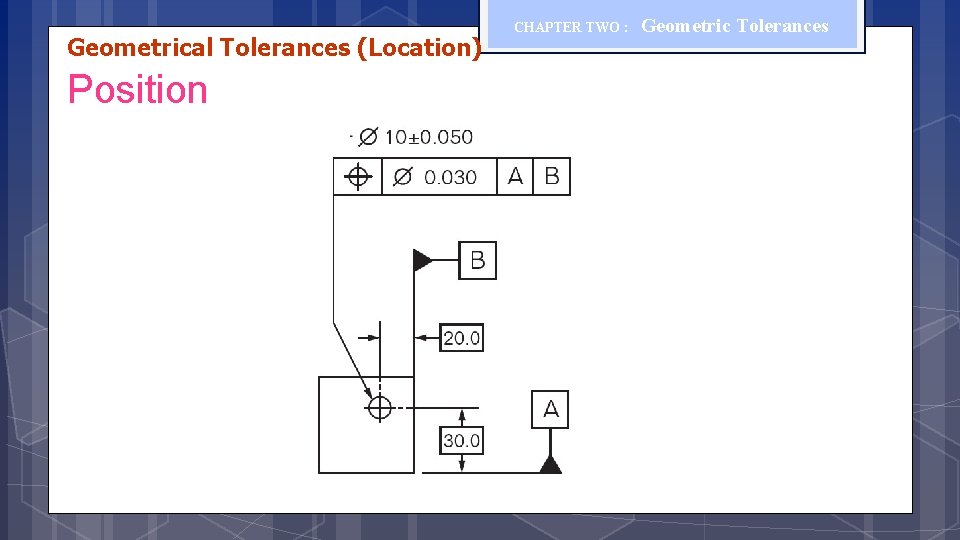
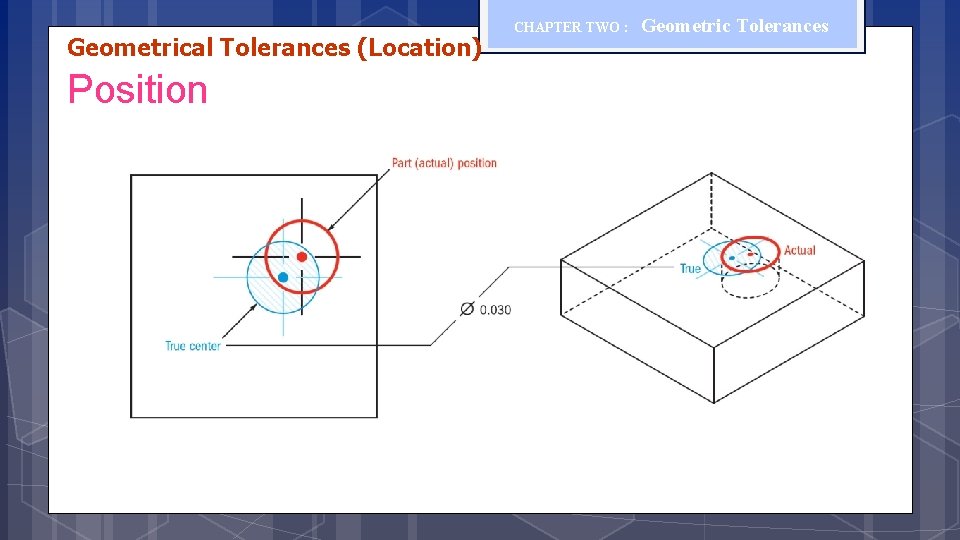
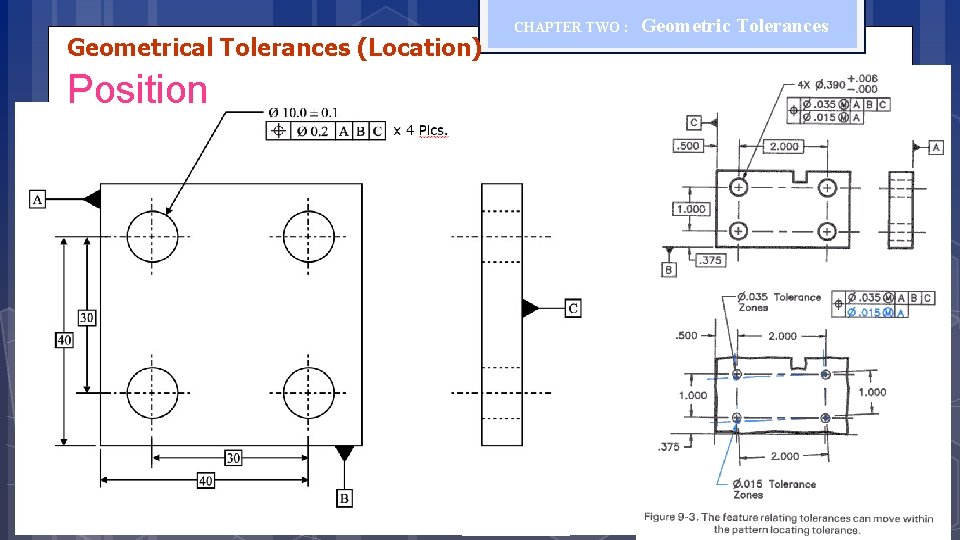
Geometrical Tolerances (Location) Position CHAPTER TWO : Geometric Tolerances The position tolerance can control a center point, axis, or center plane. The position tolerance defines how much the location of a feature may deviate from its true position. The position tolerance zone for a controlled axis is the volume defined by a cylinder. The diameter of the cylinder is the stated value of the position control tolerance. The axis being controlled must lie with in the volume defined by the tolerance zone.

Geometrical Tolerances (Location) Position CHAPTER TWO : Geometric Tolerances

Geometrical Tolerances (Location) Position CHAPTER TWO : Geometric Tolerances

Geometrical Tolerances (Location) Position CHAPTER TWO : Geometric Tolerances

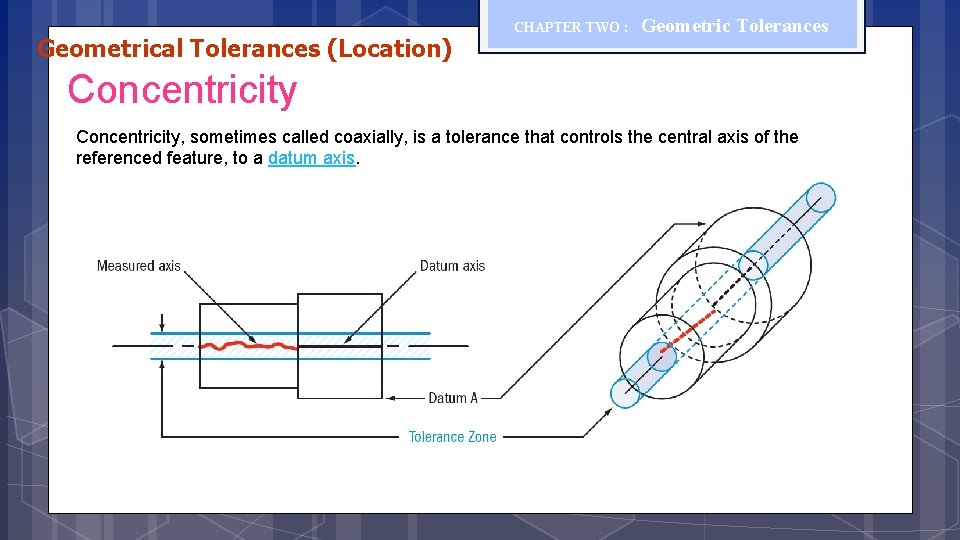
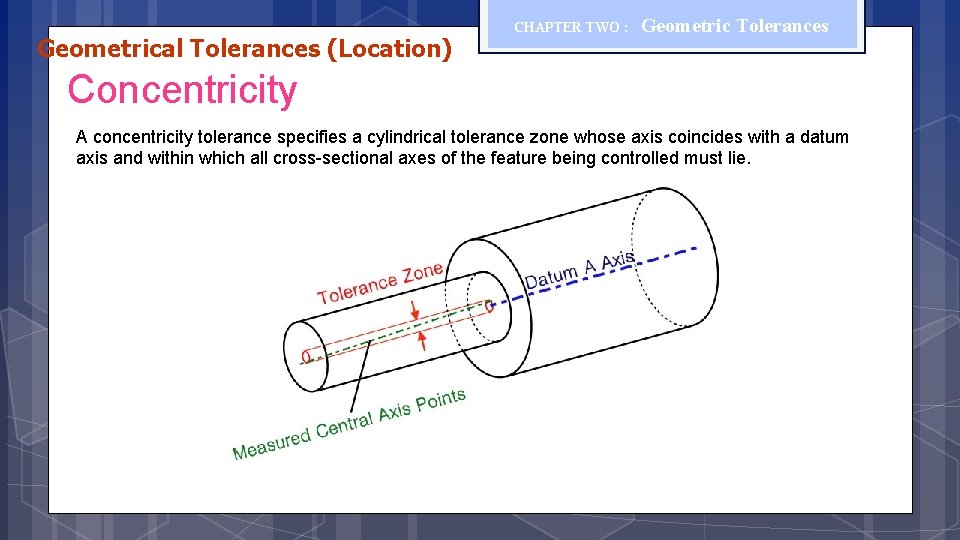
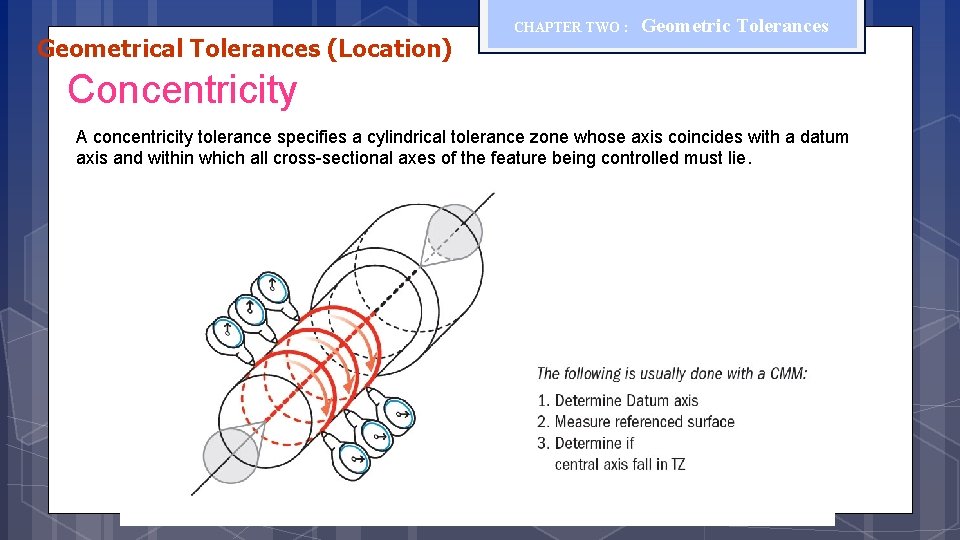
Geometrical Tolerances (Location) CHAPTER TWO : Geometric Tolerances Concentricity, sometimes called coaxially, is a tolerance that controls the central axis of the referenced feature, to a datum axis.

Geometrical Tolerances (Location) CHAPTER TWO : Geometric Tolerances Concentricity A concentricity tolerance specifies a cylindrical tolerance zone whose axis coincides with a datum axis and within which all cross-sectional axes of the feature being controlled must lie.

Geometrical Tolerances (Location) CHAPTER TWO : Geometric Tolerances Concentricity A concentricity tolerance specifies a cylindrical tolerance zone whose axis coincides with a datum axis and within which all cross-sectional axes of the feature being controlled must lie.

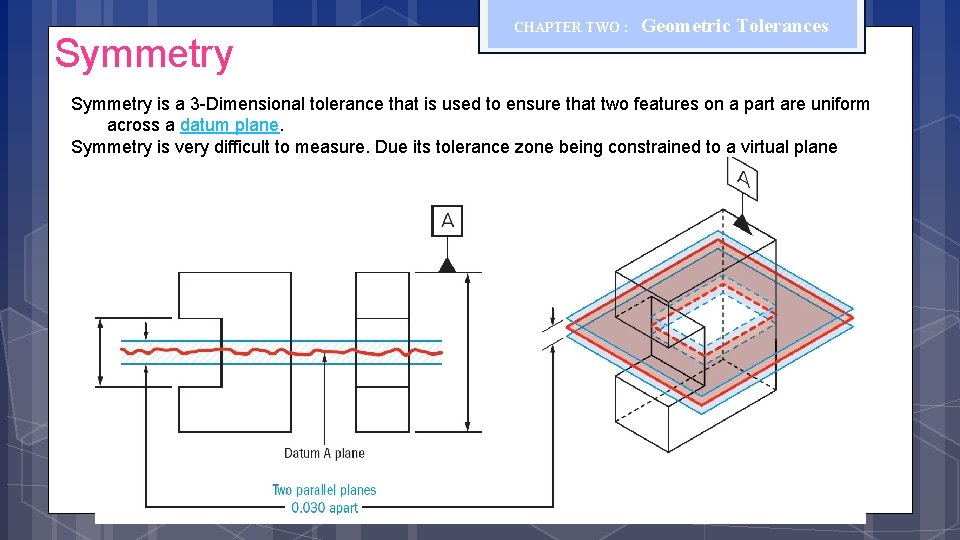
Symmetry CHAPTER TWO : Geometric Tolerances Symmetry is a 3 -Dimensional tolerance that is used to ensure that two features on a part are uniform across a datum plane. Symmetry is very difficult to measure. Due its tolerance zone being constrained to a virtual plane

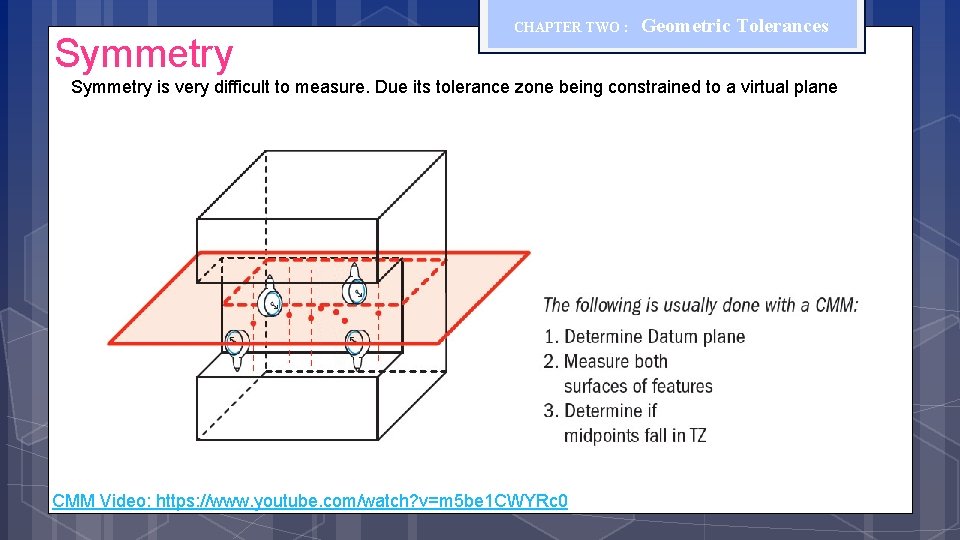
Symmetry CHAPTER TWO : Geometric Tolerances Symmetry is very difficult to measure. Due its tolerance zone being constrained to a virtual plane CMM Video: https: //www. youtube. com/watch? v=m 5 be 1 CWYRc 0

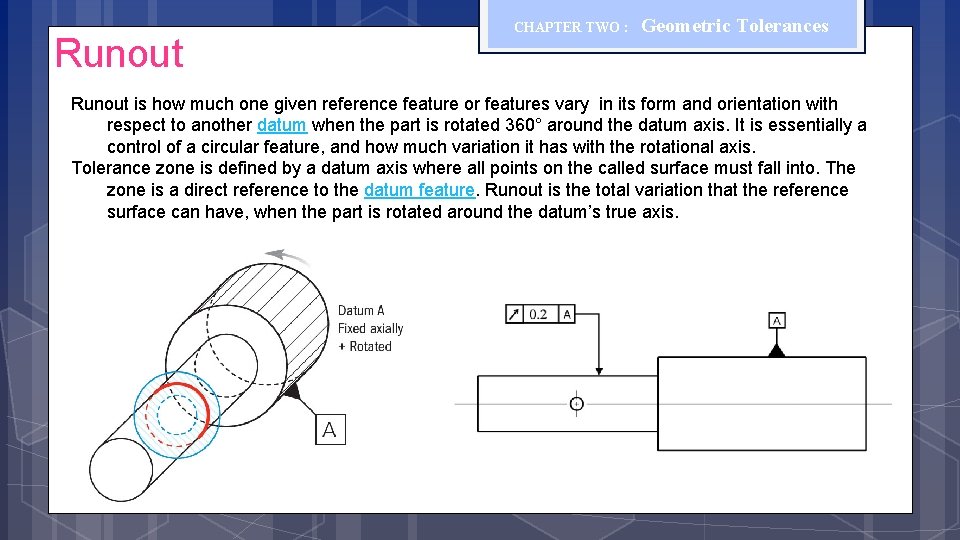
Runout CHAPTER TWO : Geometric Tolerances Runout is how much one given reference feature or features vary in its form and orientation with respect to another datum when the part is rotated 360° around the datum axis. It is essentially a control of a circular feature, and how much variation it has with the rotational axis. Tolerance zone is defined by a datum axis where all points on the called surface must fall into. The zone is a direct reference to the datum feature. Runout is the total variation that the reference surface can have, when the part is rotated around the datum’s true axis.

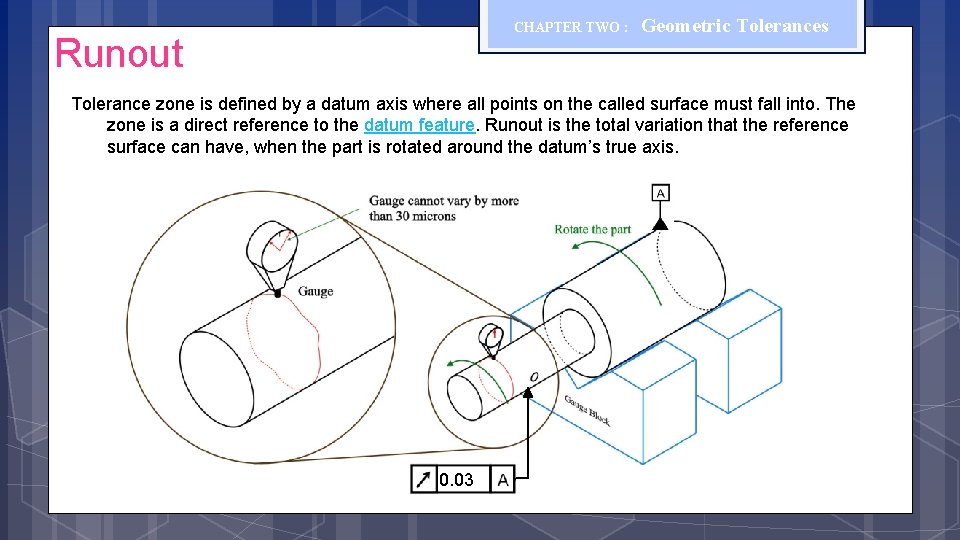
CHAPTER TWO : Runout Geometric Tolerances Tolerance zone is defined by a datum axis where all points on the called surface must fall into. The zone is a direct reference to the datum feature. Runout is the total variation that the reference surface can have, when the part is rotated around the datum’s true axis. 0. 03

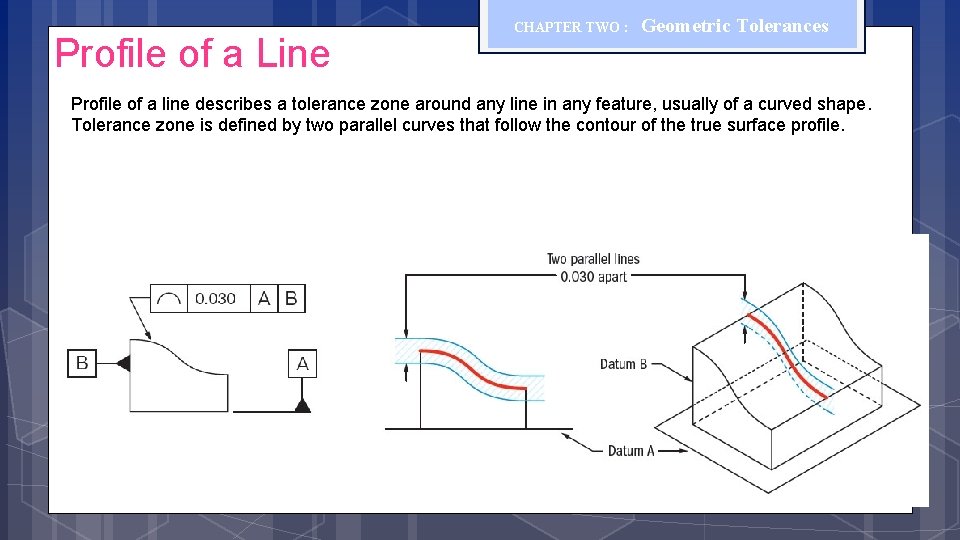
Profile of a Line CHAPTER TWO : Geometric Tolerances Profile of a line describes a tolerance zone around any line in any feature, usually of a curved shape. Tolerance zone is defined by two parallel curves that follow the contour of the true surface profile.

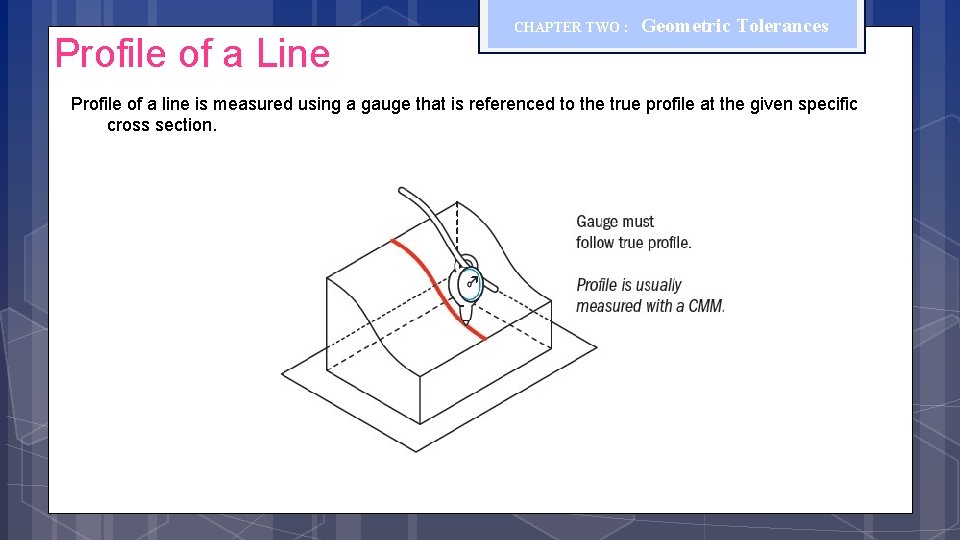
Profile of a Line CHAPTER TWO : Geometric Tolerances Profile of a line is measured using a gauge that is referenced to the true profile at the given specific cross section.