Chapter Three 3 Strength calculation and dimensioning of






- Slides: 77

Chapter Three 3. Strength calculation and dimensioning of joints 1

INTRODUCTION: a machine element used for holding or joining two or more parts (elements) of a machine or structure is known as a fastener. • Typical methods of fastening or joining parts use such devices as bolts, nuts, cap screws, setscrews, rivets, spring retainers, locking devices, pins, keys, welds, and adhesives. • Generally machine joints categorized as A. Temporary joints are those joints which can be disassembled easily with out destroying the connection components such as screw, key joint etc. B. Permanent joint are those joint which can not be disassemble with out destroying the connection of components such as weld, rivet joint etc. 2

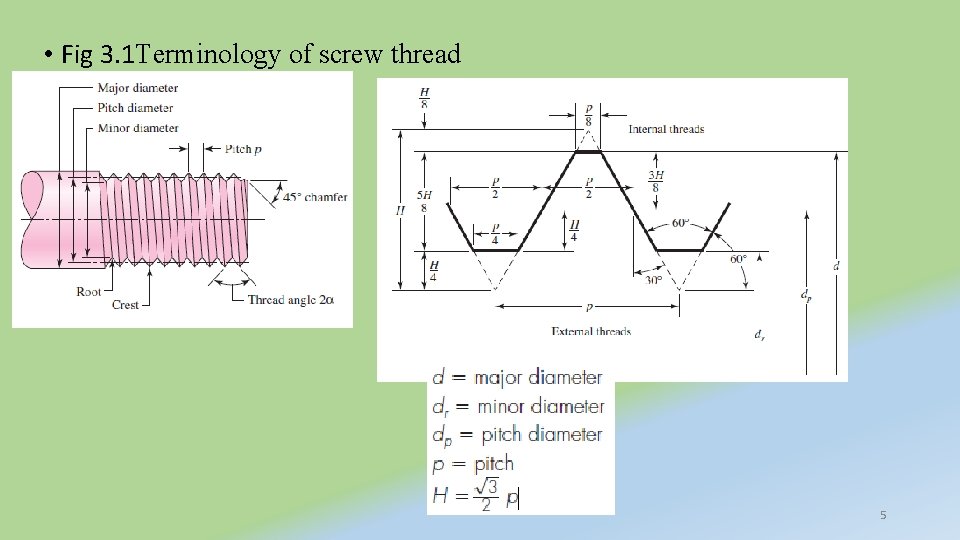
3. 1 Bolted and Riveted Joints; Thread Standards and Definitions Standard : - Formulation, publication, and implementation of guidelines, rules, and specifications for common and repeated use, aimed at achieving optimum degree of order or uniformity in a given context. • Terminology of screw thread 1. 2. 3. 4. 5. Pitch : - is the distance between adjacent thread forms measured parallel to the thread axis. The major diameter : - d is the largest diameter of a screw thread. The minor (or root) diameter dr : - is the smallest diameter of a screw thread The pitch diameter dp : - is a theoretical diameter between the major and minor diameters. The lead l, not shown, is the distance the nut moves parallel to the screw axis when the nut is given one turn. 3

A multiple-threaded product is one having two or more threads cut beside each other • Standardized products such as screws, bolts, and nuts all have single threads; a double-threaded screw has a lead equal to twice the pitch, a triple-threaded screw has a lead equal to 3 times the pitch, and so on. • All threads are made according to the right-hand rule unless otherwise noted. 4

• Fig 3. 1 Terminology of screw thread 5

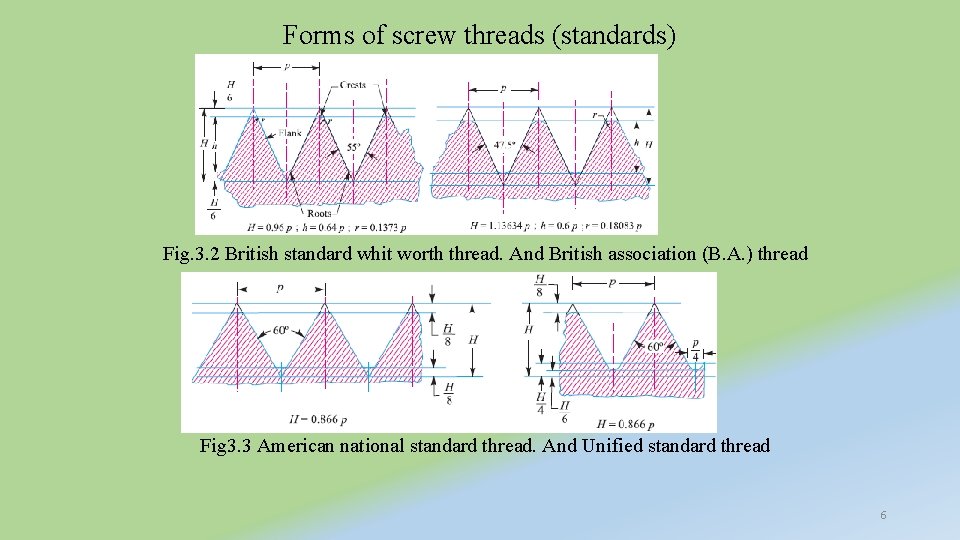
Forms of screw threads (standards) Fig. 3. 2 British standard whit worth thread. And British association (B. A. ) thread Fig 3. 3 American national standard thread. And Unified standard thread 6

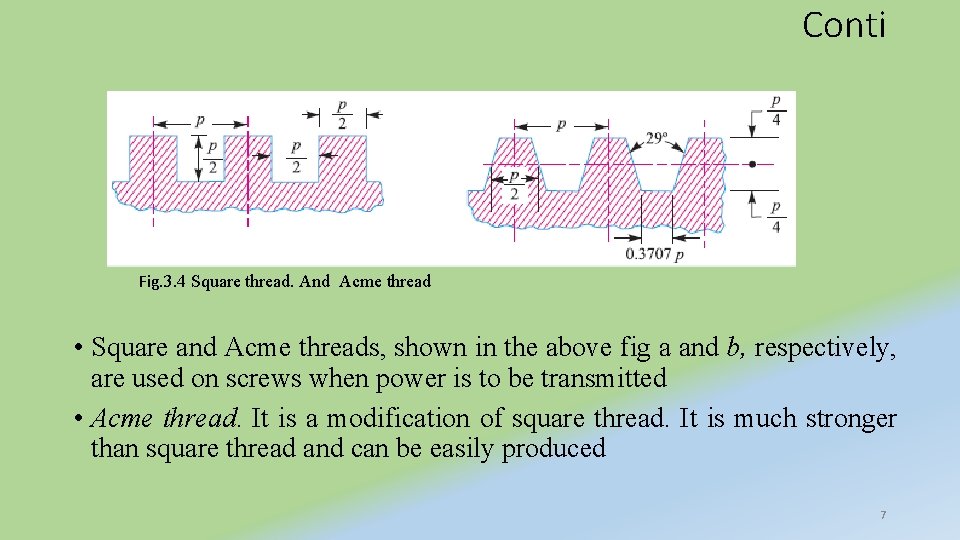
Conti Fig. 3. 4 Square thread. And Acme thread • Square and Acme threads, shown in the above fig a and b, respectively, are used on screws when power is to be transmitted • Acme thread. It is a modification of square thread. It is much stronger than square thread and can be easily produced 7

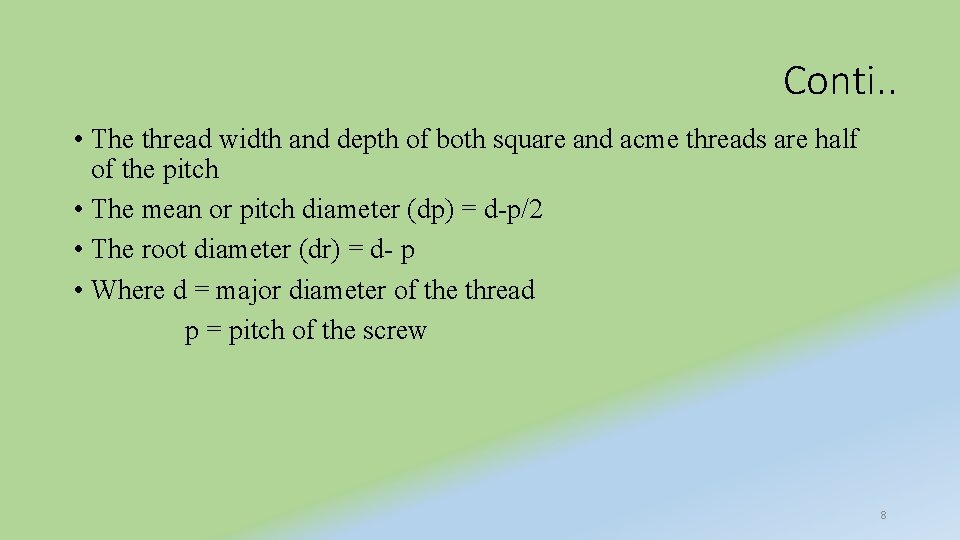
Conti. . • The thread width and depth of both square and acme threads are half of the pitch • The mean or pitch diameter (dp) = d-p/2 • The root diameter (dr) = d- p • Where d = major diameter of the thread p = pitch of the screw 8

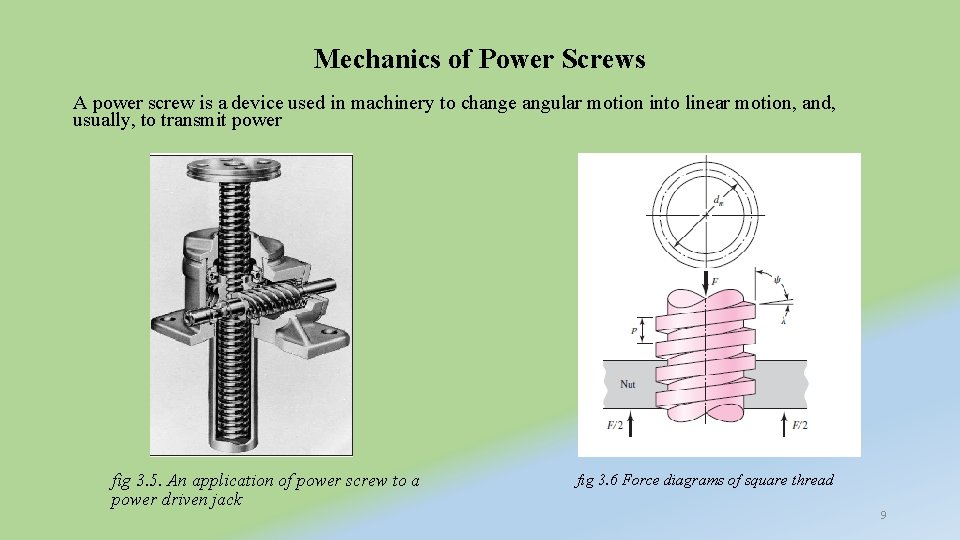
Mechanics of Power Screws A power screw is a device used in machinery to change angular motion into linear motion, and, usually, to transmit power fig 3. 5. An application of power screw to a power driven jack fig 3. 6 Force diagrams of square thread 9

ü In Fig. 3. 1 b a square-threaded power screw with single thread having a mean diameter dm, a pitch p, a lead angle λ, and a helix angle ψ is loaded by the axial compressive force F. ü To find an expression for the torque required to raise this load, and another expression for the torque required to lower the load ü First, imagine that a single thread of the screw is unrolled or developed (Fig. 3. 7) for exactly a single turn. ü Then one edge of the thread will form the hypotenuse of a right triangle whose base is the circumference of the mean-thread-diameter circle and whose height is the lead. 10

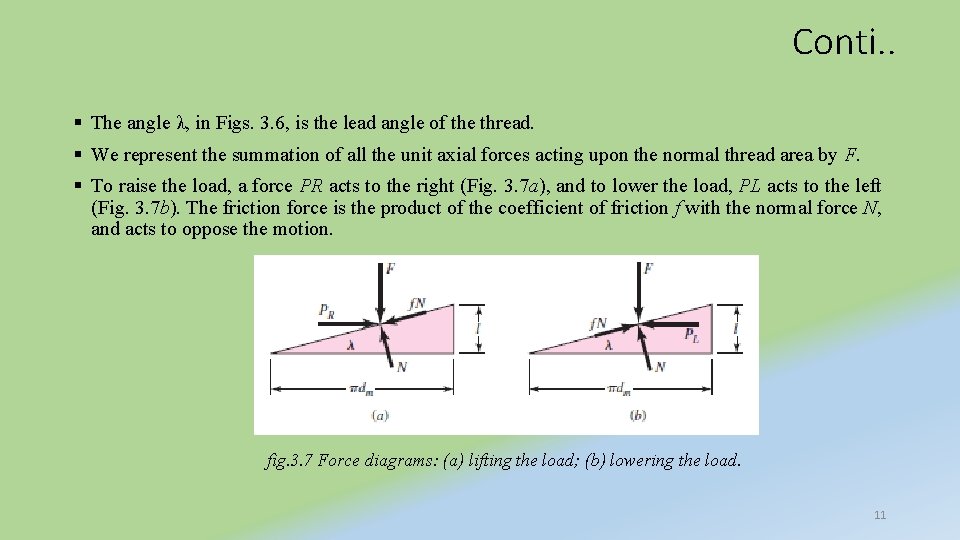
Conti. . § The angle λ, in Figs. 3. 6, is the lead angle of the thread. § We represent the summation of all the unit axial forces acting upon the normal thread area by F. § To raise the load, a force PR acts to the right (Fig. 3. 7 a), and to lower the load, PL acts to the left (Fig. 3. 7 b). The friction force is the product of the coefficient of friction f with the normal force N, and acts to oppose the motion. fig. 3. 7 Force diagrams: (a) lifting the load; (b) lowering the load. 11

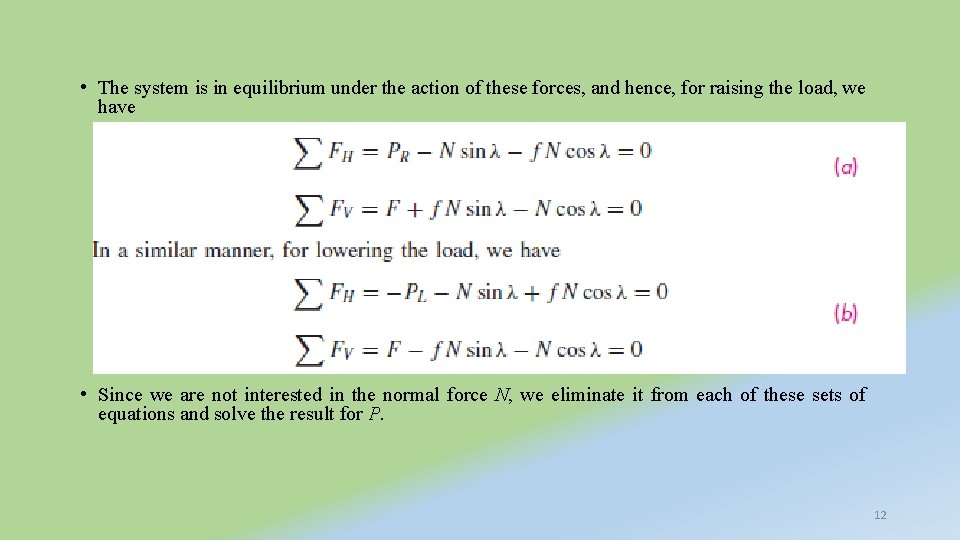
• The system is in equilibrium under the action of these forces, and hence, for raising the load, we have • Since we are not interested in the normal force N, we eliminate it from each of these sets of equations and solve the result for P. 12

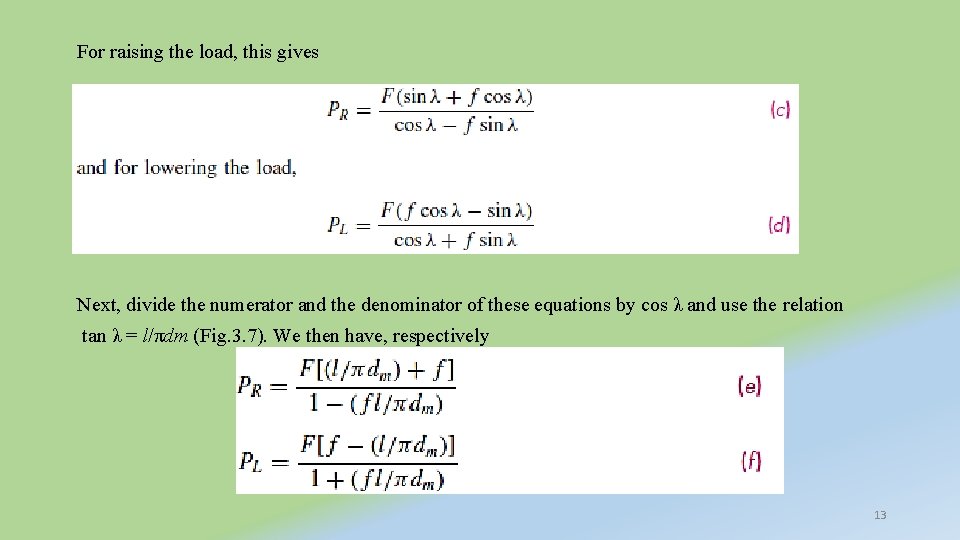
For raising the load, this gives Next, divide the numerator and the denominator of these equations by cos λ and use the relation tan λ = l/πdm (Fig. 3. 7). We then have, respectively 13

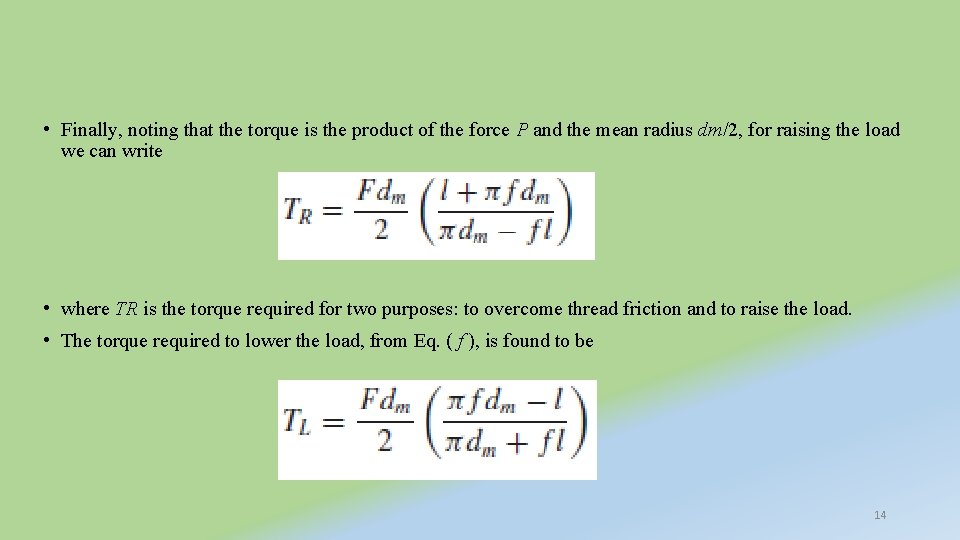
• Finally, noting that the torque is the product of the force P and the mean radius dm/2, for raising the load we can write (3. 1) • where TR is the torque required for two purposes: to overcome thread friction and to raise the load. • The torque required to lower the load, from Eq. ( f ), is found to be 14

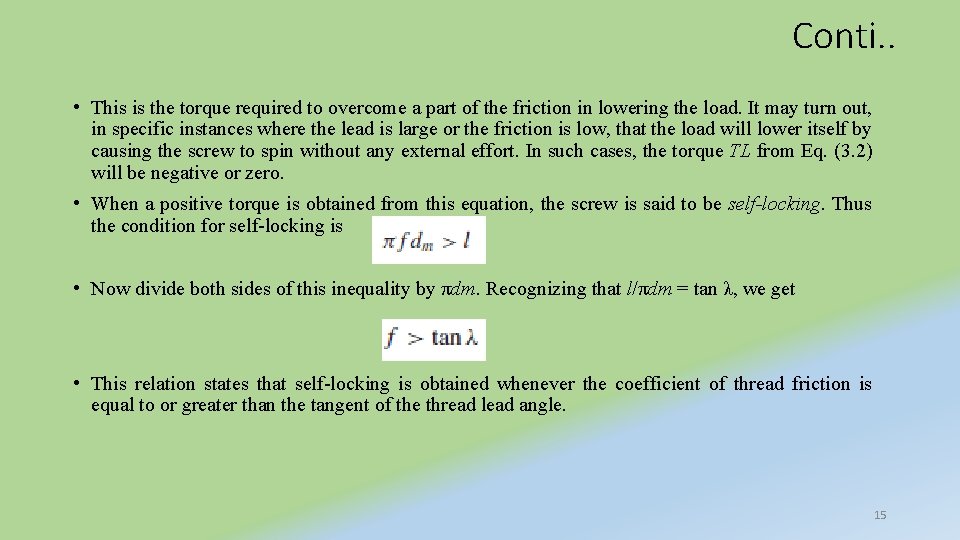
Conti. . • This is the torque required to overcome a part of the friction in lowering the load. It may turn out, in specific instances where the lead is large or the friction is low, that the load will lower itself by causing the screw to spin without any external effort. In such cases, the torque TL from Eq. (3. 2) will be negative or zero. • When a positive torque is obtained from this equation, the screw is said to be self-locking. Thus the condition for self-locking is • Now divide both sides of this inequality by πdm. Recognizing that l/πdm = tan λ, we get • This relation states that self-locking is obtained whenever the coefficient of thread friction is equal to or greater than the tangent of the thread lead angle. 15

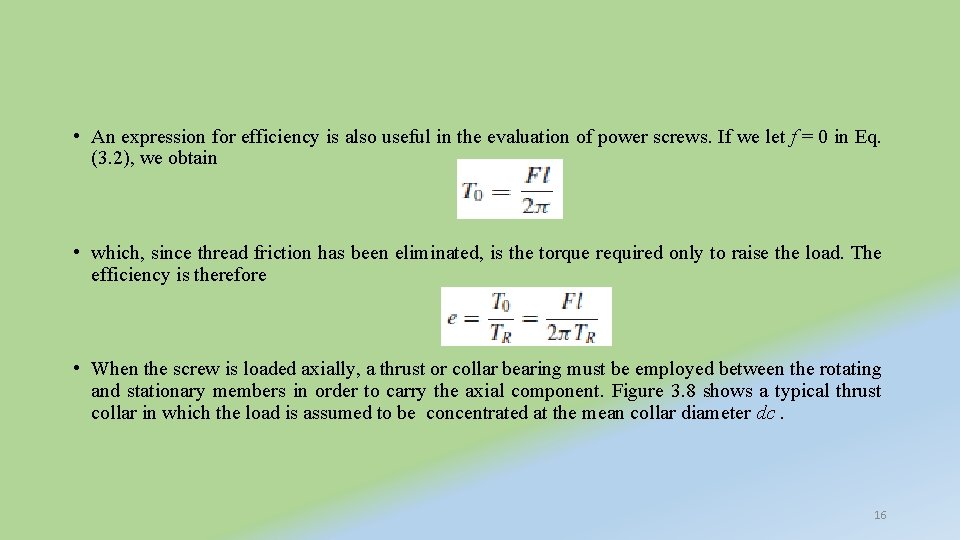
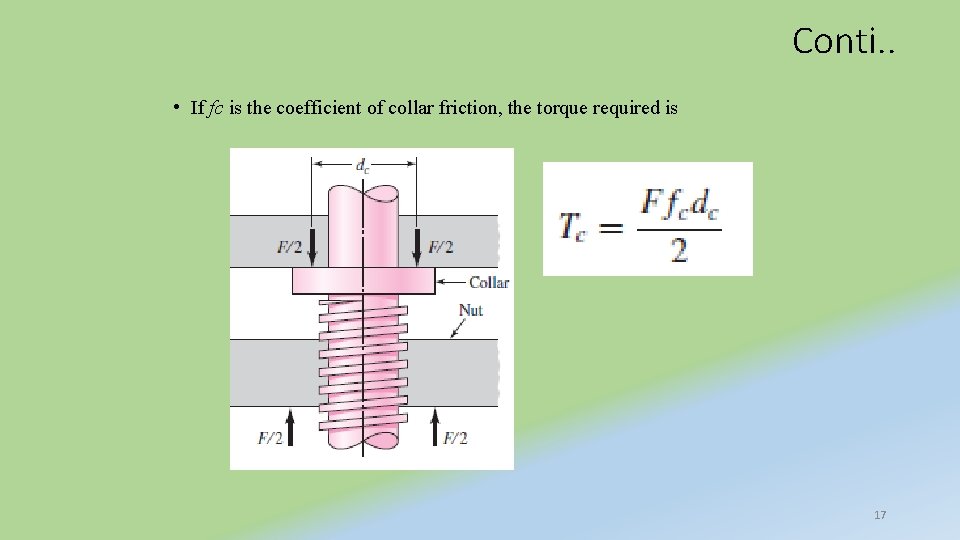
• An expression for efficiency is also useful in the evaluation of power screws. If we let f = 0 in Eq. (3. 2), we obtain • which, since thread friction has been eliminated, is the torque required only to raise the load. The efficiency is therefore • When the screw is loaded axially, a thrust or collar bearing must be employed between the rotating and stationary members in order to carry the axial component. Figure 3. 8 shows a typical thrust collar in which the load is assumed to be concentrated at the mean collar diameter dc. 16

Conti. . • If fc is the coefficient of collar friction, the torque required is 17

3. 2 Bolted Joints under Eccentric Loading There are many applications of the bolted joints which are subjected to eccentric loading such as a wall bracket, pillar crane, etc. The eccentric load may be 1. Parallel to the axis of the bolts, 2. Perpendicular to the axis of the bolts, 18

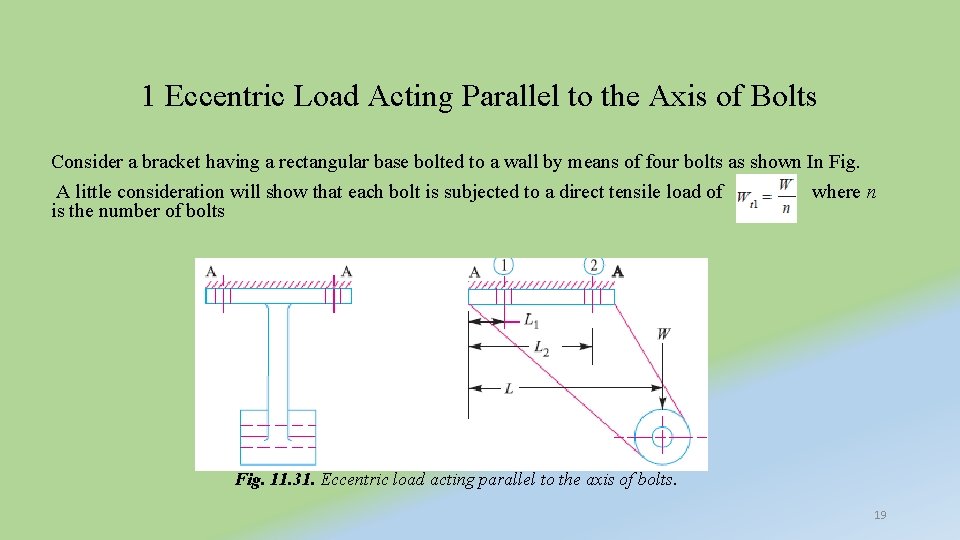
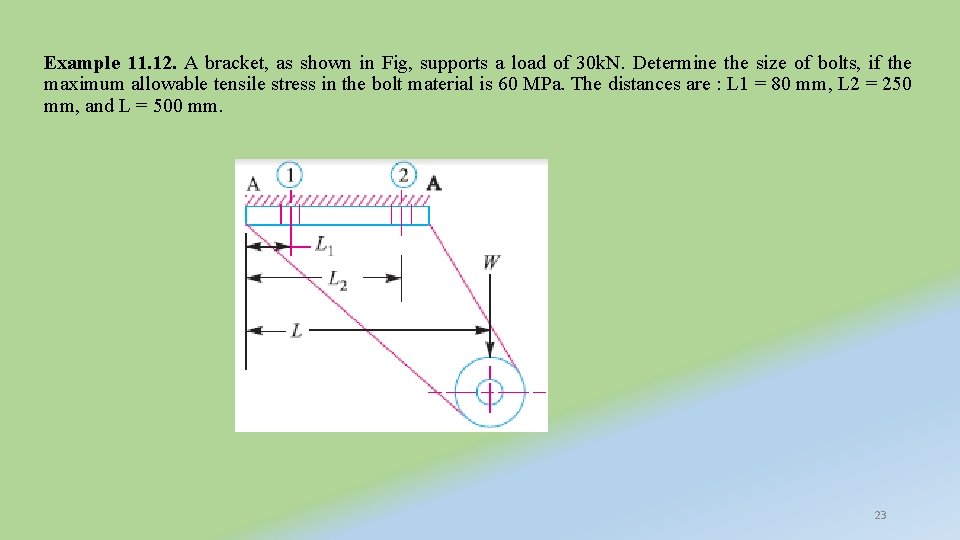
1 Eccentric Load Acting Parallel to the Axis of Bolts Consider a bracket having a rectangular base bolted to a wall by means of four bolts as shown In Fig. A little consideration will show that each bolt is subjected to a direct tensile load of where n is the number of bolts Fig. 11. 31. Eccentric load acting parallel to the axis of bolts. 19

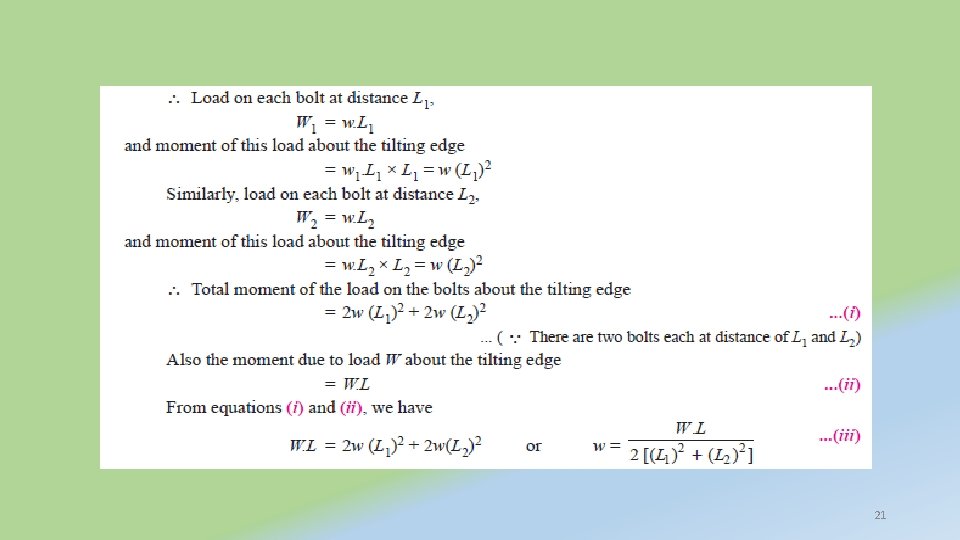
• The load W tends to rotate the bracket about the edge A-A. Due to this, each bolt is stretched by an amount that depends upon its distance from the tilting edge. • Since the stress is a function of *elongation, therefore each bolt will experience a different load which also depends upon the distance from the tilting edge. • For convenience, all the bolts are made of same size. In case the flange is heavy, it may be considered as a rigid body. • Let w be the load in a bolt per unit distance due to the turning effect of the bracket and let W 1 and W 2 be the loads on each of the bolts at distances L 1 and L 2 from the tilting edge. 20

21

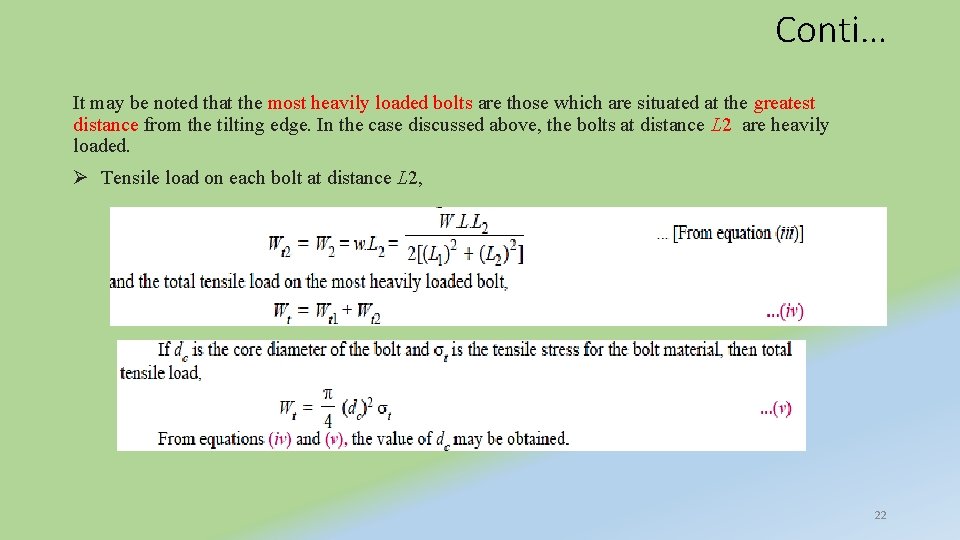
Conti… It may be noted that the most heavily loaded bolts are those which are situated at the greatest distance from the tilting edge. In the case discussed above, the bolts at distance L 2 are heavily loaded. Ø Tensile load on each bolt at distance L 2, 22

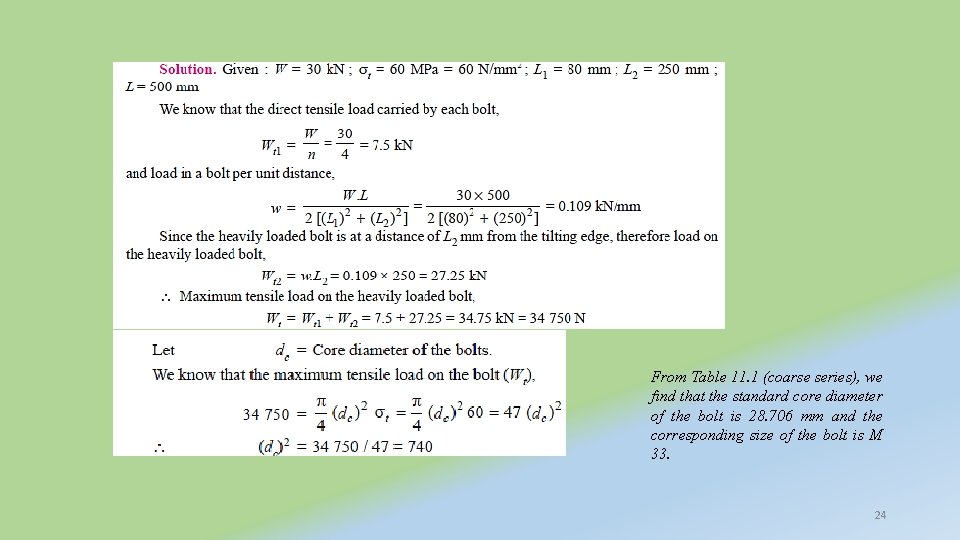
Example 11. 12. A bracket, as shown in Fig, supports a load of 30 k. N. Determine the size of bolts, if the maximum allowable tensile stress in the bolt material is 60 MPa. The distances are : L 1 = 80 mm, L 2 = 250 mm, and L = 500 mm. 23

From Table 11. 1 (coarse series), we find that the standard core diameter of the bolt is 28. 706 mm and the corresponding size of the bolt is M 33. 24

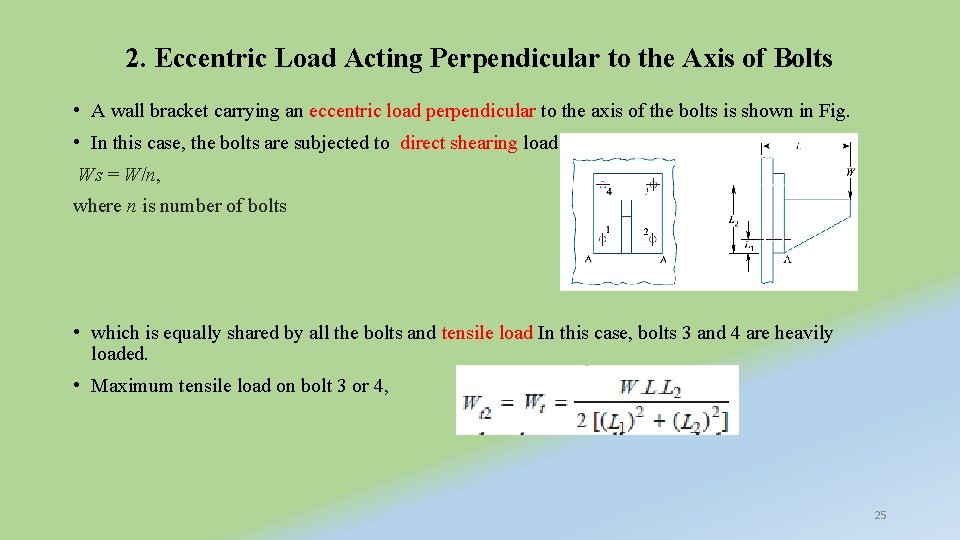
2. Eccentric Load Acting Perpendicular to the Axis of Bolts • A wall bracket carrying an eccentric load perpendicular to the axis of the bolts is shown in Fig. • In this case, the bolts are subjected to direct shearing load Ws = W/n, where n is number of bolts • which is equally shared by all the bolts and tensile load In this case, bolts 3 and 4 are heavily loaded. • Maximum tensile load on bolt 3 or 4, 25

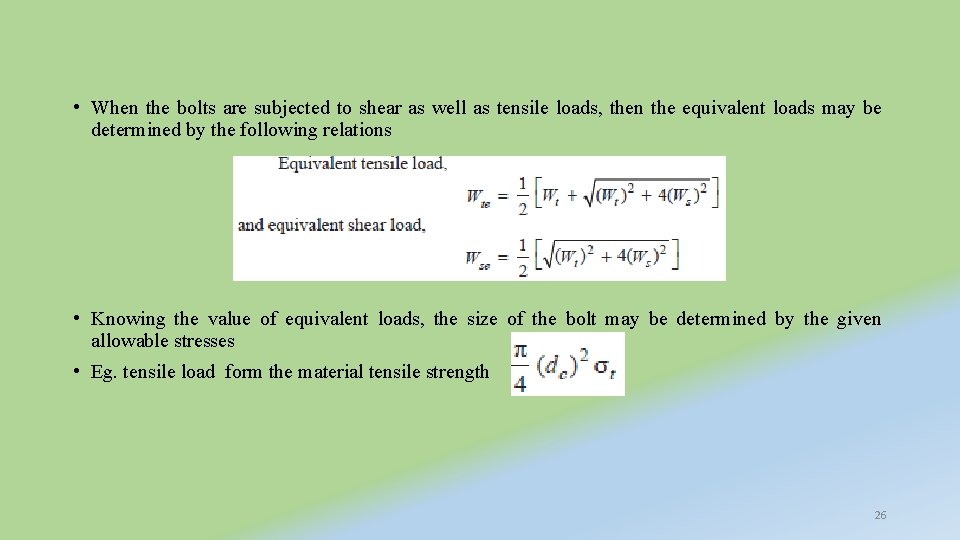
• When the bolts are subjected to shear as well as tensile loads, then the equivalent loads may be determined by the following relations • Knowing the value of equivalent loads, the size of the bolt may be determined by the given allowable stresses • Eg. tensile load form the material tensile strength 26

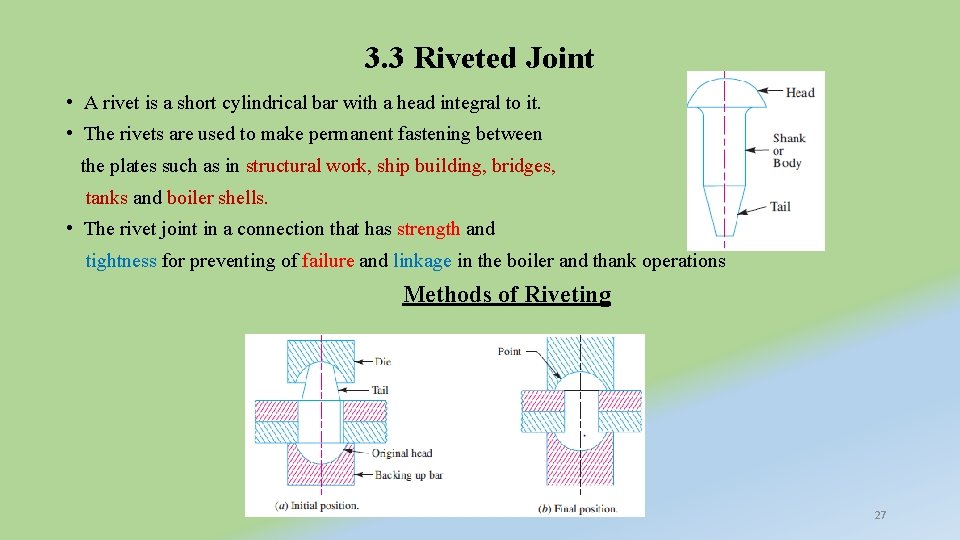
3. 3 Riveted Joint • A rivet is a short cylindrical bar with a head integral to it. • The rivets are used to make permanent fastening between the plates such as in structural work, ship building, bridges, tanks and boiler shells. • The rivet joint in a connection that has strength and tightness for preventing of failure and linkage in the boiler and thank operations Methods of Riveting 27

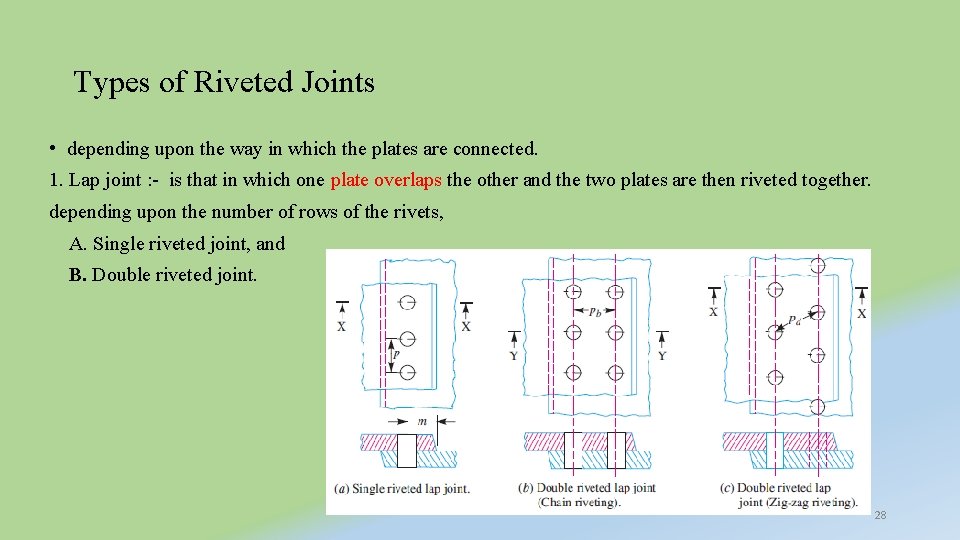
Types of Riveted Joints • depending upon the way in which the plates are connected. 1. Lap joint : - is that in which one plate overlaps the other and the two plates are then riveted together. depending upon the number of rows of the rivets, A. Single riveted joint, and B. Double riveted joint. 28

Rivet joint terminology's 1. Pitch. It is the distance from the center of one rivet to the center of the next rivet measured parallel to the seam as shown in Fig. above. It is usually denoted by p. 2. Back pitch. It is the perpendicular distance between the center lines of the successive rows as shown in above. It is usually denoted by pb. 3. Diagonal pitch. It is the distance between the centers of the rivets in adjacent rows of zig-zag riveted joint as shown in Fig, above. It is usually denoted by pd. 4. Margin or marginal pitch. It is the distance between the center of rivet hole to the nearest edge of the plate as shown in Fig. above. It is usually denoted by m. 29

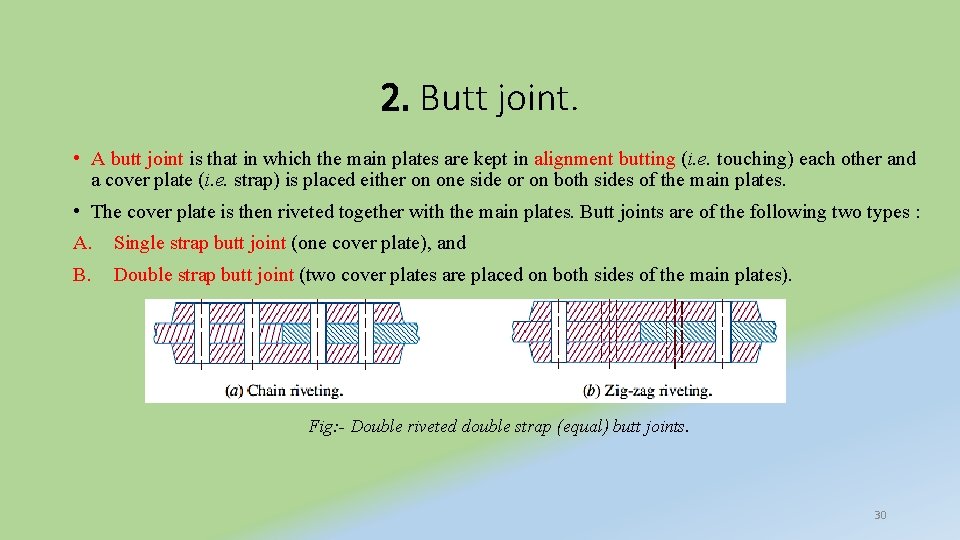
2. Butt joint. • A butt joint is that in which the main plates are kept in alignment butting (i. e. touching) each other and a cover plate (i. e. strap) is placed either on one side or on both sides of the main plates. • The cover plate is then riveted together with the main plates. Butt joints are of the following two types : A. Single strap butt joint (one cover plate), and B. Double strap butt joint (two cover plates are placed on both sides of the main plates). Fig: - Double riveted double strap (equal) butt joints. 30

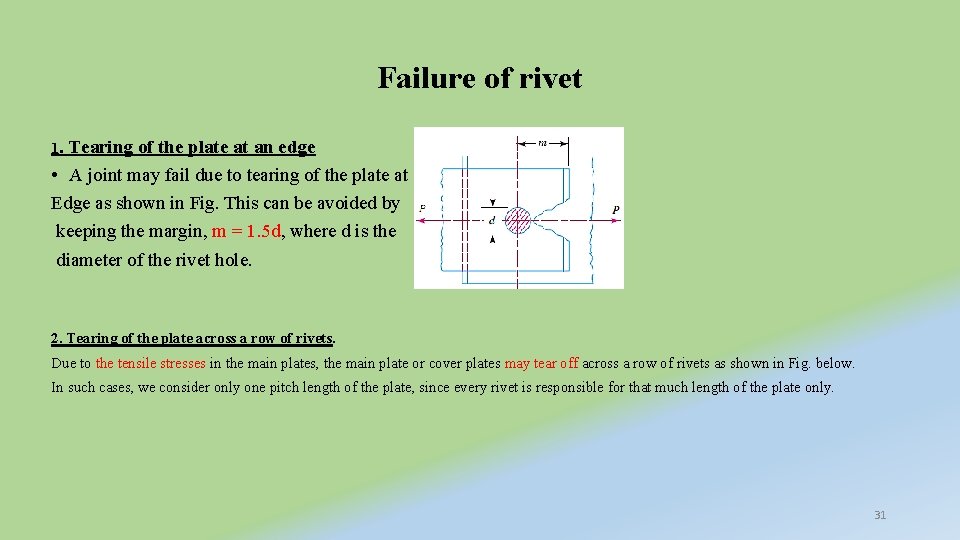
Failure of rivet 1. Tearing of the plate at an edge • A joint may fail due to tearing of the plate at an Edge as shown in Fig. This can be avoided by keeping the margin, m = 1. 5 d, where d is the diameter of the rivet hole. 2. Tearing of the plate across a row of rivets. Due to the tensile stresses in the main plates, the main plate or cover plates may tear off across a row of rivets as shown in Fig. below. In such cases, we consider only one pitch length of the plate, since every rivet is responsible for that much length of the plate only. 31

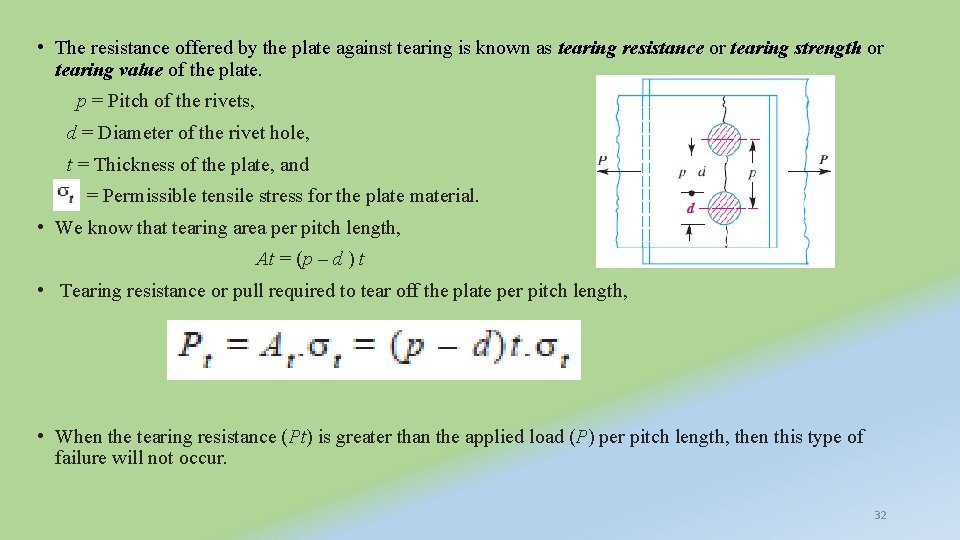
• The resistance offered by the plate against tearing is known as tearing resistance or tearing strength or tearing value of the plate. p = Pitch of the rivets, d = Diameter of the rivet hole, t = Thickness of the plate, and = Permissible tensile stress for the plate material. • We know that tearing area per pitch length, At = (p – d ) t • Tearing resistance or pull required to tear off the plate per pitch length, • When the tearing resistance (Pt) is greater than the applied load (P) per pitch length, then this type of failure will not occur. 32

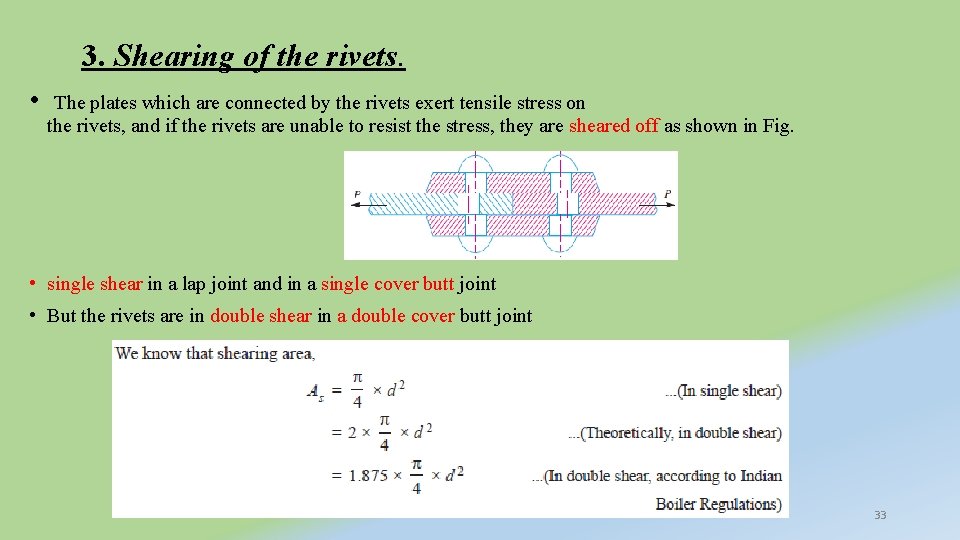
3. Shearing of the rivets. • The plates which are connected by the rivets exert tensile stress on the rivets, and if the rivets are unable to resist the stress, they are sheared off as shown in Fig. • single shear in a lap joint and in a single cover butt joint • But the rivets are in double shear in a double cover butt joint 33

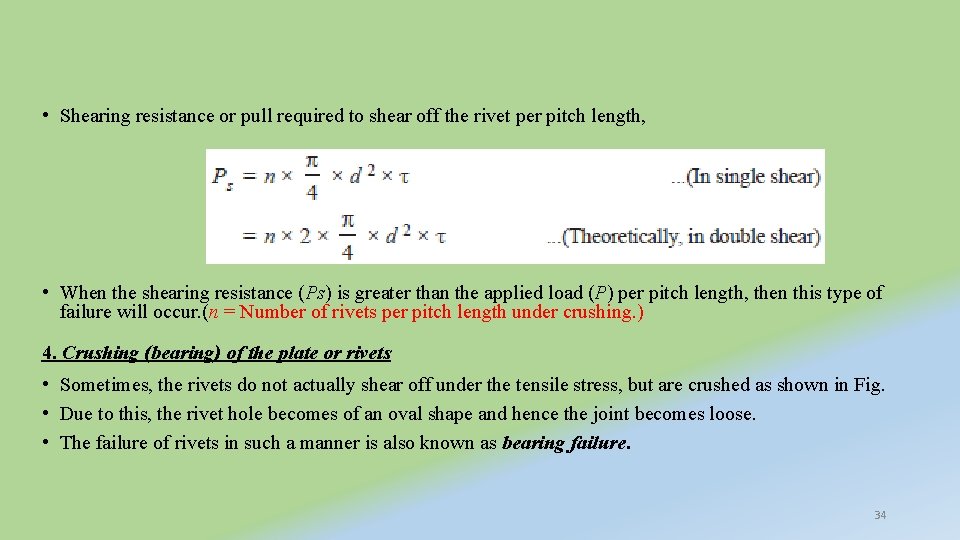
• Shearing resistance or pull required to shear off the rivet per pitch length, • When the shearing resistance (Ps) is greater than the applied load (P) per pitch length, then this type of failure will occur. (n = Number of rivets per pitch length under crushing. ) 4. Crushing (bearing) of the plate or rivets • Sometimes, the rivets do not actually shear off under the tensile stress, but are crushed as shown in Fig. • Due to this, the rivet hole becomes of an oval shape and hence the joint becomes loose. • The failure of rivets in such a manner is also known as bearing failure. 34

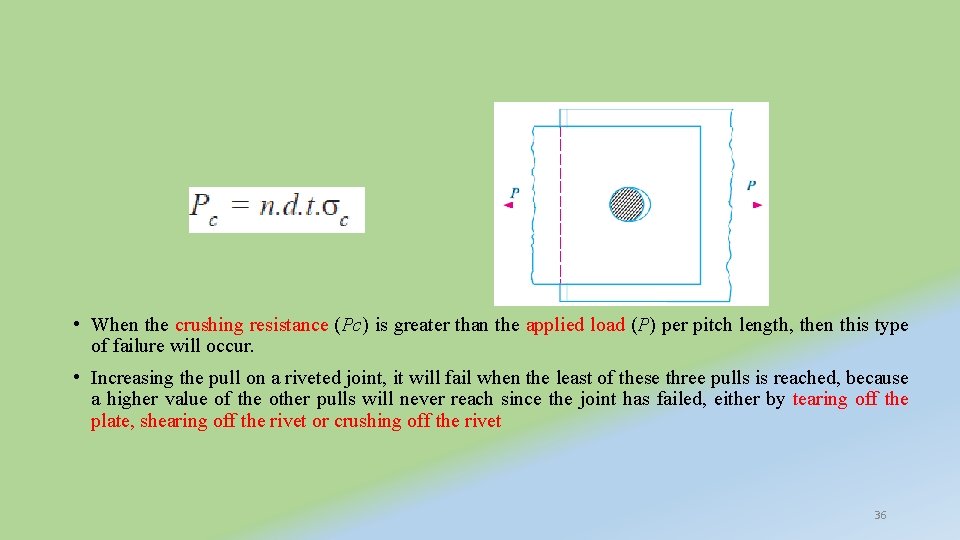
• The resistance offered by a rivet to be crushed is known as crushing resistance or crushing strength or bearing value of the rivet. Let d = Diameter of the rivet hole, t = Thickness of the plate, σc = Safe permissible crushing stress for the rivet or plate material, and n = Number of rivets per pitch length under crushing. We know that crushing area per rivet (i. e. projected area per rivet), Ac = d. t Total crushing area = n. d. t • and crushing resistance or pull required to crush the rivet per pitch length 35

• When the crushing resistance (Pc) is greater than the applied load (P) per pitch length, then this type of failure will occur. • Increasing the pull on a riveted joint, it will fail when the least of these three pulls is reached, because a higher value of the other pulls will never reach since the joint has failed, either by tearing off the plate, shearing off the rivet or crushing off the rivet 36

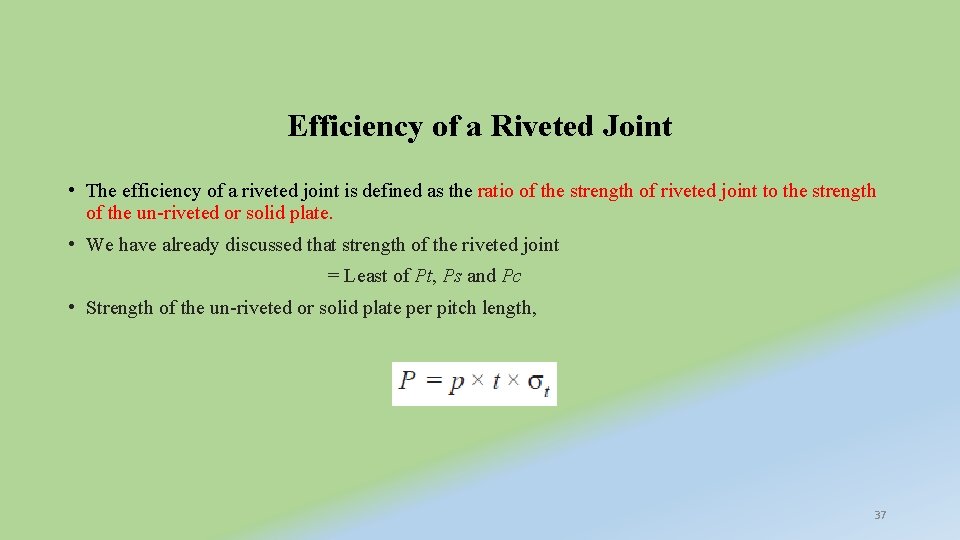
Efficiency of a Riveted Joint • The efficiency of a riveted joint is defined as the ratio of the strength of riveted joint to the strength of the un-riveted or solid plate. • We have already discussed that strength of the riveted joint = Least of Pt, Ps and Pc • Strength of the un-riveted or solid plate per pitch length, 37

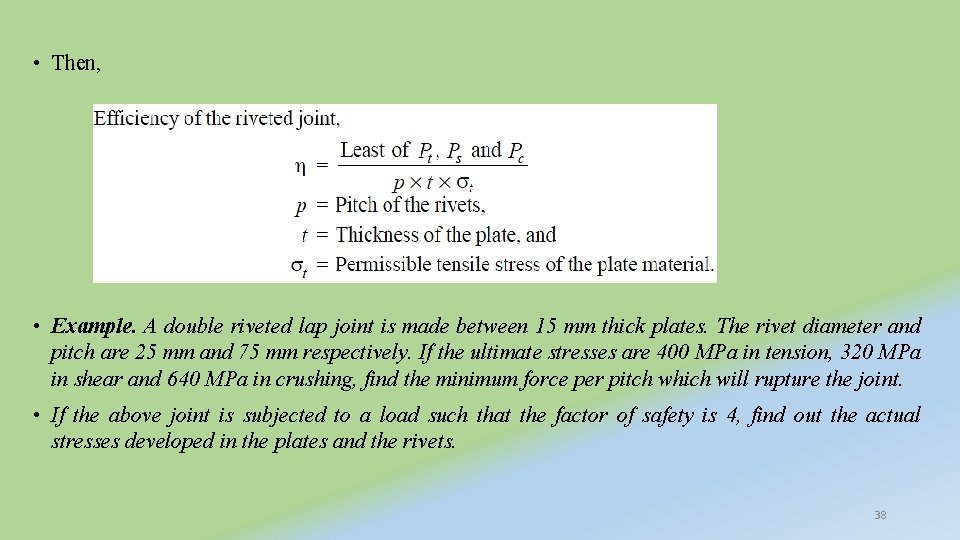
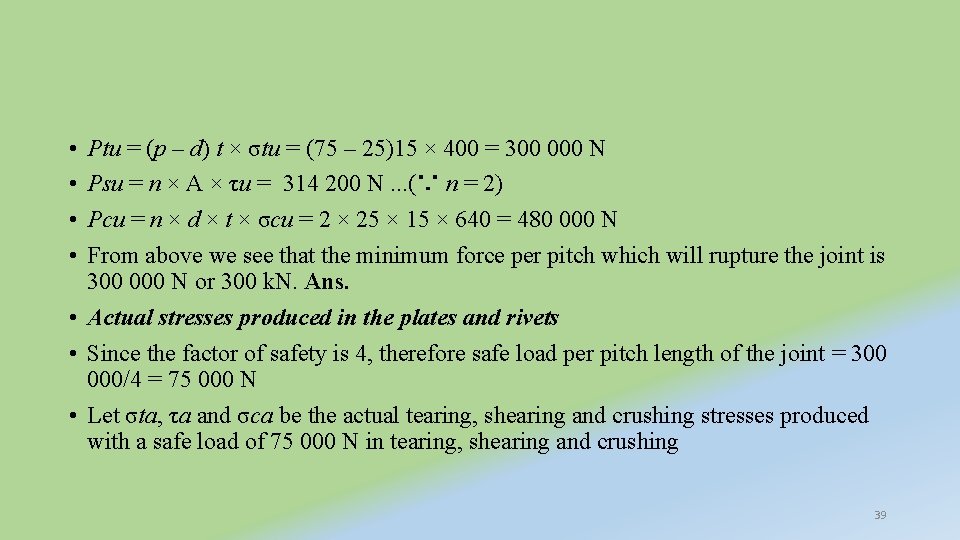
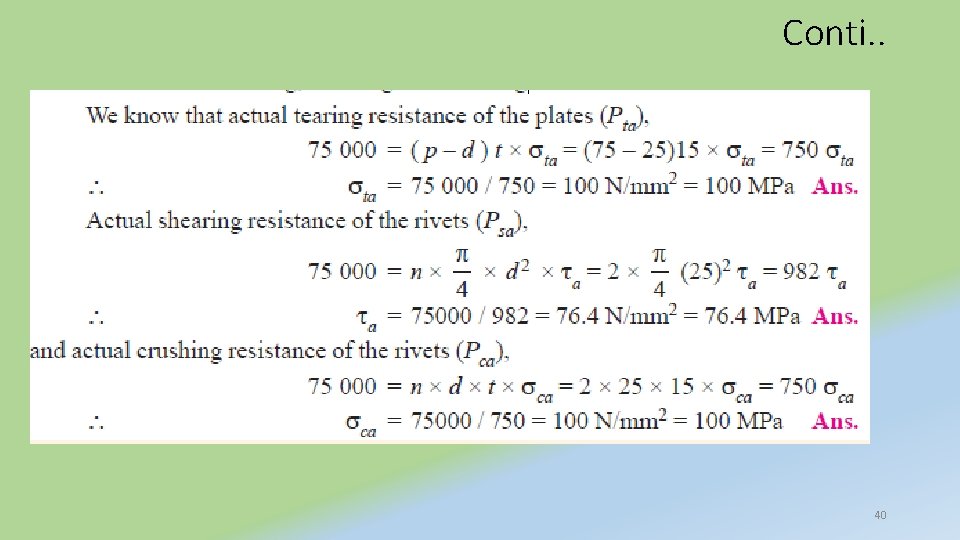
• Then, • Example. A double riveted lap joint is made between 15 mm thick plates. The rivet diameter and pitch are 25 mm and 75 mm respectively. If the ultimate stresses are 400 MPa in tension, 320 MPa in shear and 640 MPa in crushing, find the minimum force per pitch which will rupture the joint. • If the above joint is subjected to a load such that the factor of safety is 4, find out the actual stresses developed in the plates and the rivets. 38

• • Ptu = (p – d) t × σtu = (75 – 25)15 × 400 = 300 000 N Psu = n × A × τu = 314 200 N. . . (∵ n = 2) Pcu = n × d × t × σcu = 2 × 25 × 15 × 640 = 480 000 N From above we see that the minimum force per pitch which will rupture the joint is 300 000 N or 300 k. N. Ans. • Actual stresses produced in the plates and rivets • Since the factor of safety is 4, therefore safe load per pitch length of the joint = 300 000/4 = 75 000 N • Let σta, τa and σca be the actual tearing, shearing and crushing stresses produced with a safe load of 75 000 N in tearing, shearing and crushing 39

Conti. . 40

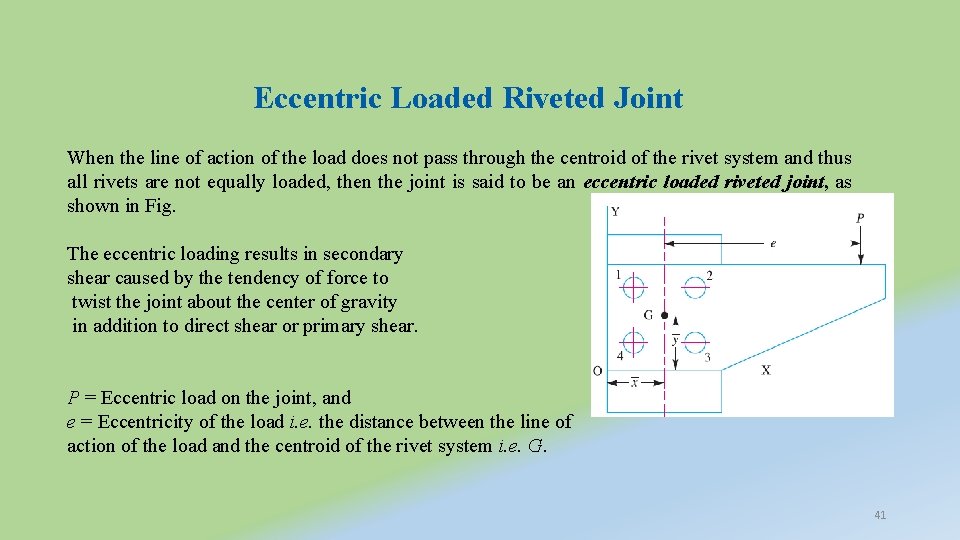
Eccentric Loaded Riveted Joint When the line of action of the load does not pass through the centroid of the rivet system and thus all rivets are not equally loaded, then the joint is said to be an eccentric loaded riveted joint, as shown in Fig. The eccentric loading results in secondary shear caused by the tendency of force to twist the joint about the center of gravity in addition to direct shear or primary shear. P = Eccentric load on the joint, and e = Eccentricity of the load i. e. the distance between the line of action of the load and the centroid of the rivet system i. e. G. 41

• The following procedure is adopted for eccentric loaded 42

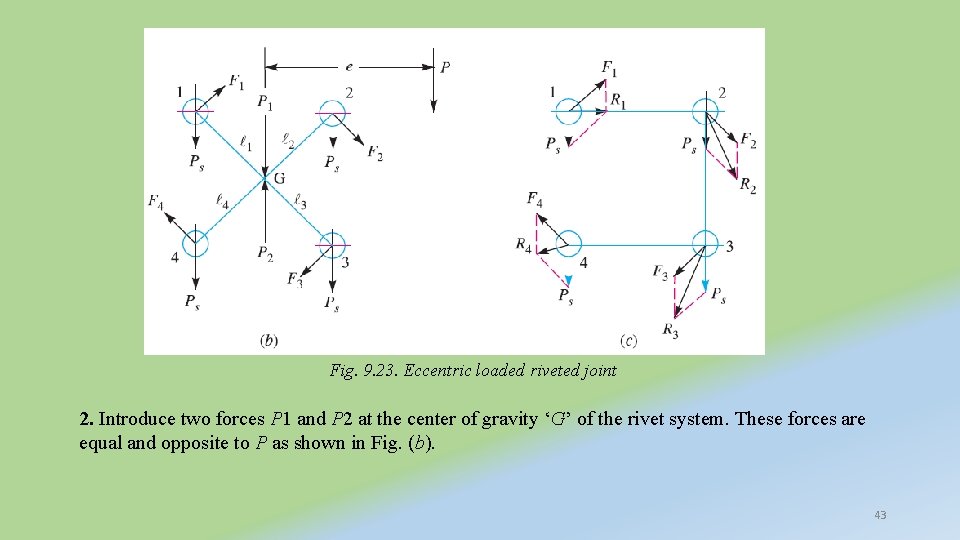
Fig. 9. 23. Eccentric loaded riveted joint 2. Introduce two forces P 1 and P 2 at the center of gravity ‘G’ of the rivet system. These forces are equal and opposite to P as shown in Fig. (b). 43

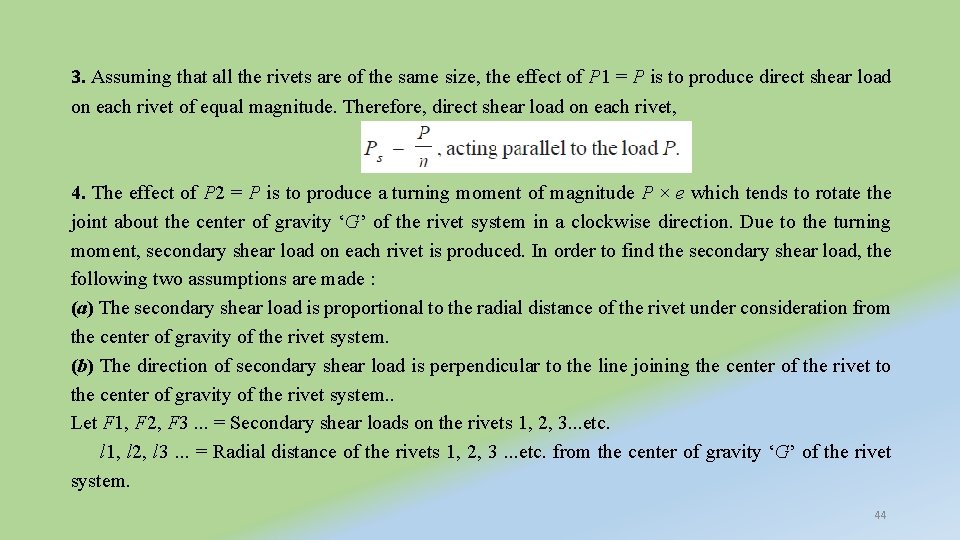
3. Assuming that all the rivets are of the same size, the effect of P 1 = P is to produce direct shear load on each rivet of equal magnitude. Therefore, direct shear load on each rivet, 4. The effect of P 2 = P is to produce a turning moment of magnitude P × e which tends to rotate the joint about the center of gravity ‘G’ of the rivet system in a clockwise direction. Due to the turning moment, secondary shear load on each rivet is produced. In order to find the secondary shear load, the following two assumptions are made : (a) The secondary shear load is proportional to the radial distance of the rivet under consideration from the center of gravity of the rivet system. (b) The direction of secondary shear load is perpendicular to the line joining the center of the rivet to the center of gravity of the rivet system. . Let F 1, F 2, F 3. . . = Secondary shear loads on the rivets 1, 2, 3. . . etc. l 1, l 2, l 3. . . = Radial distance of the rivets 1, 2, 3. . . etc. from the center of gravity ‘G’ of the rivet system. 44

Let, 45

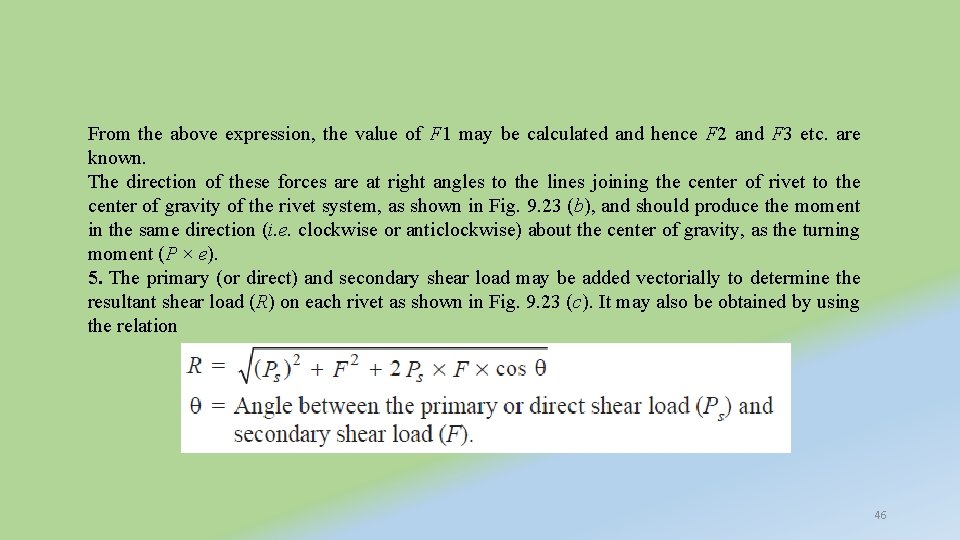
From the above expression, the value of F 1 may be calculated and hence F 2 and F 3 etc. are known. The direction of these forces are at right angles to the lines joining the center of rivet to the center of gravity of the rivet system, as shown in Fig. 9. 23 (b), and should produce the moment in the same direction (i. e. clockwise or anticlockwise) about the center of gravity, as the turning moment (P × e). 5. The primary (or direct) and secondary shear load may be added vectorially to determine the resultant shear load (R) on each rivet as shown in Fig. 9. 23 (c). It may also be obtained by using the relation 46

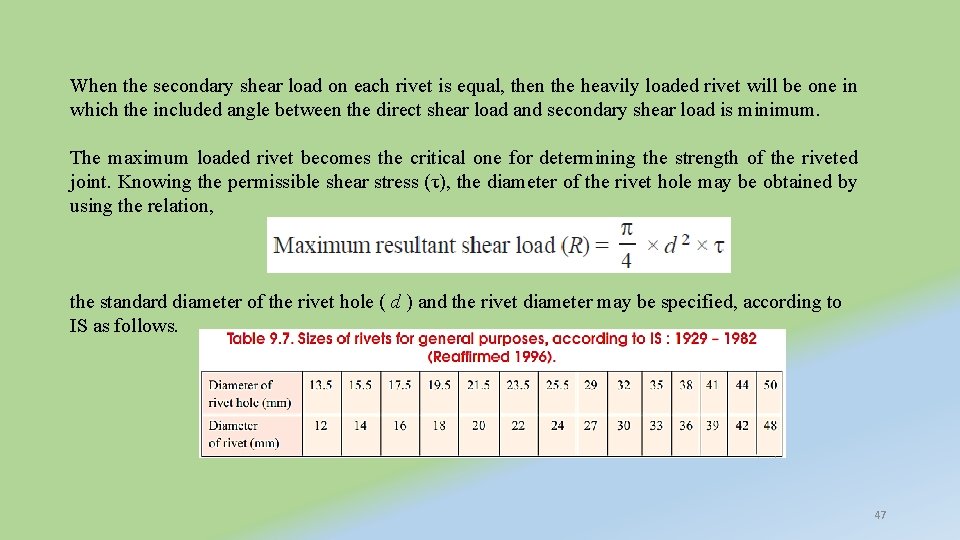
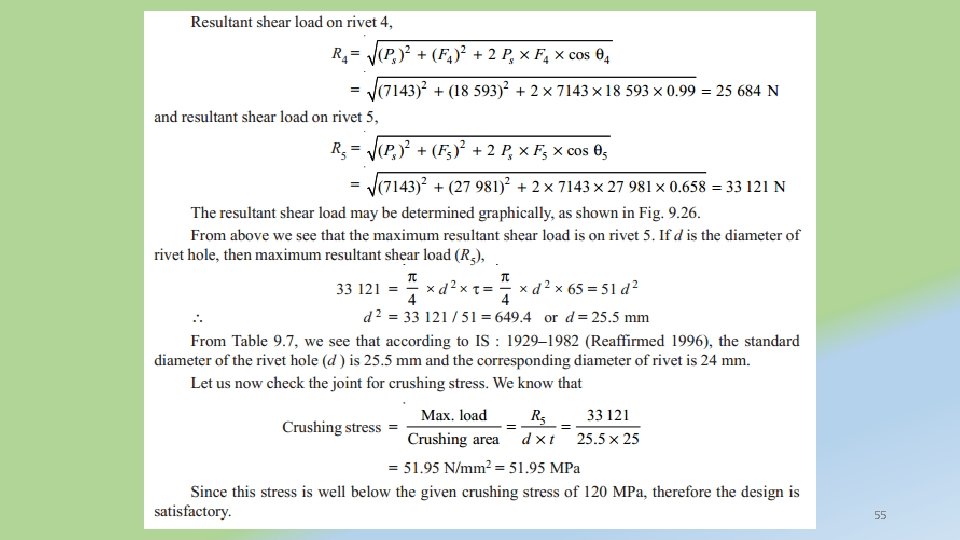
When the secondary shear load on each rivet is equal, then the heavily loaded rivet will be one in which the included angle between the direct shear load and secondary shear load is minimum. The maximum loaded rivet becomes the critical one for determining the strength of the riveted joint. Knowing the permissible shear stress (τ), the diameter of the rivet hole may be obtained by using the relation, the standard diameter of the rivet hole ( d ) and the rivet diameter may be specified, according to IS as follows. 47

Notes : 1. 2. 3. In the solution of a problem, the primary and shear loads may be laid off approximately to scale and generally the rivet having the maximum resultant shear load will be apparent by inspection. The values of the load for that rivet may then be calculated. When the thickness of the plate is given, then the diameter of the rivet hole may be checked against crushing. When the eccentric load P is inclined at some angle, then the same procedure as discussed above may be followed to find the size of rivet 48

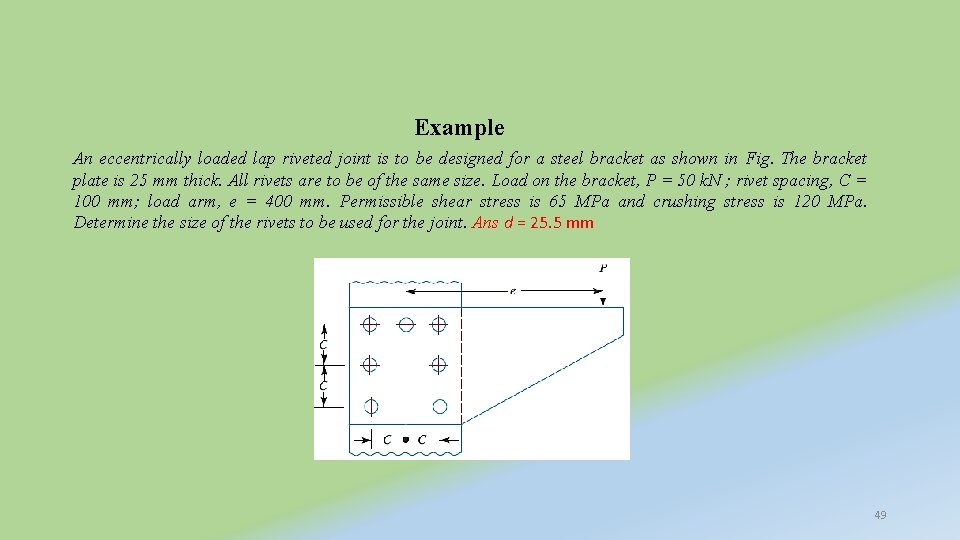
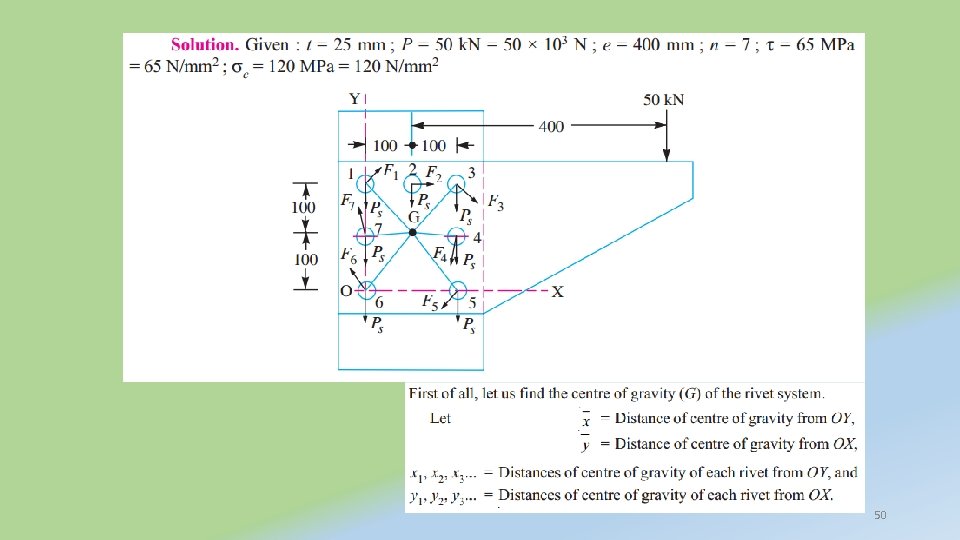
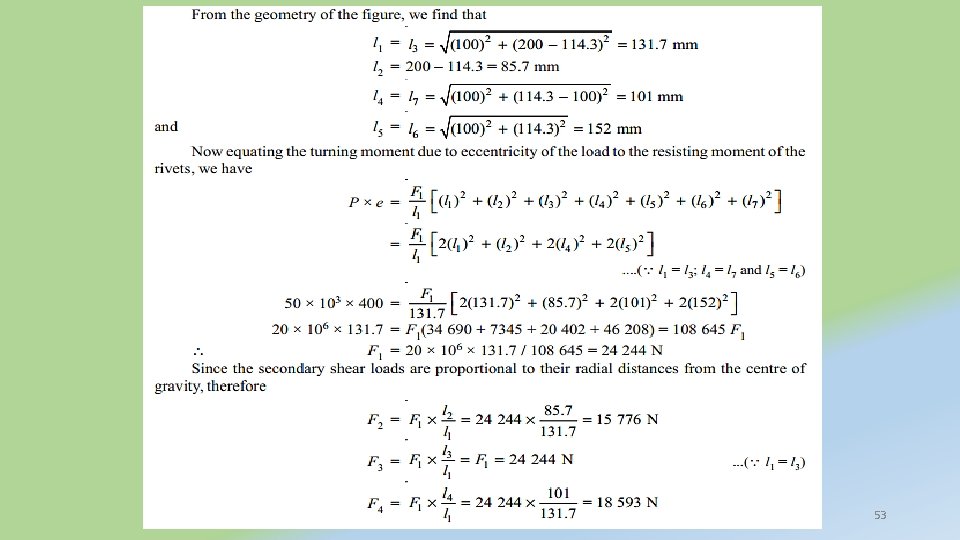
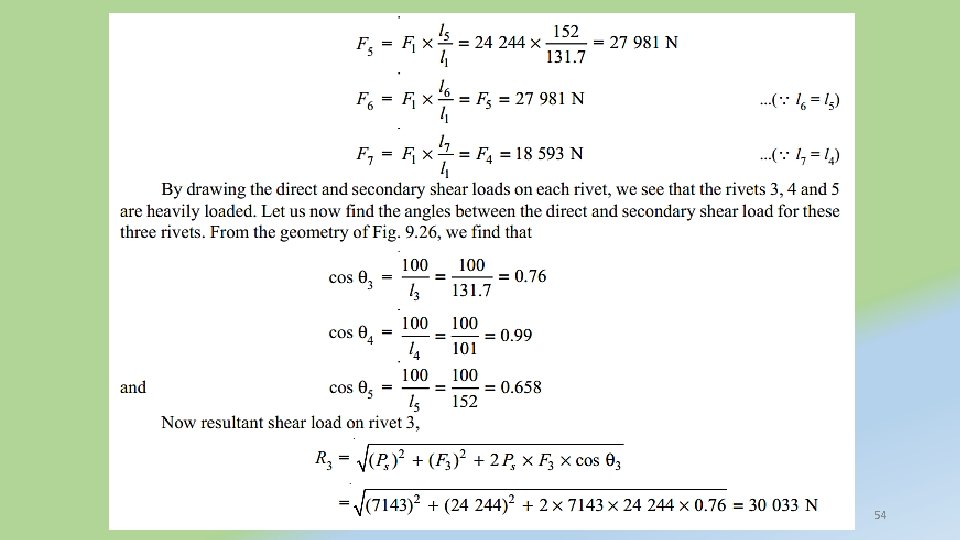
Example An eccentrically loaded lap riveted joint is to be designed for a steel bracket as shown in Fig. The bracket plate is 25 mm thick. All rivets are to be of the same size. Load on the bracket, P = 50 k. N ; rivet spacing, C = 100 mm; load arm, e = 400 mm. Permissible shear stress is 65 MPa and crushing stress is 120 MPa. Determine the size of the rivets to be used for the joint. Ans d = 25. 5 mm 49

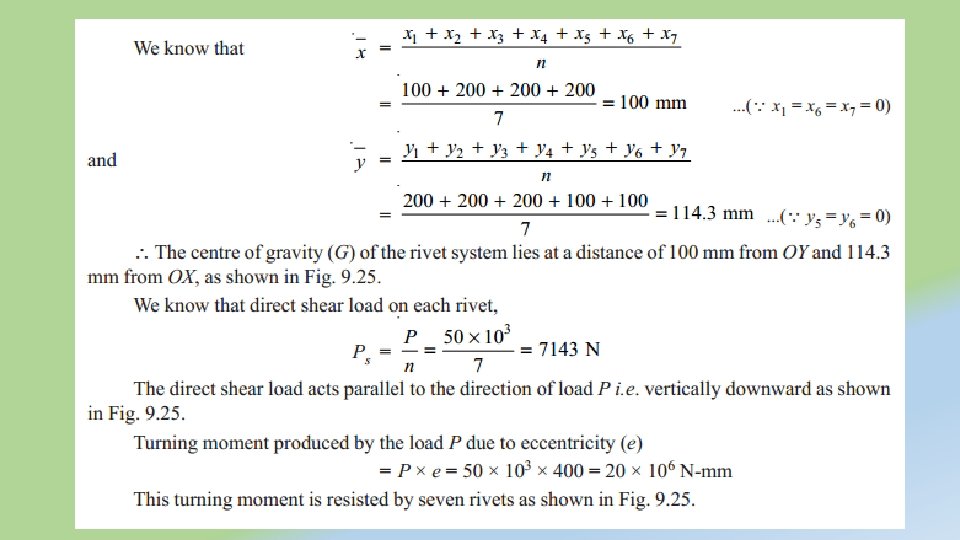
50

51

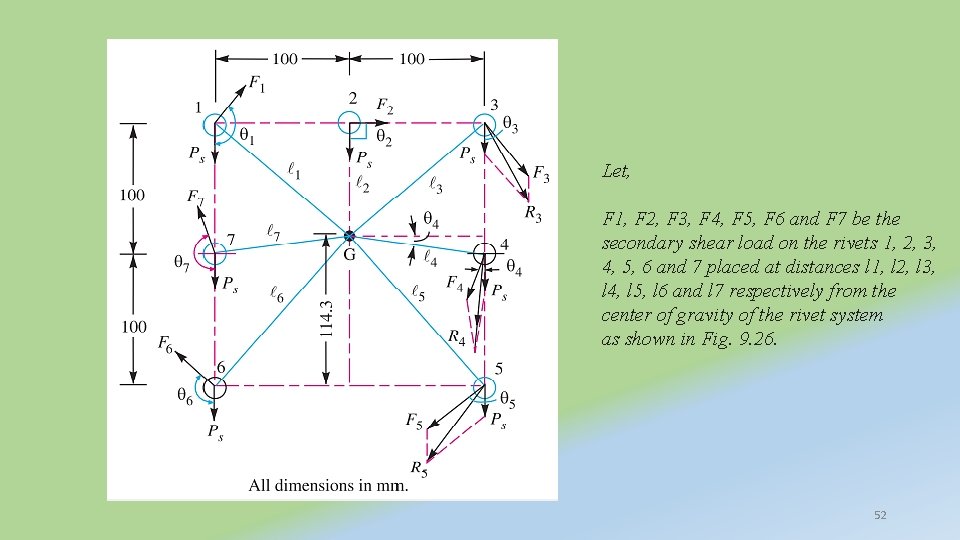
Let, F 1, F 2, F 3, F 4, F 5, F 6 and F 7 be the secondary shear load on the rivets 1, 2, 3, 4, 5, 6 and 7 placed at distances l 1, l 2, l 3, l 4, l 5, l 6 and l 7 respectively from the center of gravity of the rivet system as shown in Fig. 9. 26. 52

53

54

55

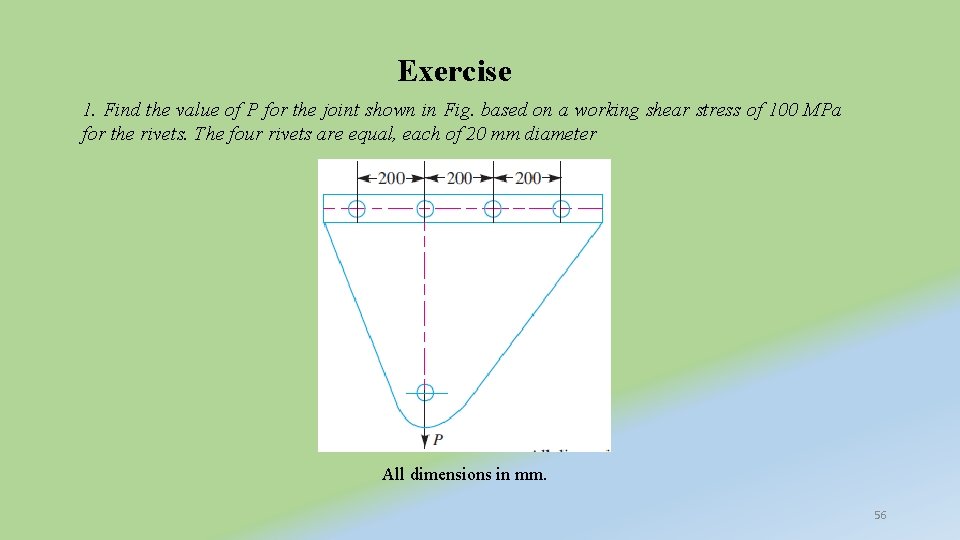
Exercise 1. Find the value of P for the joint shown in Fig. based on a working shear stress of 100 MPa for the rivets. The four rivets are equal, each of 20 mm diameter All dimensions in mm. 56

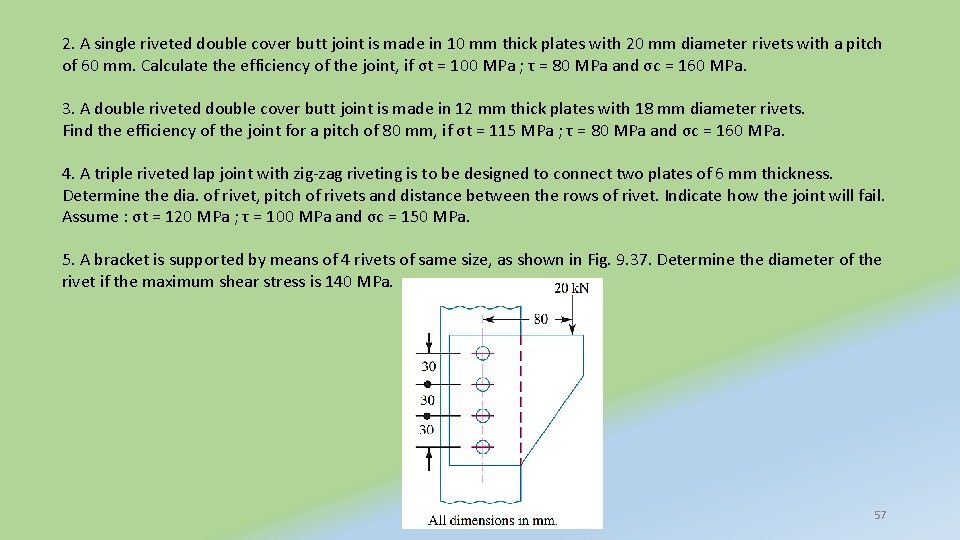
2. A single riveted double cover butt joint is made in 10 mm thick plates with 20 mm diameter rivets with a pitch of 60 mm. Calculate the efficiency of the joint, if σt = 100 MPa ; τ = 80 MPa and σc = 160 MPa. 3. A double riveted double cover butt joint is made in 12 mm thick plates with 18 mm diameter rivets. Find the efficiency of the joint for a pitch of 80 mm, if σt = 115 MPa ; τ = 80 MPa and σc = 160 MPa. 4. A triple riveted lap joint with zig-zag riveting is to be designed to connect two plates of 6 mm thickness. Determine the dia. of rivet, pitch of rivets and distance between the rows of rivet. Indicate how the joint will fail. Assume : σt = 120 MPa ; τ = 100 MPa and σc = 150 MPa. 5. A bracket is supported by means of 4 rivets of same size, as shown in Fig. 9. 37. Determine the diameter of the rivet if the maximum shear stress is 140 MPa. 57

Welded Joints A welded joint is a permanent joint which is obtained by the fusion of the edges of the two parts to be joined together, with or without the application of pressure and a filler material. Welding is extensively used in fabrication as an alternative method for casting or forging and as a replacement for bolted and riveted joints It is also used as a repair medium Advantages and Disadvantages of Welded Joints over Riveted Joints Advantages 1. The welded structures are usually lighter than riveted structures. This is due to the reason, that in welding, gussets or other connecting components are not used. 2. The welded joints provide maximum efficiency (may be 100%) which is not possible in case of riveted joints. 58

3. Alterations (small change) and additions can be easily made in the existing structures. 4. As the welded structure is smooth in appearance, therefore it looks pleasing. 5. In welded connections, the tension members are not weakened as in the case of riveted joints. 6. A welded joint has a great strength. Often a welded joint has the strength of the parent metal itself. 7. Sometimes, the members are of such a shape (i. e. circular steel pipes) that they afford difficulty for riveting. But they can be easily welded. 8. The welding provides very rigid joints. This is in line with the modern trend of providing rigid frames. 9. It is possible to weld any part of a structure at any point. But riveting requires enough clearance. 10. The process of welding takes less time than the riveting. 59

Disadvantages 1. Since there is an uneven heating and cooling during fabrication, therefore the members may get distorted or additional stresses may develop. 2. It requires a highly skilled labor and supervision. 3. Since no provision is kept for expansion and contraction in the frame, therefore there is a possibility of cracks developing in it. 4. The inspection of welding work is more difficult than riveting work. 60

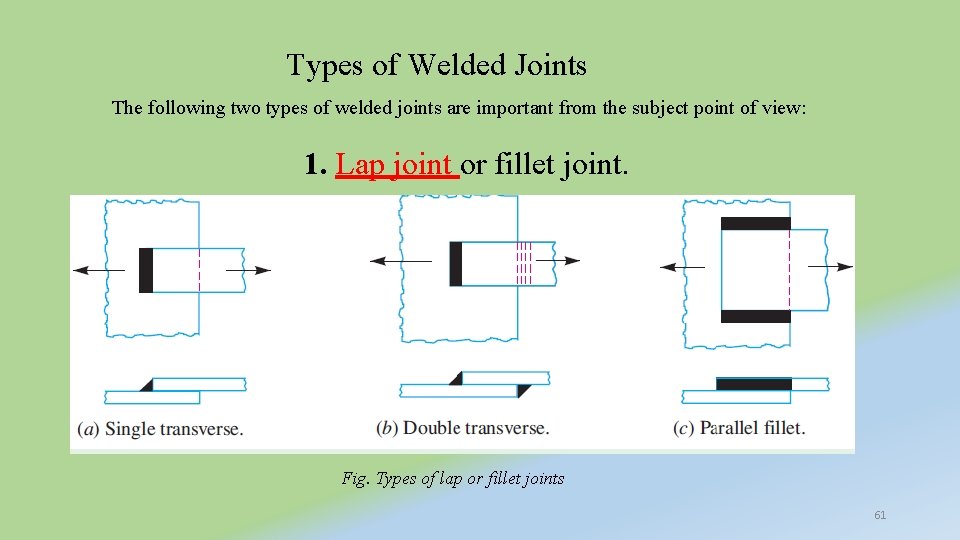
Types of Welded Joints The following two types of welded joints are important from the subject point of view: 1. Lap joint or fillet joint. Fig. Types of lap or fillet joints 61

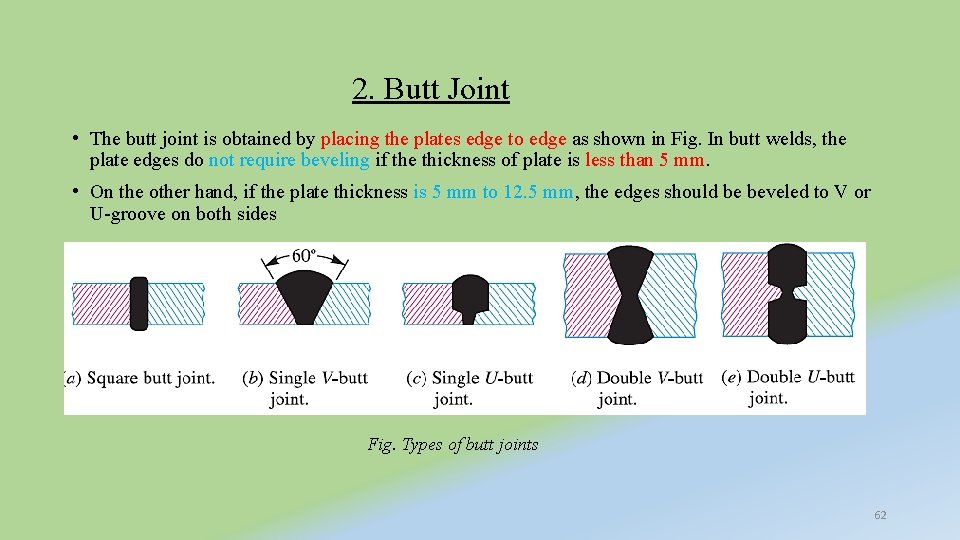
2. Butt Joint • The butt joint is obtained by placing the plates edge to edge as shown in Fig. In butt welds, the plate edges do not require beveling if the thickness of plate is less than 5 mm. • On the other hand, if the plate thickness is 5 mm to 12. 5 mm, the edges should be beveled to V or U-groove on both sides Fig. Types of butt joints 62

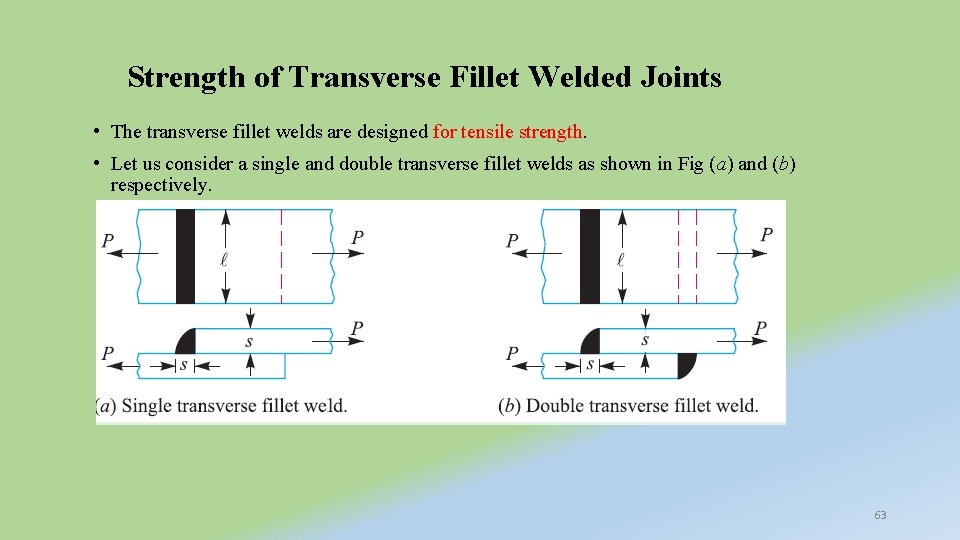
Strength of Transverse Fillet Welded Joints • The transverse fillet welds are designed for tensile strength. • Let us consider a single and double transverse fillet welds as shown in Fig (a) and (b) respectively. 63

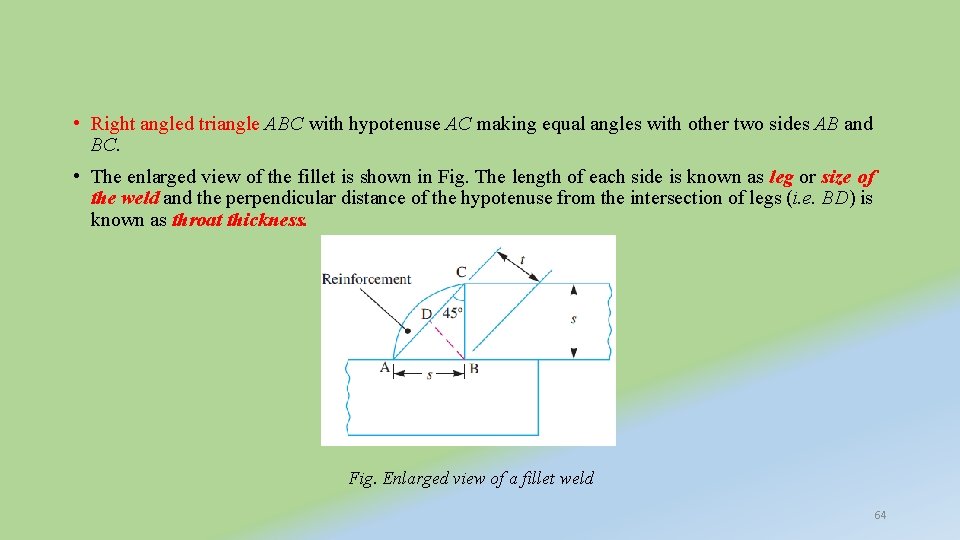
• Right angled triangle ABC with hypotenuse AC making equal angles with other two sides AB and BC. • The enlarged view of the fillet is shown in Fig. The length of each side is known as leg or size of the weld and the perpendicular distance of the hypotenuse from the intersection of legs (i. e. BD) is known as throat thickness. Fig. Enlarged view of a fillet weld 64

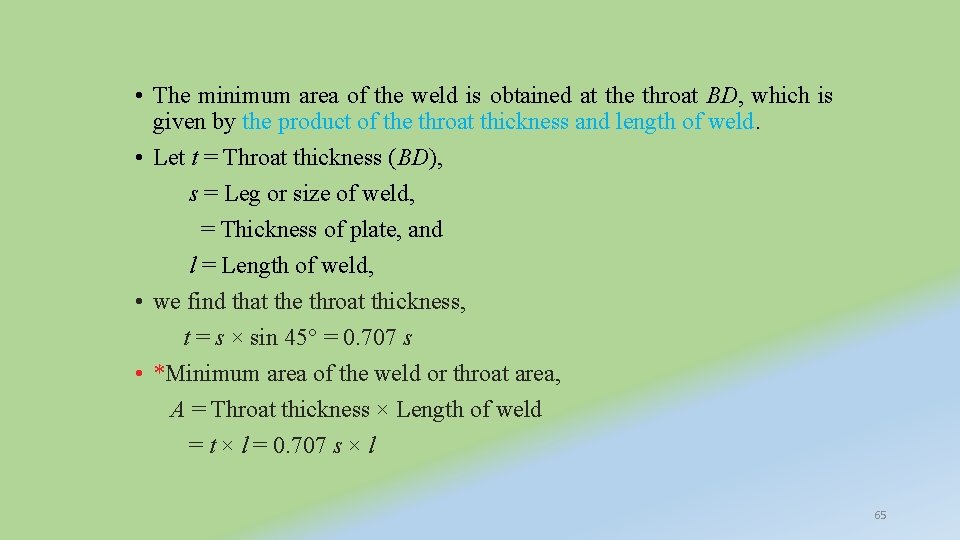
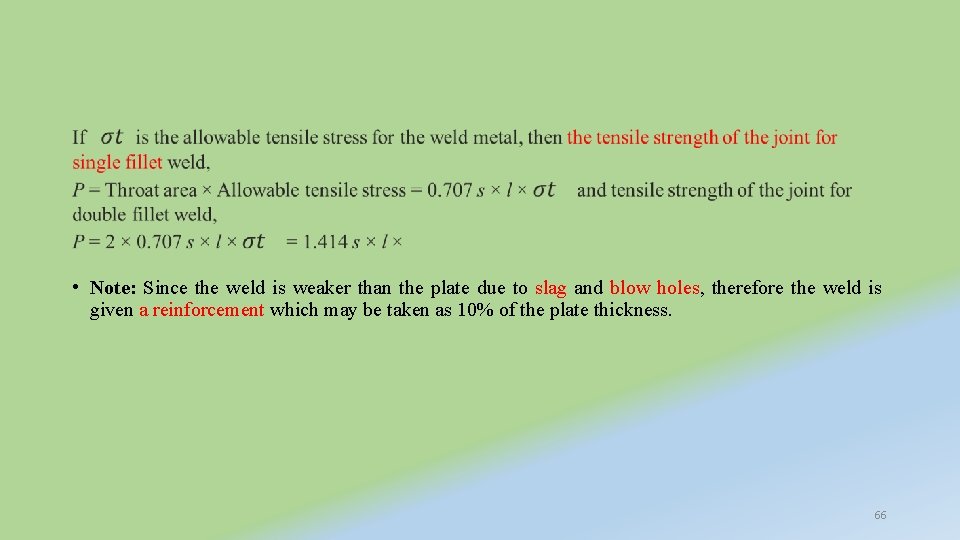
• The minimum area of the weld is obtained at the throat BD, which is given by the product of the throat thickness and length of weld. • Let t = Throat thickness (BD), s = Leg or size of weld, = Thickness of plate, and l = Length of weld, • we find that the throat thickness, t = s × sin 45° = 0. 707 s • *Minimum area of the weld or throat area, A = Throat thickness × Length of weld = t × l = 0. 707 s × l 65

• Note: Since the weld is weaker than the plate due to slag and blow holes, therefore the weld is given a reinforcement which may be taken as 10% of the plate thickness. 66

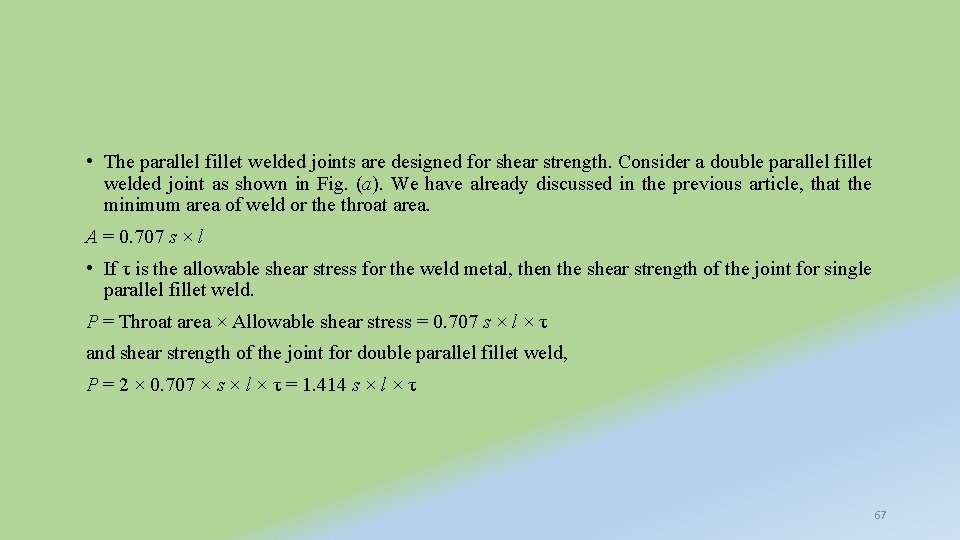
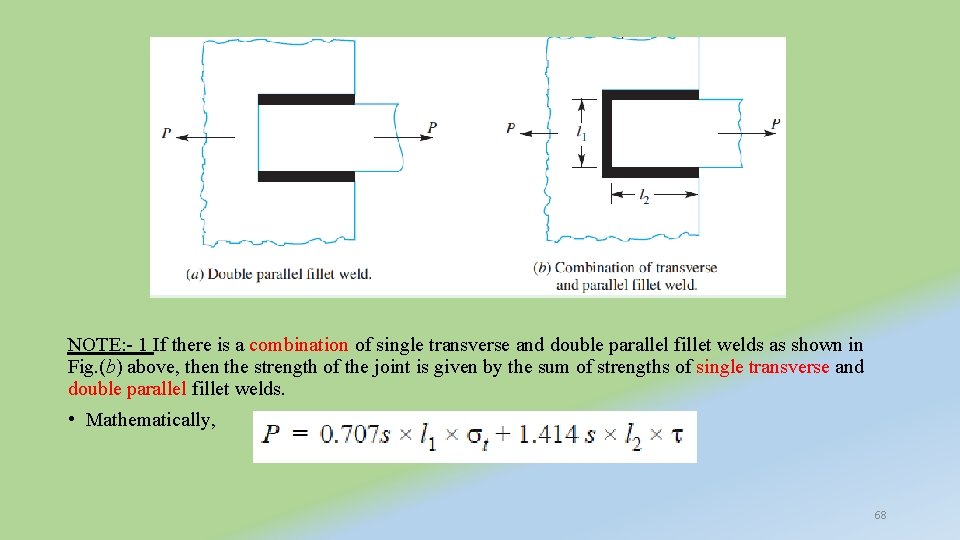
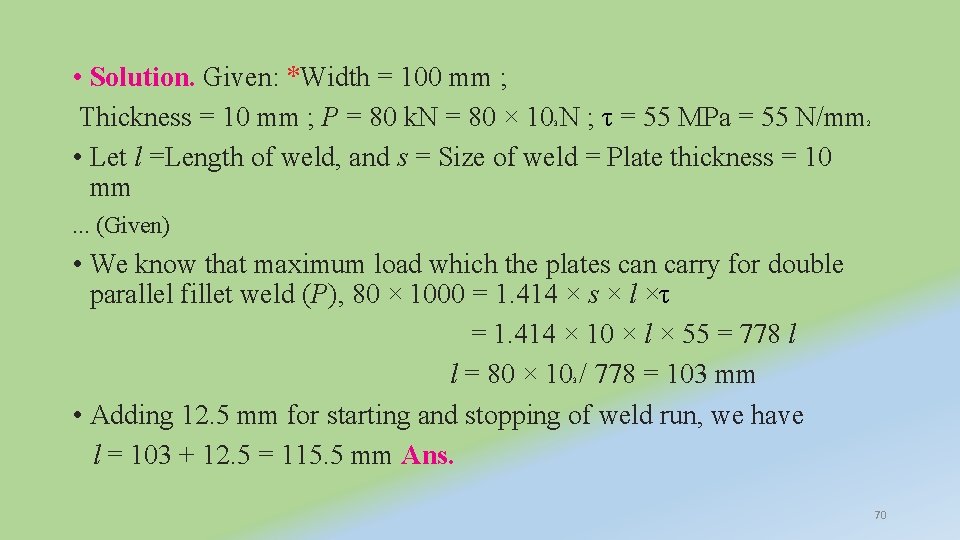
• The parallel fillet welded joints are designed for shear strength. Consider a double parallel fillet welded joint as shown in Fig. (a). We have already discussed in the previous article, that the minimum area of weld or the throat area. A = 0. 707 s × l • If τ is the allowable shear stress for the weld metal, then the shear strength of the joint for single parallel fillet weld. P = Throat area × Allowable shear stress = 0. 707 s × l × τ and shear strength of the joint for double parallel fillet weld, P = 2 × 0. 707 × s × l × τ = 1. 414 s × l × τ 67

NOTE: - 1 If there is a combination of single transverse and double parallel fillet welds as shown in Fig. (b) above, then the strength of the joint is given by the sum of strengths of single transverse and double parallel fillet welds. • Mathematically, 68

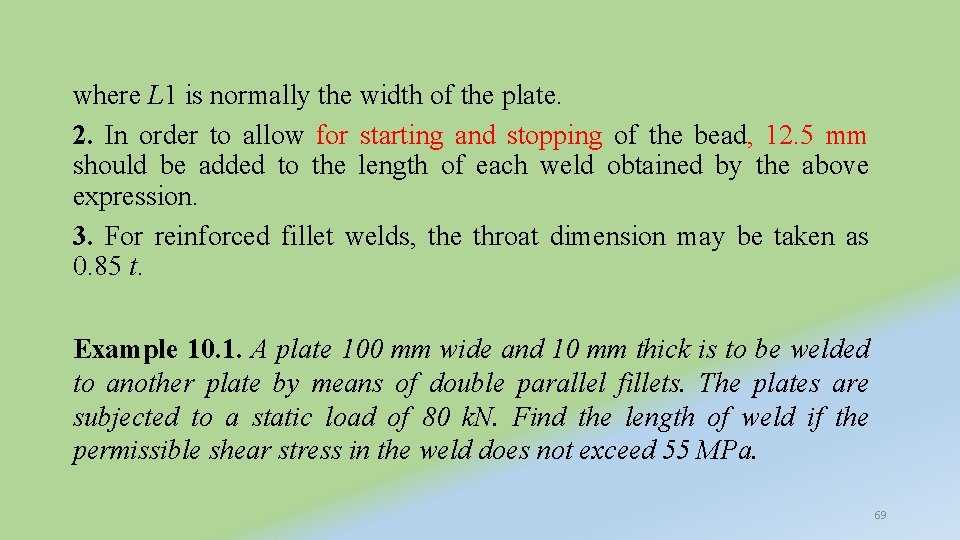
where L 1 is normally the width of the plate. 2. In order to allow for starting and stopping of the bead, 12. 5 mm should be added to the length of each weld obtained by the above expression. 3. For reinforced fillet welds, the throat dimension may be taken as 0. 85 t. Example 10. 1. A plate 100 mm wide and 10 mm thick is to be welded to another plate by means of double parallel fillets. The plates are subjected to a static load of 80 k. N. Find the length of weld if the permissible shear stress in the weld does not exceed 55 MPa. 69

• Solution. Given: *Width = 100 mm ; Thickness = 10 mm ; P = 80 k. N = 80 × 10 N ; τ = 55 MPa = 55 N/mm • Let l =Length of weld, and s = Size of weld = Plate thickness = 10 mm 3 2 . . . (Given) • We know that maximum load which the plates can carry for double parallel fillet weld (P), 80 × 1000 = 1. 414 × s × l ×τ = 1. 414 × 10 × l × 55 = 778 l l = 80 × 10 / 778 = 103 mm • Adding 12. 5 mm for starting and stopping of weld run, we have l = 103 + 12. 5 = 115. 5 mm Ans. 3 70

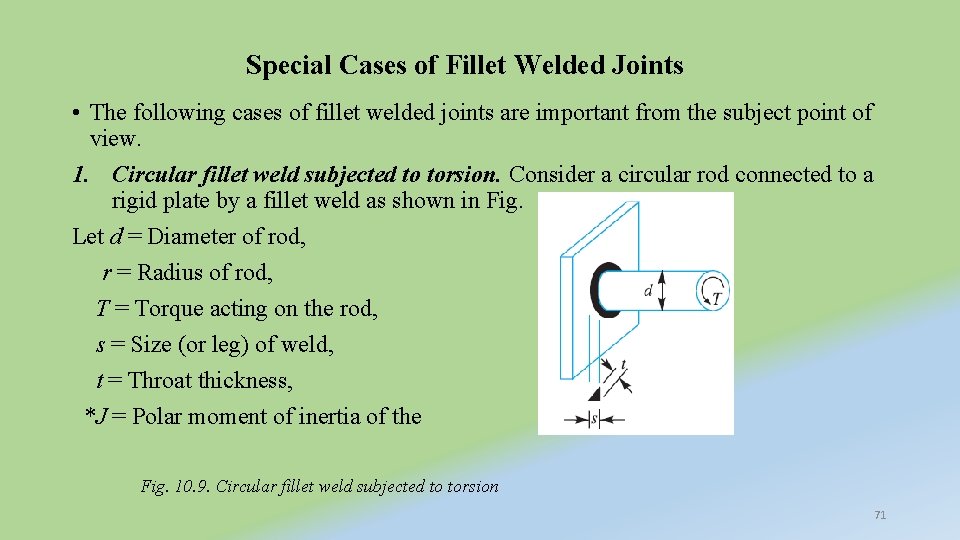
Special Cases of Fillet Welded Joints • The following cases of fillet welded joints are important from the subject point of view. 1. Circular fillet weld subjected to torsion. Consider a circular rod connected to a rigid plate by a fillet weld as shown in Fig. Let d = Diameter of rod, r = Radius of rod, T = Torque acting on the rod, s = Size (or leg) of weld, t = Throat thickness, *J = Polar moment of inertia of the Fig. 10. 9. Circular fillet weld subjected to torsion 71

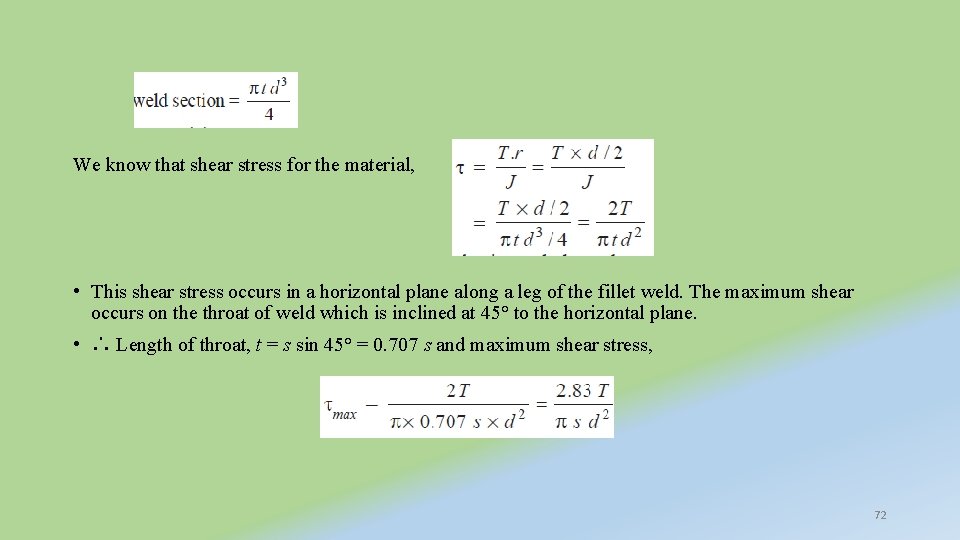
We know that shear stress for the material, • This shear stress occurs in a horizontal plane along a leg of the fillet weld. The maximum shear occurs on the throat of weld which is inclined at 45° to the horizontal plane. • ∴ Length of throat, t = s sin 45° = 0. 707 s and maximum shear stress, 72

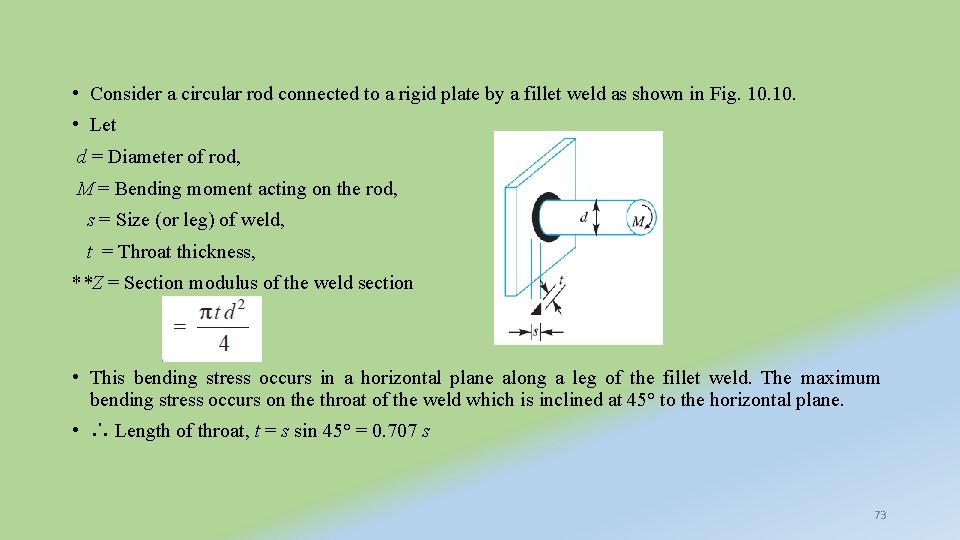
• Consider a circular rod connected to a rigid plate by a fillet weld as shown in Fig. 10. • Let d = Diameter of rod, M = Bending moment acting on the rod, s = Size (or leg) of weld, t = Throat thickness, **Z = Section modulus of the weld section • This bending stress occurs in a horizontal plane along a leg of the fillet weld. The maximum bending stress occurs on the throat of the weld which is inclined at 45° to the horizontal plane. • ∴ Length of throat, t = s sin 45° = 0. 707 s 73

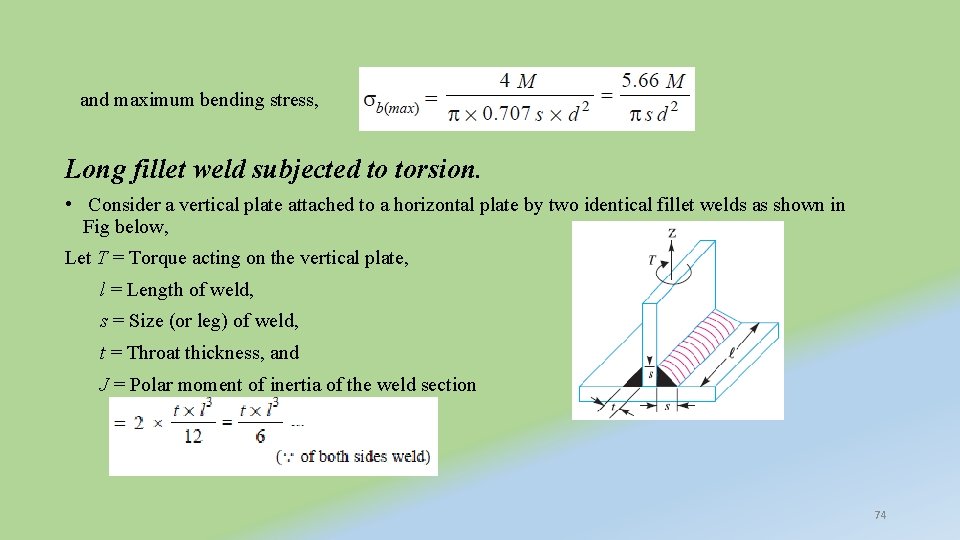
and maximum bending stress, Long fillet weld subjected to torsion. • Consider a vertical plate attached to a horizontal plate by two identical fillet welds as shown in Fig below, Let T = Torque acting on the vertical plate, l = Length of weld, s = Size (or leg) of weld, t = Throat thickness, and J = Polar moment of inertia of the weld section 74

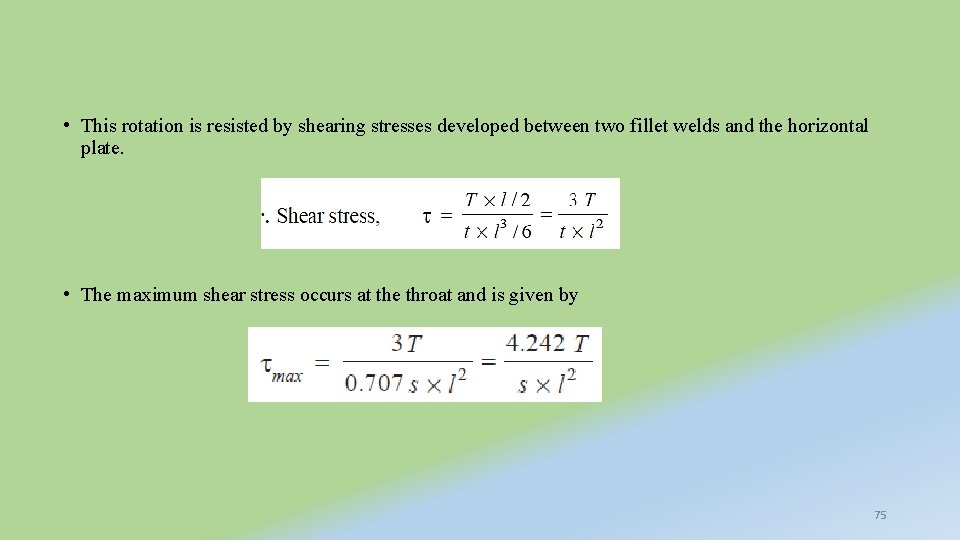
• This rotation is resisted by shearing stresses developed between two fillet welds and the horizontal plate. • The maximum shear stress occurs at the throat and is given by 75

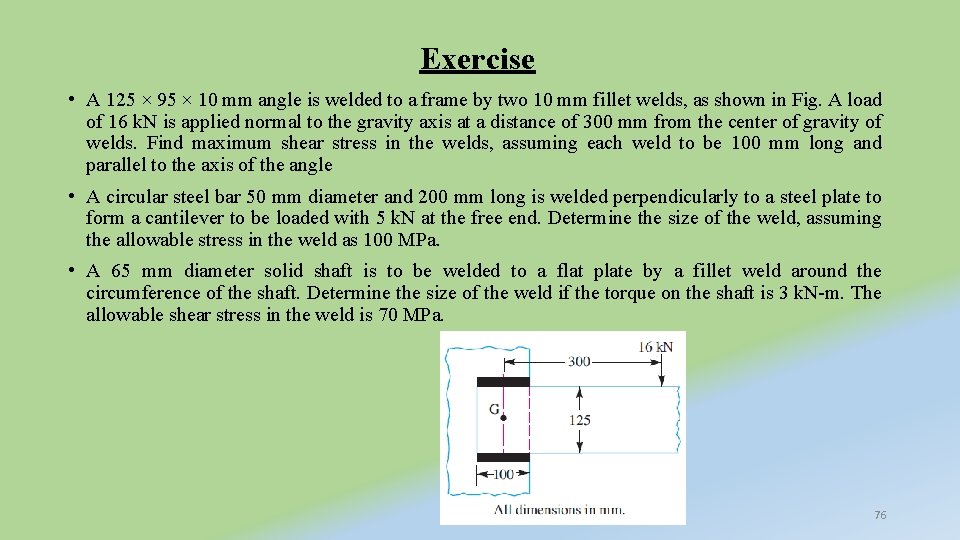
Exercise • A 125 × 95 × 10 mm angle is welded to a frame by two 10 mm fillet welds, as shown in Fig. A load of 16 k. N is applied normal to the gravity axis at a distance of 300 mm from the center of gravity of welds. Find maximum shear stress in the welds, assuming each weld to be 100 mm long and parallel to the axis of the angle • A circular steel bar 50 mm diameter and 200 mm long is welded perpendicularly to a steel plate to form a cantilever to be loaded with 5 k. N at the free end. Determine the size of the weld, assuming the allowable stress in the weld as 100 MPa. • A 65 mm diameter solid shaft is to be welded to a flat plate by a fillet weld around the circumference of the shaft. Determine the size of the weld if the torque on the shaft is 3 k. N-m. The allowable shear stress in the weld is 70 MPa. 76

End of the Chapter 77