CHAPTER 9 Cab Climate Control Supplemental Truck Heating

CHAPTER 9 Cab Climate Control/ Supplemental Truck Heating and Cooling Instructor Name: (Your Name) Copyright © 2014 Delmar, Cengage Learning

Learning Objectives • Explain how temperature is controlled in a blend air system. • Explain how temperature is controlled in a water-valve controlled system. • Describe the function of the fan switch. • List the different features controlled by the air selection switch. Copyright © 2014 Delmar, Cengage Learning

Learning Objectives (continued) • Explain the function of the temperature control switch. • Describe the function of the airconditioning switch. • Explain what happens when the recirculation button is activated or deactivated. • Describe the purpose of the bunk override switch. Copyright © 2014 Delmar, Cengage Learning

Learning Objectives (continued) • Explain the purpose of the air louvers used in truck HVAC systems. • Explain why it is important not to shut off manual coolant hand valves. • Explain the importance of ventilation in the cab of the vehicle. • Explain what stepper motors are used for in an HVAC system. Copyright © 2014 Delmar, Cengage Learning

Learning Objectives (continued) • Describe the function of a temperature sensor. • List three types of supplemental cab climate controls, and explain the differences between them. • Explain the advantages of truck stop electrification. Copyright © 2014 Delmar, Cengage Learning

Introduction • This chapter will help you understand how the climate control system operates. • Technicians must understand what should happen when HVAC controls are placed in their many different positions. • You will also learn what is happening within the dash in order for the system to maintain the desired temperature requested by the vehicle operator. Copyright © 2014 Delmar, Cengage Learning

Introduction (continued) • If the technician does not know exactly how the system operates, chances of misdiagnosis are drastically increased. • Most truck manufacturers use one of two climate control methods in their vehicles. • The two systems are the blend air system and the water-valve controlled system. Copyright © 2014 Delmar, Cengage Learning

Introduction (continued) • We will use a Freightliner Century Class as the example vehicle to study these systems in this chapter. • We will also examine supplemental truck heating and cooling systems and the advantages these units provide the vehicle owner and the environment. Copyright © 2014 Delmar, Cengage Learning

System Overview • In a blend air HVAC system, air circulated through the heater core and fresh air, or air circulated through the evaporator coil, are blended in the correct proportions to maintain the desired temperature as selected by the vehicle operator. Copyright © 2014 Delmar, Cengage Learning

Water-Valve Controlled System • The water-valve controlled system uses a water valve to vary the amount of coolant flowing through the heater core. • When the valve fully opens, coolant flow through the heater core increases, so more heat is available to be circulated through the cab. • When the valve closes down, restricting coolant flow, the amount of available heat decreases. Copyright © 2014 Delmar, Cengage Learning

Water-Valve Controlled System (continued) • The Freightliner Corporation refers to one of its systems as Constant Discharge Temperature Control (CDTC). • These systems are able to maintain a constant air flow temperature within the cab of the vehicle, regardless of ambient conditions, selected fan speed, engine coolant temperature, or coolant flow. Copyright © 2014 Delmar, Cengage Learning

Water-Valve Controlled System (continued) • Once the operator selects the desired temperature with the control switch, no other adjustment by the driver is necessary. • This is accomplished with a pulse modulating water valve. • These valves control coolant flow very accurately, maintaining the exact temperature or set point, as selected by the vehicle operator (Figures 9 -1 and 9 -2). Copyright © 2014 Delmar, Cengage Learning

Water-Valve Controlled System (continued) Figure 9 -1. The HVAC system for both the blend air system and the water-valve controlled system are contained in a package beneath the dash on the passenger side of the cab. Copyright © 2014 Delmar, Cengage Learning

Water-Valve Controlled System (continued) Figure 9 -2. A typical HVAC unit containing the evaporator, heater core, blower fan, ducting, and circulating doors. Copyright © 2014 Delmar, Cengage Learning

Water-Valve Controlled System (continued) Note: Pulse modulating valves, also known as pulse width modulation (PWM), are controlled by an electronic control unit. • The volume of fluid that the valve will allow to pass can be controlled in very small increments. Copyright © 2014 Delmar, Cengage Learning

Supplemental Heating and Cooling Systems • These systems allow the vehicle operator to maintain climate control in the cab and sleeper compartment when the engine is not running. • These systems are proven to save huge amounts of diesel fuel compared to idling the truck’s engine to maintain cab and sleeper temperature. • Due to the reduced idling times, the environment is spared a great deal of greenhouse gases (GHGs). Copyright © 2014 Delmar, Cengage Learning

Water-Valve Controlled Systems • In this section, we will examine the climate control feature of a water-valve controlled system in a Freightliner Century Class truck. • The climate control panel, as shown in Figure 9 -3, allows the vehicle operator to control all the functions of the HVAC system at one convenient center. Copyright © 2014 Delmar, Cengage Learning

Water-Valve Controlled Systems (continued) Figure 9 -3. A climate control panel featuring CDTC. Copyright © 2014 Delmar, Cengage Learning

The Fan Switch • The fan switch is located at position 2 in Figure 9 -3. • This switch gives the operator the ability to control the fan speed. • The air is forced by the fan through the selected air outlets. • The switch shown in Figure 9 -3 has eight fan speeds and an off position. Copyright © 2014 Delmar, Cengage Learning

The Fan Switch (continued) • If the switch is at the 0 position, the fan will not operate. • If the operator wishes to increase the air flow, the switch is turned clockwise or to a higher setting. • To decrease the air flow, the operator may turn the switch counterclockwise or to a lower setting. • Setting the switch to the off position disables the air conditioner and places the air source in the fresh air mode. Copyright © 2014 Delmar, Cengage Learning

The Fan Switch (continued) Note: If the fan switch on the climate control panel for the cab is in the off position, and the air conditioning for the bunk is on, the cab fan operates at low speed. • It is necessary to keep this fan running to protect the cab evaporator from freezing because the refrigerant is still flowing through the main evaporator when the remote evaporator within the sleeper is being operated. Copyright © 2014 Delmar, Cengage Learning

The Fan Switch (continued) • When the engine is started, there is a 2 second delay before the blower fan begins to operate and it can take an additional 4 seconds for the blower motor to reach its high-speed setting. • The blower motor performs a selfdiagnostic test once the engine has started, which accounts for the delay. Copyright © 2014 Delmar, Cengage Learning

Air Selection Switch • The air selection switch, located at position 4 in Figure 9 -3, allows the operator to control the flow of air from, the defrost (windshield) outlets, the face outlets, the floor outlets, or a combination of these outlets, making a total of nine different selection modes (Figure 9 -4). Copyright © 2014 Delmar, Cengage Learning

Air Selection Switch (continued) Figure 9 -4. Some of the possible air outlets in the cab of the truck. Copyright © 2014 Delmar, Cengage Learning

Air Selection Switch (continued) • Refer to Figure 9 -5 for air selection switch positions. • The different selection modes are as follows: – Position 1 is the face mode. In this mode, all air from the blower is forced through the face or instrument panel vent outlets (Figure 9 -6). Copyright © 2014 Delmar, Cengage Learning

Air Selection Switch (continued) Figure 9 -5. The air selection switch allows the vehicle operator to select the outlet that will disperse the conditioned air (whether heated or cooled). Copyright © 2014 Delmar, Cengage Learning

Air Selection Switch (continued) Figure 9 -6. The vent door for the face mode is open. Copyright © 2014 Delmar, Cengage Learning

Air Selection Switch (continued) – Position 2 is between the face mode and the bi-level mode. In this position, approximately 75% of the air flow is distributed through the face vents and the remaining 25% is directed through to the floor outlets. – Position 3 is the bi-level mode. In this position, the discharge air is divided equally between the face outlets and the floor outlets. Copyright © 2014 Delmar, Cengage Learning

Air Selection Switch (continued) – Position 4 is located between the bi-level mode and the floor mode. In this position, 25% of discharge air is forced through the face vents and 75% is directed through the floor outlets. – Position 5 is the floor mode. In this position, all the discharge air is directed to the floor outlets (Figure 9 -7). Copyright © 2014 Delmar, Cengage Learning

Air Selection Switch (continued) Figure 9 -7. The vent door is open to direct air to the floor vents. Copyright © 2014 Delmar, Cengage Learning

Air Selection Switch (continued) – Position 6 is located between the floor mode and the floor/defog mode. In this position, 75% of the discharge air is forced out the floor outlets and the remaining 25% is directed through the defrost vents at the windshield. – Position 7 is the defog mode. In this position, the discharge air is divided equally between the floor outlets and the defrost vents at the windshield (Figure 9 -8). Copyright © 2014 Delmar, Cengage Learning

Air Selection Switch (continued) Figure 9 -8. The vent doors are open, distributing air to defrost vents and floor outlet vents. Copyright © 2014 Delmar, Cengage Learning

Air Selection Switch (continued) – Position 8 is located between the defog mode and the defrost mode. In this position, 75% of the discharge air is forced though the defrost outlets and the remaining 25% through the floor outlets. • When the air selection switch is in this position, the air conditioner automatically turns on. • The recirculation button does not operate when the switch is in this mode. Copyright © 2014 Delmar, Cengage Learning

Air Selection Switch (continued) – Position 9 is the defrost mode. In this position, all of the discharge air is forced through the defrost outlet and onto the front windshield. • When the air selection switch is in this position, the air conditioner automatically turns on. • The recirculation button does not operate when the switch is in this mode (Figure 9 -9). Copyright © 2014 Delmar, Cengage Learning

Air Selection Switch (continued) Figure 9 -9. The defrost vent door is open and all others are closed, supplying all air to the windshield. Copyright © 2014 Delmar, Cengage Learning

Temperature Control Switch • The temperature control switch is found in position 6 on the control panel in Figure 9 -3. • This switch allows operators to select the desired temperature to suit their personal comfort level. • On both the manual water-valve system and the CDTC climate control panel, if the switch is turned clockwise into the red zone, the temperature increases (becomes warmer). Copyright © 2014 Delmar, Cengage Learning

Temperature Control Switch (continued) • If the switch is rotated counterclockwise into the blue zone, the discharge temperature decreases (becomes cooler). Copyright © 2014 Delmar, Cengage Learning

Air-Conditioning Switch • The purpose of the air-conditioning unit is to cool and dehumidify the interior of the cab. • The control button for the air conditioner is in position number 5 on the control panel in Figure 9 -3. • When pushed in, this switch operates the air conditioner, and if the button is again pushed in, the air conditioner is turned off. Copyright © 2014 Delmar, Cengage Learning

Air-Conditioning Switch (continued) • The air-conditioning button contains an amber indicator lamp that is on whenever the demand for air conditioning has been selected from either the cab climate control panel or the sleeper climate control panel. • If the instrument panel lights are on, then the snowflake indicator on the airconditioning button will be on. Copyright © 2014 Delmar, Cengage Learning

Air-Conditioning Switch (continued) • The air-conditioning function will be disabled when: 1. The ambient air temperature is so low that the air-conditioning function would be ineffective. 2. The engine is not running at a high enough rpm. 3. Certain conditions cause the heater and airconditioning system to go into a protection mode (Figure 9 -10). Copyright © 2014 Delmar, Cengage Learning

Air-Conditioning Switch (continued) Figure 9 -10. The airconditioning switch allows the operator to turn air conditioning on or off. Copyright © 2014 Delmar, Cengage Learning

Recirculation • The recirculation button is located at position 3 on the control panel in Figure 93. • The recirculation mode restricts the proportion of outside air entering the cab. • Often, the recirculation button is used to prevent dusty or smoky air from entering the cab. Copyright © 2014 Delmar, Cengage Learning

Recirculation (continued) • The recirculation feature can also be used to decrease the time required to heat or cool the interior of the cab when ambient temperature conditions are extreme. • Whenever the climate control system is in recirculation mode, the amber light is illuminated. Copyright © 2014 Delmar, Cengage Learning

Recirculation (continued) • When the air selection switch is in the following positions, the recirculation feature will not operate: 1. When the air selector switch is in the defog mode. 2. When the air selector switch is in between the defog mode and the defrost mode. 3. When the air selector switch is in the defrost mode. Copyright © 2014 Delmar, Cengage Learning

Recirculation (continued) Note: The recirculation feature is controlled by a timer and will automatically switch the system to partial recirculation mode after 20 minutes of operation. • This prevents the build-up of fumes or odors and also prevents oxygen depletion within the cab. • This feature alone will help the operator remain alert. Copyright © 2014 Delmar, Cengage Learning

Recirculation (continued) Note (continued): • If conditions continue to be extremely dusty or smoky, the partial recirculation mode can be overridden back to full recirculation mode by simply pressing the recirculation button twice. • This allows the timer to reset for 20 minutes (Figures 9 -11 and 9 -12). Copyright © 2014 Delmar, Cengage Learning

Recirculation (continued) Figure 9 -11. The recirculation door is open, allowing fresh air to be introduced into the HVAC. Copyright © 2014 Delmar, Cengage Learning

Recirculation (continued) Figure 9 -12. The recirculation door is closed, preventing dust and contaminants from entering the cab and reducing cooling time when air conditioning has been selected. Copyright © 2014 Delmar, Cengage Learning

Optional Bunk Override Switch • The bunk override switch (BUNK OVRD) gives the vehicle operator the ability to control the temperature and fan speed of the sleeper compartment from the cab climate control panel. • This switch is located at position 1 on the climate control panel in Figure 9 -3. • If the operator depresses the top half of the switch, it allows the cab settings to override the sleeper control settings. Copyright © 2014 Delmar, Cengage Learning

Optional Bunk Override Switch (continued) • Whenever the bunk override mode is in operation, the amber light is illuminated. • If the operator makes any adjustment to the controls within the sleeper compartment, the override mode feature will be canceled, enabling the bunk climate control settings to take over. Copyright © 2014 Delmar, Cengage Learning

Optional Bunk Override Switch (continued) • When the climate control system is in the bunk override mode, the climate control panel of the cab can be adjusted without affecting the settings of the sleeper compartment. • If it is necessary to make adjustments to the sleeper climate settings, set the fan speed and temperature settings on the cab climate control panel to the desired sleeper settings and depress the upper-half of the bunk override switch again. Copyright © 2014 Delmar, Cengage Learning

Optional Bunk Override Switch (continued) • Once again, the cab climate control panel can be adjusted for the cab settings without affecting the new sleeper settings. • When the operator wishes to cancel the bunk override mode, the lower half of the bunk override switch is depressed. Copyright © 2014 Delmar, Cengage Learning

Optional Bunk Override Switch (continued) • Once the override mode has been terminated, the sleeper climate control system is controlled from the sleeper climate control panel, and the amber indicator on the override button is off. Copyright © 2014 Delmar, Cengage Learning

Air Outlet Vents • On the instrument panel, outlets for the face have louvers that may be directed so the discharge air from them can be made to flow up, down, left, or right. • The operator can point these vents wherever desired or close the vents completely (Figure 9 -13). • Defrost (windshield) vents and the vents that are directed at the doors are fixed and thus nonadjustable. • The sleeper compartment may have one or more vents that may be positioned up, down, or closed. Copyright © 2014 Delmar, Cengage Learning

Air Outlet Vents Figure 9 -13. Louvers allow the operator to direct the discharge air where it is desired. Copyright © 2014 Delmar, Cengage Learning

Sleeper Climate Control Panel • As with the climate control system of the cab, the sleeper climate control system also features a water-valve controlled system with constant discharge temperature control (CDTC) (Figure 9 -14). • The CDTC maintains constant air flow temperature from the vents, regardless of ambient temperature conditions, selected fan speed, engine coolant temperature, and coolant flow. Copyright © 2014 Delmar, Cengage Learning

Sleeper Climate Control Panel (continued) Figure 9 -14. A sleeper climate control panel: switch #1 controls fan speed and switch #2 controls temperature. Copyright © 2014 Delmar, Cengage Learning

Sleeper Climate Control Panel (continued) • Just like the cab climate control panel, once the temperature control switch is rotated to the preferred temperature, no other adjustments are necessary. Copyright © 2014 Delmar, Cengage Learning

Fan Switch • The fan switch is located at position 1 in Figure 9 -14. • The fan switch in the sleeper controls the fan speed of the blower for the heater and air conditioning. • The fan switch on the sleeper control panel has eight fan speeds as well as an off position. • Rotating the switch in a clockwise direction or to a higher number increases the fan speed, and turning the switch counterclockwise or to a lower number decreases the fan speed. Copyright © 2014 Delmar, Cengage Learning

Fan Switch (continued) Note: If the fan switch on the climate control panel for the sleeper is in the off position and the air conditioning for the cab is on, the sleeper fan operates at low speed. • It is necessary to keep this fan running to protect the bunk evaporator from freezing because refrigerant is still flowing through the remote evaporator when the main evaporator within the cab dash is being operated. Copyright © 2014 Delmar, Cengage Learning

Temperature Control Switch • The temperature control switch for the sleeper is found in position 2 in Figure 9 -14. • This switch allows operators to select the desired temperature to suit their personal comfort level within the sleeper compartment. • Like the temperature control switch for the cab climate control, if the switch is turned clockwise into the red zone, the temperature increases (becomes warmer). Copyright © 2014 Delmar, Cengage Learning

Temperature Control Switch (continued) • If the switch is rotated counterclockwise into the blue zone, the discharge temperature decreases (becomes cooler). • The air-conditioning system automatically turns on in order to maintain the chosen temperature in the sleeper compartment. Copyright © 2014 Delmar, Cengage Learning

Temperature Control Switch (continued) • If the air-conditioning system turns on at the same time that the cab air conditioner is operating, the fan speed and temperature settings of the sleeper compartment will be overridden by the cab air-conditioning settings. • The CDTC will not function whenever the temperature control switch is in the maximum cooling or maximum heating position. Copyright © 2014 Delmar, Cengage Learning

Manual Water-Valve Controlled HVAC System • The water-valve controlled HVAC system operates much like the CDTC previously mentioned, with a few small differences. • Position 1 in Figure 9 -15 is the fan switch. • This switch allows the operator to circulate fresh or recirculated air at four different speeds, or to shut the blower fan off entirely. • Turning the switch clockwise to higher numbers increases the speed of the blower fan. Copyright © 2014 Delmar, Cengage Learning

Manual Water-Valve Controlled HVAC System (continued) Figure 9 -15. An HVAC control panel for a water-valve system. Copyright © 2014 Delmar, Cengage Learning

Manual Water-Valve Controlled HVAC System (continued) • When the switch is in the 0 position, the fan is off. • Position 2 in Figure 9 -15 is the air selection switch, which is used to direct the flow of discharge air on the face and feet, face only, feet and windshield, or windshield only. • Position 3 in Figure 9 -15 is the temperature control switch. • This switch allows operators to select the desired temperature to suit their personal comfort level. Copyright © 2014 Delmar, Cengage Learning

Manual Water-Valve Controlled HVAC System (continued) • When the switch is turned clockwise into the red zone, the temperature increases (becomes warmer). • If the switch is rotated counterclockwise into the blue zone, the discharge temperature decreases (becomes cooler). • Position 4 in Figure 9 -15 is the maximum airconditioning button. • When this button is depressed, the ventilation system is placed in the recirculation mode. Copyright © 2014 Delmar, Cengage Learning

Manual Water-Valve Controlled HVAC System (continued) • This mode of operation should not be used for more than 20 minutes to prevent the buildup of fumes, odors, and stale air from inside the cab. • Unlike the CDTC system, it does not automatically switch to partial recirculation mode after 20 minutes. • Whenever ‘‘max air conditioning’’ is selected, the system is in recirculation mode, whether or not the switch is in fresh or recirculation mode. Copyright © 2014 Delmar, Cengage Learning

Manual Water-Valve Controlled HVAC System (continued) • If air conditioning has been selected and the fresh air recirculation switch is in recirculate mode, the system will function the same as it does when the air selection switch is set at maximum air conditioning. • The control panel in Figure 9 -15 may contain a fan bunk switch. • This switch on the cab control panel overrides the sleeper climate control panel. Copyright © 2014 Delmar, Cengage Learning

Manual Water-Valve Controlled HVAC System (continued) • To increase the ventilation, the switch is put in the HI position. • For normal fan speed, the switch can be moved to the mid-position, and if operators wish, they may turn off the fan in the bunk entirely by moving the switch to the off position. Copyright © 2014 Delmar, Cengage Learning

Sleeper Climate Control Panel • The sleeper heater and air conditioning used in a water-valve controlled HVAC system operates much like the CDTC system, with a few minor differences. • The bunk HVAC system uses a separate evaporator coil, expansion valve, and blower fan for the air conditioning side, and a separate heater core and water valve that operates independently from the cab HVAC system (Figures 9 -16 and 9 -17). Copyright © 2014 Delmar, Cengage Learning

Sleeper Climate Control Panel (continued) Figure 9 -16. A bunk HVAC system containing the evaporator, heater core, blower fan, and ducting. Copyright © 2014 Delmar, Cengage Learning

Sleeper Climate Control Panel (continued) Figure 9 -17. A sleeper control panel for a water-valve controlled system; the temperature control switch is in position 1 and the fan control switch is in position 2. Copyright © 2014 Delmar, Cengage Learning

Temperature Control • The water-valve controlled system controls the intensity of the heating system by controlling the flow of coolant through the heater core. • More coolant flow through the heater core means more heat at the vent outlets. • When coolant flow is restricted, the temperature at the vent outlets decreases. • When the air conditioning is on, cold air from the evaporator mixes with warm air from the heater core. Copyright © 2014 Delmar, Cengage Learning

Temperature Control (continued) • There are two types of water valves used on trucks. • One is a manual valve, which is cable activated, and the other is electrically operated (Figure 918). • The manual valve is opened and closed by a cable, linked to the control panel, or it may be linked to the heater control stepper motor. • The Volvo Corporation calls their water valve a solenoid water valve, whereas Freightliner calls their water valve pulse modulated. Copyright © 2014 Delmar, Cengage Learning

Temperature Control (continued) Figure 9 -18. A manual water valve operated by movement of a cable. Copyright © 2014 Delmar, Cengage Learning

Temperature Control (continued) • No matter what these companies call these valves, they are both pulse width modulation controlled (Figure 9 -19). • These valves are used in systems that are electronically controlled by electrical impulses from the control unit. • The solenoid water valve is constantly supplied with 12 V and is switched on the ground side. Copyright © 2014 Delmar, Cengage Learning

Temperature Control (continued) Figure 9 -19. A solenoid water valve used by Volvo. Copyright © 2014 Delmar, Cengage Learning

Temperature Control (continued) Note: If the water valve does not have the ability to close all the way, the air conditioning will not work efficiently when set to the lowest temperature because it is working against heat generated at the heater core. • It is important not to shut off the valve at the engine for coolant to the heater core (Figure 9 -20). Copyright © 2014 Delmar, Cengage Learning

Temperature Control (continued) Figure 9 -20. Manual water shutoff valves on the engine. Copyright © 2014 Delmar, Cengage Learning

Temperature Control (continued) • This will severely hinder the system’s ability to control the air-conditioning temperature in both the cab and sleeper compartments. • When the valve is shut off, the warm coolant will not be able to circulate through the heater core, making the outlet air temperature controls unable to change the air temperature. Copyright © 2014 Delmar, Cengage Learning

Blend Air System • The control panels for blend air HVAC systems are virtually the same as those for water-valve controlled systems; the difference is in the way that the outlet air temperature is controlled. • With the blend air system, both the heater core and the evaporator coil can be operating at their highest intensity (if AC has been selected). Copyright © 2014 Delmar, Cengage Learning

Blend Air System (continued) • The air conditioning is on, and there is no restriction in the amount of coolant circulating through the heater core. • The temperature is controlled by a blending door. Copyright © 2014 Delmar, Cengage Learning

Blend Air System (continued) • This blend door may be automatically or manually positioned to allow more or less air to be directed through each of the two coils in order to maintain the desired vent temperature. • If air conditioning has not been selected by the driver, the air from the heater core is blended with fresh air brought into the cab. Copyright © 2014 Delmar, Cengage Learning

Stepper Motor • Stepper motors are used to position doors within the HVAC unit, thereby controlling air distribution, temperature, and fresh or recirculated air (Figure 9 -21). • These small devices convert electric signals to a stepped rotating motion that directly moves a door according to the vehicle operator’s selection on the control panel. Copyright © 2014 Delmar, Cengage Learning

Stepper Motor (continued) Figure 9 -21. Stepper motors are used to move vent doors within the HVAC unit into various positions. F. P. O. Copyright © 2014 Delmar, Cengage Learning

Stepper Motor (continued) • The stepper motor consists of a rotor with permanent magnets, four coil windings, and four in series diodes (Figure 9 -22). • Stepper motors are controlled by an ECU and can be moved in very precise increments. • The stepper motor in position 1 controls the shutter, which mixes fresh air with recirculated air. Copyright © 2014 Delmar, Cengage Learning

Stepper Motor (continued) Figure 9 -22. Placement of three stepper motors on a Volvo climate control system. F. P. O. Copyright © 2014 Delmar, Cengage Learning

Stepper Motor (continued) • The stepper motor in position 2 controls the air outlet distribution. • The stepper motor in position 3 controls air bypass on electronically-controlled systems, and it controls the water valve and air mixing on the manual airconditioning systems or systems without A/C. Copyright © 2014 Delmar, Cengage Learning

Ventilation • An exhaust system is included with sleeper cabs. • When the climate control panel is in the fresh air mode of operation, approximately 300 cubic feet of air per minute is brought into the cab and exhausted through a vent in the rear area of the sleeper. • This will exhaust the stale air, allowing fresh air to take its place and slightly pressurize the cab. Copyright © 2014 Delmar, Cengage Learning

Ventilation (continued) • To prevent the buildup of fumes, odors, and stale air, the HVAC system should not be run in the recirculation mode for more than 20 minutes at a time. Copyright © 2014 Delmar, Cengage Learning

HVAC General Information • The controls for other truck manufacturers tend to vary, but all operate on much of the same premises (Figure 9 -23). • The control panel for one of Western Star’s trucks has a digital LED display for the cab temperature and a rocker switch for temperature control. • Arrows above the rocker switch indicate the direction the temperature will change when the switch is depressed. Copyright © 2014 Delmar, Cengage Learning

HVAC General Information (continued) F. P. O. Figure 9 -23. A control panel from a Western Star truck. Copyright © 2014 Delmar, Cengage Learning

HVAC General Information (continued) • The vehicle operator can change the display from degrees Fahrenheit to degrees Celsius by turning the ignition switch ‘‘ON’’ and the fan speed switch to the ‘‘OFF’’ position. • The rocker switch is then depressed to the side with the temperature down arrow and held for 5 seconds. The units of temperature will be displayed on the LED screen. Copyright © 2014 Delmar, Cengage Learning

HVAC General Information (continued) • Press the down side of the rocker switch again, and the display units of temperature will change (Figure 9 -24). • If the unit of temperature display is changed on the cab control panel, the unit of temperature display on the sleeper compartment also changes. • Western Star trucks use a system called Automatic Temperature Control or ATC. Copyright © 2014 Delmar, Cengage Learning

HVAC General Information (continued) F. P. O. Figure 9 -24. A control panel from a Western Star truck; the temperature display has been changed from degrees Fahrenheit to degrees Celsius. Copyright © 2014 Delmar, Cengage Learning

HVAC General Information (continued) • When the auto setting is engaged, the system engages full-automatic control mode. • When in this mode of operation, the fan speed varies as the system maintains the temperature set on the display. • Most truck manufacturers offer vehicles with some type of electronically-controlled HVAC system. Copyright © 2014 Delmar, Cengage Learning

HVAC General Information (continued) • These systems require a control unit that may be on its own or integrated into the vehicle’s engine management system. • The HVAC control unit (computer) controls the temperature within a set of values. Copyright © 2014 Delmar, Cengage Learning

HVAC General Information (continued) • It receives input signals from temperature and pressure sensors, and delivers output signals to control compressor operation, water valve operation, and stepper motor positions. • The vehicle operator sets the control panel to the desired temperature, fan speed, ventilation position, and fresh or recirculated air position. Copyright © 2014 Delmar, Cengage Learning

Temperature Sensors • Temperature sensors are used at various points throughout the vehicle to send signals back to the electronic control unit for the HVAC system. • These sensors contain a temperaturedependent resistor. • This type of temperature sensor is known as a thermistor. Copyright © 2014 Delmar, Cengage Learning

Temperature Sensors (continued) • These thermistors are referred to as negative temperature coefficient (NTC) thermistors. • As the temperature increases, the resistance goes down and vice versa when the temperature increases. • The electronic control unit monitors these changes in resistance and responds accordingly (Figure 9 -25). Copyright © 2014 Delmar, Cengage Learning

Temperature Sensors (continued) Figure 9 -25. Temperature sensors, called thermistors, allow the system to monitor the temperature at various points to aid in controlling the set point. F. P. O. Copyright © 2014 Delmar, Cengage Learning

Operator Maintenance • It is important that the operator run the air conditioning compressor at least once every month for approximately 5 minutes. • Doing this helps prevent the drying and cracking of tubing seals, thereby reducing refrigerant leaks in the system. • The air conditioner should only be operated after the engine compartment is warm and the cab’s interior is 70 F (21 C) or higher. Copyright © 2014 Delmar, Cengage Learning

General Maintenance • Freightliner recommends that the fresh air filter be replaced every six months, regardless of mileage, to permit properation of the HVAC system. • If the filter is not replaced, damage to the heater and air conditioner components could occur. • Western Star recommends that their foamtype air filter be cleaned every 3 months, or replaced annually. Copyright © 2014 Delmar, Cengage Learning

General Maintenance (continued) • These foam-style filters can be cleaned a maximum of 3 times before they should be replaced. • It is also recommended that the optional dust/odor filter be replaced rather than cleaned every 3 months. • The air filter assembly for the sleeper compartment should also be replaced or serviced at the same interval as the cab air filter. Copyright © 2014 Delmar, Cengage Learning

General Maintenance (continued) Note: The HVAC system should not be operated without the fresh air filter installed. • Follow the instructions in the service literature for filter replacement, making sure that the new filter is oriented properly. • The filter label has an arrow that indicates the air flow direction through the filter. Copyright © 2014 Delmar, Cengage Learning

Supplemental Cab Climate Control • In order for the heating and air conditioning to function, a truck’s engine must be running. • With the number of trucks operating across North America, this is a huge environmental problem. • According to a Canadian study, a typical heavy-duty, freight-hauling, Class 8 truck idles about 1, 840 hours per year when parked overnight at truck stops. Copyright © 2014 Delmar, Cengage Learning

Supplemental Cab Climate Control (continued) • The main reasons for idling are to: – Heat or cool the truck cab and/or sleeper – Keep the fuel warm in winter – Keep the engine warm in winter so that the engine is easier to start • Bus drivers operate their engines for similar reasons. Copyright © 2014 Delmar, Cengage Learning

Supplemental Cab Climate Control (continued) • A Class 8 truck/bus engine consumes approximately 1 gallon (4 L) of diesel fuel per hour when idling at 900 rpm. • Because each quarter gallon (liter) of diesel fuel consumed by an engine produces 6. 1 lbs (2. 8 kg) of GHGs (Greenhouse Gases), one hour of idling by a Class 8 engine produces 24. 7 pounds (11. 2 kg) of GHGs, and one year’s worth of idling (1, 840 hours) produces 22. 6 tons (20, 496 kg) of GHGs. Copyright © 2014 Delmar, Cengage Learning

Supplemental Cab Climate Control (continued) • Such engine idling can be avoided through the use of devices such as fuel-fired interior heaters, engine coolant heaters with truck cab or bus interior heating apparatus, and auxiliary power generators (Figure 9 -26). Copyright © 2014 Delmar, Cengage Learning

Supplemental Cab Climate Control (continued) Figure 9 -26. A supplemental truck heating system. F. P. O. Copyright © 2014 Delmar, Cengage Learning

Fuel-Fired Interior Heaters • Fuel-fired heaters that use diesel fuel from the truck’s fuel tank are significantly more efficient at heating the truck’s interior than idling the engine, as heat is provided directly from the combustion flame to the heat exchanger. • The vehicle’s engine uses some of its heat energy to overcome internal friction and to drive engine accessories, such as alternators and power steering pumps. Copyright © 2014 Delmar, Cengage Learning

Fuel-Fired Interior Heaters (continued) • Fuel-fired interior heaters are available with outputs between 5, 100 and 50, 000 British thermal units per hour (BTU/h). • According to figures published by Natural Resources Canada on the idling habits of North American truck drivers, for Canadian conditions, one can assume 1, 450 hours of engine idling for heating and 390 hours for cooling. Copyright © 2014 Delmar, Cengage Learning
Fuel-Fired Interior Heaters (continued) • Figures published by manufacturers of fuel -fired interior heaters indicate a fuel consumption of between 0. 07 and 0. 46 gallons per hour (0. 27 to 1. 80 liters per hour). • At these rates, a fuel-fired interior heater could save from 0. 58 to 0. 98 gallons per hour (2. 2 to 3. 7 liters/hour) for approximately 1, 450 hours per year. Copyright © 2014 Delmar, Cengage Learning
Fuel-Fired Interior Heaters (continued) • This would equate to the approximate consumption of 843 to 1, 417 gallons (3, 190 to 5, 365 liters) of diesel fuel, representing a GHG reduction of 8. 8 to 16. 5 tons (8. 0 to 15 tonnes) per year. • As such, this would represent an enormous reduction in fuel consumption and GHG production that would otherwise result from idling the vehicles’ engines (Figure 9 -27). Copyright © 2014 Delmar, Cengage Learning
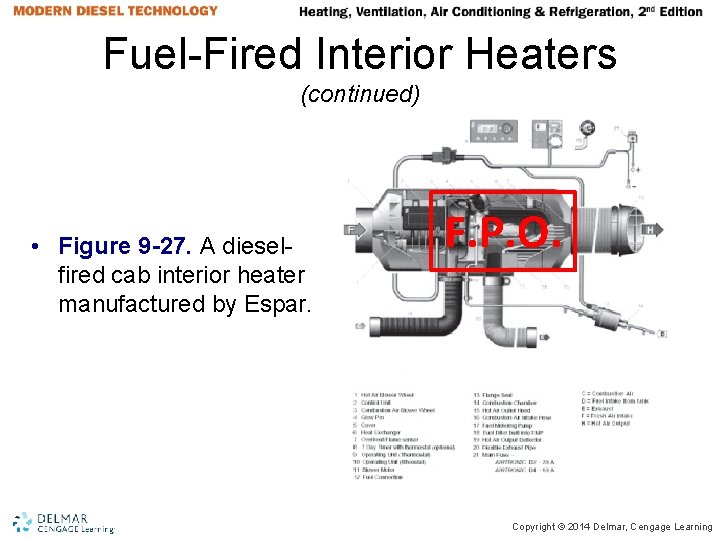
Fuel-Fired Interior Heaters (continued) • Figure 9 -27. A dieselfired cab interior heater manufactured by Espar. F. P. O. Copyright © 2014 Delmar, Cengage Learning
Operation • We will use an air heater manufactured by Espar Corporation as an example. • The heater may be turned on by means of a switch, a thermostat, or a timer. • A control unit signals the blower motor to draw combustion air into the heat exchanger; simultaneously, fuel is drawn from the fuel tank by the heater’s fuel pump and mixed with the air. Copyright © 2014 Delmar, Cengage Learning
Operation (continued) • As an ignition plug ignites the air/fuel mixture, a controlled flame is established inside the sealed heat exchanger. • Combustion gases then pass safely through the exhaust and into the atmosphere. • Clean air is drawn over the surrounding walls of the heat exchanger and circulated by the heater fan. • A flame sensor, a temperature regulating sensor, and an overheat sensor ensure safe operation of the unit. Copyright © 2014 Delmar, Cengage Learning
Operation (continued) • These units cycle through four heat settings (boost, high, medium, and low) in order to maintain the temperature selected by the vehicle operator. • In some cases, less heating is required than the heater produces in the low mode of operation. When this occurs, the heater switches to a standby mode. Copyright © 2014 Delmar, Cengage Learning
Operation (continued) • When the unit is shut off by any method, it starts a controlled cool-down sequence. • The fuel pump stops delivering fuel. • The ignition plug is then energized for 15 seconds. • The blower will continue to run for 3 minutes and will then automatically switch off. Copyright © 2014 Delmar, Cengage Learning
Engine Coolant Heaters with Truck Cab or Bus Interior Heating • This category of supplemental truck climate control includes products that both supply heated air to the truck or bus interior, as well as heat and circulate engine coolant. • These units are fuel-fired, using diesel fuel from the truck’s fuel tank. • They can be designed as a single unit, or they can be a combination of air heater and coolant heater, as long as both operate independently of the vehicle’s engine. Copyright © 2014 Delmar, Cengage Learning
Engine Coolant Heaters with Truck Cab or Bus Interior Heating (continued) • Fuel-fired coolant heaters are available with outputs between 13, 700 and 120, 000 British thermal units per hour (BTU/h). • These devices can only be used for heating the engine coolant and cab’s interior and provide no means for cooling. • Natural Resources Canada projects that, for North American winter conditions, one can assume 1, 450 hours of engine idling for heating. Copyright © 2014 Delmar, Cengage Learning
Engine Coolant Heaters with Truck Cab or Bus Interior Heating (continued) • At this rate of idling, approximately 416 gallons (5075 L) of diesel would be consumed, representing a GHG reduction of 15. 7 tons (14. 2 tonnes). • These figures indicate an enormous reduction in the fuel consumption and GHG production caused by idling the vehicle’s engine. • Preheating the engine also eliminates white smoke engine emissions that occur when starting a cold engine. Copyright © 2014 Delmar, Cengage Learning
Engine Coolant Heaters with Truck Cab or Bus Interior Heating (continued) • Warm starts also reduce engine stress and wear and reduce battery demand. • Because these coolant heaters are capable of maintaining coolant temperatures in the 185 F (85 C) range, heat is produced for the cab and sleeper compartment. • This heat may be extracted by the OEM heater cores, and a thermostatically-controlled fan or the coolant may be plumbed through another remote heat exchanger (Figure 9 -28). Copyright © 2014 Delmar, Cengage Learning
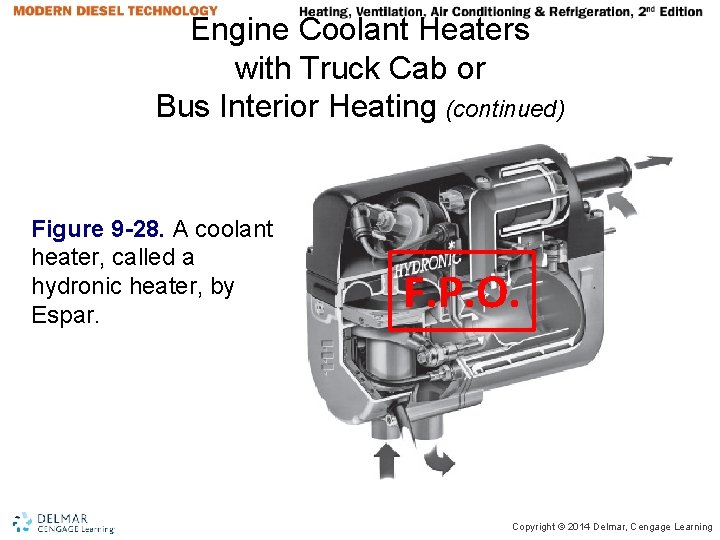
Engine Coolant Heaters with Truck Cab or Bus Interior Heating (continued) Figure 9 -28. A coolant heater, called a hydronic heater, by Espar. F. P. O. Copyright © 2014 Delmar, Cengage Learning
Operation • We will use a hydronic heater manufactured by Espar Corporation as an example. • These heaters are connected to the engine’s cooling system. • The heater may be turned on by means of a switch or timer. • A control unit signals the integrated coolant pump to start circulating coolant; simultaneously, a blower motor draws combustion air into the heat exchanger. Copyright © 2014 Delmar, Cengage Learning
Operation (continued) • Fuel is drawn from the fuel tank by the heater’s fuel pump and mixed with the air simultaneously. • The mixture is then ignited by a glow pin. • Once a flame is established, the glow pin shuts off. • Combustion gases pass safely through the exhaust and into the atmosphere. Copyright © 2014 Delmar, Cengage Learning
Operation (continued) • The heater now runs in high heat mode and the temperature is monitored at the heat exchanger. • An integrated water pump moves the coolant over the heat exchanger and heats the coolant, and then it circulates the coolant thorough the engine’s plumbing system. • These units have the capacity to raise the temperature of the coolant 100 F in one Copyright © 2014 Delmar, Cengage Learning
Operation (continued) • Once the coolant reaches 185 F (80 C), the heater automatically switches to low heat mode and continues to run. • If the coolant drops down to 167 F (75 C), the heater automatically switches back to the high heat mode of operation. • If the temperature of the coolant continues to rise, the heater shuts down when coolant temperature reaches 187 F (86 C). Copyright © 2014 Delmar, Cengage Learning
Operation (continued) • The water pump continues to operate, allowing the unit to monitor the engine temperature. • Once the coolant temperature falls to 167 F (75 C), the unit automatically restarts. • The unit automatically continues to operate, unless it is switched off either manually, automatically by a timer, or by a heater malfunction. Copyright © 2014 Delmar, Cengage Learning
Operation (continued) • When the unit is shut off by any method, it starts a controlled cool-down sequence. • The fuel metering pump stops delivering fuel, extinguishing the flame. • The combustion air blower and water pump continue to operate for 130 seconds to cool the unit down. • The unit then shuts down. Copyright © 2014 Delmar, Cengage Learning
Operation (continued) Note: If the unit shuts down due to a flameout while running, it attempts to restart once. • If the restart is successful, it continues to run; if not, the unit shuts down completely after a cooldown cycle. • Also, if the battery voltage drops below 10 VDC or rise above 16 VDC, the unit shuts down after a cool-down mode. Copyright © 2014 Delmar, Cengage Learning
Auxiliary Power Units • Auxiliary power units, or APUs, are portable, truck-mounted systems that can provide climate control (heating and cooling) as well as electricity for electrical appliances, battery charging, and/or engine preheating (block heater). • These systems generally consist of a small internal combustion engine (usually diesel) equipped with a generator and heat recovery system to provide electricity and heat. Copyright © 2014 Delmar, Cengage Learning
Auxiliary Power Units (continued) • For the air-conditioning function, an electrically powered air-conditioning unit is normally installed in the sleeper, although some systems use the truck’s airconditioning system. • The more sophisticated APUs consist of a generator powered by a diesel engine, a compressor, an alternator, and an inverter/charger. These units are fully integrated into the truck’s heating, ventilation, and air-conditioning system. Copyright © 2014 Delmar, Cengage Learning
Auxiliary Power Units (continued) • The inverter/charger allows the system to provide electrical power to the cab and sleeping compartments for appliances, such as a television or microwave. • Output ratings for these units range from 6, 000 to 25, 000 BTUs of cooling capacity. • The system heating capacity ranges between 6, 000 and 18, 000 BTUs. Copyright © 2014 Delmar, Cengage Learning
Auxiliary Power Units (continued) • These units also provide varying amounts of AC and/or DC electricity to support engine-off use of truck cab/sleeper accessories (Figure 9 -29). • According to Natural Resources Canada, for North American climate conditions, one can assume 1, 450 hours of engine idling for heating and 390 hours for cooling. • Manufacturers of APUs have published figures of between 0. 01 and 0. 2 gallons per hour (0. 38 to 0. 78 liters per hour) for their fuel consumption. Copyright © 2014 Delmar, Cengage Learning
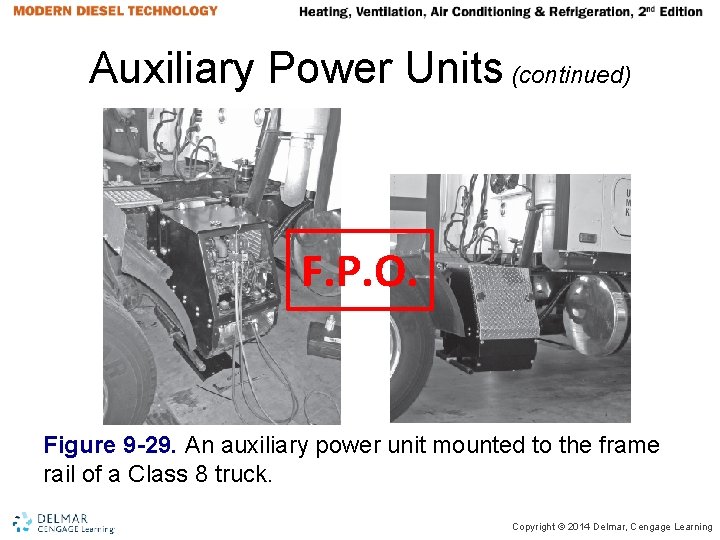
Auxiliary Power Units (continued) F. P. O. Figure 9 -29. An auxiliary power unit mounted to the frame rail of a Class 8 truck. Copyright © 2014 Delmar, Cengage Learning
Auxiliary Power Units (continued) • At these rates, a fuel-fired interior heater could save from 0. 87 to 0. 95 gallons per hour (3. 2 to 3. 6 liters/hour) for approximately 1, 840 hours per year. • This would approximately equate to the consumption of 1, 555 to 1, 750 gallons (5, 888 to 6, 624 liters) of diesel fuel, representing a GHG reduction of 18. 2 to 20. 4 tons (16. 5 to 18. 5 tonnes) per year. • These figures indicate an enormous reduction in the fuel consumption and GHG production Copyright © 2014 Delmar, Cengage Learning
Auxiliary Power Units (continued) Note: Supplemental heating and cooling systems also reduce noxious emissions such as hydrocarbons, NOX, and carbon monoxide. Copyright © 2014 Delmar, Cengage Learning
Truck Stop Electrification • The U. S. Department of Transportation (DOT) estimates that approximately 5, 000 truck stops in the United States offer parking and other services, including fueling stations, restaurants, stores, and showers. • Truck stop electrification allows the driver to plug the vehicle in to operate necessary systems without idling the truck’s engine (Figure 9 -30). Copyright © 2014 Delmar, Cengage Learning
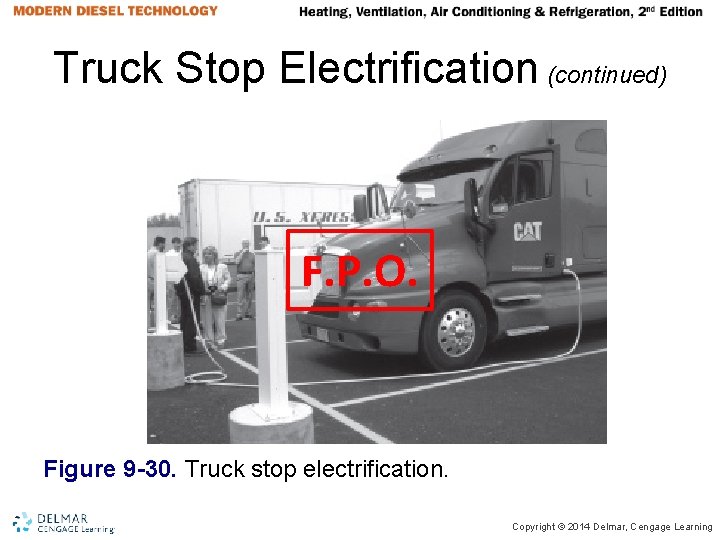
Truck Stop Electrification (continued) F. P. O. Figure 9 -30. Truck stop electrification. Copyright © 2014 Delmar, Cengage Learning
Truck Stop Electrification (continued) • In some cases, a stand-alone system can provide heating, ventilation, and air conditioning directly to the sleeper compartment. • Options for truck stop electrification include: – Stand-alone systems that are owned and operated by the truck stop. – Combination systems that require both onboard and off-board equipment. Copyright © 2014 Delmar, Cengage Learning
Truck Stop Electrification (continued) – Both of these systems eliminate idling of the truck’s engine, thereby greatly reducing the amount of harmful GHGs produced. Copyright © 2014 Delmar, Cengage Learning
Stand-Alone Systems • The stand-alone systems for HVAC operations are contained in a structure above the truck parking spaces (Figure 931). • A hose from the host HVAC unit is connected to the truck window, and a computer touchscreen allows the operator to make payment for the service provided. Copyright © 2014 Delmar, Cengage Learning
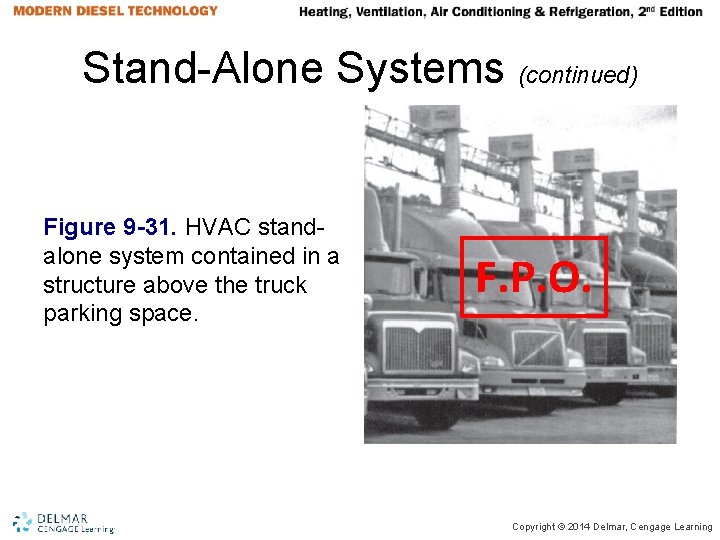
Stand-Alone Systems (continued) Figure 9 -31. HVAC standalone system contained in a structure above the truck parking space. F. P. O. Copyright © 2014 Delmar, Cengage Learning
Stand-Alone Systems (continued) • Stand-alone systems are owned and maintained by private companies that charge an hourly fee. • To accommodate the HVAC hose, a window template must be installed in the truck. Copyright © 2014 Delmar, Cengage Learning
Onboard or Shore Power Systems • Onboard or shore power systems provide electrical outlets that the truck can plug into. • To use shore power systems, the truck must be equipped with an inverter to convert 120 volt AC power. • This power can then be used to run onboard HVAC equipment or any other appliance the operator wishes to plug into the vehicle’s outlets. Copyright © 2014 Delmar, Cengage Learning
Onboard or Shore Power Systems (continued) • The truck stop outlets are owned by private companies that regulate use and fees. • Onboard equipment is owned by the owner of the vehicle or trucking company. Copyright © 2014 Delmar, Cengage Learning
Summary • A water-valve controlled system uses the valve to control the amount of coolant flowing through the heater core. • Blend air systems combine air from the heater core with air from the evaporator in the correct proportions to maintain the desired outlet temperature. • The fan switch gives the operator control over the fan speed. Copyright © 2014 Delmar, Cengage Learning
Summary (continued) • The air selection switch allows the operator to choose which vents discharge air from the system. • The temperature switch allows the operator to select the desired temperature for personal comfort level. • The air-conditioning switch allows the operator to select air conditioning or turn it off. • Recirculation mode restricts the proportion of outside air entering the cab. Copyright © 2014 Delmar, Cengage Learning
Summary (continued) • The bunk override switch lets the vehicle operator control the temperature and fan speed of the sleeper compartment from the cab climate control panel. • Pulse width modulated water valves are electronically controlled by electrical impulses from the control unit. • Supplemental climate control systems provide driver comfort without idling the truck’s engine. Copyright © 2014 Delmar, Cengage Learning
Summary (continued) • Supplemental climate control systems save large quantities of fuel and wear and tear on the truck’s engine, and create big reductions in GHGs compared to idling the truck’s engine. • Truck stop electrification can provide a total HVAC solution for the vehicle while it is parked, or provide electricity to run onboard electrical appliances for driver comfort and HVAC needs. Copyright © 2014 Delmar, Cengage Learning
- Slides: 152