Chapter 8 Mechanical Properties ISSUES TO ADDRESS Stress
- Slides: 61

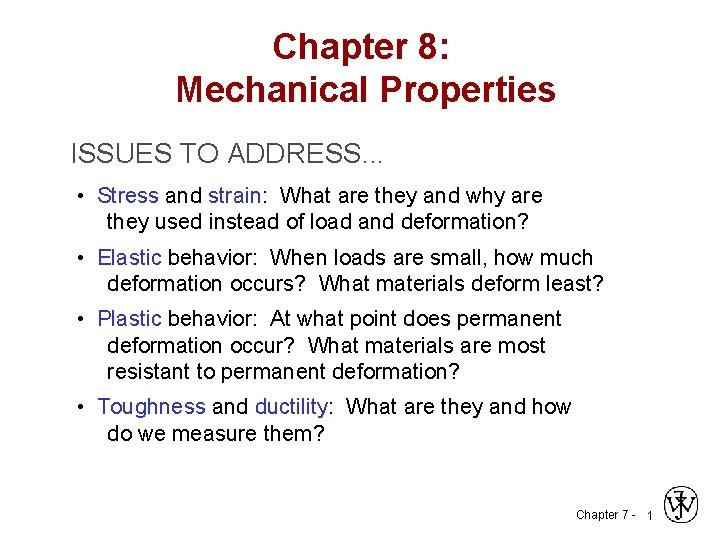
Chapter 8: Mechanical Properties ISSUES TO ADDRESS. . . • Stress and strain: What are they and why are they used instead of load and deformation? • Elastic behavior: When loads are small, how much deformation occurs? What materials deform least? • Plastic behavior: At what point does permanent deformation occur? What materials are most resistant to permanent deformation? • Toughness and ductility: What are they and how do we measure them? Chapter 7 - 1

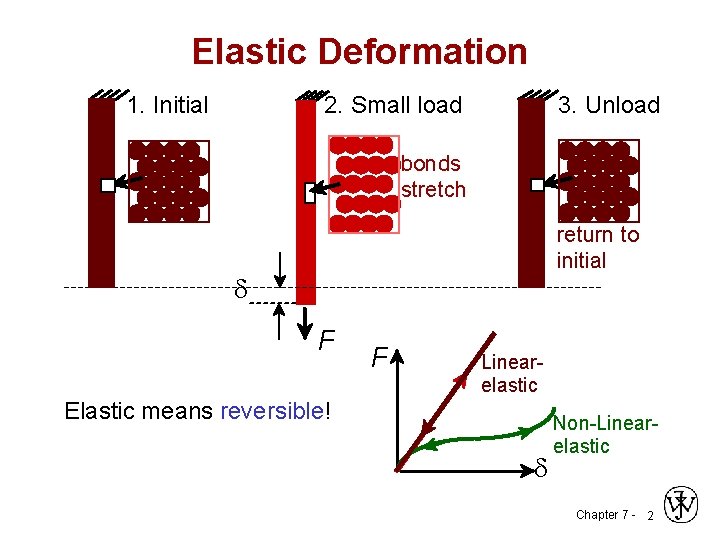
Elastic Deformation 1. Initial 3. Unload 2. Small load bonds stretch return to initial d F F Linear- elastic Elastic means reversible! d Non-Linearelastic Chapter 7 - 2

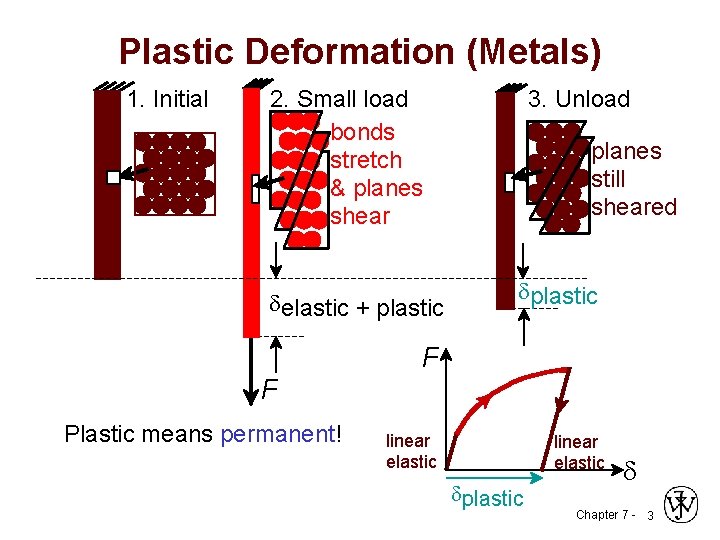
Plastic Deformation (Metals) 1. Initial 2. Small load bonds stretch & planes shear delastic + plastic 3. Unload planes still sheared dplastic F F Plastic means permanent! linear elastic dplastic d Chapter 7 - 3

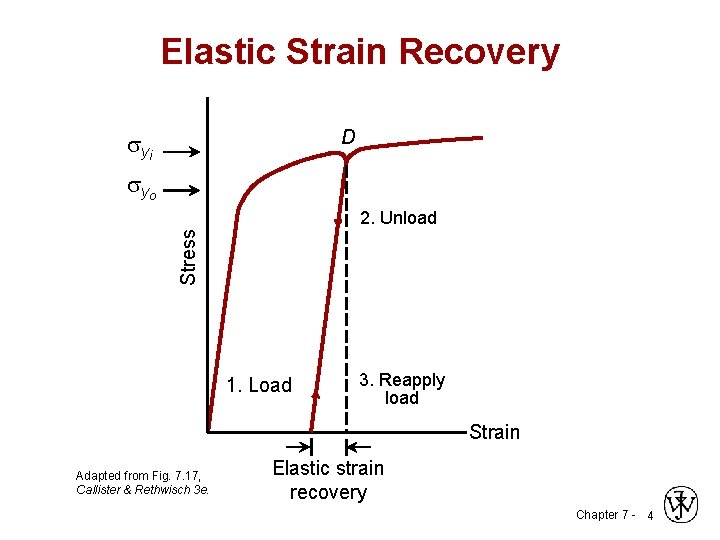
Elastic Strain Recovery D s yi s yo Stress 2. Unload 1. Load 3. Reapply load Strain Adapted from Fig. 7. 17, Callister & Rethwisch 3 e. Elastic strain recovery Chapter 7 - 4

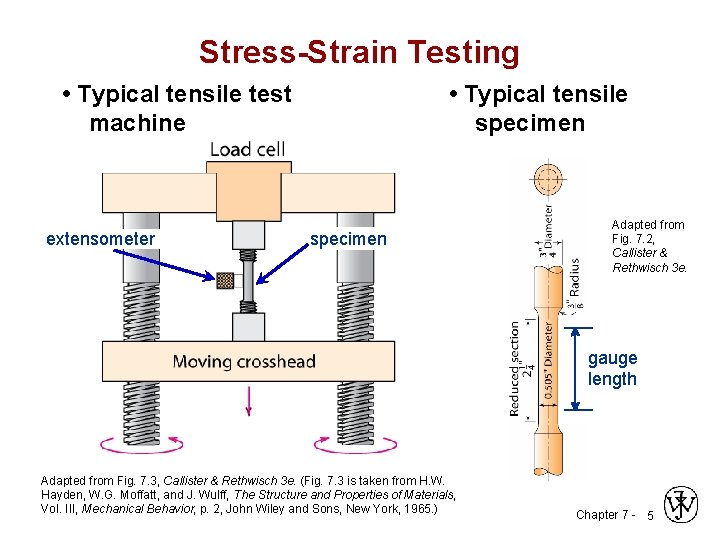
Stress-Strain Testing • Typical tensile test machine extensometer • Typical tensile specimen Adapted from Fig. 7. 2, Callister & Rethwisch 3 e. gauge length Adapted from Fig. 7. 3, Callister & Rethwisch 3 e. (Fig. 7. 3 is taken from H. W. Hayden, W. G. Moffatt, and J. Wulff, The Structure and Properties of Materials, Vol. III, Mechanical Behavior, p. 2, John Wiley and Sons, New York, 1965. ) Chapter 7 - 5

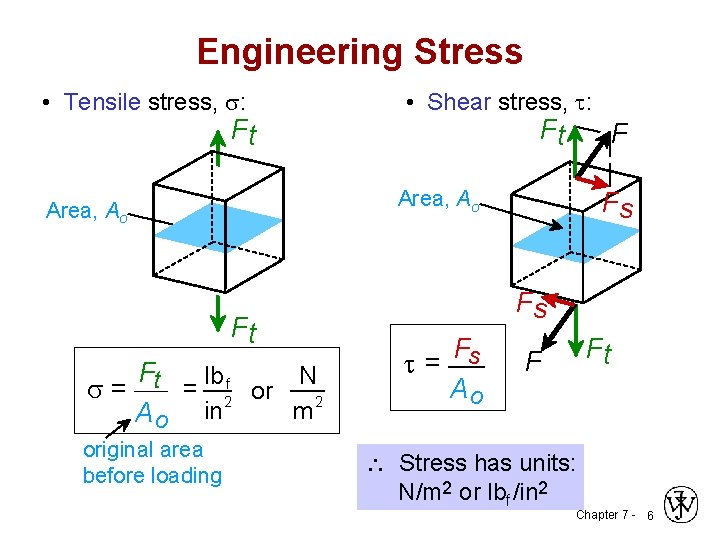
Engineering Stress • Tensile stress, s: Ft Ft F Area, Ao Ft Ft lb f N = 2 or s= 2 in m Ao original area before loading • Shear stress, t: Fs Fs Fs t= Ao Ft F Stress has units: N/m 2 or lbf /in 2 Chapter 7 - 6

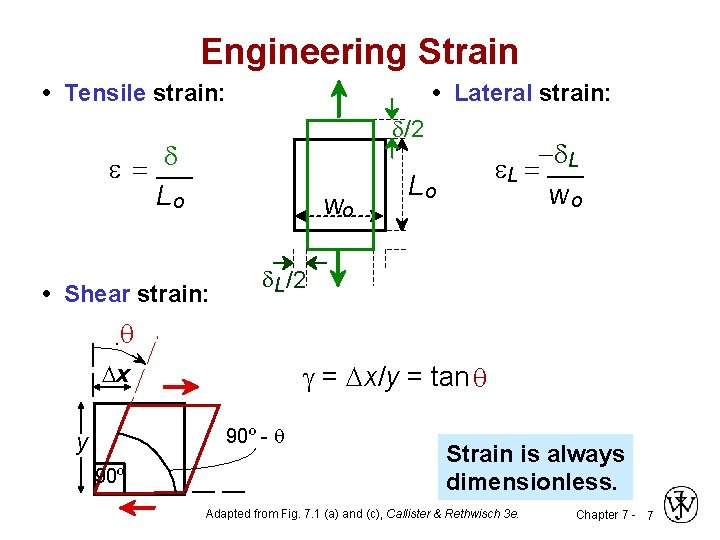
Engineering Strain • Tensile strain: • Lateral strain: d/2 e = d Lo wo • Shear strain: Lo -d. L e. L = wo d. L /2 q = x/y = tan q x 90º - q y 90º Strain is always dimensionless. Adapted from Fig. 7. 1 (a) and (c), Callister & Rethwisch 3 e. Chapter 7 - 7

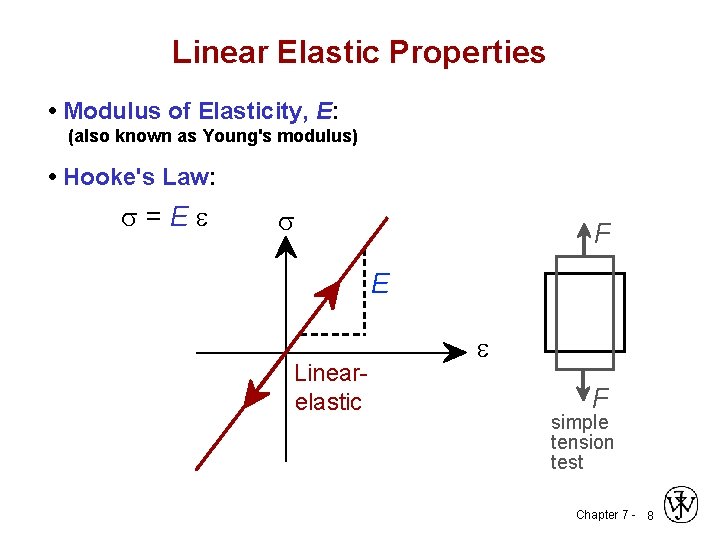
Linear Elastic Properties • Modulus of Elasticity, E: (also known as Young's modulus) • Hooke's Law: s = E e s F E Linear- elastic e F simple tension test Chapter 7 - 8

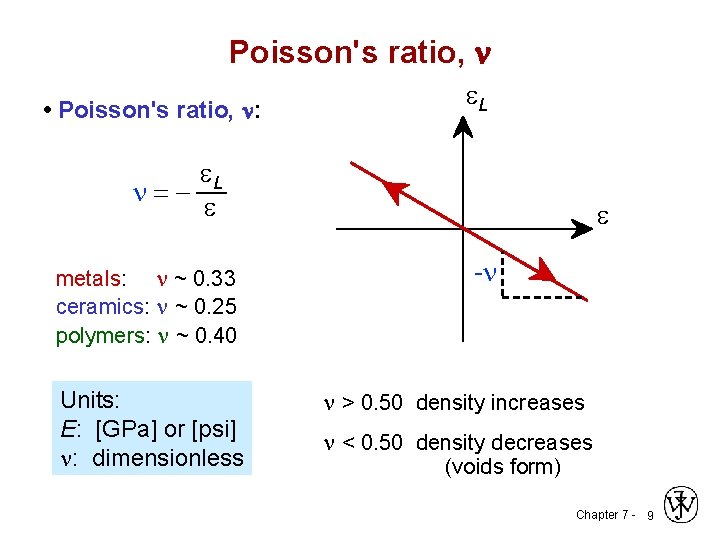
Poisson's ratio, n • Poisson's ratio, n: e. L =e metals: ~ 0. 33 ceramics: ~ 0. 25 polymers: ~ 0. 40 Units: E: [GPa] or [psi] : dimensionless e - > 0. 50 density increases < 0. 50 density decreases (voids form) Chapter 7 - 9

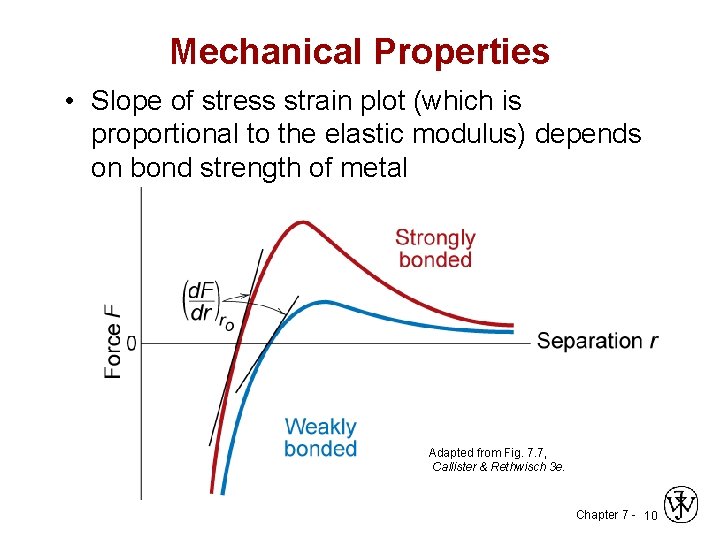
Mechanical Properties • Slope of stress strain plot (which is proportional to the elastic modulus) depends on bond strength of metal Adapted from Fig. 7. 7, Callister & Rethwisch 3 e. Chapter 7 - 10

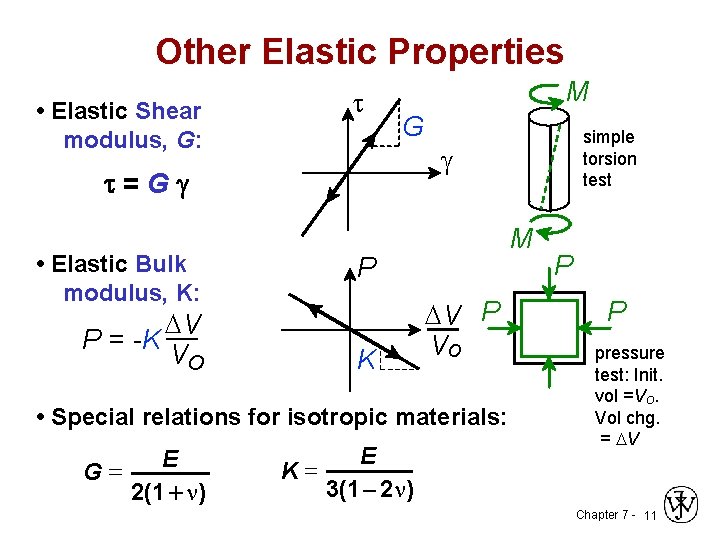
Other Elastic Properties • Elastic Shear modulus, G: t M G t = G g • Elastic Bulk modulus, K: V P = -K Vo M P K V P Vo • Special relations for isotropic materials: E G= 2(1 + ) E K= 3(1 - 2 ) simple torsion test P P pressure test: Init. vol =Vo. Vol chg. = V Chapter 7 - 11

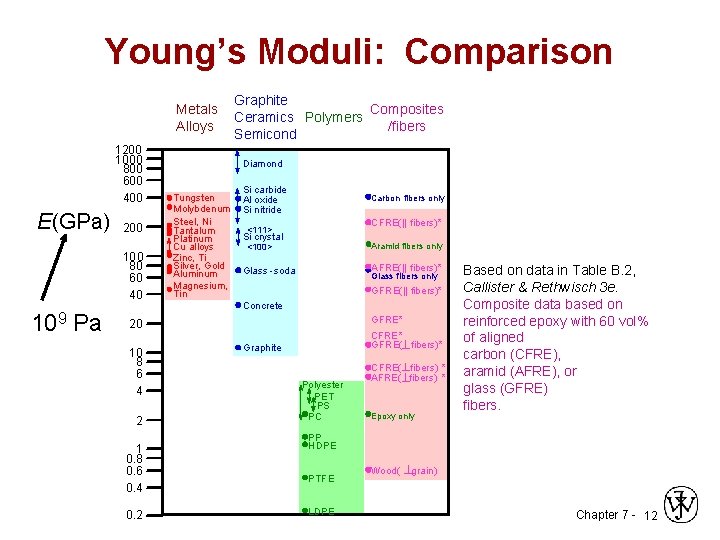
Young’s Moduli: Comparison Metals Alloys 1200 1000 800 600 400 E(GPa) 200 100 80 60 40 109 Pa Graphite Composites Ceramics Polymers /fibers Semicond Diamond Tungsten Molybdenum Steel, Ni Tantalum Platinum Cu alloys Zinc, Ti Silver, Gold Aluminum Magnesium, Tin Si carbide Al oxide Si nitride Carbon fibers only CFRE(|| fibers)* <111> Si crystal Aramid fibers only <100> AFRE(|| fibers)* Glass -soda Glass fibers only GFRE(|| fibers)* Concrete GFRE* 20 10 8 6 4 2 1 0. 8 0. 6 0. 4 0. 2 CFRE* GFRE( fibers)* Graphite Polyester PET PS PC CFRE( fibers) * AFRE( fibers) * Epoxy only Based on data in Table B. 2, Callister & Rethwisch 3 e. Composite data based on reinforced epoxy with 60 vol% of aligned carbon (CFRE), aramid (AFRE), or glass (GFRE) fibers. PP HDPE PTFE LDPE Wood( grain) Chapter 7 - 12

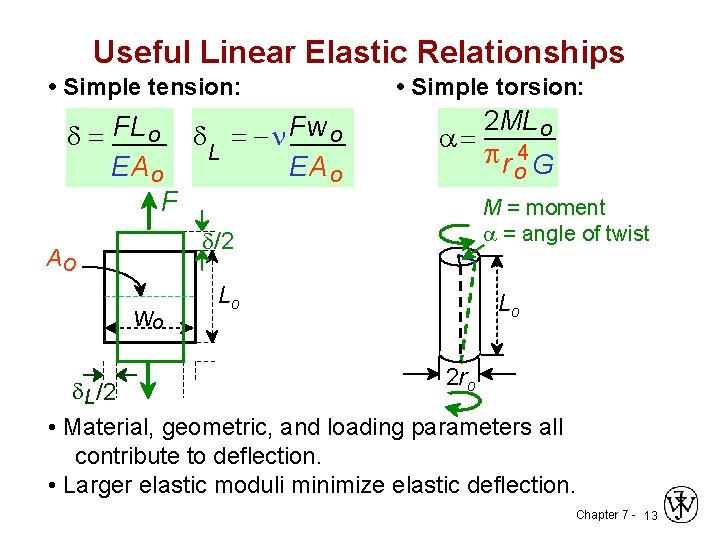
Useful Linear Elastic Relationships • Simple tension: d = FL o d = - Fw o L EA o F d/2 Ao wo Lo • Simple torsion: a= 2 ML o r 4 G o M = moment a = angle of twist Lo 2 ro d. L /2 • Material, geometric, and loading parameters all contribute to deflection. • Larger elastic moduli minimize elastic deflection. Chapter 7 - 13

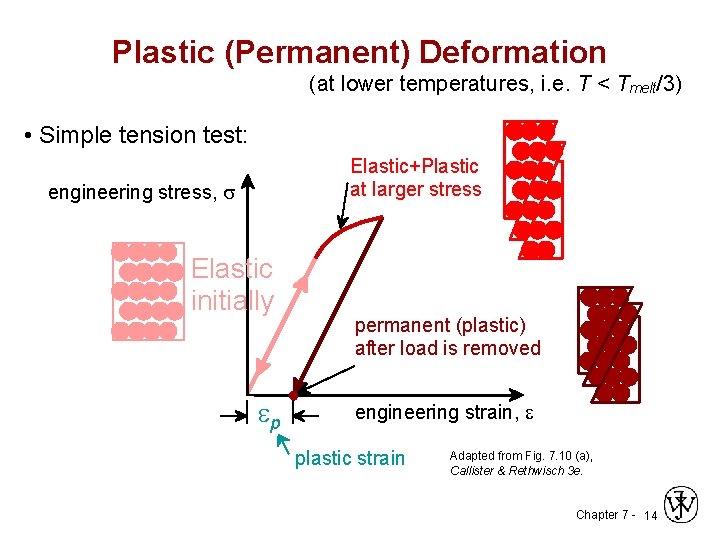
Plastic (Permanent) Deformation (at lower temperatures, i. e. T < Tmelt/3) • Simple tension test: Elastic+Plastic at larger stress engineering stress, s Elastic initially ep permanent (plastic) after load is removed engineering strain, e plastic strain Adapted from Fig. 7. 10 (a), Callister & Rethwisch 3 e. Chapter 7 - 14

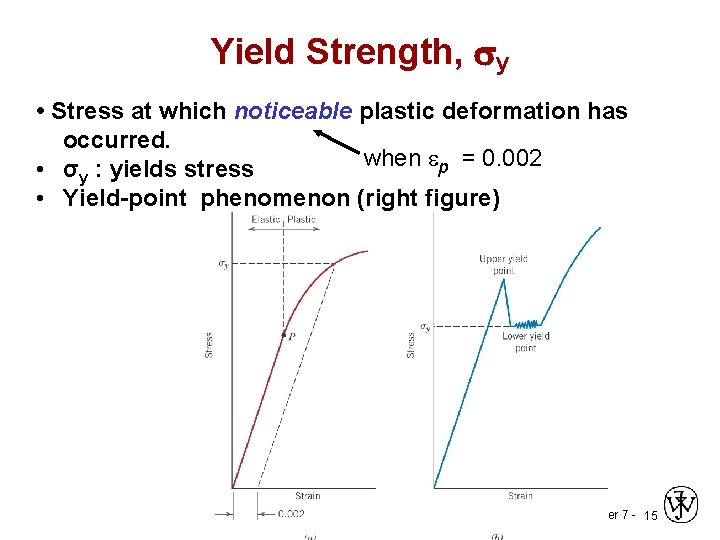
Yield Strength, y • Stress at which noticeable plastic deformation has occurred. when ep = 0. 002 • σy : yields stress • Yield-point phenomenon (right figure) Chapter 7 - 15

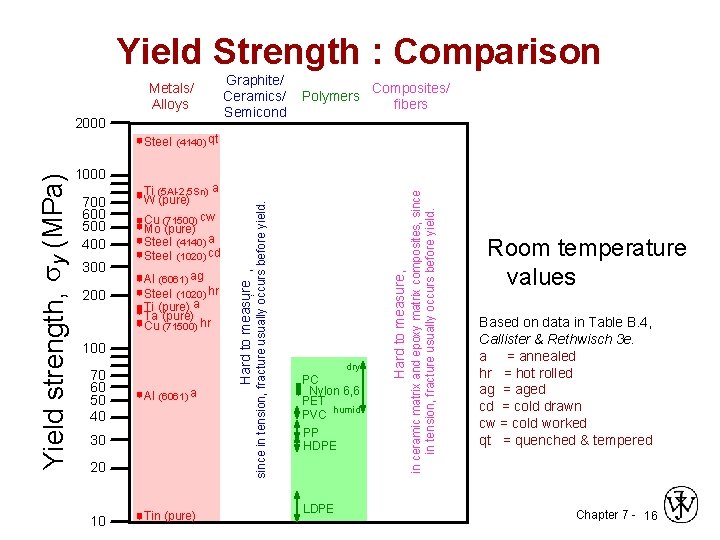
Yield Strength : Comparison Metals/ Alloys 2000 Graphite/ Composites/ Ceramics/ Polymers fibers Semicond 200 Al (6061) ag Steel (1020) hr Ti (pure) a Ta (pure) Cu (71500) hr 100 70 60 50 40 Al (6061) a 30 20 10 Tin (pure) ¨ dry PC Nylon 6, 6 PET PVC humid PP HDPE LDPE Hard to measure, 300 in ceramic matrix and epoxy matrix composites, since in tension, fracture usually occurs before yield. 700 600 500 400 Ti (5 Al-2. 5 Sn) a W (pure) Cu (71500) cw Mo (pure) Steel (4140) a Steel (1020) cd since in tension, fracture usually occurs before yield. 1000 Hard to measure , Yield strength, sy (MPa) Steel (4140) qt Room temperature values Based on data in Table B. 4, Callister & Rethwisch 3 e. a = annealed hr = hot rolled ag = aged cd = cold drawn cw = cold worked qt = quenched & tempered Chapter 7 - 16

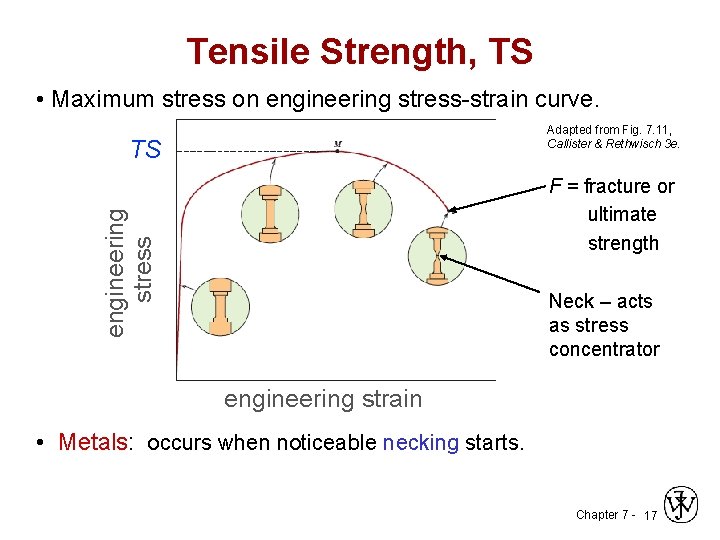
Tensile Strength, TS • Maximum stress on engineering stress-strain curve. Adapted from Fig. 7. 11, Callister & Rethwisch 3 e. TS F = fracture or ultimate strength engineering stress y Typical response of a metal Neck – acts as stress concentrator strain engineering strain • Metals: occurs when noticeable necking starts. Chapter 7 - 17

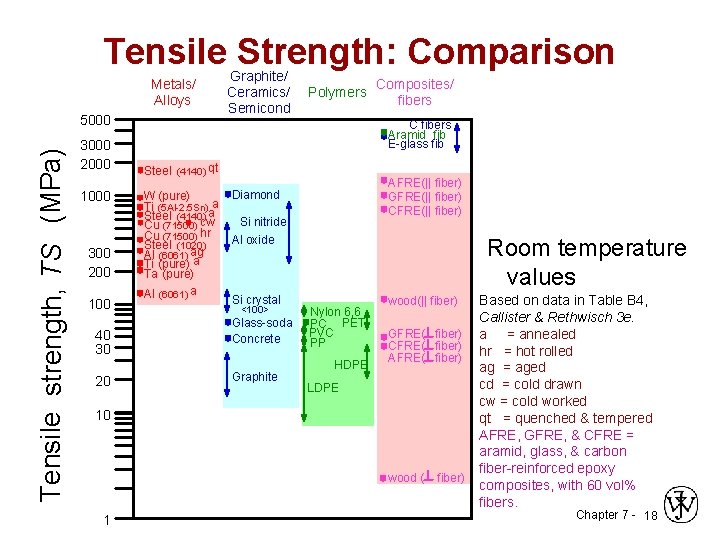
Tensile Strength: Comparison Metals/ Alloys Tensile strength, TS (MPa) 5000 3000 2000 1000 300 200 100 40 30 20 Graphite/ Ceramics/ Semicond Polymers Composites/ fibers C fibers Aramid fib E-glass fib Steel (4140) qt W (pure) Ti (5 Al-2. 5 Sn)aa Steel (4140) Cu (71500) cw Cu (71500) hr Steel (1020) Al (6061) ag Ti (pure) a Ta (pure) Al (6061) a AFRE(|| fiber) GFRE(|| fiber) CFRE(|| fiber) Diamond Si nitride Al oxide Si crystal <100> Glass-soda Concrete Graphite Room temperature values Nylon 6, 6 PC PET PVC PP HDPE wood(|| fiber) GFRE( fiber) CFRE( fiber) AFRE( fiber) LDPE 10 wood ( fiber) 1 Based on data in Table B 4, Callister & Rethwisch 3 e. a = annealed hr = hot rolled ag = aged cd = cold drawn cw = cold worked qt = quenched & tempered AFRE, GFRE, & CFRE = aramid, glass, & carbon fiber-reinforced epoxy composites, with 60 vol% fibers. Chapter 7 - 18

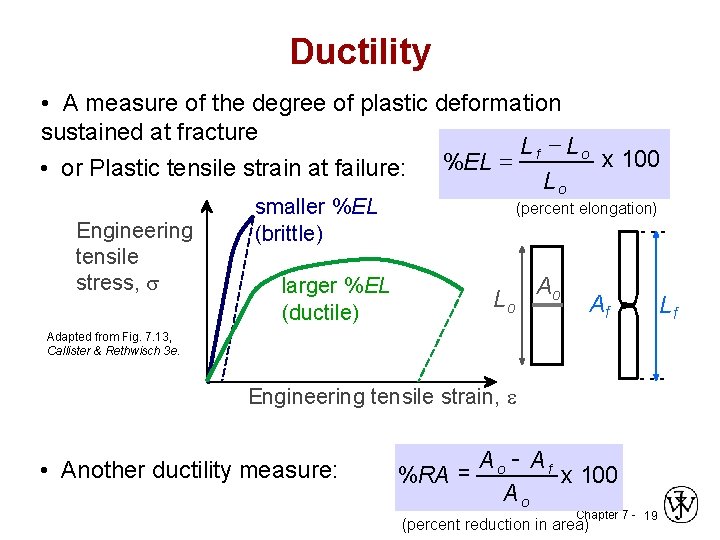
Ductility • A measure of the degree of plastic deformation sustained at fracture Lf - Lo x 100 = • or Plastic tensile strain at failure: %EL Lo Engineering tensile stress, s smaller %EL (brittle) larger %EL (ductile) (percent elongation) Lo Ao Af Adapted from Fig. 7. 13, Callister & Rethwisch 3 e. Engineering tensile strain, e • Another ductility measure: Ao - Af %RA = x 100 Ao Chapter 7 - 19 (percent reduction in area) Lf

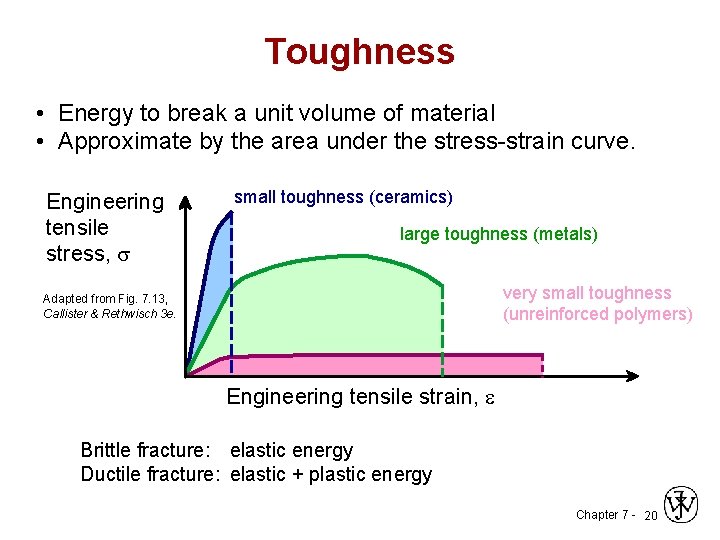
Toughness • Energy to break a unit volume of material • Approximate by the area under the stress-strain curve. Engineering tensile stress, s small toughness (ceramics) large toughness (metals) very small toughness (unreinforced polymers) Adapted from Fig. 7. 13, Callister & Rethwisch 3 e. Engineering tensile strain, e Brittle fracture: elastic energy Ductile fracture: elastic + plastic energy Chapter 7 - 20

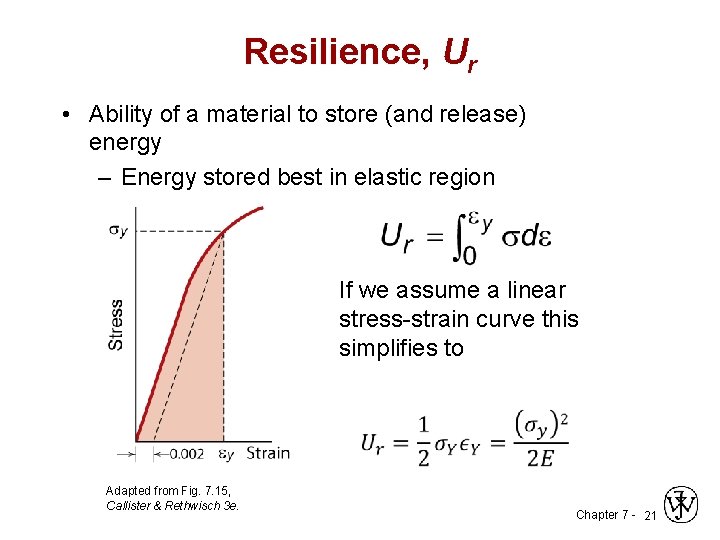
Resilience, Ur • Ability of a material to store (and release) energy – Energy stored best in elastic region If we assume a linear stress-strain curve this simplifies to Adapted from Fig. 7. 15, Callister & Rethwisch 3 e. Chapter 7 - 21

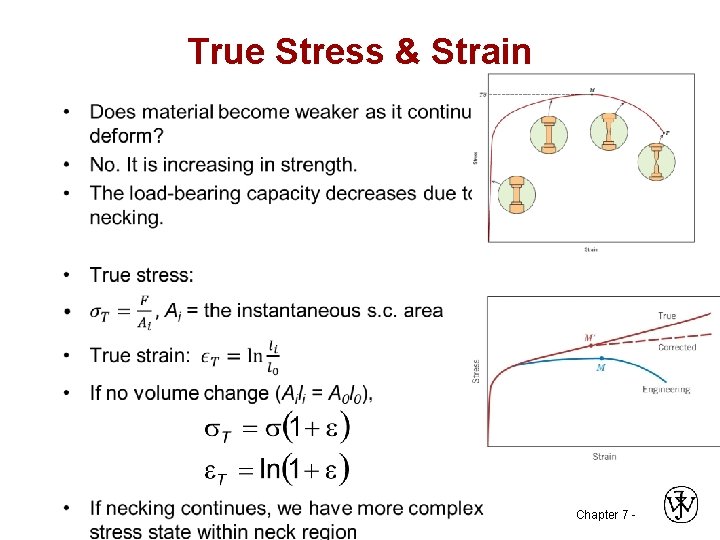
True Stress & Strain • Chapter 7 -

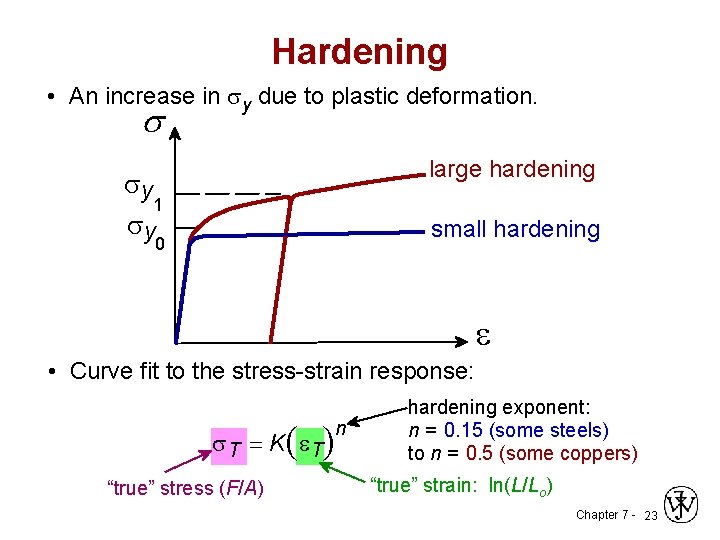
Hardening • An increase in sy due to plastic deformation. s large hardening sy 1 sy small hardening 0 e • Curve fit to the stress-strain response: ( ) s. T = K e. T “true” stress (F/A) n hardening exponent: n = 0. 15 (some steels) to n = 0. 5 (some coppers) “true” strain: ln(L/Lo) Chapter 7 - 23

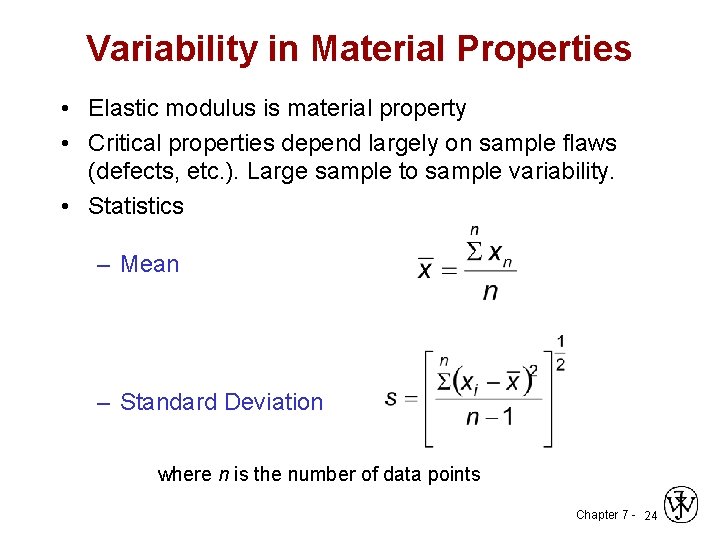
Variability in Material Properties • Elastic modulus is material property • Critical properties depend largely on sample flaws (defects, etc. ). Large sample to sample variability. • Statistics – Mean – Standard Deviation where n is the number of data points Chapter 7 - 24

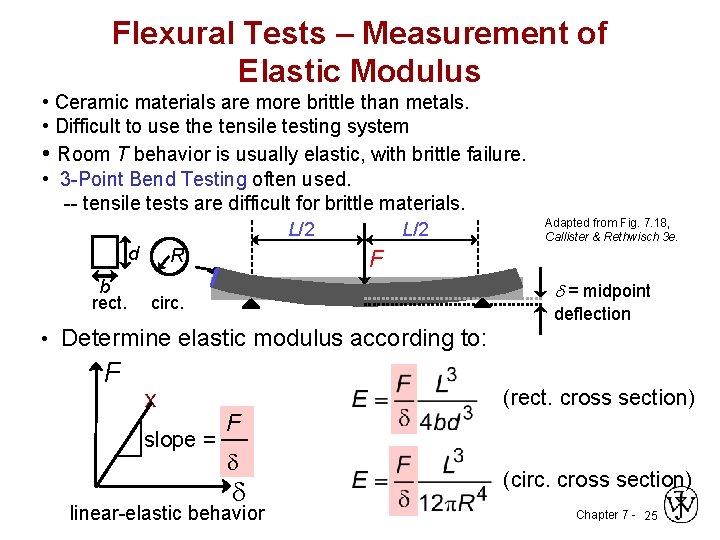
Flexural Tests – Measurement of Elastic Modulus • Ceramic materials are more brittle than metals. • Difficult to use the tensile testing system • Room T behavior is usually elastic, with brittle failure. • 3 -Point Bend Testing often used. -- tensile tests are difficult for brittle materials. L/2 d b rect. R L/2 Adapted from Fig. 7. 18, Callister & Rethwisch 3 e. F d = midpoint circ. deflection • Determine elastic modulus according to: F x slope = F d d linear-elastic behavior (rect. cross section) (circ. cross section) Chapter 7 - 25

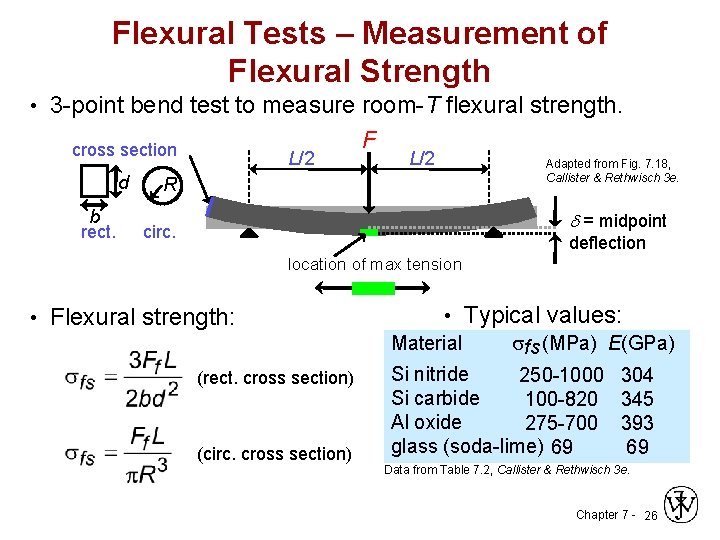
Flexural Tests – Measurement of Flexural Strength • 3 -point bend test to measure room-T flexural strength. cross section d b rect. L/2 F L/2 Adapted from Fig. 7. 18, Callister & Rethwisch 3 e. R d = midpoint circ. deflection location of max tension • Flexural strength: (rect. cross section) (circ. cross section) • Typical values: Material sfs (MPa) E(GPa) Si nitride 250 -1000 304 Si carbide 100 -820 345 Al oxide 275 -700 393 glass (soda-lime) 69 69 Data from Table 7. 2, Callister & Rethwisch 3 e. Chapter 7 - 26

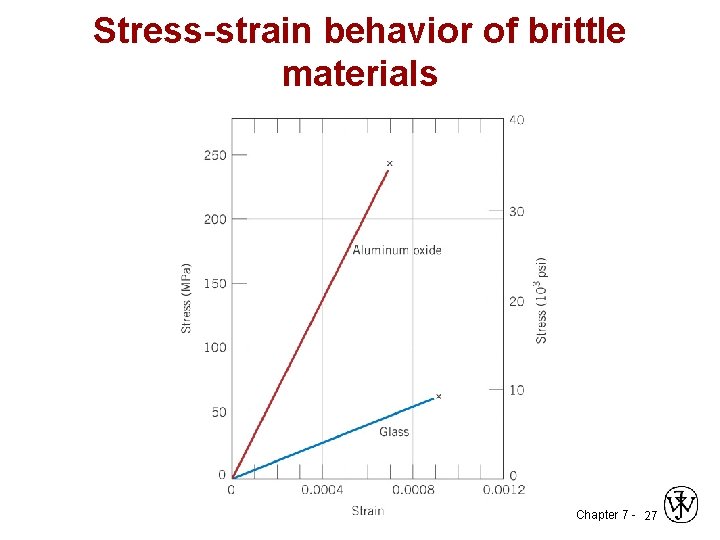
Stress-strain behavior of brittle materials Chapter 7 - 27

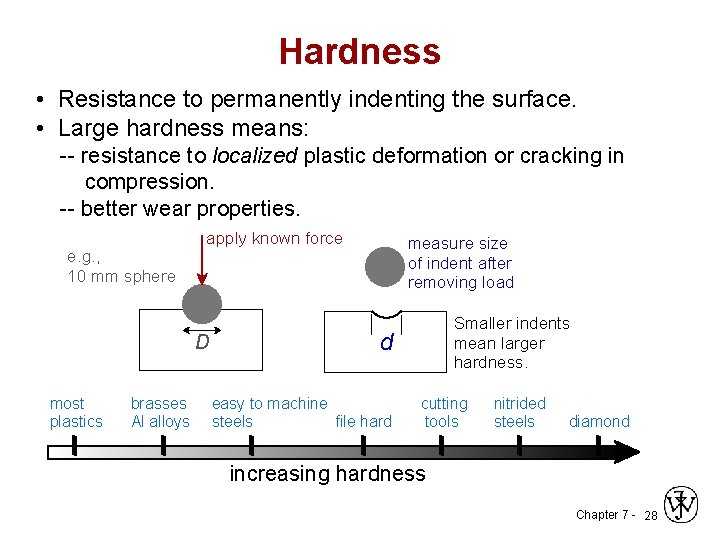
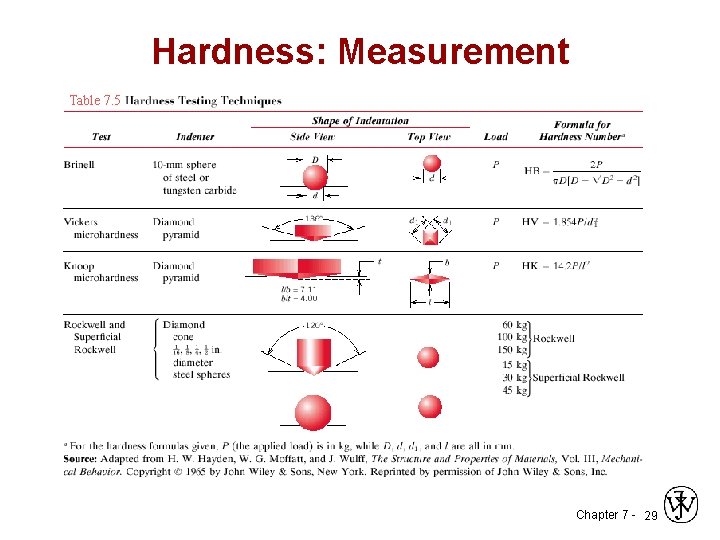
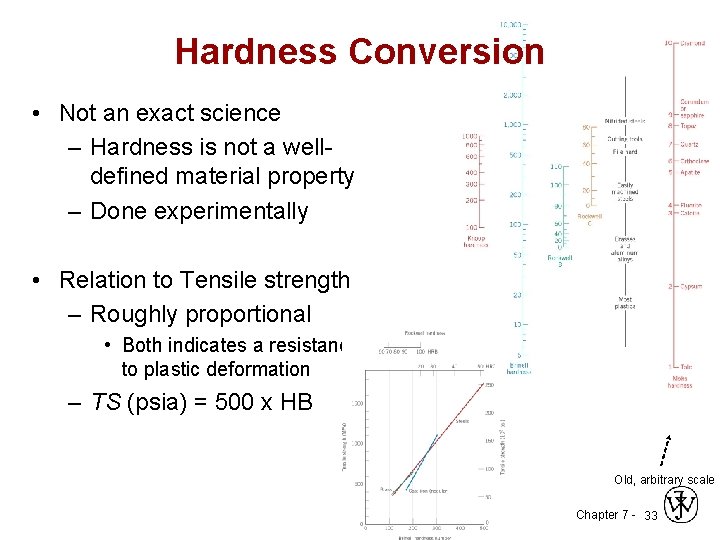
Hardness • Resistance to permanently indenting the surface. • Large hardness means: -- resistance to localized plastic deformation or cracking in compression. -- better wear properties. e. g. , 10 mm sphere apply known force D most plastics brasses Al alloys measure size of indent after removing load Smaller indents mean larger hardness. d easy to machine steels file hard cutting tools nitrided steels diamond increasing hardness Chapter 7 - 28

Hardness: Measurement Table 7. 5 Chapter 7 - 29

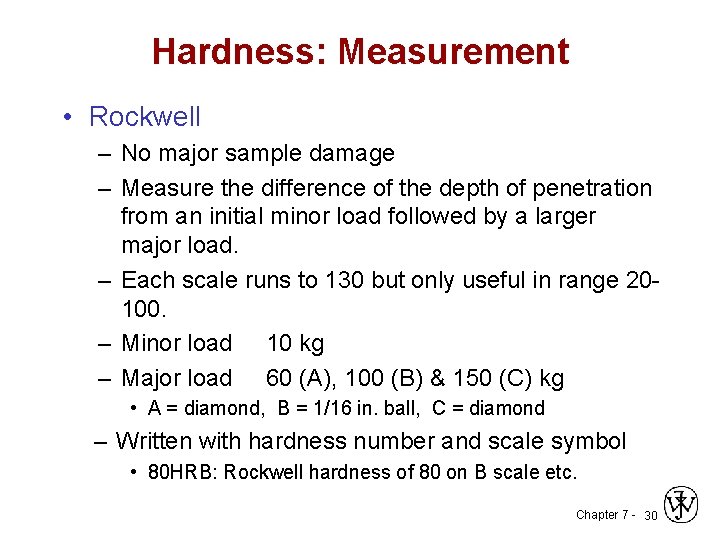
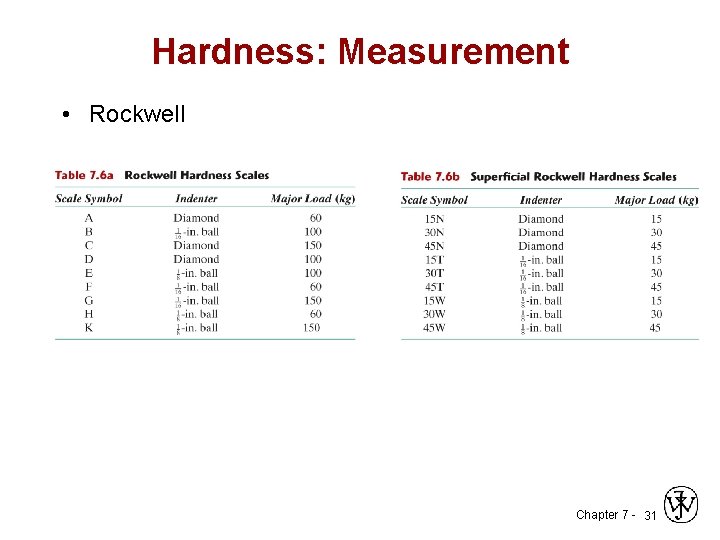
Hardness: Measurement • Rockwell – No major sample damage – Measure the difference of the depth of penetration from an initial minor load followed by a larger major load. – Each scale runs to 130 but only useful in range 20100. – Minor load 10 kg – Major load 60 (A), 100 (B) & 150 (C) kg • A = diamond, B = 1/16 in. ball, C = diamond – Written with hardness number and scale symbol • 80 HRB: Rockwell hardness of 80 on B scale etc. Chapter 7 - 30

Hardness: Measurement • Rockwell Chapter 7 - 31

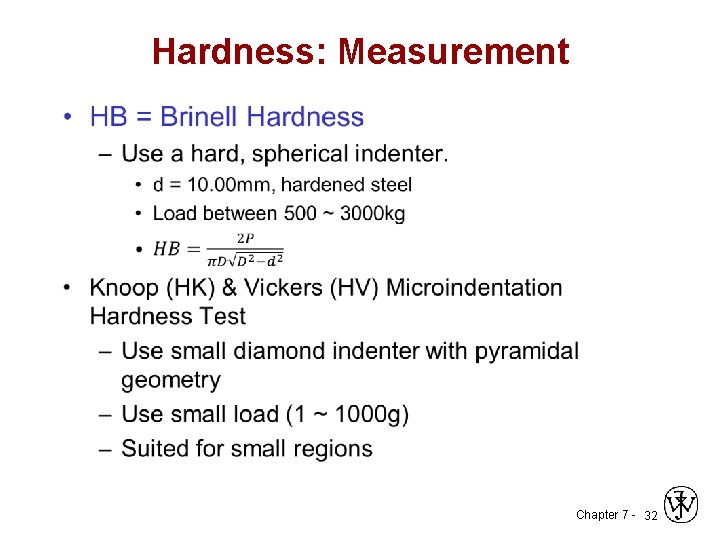
Hardness: Measurement • Chapter 7 - 32

Hardness Conversion • Not an exact science – Hardness is not a welldefined material property – Done experimentally • Relation to Tensile strength – Roughly proportional • Both indicates a resistance to plastic deformation – TS (psia) = 500 x HB Old, arbitrary scale Chapter 7 - 33

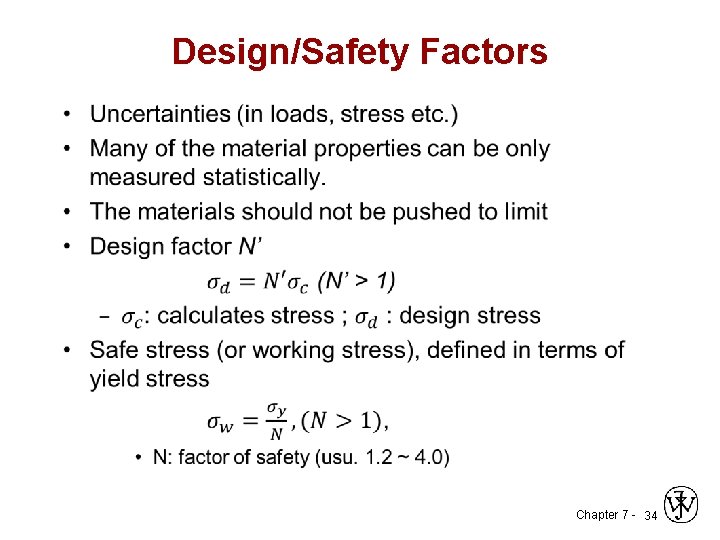
Design/Safety Factors • Chapter 7 - 34

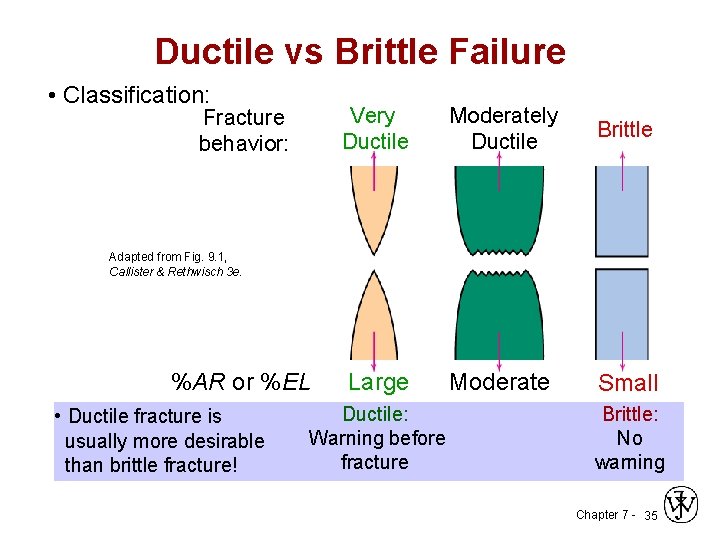
Ductile vs Brittle Failure • Classification: Fracture behavior: Very Ductile Moderately Ductile Brittle Large Moderate Small Adapted from Fig. 9. 1, Callister & Rethwisch 3 e. %AR or %EL • Ductile fracture is usually more desirable than brittle fracture! Ductile: Warning before fracture Brittle: No warning Chapter 7 - 35

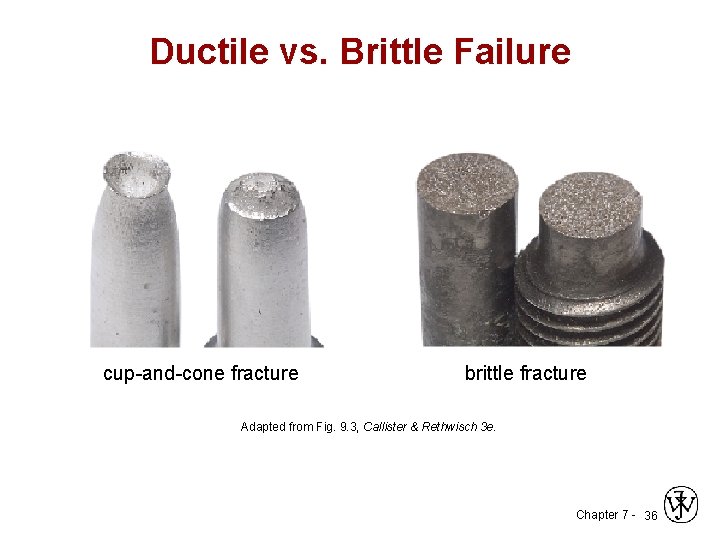
Ductile vs. Brittle Failure cup-and-cone fracture brittle fracture Adapted from Fig. 9. 3, Callister & Rethwisch 3 e. Chapter 7 - 36

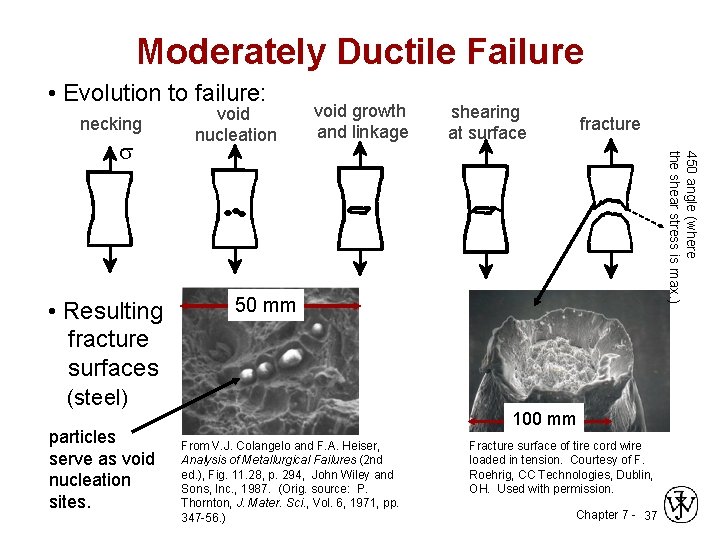
Moderately Ductile Failure • Evolution to failure: necking • Resulting fracture surfaces (steel) particles serve as void nucleation sites. void growth and linkage shearing at surface fracture 450 angle (where the shear stress is max. ) s void nucleation 50 mm 100 mm From V. J. Colangelo and F. A. Heiser, Analysis of Metallurgical Failures (2 nd ed. ), Fig. 11. 28, p. 294, John Wiley and Sons, Inc. , 1987. (Orig. source: P. Thornton, J. Mater. Sci. , Vol. 6, 1971, pp. 347 -56. ) Fracture surface of tire cord wire loaded in tension. Courtesy of F. Roehrig, CC Technologies, Dublin, OH. Used with permission. Chapter 7 - 37

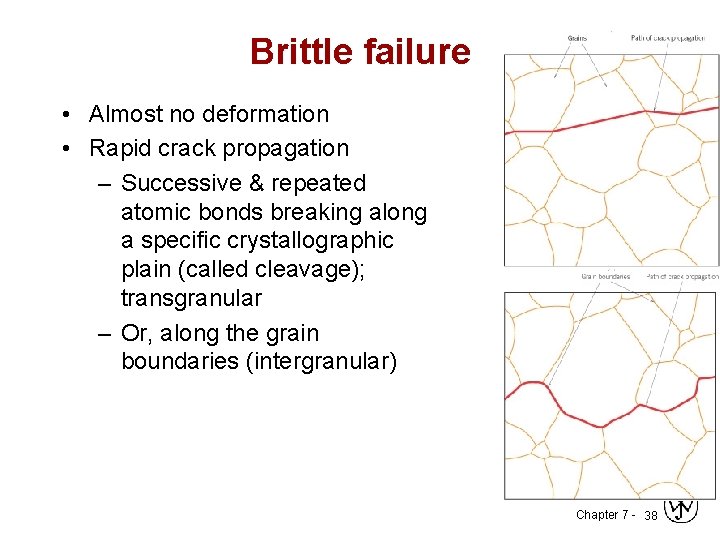
Brittle failure • Almost no deformation • Rapid crack propagation – Successive & repeated atomic bonds breaking along a specific crystallographic plain (called cleavage); transgranular – Or, along the grain boundaries (intergranular) Chapter 7 - 38

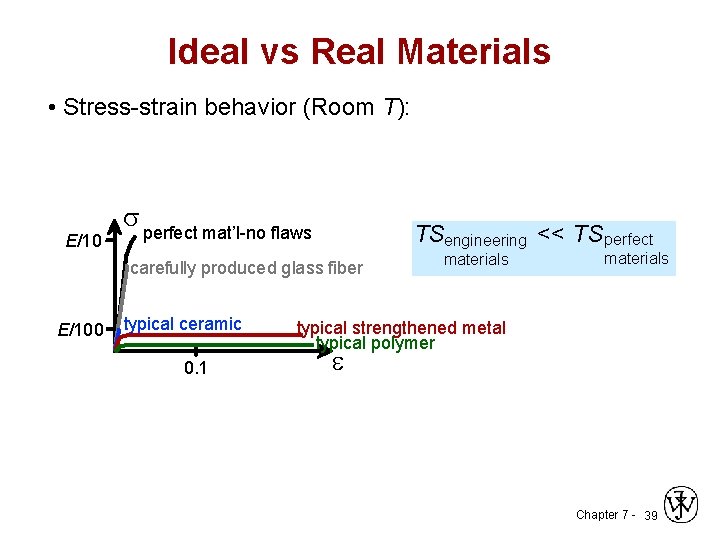
Ideal vs Real Materials • Stress-strain behavior (Room T): E/10 s perfect mat’l-no flaws TS << TS perfect engineering carefully produced glass fiber E/100 typical ceramic 0. 1 materials typical strengthened metal typical polymer e Chapter 7 - 39

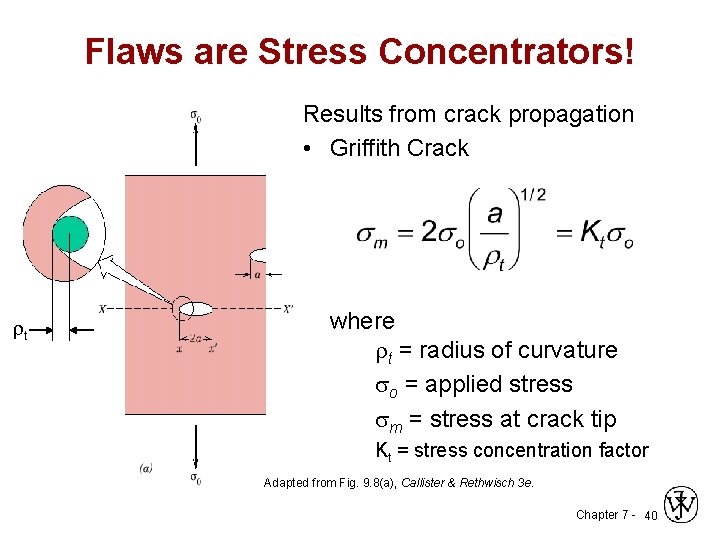
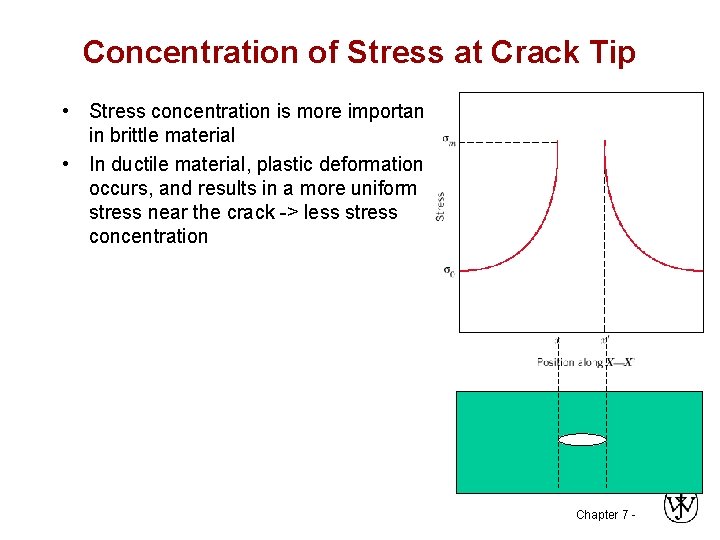
Flaws are Stress Concentrators! Results from crack propagation • Griffith Crack t where t = radius of curvature so = applied stress sm = stress at crack tip Kt = stress concentration factor Adapted from Fig. 9. 8(a), Callister & Rethwisch 3 e. Chapter 7 - 40

Concentration of Stress at Crack Tip • Stress concentration is more important in brittle material • In ductile material, plastic deformation occurs, and results in a more uniform stress near the crack -> less stress concentration Chapter 7 -

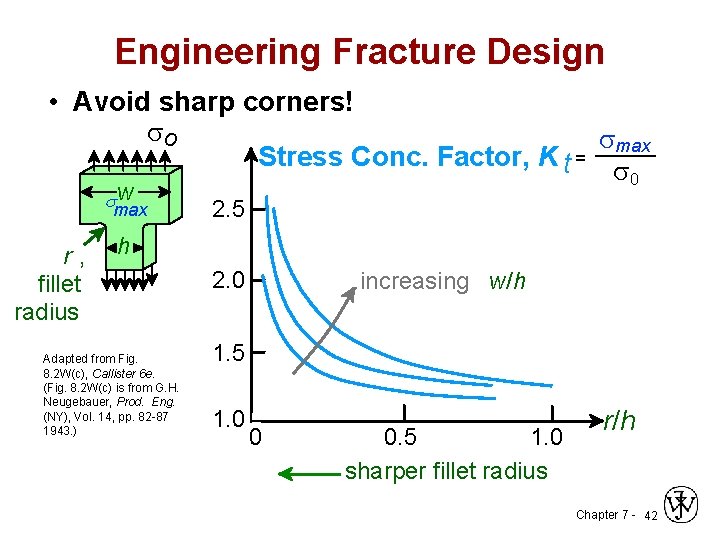
Engineering Fracture Design • Avoid sharp corners! so smax Stress Conc. Factor, K t = s 0 w smax r , h fillet radius Adapted from Fig. 8. 2 W(c), Callister 6 e. (Fig. 8. 2 W(c) is from G. H. Neugebauer, Prod. Eng. (NY), Vol. 14, pp. 82 -87 1943. ) 2. 5 2. 0 increasing w/h 1. 5 1. 0 0 0. 5 1. 0 sharper fillet radius r/h Chapter 7 - 42

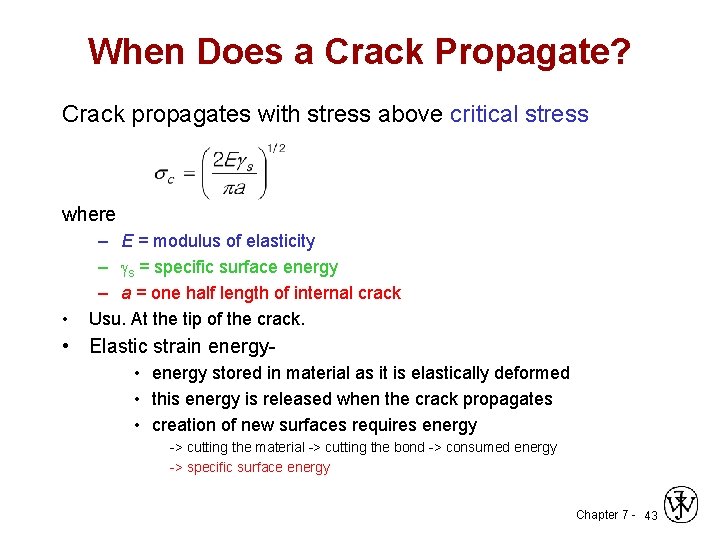
When Does a Crack Propagate? Crack propagates with stress above critical stress where • – E = modulus of elasticity – s = specific surface energy – a = one half length of internal crack Usu. At the tip of the crack. • Elastic strain energy- • energy stored in material as it is elastically deformed • this energy is released when the crack propagates • creation of new surfaces requires energy -> cutting the material -> cutting the bond -> consumed energy -> specific surface energy Chapter 7 - 43

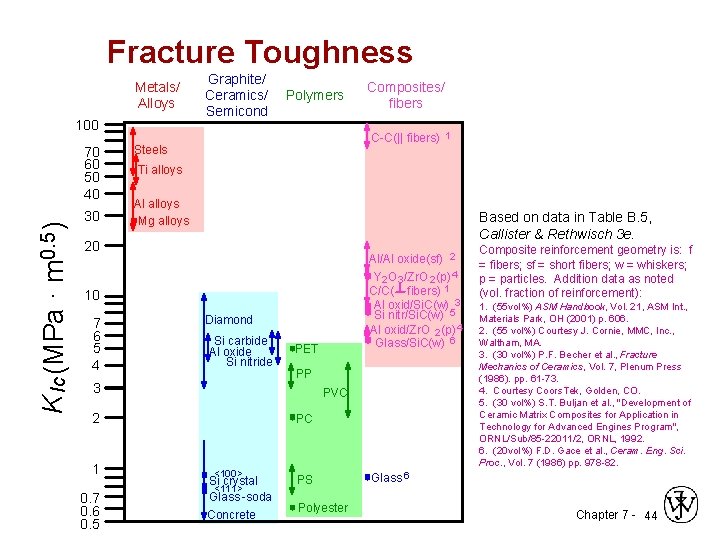
Fracture Toughness Metals/ Alloys 100 K Ic (MPa · m 0. 5 ) 70 60 50 40 30 Graphite/ Ceramics/ Semicond Polymers C-C(|| fibers) 1 Steels Ti alloys Al alloys Mg alloys Based on data in Table B. 5, Callister & Rethwisch 3 e. 20 Al/Al oxide(sf) 2 Y 2 O 3 /Zr. O 2 (p) 4 C/C( fibers) 1 Al oxid/Si. C(w) 3 Si nitr/Si. C(w) 5 Al oxid/Zr. O 2 (p) 4 Glass/Si. C(w) 6 10 7 6 5 4 Diamond Si carbide Al oxide Si nitride 3 0. 7 0. 6 0. 5 PET PP PVC 2 1 Composites/ fibers PC <100> Si crystal <111> Glass -soda Concrete PS Polyester Composite reinforcement geometry is: f = fibers; sf = short fibers; w = whiskers; p = particles. Addition data as noted (vol. fraction of reinforcement): 1. (55 vol%) ASM Handbook, Vol. 21, ASM Int. , Materials Park, OH (2001) p. 606. 2. (55 vol%) Courtesy J. Cornie, MMC, Inc. , Waltham, MA. 3. (30 vol%) P. F. Becher et al. , Fracture Mechanics of Ceramics, Vol. 7, Plenum Press (1986). pp. 61 -73. 4. Courtesy Coors. Tek, Golden, CO. 5. (30 vol%) S. T. Buljan et al. , "Development of Ceramic Matrix Composites for Application in Technology for Advanced Engines Program", ORNL/Sub/85 -22011/2, ORNL, 1992. 6. (20 vol%) F. D. Gace et al. , Ceram. Eng. Sci. Proc. , Vol. 7 (1986) pp. 978 -82. Glass 6 Chapter 7 - 44

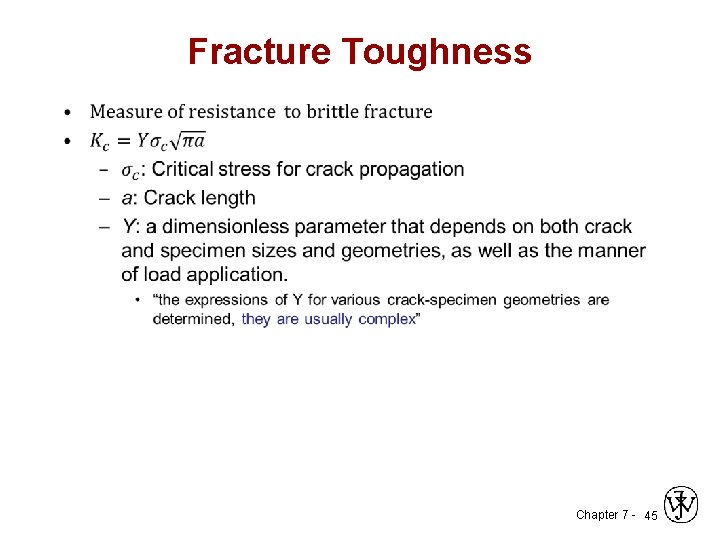
Fracture Toughness • Chapter 7 - 45

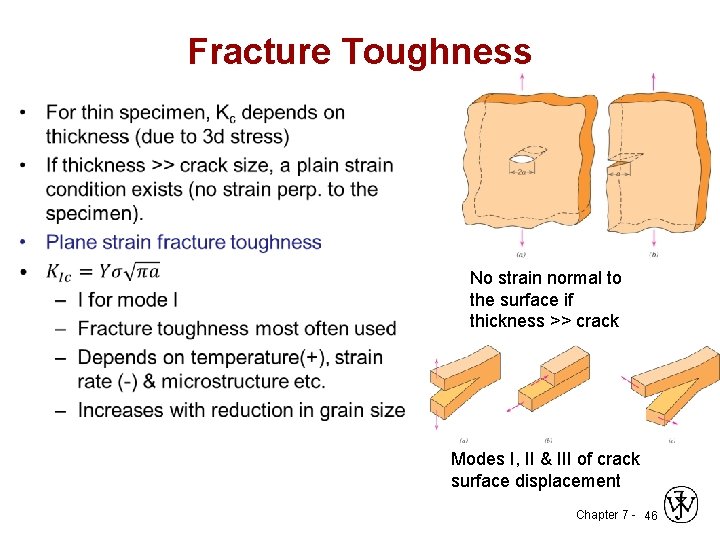
Fracture Toughness • No strain normal to the surface if thickness >> crack Modes I, II & III of crack surface displacement Chapter 7 - 46

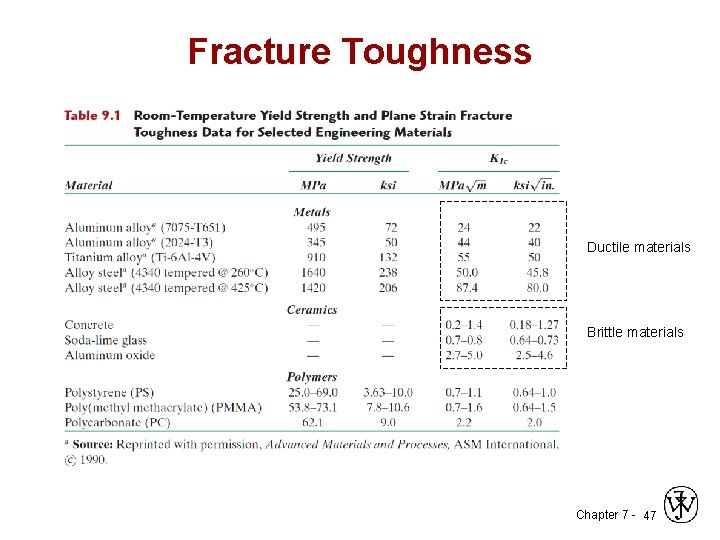
Fracture Toughness Ductile materials Brittle materials Chapter 7 - 47

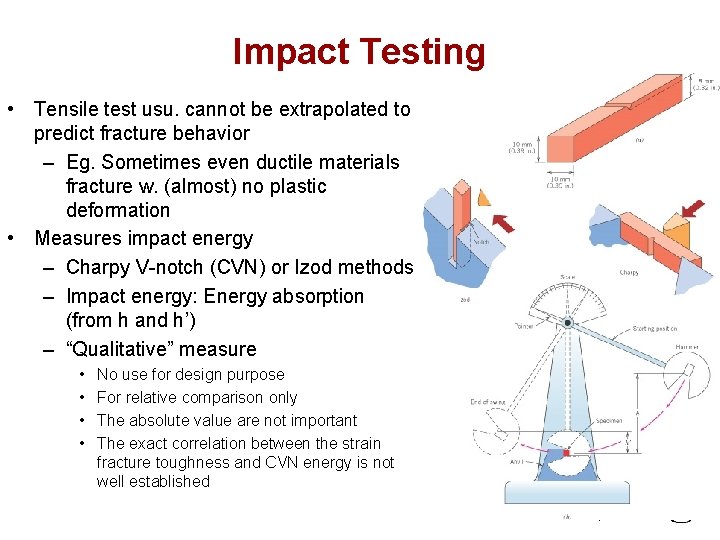
Impact Testing • Tensile test usu. cannot be extrapolated to predict fracture behavior – Eg. Sometimes even ductile materials fracture w. (almost) no plastic deformation • Measures impact energy – Charpy V-notch (CVN) or Izod methods – Impact energy: Energy absorption (from h and h’) – “Qualitative” measure • • No use for design purpose For relative comparison only The absolute value are not important The exact correlation between the strain fracture toughness and CVN energy is not well established Chapter 7 - 48

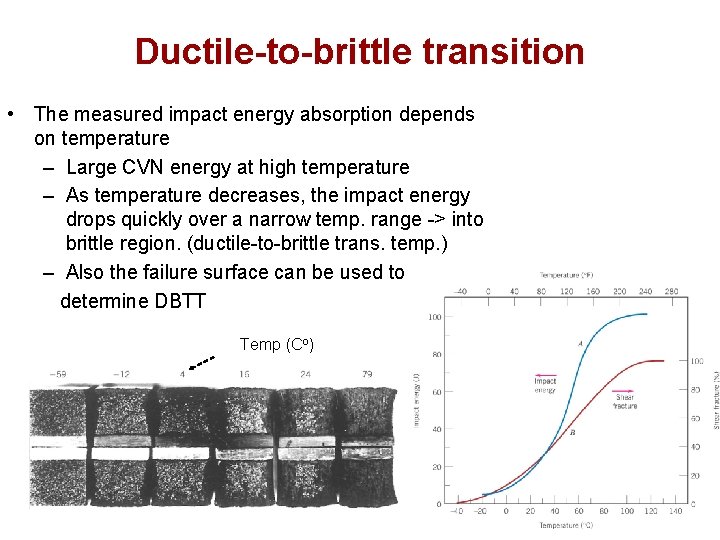
Ductile-to-brittle transition • The measured impact energy absorption depends on temperature – Large CVN energy at high temperature – As temperature decreases, the impact energy drops quickly over a narrow temp. range -> into brittle region. (ductile-to-brittle trans. temp. ) – Also the failure surface can be used to determine DBTT Temp (Co) Chapter 7 - 49

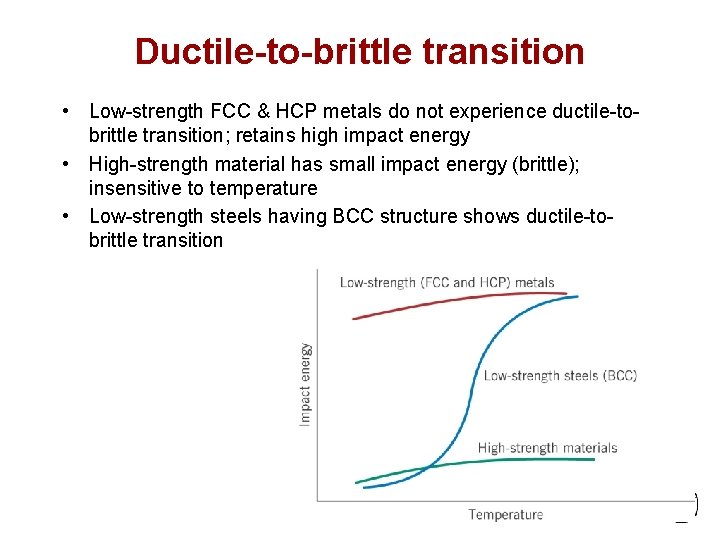
Ductile-to-brittle transition • Low-strength FCC & HCP metals do not experience ductile-tobrittle transition; retains high impact energy • High-strength material has small impact energy (brittle); insensitive to temperature • Low-strength steels having BCC structure shows ductile-tobrittle transition Chapter 7 - 50

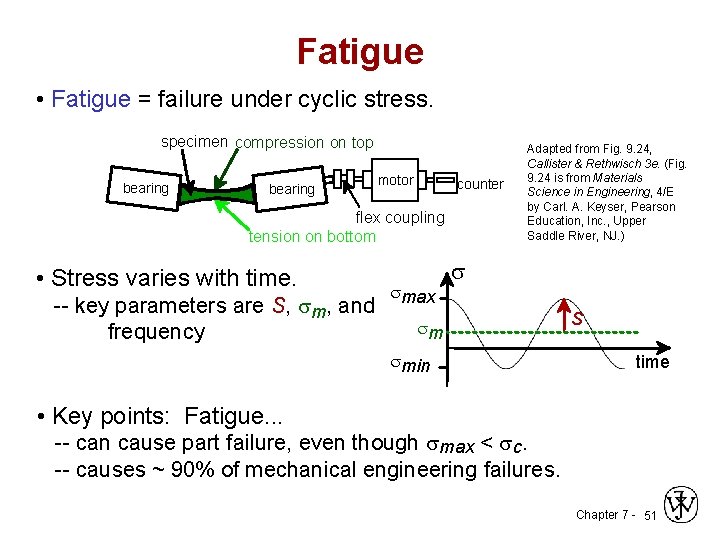
Fatigue • Fatigue = failure under cyclic stress. specimen compression on top bearing motor counter flex coupling tension on bottom • Stress varies with time. -- key parameters are S, sm, and frequency smax Adapted from Fig. 9. 24, Callister & Rethwisch 3 e. (Fig. 9. 24 is from Materials Science in Engineering, 4/E by Carl. A. Keyser, Pearson Education, Inc. , Upper Saddle River, NJ. ) s sm smin S time • Key points: Fatigue. . . -- can cause part failure, even though smax < sc. -- causes ~ 90% of mechanical engineering failures. Chapter 7 - 51

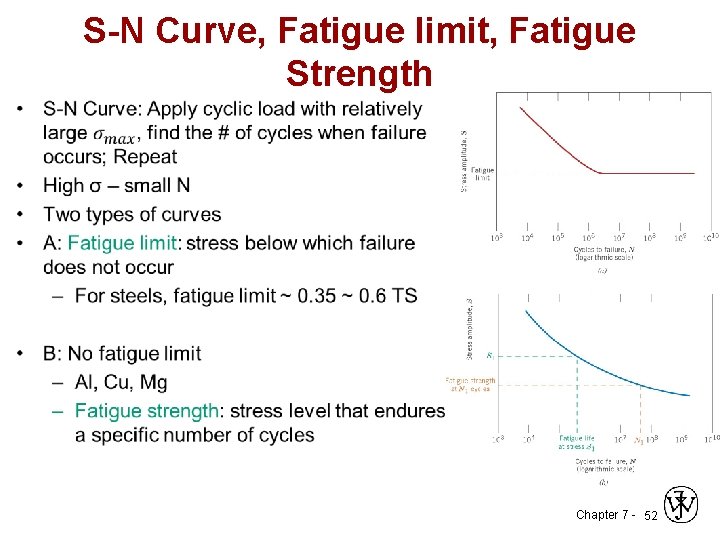
S-N Curve, Fatigue limit, Fatigue Strength • Chapter 7 - 52

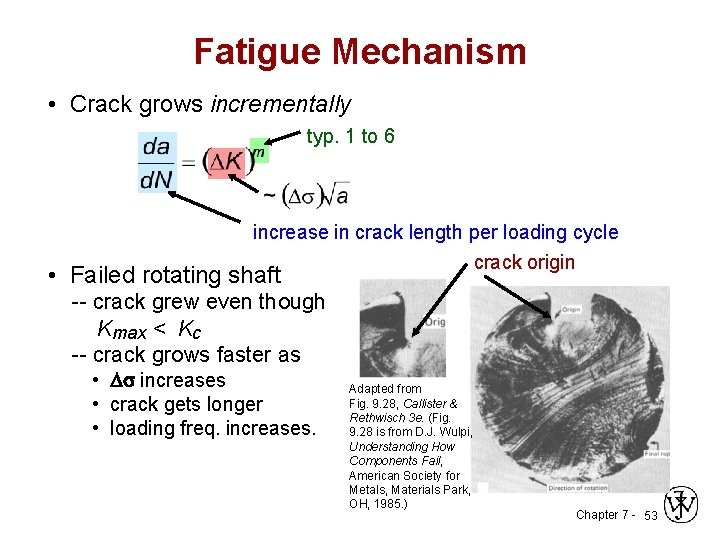
Fatigue Mechanism • Crack grows incrementally typ. 1 to 6 increase in crack length per loading cycle crack origin • Failed rotating shaft -- crack grew even though Kmax < Kc -- crack grows faster as • D increases • crack gets longer • loading freq. increases. Adapted from Fig. 9. 28, Callister & Rethwisch 3 e. (Fig. 9. 28 is from D. J. Wulpi, Understanding How Components Fail, American Society for Metals, Materials Park, OH, 1985. ) Chapter 7 - 53

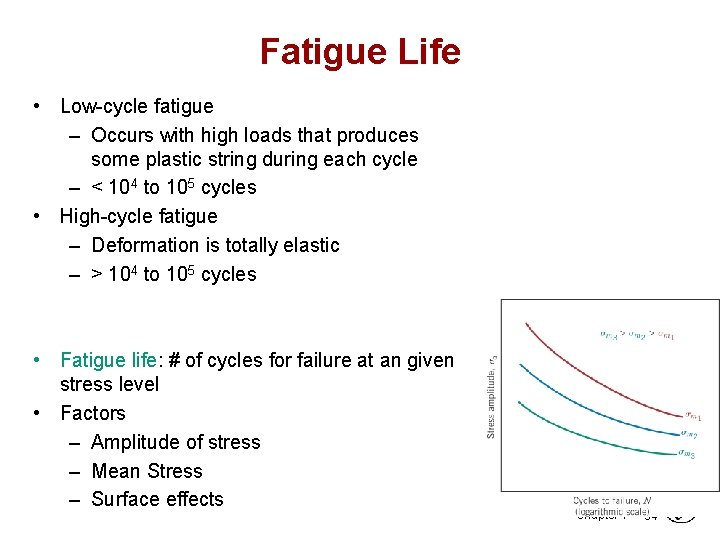
Fatigue Life • Low-cycle fatigue – Occurs with high loads that produces some plastic string during each cycle – < 104 to 105 cycles • High-cycle fatigue – Deformation is totally elastic – > 104 to 105 cycles • Fatigue life: # of cycles for failure at an given stress level • Factors – Amplitude of stress – Mean Stress – Surface effects Chapter 7 - 54

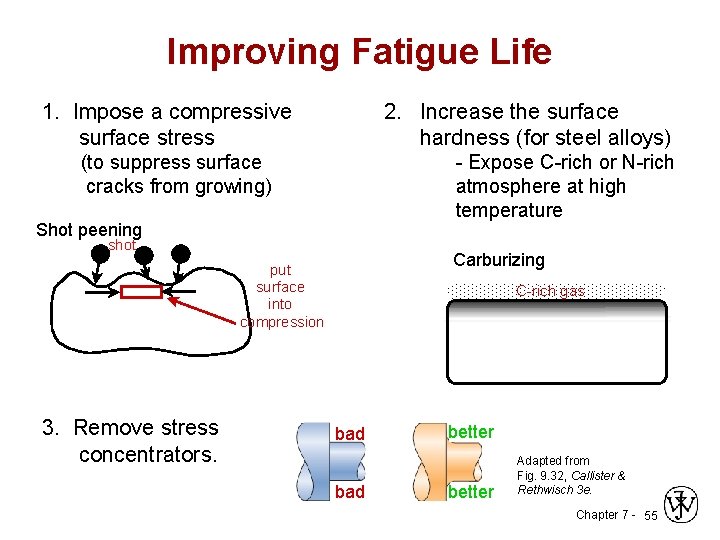
Improving Fatigue Life 2. Increase the surface hardness (for steel alloys) 1. Impose a compressive surface stress (to suppress surface cracks from growing) - Expose C-rich or N-rich atmosphere at high temperature Shot peening shot Carburizing put surface into compression 3. Remove stress concentrators. C-rich gas bad better Adapted from Fig. 9. 32, Callister & Rethwisch 3 e. Chapter 7 - 55

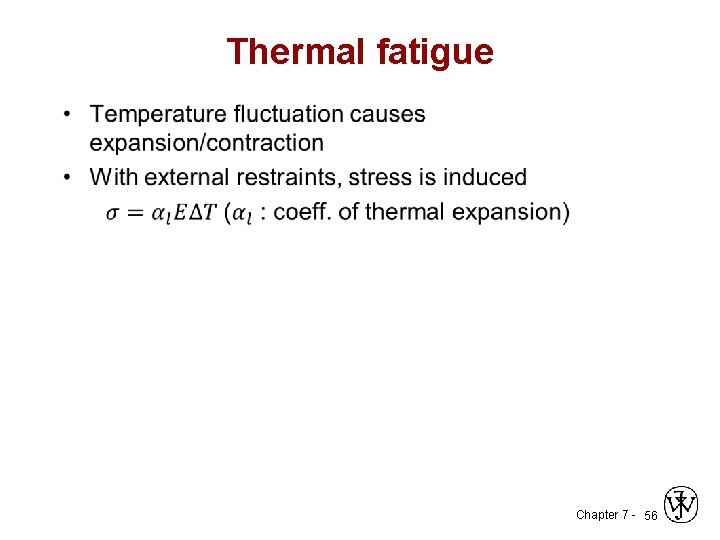
Thermal fatigue • Chapter 7 - 56

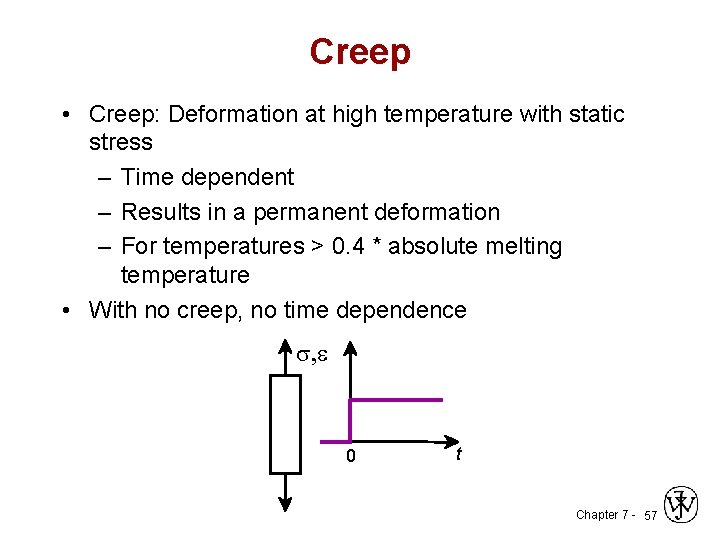
Creep • Creep: Deformation at high temperature with static stress – Time dependent – Results in a permanent deformation – For temperatures > 0. 4 * absolute melting temperature • With no creep, no time dependence s, e 0 t Chapter 7 - 57

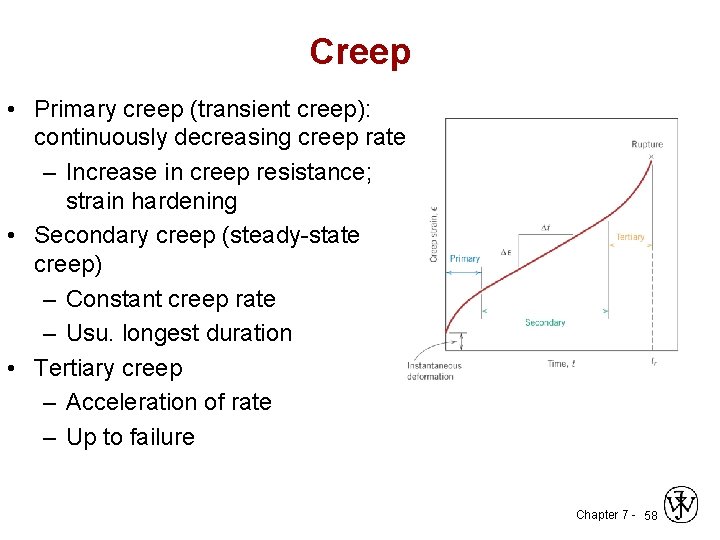
Creep • Primary creep (transient creep): continuously decreasing creep rate – Increase in creep resistance; strain hardening • Secondary creep (steady-state creep) – Constant creep rate – Usu. longest duration • Tertiary creep – Acceleration of rate – Up to failure Chapter 7 - 58

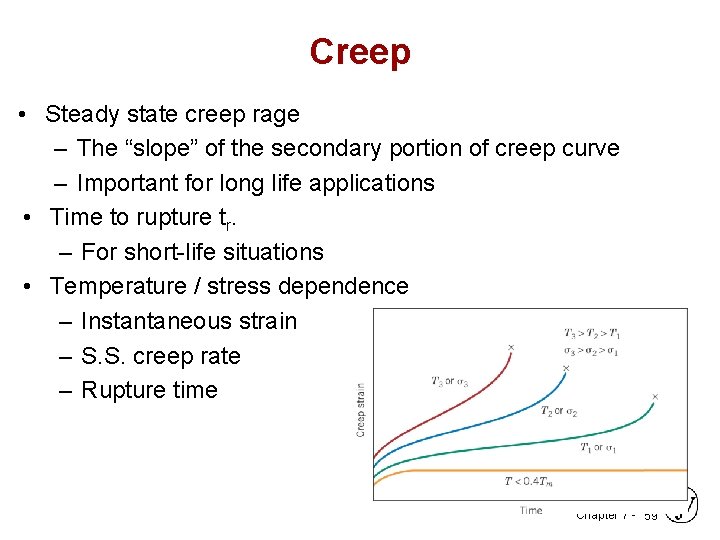
Creep • Steady state creep rage – The “slope” of the secondary portion of creep curve – Important for long life applications • Time to rupture tr. – For short-life situations • Temperature / stress dependence – Instantaneous strain – S. S. creep rate – Rupture time Chapter 7 - 59

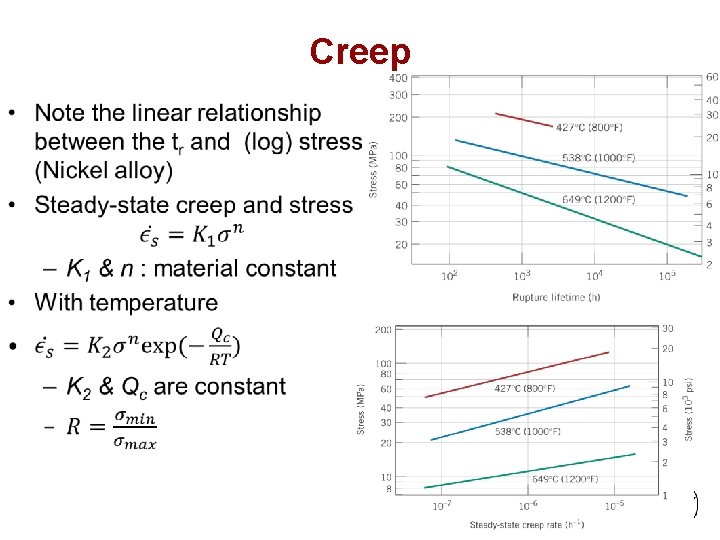
Creep • Chapter 7 - 60

ANNOUNCEMENTS Reading: Core Problems: Self-help Problems: Chapter 7 - 61