Chapter 7 Process Control 1 Control Systems Standard
- Slides: 50

Chapter 7 Process Control 1

Control Systems Standard or goal n Means of measuring accomplishment n Comparison of results with the standard to form the basis for corrective action n 2

Visual Inspection n Visual inspection processes incur high error rates because of – Complexity of designs – Mistakes resulting from low incidence of errors – Time pressure 3

Documentation and Audits Dashboards and scorecards n Standard operating procedures (SOPs) n Quality manual n Internal audits n 4

Control in Services Time n Number of nonconformances n Observable errors n Behavior n 5

Statistical Process Control (SPC) n Statistical process control – a methodology for monitoring a process to identify special causes of variation and signal the need to take corrective action when appropriate 6

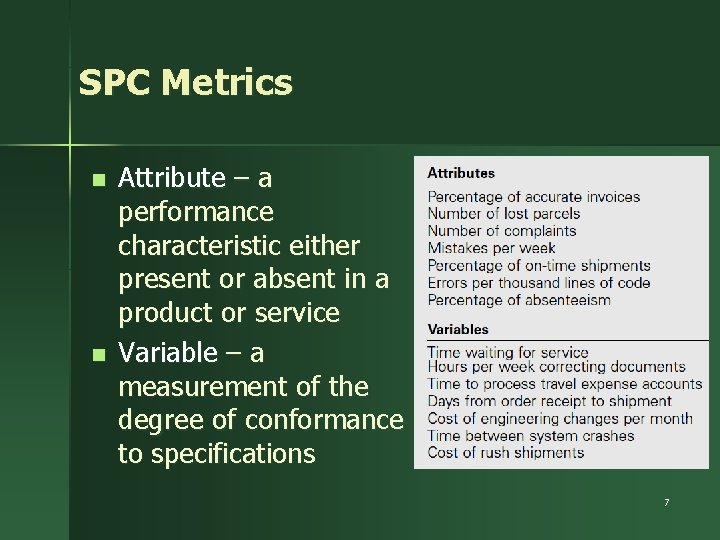
SPC Metrics n n Attribute – a performance characteristic either present or absent in a product or service Variable – a measurement of the degree of conformance to specifications 7

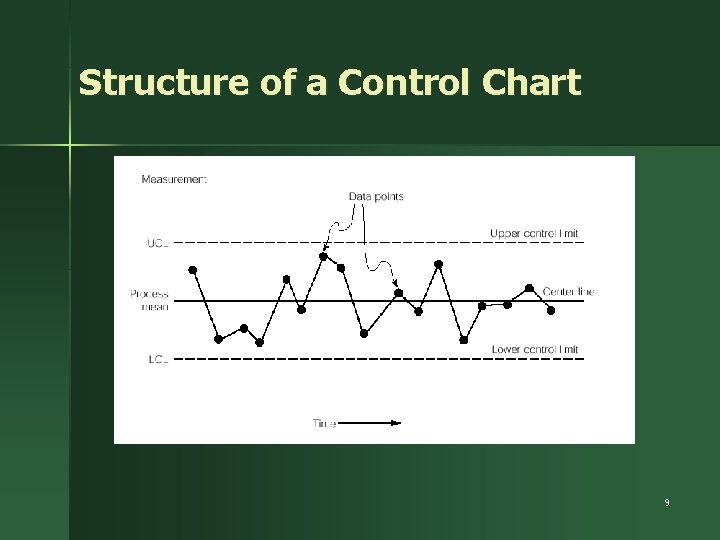
Control Charts Run chart – a line graph showing data plotted over time n Control chart – a run chart with statistically-determined upper and lower control limits (UCL and LCL) n 8

Structure of a Control Chart 9

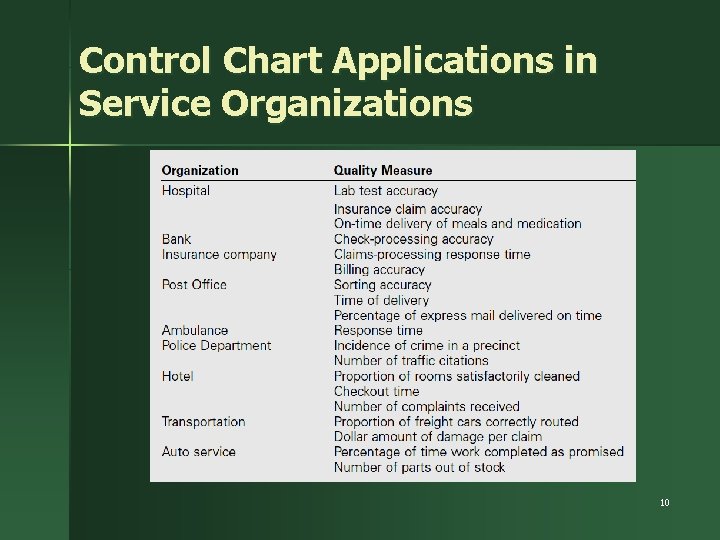
Control Chart Applications in Service Organizations 10

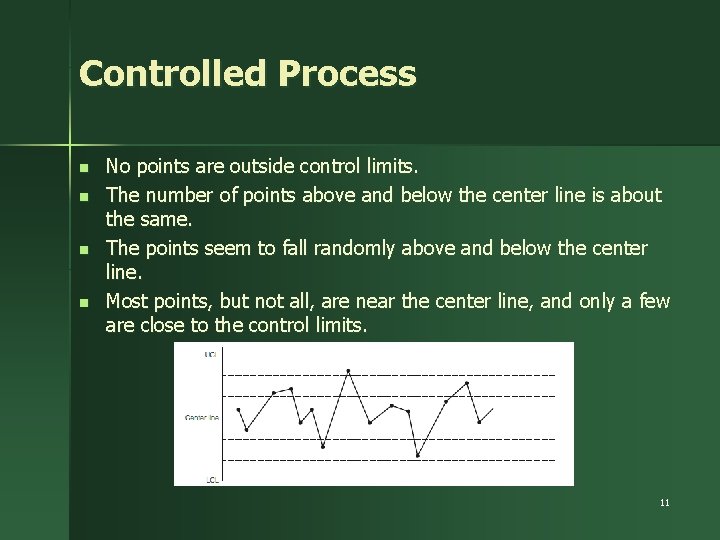
Controlled Process n n No points are outside control limits. The number of points above and below the center line is about the same. The points seem to fall randomly above and below the center line. Most points, but not all, are near the center line, and only a few are close to the control limits. 11

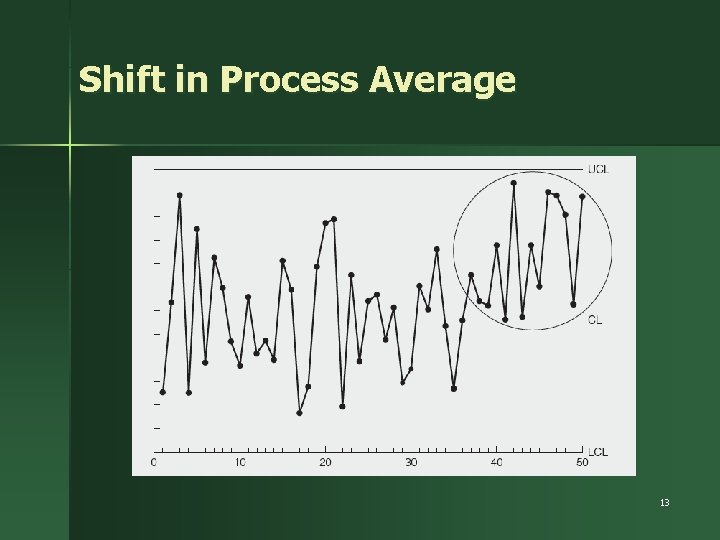
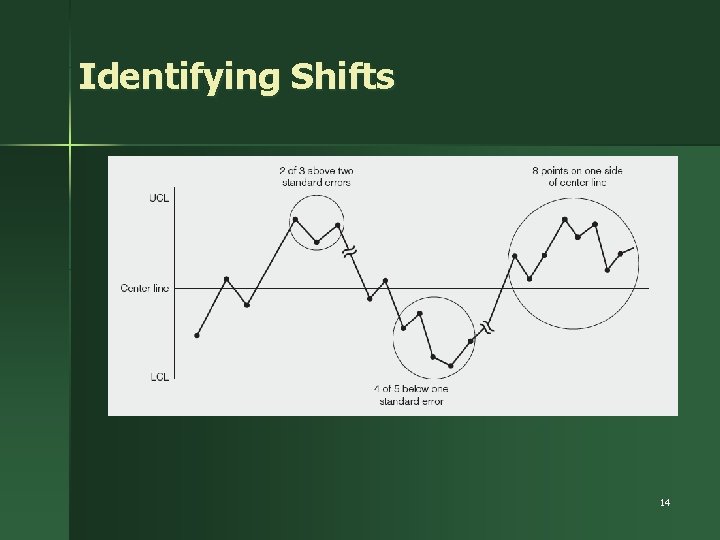
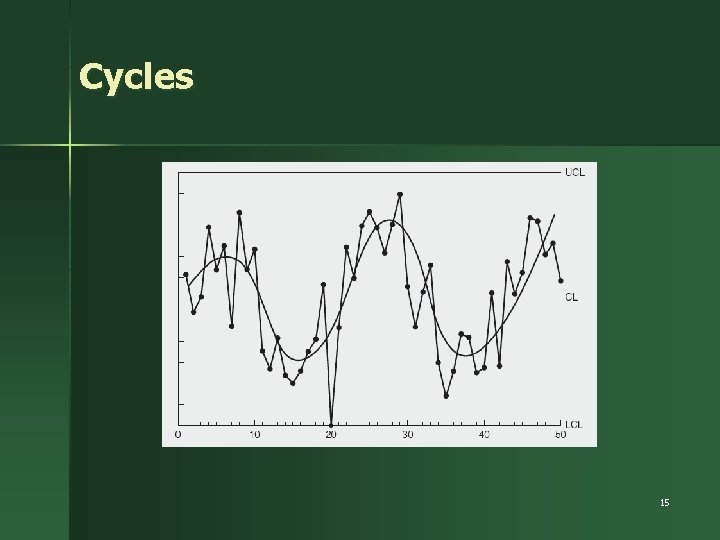
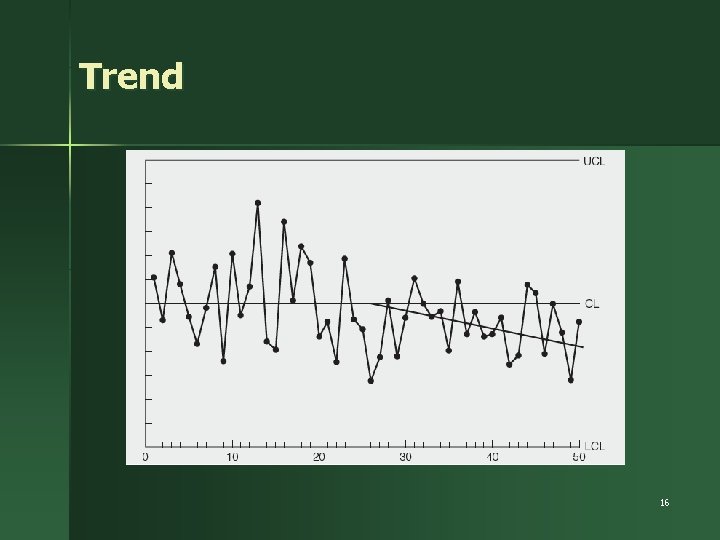
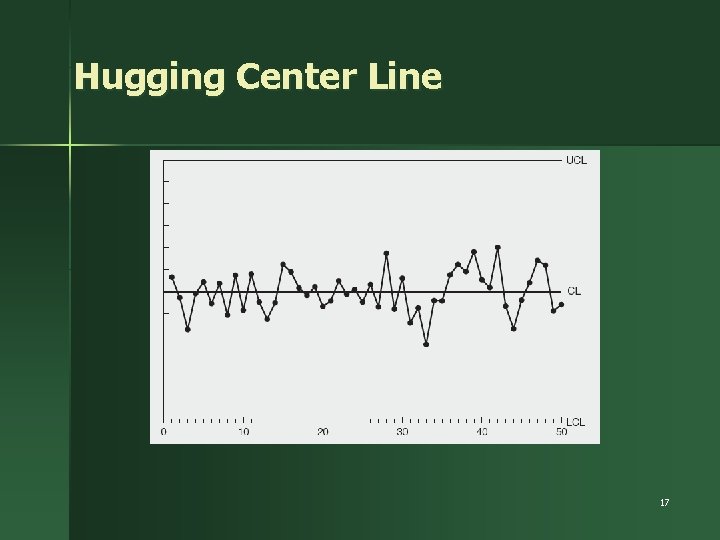
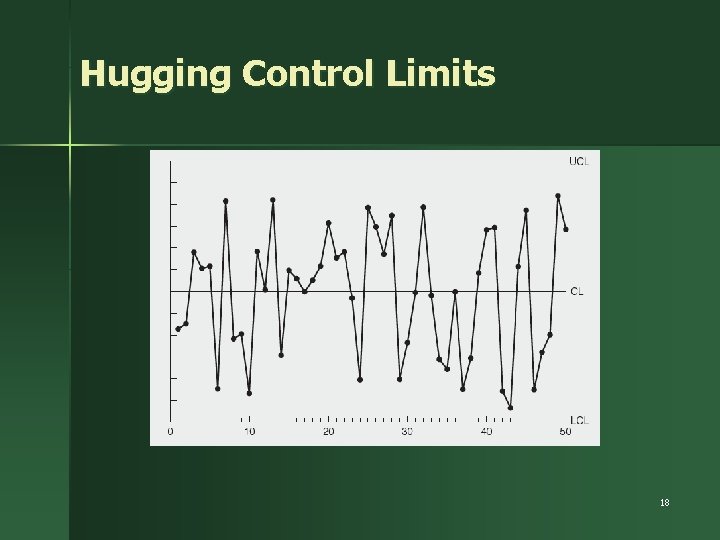
Typical Out-of-Control Patterns n n n Point outside control limits Sudden shift in process average Cycles Trends Hugging the center line Hugging the control limits 12

Shift in Process Average 13

Identifying Shifts 14

Cycles 15

Trend 16

Hugging Center Line 17

Hugging Control Limits 18

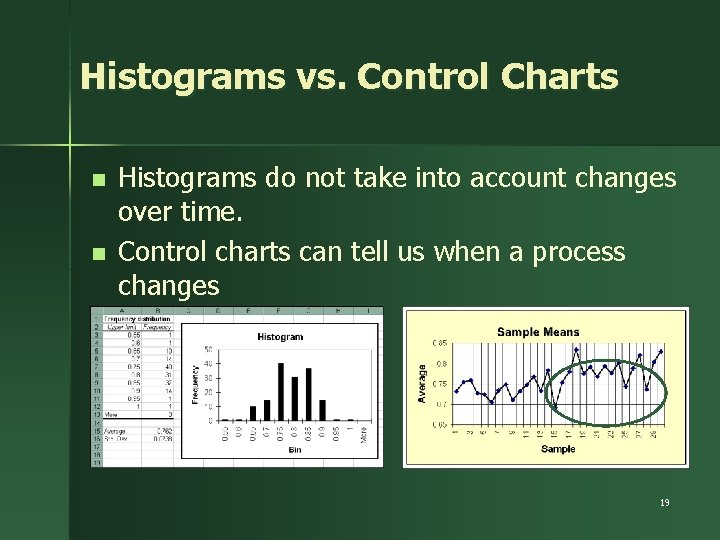
Histograms vs. Control Charts n n Histograms do not take into account changes over time. Control charts can tell us when a process changes 19

Control Chart Methodology 1. Prepare – Choose measurement – Determine how to collect data, sample size, and frequency of sampling – Set up an initial control chart 2. Collect Data – – – Record data Calculate appropriate statistics Plot statistics on chart 20

Next Steps Determine trial control limits 3. Center line (process average) Compute UCL, LCL – – Analyze and interpret results 4. – – – Determine if in control Eliminate out-of-control points Recompute control limits as necessary 21

Final Steps 5. Use as a problem-solving tool – – Continue to collect and plot data Take corrective action when necessary 22

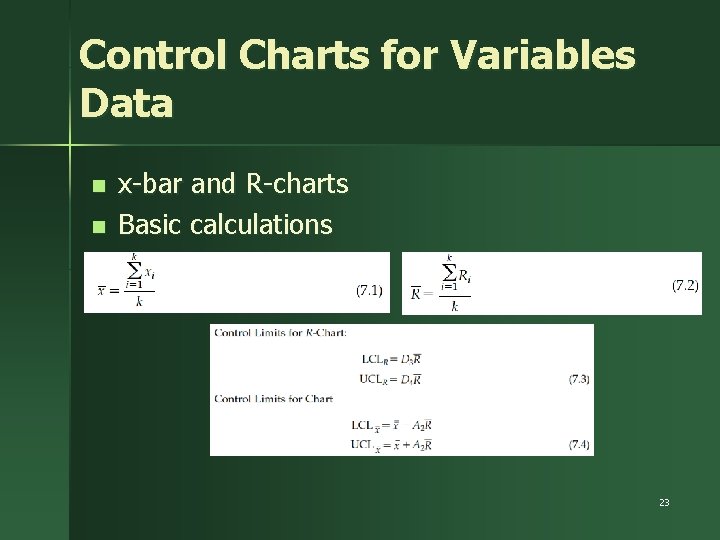
Control Charts for Variables Data n n x-bar and R-charts Basic calculations 23

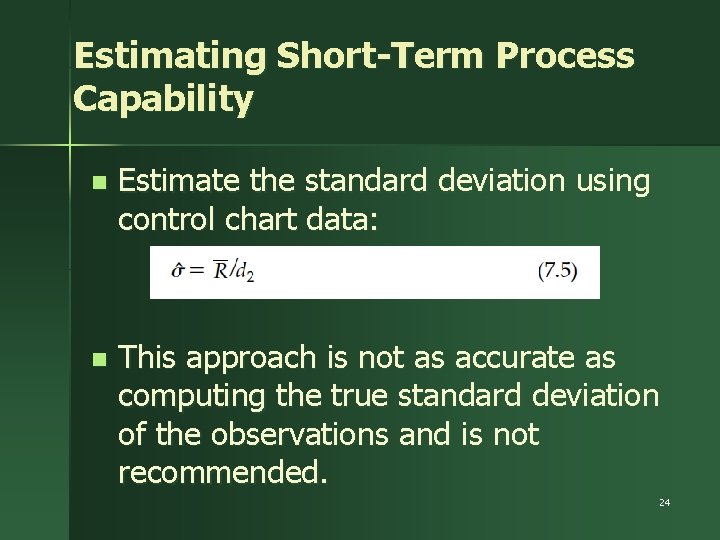
Estimating Short-Term Process Capability n Estimate the standard deviation using control chart data: n This approach is not as accurate as computing the true standard deviation of the observations and is not recommended. 24

Case Study: La Ventana Window Company n n La Ventana received some complaints about narrow, misfitting gaps between the upper and lower window sashes The plant manager wants to evaluate the capability of a critical cutting operation that he suspects might be the source of the gap problem. The nominal specification for this cutting operation is 25. 500 inches with a tolerance of 0. 030 inch. Inspect five consecutive window panels in the middle of each shift over a 15 -day period and recording the dimension of the cut 25

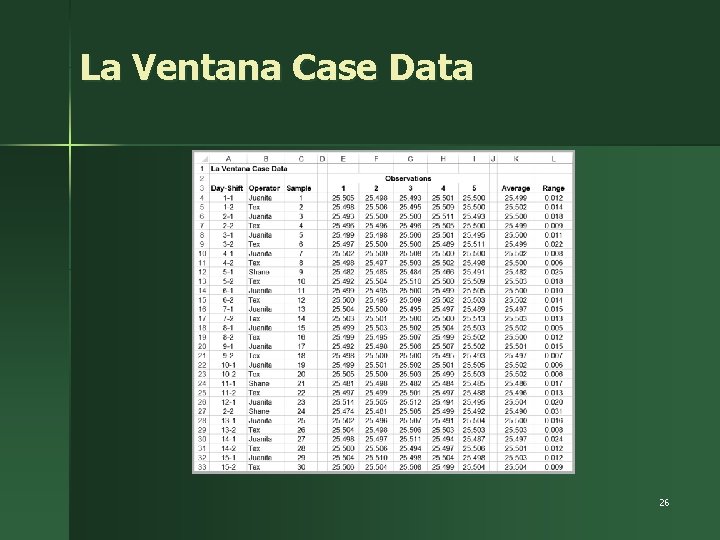
La Ventana Case Data 26

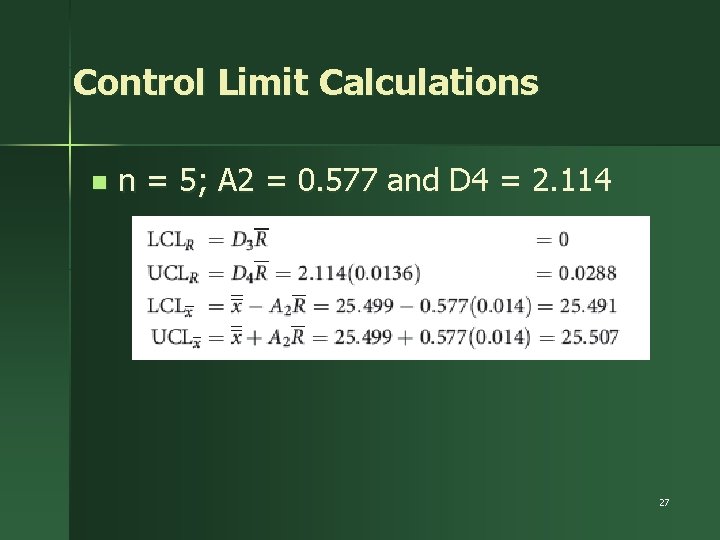
Control Limit Calculations n n = 5; A 2 = 0. 577 and D 4 = 2. 114 27

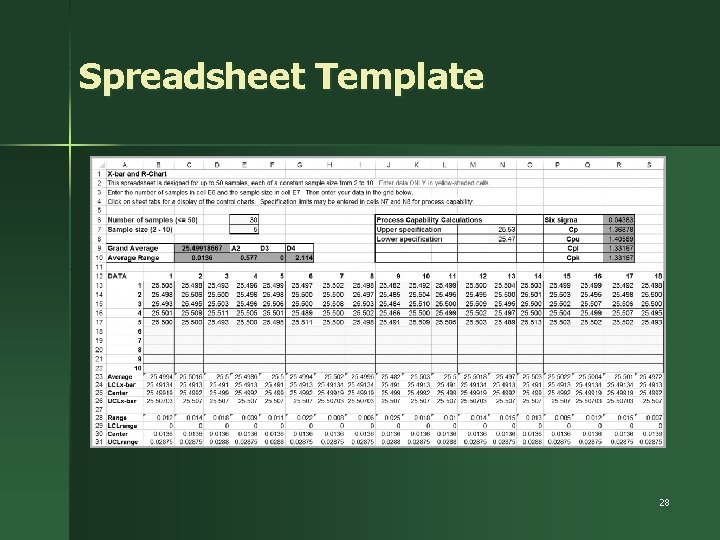
Spreadsheet Template 28

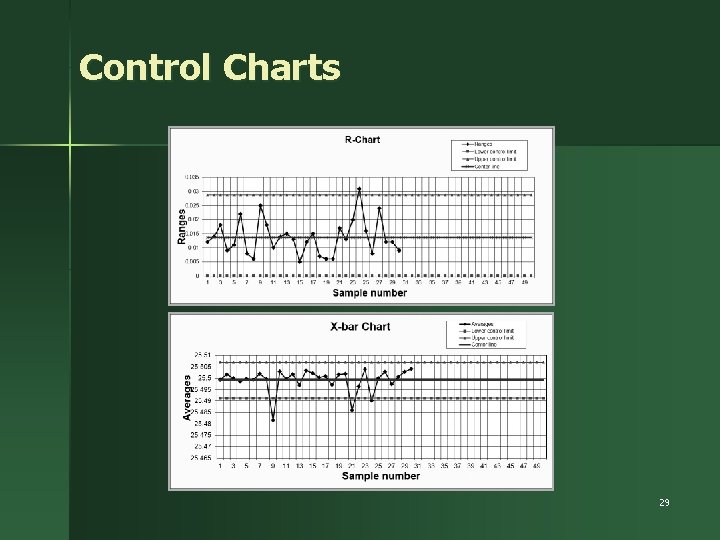
Control Charts 29

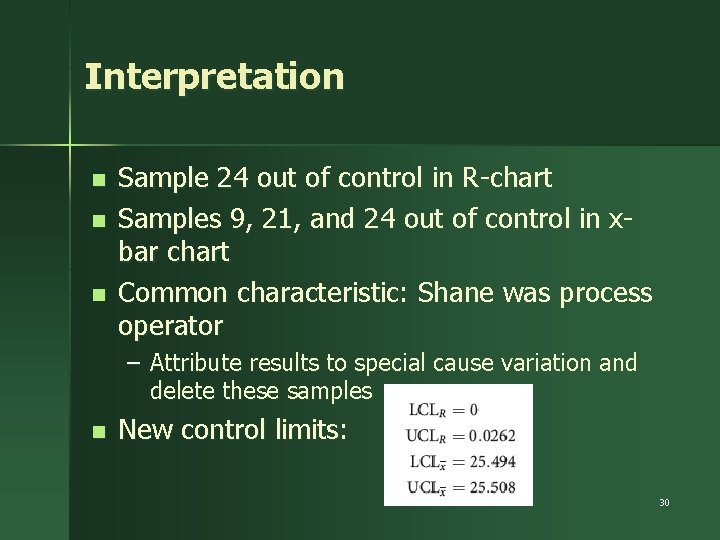
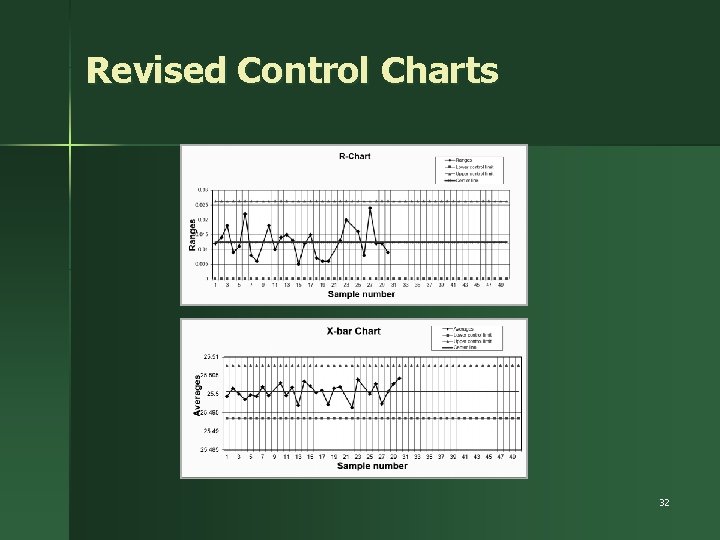
Interpretation n Sample 24 out of control in R-chart Samples 9, 21, and 24 out of control in xbar chart Common characteristic: Shane was process operator – Attribute results to special cause variation and delete these samples n New control limits: 30

Using the Control Chart Template n n n You may need to rescale the vertical axis of the charts to eliminate blank space and make them more visually appealing. See the appropriate Excel help files for the version you are using. This is rarely necessary. When a sample is deleted from a data set in the templates, do not enter zero for the data; instead, leave the cells blank (just delete the data using the (“delete” key). The charts are set up to interpolate between non-missing data points. When deleting sample data, be sure to update the number of samples used in the calculations to compute the statistics or the control charts will not display correctly. 31

Revised Control Charts 32

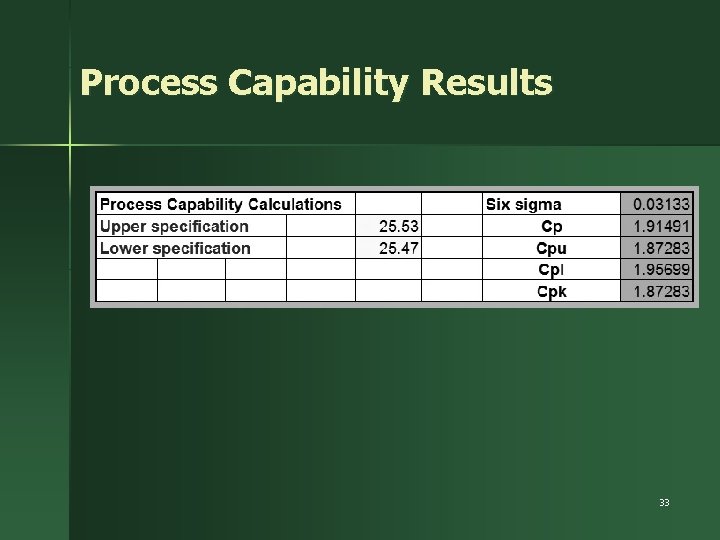
Process Capability Results 33

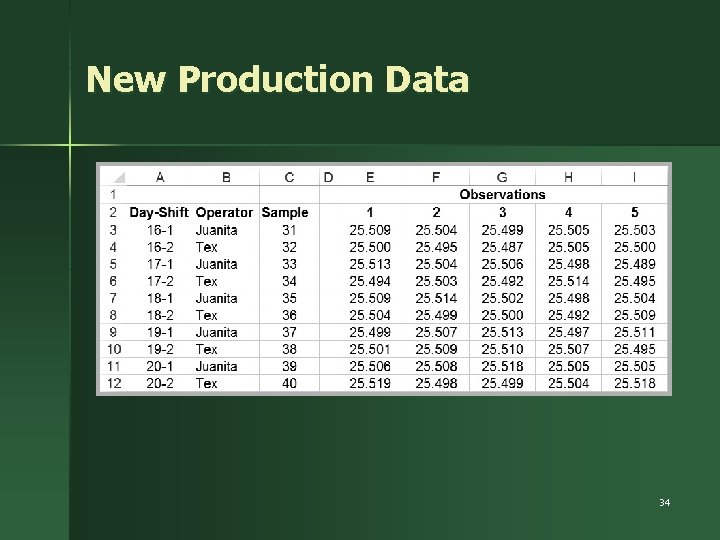
New Production Data 34

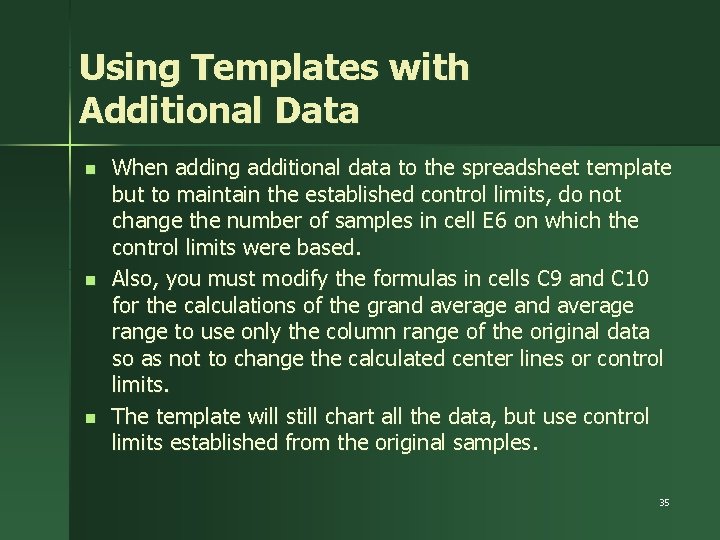
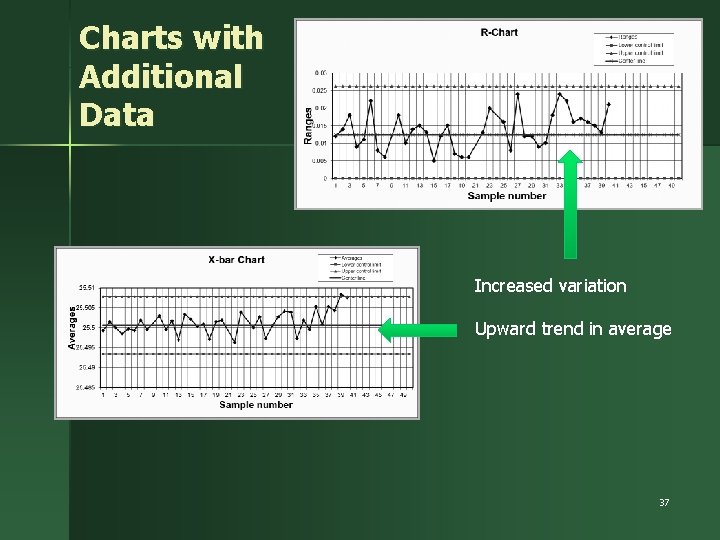
Using Templates with Additional Data n n n When adding additional data to the spreadsheet template but to maintain the established control limits, do not change the number of samples in cell E 6 on which the control limits were based. Also, you must modify the formulas in cells C 9 and C 10 for the calculations of the grand average range to use only the column range of the original data so as not to change the calculated center lines or control limits. The template will still chart all the data, but use control limits established from the original samples. 35

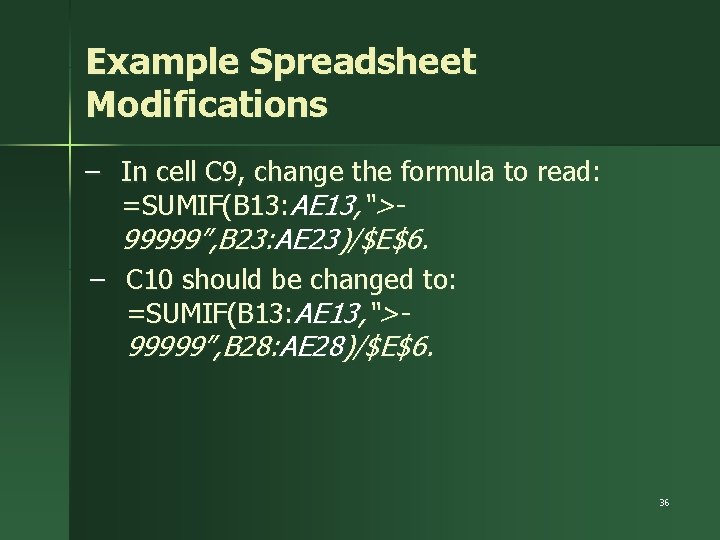
Example Spreadsheet Modifications – In cell C 9, change the formula to read: =SUMIF(B 13: AE 13, “>99999”, B 23: AE 23)/$E$6. – C 10 should be changed to: =SUMIF(B 13: AE 13, “>99999”, B 28: AE 28)/$E$6. 36

Charts with Additional Data Increased variation Upward trend in average 37

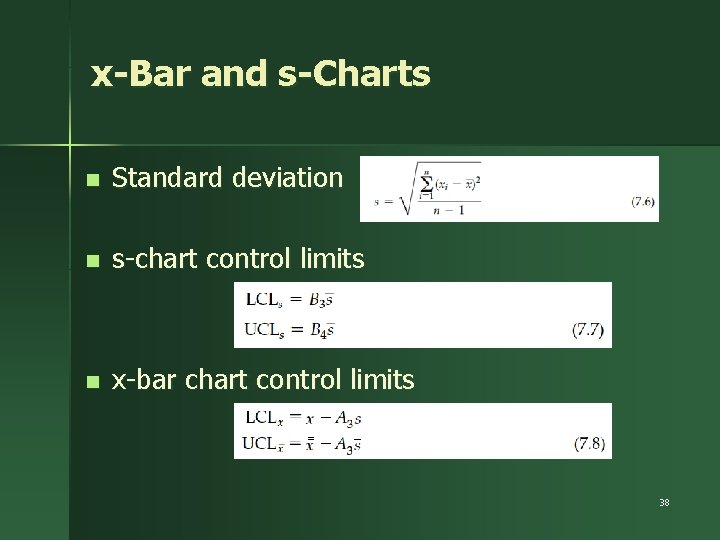
x-Bar and s-Charts n Standard deviation n s-chart control limits n x-bar chart control limits 38

Charts for Attributes n n n A nonconformance (defect, error) is a single nonconforming quality characteristic of a unit of work. If a unit of work has one or more nonconformances, we term the entire unit nonconforming. Attribute charts are used for monitoring nonconformances as well as the number nonconforming 39

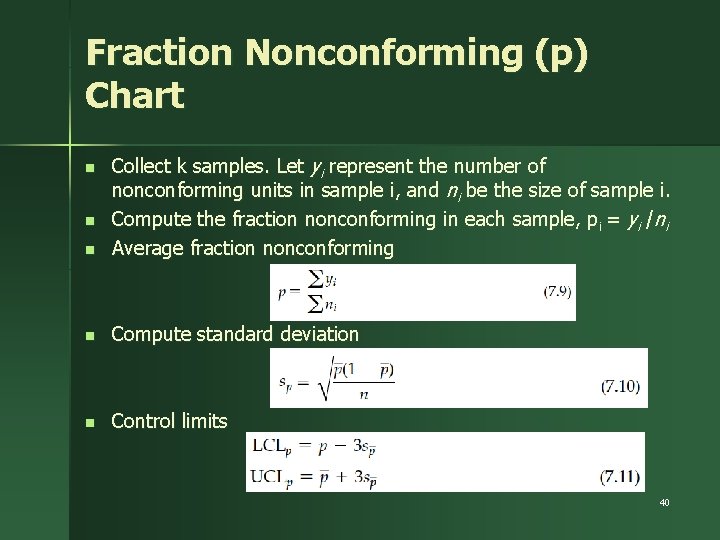
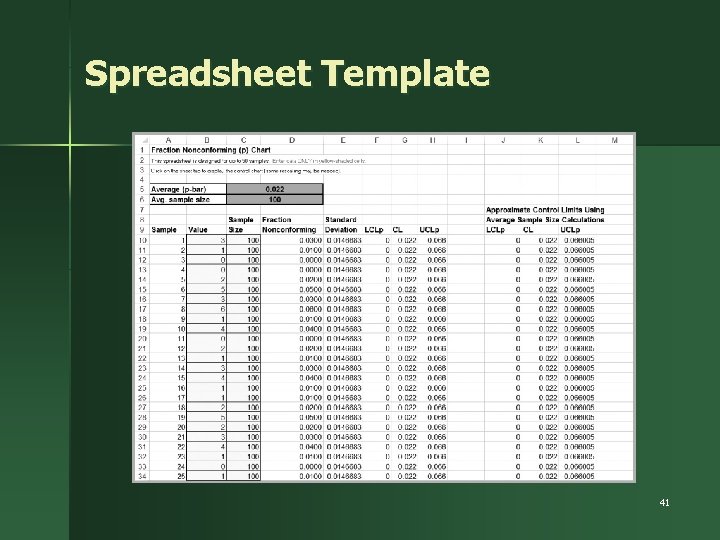
Fraction Nonconforming (p) Chart n Collect k samples. Let yi represent the number of nonconforming units in sample i, and ni be the size of sample i. Compute the fraction nonconforming in each sample, p i = yi /ni Average fraction nonconforming n Compute standard deviation n Control limits n n 40

Spreadsheet Template 41

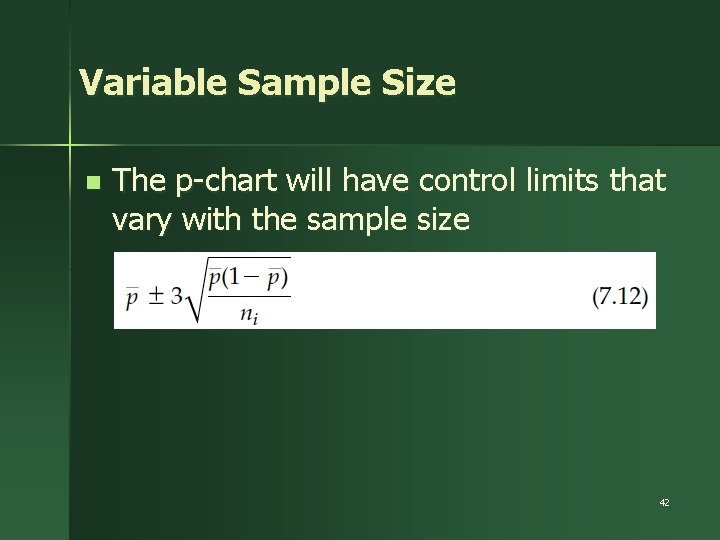
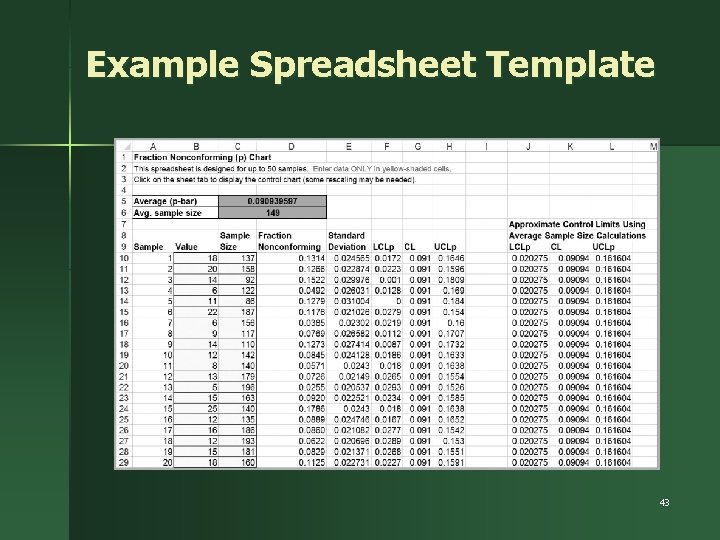
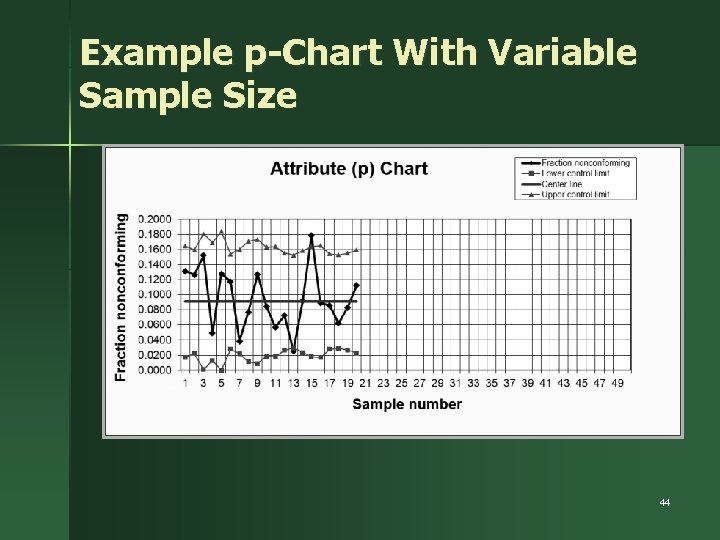
Variable Sample Size n The p-chart will have control limits that vary with the sample size 42

Example Spreadsheet Template 43

Example p-Chart With Variable Sample Size 44

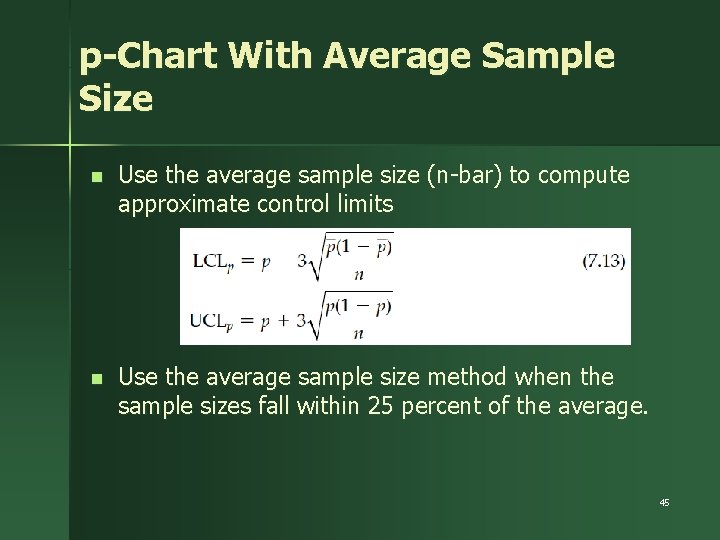
p-Chart With Average Sample Size n Use the average sample size (n-bar) to compute approximate control limits n Use the average sample size method when the sample sizes fall within 25 percent of the average. 45

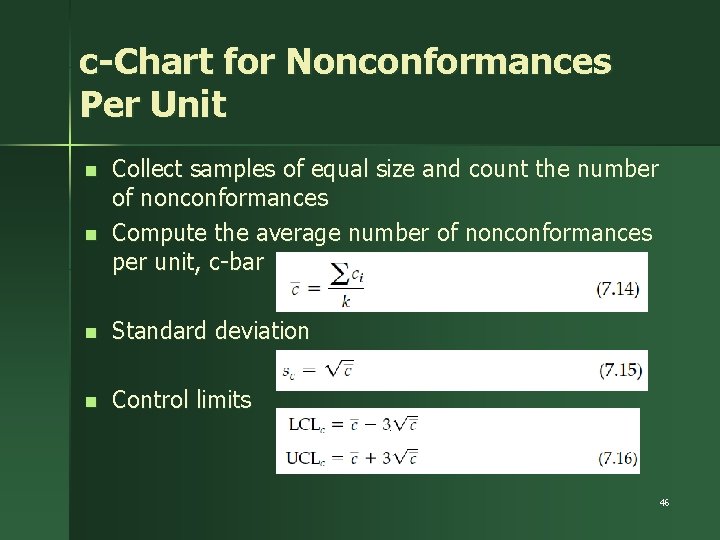
c-Chart for Nonconformances Per Unit n n Collect samples of equal size and count the number of nonconformances Compute the average number of nonconformances per unit, c-bar n Standard deviation n Control limits 46

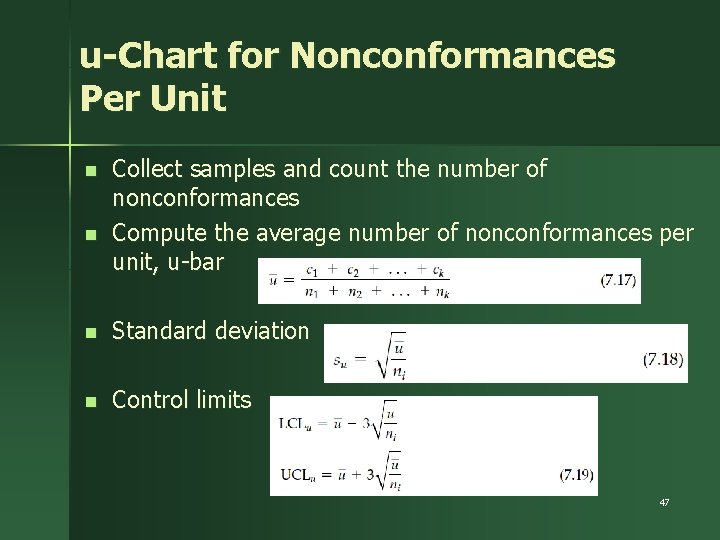
u-Chart for Nonconformances Per Unit n n Collect samples and count the number of nonconformances Compute the average number of nonconformances per unit, u-bar n Standard deviation n Control limits 47

Control Chart Design Issues Basis for sampling n Sample size n Frequency of sampling n Location of control limits n 48

Project Review – Control (1 of 2) n n n Process changes have been adequately documented Documentation for new process has been completed Process owners have been assigned responsibility for ongoing control Process capability for new process has been determined Systems, such as statistical process control, have been developed to identify out-of-control performance 49

Project Review – Control (2 of 2) n n n Responsibility for control and adjustment has been given to appropriate process owners Senior management has been informed of the project results Team members have been thanked, rewarded, and given appropriate new assignments 50