Chapter 7 Engineering Graphics I Dr Simin Nasseri
- Slides: 35

Chapter 7 Engineering Graphics I Dr Simin Nasseri Southern Polytechnic State University 1 Copyright © The Mc. Graw-Hill Companies, Inc. Permission required for reproduction or display.

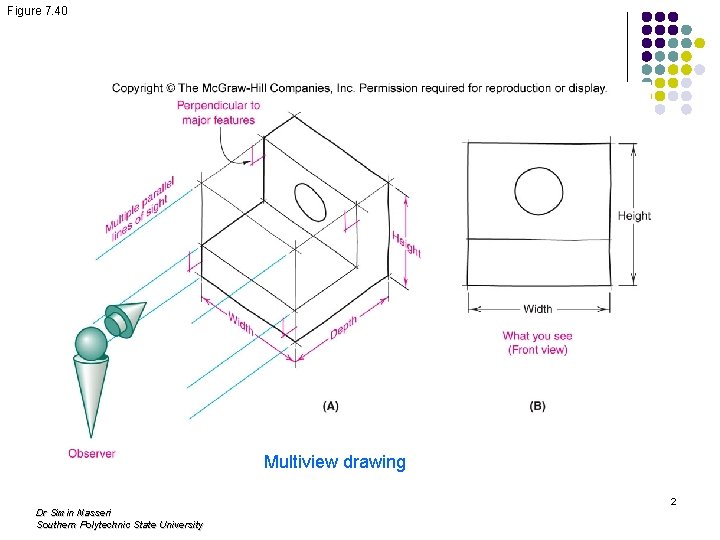
Figure 7. 40 Multiview drawing Dr Simin Nasseri Southern Polytechnic State University 2

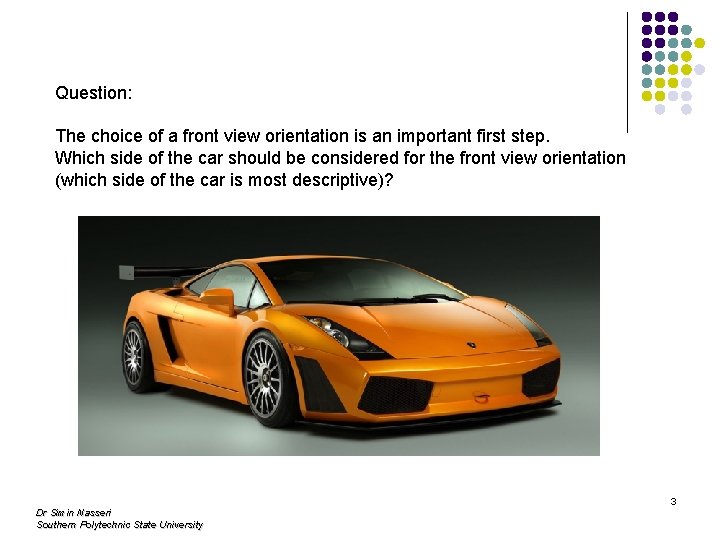
Question: The choice of a front view orientation is an important first step. Which side of the car should be considered for the front view orientation (which side of the car is most descriptive)? Dr Simin Nasseri Southern Polytechnic State University 3

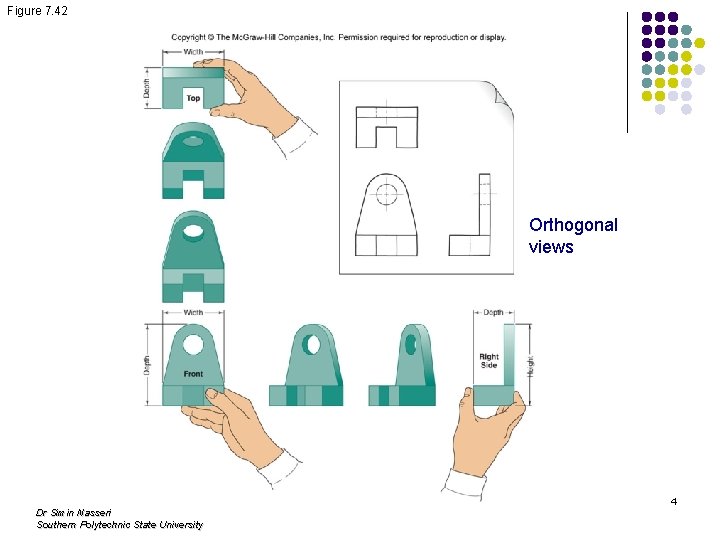
Figure 7. 42 Orthogonal views Dr Simin Nasseri Southern Polytechnic State University 4

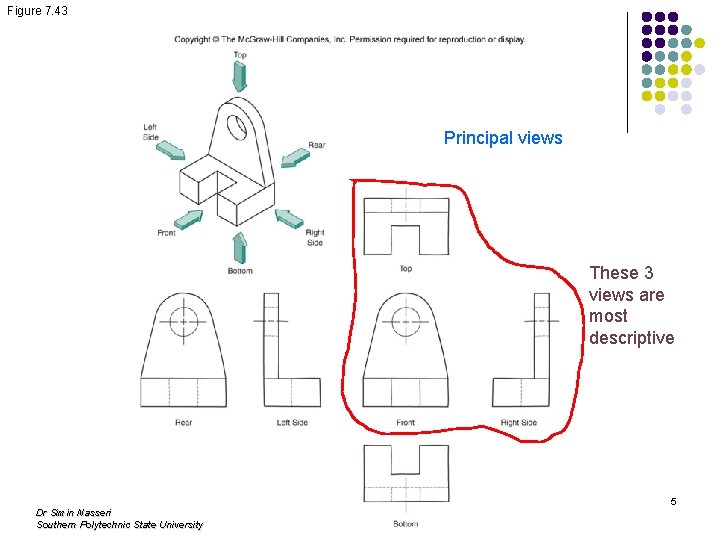
Figure 7. 43 Principal views These 3 views are most descriptive Dr Simin Nasseri Southern Polytechnic State University 5

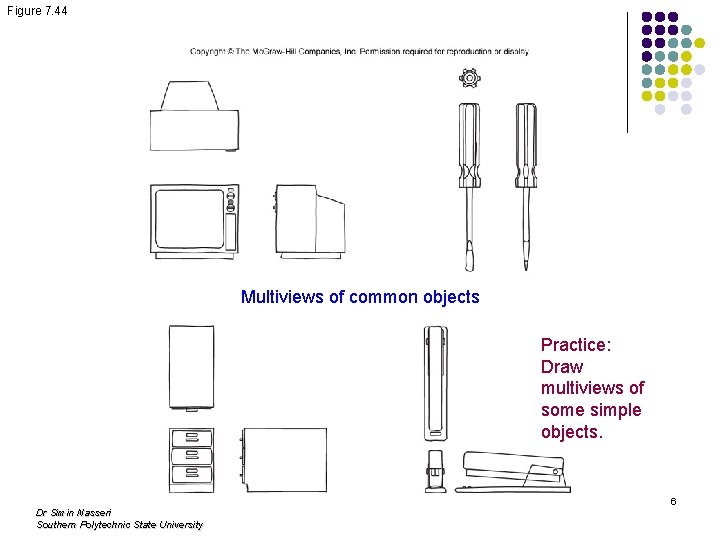
Figure 7. 44 Multiviews of common objects Practice: Draw multiviews of some simple objects. Dr Simin Nasseri Southern Polytechnic State University 6

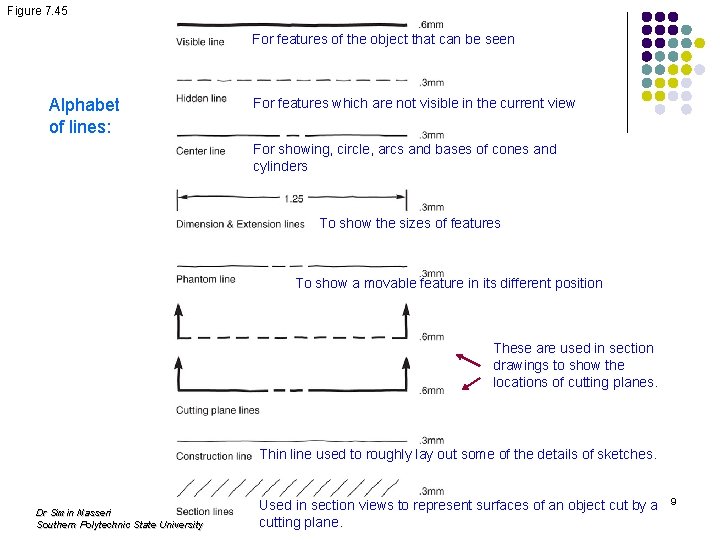
Multiview Sketching Techniques: 1. Line conventions: Multiview drawings and sketches require adherence to the proper use of alphabet of lines. These standard line types are shown in the next slide with the recommended line thicknesses. Dr Simin Nasseri Southern Polytechnic State University 7

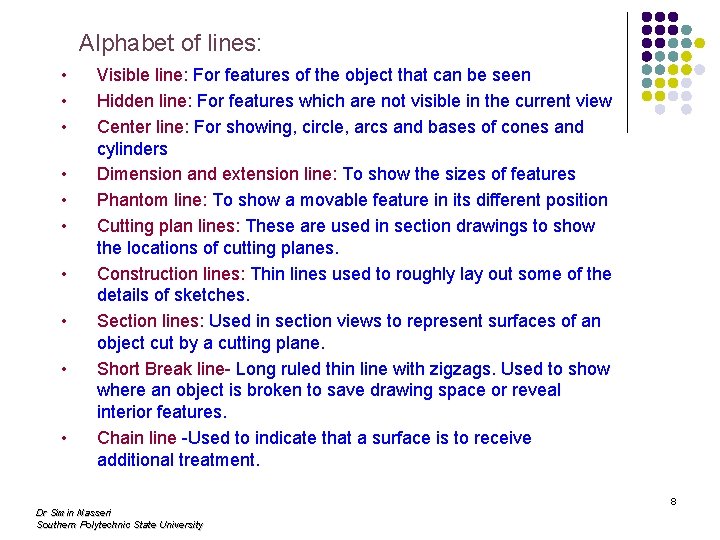
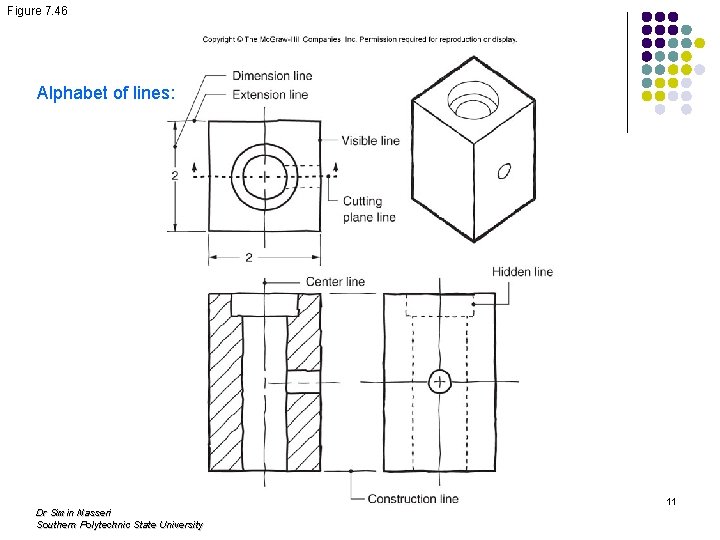
Alphabet of lines: • • • Visible line: For features of the object that can be seen Hidden line: For features which are not visible in the current view Center line: For showing, circle, arcs and bases of cones and cylinders Dimension and extension line: To show the sizes of features Phantom line: To show a movable feature in its different position Cutting plan lines: These are used in section drawings to show the locations of cutting planes. Construction lines: Thin lines used to roughly lay out some of the details of sketches. Section lines: Used in section views to represent surfaces of an object cut by a cutting plane. Short Break line- Long ruled thin line with zigzags. Used to show where an object is broken to save drawing space or reveal interior features. Chain line -Used to indicate that a surface is to receive additional treatment. Dr Simin Nasseri Southern Polytechnic State University 8

Figure 7. 45 For features of the object that can be seen Alphabet of lines: For features which are not visible in the current view For showing, circle, arcs and bases of cones and cylinders To show the sizes of features To show a movable feature in its different position These are used in section drawings to show the locations of cutting planes. Thin line used to roughly lay out some of the details of sketches. Dr Simin Nasseri Southern Polytechnic State University Used in section views to represent surfaces of an object cut by a cutting plane. 9

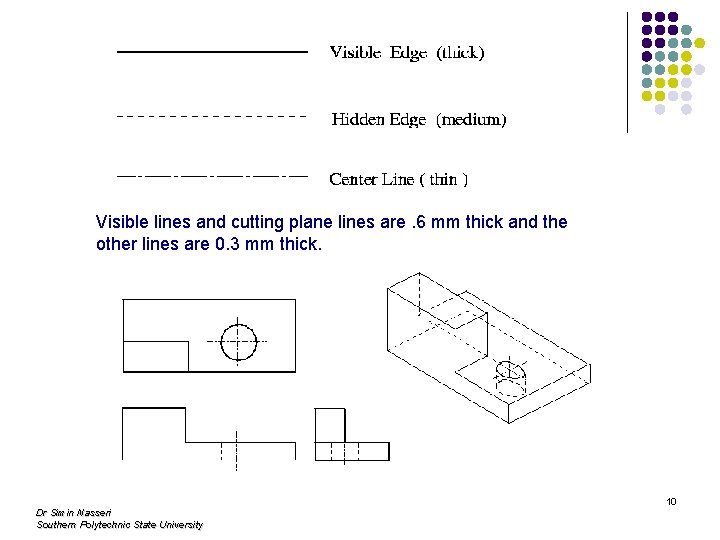
Visible lines and cutting plane lines are. 6 mm thick and the other lines are 0. 3 mm thick. Dr Simin Nasseri Southern Polytechnic State University 10

Figure 7. 46 Alphabet of lines: Dr Simin Nasseri Southern Polytechnic State University 11

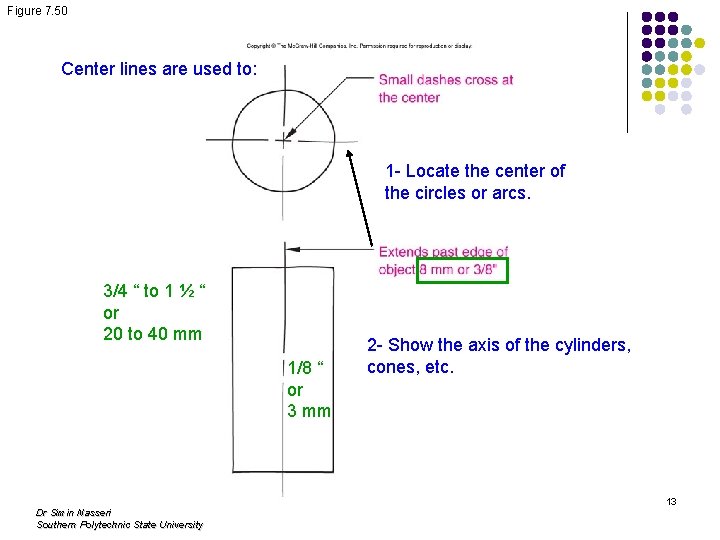
Multiview Sketching Techniques: 2. Circles are used to represent holes and bases of cones and cylinders. Arcs are used to show portions of these elements. Center lines should be used to show these elements. Dr Simin Nasseri Southern Polytechnic State University 12

Figure 7. 50 Center lines are used to: 1 - Locate the center of the circles or arcs. 3/4 “ to 1 ½ “ or 20 to 40 mm 1/8 “ or 3 mm Dr Simin Nasseri Southern Polytechnic State University 2 - Show the axis of the cylinders, cones, etc. 13

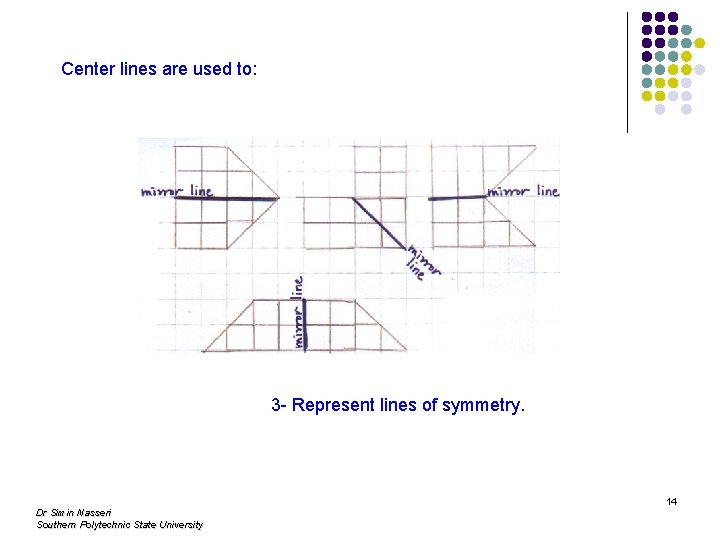
Center lines are used to: 3 - Represent lines of symmetry. Dr Simin Nasseri Southern Polytechnic State University 14

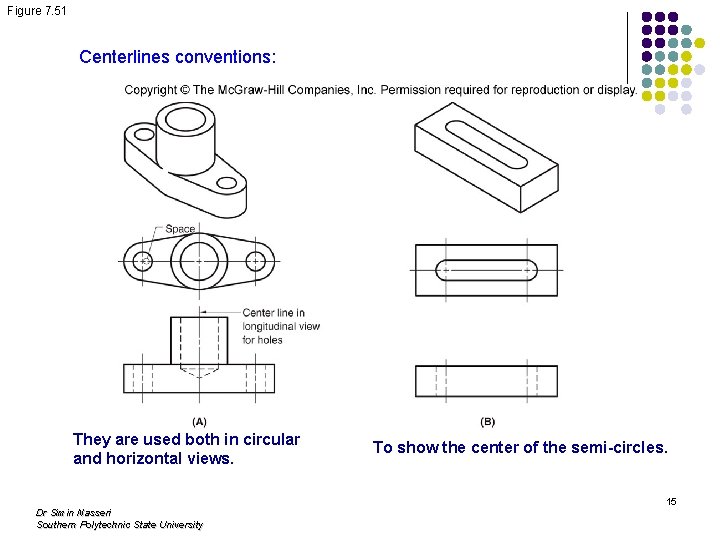
Figure 7. 51 Centerlines conventions: They are used both in circular and horizontal views. Dr Simin Nasseri Southern Polytechnic State University To show the center of the semi-circles. 15

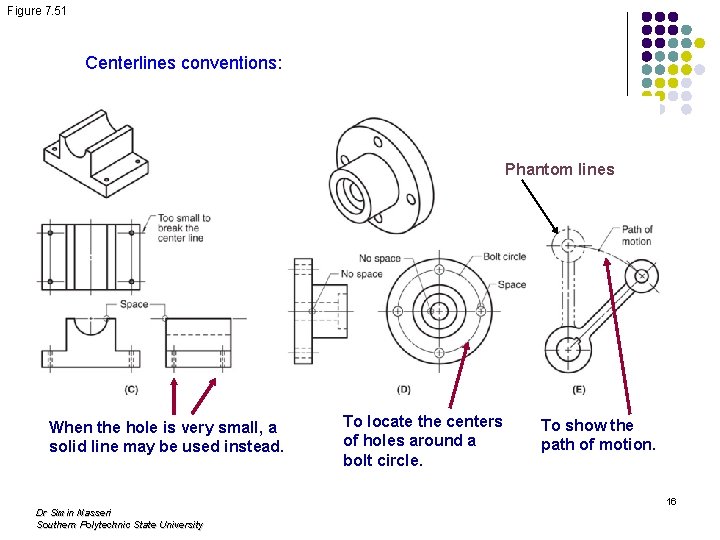
Figure 7. 51 Centerlines conventions: Phantom lines When the hole is very small, a solid line may be used instead. Dr Simin Nasseri Southern Polytechnic State University To locate the centers of holes around a bolt circle. To show the path of motion. 16

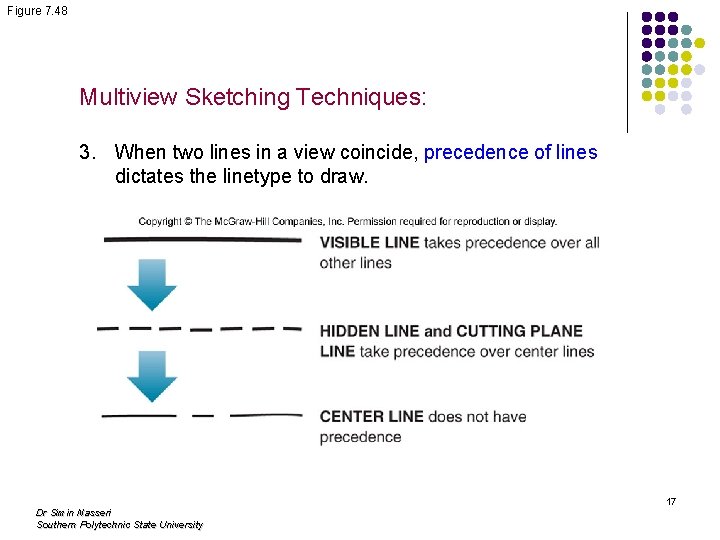
Figure 7. 48 Multiview Sketching Techniques: 3. When two lines in a view coincide, precedence of lines dictates the linetype to draw. Dr Simin Nasseri Southern Polytechnic State University 17

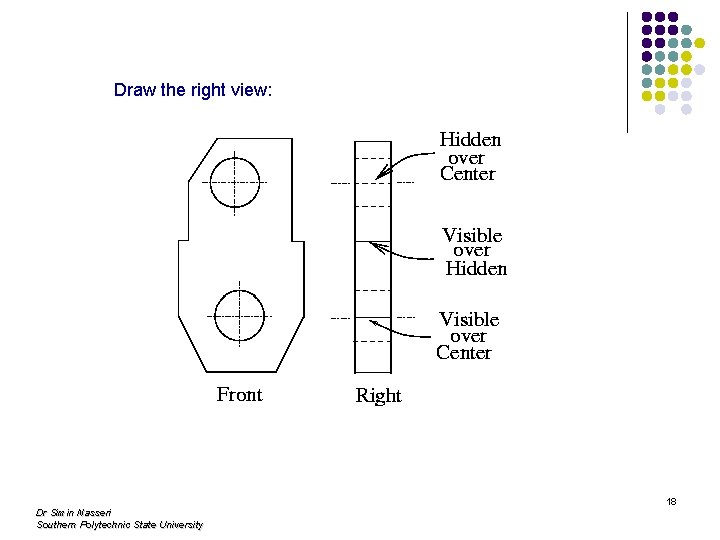
Draw the right view: Dr Simin Nasseri Southern Polytechnic State University 18

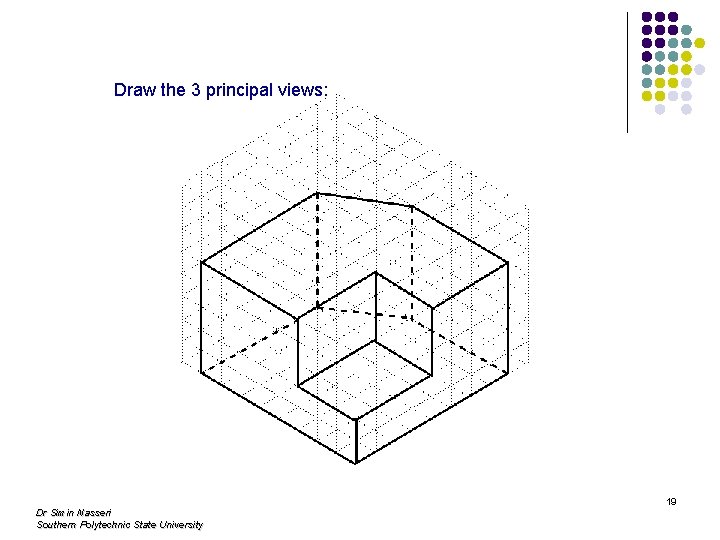
Draw the 3 principal views: Dr Simin Nasseri Southern Polytechnic State University 19

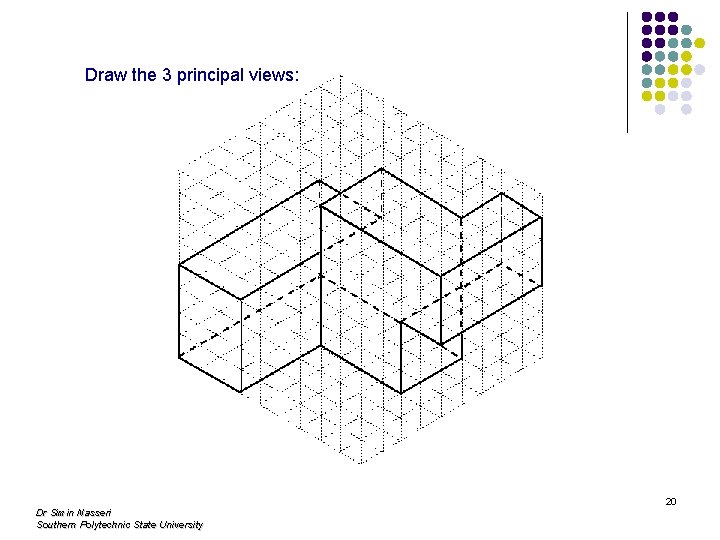
Draw the 3 principal views: Dr Simin Nasseri Southern Polytechnic State University 20

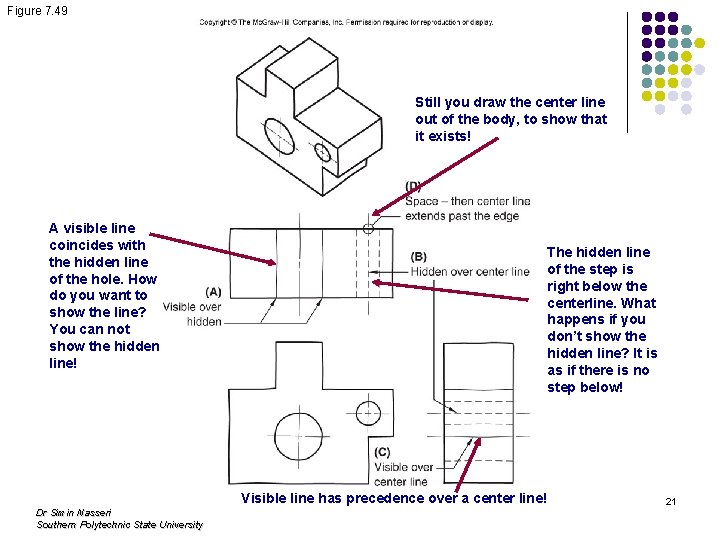
Figure 7. 49 Still you draw the center line out of the body, to show that it exists! A visible line coincides with the hidden line of the hole. How do you want to show the line? You can not show the hidden line! The hidden line of the step is right below the centerline. What happens if you don’t show the hidden line? It is as if there is no step below! Visible line has precedence over a center line! Dr Simin Nasseri Southern Polytechnic State University 21

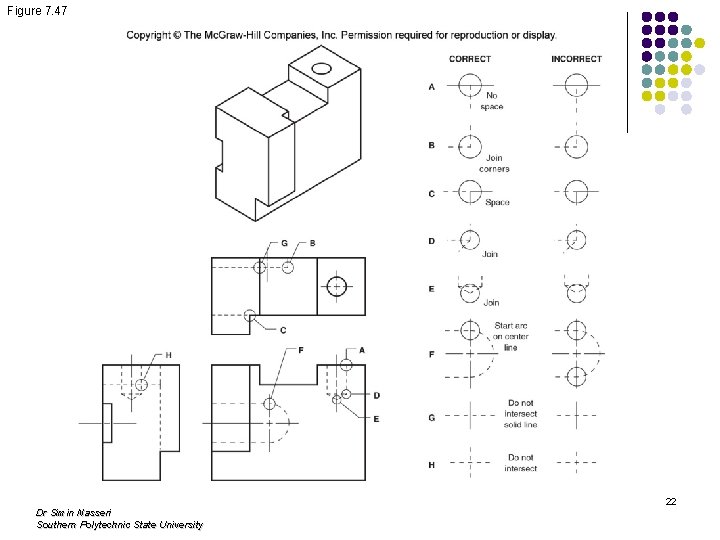
Figure 7. 47 Dr Simin Nasseri Southern Polytechnic State University 22

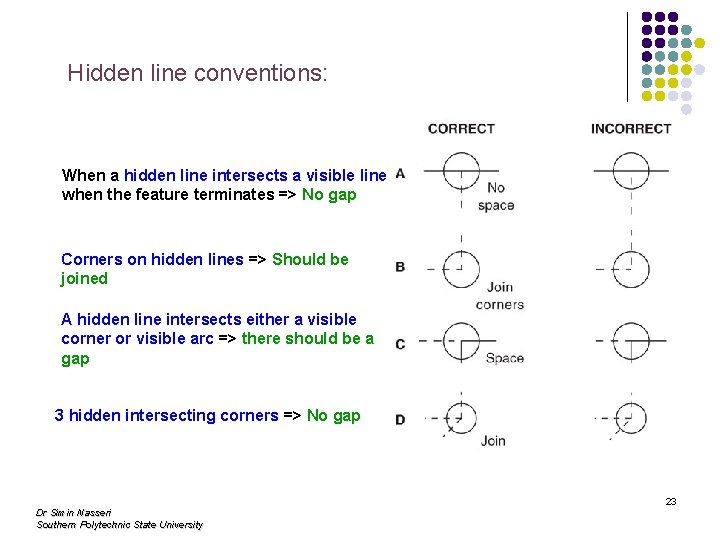
Hidden line conventions: When a hidden line intersects a visible line when the feature terminates => No gap Corners on hidden lines => Should be joined A hidden line intersects either a visible corner or visible arc => there should be a gap 3 hidden intersecting corners => No gap Dr Simin Nasseri Southern Polytechnic State University 23

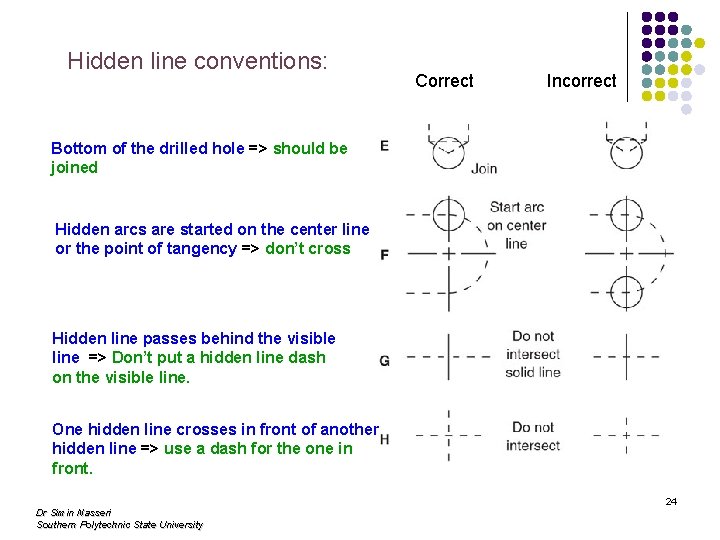
Hidden line conventions: Correct Incorrect Bottom of the drilled hole => should be joined Hidden arcs are started on the center line or the point of tangency => don’t cross Hidden line passes behind the visible line => Don’t put a hidden line dash on the visible line. One hidden line crosses in front of another hidden line => use a dash for the one in front. Dr Simin Nasseri Southern Polytechnic State University 24

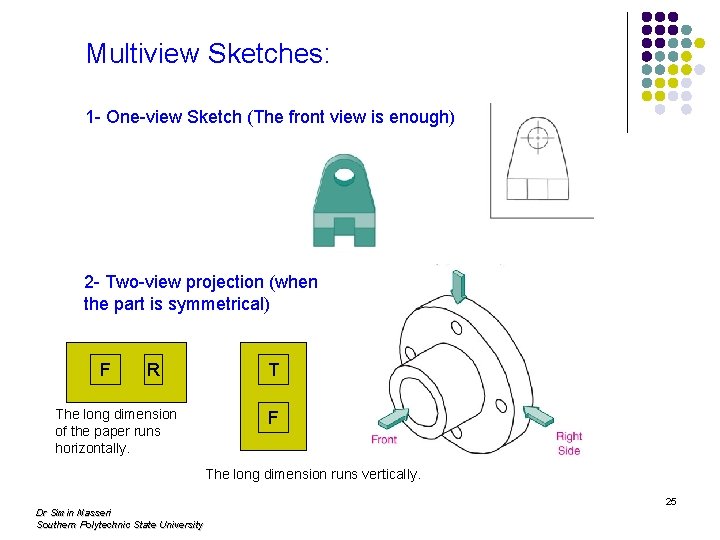
Multiview Sketches: 1 - One-view Sketch (The front view is enough) 2 - Two-view projection (when the part is symmetrical) F R The long dimension of the paper runs horizontally. T F The long dimension runs vertically. Dr Simin Nasseri Southern Polytechnic State University 25

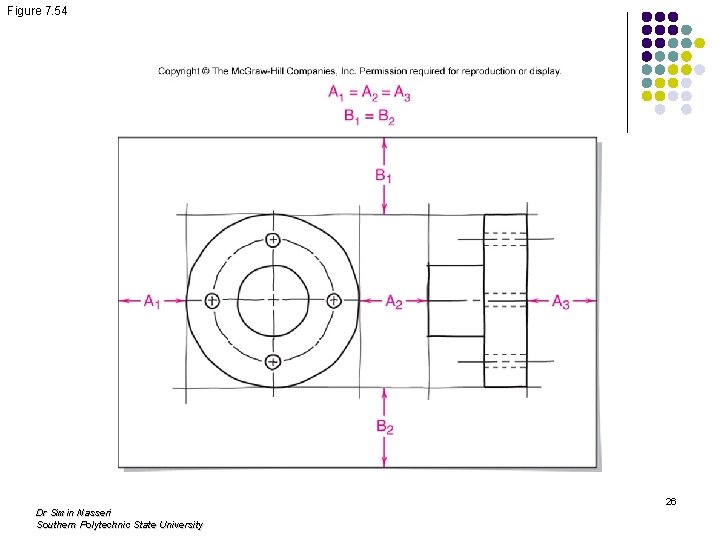
Figure 7. 54 Dr Simin Nasseri Southern Polytechnic State University 26

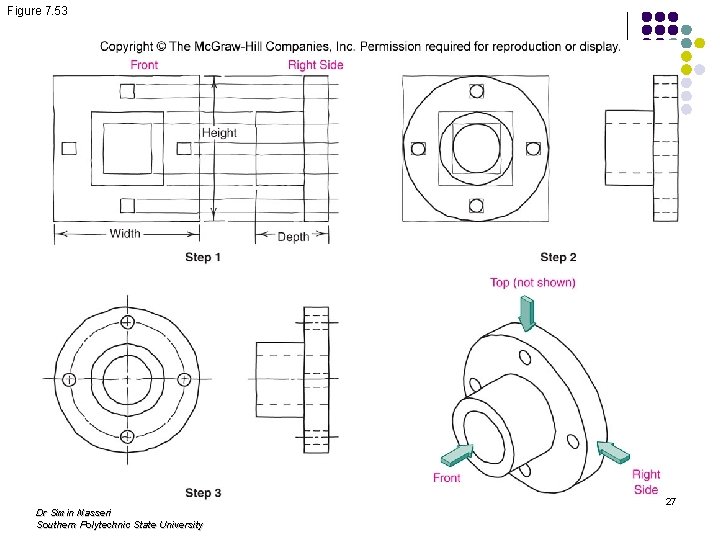
Figure 7. 53 Dr Simin Nasseri Southern Polytechnic State University 27

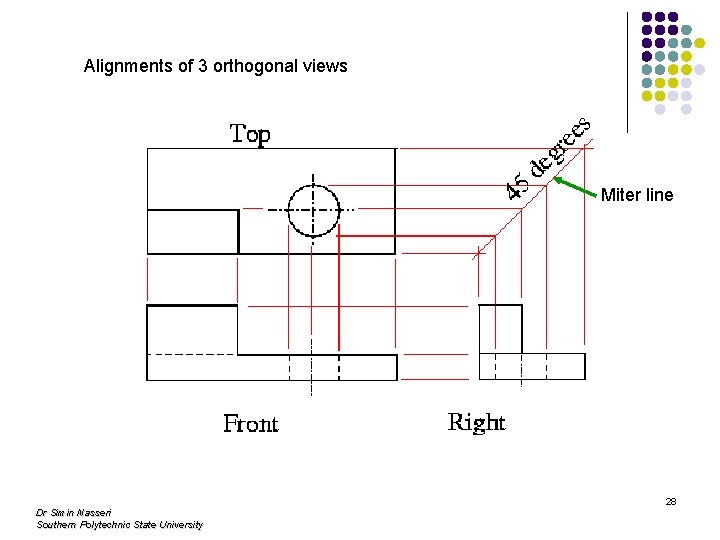
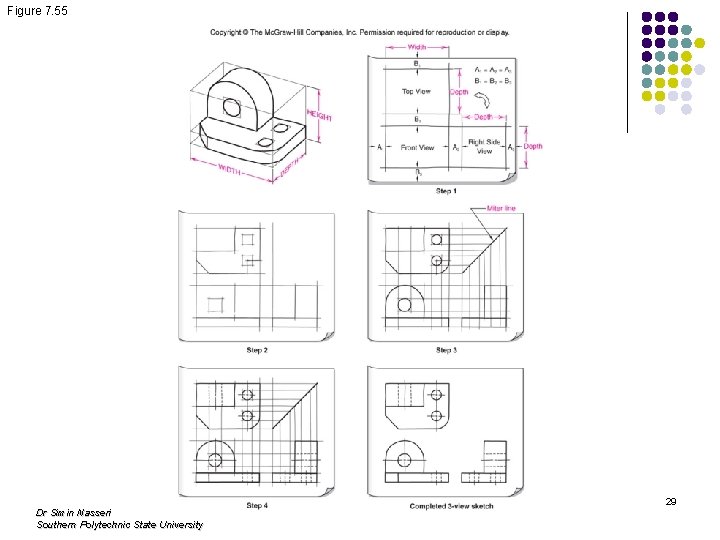
Alignments of 3 orthogonal views Miter line Dr Simin Nasseri Southern Polytechnic State University 28

Figure 7. 55 Dr Simin Nasseri Southern Polytechnic State University 29

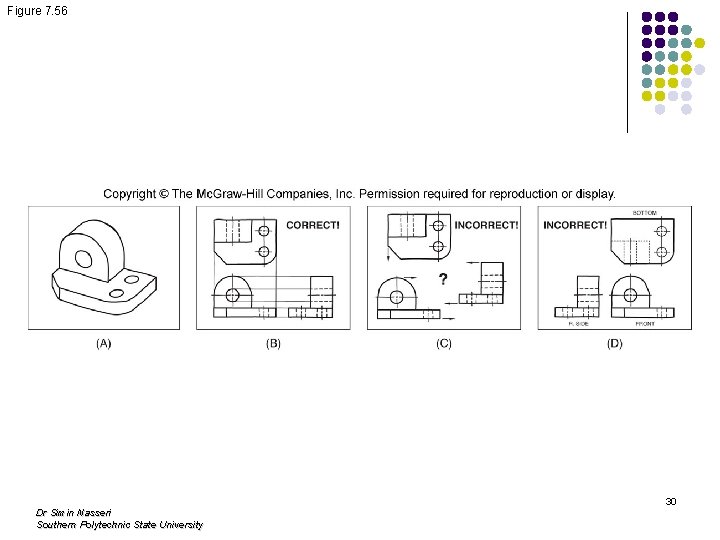
Figure 7. 56 Dr Simin Nasseri Southern Polytechnic State University 30

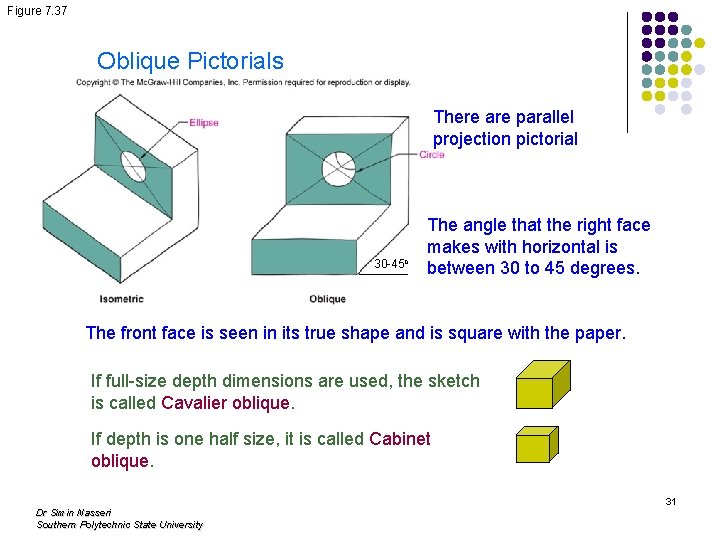
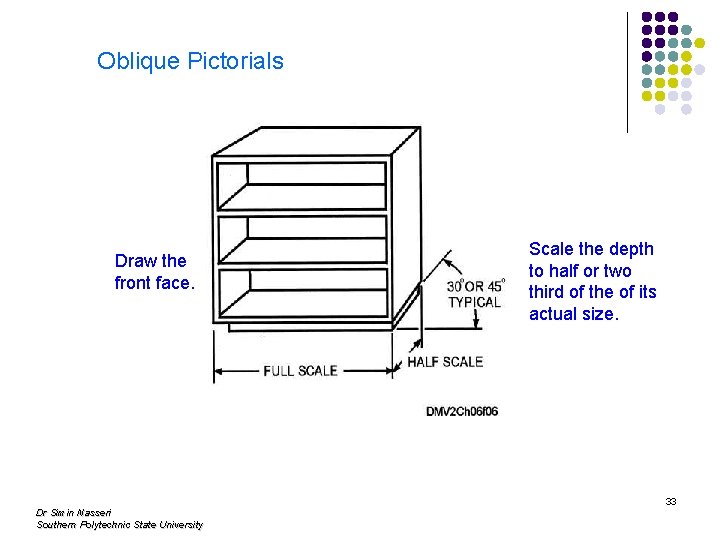
Figure 7. 37 Oblique Pictorials There are parallel projection pictorial 30 -45 o The angle that the right face makes with horizontal is between 30 to 45 degrees. The front face is seen in its true shape and is square with the paper. If full-size depth dimensions are used, the sketch is called Cavalier oblique. If depth is one half size, it is called Cabinet oblique. Dr Simin Nasseri Southern Polytechnic State University 31

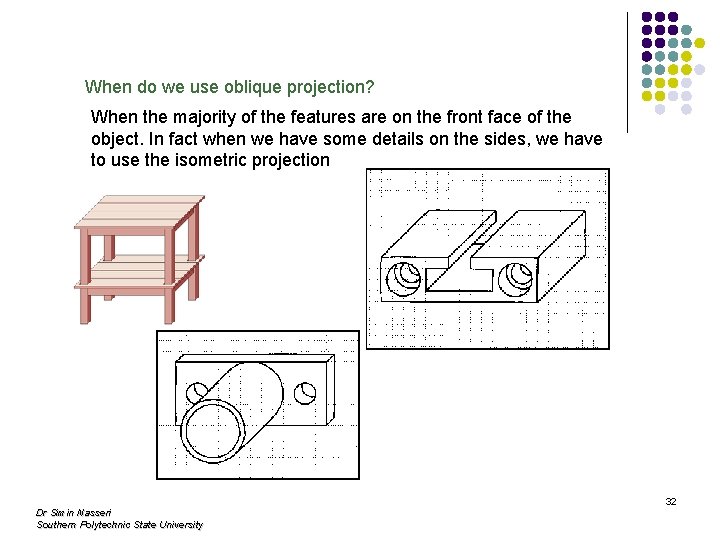
When do we use oblique projection? When the majority of the features are on the front face of the object. In fact when we have some details on the sides, we have to use the isometric projection Dr Simin Nasseri Southern Polytechnic State University 32

Oblique Pictorials Draw the front face. Dr Simin Nasseri Southern Polytechnic State University Scale the depth to half or two third of the of its actual size. 33

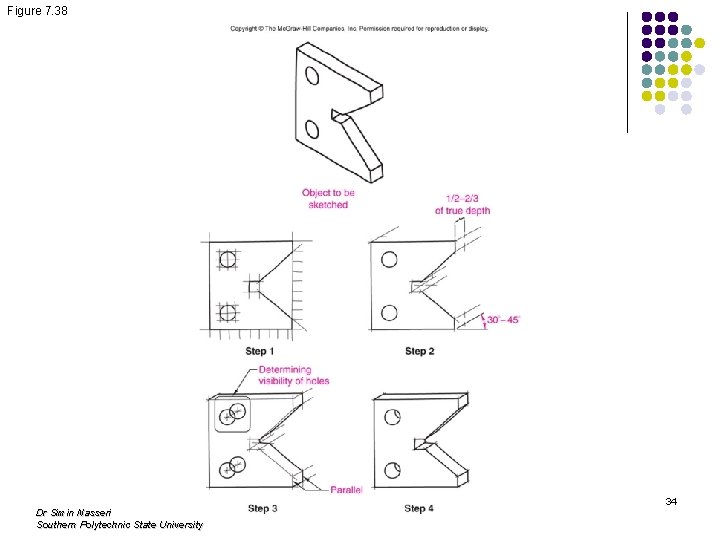
Figure 7. 38 Dr Simin Nasseri Southern Polytechnic State University 34

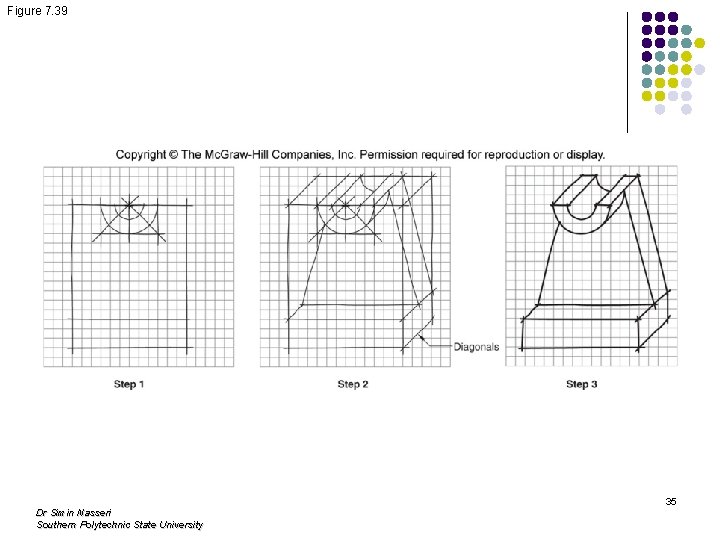
Figure 7. 39 Dr Simin Nasseri Southern Polytechnic State University 35