Chapter 6 Concept Modeling Concept Modeling Contents Concept

![Workshop 6 -1, Line and Surface Bodies [Sketch] > Rectangle 1. Place the cursor Workshop 6 -1, Line and Surface Bodies [Sketch] > Rectangle 1. Place the cursor](https://slidetodoc.com/presentation_image_h/e406fc4a326c43706995269bf18b5bff/image-35.jpg)
![Workshop 6 -1, Line and Surface Bodies [Sketch] > Dimension > General Horizontal = Workshop 6 -1, Line and Surface Bodies [Sketch] > Dimension > General Horizontal =](https://slidetodoc.com/presentation_image_h/e406fc4a326c43706995269bf18b5bff/image-36.jpg)
![Workshop 6 -1, Line and Surface Bodies Training Manual [Sketch] > Draw > Line Workshop 6 -1, Line and Surface Bodies Training Manual [Sketch] > Draw > Line](https://slidetodoc.com/presentation_image_h/e406fc4a326c43706995269bf18b5bff/image-37.jpg)
![Workshop 6 -1, Line and Surface Bodies [Main Menu] > Concept > Lines From Workshop 6 -1, Line and Surface Bodies [Main Menu] > Concept > Lines From](https://slidetodoc.com/presentation_image_h/e406fc4a326c43706995269bf18b5bff/image-38.jpg)
![Workshop 6 -1, Line and Surface Bodies [Main Menu] > Concept > Cross Section Workshop 6 -1, Line and Surface Bodies [Main Menu] > Concept > Cross Section](https://slidetodoc.com/presentation_image_h/e406fc4a326c43706995269bf18b5bff/image-39.jpg)
![Workshop 6 -1, Line and Surface Bodies [Main Menu] > View > Show Cross Workshop 6 -1, Line and Surface Bodies [Main Menu] > View > Show Cross](https://slidetodoc.com/presentation_image_h/e406fc4a326c43706995269bf18b5bff/image-41.jpg)
![Workshop 6 -1, Line and Surface Bodies Training Manual 10. [Main Menu] > Concept Workshop 6 -1, Line and Surface Bodies Training Manual 10. [Main Menu] > Concept](https://slidetodoc.com/presentation_image_h/e406fc4a326c43706995269bf18b5bff/image-42.jpg)
- Slides: 46

Chapter 6 Concept Modeling

Concept Modeling Contents Concept Modeling • Creating Line Bodies • Modifying Line Bodies • Cross Section Alignment • Cross Section Offset • Surfaces From Lines • Edge Joints • Workshop 6 -1, Line and Surface Bodies ANSYS Workbench - Design. Modeler • Training Manual December 17, 2004 Inventory #002176 6 -2

Concept Modeling Training Manual The features in the Concept menu are used to create and modify line bodies and/or surface bodies which become FE beam or shell models. • To begin Concept Modeling, you can either: – Create line or surface bodies using the features in the Draw toolbox to design a 2 D sketch and/or generate a 3 D model – Use the Import external geometry file feature • Line bodies can be created using the concept modeling tools: – Lines from points – Lines from sketches – Lines from edges • Surface bodies can be created using the concept modeling tools: – Surfaces from lines – Surfaces from sketches ANSYS Workbench - Design. Modeler • December 17, 2004 Inventory #002176 6 -3

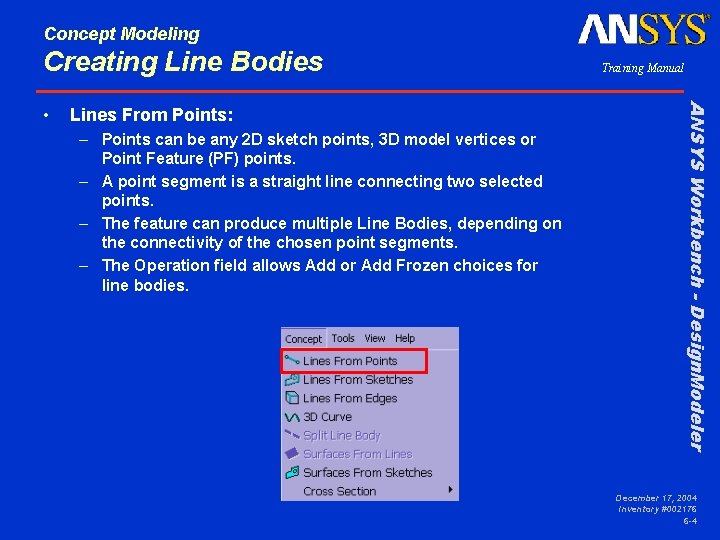
Concept Modeling Creating Line Bodies Lines From Points: – Points can be any 2 D sketch points, 3 D model vertices or Point Feature (PF) points. – A point segment is a straight line connecting two selected points. – The feature can produce multiple Line Bodies, depending on the connectivity of the chosen point segments. – The Operation field allows Add or Add Frozen choices for line bodies. ANSYS Workbench - Design. Modeler • Training Manual December 17, 2004 Inventory #002176 6 -4

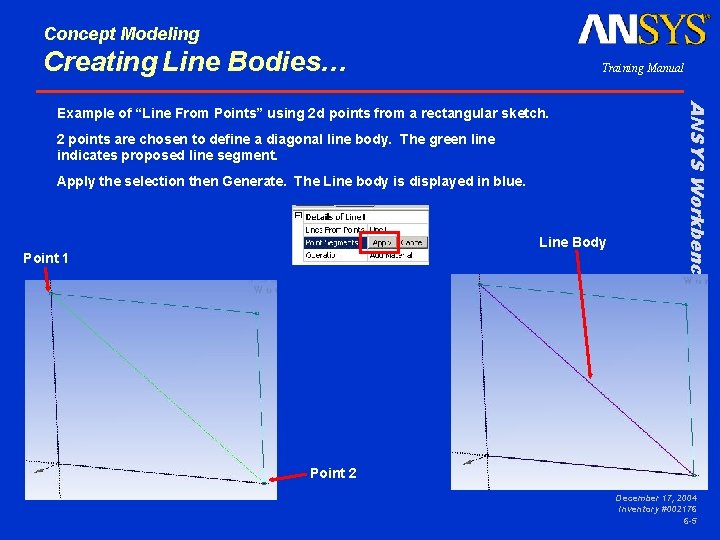
Concept Modeling Creating Line Bodies… Training Manual 2 points are chosen to define a diagonal line body. The green line indicates proposed line segment. Apply the selection then Generate. The Line body is displayed in blue. Line Body Point 1 ANSYS Workbench - Design. Modeler Example of “Line From Points” using 2 d points from a rectangular sketch. Point 2 December 17, 2004 Inventory #002176 6 -5

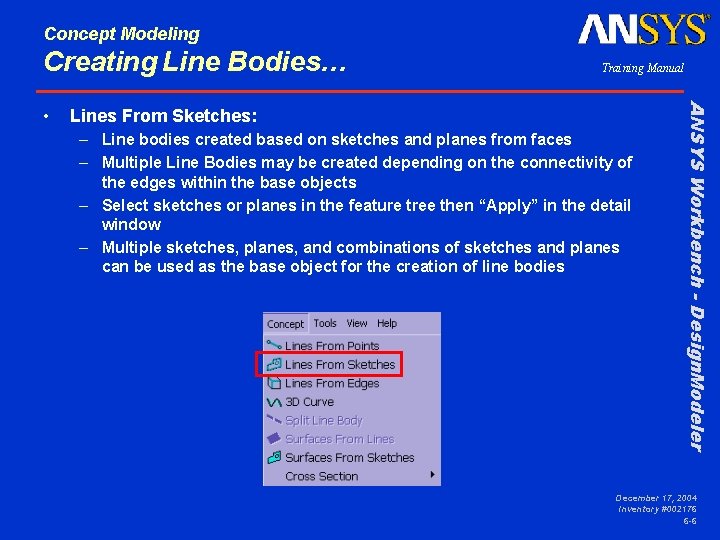
Concept Modeling Creating Line Bodies… Lines From Sketches: – Line bodies created based on sketches and planes from faces – Multiple Line Bodies may be created depending on the connectivity of the edges within the base objects – Select sketches or planes in the feature tree then “Apply” in the detail window – Multiple sketches, planes, and combinations of sketches and planes can be used as the base object for the creation of line bodies ANSYS Workbench - Design. Modeler • Training Manual December 17, 2004 Inventory #002176 6 -6

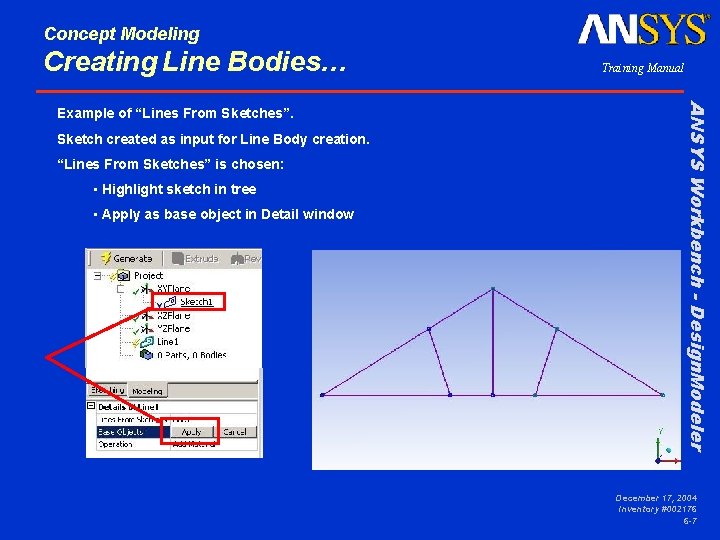
Concept Modeling Creating Line Bodies… Sketch created as input for Line Body creation. “Lines From Sketches” is chosen: • Highlight sketch in tree • Apply as base object in Detail window ANSYS Workbench - Design. Modeler Example of “Lines From Sketches”. Training Manual December 17, 2004 Inventory #002176 6 -7

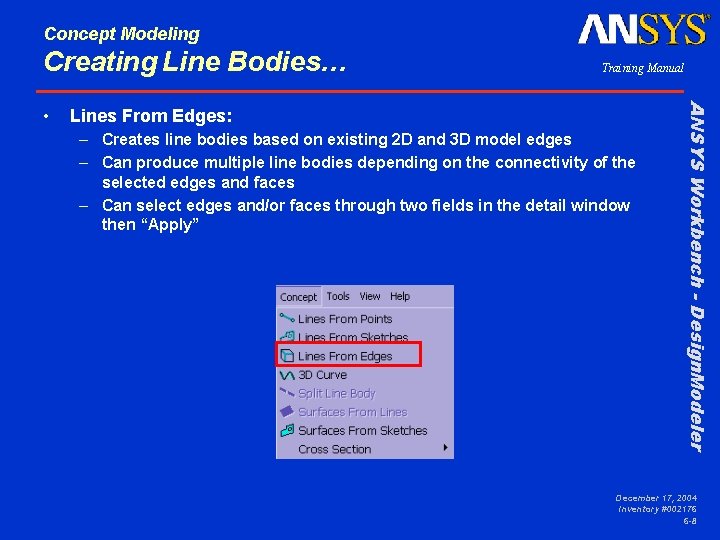
Concept Modeling Creating Line Bodies… Lines From Edges: – Creates line bodies based on existing 2 D and 3 D model edges – Can produce multiple line bodies depending on the connectivity of the selected edges and faces – Can select edges and/or faces through two fields in the detail window then “Apply” ANSYS Workbench - Design. Modeler • Training Manual December 17, 2004 Inventory #002176 6 -8

Concept Modeling Creating Line Bodies… Training Manual “Lines From Edges” is chosen: • Select faces on model. Face boundaries will become line bodies (alternately select 3 d edges directly). • Apply as base object in Detail window • Note: in this case 2 line bodies are created due to the edge connectivity. ANSYS Workbench - Design. Modeler Example of “Lines From Edges”. 3 D solid created as input for Line Body creation. December 17, 2004 Inventory #002176 6 -9

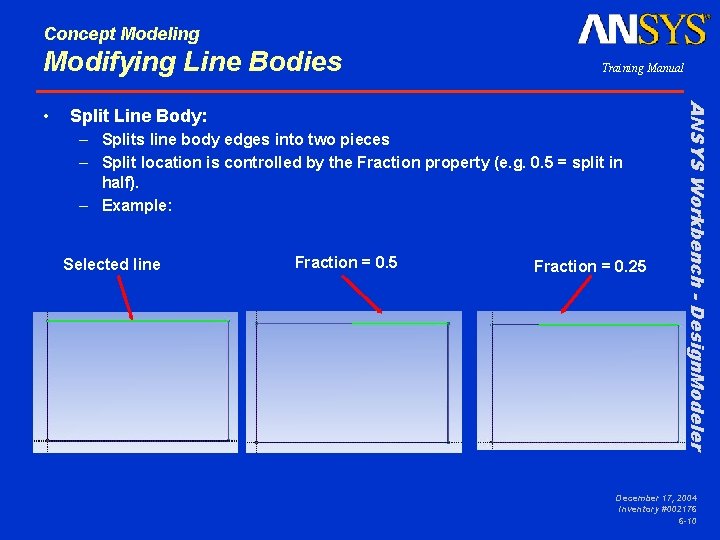
Concept Modeling Modifying Line Bodies Split Line Body: – Splits line body edges into two pieces – Split location is controlled by the Fraction property (e. g. 0. 5 = split in half). – Example: Selected line Fraction = 0. 5 Fraction = 0. 25 ANSYS Workbench - Design. Modeler • Training Manual December 17, 2004 Inventory #002176 6 -10

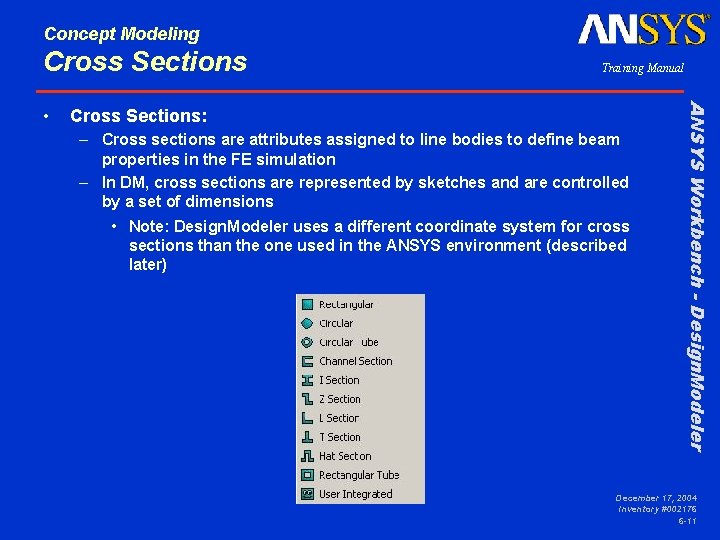
Concept Modeling Cross Sections: – Cross sections are attributes assigned to line bodies to define beam properties in the FE simulation – In DM, cross sections are represented by sketches and are controlled by a set of dimensions • Note: Design. Modeler uses a different coordinate system for cross sections than the one used in the ANSYS environment (described later) ANSYS Workbench - Design. Modeler • Training Manual December 17, 2004 Inventory #002176 6 -11

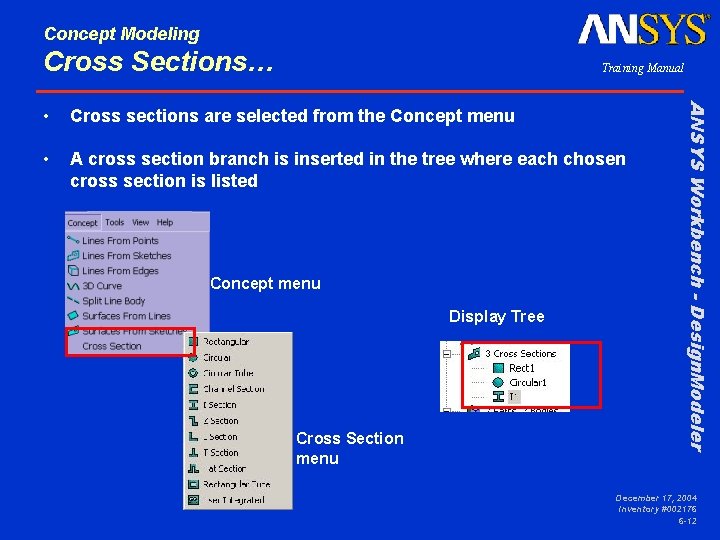
Concept Modeling Cross Sections… Training Manual Cross sections are selected from the Concept menu • A cross section branch is inserted in the tree where each chosen cross section is listed Concept menu Display Tree Cross Section menu ANSYS Workbench - Design. Modeler • December 17, 2004 Inventory #002176 6 -12

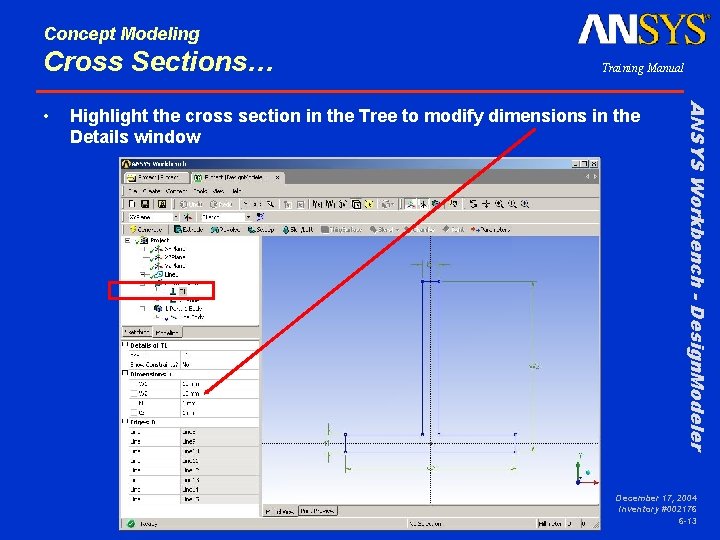
Concept Modeling Cross Sections… Highlight the cross section in the Tree to modify dimensions in the Details window ANSYS Workbench - Design. Modeler • Training Manual December 17, 2004 Inventory #002176 6 -13

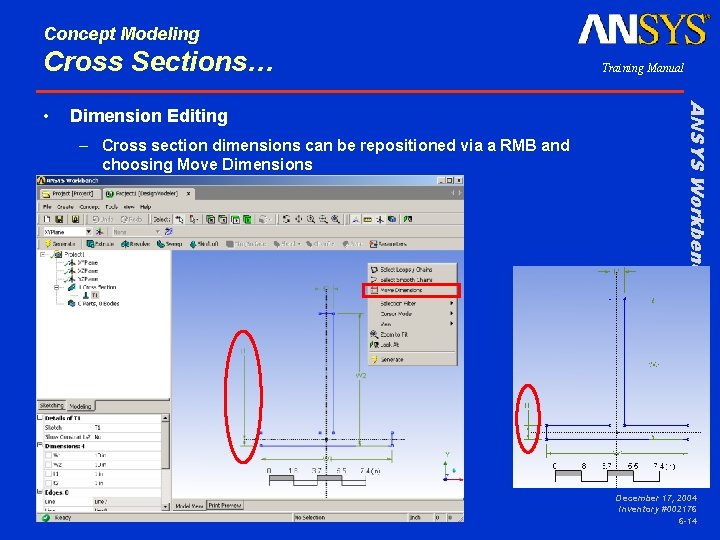
Concept Modeling Cross Sections… Dimension Editing – Cross section dimensions can be repositioned via a RMB and choosing Move Dimensions ANSYS Workbench - Design. Modeler • Training Manual December 17, 2004 Inventory #002176 6 -14

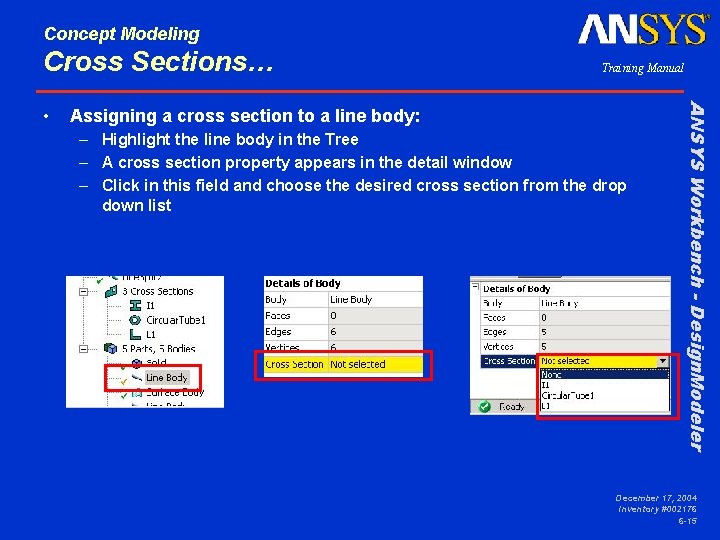
Concept Modeling Cross Sections… Assigning a cross section to a line body: – Highlight the line body in the Tree – A cross section property appears in the detail window – Click in this field and choose the desired cross section from the drop down list ANSYS Workbench - Design. Modeler • Training Manual December 17, 2004 Inventory #002176 6 -15

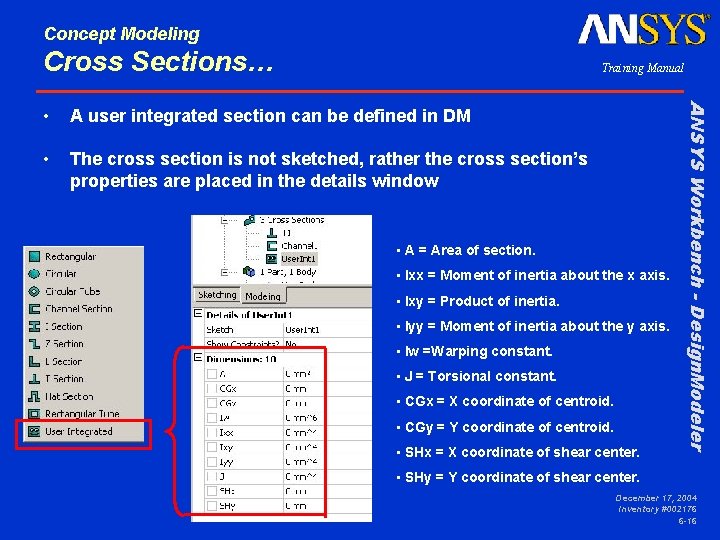
Concept Modeling Cross Sections… Training Manual A user integrated section can be defined in DM • The cross section is not sketched, rather the cross section’s properties are placed in the details window • A = Area of section. • Ixx = Moment of inertia about the x axis. • Ixy = Product of inertia. • Iyy = Moment of inertia about the y axis. • Iw =Warping constant. • J = Torsional constant. • CGx = X coordinate of centroid. • CGy = Y coordinate of centroid. • SHx = X coordinate of shear center. ANSYS Workbench - Design. Modeler • • SHy = Y coordinate of shear center. December 17, 2004 Inventory #002176 6 -16

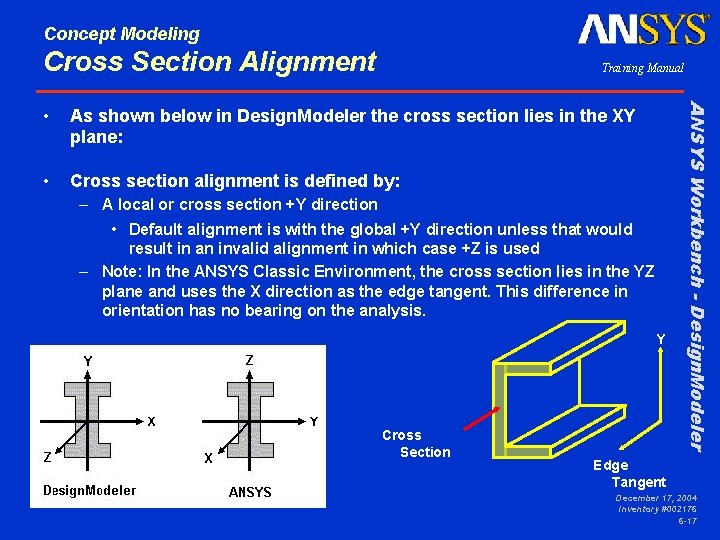
Concept Modeling Cross Section Alignment Training Manual As shown below in Design. Modeler the cross section lies in the XY plane: • Cross section alignment is defined by: – A local or cross section +Y direction • Default alignment is with the global +Y direction unless that would result in an invalid alignment in which case +Z is used – Note: In the ANSYS Classic Environment, the cross section lies in the YZ plane and uses the X direction as the edge tangent. This difference in orientation has no bearing on the analysis. Y Cross Section ANSYS Workbench - Design. Modeler • Edge Tangent December 17, 2004 Inventory #002176 6 -17

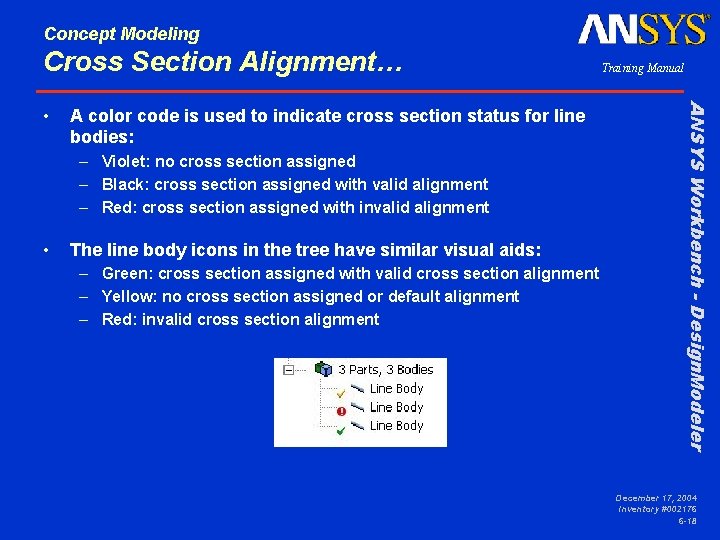
Concept Modeling Cross Section Alignment… A color code is used to indicate cross section status for line bodies: – Violet: no cross section assigned – Black: cross section assigned with valid alignment – Red: cross section assigned with invalid alignment • The line body icons in the tree have similar visual aids: – Green: cross section assigned with valid cross section alignment – Yellow: no cross section assigned or default alignment – Red: invalid cross section alignment ANSYS Workbench - Design. Modeler • Training Manual December 17, 2004 Inventory #002176 6 -18

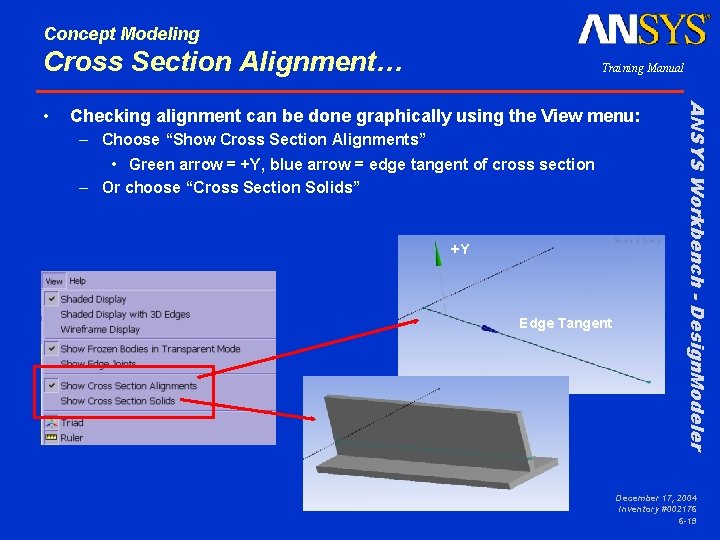
Concept Modeling Cross Section Alignment… Checking alignment can be done graphically using the View menu: – Choose “Show Cross Section Alignments” • Green arrow = +Y, blue arrow = edge tangent of cross section – Or choose “Cross Section Solids” +Y Edge Tangent ANSYS Workbench - Design. Modeler • Training Manual December 17, 2004 Inventory #002176 6 -19

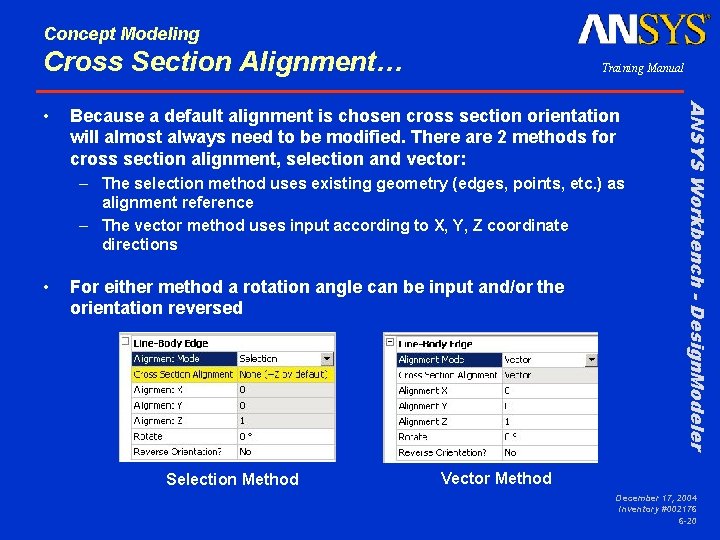
Concept Modeling Cross Section Alignment… Because a default alignment is chosen cross section orientation will almost always need to be modified. There are 2 methods for cross section alignment, selection and vector: – The selection method uses existing geometry (edges, points, etc. ) as alignment reference – The vector method uses input according to X, Y, Z coordinate directions • For either method a rotation angle can be input and/or the orientation reversed Selection Method ANSYS Workbench - Design. Modeler • Training Manual Vector Method December 17, 2004 Inventory #002176 6 -20

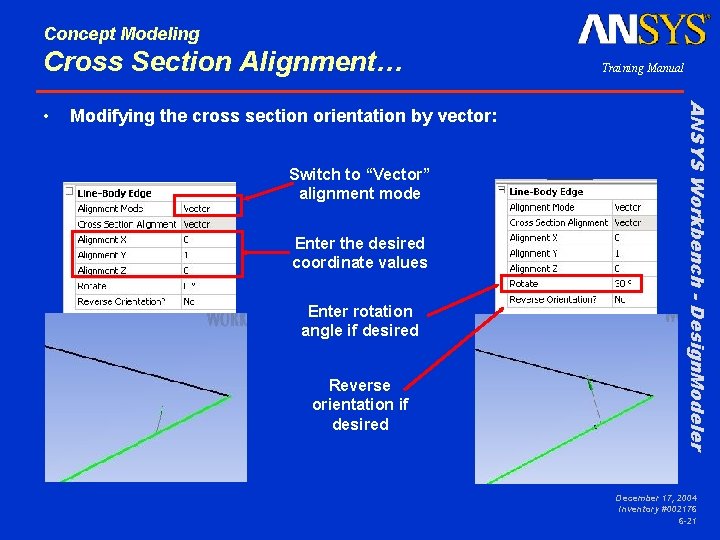
Concept Modeling Cross Section Alignment… Modifying the cross section orientation by vector: Switch to “Vector” alignment mode Enter the desired coordinate values Enter rotation angle if desired Reverse orientation if desired ANSYS Workbench - Design. Modeler • Training Manual December 17, 2004 Inventory #002176 6 -21

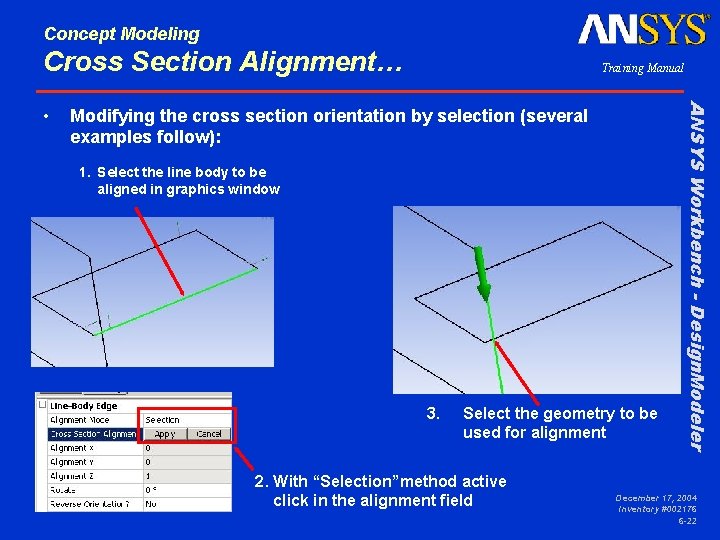
Concept Modeling Cross Section Alignment… Modifying the cross section orientation by selection (several examples follow): 1. Select the line body to be aligned in graphics window 3. Select the geometry to be used for alignment 2. With “Selection”method active click in the alignment field ANSYS Workbench - Design. Modeler • Training Manual December 17, 2004 Inventory #002176 6 -22

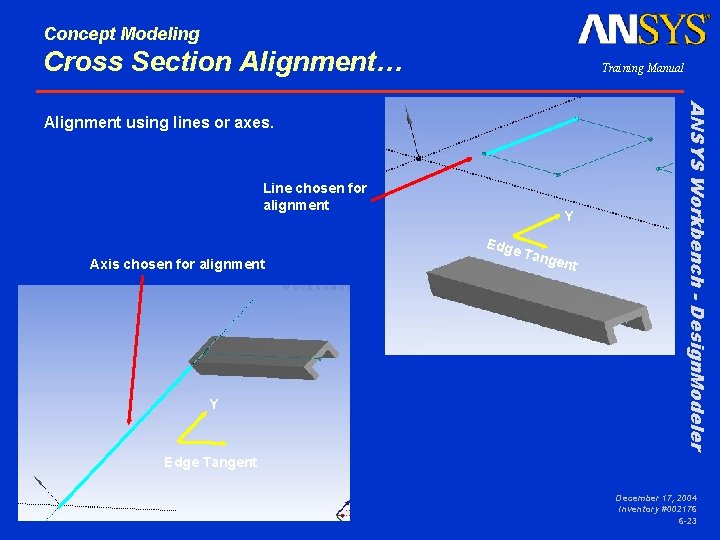
Concept Modeling Cross Section Alignment… Training Manual Line chosen for alignment Axis chosen for alignment Y Y Edge Tang ent ANSYS Workbench - Design. Modeler Alignment using lines or axes. Edge Tangent December 17, 2004 Inventory #002176 6 -23

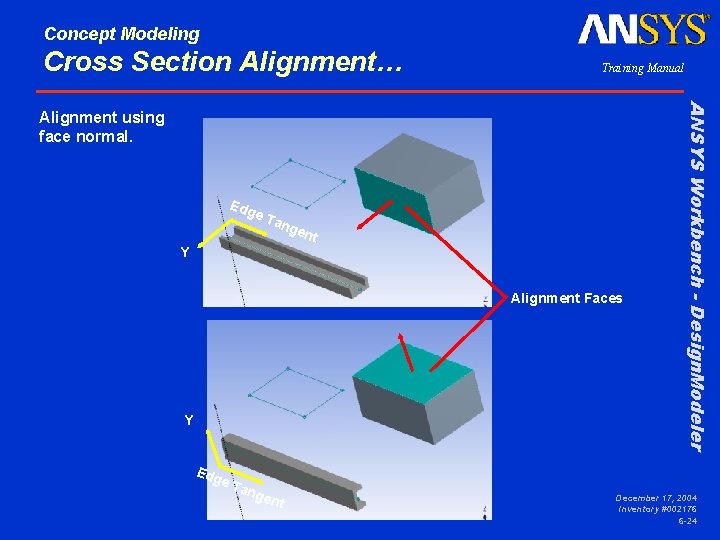
Concept Modeling Cross Section Alignment… Training Manual Edg e. T Y ang ent Alignment Faces Y Edg e. T ang e nt ANSYS Workbench - Design. Modeler Alignment using face normal. December 17, 2004 Inventory #002176 6 -24

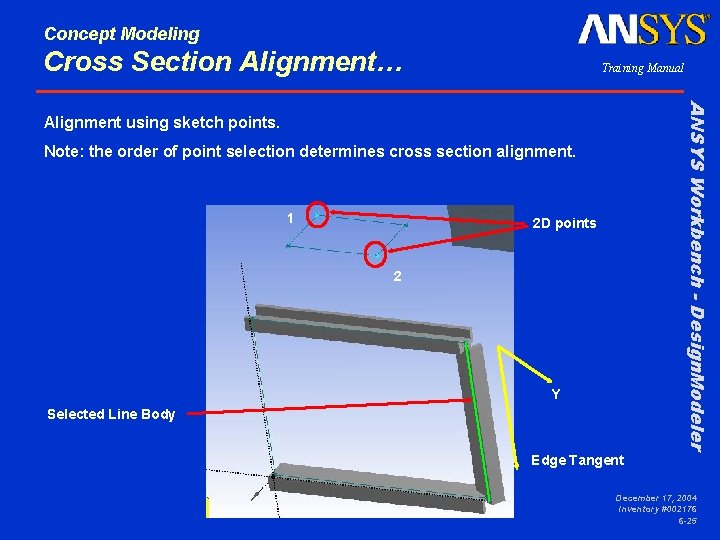
Concept Modeling Cross Section Alignment… Training Manual ANSYS Workbench - Design. Modeler Alignment using sketch points. Note: the order of point selection determines cross section alignment. 1 2 D points 2 Y Selected Line Body Edge Tangent December 17, 2004 Inventory #002176 6 -25

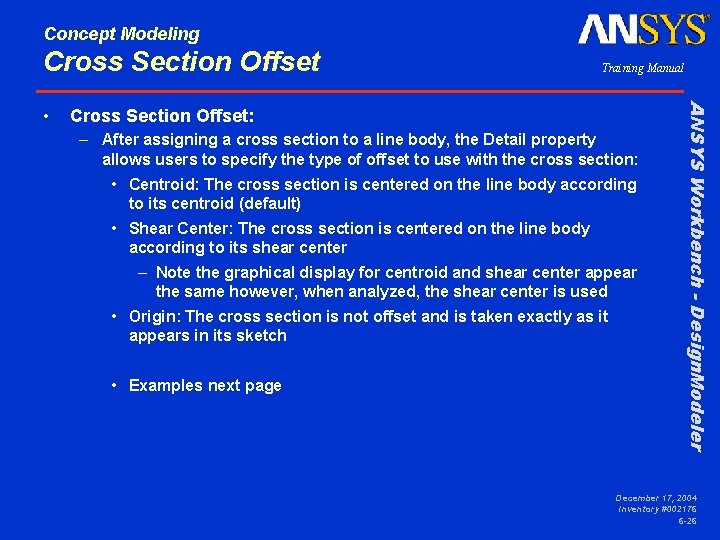
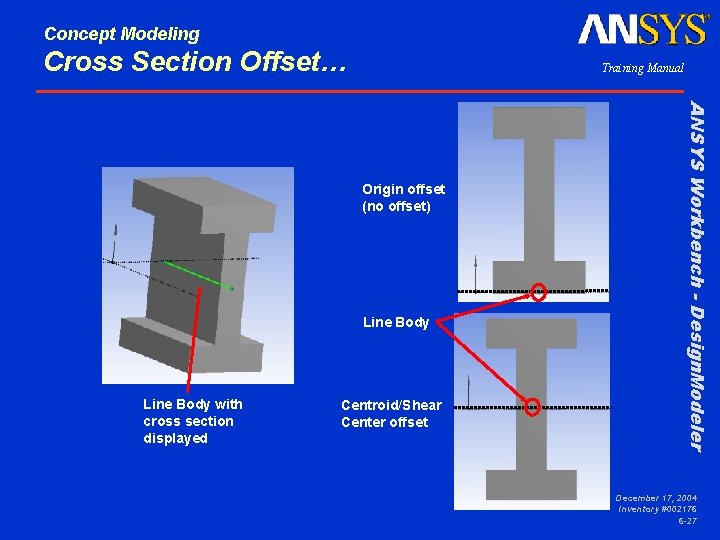
Concept Modeling Cross Section Offset: – After assigning a cross section to a line body, the Detail property allows users to specify the type of offset to use with the cross section: • Centroid: The cross section is centered on the line body according to its centroid (default) • Shear Center: The cross section is centered on the line body according to its shear center – Note the graphical display for centroid and shear center appear the same however, when analyzed, the shear center is used • Origin: The cross section is not offset and is taken exactly as it appears in its sketch • Examples next page ANSYS Workbench - Design. Modeler • Training Manual December 17, 2004 Inventory #002176 6 -26

Concept Modeling Cross Section Offset… Training Manual Line Body with cross section displayed Centroid/Shear Center offset ANSYS Workbench - Design. Modeler Origin offset (no offset) December 17, 2004 Inventory #002176 6 -27

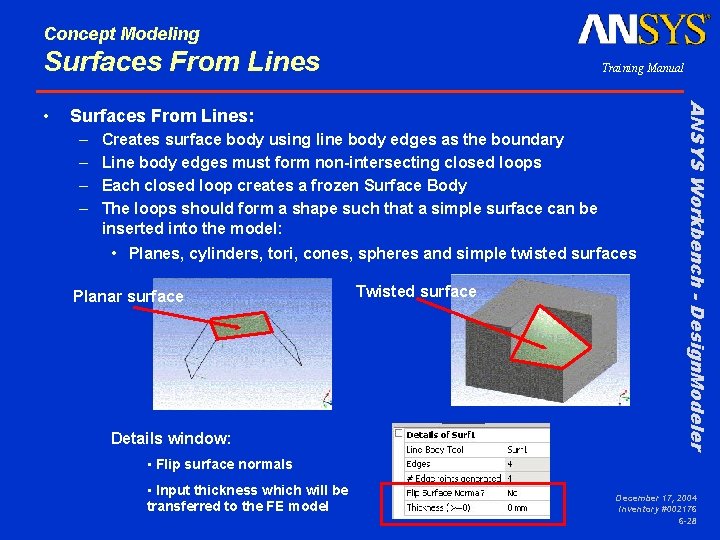
Concept Modeling Surfaces From Lines: – – Creates surface body using line body edges as the boundary Line body edges must form non-intersecting closed loops Each closed loop creates a frozen Surface Body The loops should form a shape such that a simple surface can be inserted into the model: • Planes, cylinders, tori, cones, spheres and simple twisted surfaces Planar surface Details window: Twisted surface ANSYS Workbench - Design. Modeler • Training Manual • Flip surface normals • Input thickness which will be transferred to the FE model December 17, 2004 Inventory #002176 6 -28

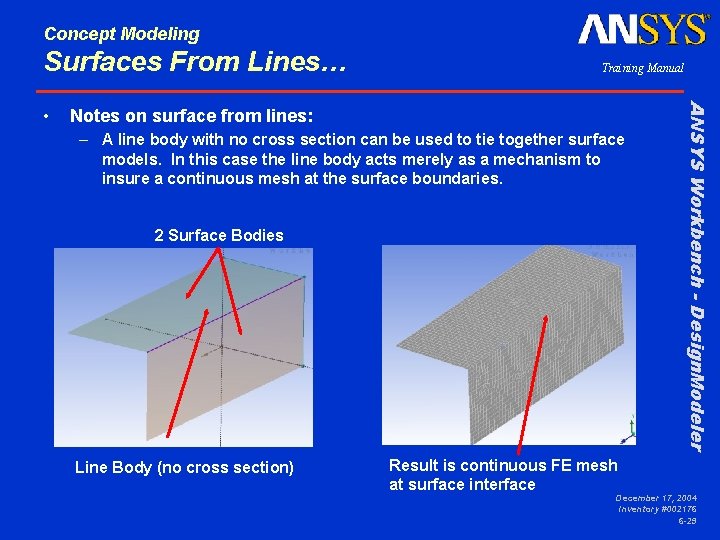
Concept Modeling Surfaces From Lines… Notes on surface from lines: – A line body with no cross section can be used to tie together surface models. In this case the line body acts merely as a mechanism to insure a continuous mesh at the surface boundaries. 2 Surface Bodies Line Body (no cross section) Result is continuous FE mesh at surface interface ANSYS Workbench - Design. Modeler • Training Manual December 17, 2004 Inventory #002176 6 -29

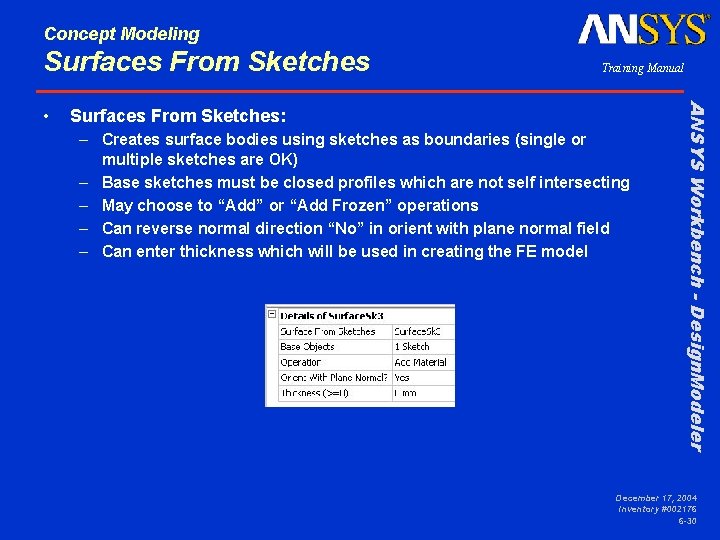
Concept Modeling Surfaces From Sketches: – Creates surface bodies using sketches as boundaries (single or multiple sketches are OK) – Base sketches must be closed profiles which are not self intersecting – May choose to “Add” or “Add Frozen” operations – Can reverse normal direction “No” in orient with plane normal field – Can enter thickness which will be used in creating the FE model ANSYS Workbench - Design. Modeler • Training Manual December 17, 2004 Inventory #002176 6 -30

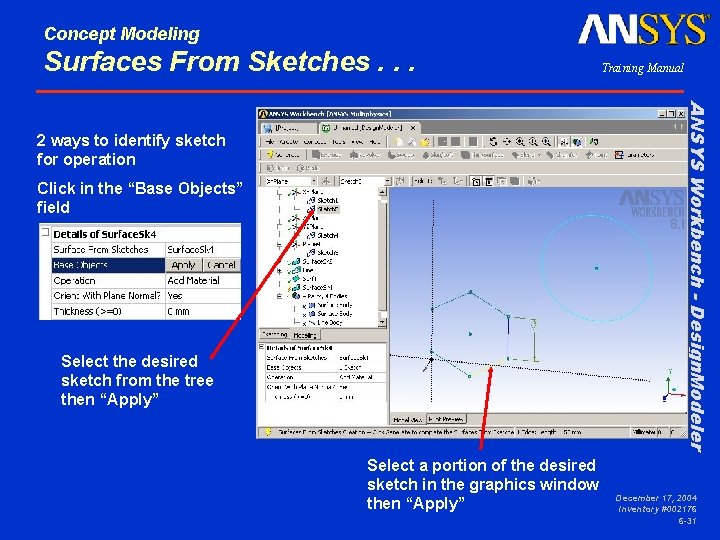
Concept Modeling Surfaces From Sketches. . . Training Manual ANSYS Workbench - Design. Modeler 2 ways to identify sketch for operation Click in the “Base Objects” field Select the desired sketch from the tree then “Apply” Select a portion of the desired sketch in the graphics window then “Apply” December 17, 2004 Inventory #002176 6 -31

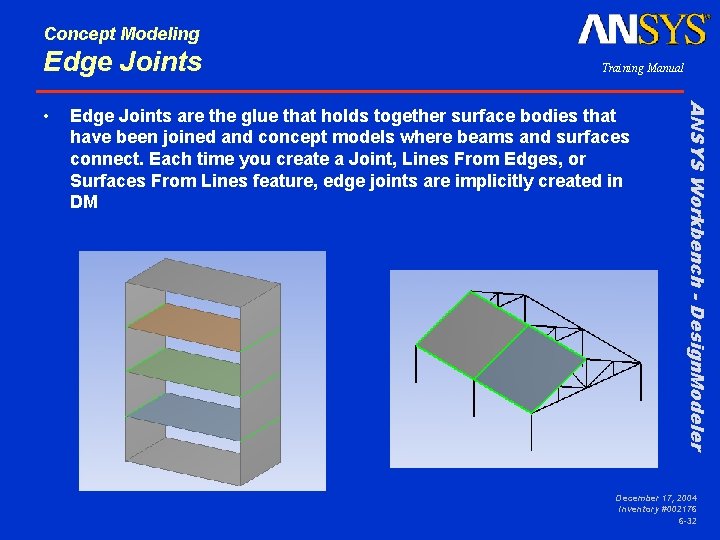
Concept Modeling Edge Joints are the glue that holds together surface bodies that have been joined and concept models where beams and surfaces connect. Each time you create a Joint, Lines From Edges, or Surfaces From Lines feature, edge joints are implicitly created in DM ANSYS Workbench - Design. Modeler • Training Manual December 17, 2004 Inventory #002176 6 -32

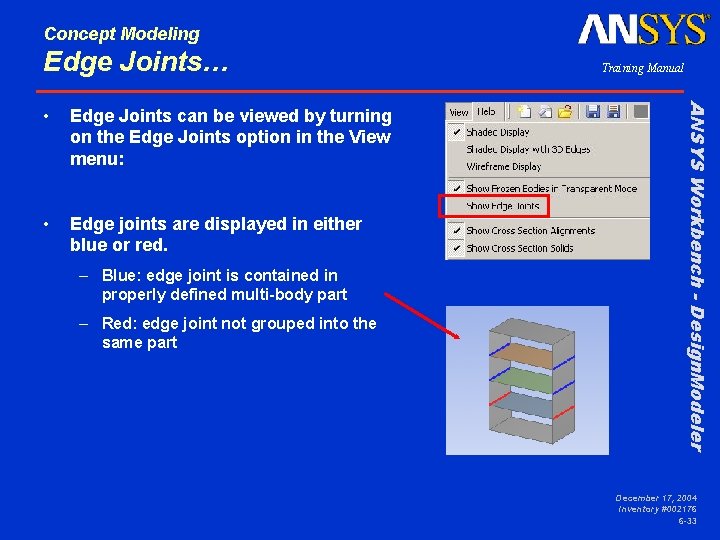
Concept Modeling Edge Joints… Edge Joints can be viewed by turning on the Edge Joints option in the View menu: • Edge joints are displayed in either blue or red. – Blue: edge joint is contained in properly defined multi-body part – Red: edge joint not grouped into the same part ANSYS Workbench - Design. Modeler • Training Manual December 17, 2004 Inventory #002176 6 -33

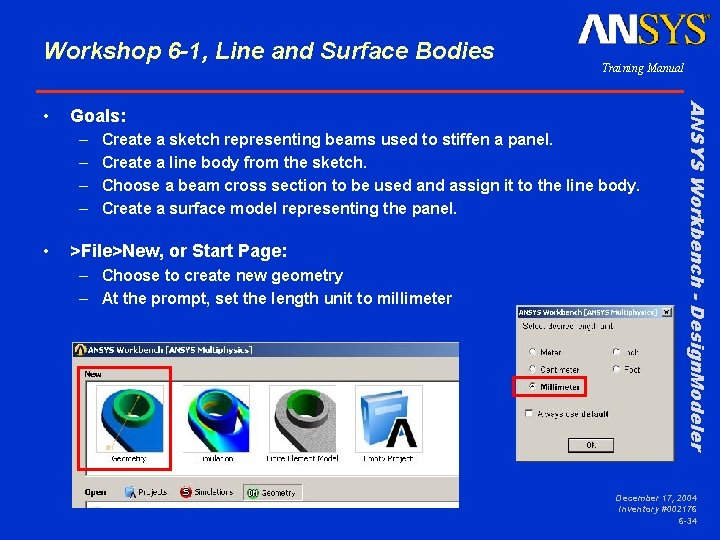
Workshop 6 -1, Line and Surface Bodies Goals: – – • Create a sketch representing beams used to stiffen a panel. Create a line body from the sketch. Choose a beam cross section to be used and assign it to the line body. Create a surface model representing the panel. >File>New, or Start Page: – Choose to create new geometry – At the prompt, set the length unit to millimeter ANSYS Workbench - Design. Modeler • Training Manual December 17, 2004 Inventory #002176 6 -34
![Workshop 6 1 Line and Surface Bodies Sketch Rectangle 1 Place the cursor Workshop 6 -1, Line and Surface Bodies [Sketch] > Rectangle 1. Place the cursor](https://slidetodoc.com/presentation_image_h/e406fc4a326c43706995269bf18b5bff/image-35.jpg)
Workshop 6 -1, Line and Surface Bodies [Sketch] > Rectangle 1. Place the cursor near the origin until ‘P’ appears, click then drag to define the rectangle Click “>Look At” & “>Zoom to Fit” tool buttons, and Triad ISO Ball as desired. 1 ANSYS Workbench - Design. Modeler Create a rectangle Training Manual December 17, 2004 Inventory #002176 6 -35
![Workshop 6 1 Line and Surface Bodies Sketch Dimension General Horizontal Workshop 6 -1, Line and Surface Bodies [Sketch] > Dimension > General Horizontal =](https://slidetodoc.com/presentation_image_h/e406fc4a326c43706995269bf18b5bff/image-36.jpg)
Workshop 6 -1, Line and Surface Bodies [Sketch] > Dimension > General Horizontal = 600 mm Vertical = 300 mm Fit the sketch and move dimensions as necessary [Sketch] > Dimension > Move ANSYS Workbench - Design. Modeler Dimension the rectangle 600 X 300 mm as shown Training Manual December 17, 2004 Inventory #002176 6 -36
![Workshop 6 1 Line and Surface Bodies Training Manual Sketch Draw Line Workshop 6 -1, Line and Surface Bodies Training Manual [Sketch] > Draw > Line](https://slidetodoc.com/presentation_image_h/e406fc4a326c43706995269bf18b5bff/image-37.jpg)
Workshop 6 -1, Line and Surface Bodies Training Manual [Sketch] > Draw > Line 2. 3. Place the cursor near the top line until the ‘C’ coincidence constraint appears. Move the cursor to the bottom line until the ‘C’ appears and a ‘V’ indicating a vertical constraint. Repeat for second line Apply horizontal dimensions as shown. [Sketch] > Dimension > Horizontal Adjust Details so all dimensions are as indicated 2 3 ANSYS Workbench - Design. Modeler Add 2 vertical lines and dimension as shown December 17, 2004 Inventory #002176 6 -37
![Workshop 6 1 Line and Surface Bodies Main Menu Concept Lines From Workshop 6 -1, Line and Surface Bodies [Main Menu] > Concept > Lines From](https://slidetodoc.com/presentation_image_h/e406fc4a326c43706995269bf18b5bff/image-38.jpg)
Workshop 6 -1, Line and Surface Bodies [Main Menu] > Concept > Lines From Sketches 4. Select “Sketch 1” from the Tree (click the “+” near the XYPlane to expand that branch if necessary) and “>Details>Apply” it as the base object 5. Click >Generate 5 4 ANSYS Workbench - Design. Modeler Create a Line Body from Sketch 1 Training Manual December 17, 2004 Inventory #002176 6 -38
![Workshop 6 1 Line and Surface Bodies Main Menu Concept Cross Section Workshop 6 -1, Line and Surface Bodies [Main Menu] > Concept > Cross Section](https://slidetodoc.com/presentation_image_h/e406fc4a326c43706995269bf18b5bff/image-39.jpg)
Workshop 6 -1, Line and Surface Bodies [Main Menu] > Concept > Cross Section > Rectangular Tube After selection, the cross section is displayed with its dimensions. In this case we will use the default dimensions. If desired the cross section Details can be changed to modify the cross section. ANSYS Workbench - Design. Modeler Select a rectangular tube type cross section: Training Manual December 17, 2004 Inventory #002176 6 -39

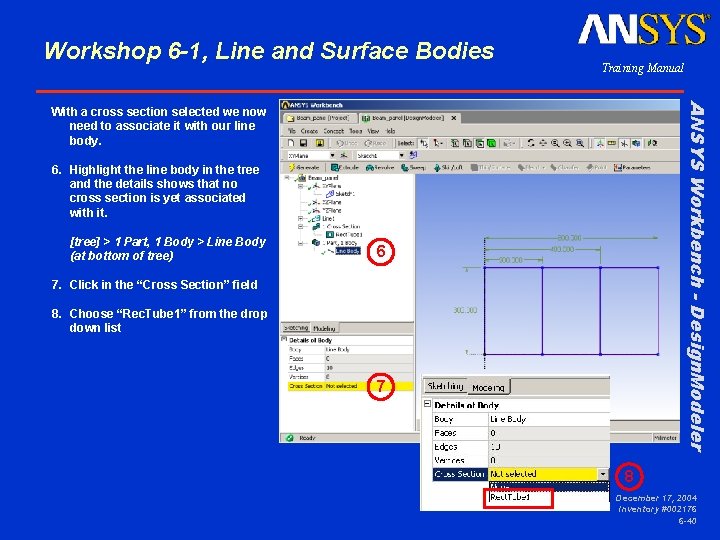
Workshop 6 -1, Line and Surface Bodies Training Manual ANSYS Workbench - Design. Modeler With a cross section selected we now need to associate it with our line body. 6. Highlight the line body in the tree and the details shows that no cross section is yet associated with it. [tree] > 1 Part, 1 Body > Line Body (at bottom of tree) 6 7. Click in the “Cross Section” field 8. Choose “Rec. Tube 1” from the drop down list 7 8 December 17, 2004 Inventory #002176 6 -40
![Workshop 6 1 Line and Surface Bodies Main Menu View Show Cross Workshop 6 -1, Line and Surface Bodies [Main Menu] > View > Show Cross](https://slidetodoc.com/presentation_image_h/e406fc4a326c43706995269bf18b5bff/image-41.jpg)
Workshop 6 -1, Line and Surface Bodies [Main Menu] > View > Show Cross Sections Solids ANSYS Workbench - Design. Modeler After assigning the cross section to the line body the default display shows the line body with its cross section alignment (see right). We can also display the beam with the cross section displayed as a solid. Training Manual December 17, 2004 Inventory #002176 6 -41
![Workshop 6 1 Line and Surface Bodies Training Manual 10 Main Menu Concept Workshop 6 -1, Line and Surface Bodies Training Manual 10. [Main Menu] > Concept](https://slidetodoc.com/presentation_image_h/e406fc4a326c43706995269bf18b5bff/image-42.jpg)
Workshop 6 -1, Line and Surface Bodies Training Manual 10. [Main Menu] > Concept > Surfaces From Lines 10 Hold the control key and select the 4 lines shown at right. (or can hold down LMB and sweep mouse over lines to be group selected) 11. >Apply 11 ANSYS Workbench - Design. Modeler The next step is to create the surfaces between the beams. These surfaces will be shell meshed in the FE simulation. December 17, 2004 Inventory #002176 6 -42

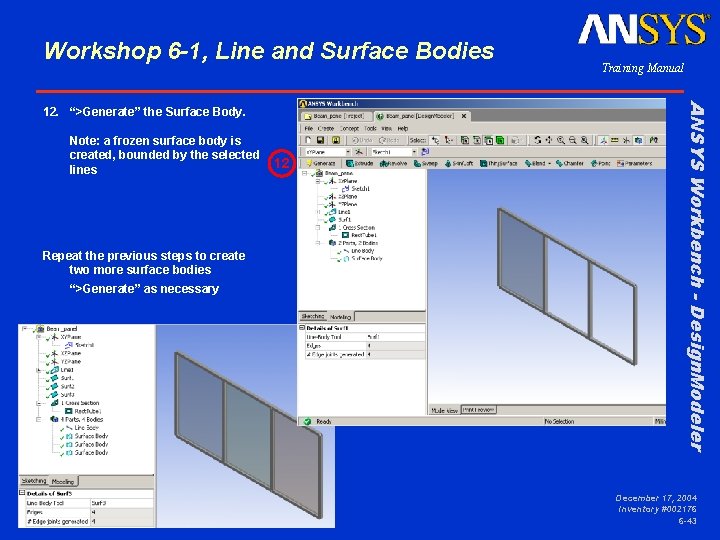
Workshop 6 -1, Line and Surface Bodies Note: a frozen surface body is created, bounded by the selected lines Repeat the previous steps to create two more surface bodies “>Generate” as necessary 12 ANSYS Workbench - Design. Modeler 12. “>Generate” the Surface Body. Training Manual December 17, 2004 Inventory #002176 6 -43

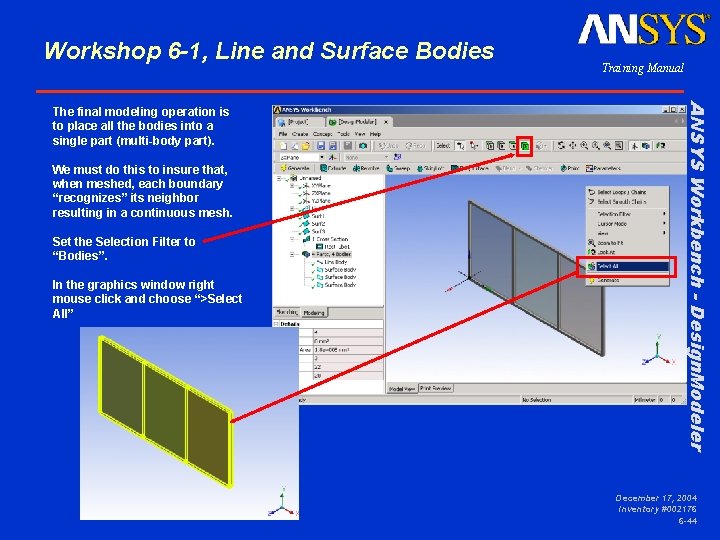
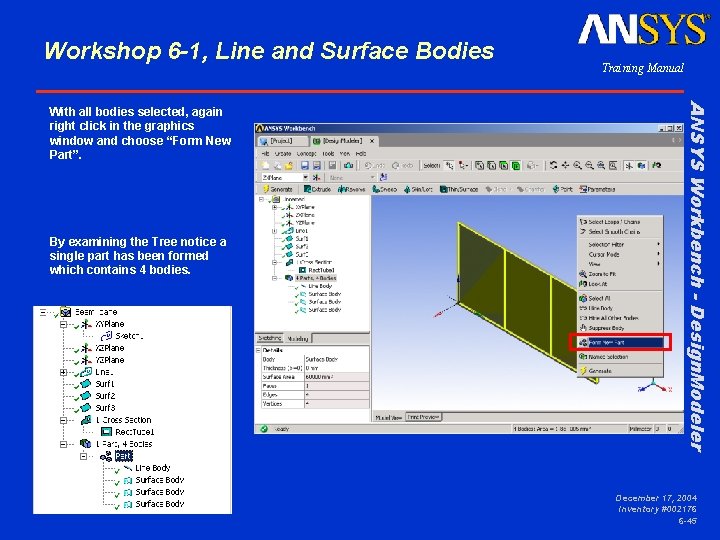
Workshop 6 -1, Line and Surface Bodies We must do this to insure that, when meshed, each boundary “recognizes” its neighbor resulting in a continuous mesh. Set the Selection Filter to “Bodies”. In the graphics window right mouse click and choose “>Select All” ANSYS Workbench - Design. Modeler The final modeling operation is to place all the bodies into a single part (multi-body part). Training Manual December 17, 2004 Inventory #002176 6 -44

Workshop 6 -1, Line and Surface Bodies By examining the Tree notice a single part has been formed which contains 4 bodies. ANSYS Workbench - Design. Modeler With all bodies selected, again right click in the graphics window and choose “Form New Part”. Training Manual December 17, 2004 Inventory #002176 6 -45

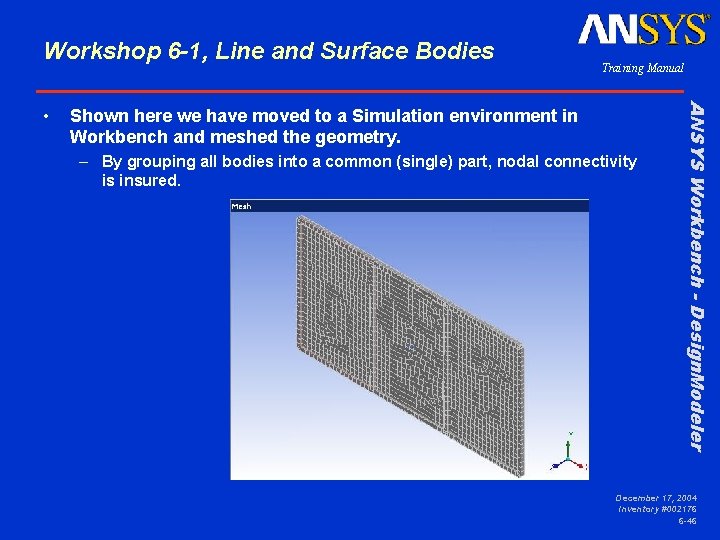
Workshop 6 -1, Line and Surface Bodies Shown here we have moved to a Simulation environment in Workbench and meshed the geometry. – By grouping all bodies into a common (single) part, nodal connectivity is insured. ANSYS Workbench - Design. Modeler • Training Manual December 17, 2004 Inventory #002176 6 -46