CHAPTER 5 SURFACE TECHNOLOGY SURFACE TECHNOLOGY Surface Engineering

- Slides: 35

CHAPTER 5 SURFACE TECHNOLOGY

SURFACE TECHNOLOGY Surface Engineering Friction Thin film Wear Surface Roughnes s Oil Bearing Lubrication

Introduction �A surface can be described in simple terms to be the outermost layer of an entity. � An interface can be defined to be the transition layer between two or more entities that differ either chemically or physically or in both aspects. � Surface science can be defined as a branch of science dealing with any type & any level of surface & interface interactions between two or more entities these interactions could be physical, chemical, electrical, mechanical, thermal, biological, geological, astronomical & maybe even emotional.

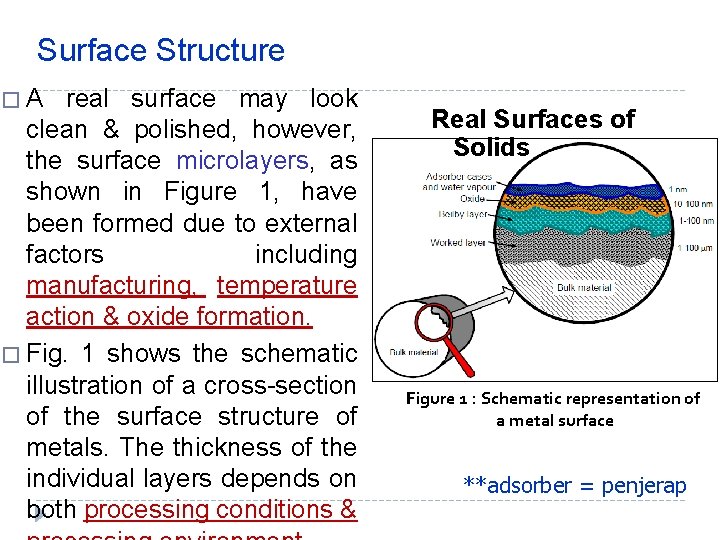
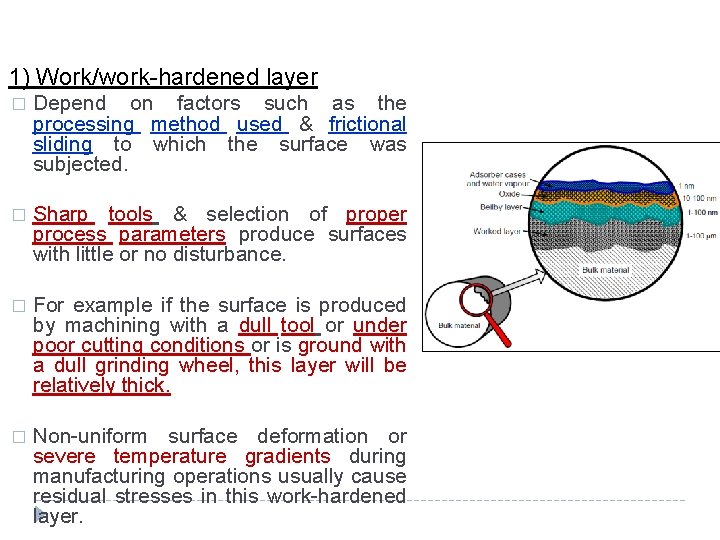
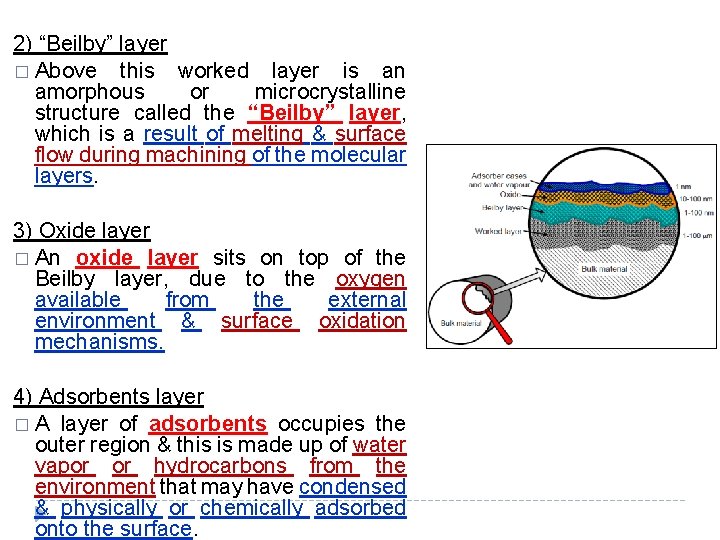
Surface Structure �A real surface may look clean & polished, however, the surface microlayers, as shown in Figure 1, have been formed due to external factors including manufacturing, temperature action & oxide formation. � Fig. 1 shows the schematic illustration of a cross-section of the surface structure of metals. The thickness of the individual layers depends on both processing conditions & Real Surfaces of Solids Figure 1 : Schematic representation of a metal surface **adsorber = penjerap

1) Work/work-hardened layer � Depend on factors such as the processing method used & frictional sliding to which the surface was subjected. � Sharp tools & selection of proper process parameters produce surfaces with little or no disturbance. � For example if the surface is produced by machining with a dull tool or under poor cutting conditions or is ground with a dull grinding wheel, this layer will be relatively thick. � Non-uniform surface deformation or severe temperature gradients during manufacturing operations usually cause residual stresses in this work-hardened layer.

2) “Beilby” layer � Above this worked layer is an amorphous or microcrystalline structure called the “Beilby” layer, which is a result of melting & surface flow during machining of the molecular layers. 3) Oxide layer � An oxide layer sits on top of the Beilby layer, due to the oxygen available from the external environment & surface oxidation mechanisms. 4) Adsorbents layer � A layer of adsorbents occupies the outer region & this is made up of water vapor or hydrocarbons from the environment that may have condensed & physically or chemically adsorbed onto the surface.

� Thus, surfaces generally have properties that are very different from those of the substrate � The oxide on a metal's surface, for example, is generally much harder than the base metal Hence oxides tend to be brittle & abrasive � The surface texture of these materials depends, as with metals, on the method of production � Environmental conditions also influence the surface characteristics of these materials

Surface Integrity � Surface integrity in the engineering sense can be defined as a set of various properties (both superficial & in-depth) of an engineering surface that affect the performance of this surface in service � These properties primarily include; surface finish, texture & profile fatigue corrosion & wear resistance adhesion & diffusion properties � Surface integrity describes not only the topological (geometric) features of surfaces & their physical & chemical properties but their mechanical & metallurgical properties & characteristics as well **integrity = kekukuhan

� Several defects caused by & produced by during component manufacturing can be responsible for inadequate surface integrity. � These defects usually are caused by a combination of factors, such as; (a) defects in the original material (b) the method by which the surface is produced machining (c) the lack of proper control of the process parameters (which can result in excessive stresses, temperatures or surface deformation).

� The following are definitions of the major surface defects found in practice; � Cracks are external or internal separations with sharp outlines. Cracks requiring a magnification of 10 X or higher to be seen by the naked eye are called microcracks. � Craters are shallow depressions. � Seams are surface defects resulting from overlapping of the material during processing. � Folds & Laps are the same as seams. � Heat-affected zone (HAZ) is the portion of a metal subjected to thermal cycling without melting. � Inclusions are small, nonmetallic elements or compounds in the metal.

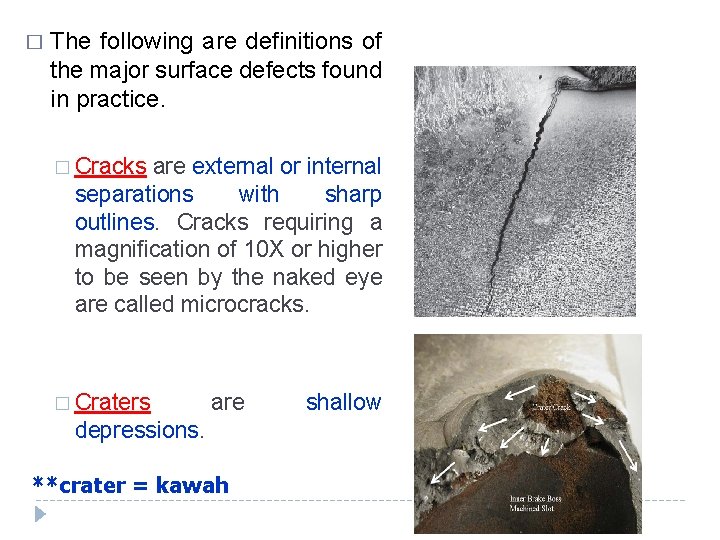
� The following are definitions of the major surface defects found in practice. � Cracks are external or internal separations with sharp outlines. Cracks requiring a magnification of 10 X or higher to be seen by the naked eye are called microcracks. � Craters are depressions. **crater = kawah shallow

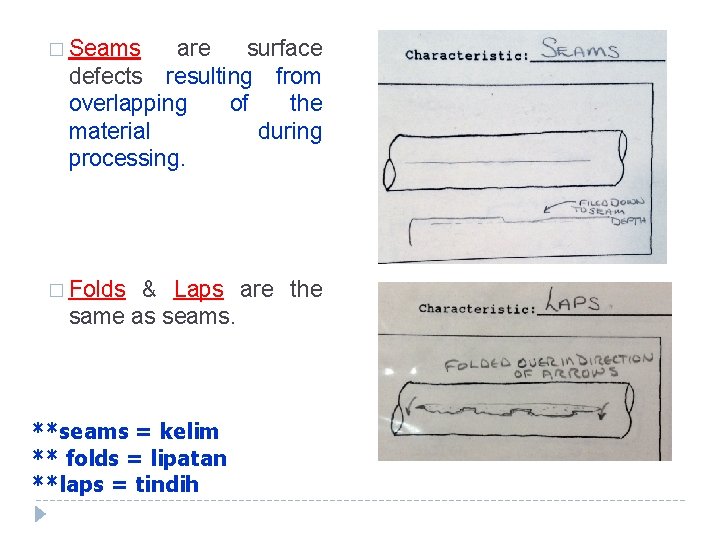
� Seams are surface defects resulting from overlapping of the material during processing. � Folds & Laps are the same as seams. **seams = kelim ** folds = lipatan **laps = tindih

Intergranular attack is the weakening of grain boundaries by liquid-metal embrittlement & corrosion. Metallurgical transformation involves microstructural changes caused by temperature & pressure cycling. Included are phase transformations, recrystallization, alloy depletion, decarburization, & molten & recast, resolidified or redeposited material as in electrical-discharge machining. Pits are shallow surface depressions usually the result of chemical or physical attack. Plastic deformation is a severe surface deformation caused by high stresses due to friction, tool & die geometry, worn tools & method of processing. Residual stresses are surface stresses (tension or compression) caused by nonuniform deformation & temperature distribution. Splatter consists of small resolidified molten metal particles deposited on a surface, as from welding & casting

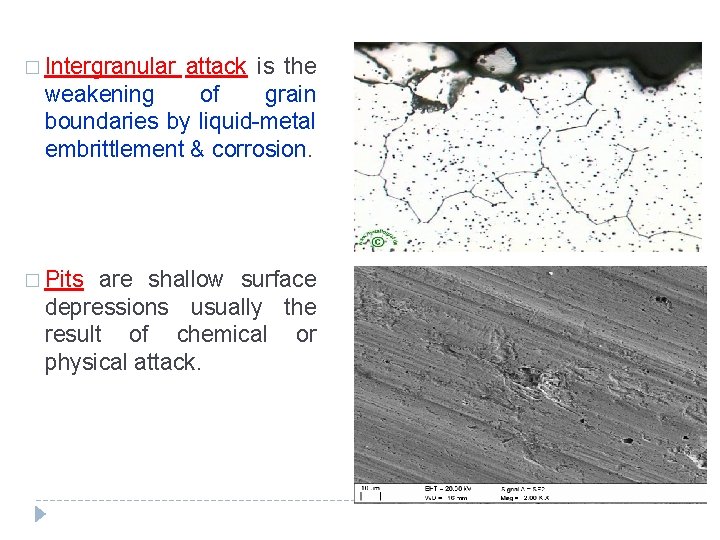
� Intergranular attack is the weakening of grain boundaries by liquid-metal embrittlement & corrosion. � Pits are shallow surface depressions usually the result of chemical or physical attack.

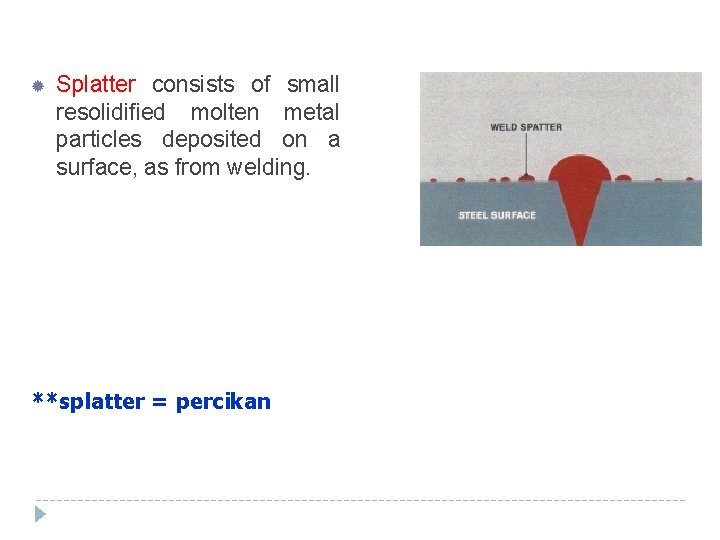
Splatter consists of small resolidified molten metal particles deposited on a surface, as from welding. **splatter = percikan

Examining Surface Integrity � One of the most commonly used techniques for testing surface integrity is metallography. � Samples are removed from the workpiece, polished, etched & observed under an optical or electron microscope.

SURFACE TEXTURE � Regardless of the method of production, all surfaces have their own characteristics which were referred to as surface texture. � The description of surface texture as a geometrical property is complex. � However, certain guidelines have been established for identifying surface texture in terms of well-defined & measurable quantities. � Definition: Pattern (regular or irregular) formed by irregularities on a surface � This includes: �Roughness �Waviness (ombak) �Lay/directionalities (keberarahan)

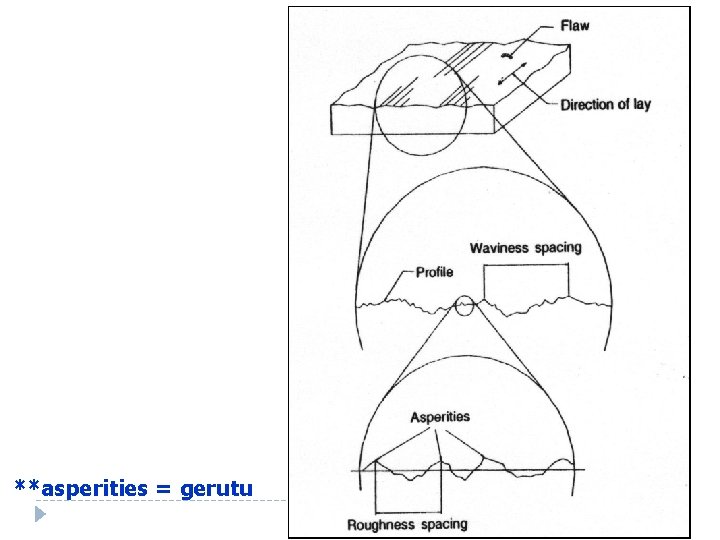
**asperities = gerutu

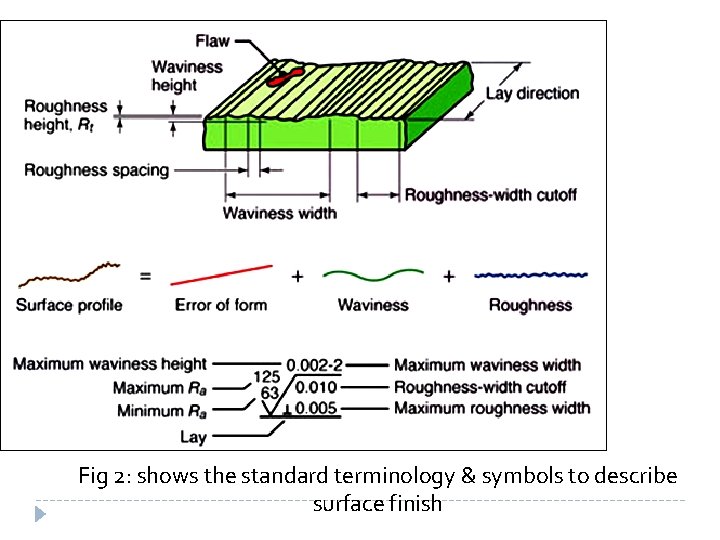
Fig 2: shows the standard terminology & symbols to describe surface finish

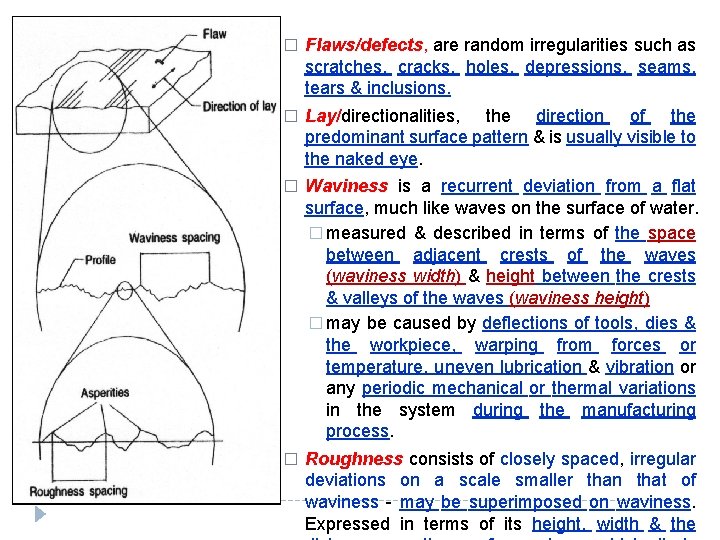
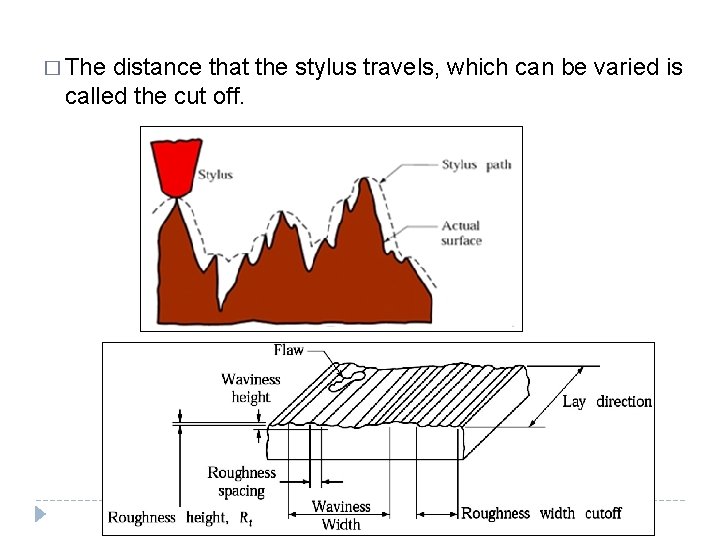
� Flaws/defects, are random irregularities such as scratches, cracks, holes, depressions, seams, tears & inclusions. � Lay/directionalities, the direction of the predominant surface pattern & is usually visible to the naked eye. � Waviness is a recurrent deviation from a flat surface, much like waves on the surface of water. � measured & described in terms of the space between adjacent crests of the waves (waviness width) & height between the crests & valleys of the waves (waviness height) � may be caused by deflections of tools, dies & the workpiece, warping from forces or temperature, uneven lubrication & vibration or any periodic mechanical or thermal variations in the system during the manufacturing process. � Roughness consists of closely spaced, irregular deviations on a scale smaller than that of waviness - may be superimposed on waviness. Expressed in terms of its height, width & the

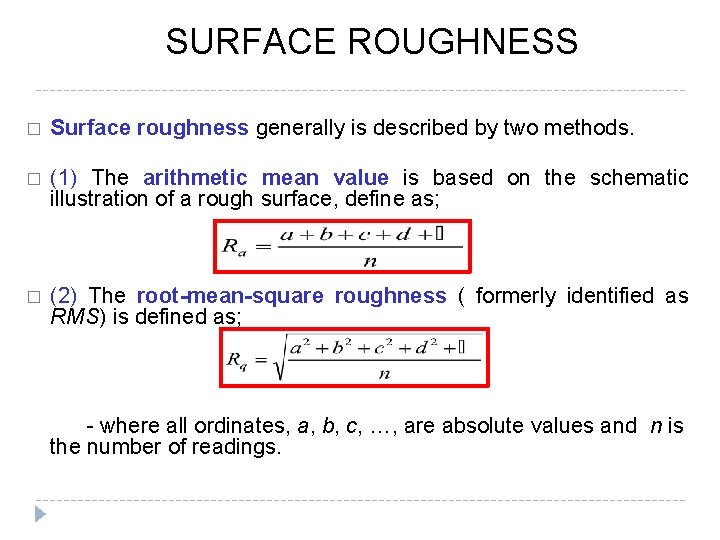
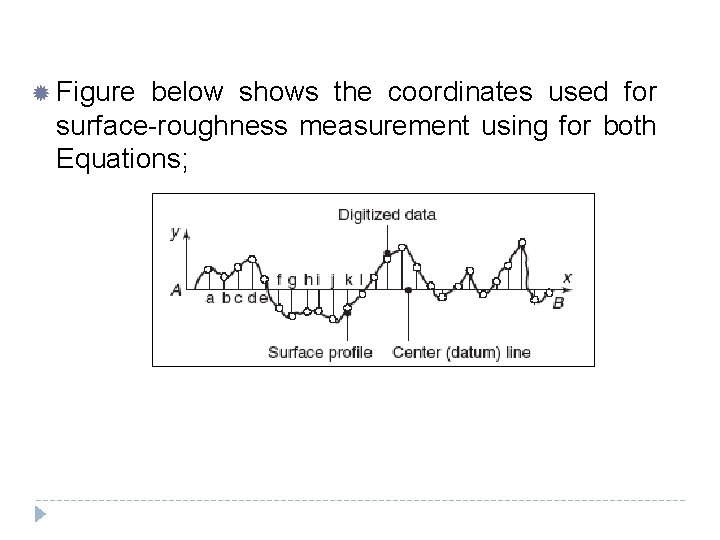
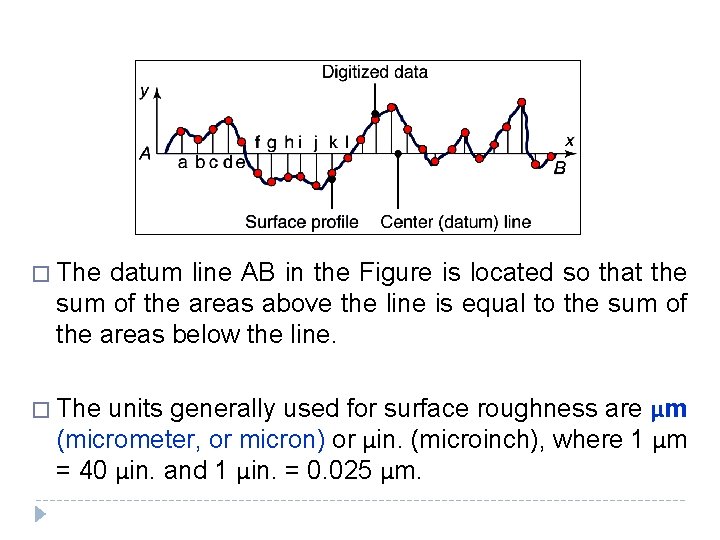
SURFACE ROUGHNESS � Surface roughness generally is described by two methods. � (1) The arithmetic mean value is based on the schematic illustration of a rough surface, define as; � (2) The root-mean-square roughness ( formerly identified as RMS) is defined as; - where all ordinates, a, b, c, …, are absolute values and n is the number of readings.

Figure below shows the coordinates used for surface-roughness measurement using for both Equations;

� The datum line AB in the Figure is located so that the sum of the areas above the line is equal to the sum of the areas below the line. units generally used for surface roughness are μm (micrometer, or micron) or μin. (microinch), where 1 μm = 40 μin. and 1 μin. = 0. 025 μm. � The

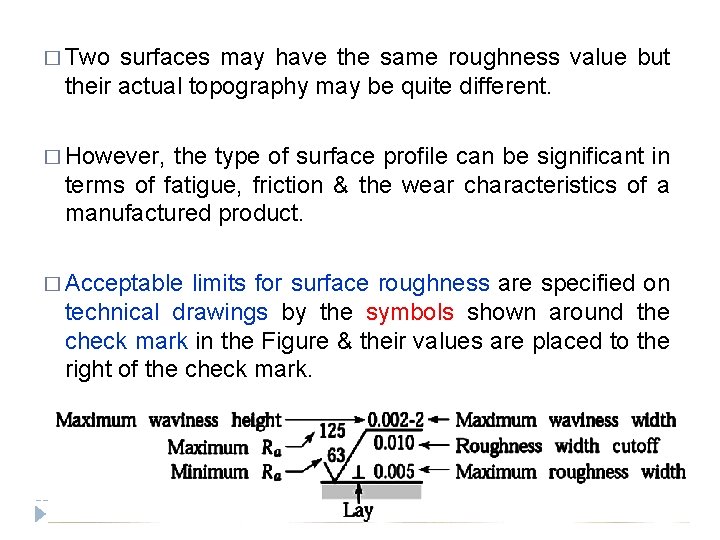
� Two surfaces may have the same roughness value but their actual topography may be quite different. � However, the type of surface profile can be significant in terms of fatigue, friction & the wear characteristics of a manufactured product. � Acceptable limits for surface roughness are specified on technical drawings by the symbols shown around the check mark in the Figure & their values are placed to the right of the check mark.

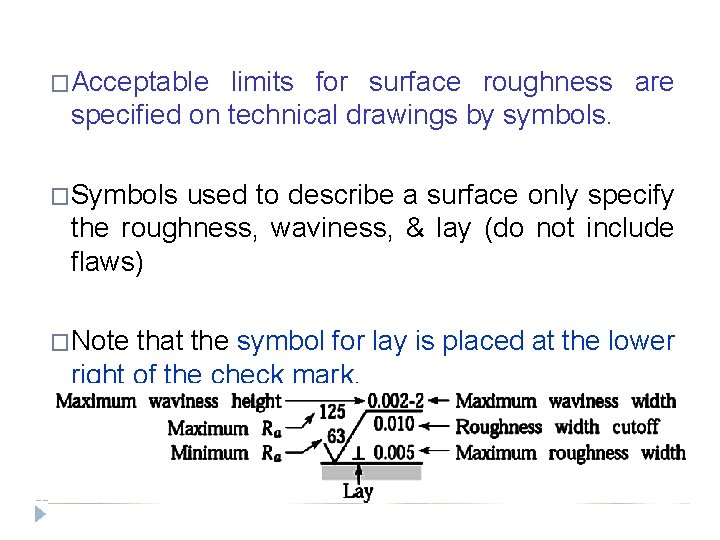
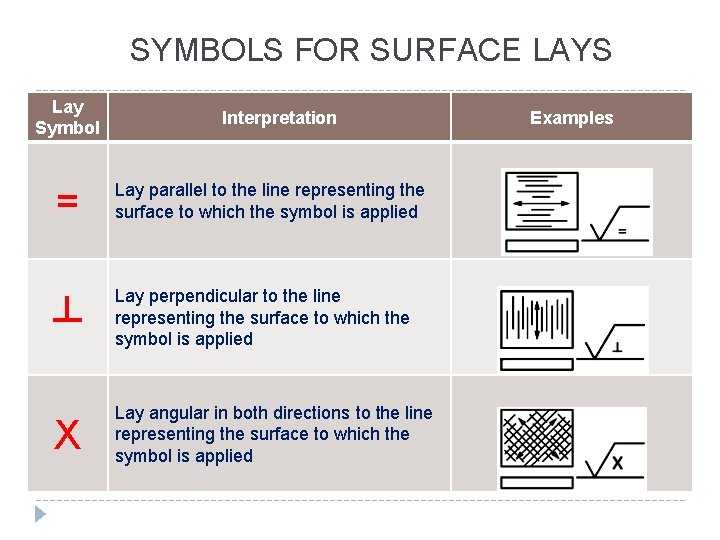
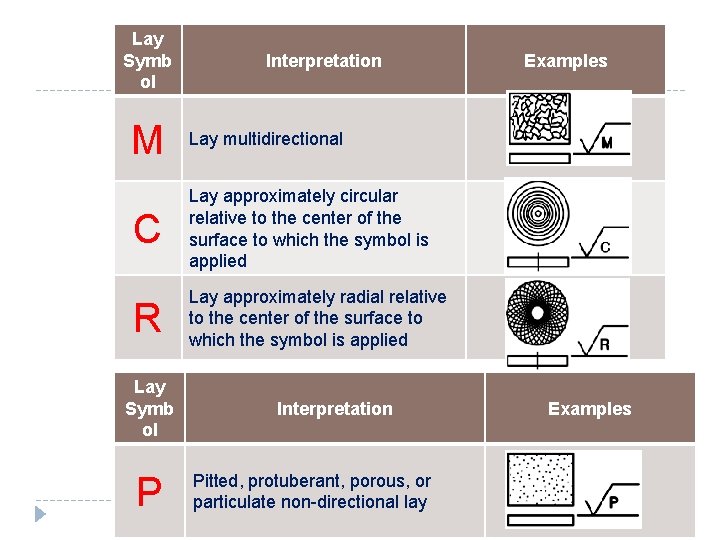
�Acceptable limits for surface roughness are specified on technical drawings by symbols. �Symbols used to describe a surface only specify the roughness, waviness, & lay (do not include flaws) �Note that the symbol for lay is placed at the lower right of the check mark.

SYMBOLS FOR SURFACE LAYS Lay Symbol Interpretation = Lay parallel to the line representing the surface to which the symbol is applied ┴ Lay perpendicular to the line representing the surface to which the symbol is applied X Lay angular in both directions to the line representing the surface to which the symbol is applied Examples

Lay Symb ol Interpretation M Lay multidirectional C Lay approximately circular relative to the center of the surface to which the symbol is applied R Lay approximately radial relative to the center of the surface to which the symbol is applied Lay Symb ol P Interpretation Pitted, protuberant, porous, or particulate non-directional lay Examples

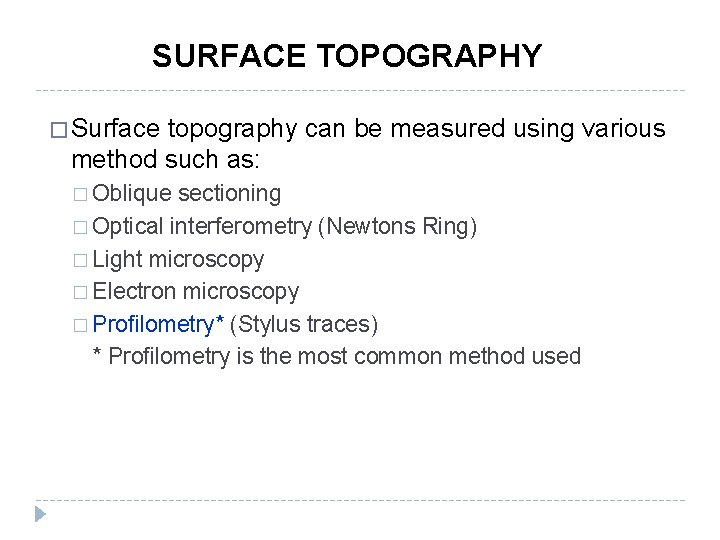
SURFACE TOPOGRAPHY � Surface topography can be measured using various method such as: � Oblique sectioning � Optical interferometry (Newtons Ring) � Light microscopy � Electron microscopy � Profilometry* (Stylus traces) * Profilometry is the most common method used

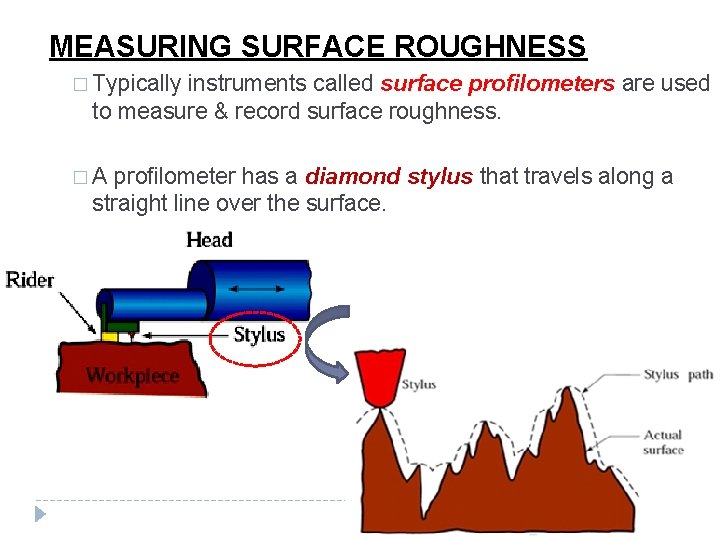
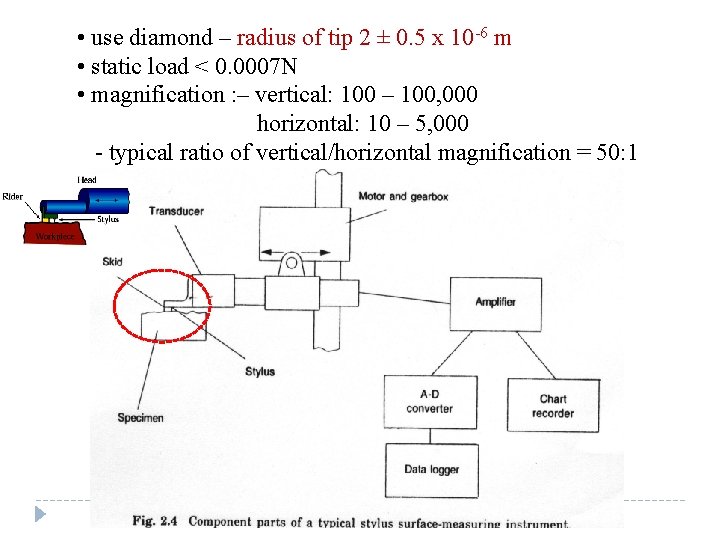
MEASURING SURFACE ROUGHNESS � Typically instruments called surface profilometers are used to measure & record surface roughness. �A profilometer has a diamond stylus that travels along a straight line over the surface.

• use diamond – radius of tip 2 ± 0. 5 x 10 -6 m • static load < 0. 0007 N • magnification : – vertical: 100 – 100, 000 horizontal: 10 – 5, 000 - typical ratio of vertical/horizontal magnification = 50: 1

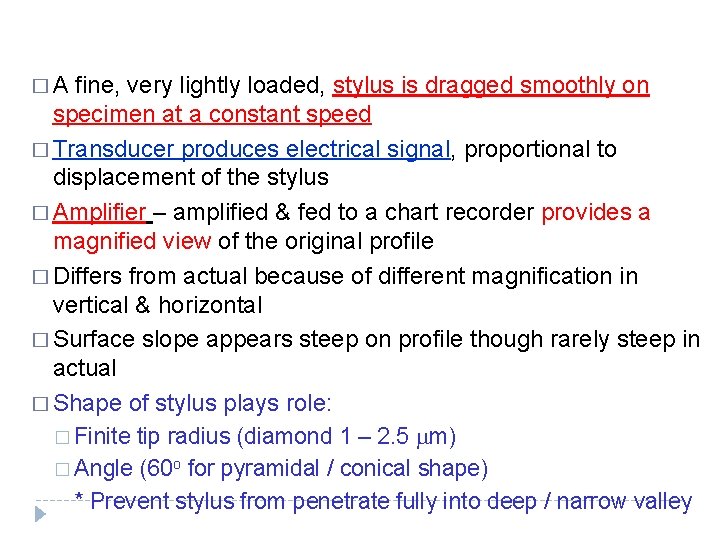
�A fine, very lightly loaded, stylus is dragged smoothly on specimen at a constant speed � Transducer produces electrical signal, proportional to displacement of the stylus � Amplifier – amplified & fed to a chart recorder provides a magnified view of the original profile � Differs from actual because of different magnification in vertical & horizontal � Surface slope appears steep on profile though rarely steep in actual � Shape of stylus plays role: � Finite tip radius (diamond 1 – 2. 5 m) � Angle (60 o for pyramidal / conical shape) * Prevent stylus from penetrate fully into deep / narrow valley

� The distance that the stylus travels, which can be varied is called the cut off.

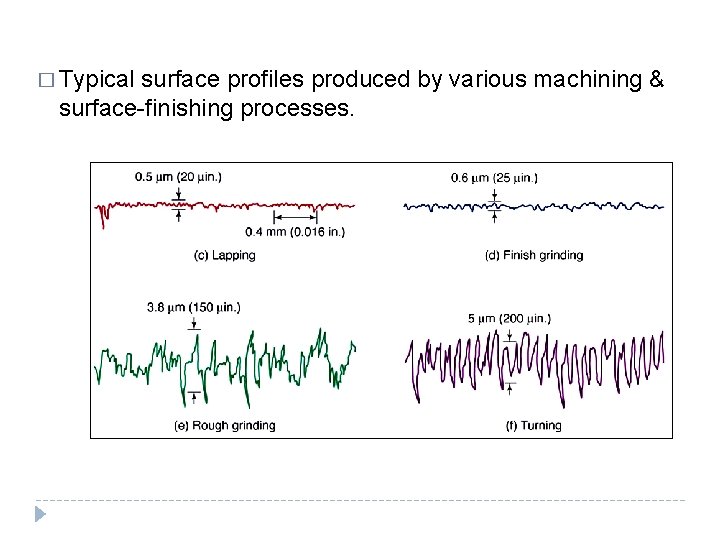
� Typical surface profiles produced by various machining & surface-finishing processes.

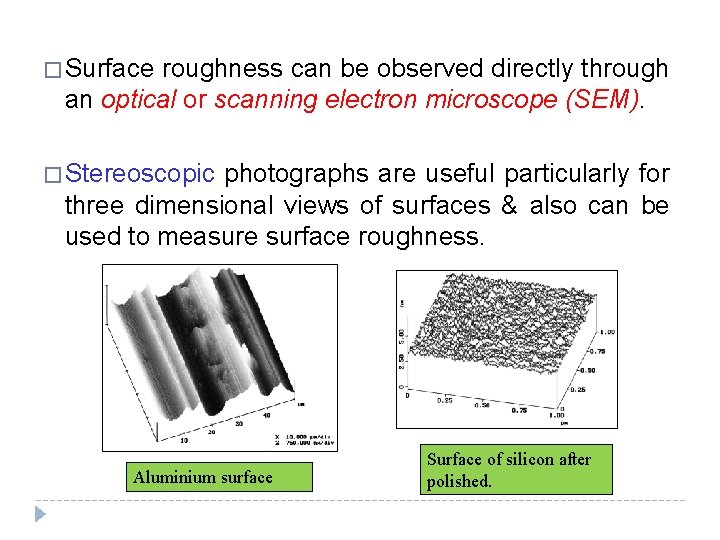
� Surface roughness can be observed directly through an optical or scanning electron microscope (SEM). � Stereoscopic photographs are useful particularly for three dimensional views of surfaces & also can be used to measure surface roughness. Aluminium surface Surface of silicon after polished.

� Optical-interference microscopes shine a light against a reflective surface & record the interference fringes that result from the incident & its reflected waves. � This technique allows for a direct measurement of the surface slope over the area of interest. � Atomic-force microscopes (AFMs) are used to measure extremely smooth surfaces & have the capability of distinguishing atoms on atomically smooth surfaces. � In principle, an AFM is merely a very fine surface profilometer with a laser that is used to measure heights.