Chapter 5 Sections SECTIONS A primary purpose of

- Slides: 35

Chapter 5 Sections

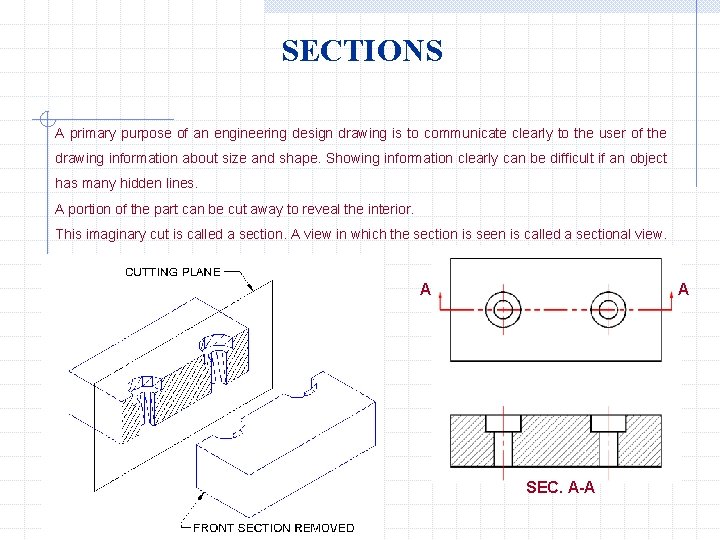
SECTIONS A primary purpose of an engineering design drawing is to communicate clearly to the user of the drawing information about size and shape. Showing information clearly can be difficult if an object has many hidden lines. A portion of the part can be cut away to reveal the interior. This imaginary cut is called a section. A view in which the section is seen is called a sectional view. A A SEC. A-A

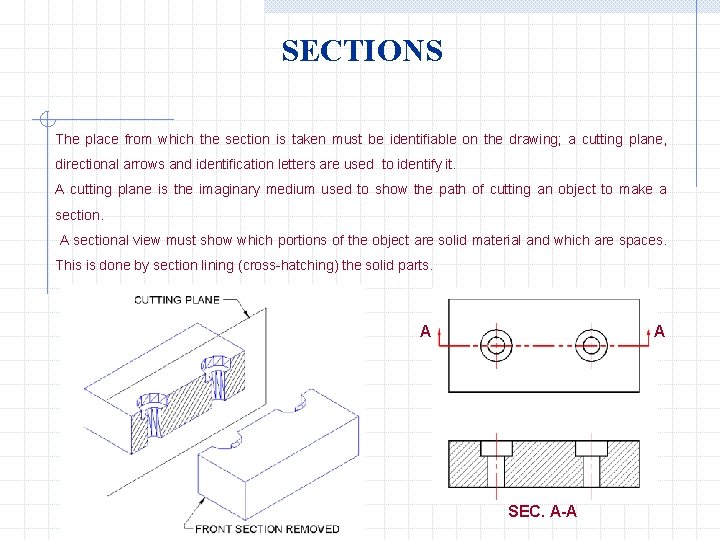
SECTIONS The place from which the section is taken must be identifiable on the drawing; a cutting plane, directional arrows and identification letters are used to identify it. A cutting plane is the imaginary medium used to show the path of cutting an object to make a section. A sectional view must show which portions of the object are solid material and which are spaces. This is done by section lining (cross-hatching) the solid parts. A A SEC. A-A

SECTIONS

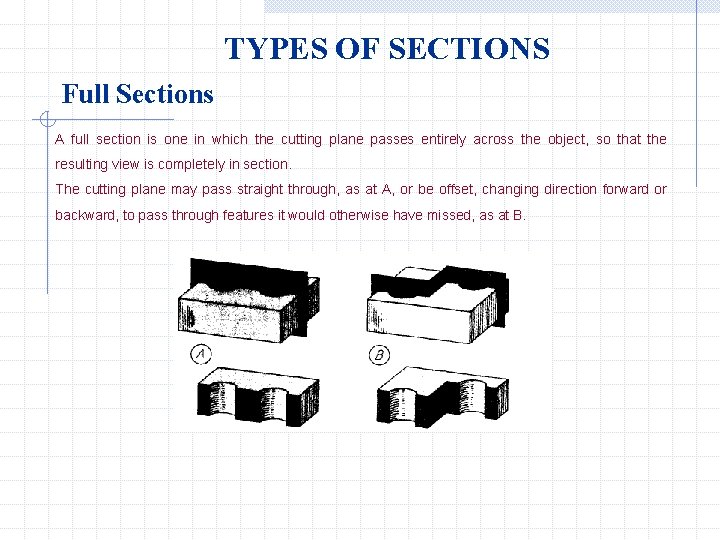
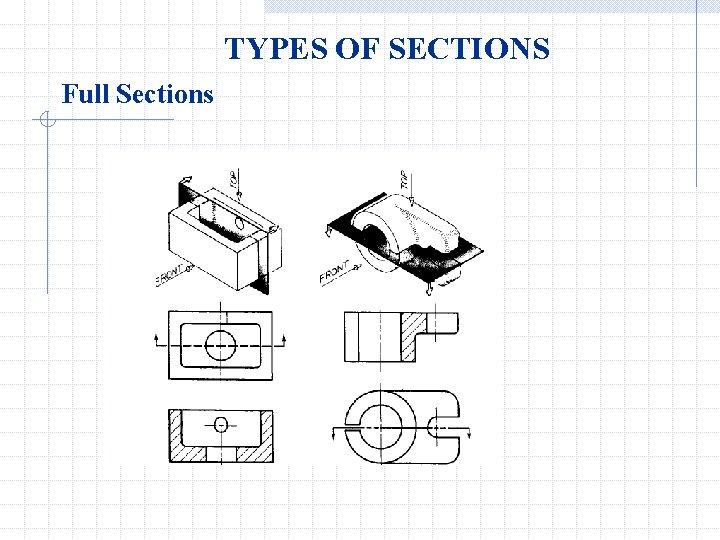
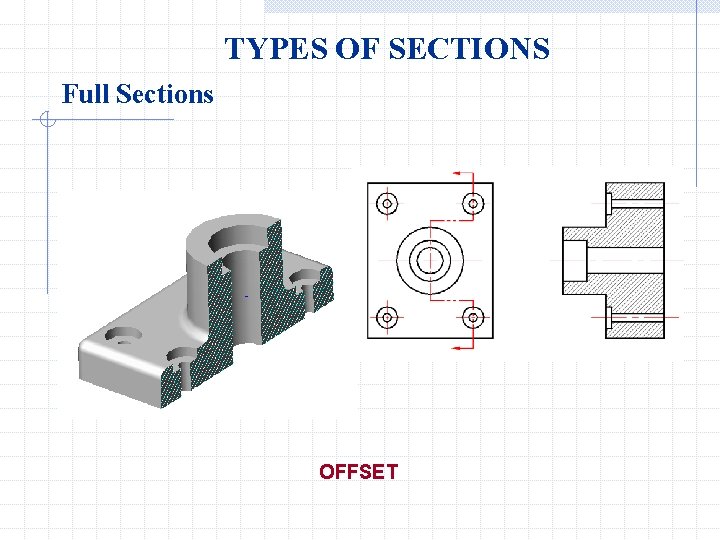
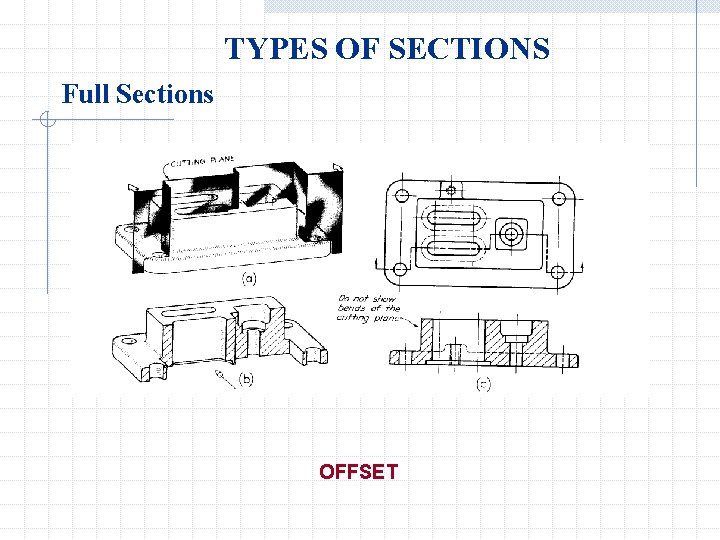
TYPES OF SECTIONS Full Sections A full section is one in which the cutting plane passes entirely across the object, so that the resulting view is completely in section. The cutting plane may pass straight through, as at A, or be offset, changing direction forward or backward, to pass through features it would otherwise have missed, as at B.

TYPES OF SECTIONS Full Sections

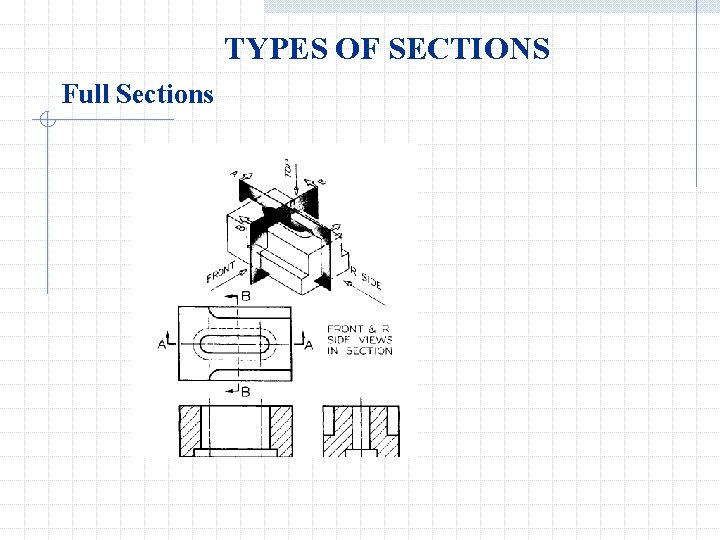
TYPES OF SECTIONS Full Sections Sometimes two views are drawn in section on a pair of cutting planes as at A. In such cases each view is considered seperately. Thus B shows the portion remaining and the cut surface for one sectional view, and C shows them for the other sectional view.

TYPES OF SECTIONS Full Sections

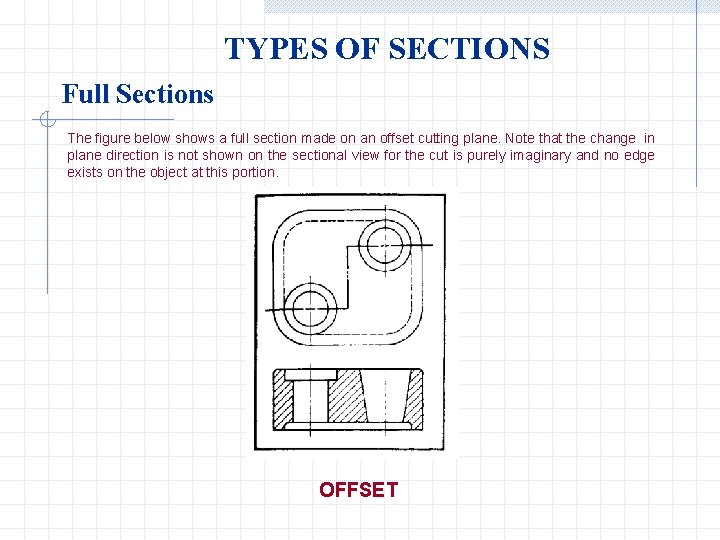
TYPES OF SECTIONS Full Sections The figure below shows a full section made on an offset cutting plane. Note that the change in plane direction is not shown on the sectional view for the cut is purely imaginary and no edge exists on the object at this portion. OFFSET

TYPES OF SECTIONS Full Sections OFFSET

TYPES OF SECTIONS Full Sections OFFSET

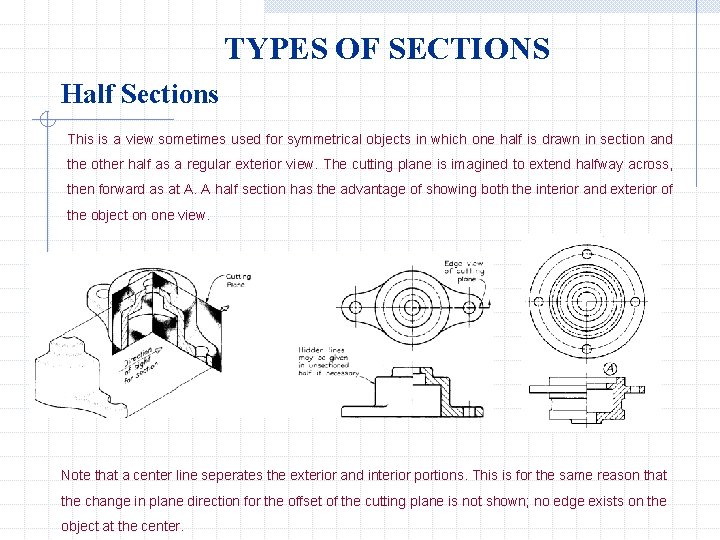
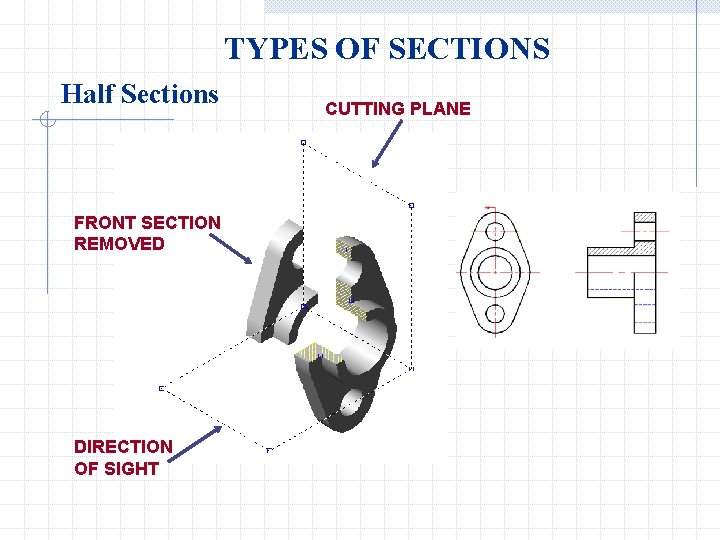
TYPES OF SECTIONS Half Sections This is a view sometimes used for symmetrical objects in which one half is drawn in section and the other half as a regular exterior view. The cutting plane is imagined to extend halfway across, then forward as at A. A half section has the advantage of showing both the interior and exterior of the object on one view. Note that a center line seperates the exterior and interior portions. This is for the same reason that the change in plane direction for the offset of the cutting plane is not shown; no edge exists on the object at the center.

TYPES OF SECTIONS Half Sections FRONT SECTION REMOVED DIRECTION OF SIGHT CUTTING PLANE

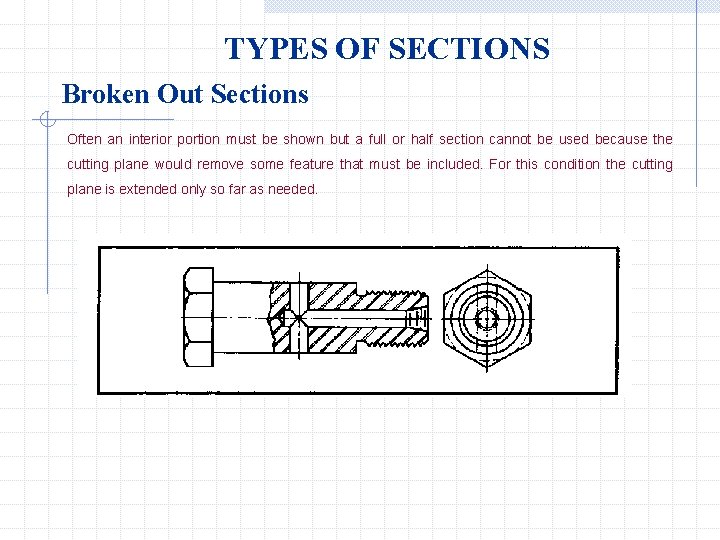
TYPES OF SECTIONS Broken Out Sections Often an interior portion must be shown but a full or half section cannot be used because the cutting plane would remove some feature that must be included. For this condition the cutting plane is extended only so far as needed.

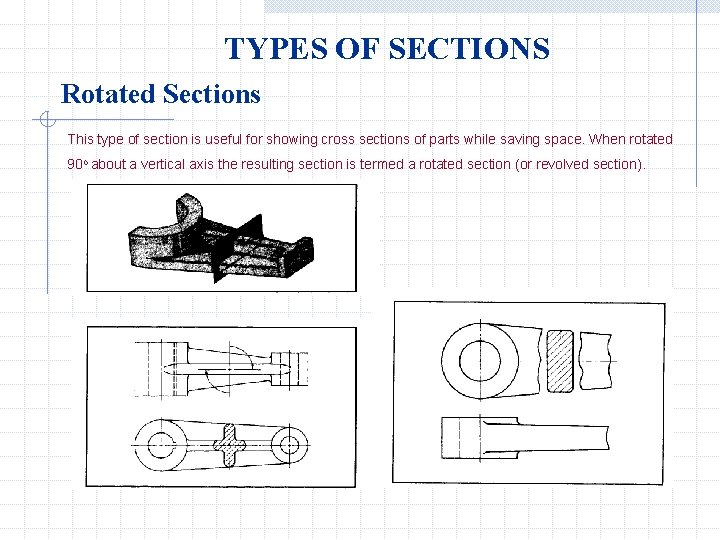
TYPES OF SECTIONS Rotated Sections This type of section is useful for showing cross sections of parts while saving space. When rotated 90 o about a vertical axis the resulting section is termed a rotated section (or revolved section).

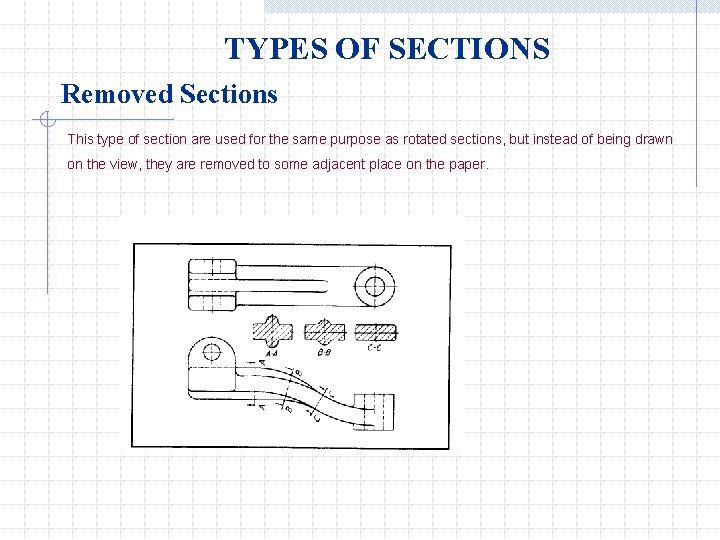
TYPES OF SECTIONS Removed Sections This type of section are used for the same purpose as rotated sections, but instead of being drawn on the view, they are removed to some adjacent place on the paper.

TYPES OF SECTIONS Auxiliary Sections An auxiliary section conforms to the principles of ortographic projection. An auxiliary section shows the true surface of a cutting plane that is in position on an inclined surface. All types of sections are used on auxiliaries.

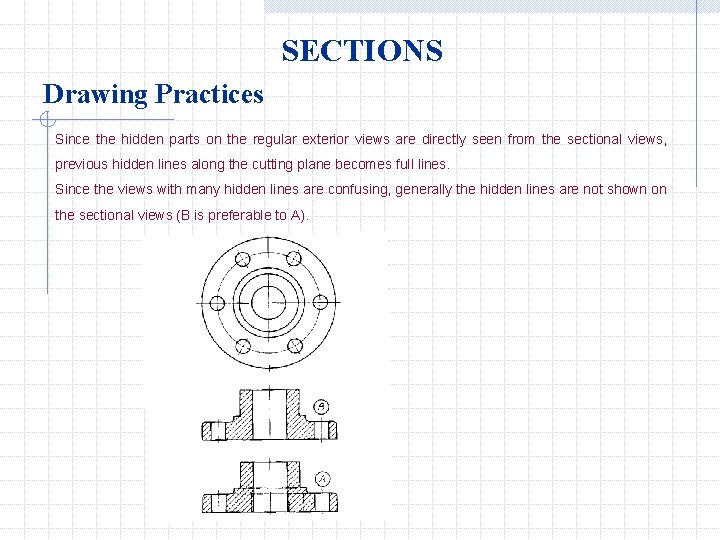
SECTIONS Drawing Practices Since the hidden parts on the regular exterior views are directly seen from the sectional views, previous hidden lines along the cutting plane becomes full lines. Since the views with many hidden lines are confusing, generally the hidden lines are not shown on the sectional views (B is preferable to A).

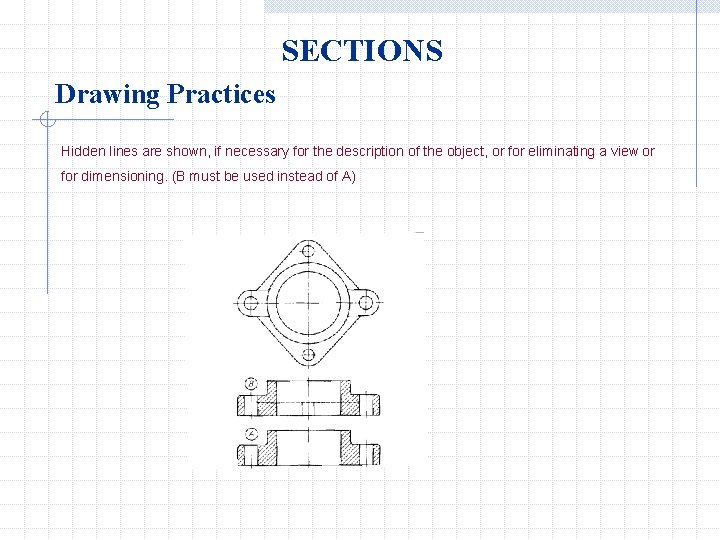
SECTIONS Drawing Practices Hidden lines are shown, if necessary for the description of the object, or for eliminating a view or for dimensioning. (B must be used instead of A)

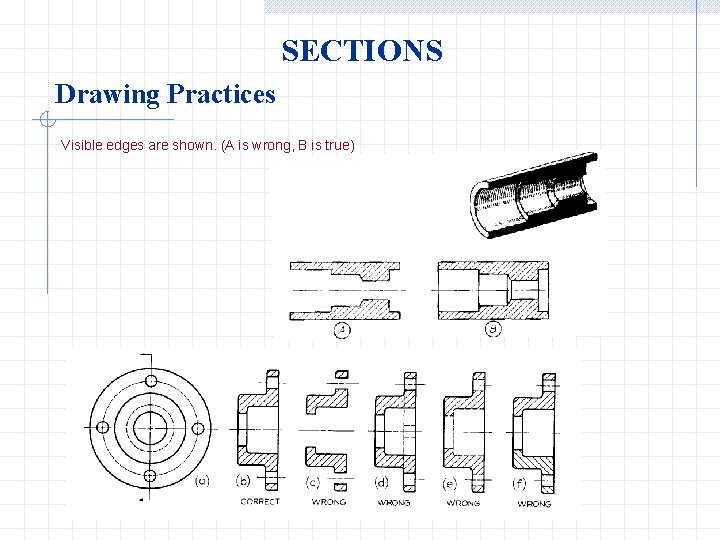
SECTIONS Drawing Practices Visible edges are shown. (A is wrong, B is true)

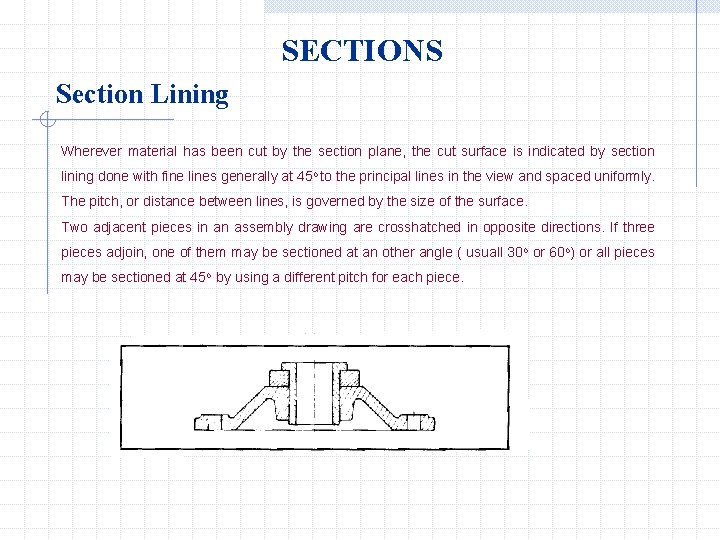
SECTIONS Section Lining Wherever material has been cut by the section plane, the cut surface is indicated by section lining done with fine lines generally at 45 o to the principal lines in the view and spaced uniformly. The pitch, or distance between lines, is governed by the size of the surface. Two adjacent pieces in an assembly drawing are crosshatched in opposite directions. If three pieces adjoin, one of them may be sectioned at an other angle ( usuall 30 o or 60 o) or all pieces may be sectioned at 45 o by using a different pitch for each piece.

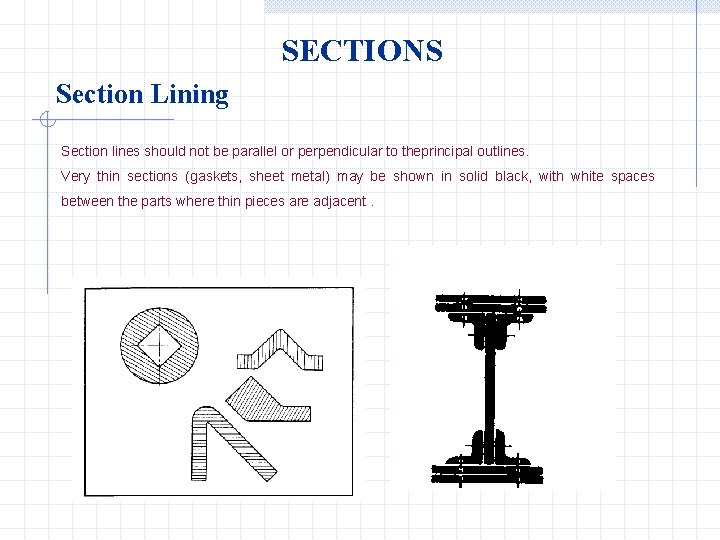
SECTIONS Section Lining Section lines should not be parallel or perpendicular to theprincipal outlines. Very thin sections (gaskets, sheet metal) may be shown in solid black, with white spaces between the parts where thin pieces are adjacent.

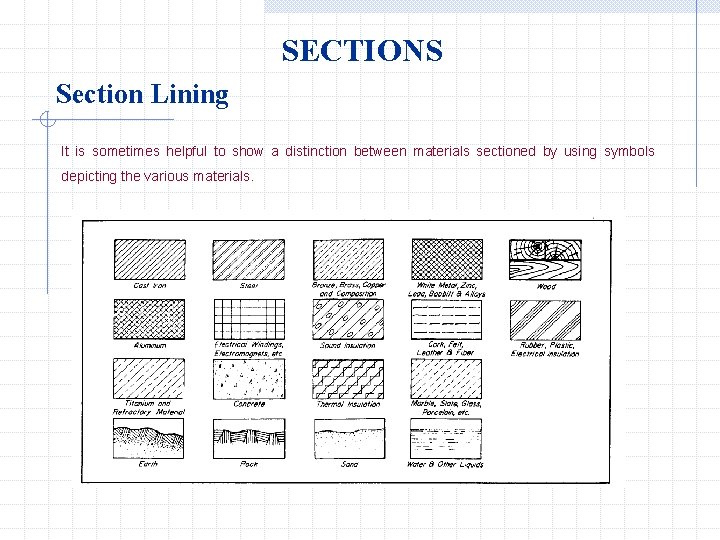
SECTIONS Section Lining It is sometimes helpful to show a distinction between materials sectioned by using symbols depicting the various materials.

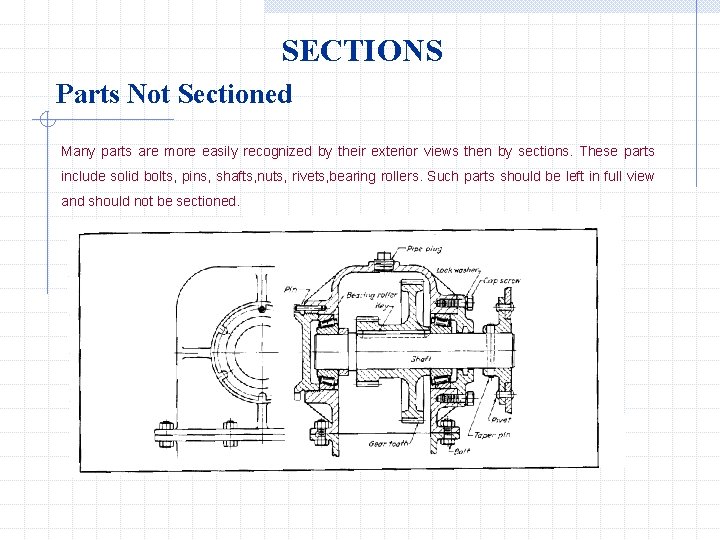
SECTIONS Parts Not Sectioned Many parts are more easily recognized by their exterior views then by sections. These parts include solid bolts, pins, shafts, nuts, rivets, bearing rollers. Such parts should be left in full view and should not be sectioned.

SECTIONS Portions Of Parts Not Sectioned A basic principle for sectioning circular parts is that any element not continious (not solid) around the axis of the part should be drawn without crosshatching in order to avoid a misleading effect.

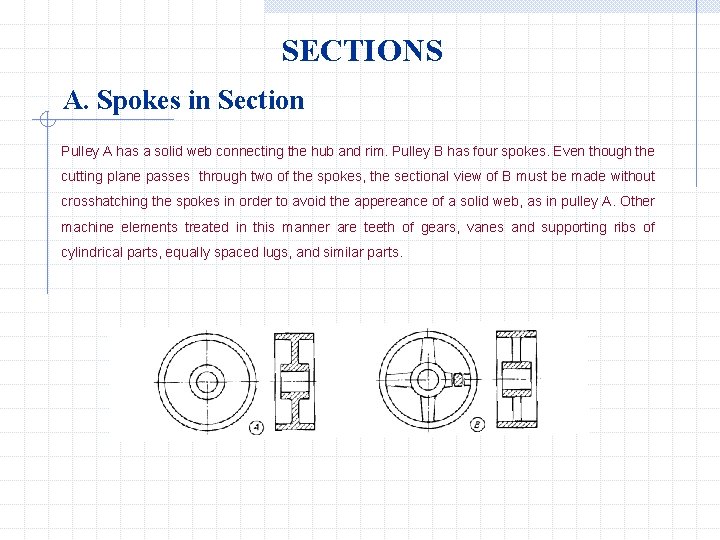
SECTIONS A. Spokes in Section Pulley A has a solid web connecting the hub and rim. Pulley B has four spokes. Even though the cutting plane passes through two of the spokes, the sectional view of B must be made without crosshatching the spokes in order to avoid the appereance of a solid web, as in pulley A. Other machine elements treated in this manner are teeth of gears, vanes and supporting ribs of cylindrical parts, equally spaced lugs, and similar parts.

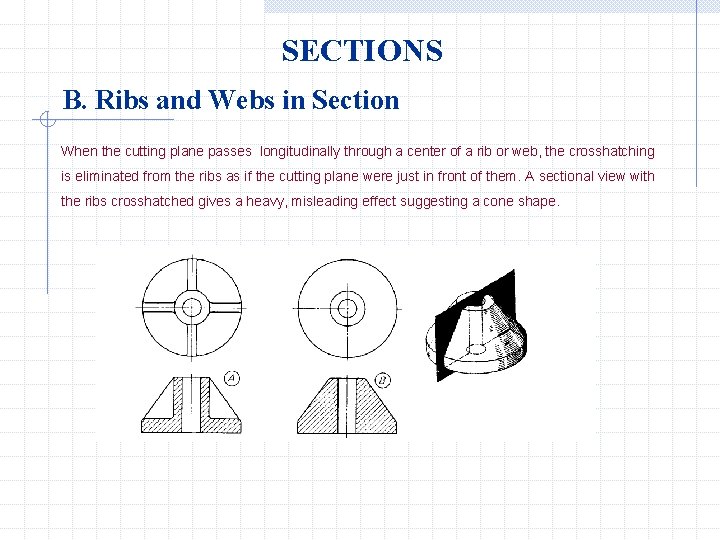
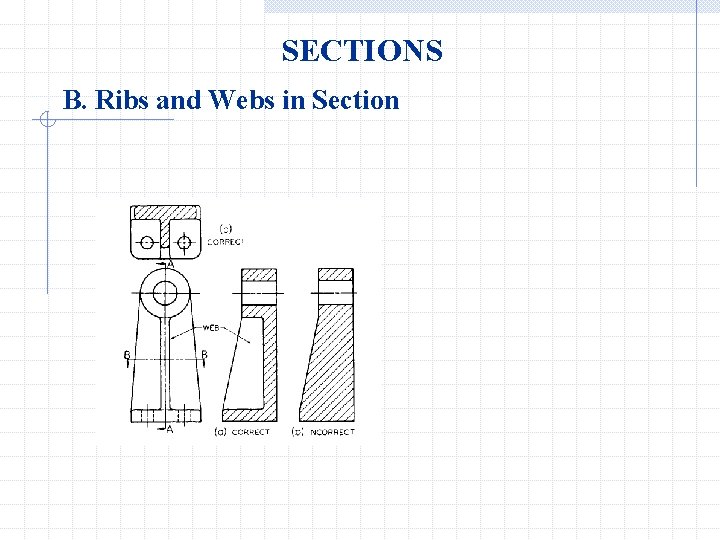
SECTIONS B. Ribs and Webs in Section When the cutting plane passes longitudinally through a center of a rib or web, the crosshatching is eliminated from the ribs as if the cutting plane were just in front of them. A sectional view with the ribs crosshatched gives a heavy, misleading effect suggesting a cone shape.

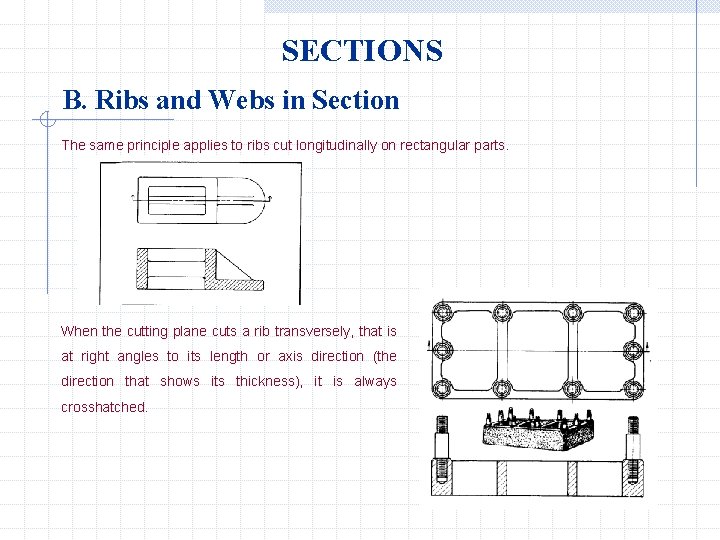
SECTIONS B. Ribs and Webs in Section The same principle applies to ribs cut longitudinally on rectangular parts. When the cutting plane cuts a rib transversely, that is at right angles to its length or axis direction (the direction that shows its thickness), it is always crosshatched.

SECTIONS B. Ribs and Webs in Section

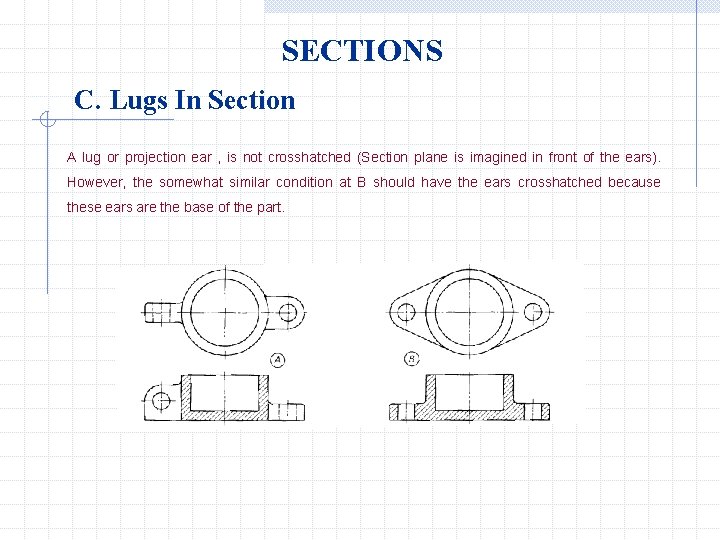
SECTIONS C. Lugs In Section A lug or projection ear , is not crosshatched (Section plane is imagined in front of the ears). However, the somewhat similar condition at B should have the ears crosshatched because these ears are the base of the part.

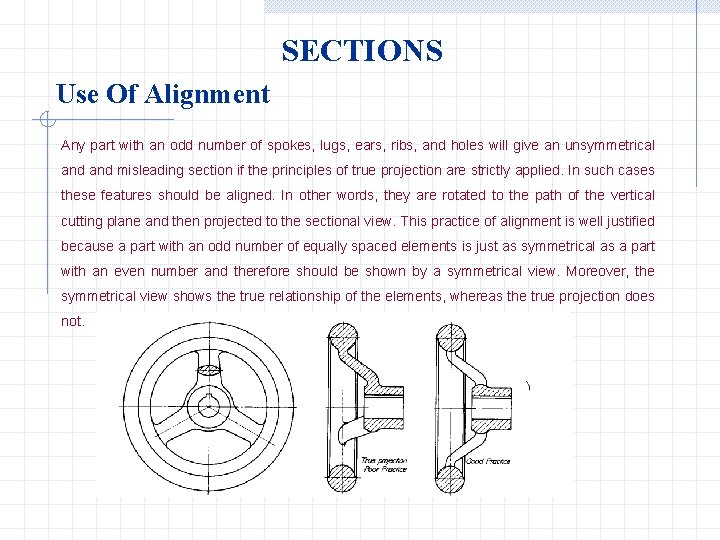
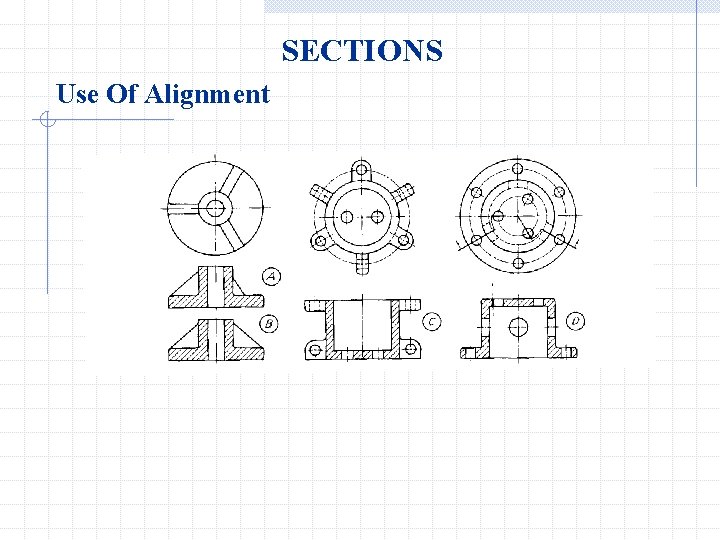
SECTIONS Use Of Alignment Any part with an odd number of spokes, lugs, ears, ribs, and holes will give an unsymmetrical and misleading section if the principles of true projection are strictly applied. In such cases these features should be aligned. In other words, they are rotated to the path of the vertical cutting plane and then projected to the sectional view. This practice of alignment is well justified because a part with an odd number of equally spaced elements is just as symmetrical as a part with an even number and therefore should be shown by a symmetrical view. Moreover, the symmetrical view shows the true relationship of the elements, whereas the true projection does not.

SECTIONS Use Of Alignment

SECTIONS Use Of Alignment

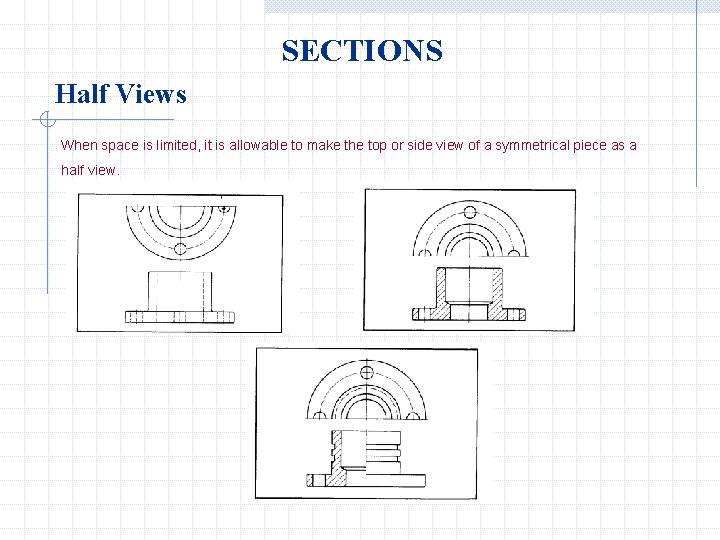
SECTIONS Half Views When space is limited, it is allowable to make the top or side view of a symmetrical piece as a half view.

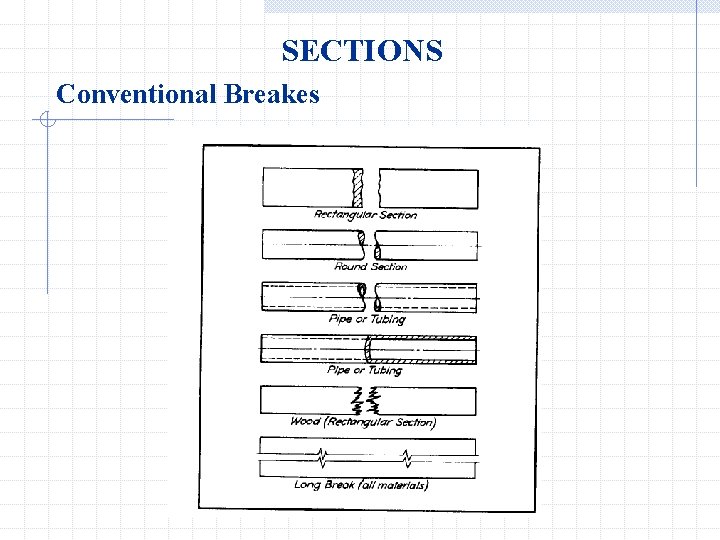
SECTIONS Conventional Breakes