CHAPTER 4 PLC PROGRAMMING BAKISS HIYANA BT ABU

CHAPTER 4: PLC PROGRAMMING BAKISS HIYANA BT ABU BAKAR
 1. Explain clearly blocks, parts, components and instructions found in")
Course Learning Outcomes (CLO) 1. Explain clearly blocks, parts, components and instructions found in the automation systems. (C 2) 2. Construct simple automation sequential control of hardwired or PLC system based on IEC 61131 and NEMA standards. (C 4).

Specific Objectives: After completed this chapter, student will know the major component • • Familiarize with the PLC Programming system Able to explain PLC programming method using Ladder Diagram and mnemonic code, Instruction set and logic function. Understand use Ladder Diagram and mnemonic code to solve control systems circuits. Explain the following logic instruction set: Load Not, Out, And Not, Or Not, END, No Operation, And Ld and Or Ld. Explain sequential instruction set: Interlock, Jump, Keep, Set/Reset, Move, Shift Register, Arithmetic Function and Differential Up/Down. Explain the timer and Counter instruction set and execute timer/counter application solution methods. Explain the combination logical function sequence.

4. 1 PLC PROGRAMMING SYSTEM DEFINITION An activity of planning, building and executing a program to perform the tasks required

4. 1 PLC PROGRAMMING SYSTEM Here are the parts that should be there in a PLC program:

4. 1. 1 Famous PLC Programming Method q IEC 1131 -3 is the international standard for programmable controller programming languages. q The following is a list of programming languages specified by this standard: i. Ladder Diagram (LD) ii. Mnemonic Code iii. Instruction List/Set (IL) iv. Function Block Diagram (FBD) v. Sequential Function Chart (SFC) vi. Structured Text (ST) /Windows Based program q One of the primary benefits of the standard is that it allows multiple languages to be used within the same programmable controller. q This allows the program developer to select the language best suited to each particular task.
 • Ladder Diagram is kind of graphical programming language that")
i. Ladder Diagram (LD) • Ladder Diagram is kind of graphical programming language that changed the relay control wiring circuit diagram. • Ladder Diagram contains right and left vertical line to represent bus bar, for +ve & -ve power line. • The horizontal line connects bus bar is called logic line which placing of switching elements of n NO & NC and OUTPUT • The combination of switching element is called as Rung • Ladder diagram also shows the control circuit and the display function and a combination of the sequence of operations for each branch of the horizontal lines separately.

Graphical diagram of Ladder Diagram

Ø Based on the picture above, one should note that a ladder diagram consists of two basic parts: left section also called conditional, and a right section which has instructions. Ø The pairs of vertical lines along the branch line is called the conditions. These conditions consist of two, namely: i. Normally open condition (NO) ii. Normally closed condition (NC) Ø When a condition is fulfilled, instruction is executed.

Notes: • Normally open condition is ON if the bit operation is ON and will be OFF if the bit operation is OFF. • Normally closed condition is ON if the bit operation is OFF and will be OFF if bit operation is ON.

Comparison between relay wiring and Ladder Diagram RELAY WIRING LADDER DIAGRAM

ii. Mnemonic Code • These instructions can be derived directly from the ladder logic diagrams and entered into the PLC through a simple programming terminal. • Ladder diagrams can not be read by the programming Console. • Therefore Ladder Diagrams has to be converted to mnemonic code that provides the same information as Ladder Diagram and can be typed directly on the console programming. ADDRESS INSTRUCTION DATA 00000 LD 000001 OR 00001 00002 AND 00003 AND LD 00004 OUT 01000 00005 TIM 000 #0050 00006 CNT 002 #0010 00007 FUN 01
 • This low-level language is similar to Assembly language and")
iii. Instruction List/Set (IL) • This low-level language is similar to Assembly language and is useful in cases where small functions are repeated often. • Although it is powerful, it is considered to be difficult to learn. Example: Calculate new weight by subtracting tare weight from net weight.
 • FBD is a graphical language that allows programming")
iv. Function Block Diagram (FBD) • FBD is a graphical language that allows programming in other languages (ladder, instruction list, or structured text) to be nested within the FBD. • In FBD, program elements appear as blocks which are "wired" together in a manner resembling a circuit diagram. • FBD is most useful in those applications involving a high degree of information/data flow between control components, such as process control. • The main concept is the data flow that start from inputs and passes in block(s) and generate the output.
 • SFC have been developed to accommodate the programming")
v. Sequential Function Chart (SFC) • SFC have been developed to accommodate the programming of more advanced systems. • These are similar to flowcharts, but much more powerful. • This method is much different from flowcharts because it does not have to follow a single path through the flowchart. • SFC programming offers a graphical method of organizing the program. The three main components of an SFC are steps, actions and transitions.
 /Windows Based program • Programming has been developed as a")
vi. Structured Text (ST) /Windows Based program • Programming has been developed as a more modern programming language. It is quite similar to languages such as BASIC and Pascal. • ST is ideal for tasks requiring complex math, algorithms or decisionmaking. • Its concise format allows a large algorithm to be displayed on a single. • Benefits of Structured Text: �People trained in computer languages can easily program control logic �Symbols make the programs easy to understand �Programs can be created in any text editor �Runs as fast as ladder

Example 1 • We have Motor that will be controlled manually by 2 push buttons (Start Push Button, and Stop Push Button). • When the Start Push Button is pushed then the Motor will be turned ON. • When the Stop Push Button is Pushed then we want to stop the Motor. (Security logic has been taken off this logic, for the purpose of demonstration. )

4. 1. 2 Use ladder diagram and mnemonic codes to solve control system circuits. • Example 1:

• Example 2: 000003 01000 instruction 00001 ADDRESS INSTRUCTION DATA 00000 LD 000001 OR 00001 00002 AND 00003 OUT 01000 00004 FUN 01

Example 3: 000002 01000 instruction 00001 00003 ADDRESS INSTRUCTION OPERAND / DATA 00000 LD 000001 OR 00001 00002 LD 00002 00003 OR NOT 00003 00004 AND LD ------ 00005 OUT 01000 00007 FUN 01

Basic Terms

1. Execution Conditions v Logical combination of the ON and OFF states gathered to establish an instruction to be implemented. This condition is called Execution Condition. Refer to figure below. v Instructions will be in the Execution Conditions ON when IR 00000 is ON, IR 00001 is OFF and IR 00002 is ON.

DATA AREAS 2. Operand Bits IR area Output area v Bit operations for every instruction can be of any bit in memory areas of IR, SR, HR, TC or TR. v It shows that conditions in Ladder Diagram can be decided by I/O bit, flags, work bits, timers/ counters etc. v Table shows the memory map refers to the PLC type SYSMAC OMRON-CQM 1 H Input area Work area BITS IR 00000 IR 00915 IR 01000 – IR 01915 IR 02000 – IR 04915 IR 20000 – IR 23115 FUNCTIONS Used as input bit Used as output bit Freely used in a program. No specific function. SR area SR 22800 – SR 25515 TR area TR 0 – TR 7 Bit used to store temporary the ON/OFF status at program junction HR area HR 0000 – HR 1915 Bit used to store data and ON/OFF status when power off TC 000 – TC 255 The same number is used for timer and counter. TC 000 to TC 002 used for `interval timer’ Area for Timer/Counter Bit used as flags and control bit.

3. Logic Block v The respond to an instruction is determined by the relationship between the conditions on the instruction line that connects them. v Any group of conditions that formed to produce a logical result is called a logical block.

4. Instruction Block v A block of instruction is composed of all the instructions contained in a block. v Block is obtained by drawing a horizontal line without cutting a vertical line and vice versa.

HOW PLC WORKS ? A PLC works by continually scanning a program with consisting of 3 important steps

1. SCANNING • Scanning is the process of CPU

2. CHECK INPUT STATUS v First the PLC takes a look at each input to determine if it is on or off. In other words, is the sensor connected to the first input on? v How about the second input? How about the third. . . It records this data into its memory to be used during the next step. 3. EXECUTE PROGRAM v Next the PLC executes your program one instruction at a time. Maybe your program said that if the first input was on then it should turn on the first output. 4. UPDATE OUTPUT STATUS v Finally the PLC updates the status of the outputs. It updates the outputs based on which inputs were on during the first step and the results of executing your program during the second step.

4. 2 BASIC LOGIC INSTRUCTION SET There a lot of instructions used to develop the PLC program. Each instruction has a respective function.
 Load (LD): q These instructions are use")
4. 2. 1 Basic Logic Instruction a) Load (LD): q These instructions are use to start a line of the program. q It is used in the first contacts in the normally open condition (NO). Ladder Diagram 00000 Mnemonic Code 01000 OUTPUT Address Instruction Operand/Data 00000 LD 000001 OUT 01000 Explanation: The Execution Conditions of the instruction on the right will be ON when IR 00000 is ON.
: q These instructions are use to start a line of")
Load Not (LD Not): q These instructions are use to start a line of the program. q It is used in the first contacts in the normally closed condition (NC). Ladder Diagram 00000 Mnemonic Code 01000 output address Instruction Operand/Data 00000 LD NOT 000001 OUT 01000 Explanation The Execution Conditions of the instruction on the right will be ON when IR 00000 is OFF
 And (AND): q These instructions are used in the second contact in a")
b) And (AND): q These instructions are used in the second contact in a normally open (NO) and a series with previous contacts Ladder Diagram 000001 01000 output Mnemonic Code Alamat Arahan Operand/Data 00000 LD 000001 AND 00001 00002 OUT 01000 Explanation The Execution Conditions of the instruction on the right will be ON when IR 00000 and IR 00001 are ON
: q These instructions are used in the second contact in")
And Not (AND NOT): q These instructions are used in the second contact in a normally closed (NC) and in series with previous contacts Ladder Diagram 000001 01000 output Mnemonic Code Address instruction Operand/Data 00000 LD 000001 AND 00001 00002 OUT 01000 Explanation The Execution Conditions of the instruction on the right will be ON when IR 00000 ON and IR 00001 are OFF.
 Or (OR): q These instructions are used in the second contact in a")
c) Or (OR): q These instructions are used in the second contact in a normally open (NO) and in line (parallel) with previous contacts. Ladder Diagram 00000 01000 Mnemonic Code address instruction Operand/Data 00000 LD 000001 OR 00001 00002 OUT 01000 output 00001 Explanation The Execution Conditions of the instruction on the right will be ON when either IR 00000 or IR 00001 are ON.
: q These instructions are used in the second contact in")
Or Not (OR NOT): q These instructions are used in the second contact in a normally closed (NC) and in line (parallel) with previous contacts. Ladder Diagram 000001 01000 OUTPUT Mnemonic Code Address instruction Operand/Data 00000 LD 000001 OR NOT 00001 00002 OUT 01000 Explanation The Execution Conditions of the instruction on the right will be ON when either IR 00000 is ON or IR 00001 is OFF or IR 00000 ON, IR 00001 OFF simultaneously
 Out (OUT): q These instructions are used for the coil output. Ladder Diagram")
d) Out (OUT): q These instructions are used for the coil output. Ladder Diagram 00000 01000 Mnemonic Code address instruction Operand/Data 00000 LD 000001 OUT 10000 q IR 10000 will ON when IR 00000 is ON.
 END (FUN (01): q END instruction has no physical contact device. q It")
e) END (FUN (01): q END instruction has no physical contact device. q It is the last instruction required for completion of a program. q If no END instruction, the program cannot be implemented Ladder Diagram 000001 END 01000 Mnemonic Code address instruction Operand/Data 00000 LD 000001 AND NOT 00001 00002 OUT 01000 00003 FUN 01 v For PLC type OMRON - SYSMAC CQM 1 H, the instruction FUN 01 is the END instruction.
 And Load (AND LD): q The AND LD no physical contact device. q")
f) And Load (AND LD): q The AND LD no physical contact device. q Only a programming tool for solving complex functions such as AND connects a number of OR, OR NOT, OR LD in the series. Ladder Diagram Mnemonic Code
 And Load (AND LD): o AND LD instruction is used to connect parallel")
f) And Load (AND LD): o AND LD instruction is used to connect parallel blocks in series. o Example:
 And Load (AND LD): o The AND LD instruction must be used if")
f) And Load (AND LD): o The AND LD instruction must be used if the element or serial block is in front of the parallel block. o If the parallel block is in front of the element or serial block, AND instruction can be used to connect all parts together. o Example:

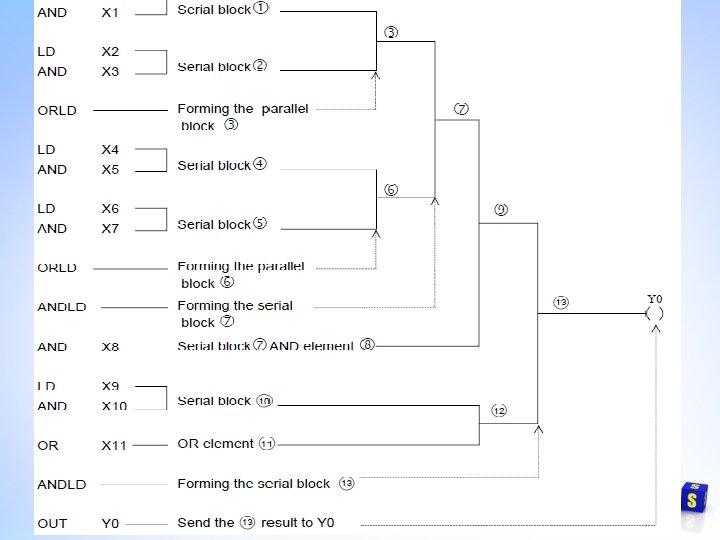
Example AND LD: o Remark: If there are more than two blocks are to be connected serially, they should be connected in a top to bottom sequence. o For example, block 1 and 2 should be connected first, then connect block 3 to it and so on.
 OR load (OR LD): q The OR LD instruction has no physical contact")
g) OR load (OR LD): q The OR LD instruction has no physical contact device. q Only a programming tool for solving complex OR function as a series of contacts LD (or LD NOT), in parallel with a series of other contacts. Ladder Diagram Mnemonic Code

Example OR LD: o Remark:If more than two blocks are to be connected in parallel, they should be connected in a top to bottom sequence. o For example, block 1 and block 2 should be connected first, then connect block 3 to it and so on.

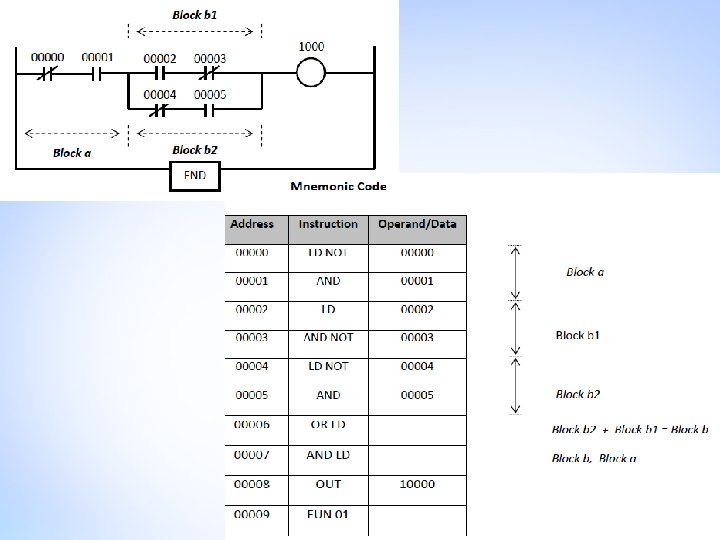
OR LD and AND LD: q When both logic block instruction is to be used in Ladder Diagram, a program must be written from the bottom up to merge logic blocks. q For example, ladder diagram below: Logic block of instruction for the last two blocks (blocks b 1 and b 2 blocks) are written first and then followed by the first logic block instruction (block a).
 No operation (NOP): q These instructions do not have a ladder diagram symbols")
h) No operation (NOP): q These instructions do not have a ladder diagram symbols and will not do any operations. q When you remove the memory in this instruction will be displayed on the console screen PLC programming.

De-composition of a network v The key process of de-composition of a network is to separate the circuits that appear between two vertical lines into independent elements and serial blocks, then coding those elements and serial blocks according to the mnemonic coding rules and then connect them (with ANDLD or ORLD instruction) from left to right and top to bottom to form a parallel or a serial-parallel blocks, and finally to form a complete network. v Sample diagram:

A systematic approach of Control System Design using A PLC 1. 2. 3. 4. 5. Determine the machine sequence of operation. Assignment of input & output. Writing the program / construct ladder diagram. Convert to mnemonic code. Running the system.

Example Approach of Control System Design: • Design the following sequences: A grind machine need to be continuously function when ON button, S 1 is pressed and only OFF when stop button, S 2 is pressed. STEP 1: The machine sequence: The activity The sequence S 1 ; ON Motor, M 1 ; ON S 2 ; ON Motor, M 1 ; OFF STEP 2: I/O assignment: Input Description Output Description 00001 S 1 01001 M 1 00002 S 2

STEP 3: Ladder Diagram: 00001 S 1 00002 S 2 01001 M 1 01001 END STEP 4: Mnemonic code: Address Instruction Data 00000 LD 00001 OR 01001 00002 AND NOT 00002 00003 OUT 01001 00004 FUN(01)

4. 3 SPECIAL SEQUENTIAL INSTRUCTION SET v A sequence of instructions which usually acts as the last instruction in the instruction line. v Instruction sequence SET, RESET, KEEP, DIFFERENTIATE UP, DOWN DIFFERENTIATE, used to ON and OFF state output bits in the IR. These instructions are used to control the status of the other bits in the IR or in other areas. v INTERLOCK instruction sequences can overcome the problem of storing execution conditions, in the branches of the ladder diagram. v JUMP instruction sequence can be used to control devices that require a product that can last a long time.
 Keep (FUN (11)): Ø KEEP instruction is used to maintain the status bit")
a) Keep (FUN (11)): Ø KEEP instruction is used to maintain the status bit operation based on two state execution condition. Ø KEEP (11) operates like a Latching Relay which is set by S and reset by R. Ø When S is in the ON state, the operation of a particular product instruction is ON and remain ON until reset, regardless of whether S is ON or OFF. Ø When R is in the ON state, the operation of a particular product instruction is OFF and remain OFF until reset, regardless of whether R is ON or OFF. Ø For PLC type OMRON - SYSMAC CQM 1 H, the instruction FUN 11 is KEEP instruction.

Ladder Diagram shows KEEP instruction Explanation o Instruction LD 00 002 acts as S (Set)-and the LD 00 003 acts as R (Reset). o When the instruction LD 00 002 ON, the output instruction OUT 10004 will be ON and will remain ON even if the instruction LD 00 002 is OFF. o When the instruction LD 00 003 ON, then the output OUT 10004 instruction OFF and will remain OFF even though the instruction LD 00 002 in OFF or ON state.

Ladder Diagram shows KEEP instruction Operation table 00002 00003 HR 000 01004 Timing diagram
 Set/Reset (SET/RESET): Ø SET and RESET instruction will change the status of bit")
b) Set/Reset (SET/RESET): Ø SET and RESET instruction will change the status of bit operations only when the implementation is ON. Ø In the OFF condition, the instructions will not change the bit operation status. Ladder Diagram shows the Set and Reset instruction

Mnemonic Code Explanation Ø When the input instruction LD 00 000 is ON, SET instruction command to ON and always ON regardless of whether the input instruction LD 00 000 is ON or OFF. Ø When the inputs instruction LD 00 001 is ON, RESET instruction is ON and SET instruction will be off. Ø Its operations can be understood clearly in the KEEP instruction.
 Jump (FUN(04)) & Jump End (FUN (05)): • Instructions JMP (04) is usually")
c) Jump (FUN(04)) & Jump End (FUN (05)): • Instructions JMP (04) is usually used in pairs with the command JME (05) for the jump. • JMP (04) is a command to determine the starting point of the jump and JME (05) is the instruction that the direction of the jump. ( where to jump). • When the instruction JMP (04) is ON, no jump will occur and the program will be implemented as written. • When the instruction JMP (04) is OFF, a jump to the instruction JME (05) which has the same number will be done. Further instructions are the instructions JME (05) will be implemented.

o Instructions JUMP and JUMP END can use the numbers from the range of 00 to 99. o To set the instruction for PLC type OMRON - SYSMAC CQM 1 H, is FUN 04 for JUMP instruction and FUN 05 instruction is the JUMP END instruction. Ladder Diagram shows JUMP instruction

Mnemonic Code Explanation o When the input instruction LD 00000 is ON, instruction JMP (04) will be ON. Subsequent instructions will be implemented as written. o If the input instruction LD 00 001 is ON, output instruction OUT 10000 will be ON. o If the input instruction LD 00 001 is OFF, output instruction OUT 10000 will be OFF.

000001 01000 Operation table Timing diagram o When the input instruction LD 00 000 is OFF, instruction JMP (04) will be OFF. Next jumps to Instruction JME (05) will occur. o All instruction that is between JMP (04) and JME (05) will be ignored. o Refer to the table above.
 Interlock (FUN (02)) & Interlock Clear (FUN (03)): Ø IL (02) and ILC")
d) Interlock (FUN (02)) & Interlock Clear (FUN (03)): Ø IL (02) and ILC (03) must be used together. Ø These instructions are used to solve the problem of storing execution conditions at branch points. Ø When the INTERLOCK instruction is ON as shown in Ladder Diagram, the implementation of the INTERLOCK instruction will control all of the instruction execution until the instruction ‘INTERLOCK CLEAR’. Ø When the INTERLOCK instruction is OFF, INTERLOCK CLEAR instruction will reset the program operation.

Ø To set the INTERLOCK instruction for PLC type OMRON - SYSMAC CQM 1 H is FUN 02 for INTERLOCK instruction and FUN 03 is INTERLOCK CLEAR instruction. 00001 1000 T 1 Ladder Diagram shows IL ( 02 ) dan ILC ( 03 ) T 2 T 3 Timing diagram T 4

Mnemonic Code Explanation Ø When the instruction input LD 00 000 is ON, the instruction IL (02) will be ON. Ø Instruction output OUT 10 000 will depend on the instruction input ON LD 00001 and LD 00000. Ø If the input instruction LD 00 001 ON, output OUT 10000 will be ON. Ø If the input instruction LD 00 001 OFF, output OUT 10000 will be OFF.

Refer the table below: Ø In the event that the input instructions LD 00 000 OFF, instruction IL (02) is OFF. Ø Instructions to the output OUT 10 000 will be OFF. Ø Next program ILC (03) will reset the program.
 Differentiate Up (FUN (13))/Down (FUN (14)): Ø DIFU instructions (13) and DIFD (14)")
e) Differentiate Up (FUN (13))/Down (FUN (14)): Ø DIFU instructions (13) and DIFD (14) will ON the output within a very short time. Ø Instructions DIFU (13) will turn the output to ON when the input signal changes from OFF to ON. Ø Instructions DIFD (14) will turn the output to ON when the input signal changes from ON to OFF. Ø For PLC type of OMRON - SYSMAC CQM 1 H, instruction FUN 13 is instruction DIFFERENTIATE UP and FUN 14 is instruction DIFFERENTIATE DOWN.

Ladder Diagram shows DIFFERENTIATE UP instruction Mnemonic Code 01001 0000 01001 T 2 T 3 T 4 Referring to Ladder Diagram, o When the input instruction LD 00000 is ON (has changes from OFF to ON), operand bit 01 000 will be ON, the output OUT 10000 will be ON within a very short time and then OFF. o We can not see the situation in the products. o After that the operand bit 01 000 will be OFF regardless of the status of the input instruction LD 00 000.

Ladder Diagram shows the DIFFERENTIATE DOWN instruction Mnemonic Code 01001 0000 01001 T 2 T 3 T 4 Referring to Ladder Diagram, Ø When the input instruction LD 00 000 is OFF (change from ON to OFF), operand bit 01000 will be ON, the output OUT 10000 will be ON within a very short time and then OFF. Ø We can not see the situation in the products. Ø After that the operand bit 01000 will be OFF regardless of the status of the input instruction LD 00 000.
 Move (FUN (21)): • MOVE instruction copy data from source channel to destination")
f) Move (FUN (21)): • MOVE instruction copy data from source channel to destination channel. • IR is the memory areas that can be used for MOVE instruction. • To set the instruction for PLC type OMRON - SYSMAC CQM 1 H, FUN (21) is instruction for MOVE. • Symbol: • Ladder diagram:

• Mnemonic code: Referring to Ladder Diagram, • When the input instruction LD 00000 ON, all data in IR 000 will be copy into IR 100.
 Shift Register (SFT (10)): • Shift Register ( SFT ) move 16 bit")
g) Shift Register (SFT (10)): • Shift Register ( SFT ) move 16 bit data, bit by bit which are 1 or 0 in a certain channel. • Each bit 1 or 0 represent 1 condition. • Symbol: • SFT ( 10 ) control by three execution condition which are DI , CP and R. • S and E must in the same memory area such as IR, SR, AR, HR or LR.

• S is at right side of the shift register and E is at left side of the adalah shift register. • If DI is ON, ` 1’ will be move into the register. • If DI is OFF, ` 0 ’ will be move into the register. • When DI move into register, all original bit in the register will be move to the left. • The last left side bit will be delete. • When R is ON, it will RESET the operation and all bit in the register will change to ‘ 0’. Data being delete

• Ladder diagram: • Mnemonic code:
 Arithmetic Function: SET CARRY – STC (40) – FUN(40): • Symbol: • If")
h) Arithmetic Function: SET CARRY – STC (40) – FUN(40): • Symbol: • If the execution condition OFF, instruction STC ( 40 ) will not function. • If execution condition ON, instruction STC ( 40 ) will ON carry ( Cy ). • SR 25504 is carry flag that will ON if carry occur in execution condition. • To set the instruction for PLC type OMRON - SYSMAC CQM 1 H, FUN (40) is instruction for SET CARRY.
- FUN (41): • Symbol: • If the execution condition")
CLEAR CARRY – CLC (41)- FUN (41): • Symbol: • If the execution condition OFF, instruction CLC ( 41 ) will not function. • If the execution condition ON, instruction CLC ( 41 ) will OFF ( SR 25504 ). Cy • CLEAR CARRY use to reset Cy ( 25504 ) to `0’. • To set the instruction for PLC type OMRON - SYSMAC CQM 1 H, FUN (41) is instruction for CLEAR CARRY.
- FUN (30): • Symbol: • Instruction ADD is use to add")
ADD – ADD(30)- FUN (30): • Symbol: • Instruction ADD is use to add data from two different channel and the total result will be store in the third channel. • The three channel are: q Augend Channel ( Au ) q Addend Channel ( Ad ) q Result Channel ( R ). • The range of number for Au dan Ad are # 0000 to # FFFF. • To set the instruction for PLC type OMRON - SYSMAC CQM 1 H, FUN (30) is instruction for ADD ( 30 ).

ADD process: • Result will be store in R. • Cy will be set if the result > # 9999. • Ladder diagram: Mnemonic code: Refer to ladder diagram: o Instruction CLC ( 41 ) will reset Cy to ` 0 ’. o 21600 to 21915 is bit that don’t have any specific function, so can be freely use. o ADD result will be store at IR 100.

EXAMPLE 1:

EXAMPLE 2:
- FUN (31): • Symbol: • Instruction SUB is")
SUBTRACT – SUB ( 31 )- FUN (31): • Symbol: • Instruction SUB is to find the different between 2 data from 2 different channel and the result will be store in the third channel. • The three channel are: q Minuend ( Mi ) q Subtrahend ( Su ) q Result ( R ). • The range of number for Mi dan Su are # 0000 to # FFFF. • To set the instruction for PLC type OMRON - SYSMAC CQM 1 H, FUN (31) is instruction for SUBTRACT (31)

SUBTRACT process: • Ladder diagram: Mnemonic code:

EXAMPLE 1:
- FUN (20): • Symbol: • Instruction CMP use")
COMPARE – CMP ( 20 )- FUN (20): • Symbol: • Instruction CMP use to compare 2 data from 2 different channel. • To set the instruction for PLC type OMRON - SYSMAC CQM 1 H, FUN (20) is instruction for COMPARE (20). • The COMPARE result can be either one of the three condition: q Greater than (GR) q Less than (LE) q Equal to the data (EQ)

• Address for COMPARE instruction: • Ladder diagram:

• Mnemonic code: Compare Result: Refer to ladder diagram: o 10 will be compare with 5. o Result: 10 > 5. o So, OUT 10000 will ON Explanation: • TR use to temporary store the status ON/OFF at the instruction branch. Bit TR are from TR 0 until TR 7. • When instruction LD 00000 ON, instruction CMP ( 20 ) will execute. • Instruction COMPARE will compare the value in C 1 with the value in C 2. Refer to the table above.

4. 3. 2 Build program using special sequential instructions set • EXAMPLE 1: • A burglar alarm is activated by N. O push button, placed on a door, D 1 and window, W 1. • When the alarm is armed and a door or window is opened, the alarm will trigger ON. • The only way to turn OFF the alarm is by disable the power supply or hit the reset button, S 1. • Draw the PLC ladder diagram and write the mnemonic code to execute the control action.
 and COUNTER (CNT) is the")
4. 4 TIMER & COUNTER INSTRUCTION • TIMER (TIM) and COUNTER (CNT) is the instructions that require numbers TIM / CNT (N) and the set value(SV). • The range of numbers TIM / CNT is from 000 to 255, while the range of set values for the TIM / CNT is #0000 to #9999. • The numbers TIM / CNT can not be used twice. When a number has been used as definer, such as number 000 for instructions on TIM / CNT, the number can not be used again. • When a number is defined as the number of TIM / CNT, it can be used as often as required as an operator operand in other instructions from the command TIMER or COUNTER.
 is between")
4. 4. 1 Timer Instruction Set • Symbol: • Timer numbers (N) is between 000 and 255. • The set value (SV) is between 0000 to 9999. • All numbers TIM / CNT can be used as definer in only one TIMER or COUNTER instruction. • TIMER is enabled/activated when the execution condition is ON and will be reset to set value (SV) when the execution condition is OFF. • The set value (SV) of TIMER is the BCD between # 0000 to # 9999. • For example, if TIMER be set to 5 seconds, then the set value (SV) is # 0050.

4. 4. 2 Timer Application Solution Method
 is ON, the timer")
Example 1: Operating Condition: • When the input (LD 00000) is ON, the timer contact will be activated after 5 seconds. • Next, the output (OUT 10000) will be ON. 0000 TIM 000 5 sec 1000 T 1 T 2 T 3 T 4 Timing diagram
 ON, the timer (TIM")
Example 2: Operating Condition: • When the input (LD 00000) ON, the timer (TIM 000) will be activated after 5 seconds and the output (OUT 10000) will be ON. • While the output (OUT 10 001) will be ON as soon as the supply is supplied and will be OFF after 5 seconds. • Timer will continue to be active as long as the input 00000 state is ON.
 ON, the timer (TIM")
Example 3: Operating Condition: • When the input (LD 00000) ON, the timer (TIM 000) will be activated after 5 seconds. Next the output (OUT 10000) will be ON. • After 3 seconds the output (OUT 10000) ON, the timer (TIM 001) will be activated the next output (OUT 10000) will be OFF and the timer (TIM 001) will be OFF. • When the timer TM 001 OFF, contact TIM 001 (NC) will be ON and the output (OUT 10000) is ON state. • Output (OUT 10000) will continue ON and OFF until the input (LD 00000) in the OFF state.

4. 4. 3 Counter Instruction Set • Symbol: • Number TIM / CNT can be used as definer for either timer or counter. • Counter numbers are range from 000 to 255. • Counters are used to calculate the count down from the set value (SV) on the execution condition on the counting pulse (CP) when it is changed from OFF to ON. • The set value (SV) is range 0000 to 9999. • Counters will reset to the reset (R).

4. 4. 4 Counter Application Solution Method

Example 1: Operating Condition • Counter set to count 10. When the input (LD 00, 000) is the pulse of ten, a counter will be activated and thus the output (OUT 10000) will be ON. • When reset (LD 00, 001) ON, a counter will be in original condition

Timing Diagram: 0000 0001 CNT 001 1000

4. 5 COMBINED LOGICAL FUNCTION SEQUENCE The Application Of Timer And Counter Instructions: • The number of Counter cannot be the same number to the number of timer because both share the same data in the PLC memory. • Ladder diagram: 0001 Operating Condition: o Counter set to count 5. When the input (LD 00, 000) is the pulse of five, a counter will be activated and thus the output (OUT 10000) will be ON. o When the output (OUT 10000) ON, TIM 001 will be activated after 5 seconds and then the output (OUT 10 001) will be ON. o Both the output (OUT 10000) and (OUT 10 001) will always be ON until reset (LD 00001) in the ON state. o Reset will return the counter to its original condition.

Timing Diagram: 0000 0001 CNT 000 TIM 001 5 SEC 1000 1001 5 SEC
 • The carrier is moved by the forward/reverse")
EXAMPLE 1 (Timer And Counter Instructions) • The carrier is moved by the forward/reverse motor. The initial position of the carrier is the left position indicated by the limit switch S 4. When the start push button, S 1 is pressed (then release), the carrier will be loaded with 5 pieces of product, which is sense by photo sensor S 3 before it moves to the right until it touches the right limit switch S 5, the automatic carrier will halt for 5 seconds before it reverse to the left. Once it touches S 4, the carrier stop until it is sufficiently loaded. Then it starts conveying again. The stop button, S 2 stops the motor regardless of which direction it is turning. • Study the description as given. Then design a ladder diagram and mnemonic code by applying Five (5) sequences of programming method. Start ( S 1) Conveyor belt Sensor (S 3) Stop (S 2) LS 1 (s 4) LS 2 (S 5) carrier B A M 1 M 2

EXAMPLE 2: • Design a program that will monitor & control the conveyor system for material testing while adhering the following criteria: – The start button will be used to start the conveyor. – The stop button will be used to stop the conveyor if emergency occur. – 2 sensor which are inductive sensor and through beam sensor. – The conveyor will halt at through beam sensor when material available for 5 seconds. – If there is non-metal material, the conveyor will continue to run. – If there is metal material, the conveyor will halt again at inductive sensor for 10 seconds.
- Slides: 100