Chapter 4 3 D Geometry 3 D Geometry
![Workshop 4 -1, Catalytic Converter – [Modeling] >Converter >Plane 5 – Toolbar: New Plane Workshop 4 -1, Catalytic Converter – [Modeling] >Converter >Plane 5 – Toolbar: New Plane](https://slidetodoc.com/presentation_image_h/ec092608270bd2472290c7d30ff0b97c/image-49.jpg)
![Workshop 4 -1, Catalytic Converter – [Modeling] >Converter >XYPlane – Toolbar: New Sketch • Workshop 4 -1, Catalytic Converter – [Modeling] >Converter >XYPlane – Toolbar: New Sketch •](https://slidetodoc.com/presentation_image_h/ec092608270bd2472290c7d30ff0b97c/image-54.jpg)

- Slides: 58

Chapter 4 3 D Geometry

3 D Geometry Contents Bodies and Parts • 3 D Features • Boolean Operations • Feature Direction • Feature Type • Feature Creation • Workshop 4 -1, Catalytic Converter ANSYS Workbench - Design. Modeler • Training Manual December 17, 2004 Inventory #002176 4 -2

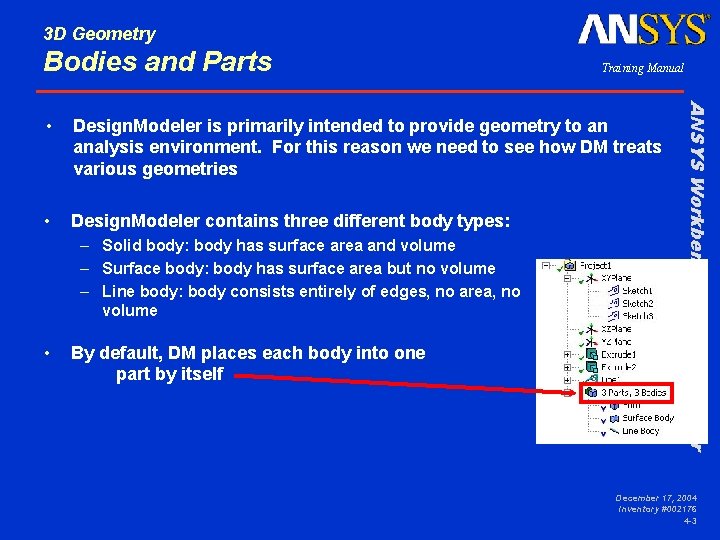
3 D Geometry Bodies and Parts Training Manual Design. Modeler is primarily intended to provide geometry to an analysis environment. For this reason we need to see how DM treats various geometries • Design. Modeler contains three different body types: – Solid body: body has surface area and volume – Surface body: body has surface area but no volume – Line body: body consists entirely of edges, no area, no volume • By default, DM places each body into one part by itself ANSYS Workbench - Design. Modeler • December 17, 2004 Inventory #002176 4 -3

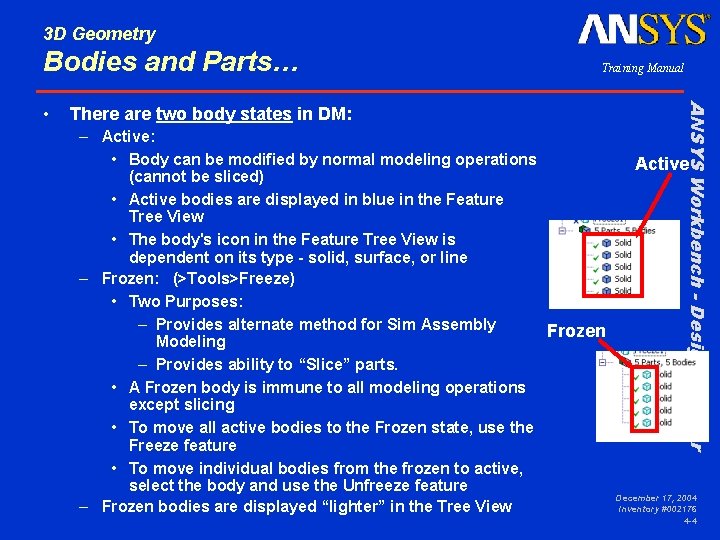
3 D Geometry Bodies and Parts… There are two body states in DM: – Active: • Body can be modified by normal modeling operations (cannot be sliced) • Active bodies are displayed in blue in the Feature Tree View • The body's icon in the Feature Tree View is dependent on its type - solid, surface, or line – Frozen: (>Tools>Freeze) • Two Purposes: – Provides alternate method for Sim Assembly Frozen Modeling – Provides ability to “Slice” parts. • A Frozen body is immune to all modeling operations except slicing • To move all active bodies to the Frozen state, use the Freeze feature • To move individual bodies from the frozen to active, select the body and use the Unfreeze feature – Frozen bodies are displayed “lighter” in the Tree View ANSYS Workbench - Design. Modeler • Training Manual Active December 17, 2004 Inventory #002176 4 -4

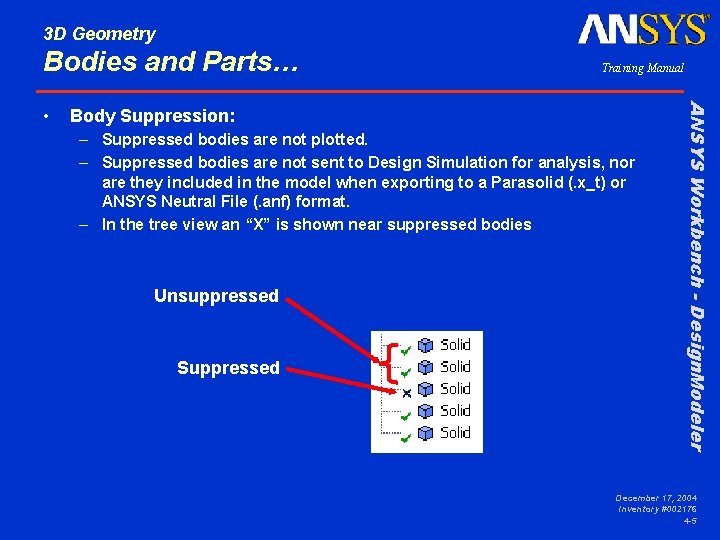
3 D Geometry Bodies and Parts… Body Suppression: – Suppressed bodies are not plotted. – Suppressed bodies are not sent to Design Simulation for analysis, nor are they included in the model when exporting to a Parasolid (. x_t) or ANSYS Neutral File (. anf) format. – In the tree view an “X” is shown near suppressed bodies Unsuppressed Suppressed ANSYS Workbench - Design. Modeler • Training Manual December 17, 2004 Inventory #002176 4 -5

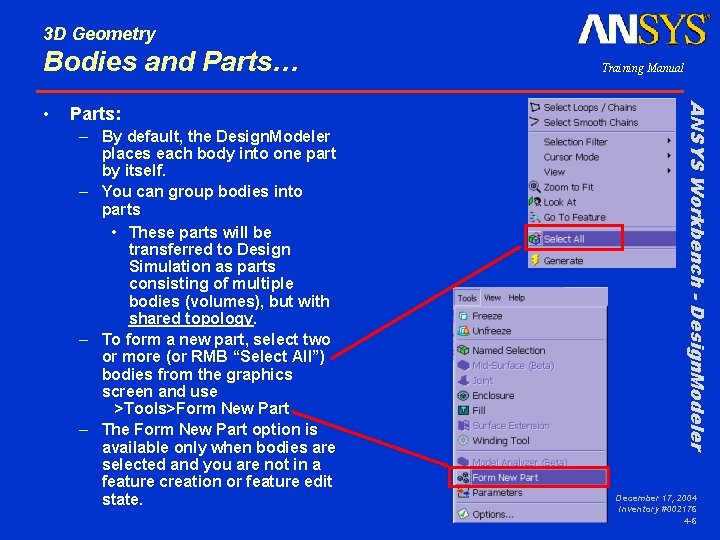
3 D Geometry Bodies and Parts… Parts: – By default, the Design. Modeler places each body into one part by itself. – You can group bodies into parts • These parts will be transferred to Design Simulation as parts consisting of multiple bodies (volumes), but with shared topology. – To form a new part, select two or more (or RMB “Select All”) bodies from the graphics screen and use >Tools>Form New Part – The Form New Part option is available only when bodies are selected and you are not in a feature creation or feature edit state. ANSYS Workbench - Design. Modeler • Training Manual December 17, 2004 Inventory #002176 4 -6

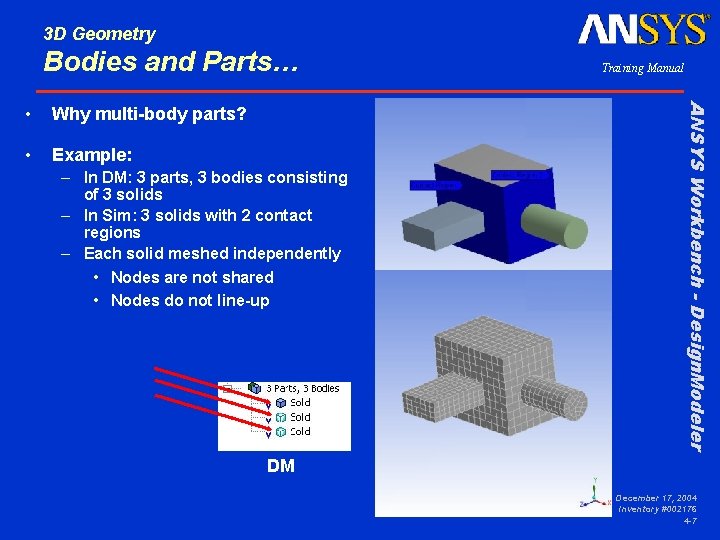
3 D Geometry Bodies and Parts… Why multi-body parts? • Example: DM – In DM: 3 parts, 3 bodies consisting of 3 solids – In Sim: 3 solids with 2 contact regions – Each solid meshed independently • Nodes are not shared • Nodes do not line-up Si m ANSYS Workbench - Design. Modeler • Training Manual DM December 17, 2004 Inventory #002176 4 -7

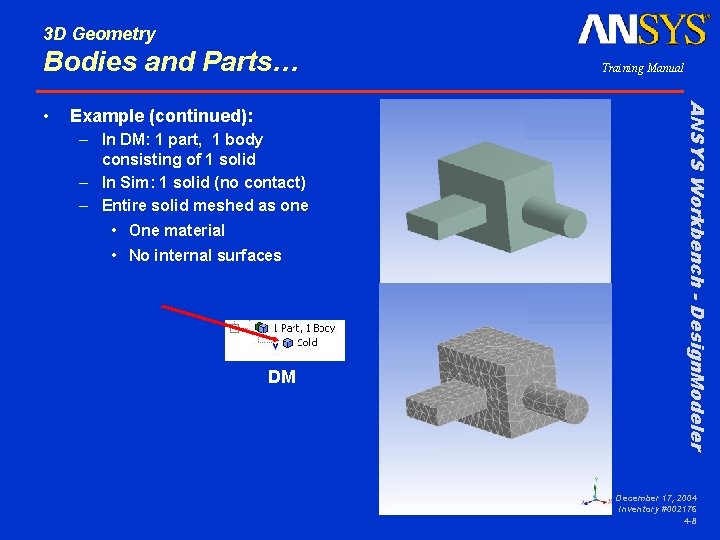
3 D Geometry Bodies and Parts… Example (continued): DM – In DM: 1 part, 1 body consisting of 1 solid – In Sim: 1 solid (no contact) – Entire solid meshed as one • One material • No internal surfaces Sim DM ANSYS Workbench - Design. Modeler • Training Manual December 17, 2004 Inventory #002176 4 -8

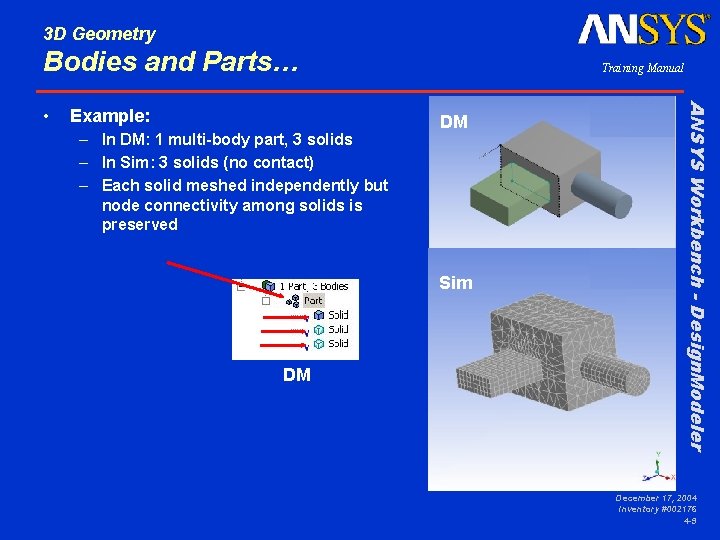
3 D Geometry Bodies and Parts… Example: – In DM: 1 multi-body part, 3 solids – In Sim: 3 solids (no contact) – Each solid meshed independently but node connectivity among solids is preserved DM Sim DM ANSYS Workbench - Design. Modeler • Training Manual December 17, 2004 Inventory #002176 4 -9

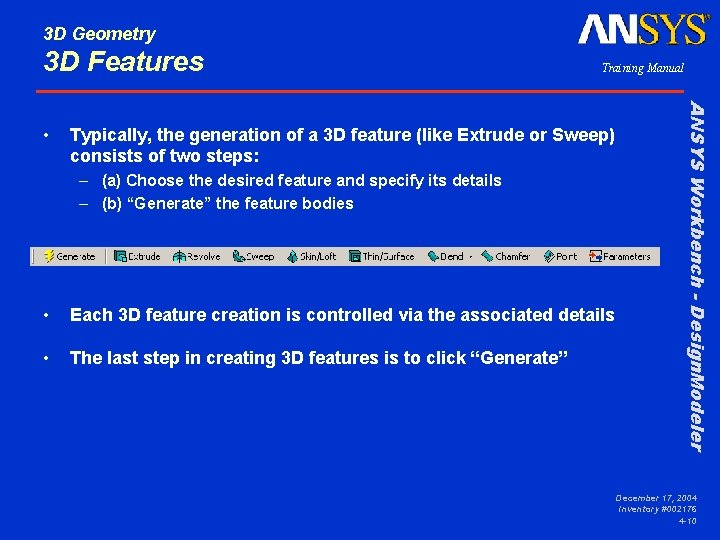
3 D Geometry 3 D Features Typically, the generation of a 3 D feature (like Extrude or Sweep) consists of two steps: – (a) Choose the desired feature and specify its details – (b) “Generate” the feature bodies • Each 3 D feature creation is controlled via the associated details • The last step in creating 3 D features is to click “Generate” ANSYS Workbench - Design. Modeler • Training Manual December 17, 2004 Inventory #002176 4 -10

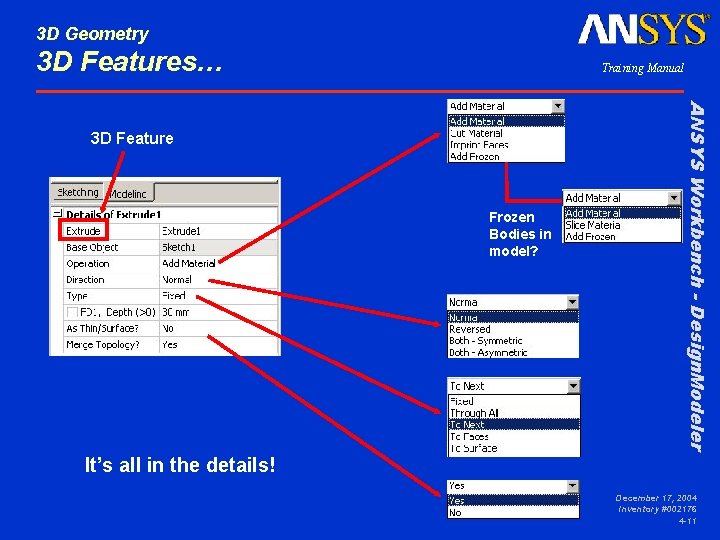
3 D Geometry 3 D Features… Training Manual Frozen Bodies in model? ANSYS Workbench - Design. Modeler 3 D Feature It’s all in the details! December 17, 2004 Inventory #002176 4 -11

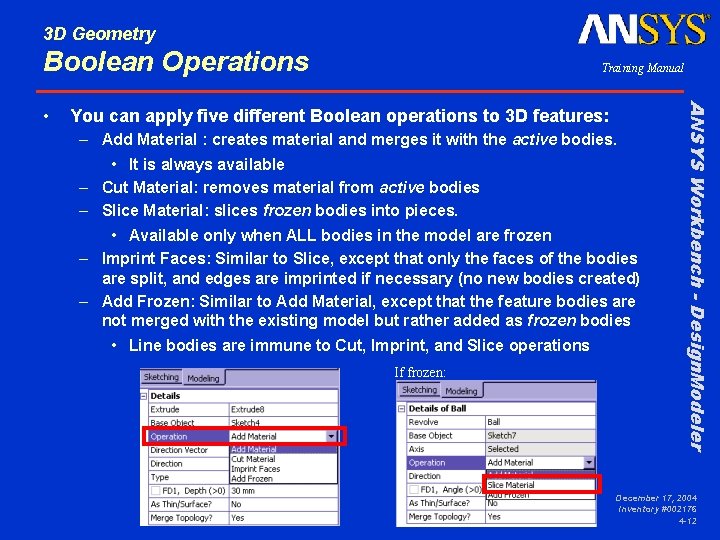
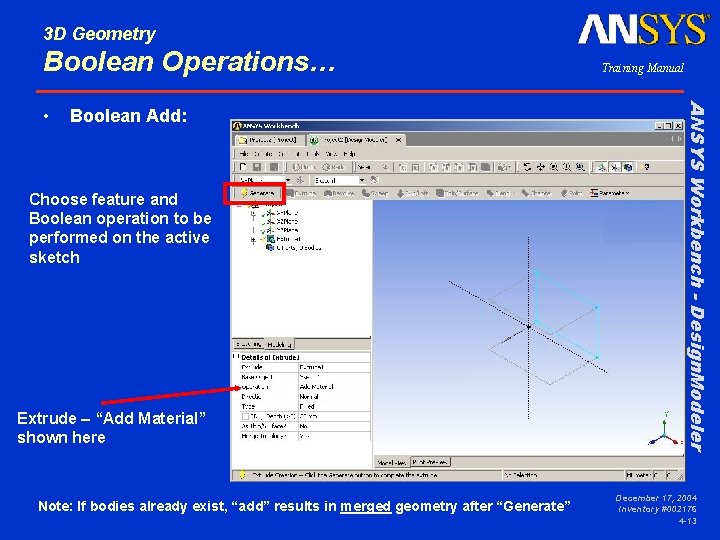
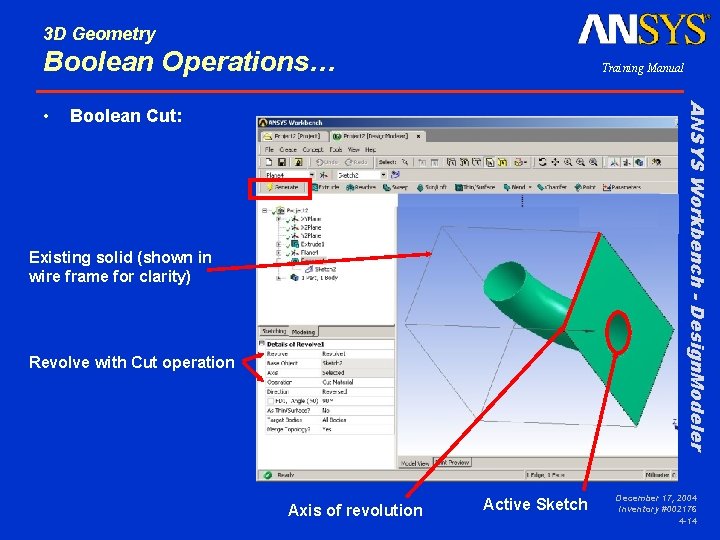
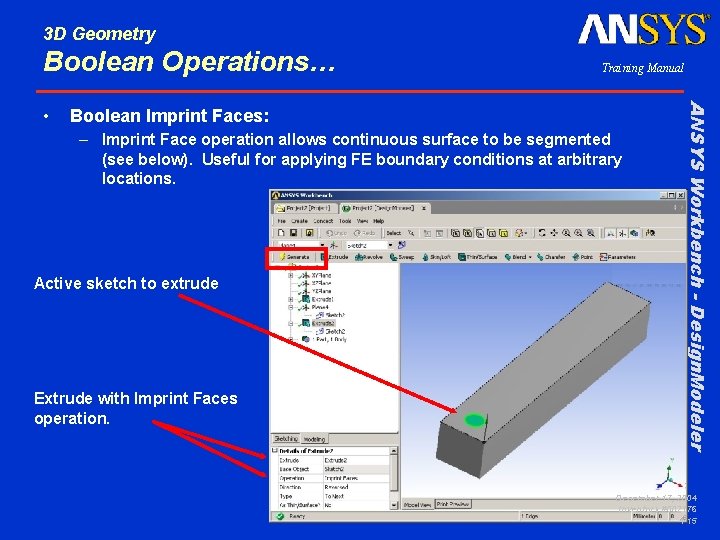
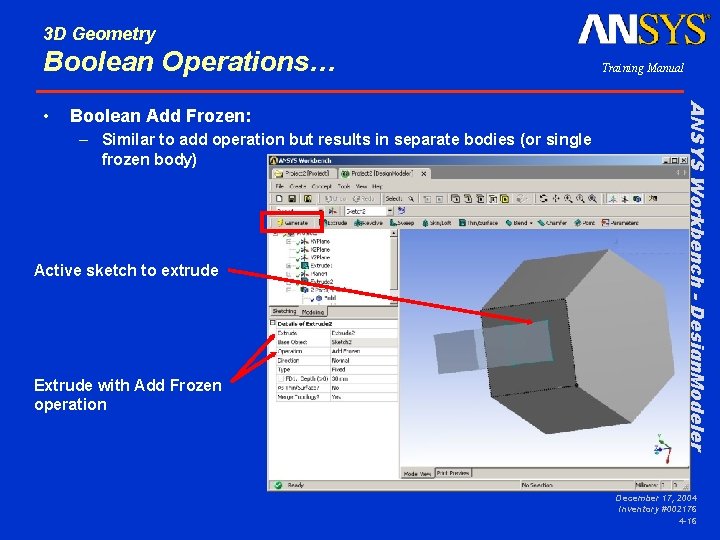
3 D Geometry Boolean Operations You can apply five different Boolean operations to 3 D features: – Add Material : creates material and merges it with the active bodies. • It is always available – Cut Material: removes material from active bodies – Slice Material: slices frozen bodies into pieces. • Available only when ALL bodies in the model are frozen – Imprint Faces: Similar to Slice, except that only the faces of the bodies are split, and edges are imprinted if necessary (no new bodies created) – Add Frozen: Similar to Add Material, except that the feature bodies are not merged with the existing model but rather added as frozen bodies • Line bodies are immune to Cut, Imprint, and Slice operations If frozen: ANSYS Workbench - Design. Modeler • Training Manual December 17, 2004 Inventory #002176 4 -12

3 D Geometry Boolean Operations… Boolean Add: Choose feature and Boolean operation to be performed on the active sketch Extrude – “Add Material” shown here Note: If bodies already exist, “add” results in merged geometry after “Generate” ANSYS Workbench - Design. Modeler • Training Manual December 17, 2004 Inventory #002176 4 -13

3 D Geometry Boolean Operations… ANSYS Workbench - Design. Modeler • Training Manual Boolean Cut: Existing solid (shown in wire frame for clarity) Revolve with Cut operation Axis of revolution Active Sketch December 17, 2004 Inventory #002176 4 -14

3 D Geometry Boolean Operations… Boolean Imprint Faces: – Imprint Face operation allows continuous surface to be segmented (see below). Useful for applying FE boundary conditions at arbitrary locations. Active sketch to extrude Extrude with Imprint Faces operation. ANSYS Workbench - Design. Modeler • Training Manual December 17, 2004 Inventory #002176 4 -15

3 D Geometry Boolean Operations… Boolean Add Frozen: – Similar to add operation but results in separate bodies (or single frozen body) Active sketch to extrude Extrude with Add Frozen operation ANSYS Workbench - Design. Modeler • Training Manual December 17, 2004 Inventory #002176 4 -16

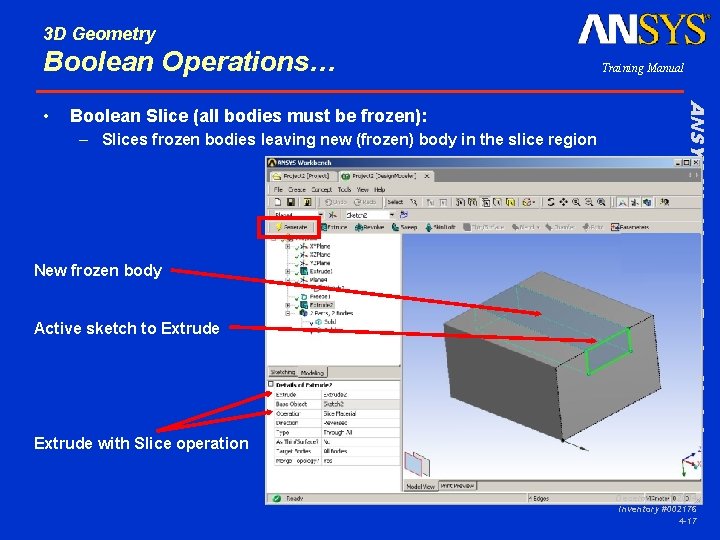
3 D Geometry Boolean Operations… Boolean Slice (all bodies must be frozen): – Slices frozen bodies leaving new (frozen) body in the slice region New frozen body Active sketch to Extrude with Slice operation ANSYS Workbench - Design. Modeler • Training Manual December 17, 2004 Inventory #002176 4 -17

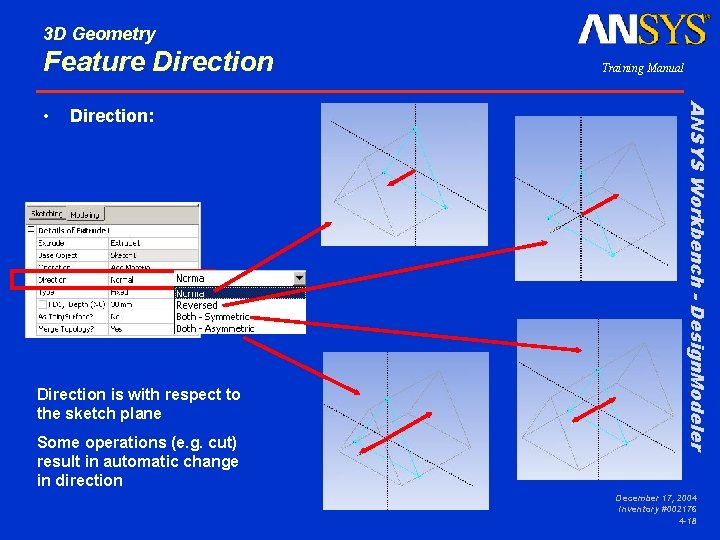
3 D Geometry Feature Direction: Direction is with respect to the sketch plane Some operations (e. g. cut) result in automatic change in direction ANSYS Workbench - Design. Modeler • Training Manual December 17, 2004 Inventory #002176 4 -18

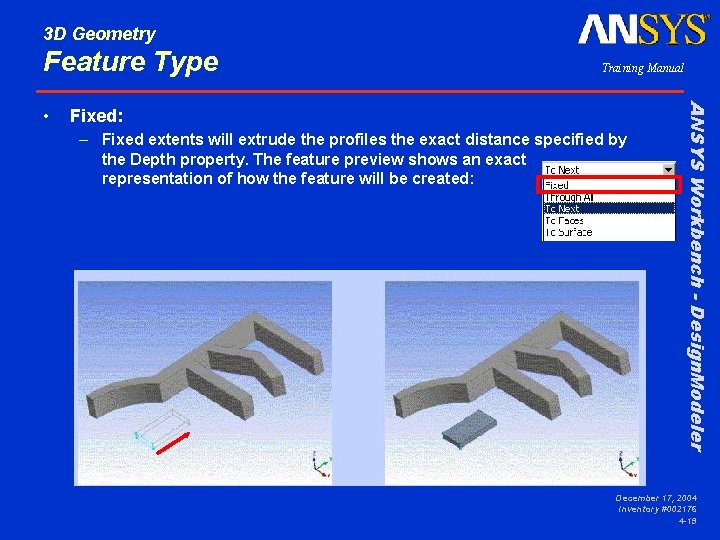
3 D Geometry Feature Type Fixed: – Fixed extents will extrude the profiles the exact distance specified by the Depth property. The feature preview shows an exact representation of how the feature will be created: Fixed ANSYS Workbench - Design. Modeler • Training Manual December 17, 2004 Inventory #002176 4 -19

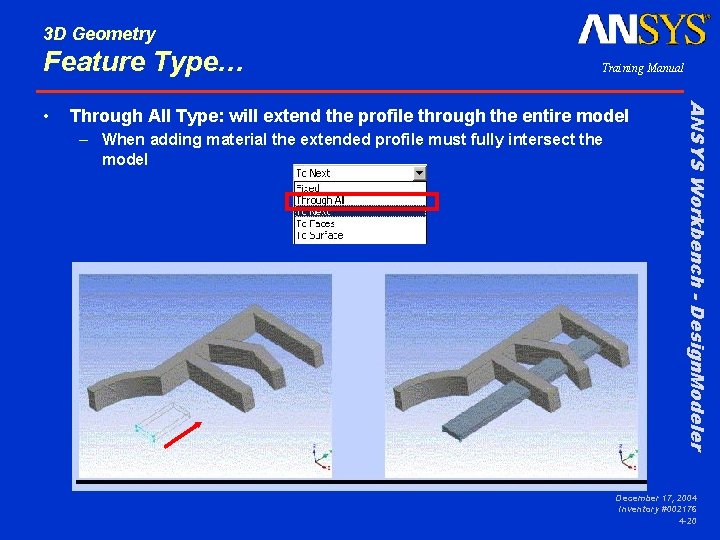
3 D Geometry Feature Type… Through All Type: will extend the profile through the entire model – When adding material the extended profile must fully intersect the model ANSYS Workbench - Design. Modeler • Training Manual December 17, 2004 Inventory #002176 4 -20

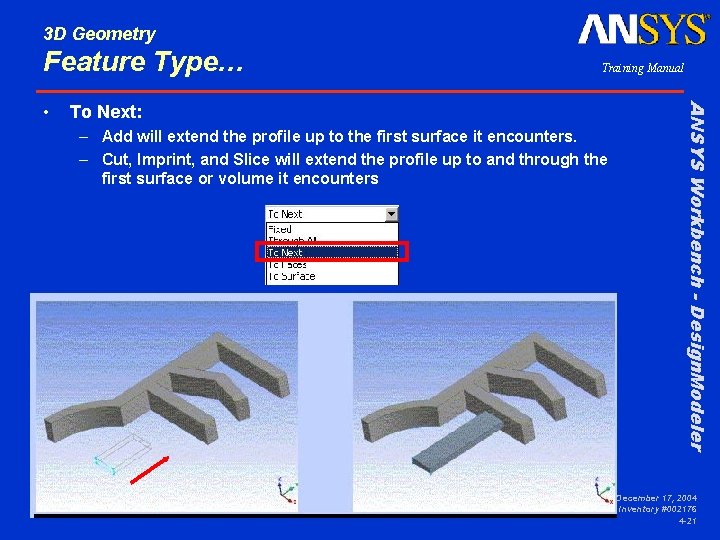
3 D Geometry Feature Type… To Next: – Add will extend the profile up to the first surface it encounters. – Cut, Imprint, and Slice will extend the profile up to and through the first surface or volume it encounters ANSYS Workbench - Design. Modeler • Training Manual December 17, 2004 Inventory #002176 4 -21

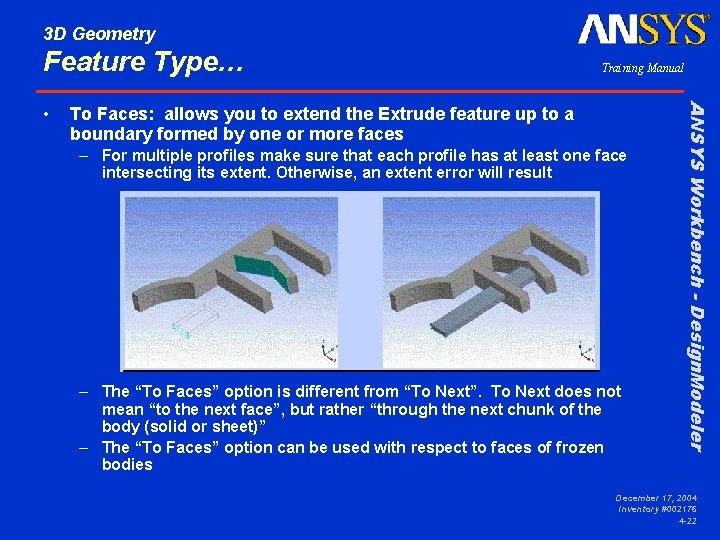
3 D Geometry Feature Type… To Faces: allows you to extend the Extrude feature up to a boundary formed by one or more faces – For multiple profiles make sure that each profile has at least one face intersecting its extent. Otherwise, an extent error will result – The “To Faces” option is different from “To Next”. To Next does not mean “to the next face”, but rather “through the next chunk of the body (solid or sheet)” – The “To Faces” option can be used with respect to faces of frozen bodies ANSYS Workbench - Design. Modeler • Training Manual December 17, 2004 Inventory #002176 4 -22

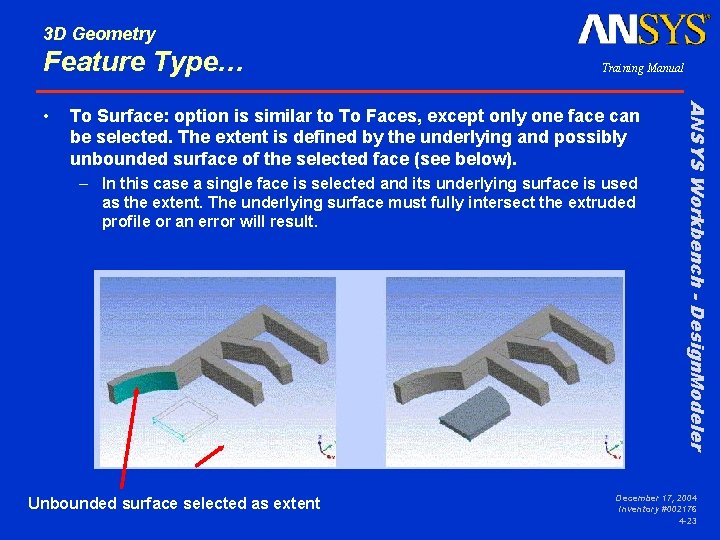
3 D Geometry Feature Type… To Surface: option is similar to To Faces, except only one face can be selected. The extent is defined by the underlying and possibly unbounded surface of the selected face (see below). – In this case a single face is selected and its underlying surface is used as the extent. The underlying surface must fully intersect the extruded profile or an error will result. Unbounded surface selected as extent ANSYS Workbench - Design. Modeler • Training Manual December 17, 2004 Inventory #002176 4 -23

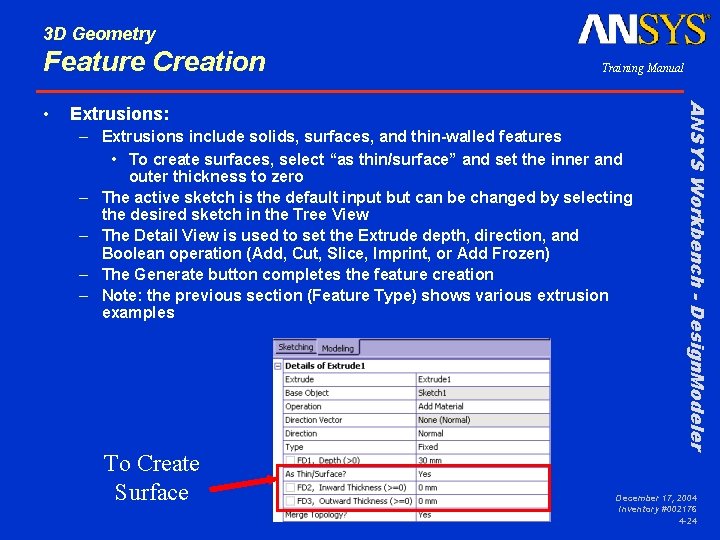
3 D Geometry Feature Creation Extrusions: – Extrusions include solids, surfaces, and thin-walled features • To create surfaces, select “as thin/surface” and set the inner and outer thickness to zero – The active sketch is the default input but can be changed by selecting the desired sketch in the Tree View – The Detail View is used to set the Extrude depth, direction, and Boolean operation (Add, Cut, Slice, Imprint, or Add Frozen) – The Generate button completes the feature creation – Note: the previous section (Feature Type) shows various extrusion examples To Create Surface ANSYS Workbench - Design. Modeler • Training Manual December 17, 2004 Inventory #002176 4 -24

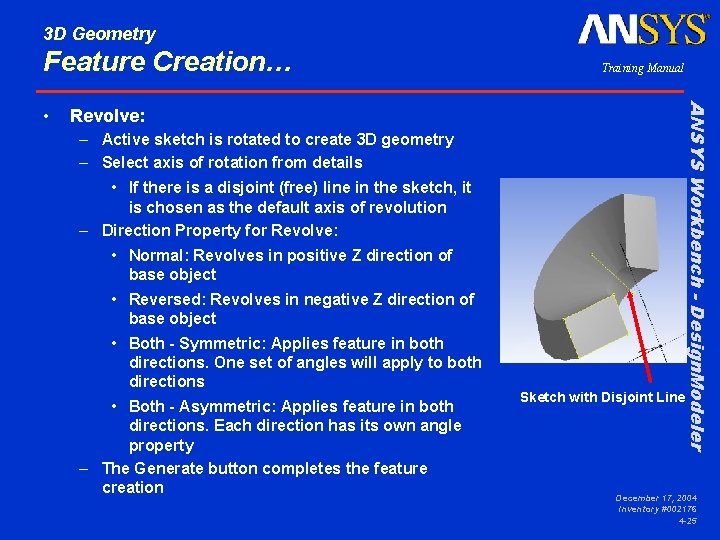
3 D Geometry Feature Creation… Revolve: – Active sketch is rotated to create 3 D geometry – Select axis of rotation from details • If there is a disjoint (free) line in the sketch, it is chosen as the default axis of revolution – Direction Property for Revolve: • Normal: Revolves in positive Z direction of base object • Reversed: Revolves in negative Z direction of base object • Both - Symmetric: Applies feature in both directions. One set of angles will apply to both directions • Both - Asymmetric: Applies feature in both directions. Each direction has its own angle property – The Generate button completes the feature creation Sketch with Disjoint Line ANSYS Workbench - Design. Modeler • Training Manual December 17, 2004 Inventory #002176 4 -25

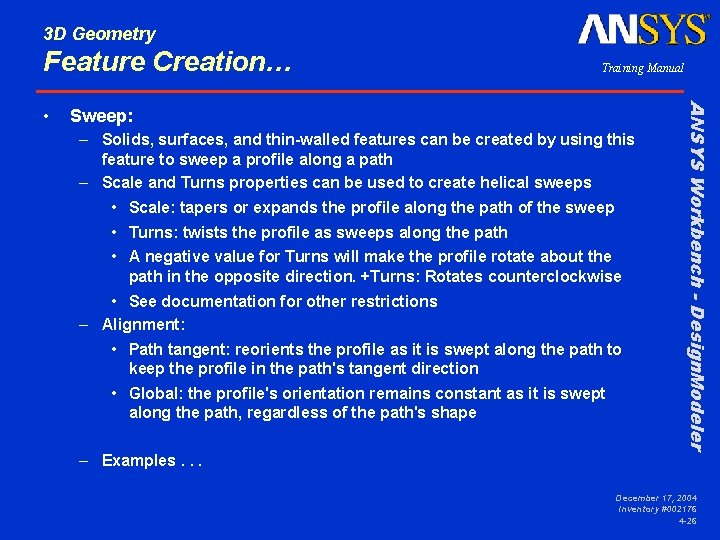
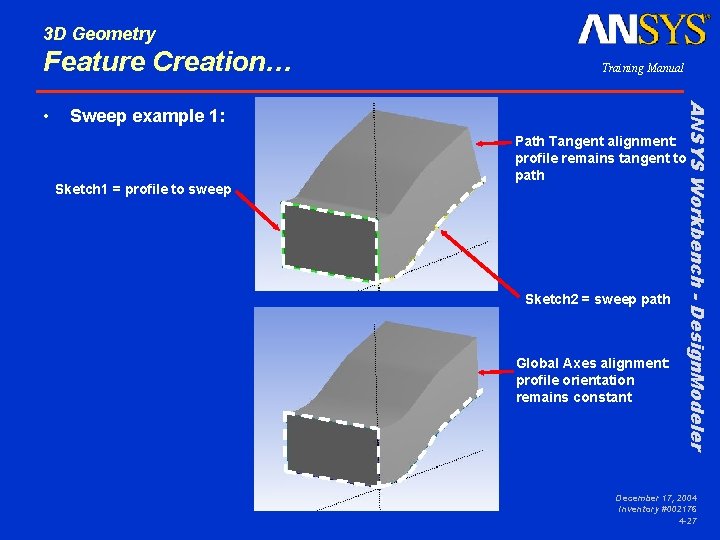
3 D Geometry Feature Creation… Sweep: – Solids, surfaces, and thin-walled features can be created by using this feature to sweep a profile along a path – Scale and Turns properties can be used to create helical sweeps • Scale: tapers or expands the profile along the path of the sweep • Turns: twists the profile as sweeps along the path • A negative value for Turns will make the profile rotate about the path in the opposite direction. +Turns: Rotates counterclockwise • See documentation for other restrictions – Alignment: • Path tangent: reorients the profile as it is swept along the path to keep the profile in the path's tangent direction • Global: the profile's orientation remains constant as it is swept along the path, regardless of the path's shape ANSYS Workbench - Design. Modeler • Training Manual – Examples. . . December 17, 2004 Inventory #002176 4 -26

3 D Geometry Feature Creation… Sweep example 1: Sketch 1 = profile to sweep ANSYS Workbench - Design. Modeler • Training Manual Path Tangent alignment: profile remains tangent to path Sketch 2 = sweep path Global Axes alignment: profile orientation remains constant December 17, 2004 Inventory #002176 4 -27

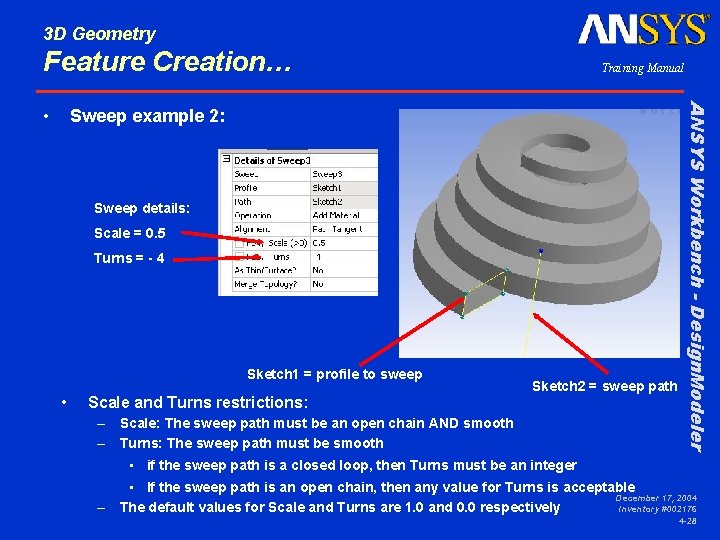
3 D Geometry Feature Creation… Sweep example 2: Sweep details: Scale = 0. 5 Turns = - 4 Sketch 1 = profile to sweep • Scale and Turns restrictions: Sketch 2 = sweep path – Scale: The sweep path must be an open chain AND smooth – Turns: The sweep path must be smooth ANSYS Workbench - Design. Modeler • Training Manual • if the sweep path is a closed loop, then Turns must be an integer • If the sweep path is an open chain, then any value for Turns is acceptable December 17, 2004 – The default values for Scale and Turns are 1. 0 and 0. 0 respectively Inventory #002176 4 -28

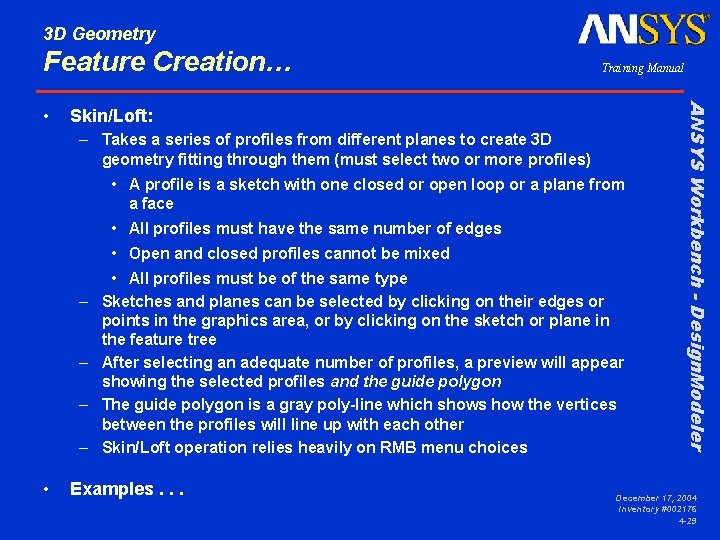
3 D Geometry Feature Creation… Skin/Loft: – Takes a series of profiles from different planes to create 3 D geometry fitting through them (must select two or more profiles) • A profile is a sketch with one closed or open loop or a plane from a face • All profiles must have the same number of edges • Open and closed profiles cannot be mixed – – • • All profiles must be of the same type Sketches and planes can be selected by clicking on their edges or points in the graphics area, or by clicking on the sketch or plane in the feature tree After selecting an adequate number of profiles, a preview will appear showing the selected profiles and the guide polygon The guide polygon is a gray poly-line which shows how the vertices between the profiles will line up with each other Skin/Loft operation relies heavily on RMB menu choices Examples. . . ANSYS Workbench - Design. Modeler • Training Manual December 17, 2004 Inventory #002176 4 -29

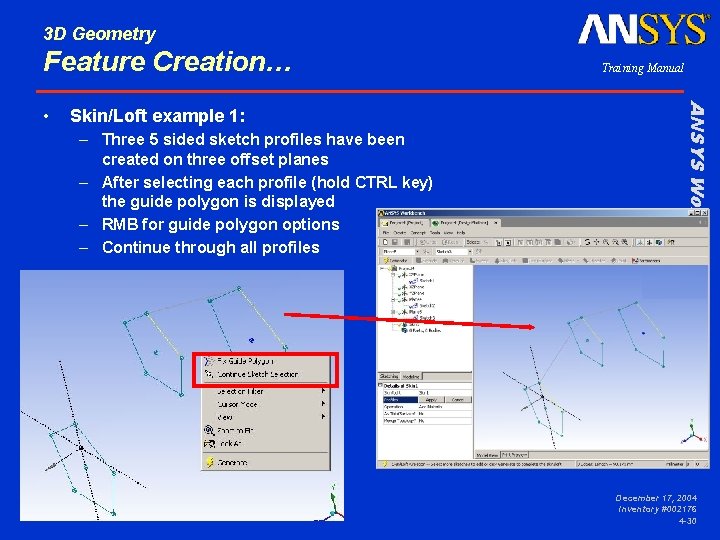
3 D Geometry Feature Creation… Skin/Loft example 1: – Three 5 sided sketch profiles have been created on three offset planes – After selecting each profile (hold CTRL key) the guide polygon is displayed – RMB for guide polygon options – Continue through all profiles ANSYS Workbench - Design. Modeler • Training Manual December 17, 2004 Inventory #002176 4 -30

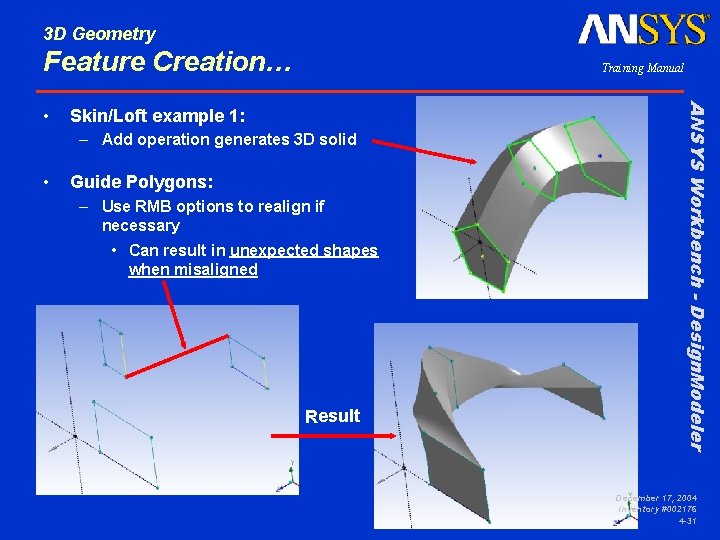
3 D Geometry Feature Creation… Skin/Loft example 1: – Add operation generates 3 D solid • Guide Polygons: – Use RMB options to realign if necessary • Can result in unexpected shapes when misaligned Result ANSYS Workbench - Design. Modeler • Training Manual December 17, 2004 Inventory #002176 4 -31

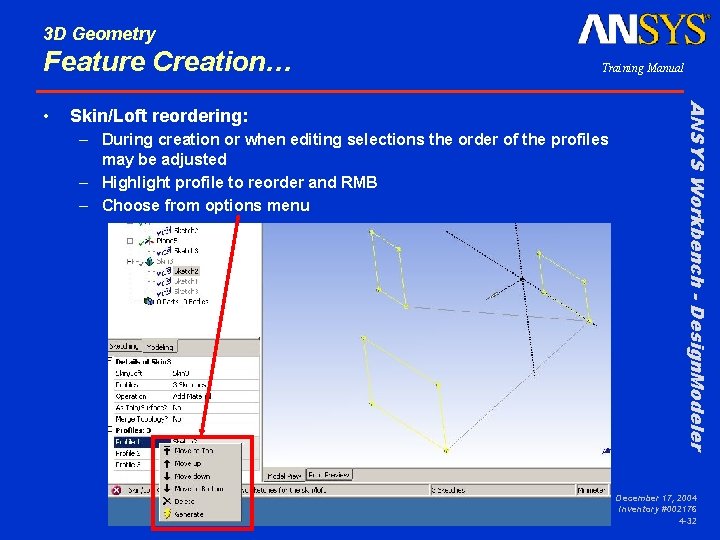
3 D Geometry Feature Creation… Skin/Loft reordering: – During creation or when editing selections the order of the profiles may be adjusted – Highlight profile to reorder and RMB – Choose from options menu ANSYS Workbench - Design. Modeler • Training Manual December 17, 2004 Inventory #002176 4 -32

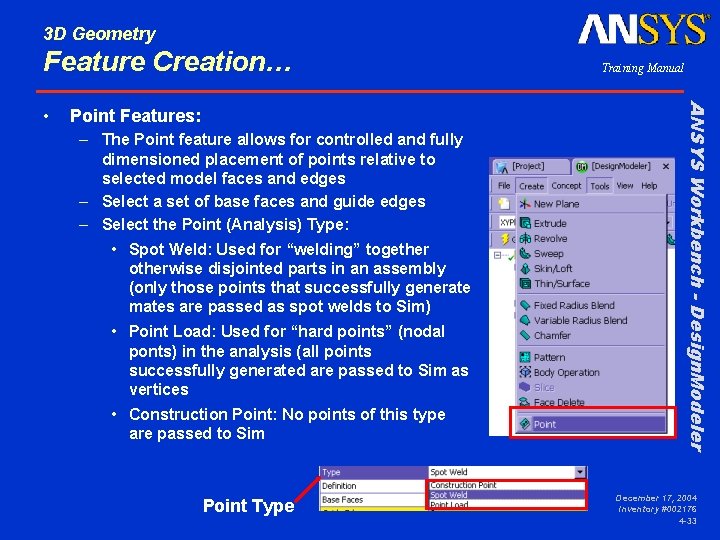
3 D Geometry Feature Creation… Point Features: – The Point feature allows for controlled and fully dimensioned placement of points relative to selected model faces and edges – Select a set of base faces and guide edges – Select the Point (Analysis) Type: • Spot Weld: Used for “welding” together otherwise disjointed parts in an assembly (only those points that successfully generate mates are passed as spot welds to Sim) • Point Load: Used for “hard points” (nodal ponts) in the analysis (all points successfully generated are passed to Sim as vertices • Construction Point: No points of this type are passed to Sim Point Type ANSYS Workbench - Design. Modeler • Training Manual December 17, 2004 Inventory #002176 4 -33

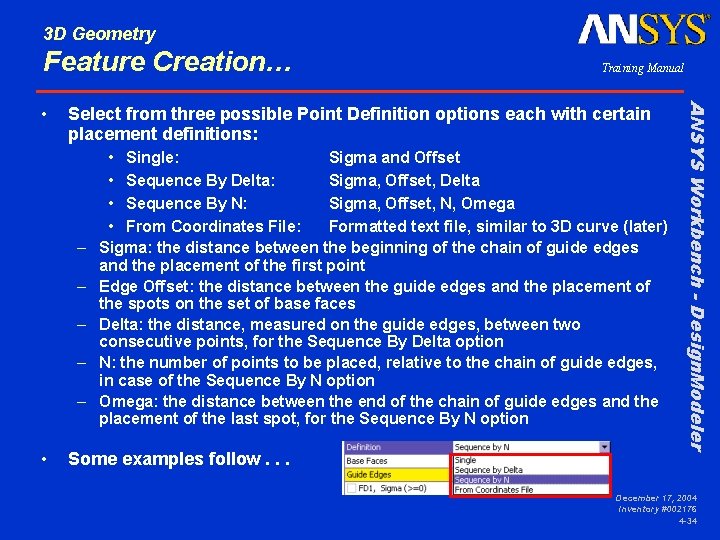
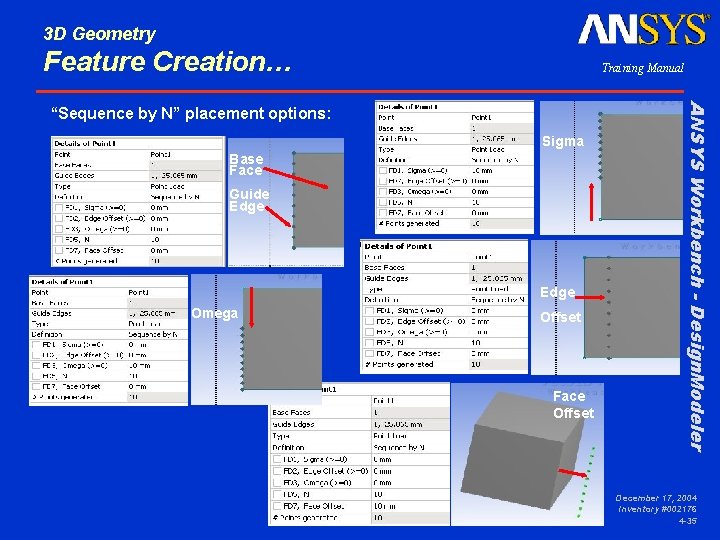
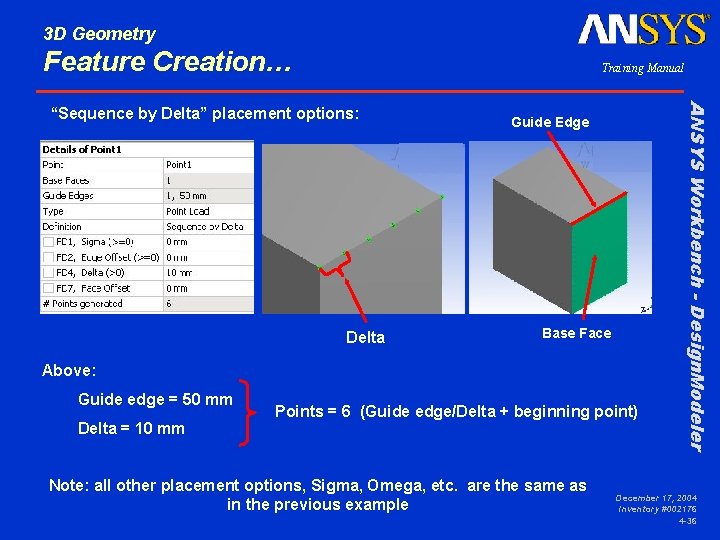
3 D Geometry Feature Creation… Select from three possible Point Definition options each with certain placement definitions: – – – • • Single: Sigma and Offset • Sequence By Delta: Sigma, Offset, Delta • Sequence By N: Sigma, Offset, N, Omega • From Coordinates File: Formatted text file, similar to 3 D curve (later) Sigma: the distance between the beginning of the chain of guide edges and the placement of the first point Edge Offset: the distance between the guide edges and the placement of the spots on the set of base faces Delta: the distance, measured on the guide edges, between two consecutive points, for the Sequence By Delta option N: the number of points to be placed, relative to the chain of guide edges, in case of the Sequence By N option Omega: the distance between the end of the chain of guide edges and the placement of the last spot, for the Sequence By N option Some examples follow. . . ANSYS Workbench - Design. Modeler • Training Manual December 17, 2004 Inventory #002176 4 -34

3 D Geometry Feature Creation… Training Manual Sigma Base Face Guide Edge Omega Offset Face Offset ANSYS Workbench - Design. Modeler “Sequence by N” placement options: December 17, 2004 Inventory #002176 4 -35

3 D Geometry Feature Creation… Training Manual Delta Guide Edge Base Face Above: Guide edge = 50 mm Delta = 10 mm Points = 6 (Guide edge/Delta + beginning point) Note: all other placement options, Sigma, Omega, etc. are the same as in the previous example ANSYS Workbench - Design. Modeler “Sequence by Delta” placement options: December 17, 2004 Inventory #002176 4 -36

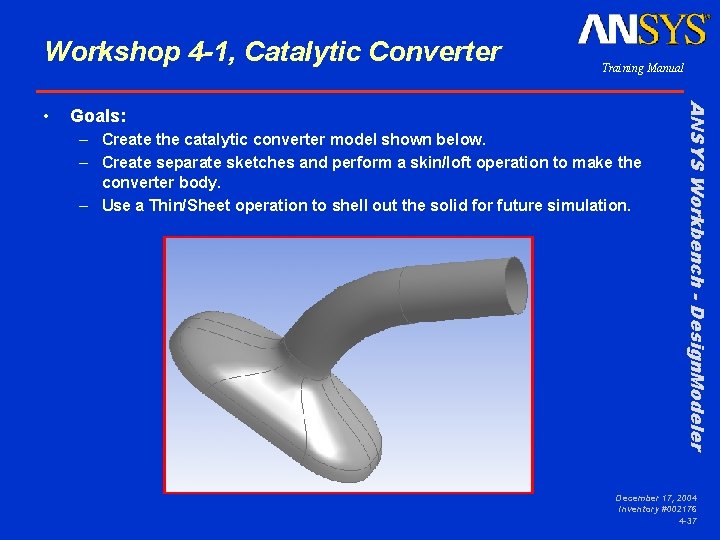
Workshop 4 -1, Catalytic Converter Goals: – Create the catalytic converter model shown below. – Create separate sketches and perform a skin/loft operation to make the converter body. – Use a Thin/Sheet operation to shell out the solid for future simulation. ANSYS Workbench - Design. Modeler • Training Manual December 17, 2004 Inventory #002176 4 -37

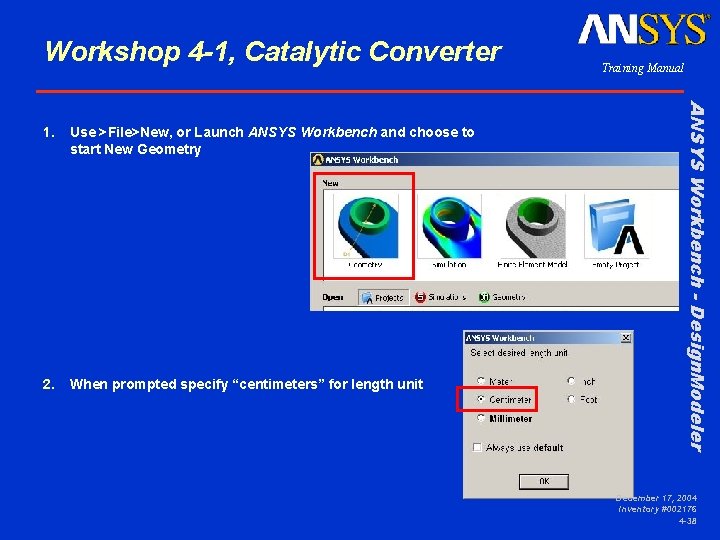
Workshop 4 -1, Catalytic Converter Use >File>New, or Launch ANSYS Workbench and choose to start New Geometry 2. When prompted specify “centimeters” for length unit ANSYS Workbench - Design. Modeler 1. Training Manual December 17, 2004 Inventory #002176 4 -38

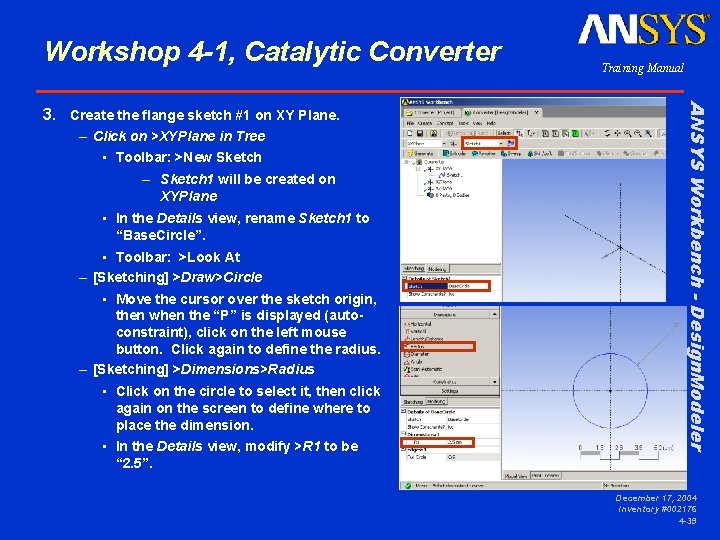
Workshop 4 -1, Catalytic Converter – Click on >XYPlane in Tree • Toolbar: >New Sketch – Sketch 1 will be created on XYPlane • In the Details view, rename Sketch 1 to “Base. Circle”. • Toolbar: >Look At – [Sketching] >Draw>Circle • Move the cursor over the sketch origin, then when the “P” is displayed (autoconstraint), click on the left mouse button. Click again to define the radius. – [Sketching] >Dimensions>Radius • Click on the circle to select it, then click again on the screen to define where to place the dimension. • In the Details view, modify >R 1 to be “ 2. 5”. ANSYS Workbench - Design. Modeler 3. Create the flange sketch #1 on XY Plane. Training Manual December 17, 2004 Inventory #002176 4 -39

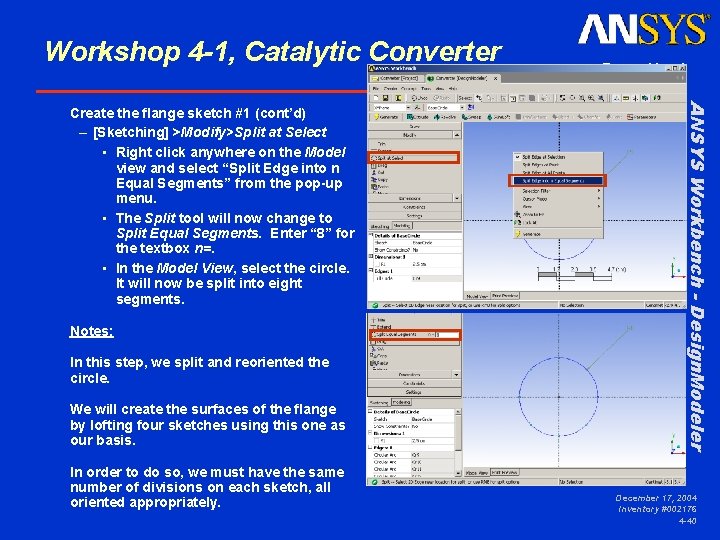
Workshop 4 -1, Catalytic Converter Notes: In this step, we split and reoriented the circle. We will create the surfaces of the flange by lofting four sketches using this one as our basis. In order to do so, we must have the same number of divisions on each sketch, all oriented appropriately. ANSYS Workbench - Design. Modeler Create the flange sketch #1 (cont’d) – [Sketching] >Modify>Split at Select • Right click anywhere on the Model view and select “Split Edge into n Equal Segments” from the pop-up menu. • The Split tool will now change to Split Equal Segments. Enter “ 8” for the textbox n=. • In the Model View, select the circle. It will now be split into eight segments. Training Manual December 17, 2004 Inventory #002176 4 -40

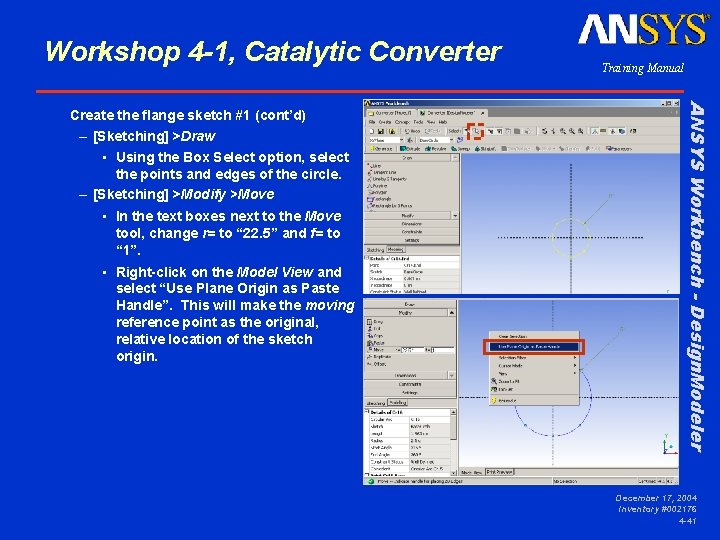
Workshop 4 -1, Catalytic Converter • Using the Box Select option, select the points and edges of the circle. – [Sketching] >Modify >Move • In the text boxes next to the Move tool, change r= to “ 22. 5” and f= to “ 1”. • Right-click on the Model View and select “Use Plane Origin as Paste Handle”. This will make the moving reference point as the original, relative location of the sketch origin. ANSYS Workbench - Design. Modeler Create the flange sketch #1 (cont’d) – [Sketching] >Draw Training Manual December 17, 2004 Inventory #002176 4 -41

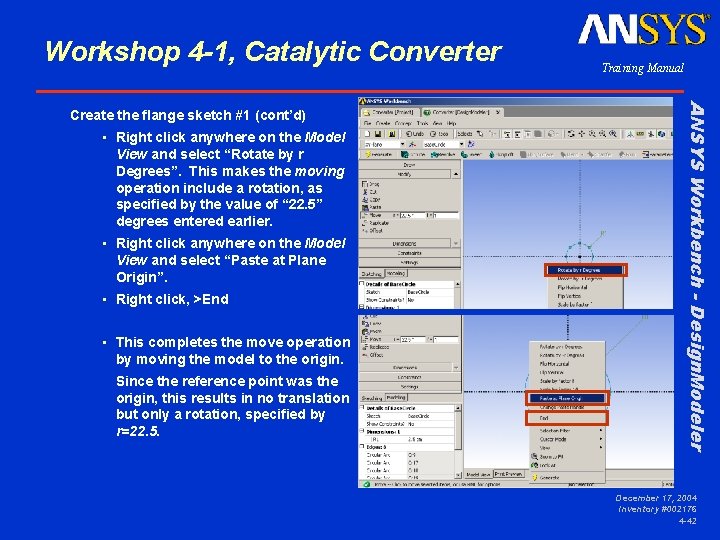
Workshop 4 -1, Catalytic Converter • Right click anywhere on the Model View and select “Rotate by r Degrees”. This makes the moving operation include a rotation, as specified by the value of “ 22. 5” degrees entered earlier. • Right click anywhere on the Model View and select “Paste at Plane Origin”. • Right click, >End • This completes the move operation by moving the model to the origin. Since the reference point was the origin, this results in no translation but only a rotation, specified by r=22. 5. ANSYS Workbench - Design. Modeler Create the flange sketch #1 (cont’d) Training Manual December 17, 2004 Inventory #002176 4 -42

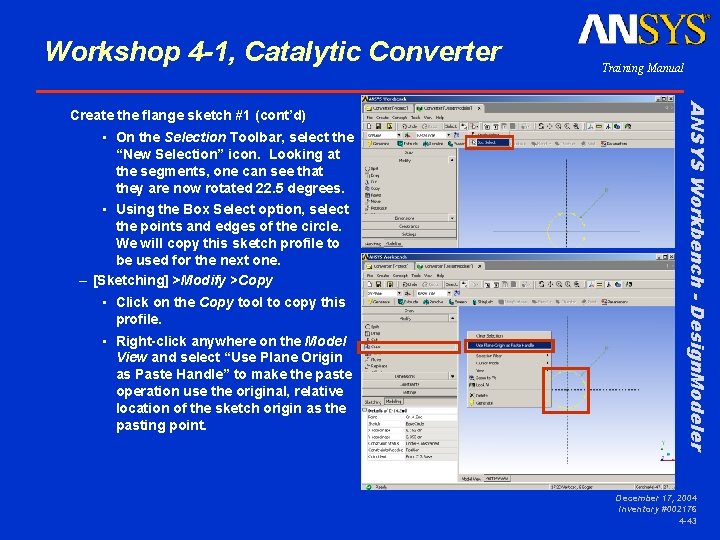
Workshop 4 -1, Catalytic Converter • On the Selection Toolbar, select the “New Selection” icon. Looking at the segments, one can see that they are now rotated 22. 5 degrees. • Using the Box Select option, select the points and edges of the circle. We will copy this sketch profile to be used for the next one. – [Sketching] >Modify >Copy • Click on the Copy tool to copy this profile. • Right-click anywhere on the Model View and select “Use Plane Origin as Paste Handle” to make the paste operation use the original, relative location of the sketch origin as the pasting point. ANSYS Workbench - Design. Modeler Create the flange sketch #1 (cont’d) Training Manual December 17, 2004 Inventory #002176 4 -43

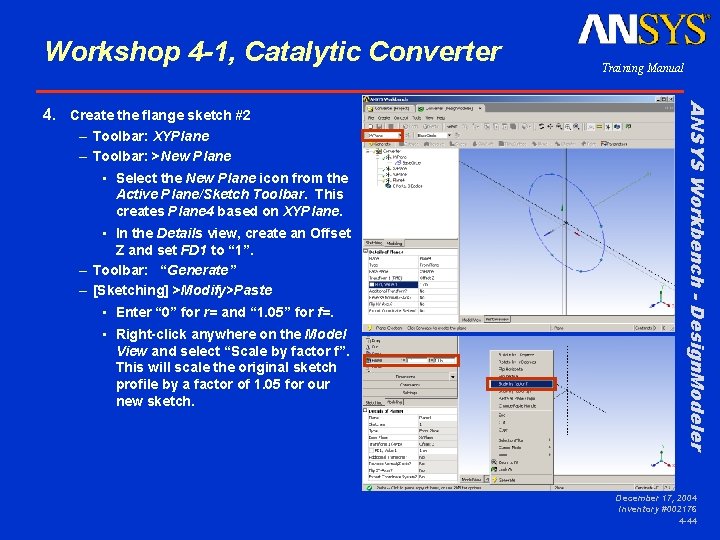
Workshop 4 -1, Catalytic Converter – Toolbar: XYPlane – Toolbar: >New Plane • Select the New Plane icon from the Active Plane/Sketch Toolbar. This creates Plane 4 based on XYPlane. • In the Details view, create an Offset Z and set FD 1 to “ 1”. – Toolbar: “Generate” – [Sketching] >Modify>Paste • Enter “ 0” for r= and “ 1. 05” for f=. • Right-click anywhere on the Model View and select “Scale by factor f”. This will scale the original sketch profile by a factor of 1. 05 for our new sketch. ANSYS Workbench - Design. Modeler 4. Create the flange sketch #2 Training Manual December 17, 2004 Inventory #002176 4 -44

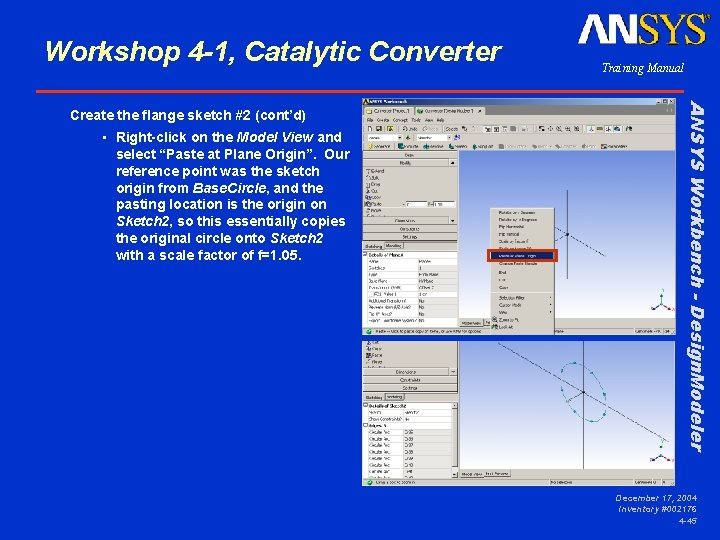
Workshop 4 -1, Catalytic Converter • Right-click on the Model View and select “Paste at Plane Origin”. Our reference point was the sketch origin from Base. Circle, and the pasting location is the origin on Sketch 2, so this essentially copies the original circle onto Sketch 2 with a scale factor of f=1. 05. ANSYS Workbench - Design. Modeler Create the flange sketch #2 (cont’d) Training Manual December 17, 2004 Inventory #002176 4 -45

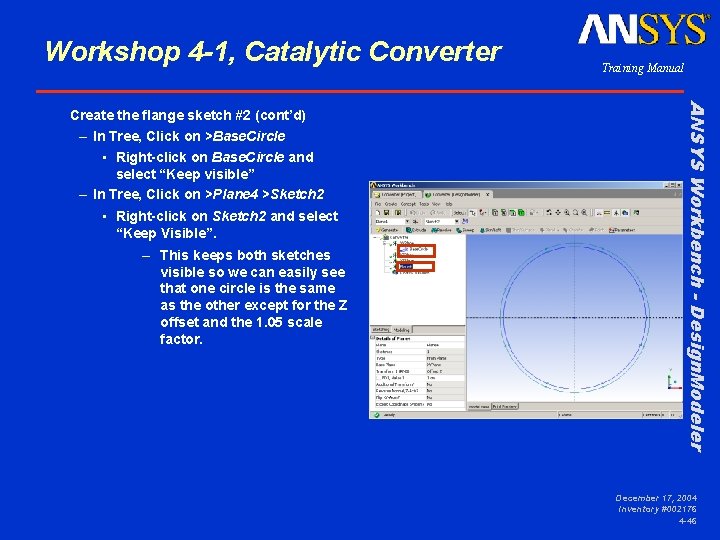
Workshop 4 -1, Catalytic Converter • Right-click on Base. Circle and select “Keep visible” – In Tree, Click on >Plane 4 >Sketch 2 • Right-click on Sketch 2 and select “Keep Visible”. – This keeps both sketches visible so we can easily see that one circle is the same as the other except for the Z offset and the 1. 05 scale factor. ANSYS Workbench - Design. Modeler Create the flange sketch #2 (cont’d) – In Tree, Click on >Base. Circle Training Manual December 17, 2004 Inventory #002176 4 -46

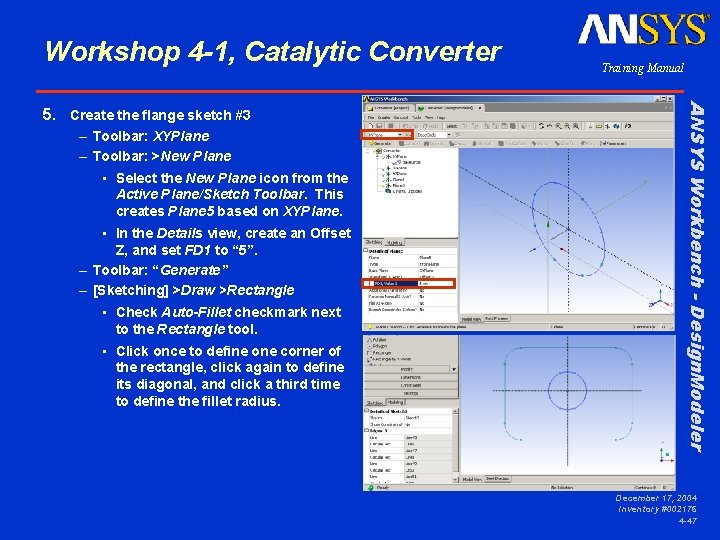
Workshop 4 -1, Catalytic Converter – Toolbar: XYPlane – Toolbar: >New Plane • Select the New Plane icon from the Active Plane/Sketch Toolbar. This creates Plane 5 based on XYPlane. • In the Details view, create an Offset Z, and set FD 1 to “ 5”. – Toolbar: “Generate” – [Sketching] >Draw >Rectangle • Check Auto-Fillet checkmark next to the Rectangle tool. • Click once to define one corner of the rectangle, click again to define its diagonal, and click a third time to define the fillet radius. ANSYS Workbench - Design. Modeler 5. Create the flange sketch #3 Training Manual December 17, 2004 Inventory #002176 4 -47

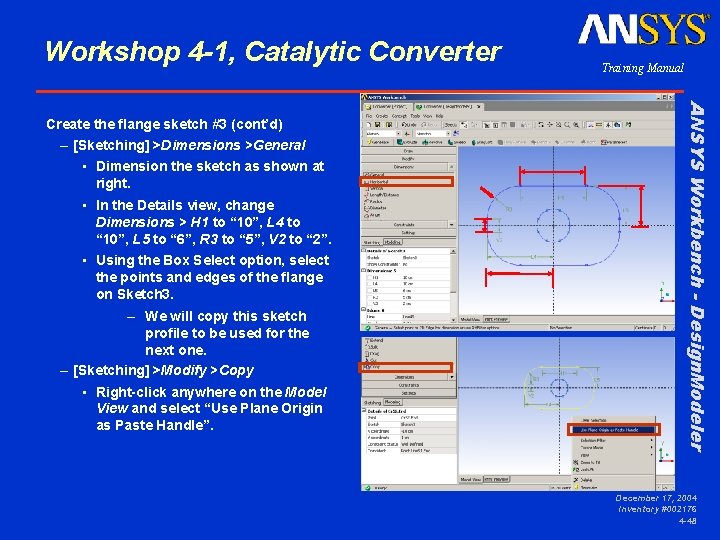
Workshop 4 -1, Catalytic Converter • Dimension the sketch as shown at right. • In the Details view, change Dimensions > H 1 to “ 10”, L 4 to “ 10”, L 5 to “ 6”, R 3 to “ 5”, V 2 to “ 2”. • Using the Box Select option, select the points and edges of the flange on Sketch 3. – We will copy this sketch profile to be used for the next one. – [Sketching] >Modify >Copy • Right-click anywhere on the Model View and select “Use Plane Origin as Paste Handle”. ANSYS Workbench - Design. Modeler Create the flange sketch #3 (cont’d) – [Sketching] >Dimensions >General Training Manual December 17, 2004 Inventory #002176 4 -48
![Workshop 4 1 Catalytic Converter Modeling Converter Plane 5 Toolbar New Plane Workshop 4 -1, Catalytic Converter – [Modeling] >Converter >Plane 5 – Toolbar: New Plane](https://slidetodoc.com/presentation_image_h/ec092608270bd2472290c7d30ff0b97c/image-49.jpg)
Workshop 4 -1, Catalytic Converter – [Modeling] >Converter >Plane 5 – Toolbar: New Plane • Select the New Plane icon from the Active Plane/Sketch Toolbar. This creates Plane 6 based on Plane 5. • In the Details view, create an Offset Z, and set FD 1 to “ 1”. – Toolbar: Generate – [Sketching] >Modify >Paste • Enter “ 0” for r= and “ 1. 05” for f=. Right-click anywhere on the Model View and select “Scale by factor f”. (scales the original sketch profile by a factor of 1. 05). • Right-click on the Model View and select “Paste at Plane Origin”. Our reference point was the sketch origin from Plane 5, and the pasting location is the origin on Plane 6, so this copies the rectangle onto Plane 6 and scales it by 1. 05. ANSYS Workbench - Design. Modeler 6. Create the flange sketch #4 Training Manual December 17, 2004 Inventory #002176 4 -49

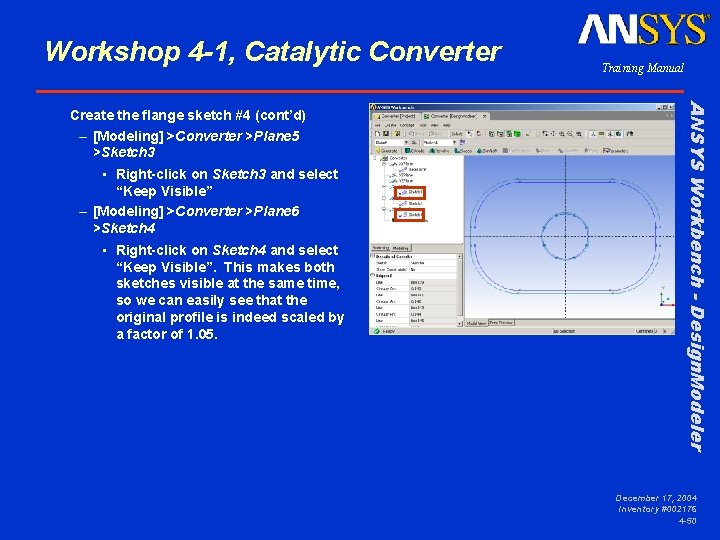
Workshop 4 -1, Catalytic Converter • Right-click on Sketch 3 and select “Keep Visible” – [Modeling] >Converter >Plane 6 >Sketch 4 • Right-click on Sketch 4 and select “Keep Visible”. This makes both sketches visible at the same time, so we can easily see that the original profile is indeed scaled by a factor of 1. 05. ANSYS Workbench - Design. Modeler Create the flange sketch #4 (cont’d) – [Modeling] >Converter >Plane 5 >Sketch 3 Training Manual December 17, 2004 Inventory #002176 4 -50

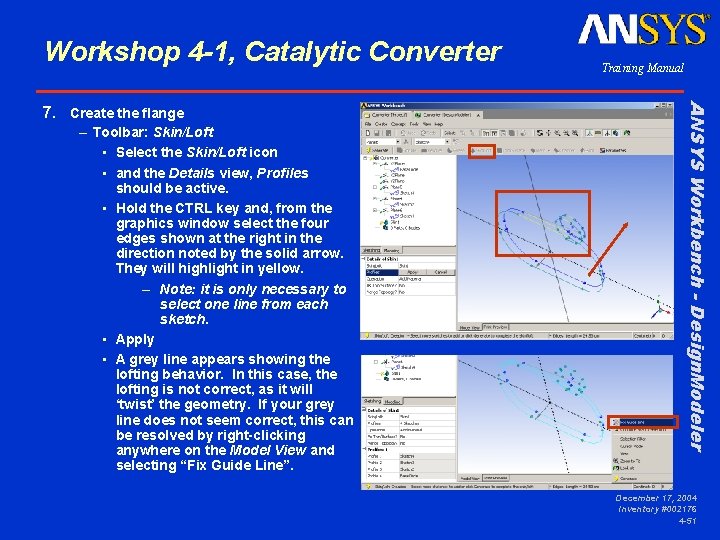
Workshop 4 -1, Catalytic Converter – Toolbar: Skin/Loft • Select the Skin/Loft icon • and the Details view, Profiles should be active. • Hold the CTRL key and, from the graphics window select the four edges shown at the right in the direction noted by the solid arrow. They will highlight in yellow. – Note: it is only necessary to select one line from each sketch. • Apply • A grey line appears showing the lofting behavior. In this case, the lofting is not correct, as it will ‘twist’ the geometry. If your grey line does not seem correct, this can be resolved by right-clicking anywhere on the Model View and selecting “Fix Guide Line”. ANSYS Workbench - Design. Modeler 7. Create the flange Training Manual December 17, 2004 Inventory #002176 4 -51

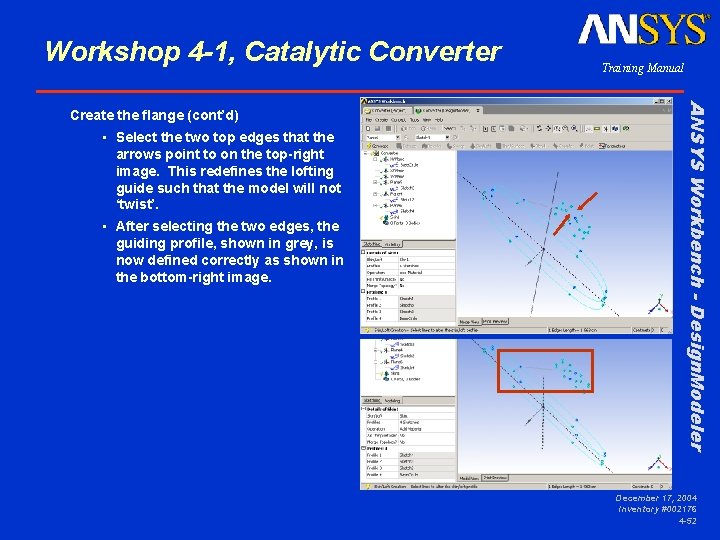
Workshop 4 -1, Catalytic Converter • Select the two top edges that the arrows point to on the top-right image. This redefines the lofting guide such that the model will not ‘twist’. • After selecting the two edges, the guiding profile, shown in grey, is now defined correctly as shown in the bottom-right image. ANSYS Workbench - Design. Modeler Create the flange (cont’d) Training Manual December 17, 2004 Inventory #002176 4 -52

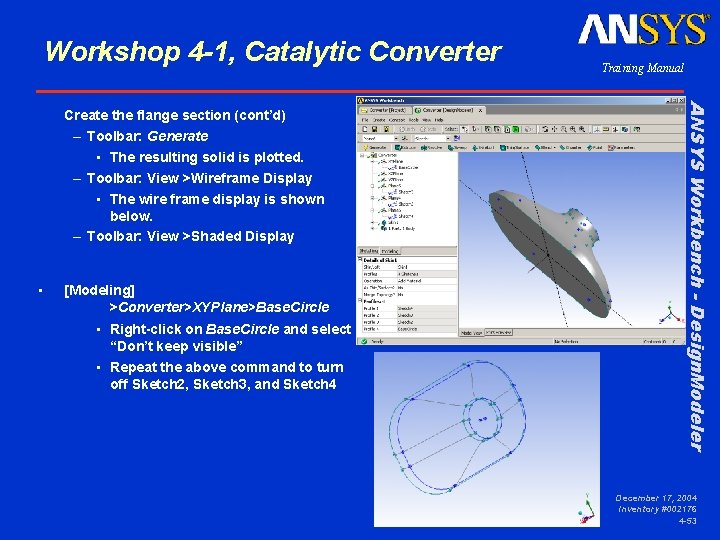
Workshop 4 -1, Catalytic Converter • The resulting solid is plotted. – Toolbar: View >Wireframe Display • The wire frame display is shown below. – Toolbar: View >Shaded Display • [Modeling] >Converter>XYPlane>Base. Circle • Right-click on Base. Circle and select “Don’t keep visible” • Repeat the above command to turn off Sketch 2, Sketch 3, and Sketch 4 ANSYS Workbench - Design. Modeler Create the flange section (cont’d) – Toolbar: Generate Training Manual December 17, 2004 Inventory #002176 4 -53
![Workshop 4 1 Catalytic Converter Modeling Converter XYPlane Toolbar New Sketch Workshop 4 -1, Catalytic Converter – [Modeling] >Converter >XYPlane – Toolbar: New Sketch •](https://slidetodoc.com/presentation_image_h/ec092608270bd2472290c7d30ff0b97c/image-54.jpg)
Workshop 4 -1, Catalytic Converter – [Modeling] >Converter >XYPlane – Toolbar: New Sketch • Sketch 5 will be created on XYPlane • Choose the “Look At” icon • In the Details view, rename Sketch 5 to “Revolve. Axis”. – [Sketching] >Draw >Line • Create a single line as shown on the bottom-right. Make sure it has an auto-constraint of “V” (vertical). – [Sketching] >Dimensions >General • Dimension the distance of the line from the vertical axis as “ 15”. ANSYS Workbench - Design. Modeler 8. Create the pipe bend Training Manual December 17, 2004 Inventory #002176 4 -54

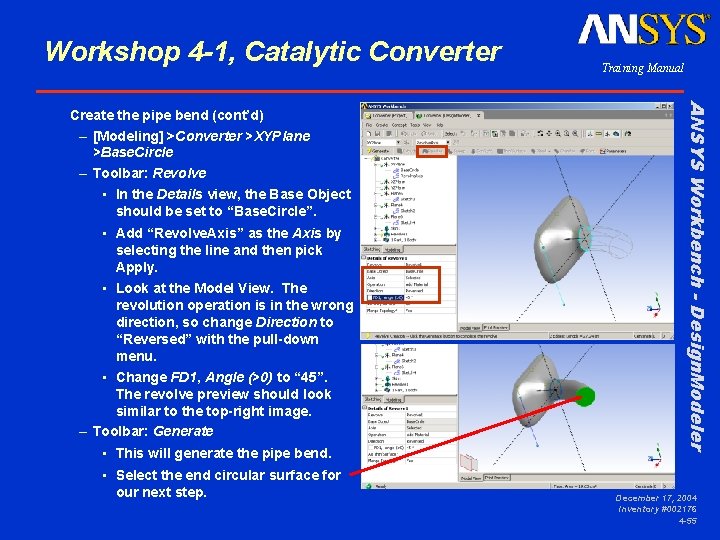
Workshop 4 -1, Catalytic Converter • In the Details view, the Base Object should be set to “Base. Circle”. • Add “Revolve. Axis” as the Axis by selecting the line and then pick Apply. • Look at the Model View. The revolution operation is in the wrong direction, so change Direction to “Reversed” with the pull-down menu. • Change FD 1, Angle (>0) to “ 45”. The revolve preview should look similar to the top-right image. – Toolbar: Generate • This will generate the pipe bend. • Select the end circular surface for our next step. ANSYS Workbench - Design. Modeler Create the pipe bend (cont’d) – [Modeling] >Converter >XYPlane >Base. Circle – Toolbar: Revolve Training Manual December 17, 2004 Inventory #002176 4 -55

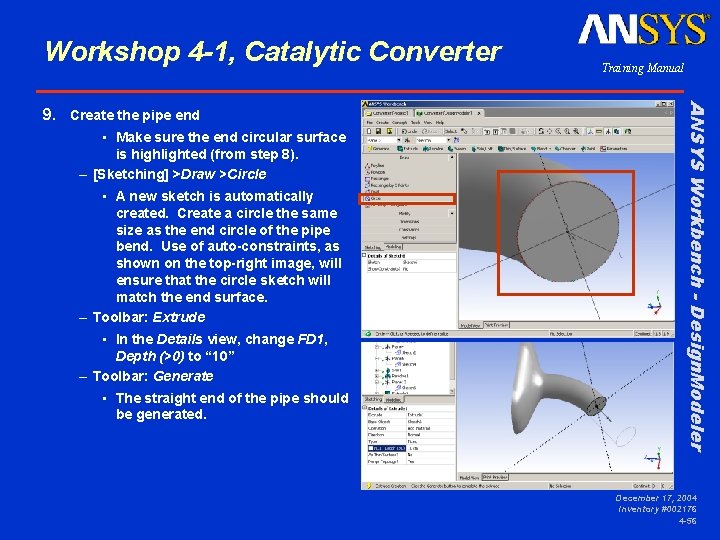
Workshop 4 -1, Catalytic Converter • Make sure the end circular surface is highlighted (from step 8). – [Sketching] >Draw >Circle • A new sketch is automatically created. Create a circle the same size as the end circle of the pipe bend. Use of auto-constraints, as shown on the top-right image, will ensure that the circle sketch will match the end surface. – Toolbar: Extrude • In the Details view, change FD 1, Depth (>0) to “ 10” – Toolbar: Generate • The straight end of the pipe should be generated. ANSYS Workbench - Design. Modeler 9. Create the pipe end Training Manual December 17, 2004 Inventory #002176 4 -56

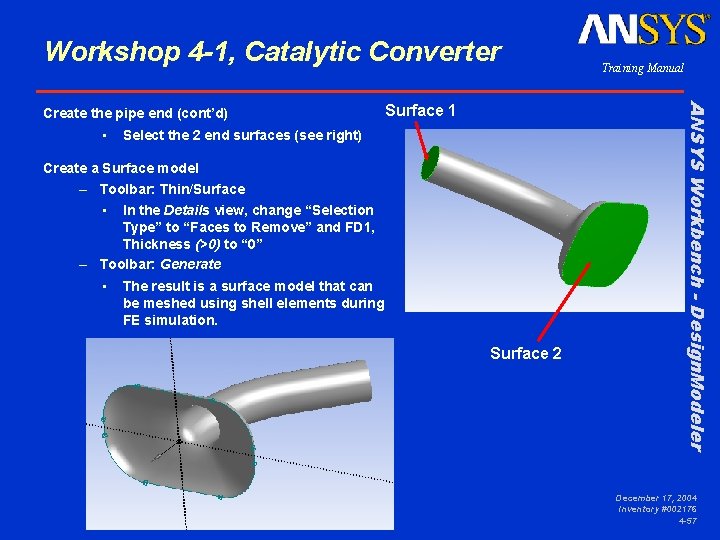
Workshop 4 -1, Catalytic Converter • Surface 1 Select the 2 end surfaces (see right) Create a Surface model – Toolbar: Thin/Surface • In the Details view, change “Selection Type” to “Faces to Remove” and FD 1, Thickness (>0) to “ 0” – Toolbar: Generate • The result is a surface model that can be meshed using shell elements during FE simulation. Surface 2 ANSYS Workbench - Design. Modeler Create the pipe end (cont’d) Training Manual December 17, 2004 Inventory #002176 4 -57

December 17, 2004 Inventory #002176 4 -58