Chapter 23 Machining Processes Used to Produce Round




- Slides: 71

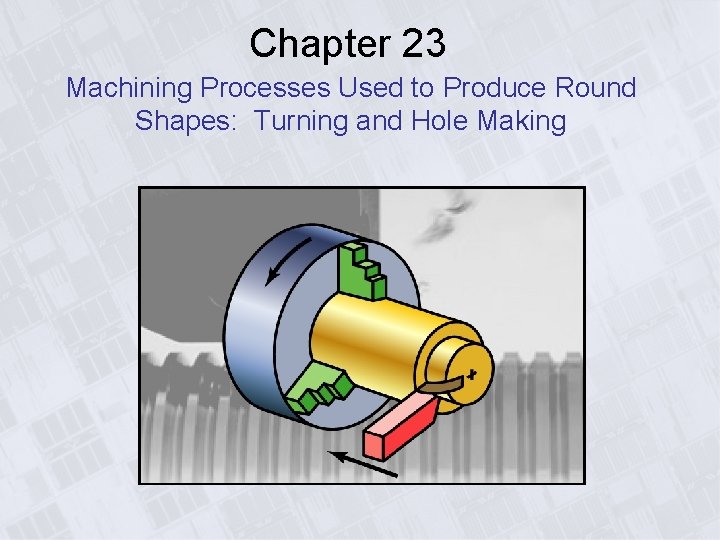
Chapter 23 Machining Processes Used to Produce Round Shapes: Turning and Hole Making

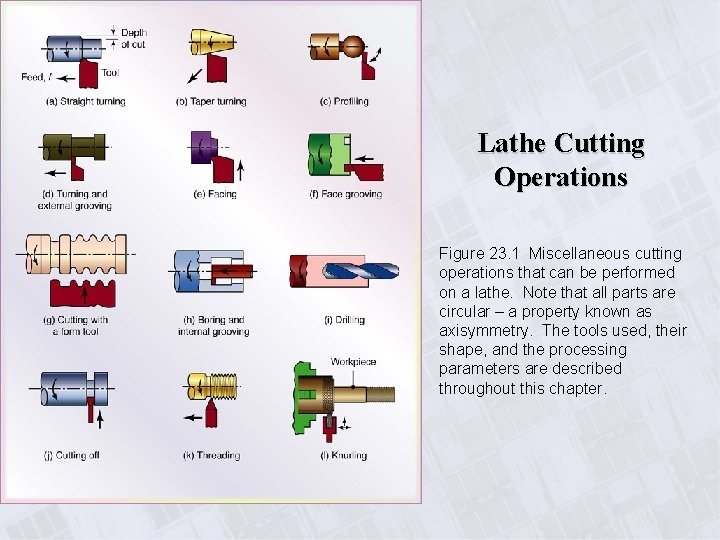
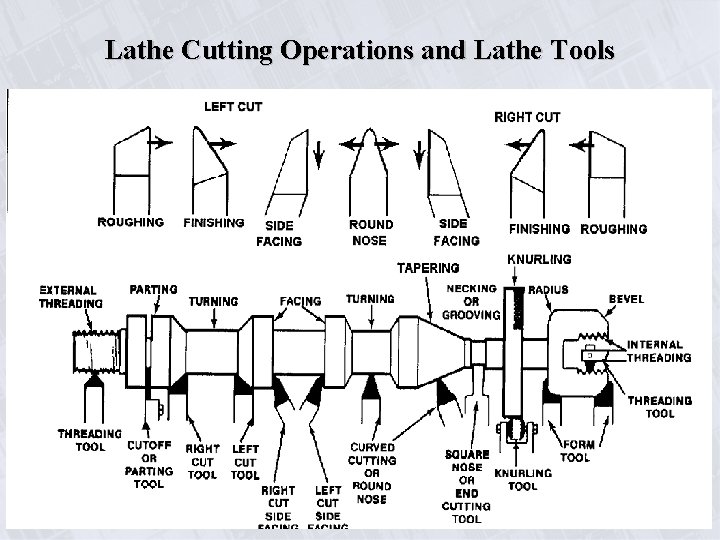
Lathe Cutting Operations Figure 23. 1 Miscellaneous cutting operations that can be performed on a lathe. Note that all parts are circular – a property known as axisymmetry. The tools used, their shape, and the processing parameters are described throughout this chapter.

Lathe Cutting Operations • Turning: to produce straight, conical, curved, or grooved workpieces (Figs. 23. la through d), such as shafts, spindles, and pins. • Facing: to produce a flat surface at the end of the part and perpendicular to its axis (Fig. 23. 1 e), useful for parts that are assembled with other components. Face grooving produces grooves for applications such as O-ring seats (Fig. 23. 1 f). • Cutting with form tools: (Fig. 23. 1 g) to produce various axisymmetric shapes for functional or aesthetic purposes. • Boring: to enlarge a hole or cylindrical cavity made by a previous process or to produce circular internal grooves (Fig. 23. 1 h).

Lathe Cutting Operations • Drilling: to produce a hole (Fig. 23. 1 i), which may be followed by boring to improve its dimensional accuracy and surface finish. • Parting: also called cutting off, to cut a piece from the end of a part, as is done in the production of slugs or blanks for additional processing into discrete products (Fig. 23. 1 j). • Threading: to produce external or internal threads (Fig. 23. 1 k). • Knurling: to produce a regularly shaped roughness on cylindrical surfaces, as in making knobs and handles (Fig. 23. 1 l).

Lathe Cutting Operations and Lathe Tools

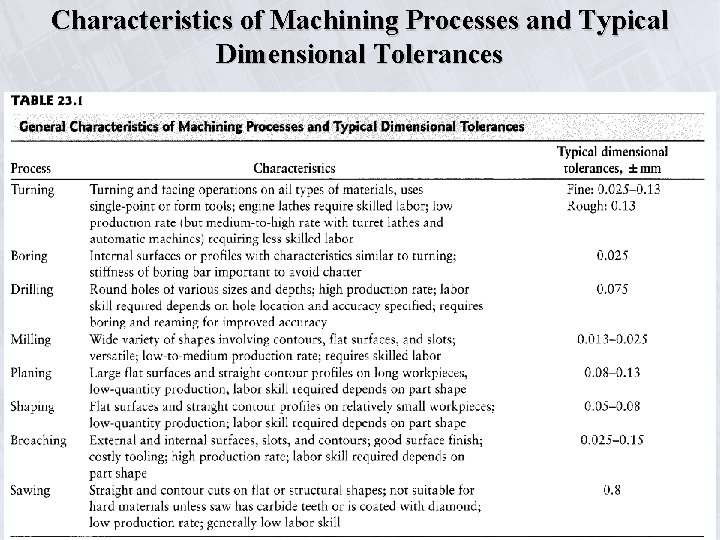
Characteristics of Machining Processes and Typical Dimensional Tolerances

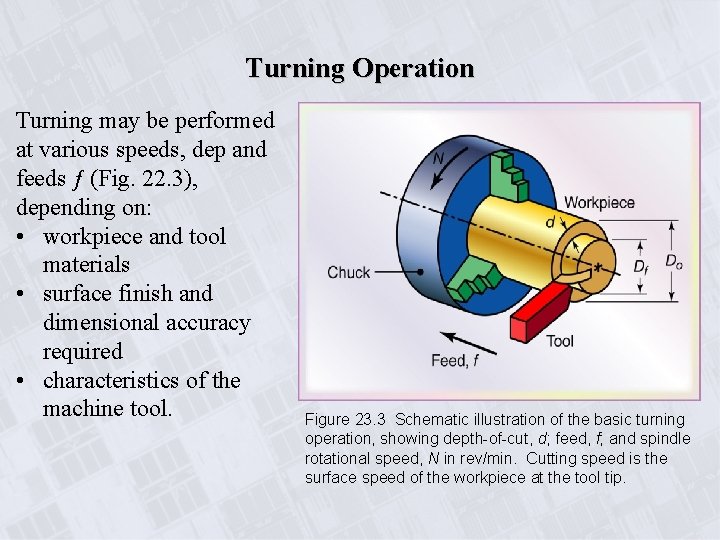
Turning Operation Turning may be performed at various speeds, dep and feeds ƒ (Fig. 22. 3), depending on: • workpiece and tool materials • surface finish and dimensional accuracy required • characteristics of the machine tool. Figure 23. 3 Schematic illustration of the basic turning operation, showing depth-of-cut, d; feed, f; and spindle rotational speed, N in rev/min. Cutting speed is the surface speed of the workpiece at the tool tip.

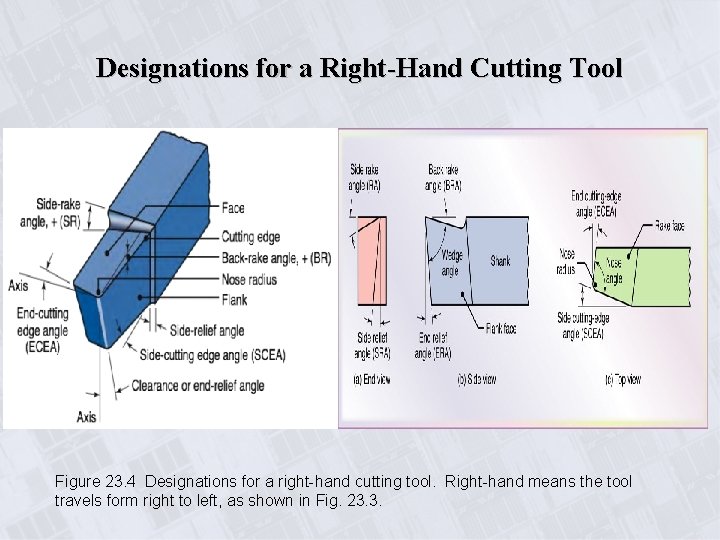
Designations for a Right-Hand Cutting Tool Figure 23. 4 Designations for a right-hand cutting tool. Right-hand means the tool travels form right to left, as shown in Fig. 23. 3.

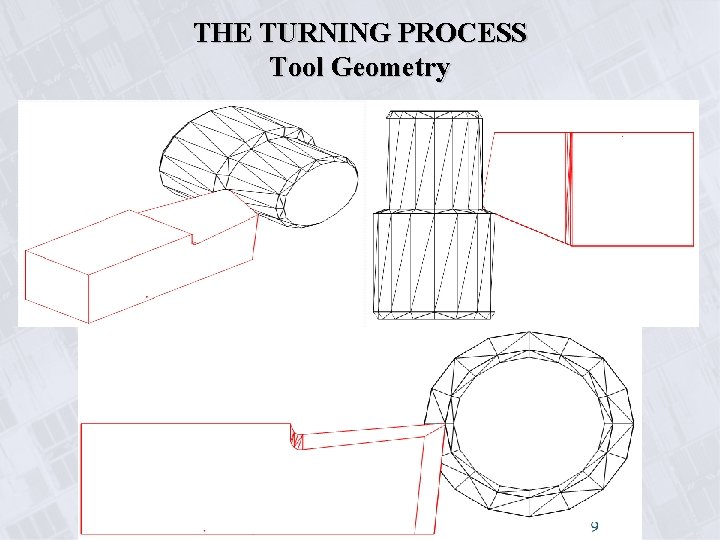
THE TURNING PROCESS Tool Geometry

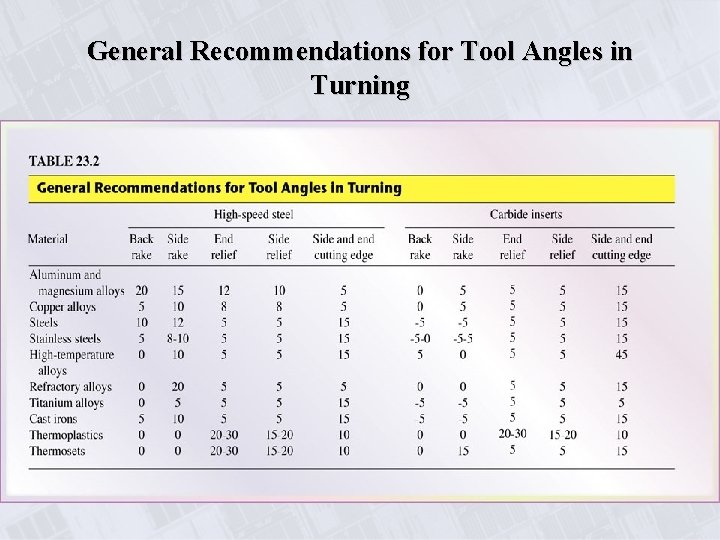
General Recommendations for Tool Angles in Turning

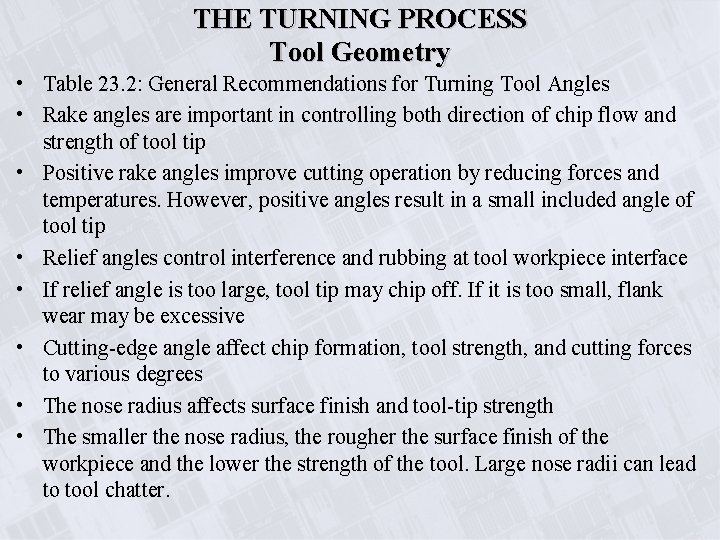
THE TURNING PROCESS Tool Geometry • Table 23. 2: General Recommendations for Turning Tool Angles • Rake angles are important in controlling both direction of chip flow and strength of tool tip • Positive rake angles improve cutting operation by reducing forces and temperatures. However, positive angles result in a small included angle of tool tip • Relief angles control interference and rubbing at tool workpiece interface • If relief angle is too large, tool tip may chip off. If it is too small, flank wear may be excessive • Cutting-edge angle affect chip formation, tool strength, and cutting forces to various degrees • The nose radius affects surface finish and tool-tip strength • The smaller the nose radius, the rougher the surface finish of the workpiece and the lower the strength of the tool. Large nose radii can lead to tool chatter.

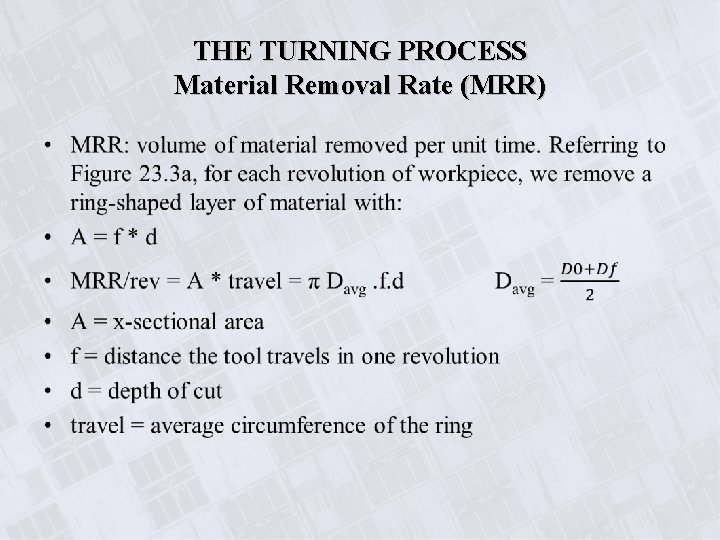
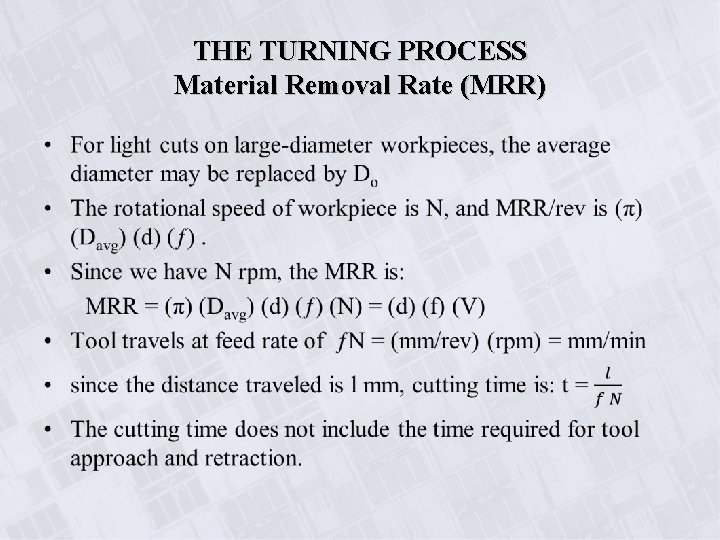
THE TURNING PROCESS Material Removal Rate (MRR) •

THE TURNING PROCESS Material Removal Rate (MRR) •

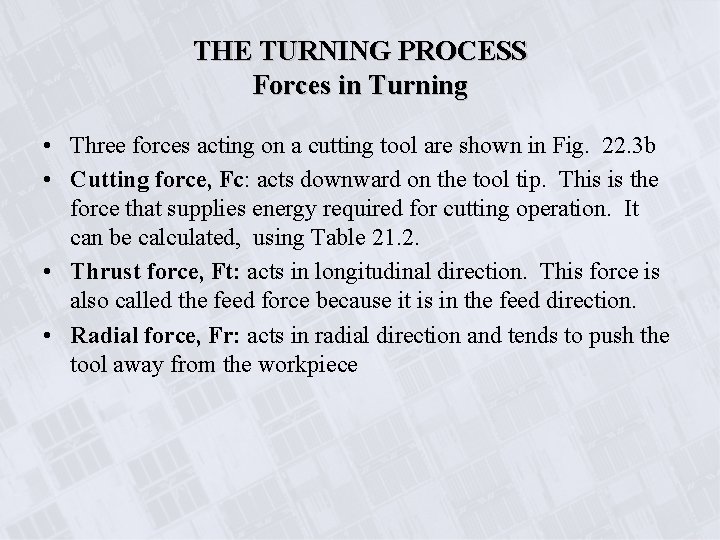
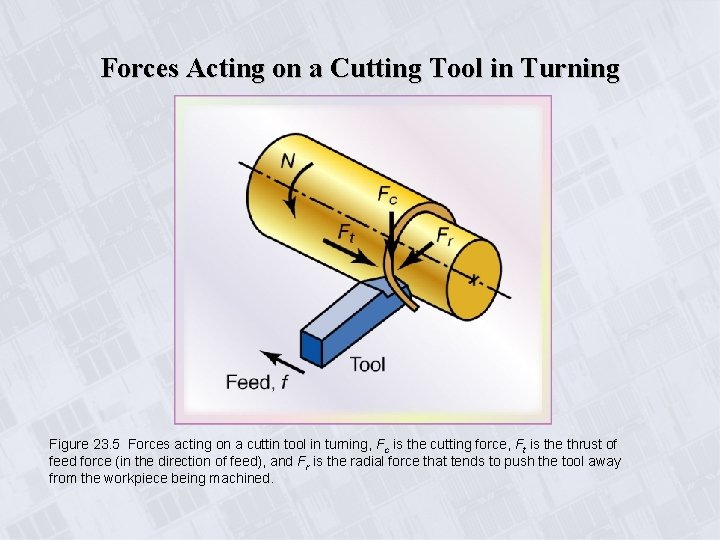
THE TURNING PROCESS Forces in Turning • Three forces acting on a cutting tool are shown in Fig. 22. 3 b • Cutting force, Fc: acts downward on the tool tip. This is the force that supplies energy required for cutting operation. It can be calculated, using Table 21. 2. • Thrust force, Ft: acts in longitudinal direction. This force is also called the feed force because it is in the feed direction. • Radial force, Fr: acts in radial direction and tends to push the tool away from the workpiece

Forces Acting on a Cutting Tool in Turning Figure 23. 5 Forces acting on a cuttin tool in turning, Fc is the cutting force, Ft is the thrust of feed force (in the direction of feed), and Fr is the radial force that tends to push the tool away from the workpiece being machined.

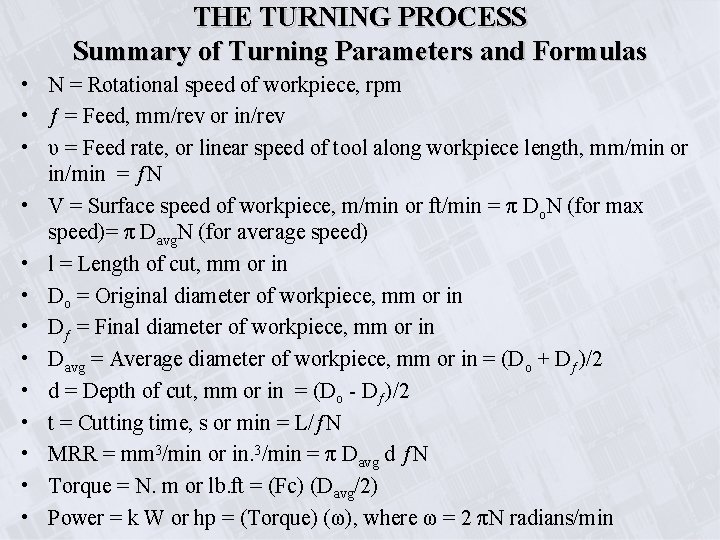
THE TURNING PROCESS Summary of Turning Parameters and Formulas • N = Rotational speed of workpiece, rpm • ƒ = Feed, mm/rev or in/rev • υ = Feed rate, or linear speed of tool along workpiece length, mm/min or in/min = ƒN • V = Surface speed of workpiece, m/min or ft/min = π Do. N (for max speed)= π Davg. N (for average speed) • l = Length of cut, mm or in • Do = Original diameter of workpiece, mm or in • Dƒ = Final diameter of workpiece, mm or in • Davg = Average diameter of workpiece, mm or in = (Do + Dƒ)/2 • d = Depth of cut, mm or in = (Do - Dƒ)/2 • t = Cutting time, s or min = L/ƒN • MRR = mm 3/min or in. 3/min = π Davg d ƒN • Torque = N. m or lb. ft = (Fc) (Davg/2) • Power = k W or hp = (Torque) (ω), where ω = 2 πN radians/min

Summary of Turning Parameters and Formulas

THE TURNING PROCESS Summary of Turning Parameters and Formulas • Roughing and Finishing Cuts. • In machining, the usual procedure is to first perform one or more roughing cuts at high feed rates and large depths of cut (and thereforehigh material~removal rates), but with little consideration for dimensional tolerance and surface roughness. • These cuts are then followed by a finishing cut, at a lower feed and depth of cut in order to produce a good surface finish.

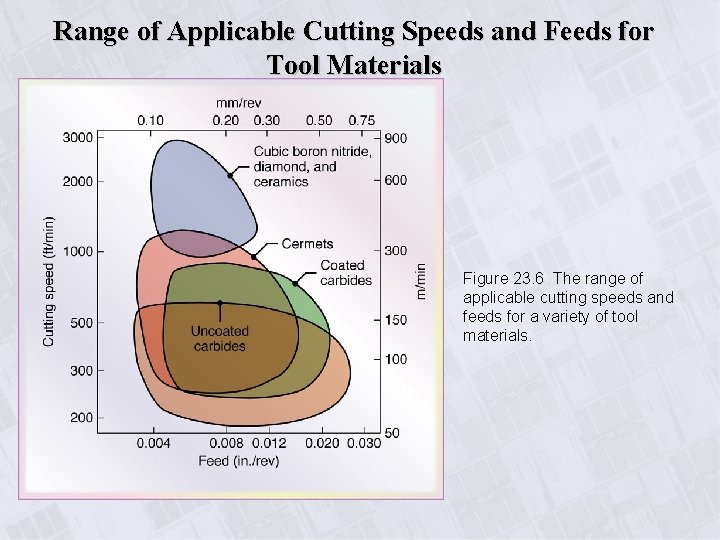
Range of Applicable Cutting Speeds and Feeds for Tool Materials Figure 23. 6 The range of applicable cutting speeds and feeds for a variety of tool materials.

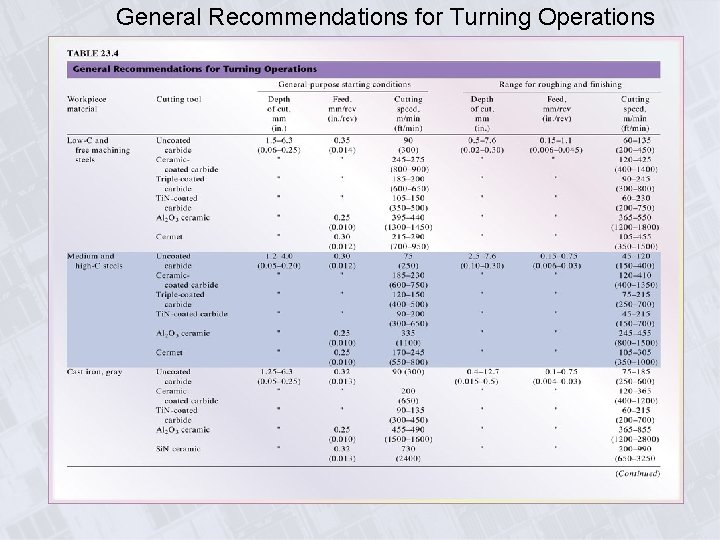
General Recommendations for Turning Operations

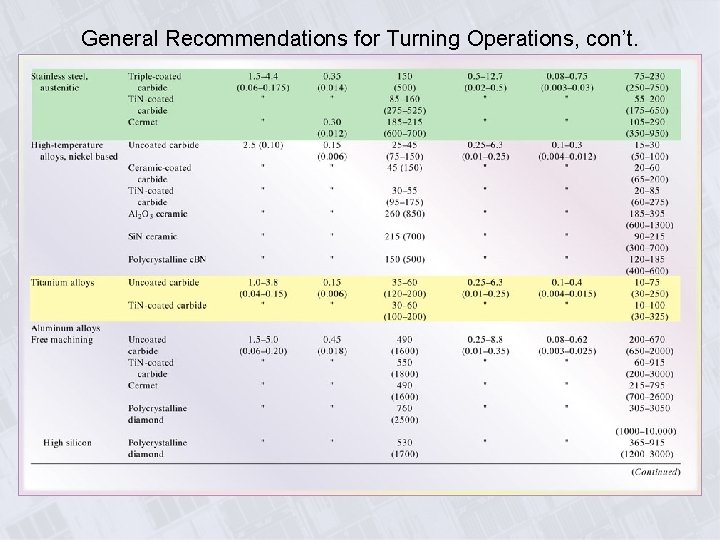
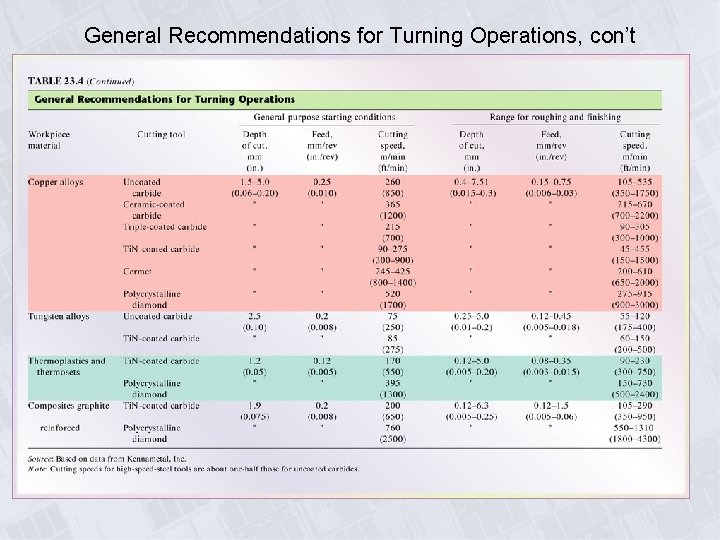
General Recommendations for Turning Operations, con’t.

General Recommendations for Turning Operations, con’t

Specific energy for cutting

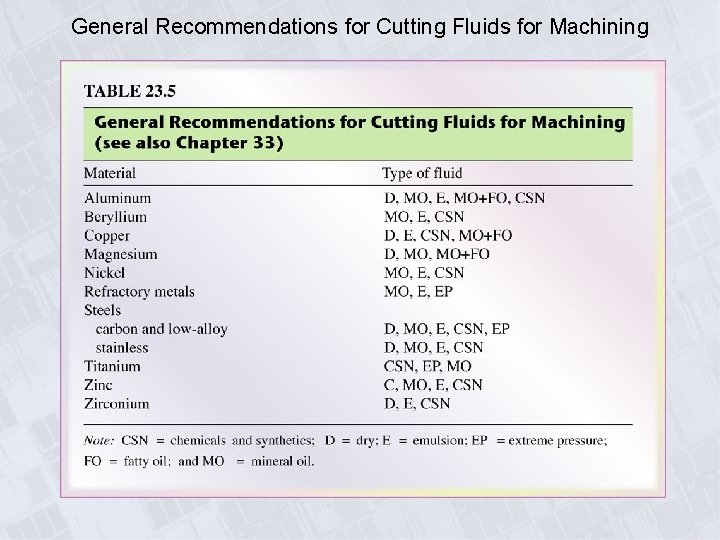
General Recommendations for Cutting Fluids for Machining

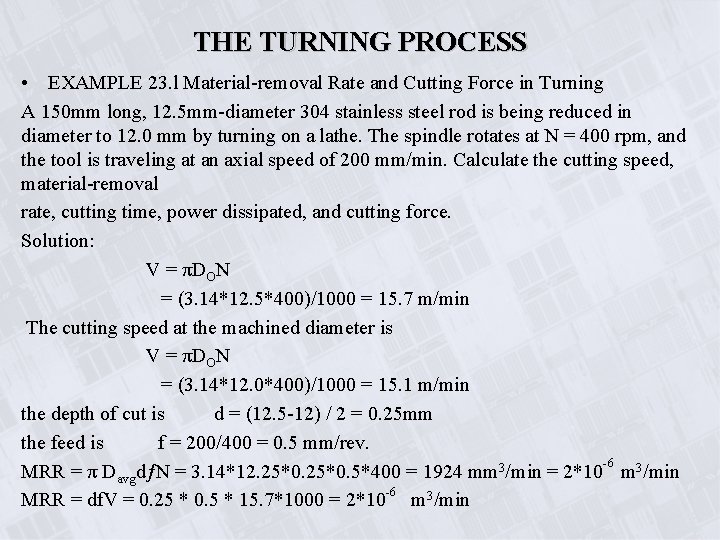
THE TURNING PROCESS • EXAMPLE 23. l Material-removal Rate and Cutting Force in Turning A 150 mm long, 12. 5 mm-diameter 304 stainless steel rod is being reduced in diameter to 12. 0 mm by turning on a lathe. The spindle rotates at N = 400 rpm, and the tool is traveling at an axial speed of 200 mm/min. Calculate the cutting speed, material-removal rate, cutting time, power dissipated, and cutting force. Solution: V = πDON = (3. 14*12. 5*400)/1000 = 15. 7 m/min The cutting speed at the machined diameter is V = πDON = (3. 14*12. 0*400)/1000 = 15. 1 m/min the depth of cut is d = (12. 5 -12) / 2 = 0. 25 mm the feed is f = 200/400 = 0. 5 mm/rev. -6 MRR = π DavgdƒN = 3. 14*12. 25*0. 5*400 = 1924 mm 3/min = 2*10 m 3/min -6 MRR = df. V = 0. 25 * 0. 5 * 15. 7*1000 = 2*10 m 3/min

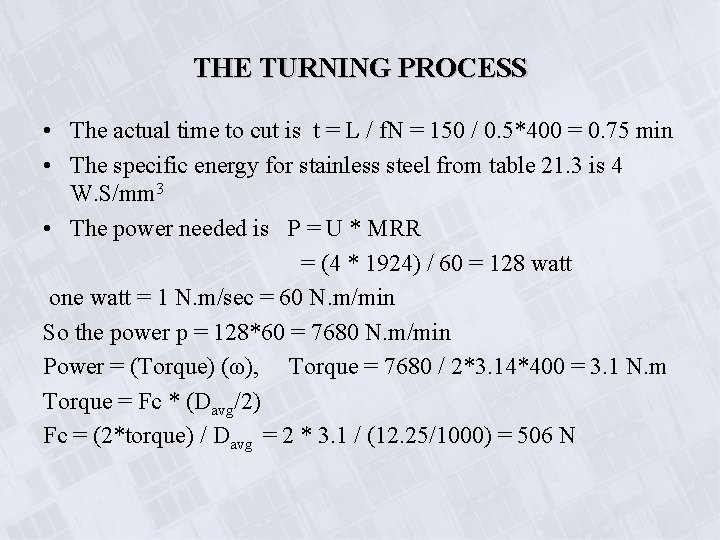
THE TURNING PROCESS • The actual time to cut is t = L / f. N = 150 / 0. 5*400 = 0. 75 min • The specific energy for stainless steel from table 21. 3 is 4 W. S/mm 3 • The power needed is P = U * MRR = (4 * 1924) / 60 = 128 watt one watt = 1 N. m/sec = 60 N. m/min So the power p = 128*60 = 7680 N. m/min Power = (Torque) (ω), Torque = 7680 / 2*3. 14*400 = 3. 1 N. m Torque = Fc * (Davg/2) Fc = (2*torque) / Davg = 2 * 3. 1 / (12. 25/1000) = 506 N

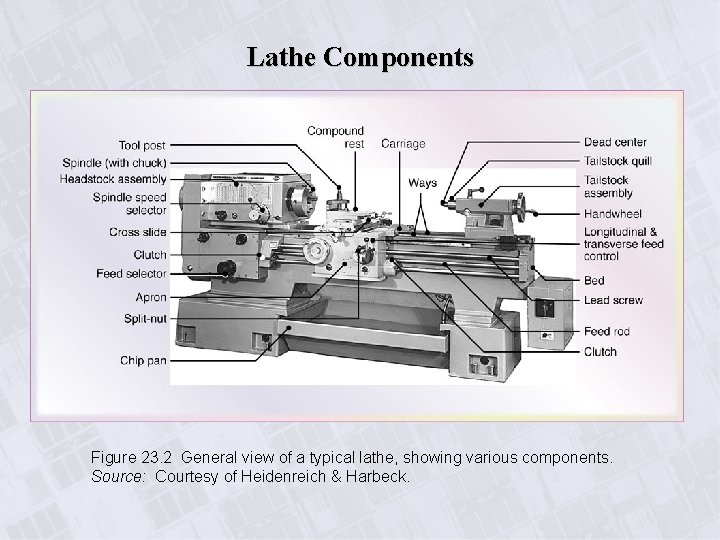
Lathe Components Figure 23. 2 General view of a typical lathe, showing various components. Source: Courtesy of Heidenreich & Harbeck.

LATHES AND LATHE OPERATIONS Lathe Components 1. Bed: The bed supports all major components of the lathe. Beds have a large mass and are built rigidly, usually from gray or nodular cast iron. The top portion of the bed has two ways 2. Carriage: Consists of an assembly of cross-slide, tool post, and apron Ø The tool post, usually with a compound rest that swivels for tool positioning and adjustment. Ø The cross-slide moves radially in and out Ø The apron is equipped with mechanisms for both manual and mechanized movement of carriage and cross-slide by means of the lead screw

LATHES AND LATHE OPERATIONS Lathe Components 3. Headstock: have a hollow spindle to which Workholding devices, such as chucks and collets, are attached, and long bars or tubing can be fed through for various turning operations. 4. Tailstock: It is equipped with a center that may be fixed (dead center) or may be free to rotate with the workpiece (live center). • Drills and reamers can be mounted on tailstock quill to drill axial holes in the workpiece • A quill is a hollow cylindrical part with a tapered hole 5. The feed rod and Lead Screw. : is powered by a set of gears from the headstock. It rotates during the operation of the lathe and provides movement to the carriage and the cross-slide by means of gears

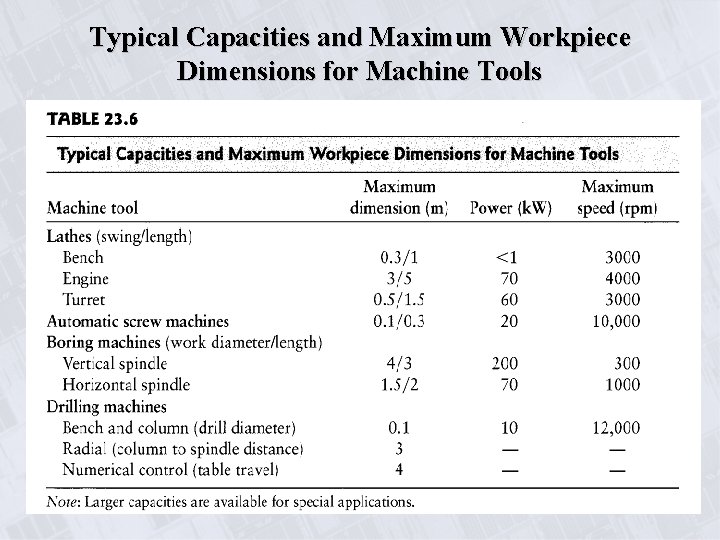
LATHES AND LATHE OPERATIONS Lathe Specifications A lathe generally is specified by the following parameters: • Swing: the max diameter of the workpiece that can be machined • The max distance between the headstock and tailstock centers (distance between centers) • The length of the bed • Table 23. 6: Typical Capacities and Maximum Workpiece Dimensions for Machine Tools • For example, a lathe may have the following size: 360 -mm swing by 760 mm between centers by 1830 -mm length of bed. • Maximum workpiece diameters may be as much as 2 m.

Typical Capacities and Maximum Workpiece Dimensions for Machine Tools

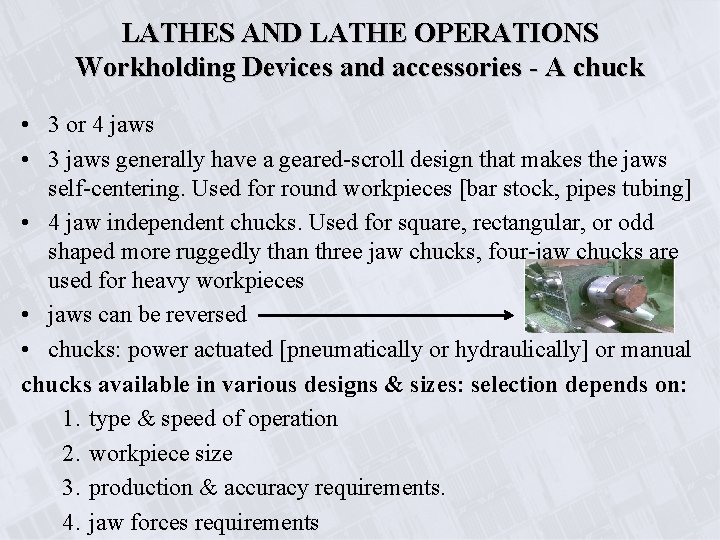
LATHES AND LATHE OPERATIONS Workholding Devices and accessories - A chuck • 3 or 4 jaws • 3 jaws generally have a geared-scroll design that makes the jaws self-centering. Used for round workpieces [bar stock, pipes tubing] • 4 jaw independent chucks. Used for square, rectangular, or odd shaped more ruggedly than three jaw chucks, four-jaw chucks are used for heavy workpieces • jaws can be reversed • chucks: power actuated [pneumatically or hydraulically] or manual chucks available in various designs & sizes: selection depends on: 1. type & speed of operation 2. workpiece size 3. production & accuracy requirements. 4. jaw forces requirements

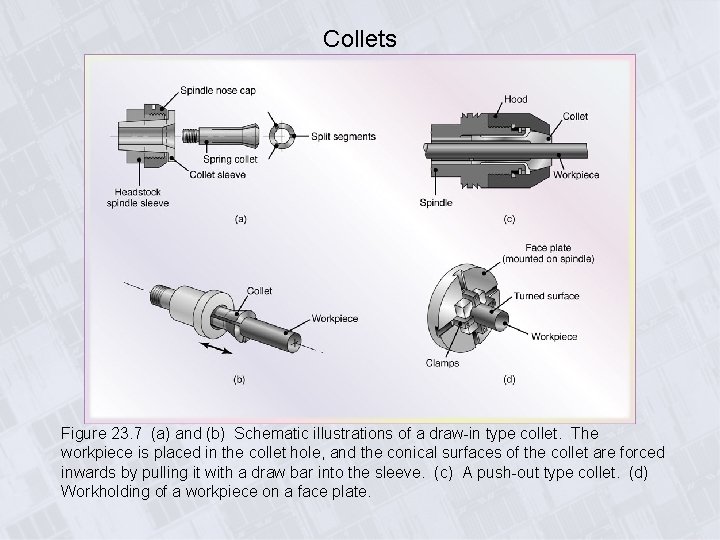
LATHES AND LATHE OPERATIONS Workholding Devices and accessories - A Collet • A collet is basically a longitudinally-split, tapered bushing. • The workpiece (generally with a maximum diameter of 25 mm) is placed inside the collet. • The tapered surfaces shrink the segments of the collet radially, tightening onto the workpiece. • One advantage to using a collet (rather than a three- or fourjaw chuck) is that the collet grips nearly the entire circumference of the part, making the device well suited particularly for parts with small cross sections.

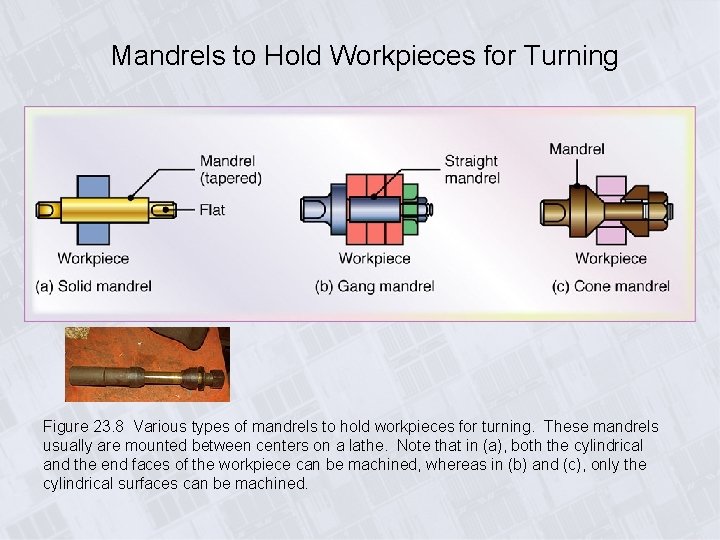
LATHES AND LATHE OPERATIONS Workholding Devices and accessories – Face Plates and Mandrels • Face plates are used for clamping irregularly shaped workpieces. The plates are round and have several slots and holes through which the workpiece is bolted or clamped (Fig. 23. 7 d). • Mandrels (Fig. 23. 8) are placed inside hollow or tubular workpieces and are used to hold workpieces that require machining on both ends or on their cylindrical surfaces. • Some mandrels are mounted between centers on the lathe. a. both the cylindrical and the end faces of the workpiece can be machined b. only the cylindrical surfaces can be machined

Collets Figure 23. 7 (a) and (b) Schematic illustrations of a draw-in type collet. The workpiece is placed in the collet hole, and the conical surfaces of the collet are forced inwards by pulling it with a draw bar into the sleeve. (c) A push-out type collet. (d) Workholding of a workpiece on a face plate.

Mandrels to Hold Workpieces for Turning Figure 23. 8 Various types of mandrels to hold workpieces for turning. These mandrels usually are mounted between centers on a lathe. Note that in (a), both the cylindrical and the end faces of the workpiece can be machined, whereas in (b) and (c), only the cylindrical surfaces can be machined.

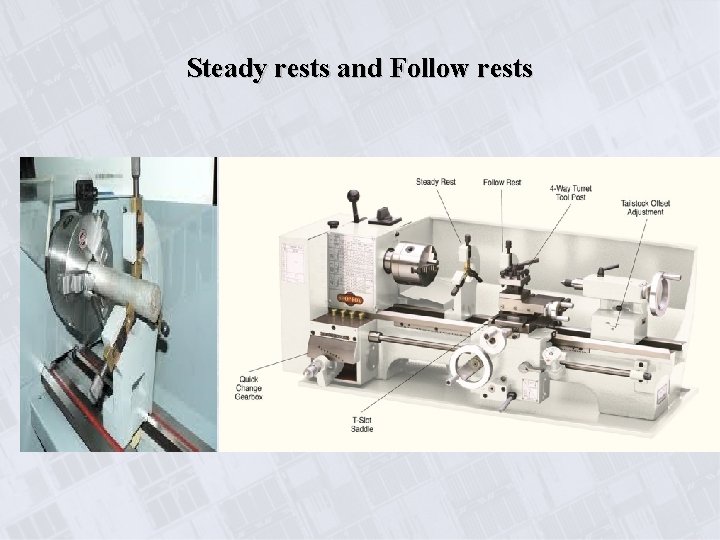
LATHES AND LATHE OPERATIONS Lathe Operations • Long and slender parts must be supported by a steady rest and follow rest placed on the bed otherwise the part will deflect under the cutting forces. • These rests usually are equipped with three adjustable fingers or rollers that support the workpiece while allowing it to rotate freely • Steady rests are clamped directly on the ways of the lathe, whereas follow rests are clamped on the carriage and travel with it. • A right-hand tool travels toward the headstock, and a left-hand tool travels toward the tailstock. • Form tools are used to produce various shapes on solid, round workpieces by moving the tool radially inward while the part is rotating. • Form cutting is not suitable for deep and narrow grooves or sharp corners, because vibration and chatter may result and cause poor surface finish.

Steady rests and Follow rests

LATHES AND LATHE OPERATIONS Lathe Operations • Boring on a lathe is similar to turning. It is performed inside hollow workpieces or in a hole made previously by drilling or other means. • Out-of-shape holes can be straightened by boring. • Drilling The workpiece is clamped in a work holder on the headstock, and the drill bit is advanced by rotating the handwheel of the tailstock. • Holes drilled in this manner may not be sufficiently concentric because of the tendency for the drill to drift radially. The concentricity of the hole can be improved by subsequently boring the drilled hole. Drilled holes may be reamed (Section 23. 6) on lathes in a manner similar to drilling, thus improving hole dimensional tolerances and surface finish. • The tools for parting, grooving, threading, and various other operations are specially shaped for their particular purpose or are available as inserts. Knurling is performed on a lathe with hardened rolls

LATHES AND LATHE OPERATIONS Types of Lathes Bench Lathes. Special-purpose Lathes. • Special applications (such as railroad wheels, gun barrels, and rollingmill rolls) with workpiece sizes as large as 1. 7 m in diameter by 8 m in length and capacities of 450 k. W Tracer Lathes • With attachments capable of turning parts with various contours • have been replaced largely by numerical-control lathes. Automatic Lathes • medium to high volume production, parts are fed and removed automatically, Lathes that do not have tailstocks are called chucking machines or chuckers. They are either single- or multiple-spindle types. Automatic Bar Machines (Screw Machines): high production rate of screws

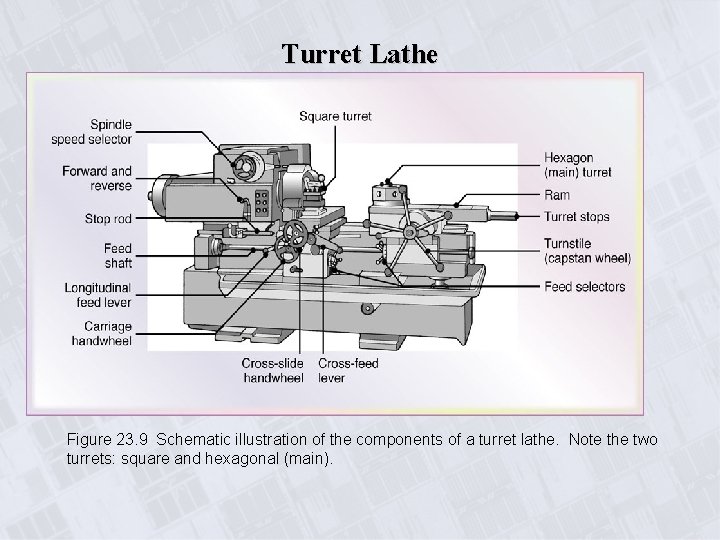
LATHES AND LATHE OPERATIONS Types of Lathes Turret Lathes • multiple cutting operations [turning, boring, drilling, thread cutting, and facing] • several cutting tools are mounted on the hexagonal main turret which is rotated for each specific operation • Vertical turret lathes also are available; they are more suitable for short, heavy workpieces with diameters as large as 1. 2 m. • ram-type turret lathe-one in which the ram slides in a separate base on the saddle. • The short stroke of the turret slide limits this machine to relatively short workpieces and light cuts in both small- and medium-quantity production. • In the saddle type, the main turret is installed directly on the saddle, which slides along the bed.

Turret Lathe Figure 23. 9 Schematic illustration of the components of a turret lathe. Note the two turrets: square and hexagonal (main).

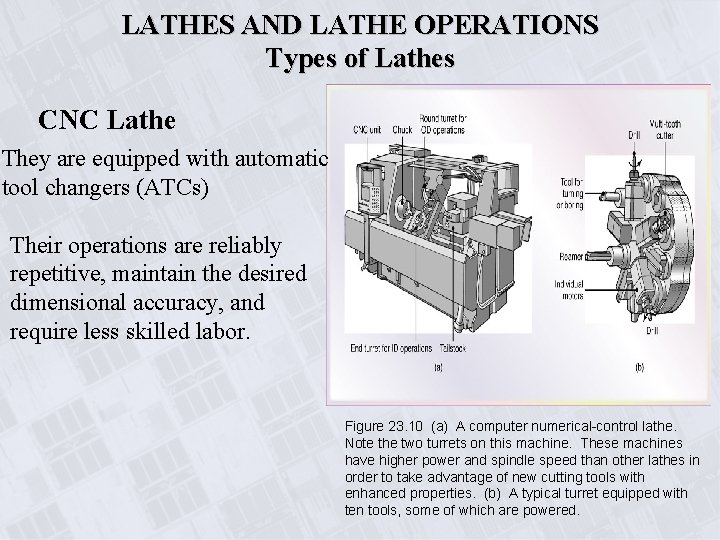
LATHES AND LATHE OPERATIONS Types of Lathes CNC Lathe They are equipped with automatic tool changers (ATCs) Their operations are reliably repetitive, maintain the desired dimensional accuracy, and require less skilled labor. Figure 23. 10 (a) A computer numerical-control lathe. Note the two turrets on this machine. These machines have higher power and spindle speed than other lathes in order to take advantage of new cutting tools with enhanced properties. (b) A typical turret equipped with ten tools, some of which are powered.

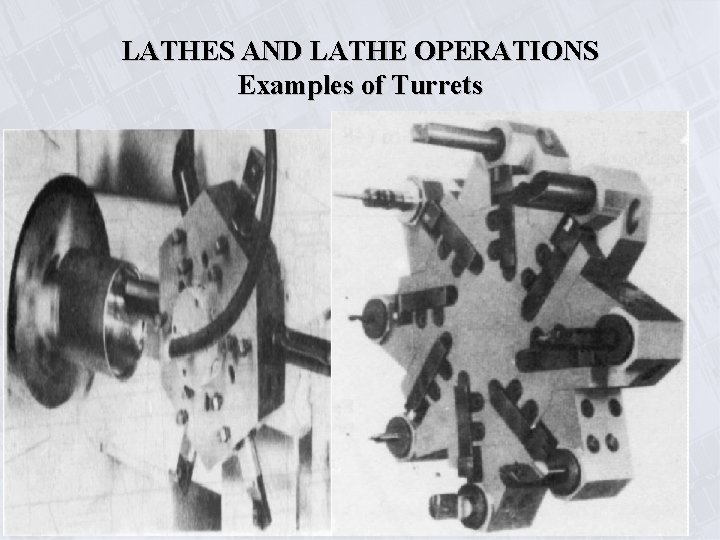
LATHES AND LATHE OPERATIONS Examples of Turrets

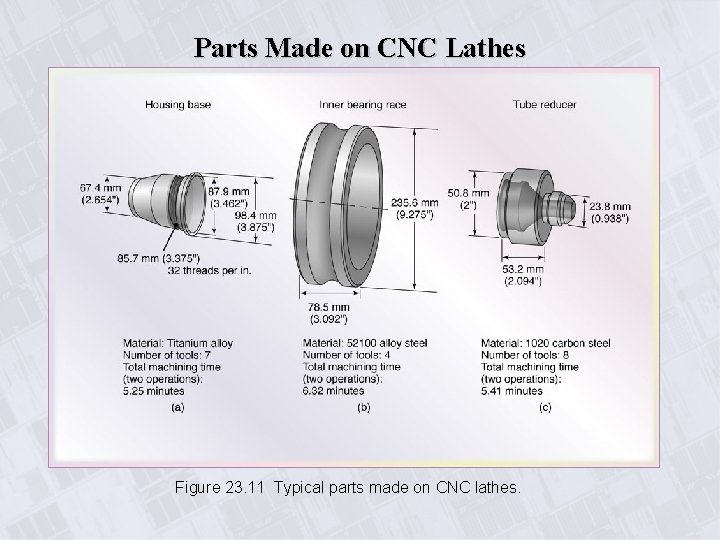
Parts Made on CNC Lathes Figure 23. 11 Typical parts made on CNC lathes.

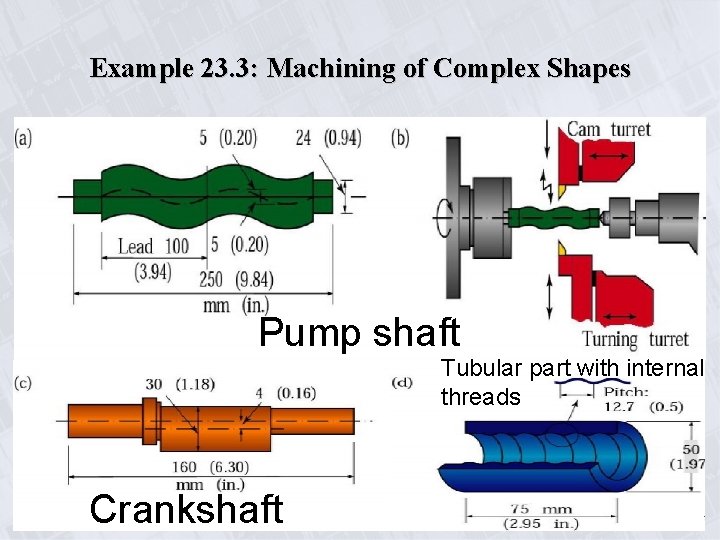
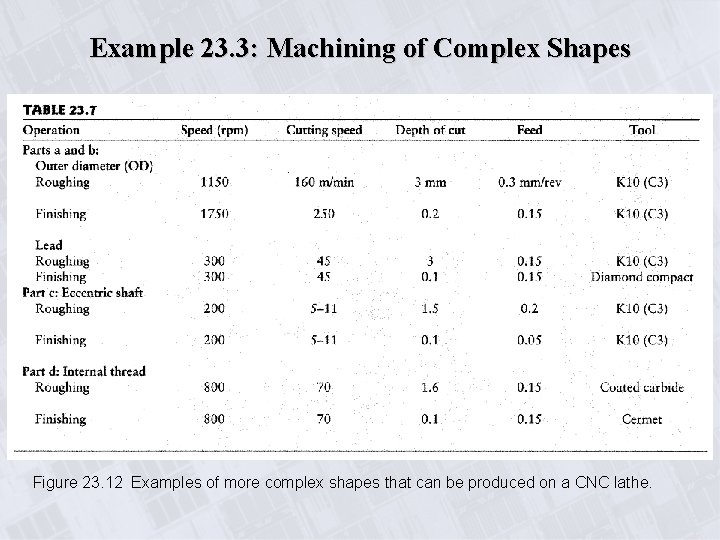
Example 23. 3: Machining of Complex Shapes Pump shaft Tubular part with internal threads Crankshaft

Example 23. 3: Machining of Complex Shapes Figure 23. 12 Examples of more complex shapes that can be produced on a CNC lathe.

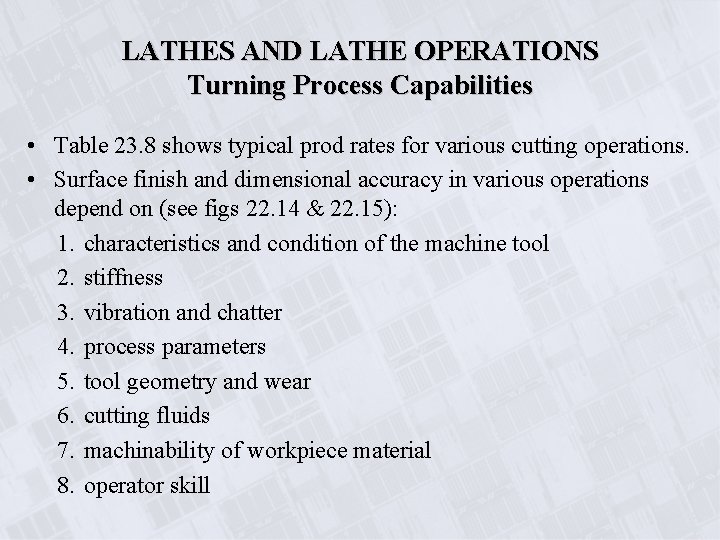
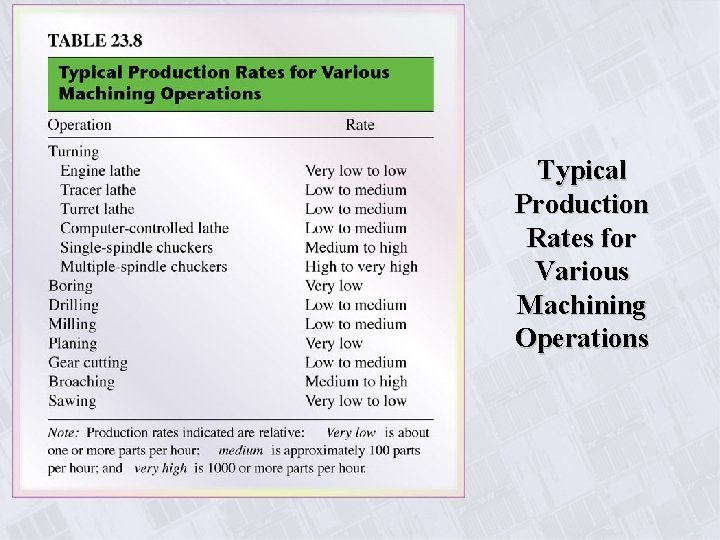
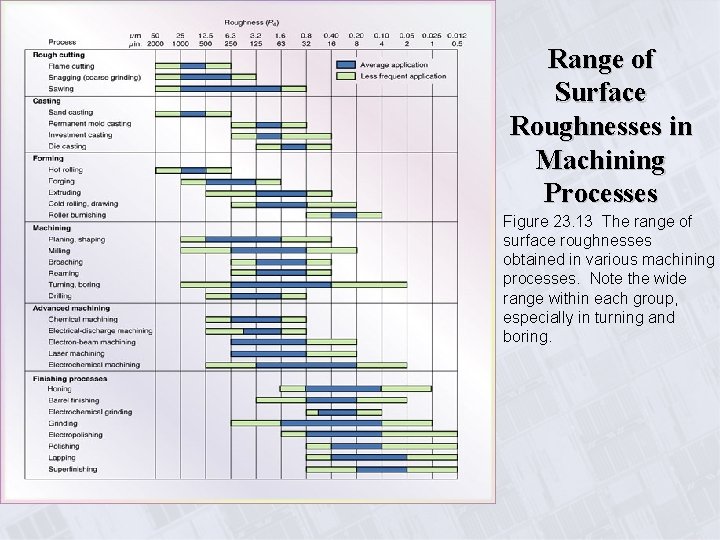
LATHES AND LATHE OPERATIONS Turning Process Capabilities • Table 23. 8 shows typical prod rates for various cutting operations. • Surface finish and dimensional accuracy in various operations depend on (see figs 22. 14 & 22. 15): 1. characteristics and condition of the machine tool 2. stiffness 3. vibration and chatter 4. process parameters 5. tool geometry and wear 6. cutting fluids 7. machinability of workpiece material 8. operator skill

Typical Production Rates for Various Machining Operations

Range of Surface Roughnesses in Machining Processes Figure 23. 13 The range of surface roughnesses obtained in various machining processes. Note the wide range within each group, especially in turning and boring.

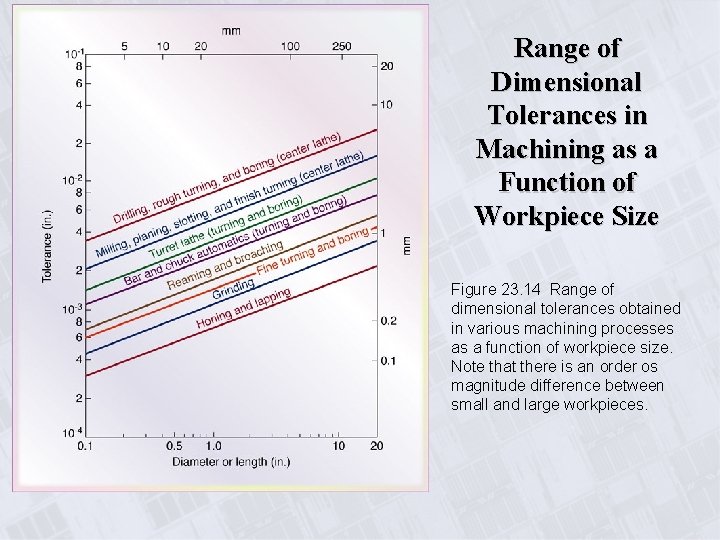
Range of Dimensional Tolerances in Machining as a Function of Workpiece Size Figure 23. 14 Range of dimensional tolerances obtained in various machining processes as a function of workpiece size. Note that there is an order os magnitude difference between small and large workpieces.

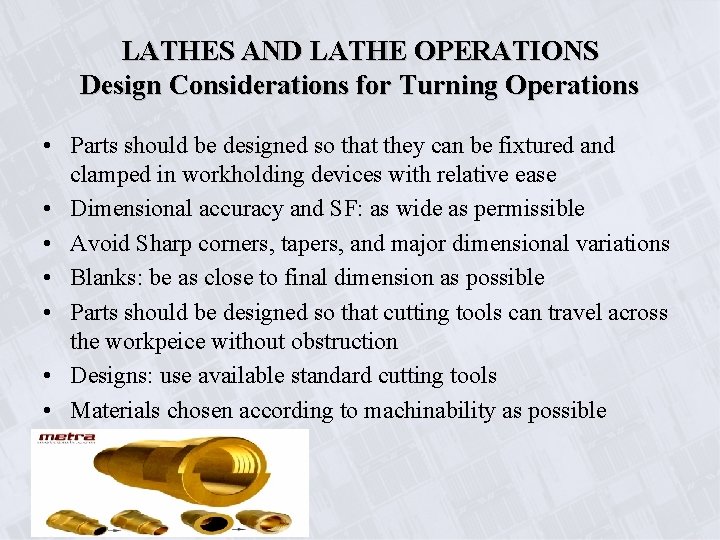
LATHES AND LATHE OPERATIONS Design Considerations for Turning Operations • Parts should be designed so that they can be fixtured and clamped in workholding devices with relative ease • Dimensional accuracy and SF: as wide as permissible • Avoid Sharp corners, tapers, and major dimensional variations • Blanks: be as close to final dimension as possible • Parts should be designed so that cutting tools can travel across the workpeice without obstruction • Designs: use available standard cutting tools • Materials chosen according to machinability as possible

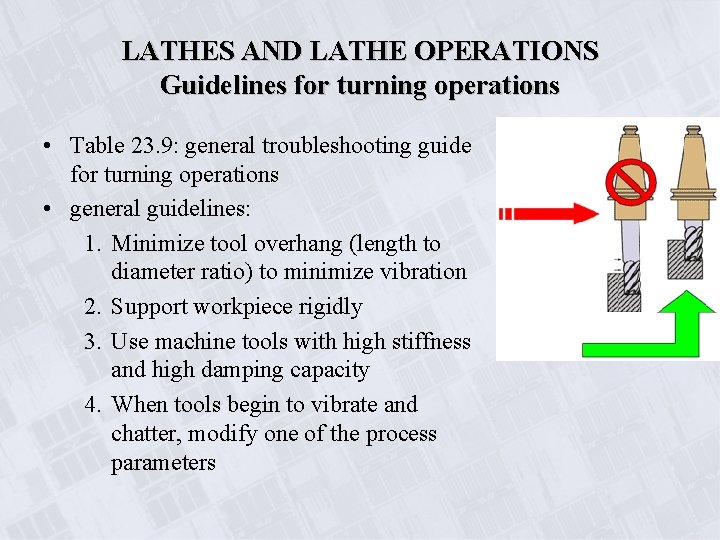
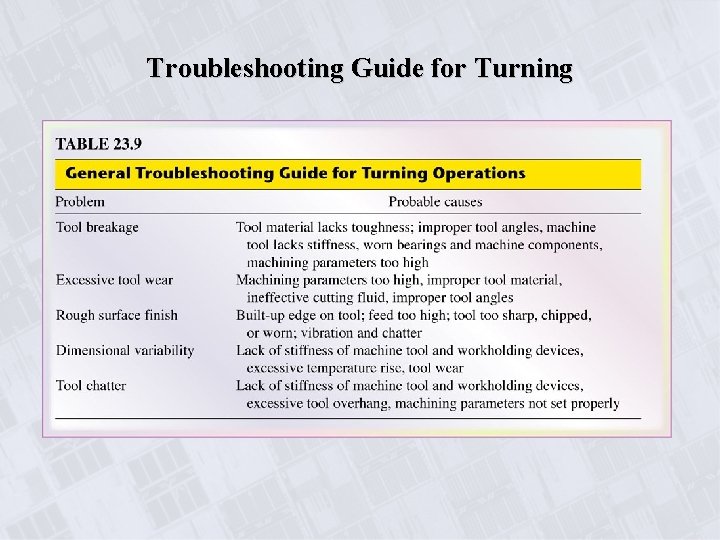
LATHES AND LATHE OPERATIONS Guidelines for turning operations • Table 23. 9: general troubleshooting guide for turning operations • general guidelines: 1. Minimize tool overhang (length to diameter ratio) to minimize vibration 2. Support workpiece rigidly 3. Use machine tools with high stiffness and high damping capacity 4. When tools begin to vibrate and chatter, modify one of the process parameters

Troubleshooting Guide for Turning

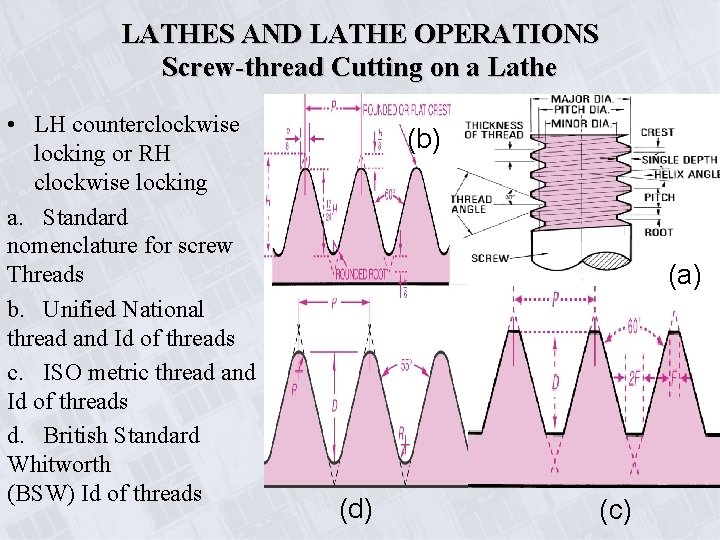
LATHES AND LATHE OPERATIONS Screw-thread Cutting on a Lathe • LH counterclockwise locking or RH clockwise locking a. Standard nomenclature for screw Threads b. Unified National thread and Id of threads c. ISO metric thread and Id of threads d. British Standard Whitworth (BSW) Id of threads (b) (a) (d) (c)

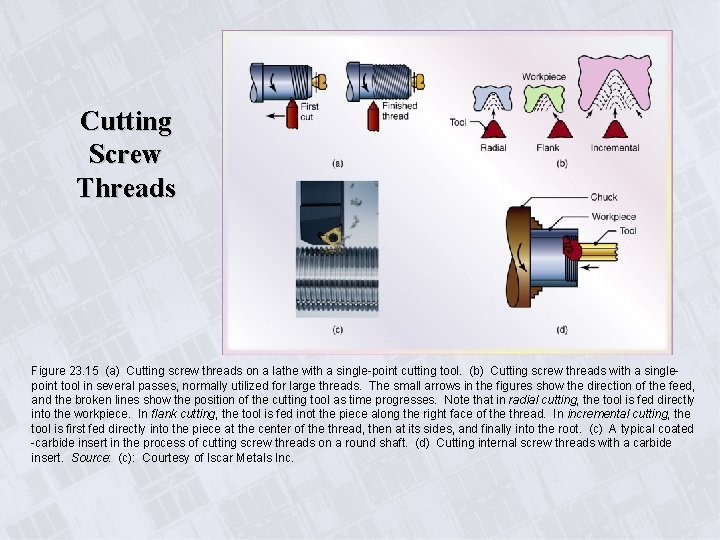
Cutting Screw Threads Figure 23. 15 (a) Cutting screw threads on a lathe with a single-point cutting tool. (b) Cutting screw threads with a singlepoint tool in several passes, normally utilized for large threads. The small arrows in the figures show the direction of the feed, and the broken lines show the position of the cutting tool as time progresses. Note that in radial cutting, the tool is fed directly into the workpiece. In flank cutting, the tool is fed inot the piece along the right face of the thread. In incremental cutting, the tool is first fed directly into the piece at the center of the thread, then at its sides, and finally into the root. (c) A typical coated -carbide insert in the process of cutting screw threads on a round shaft. (d) Cutting internal screw threads with a carbide insert. Source: (c): Courtesy of Iscar Metals Inc.

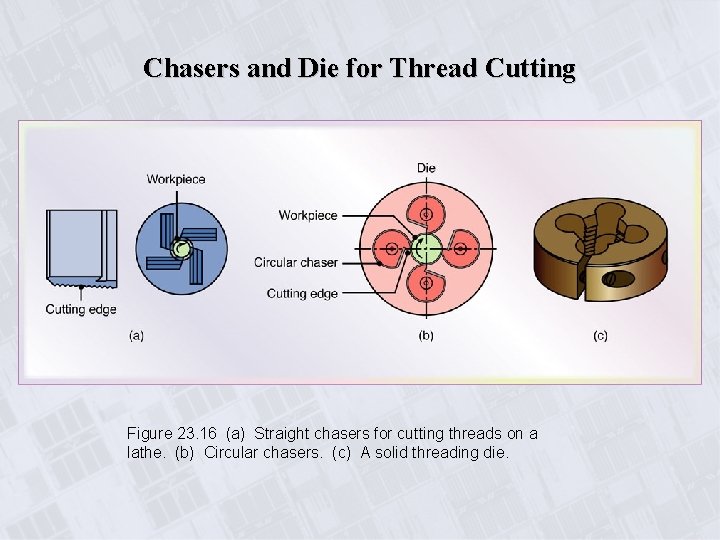
Chasers and Die for Thread Cutting Figure 23. 16 (a) Straight chasers for cutting threads on a lathe. (b) Circular chasers. (c) A solid threading die.

LATHES AND LATHE OPERATIONS Design Considerations for Screw Thread Cutting • • Undercut termination before shoulders Internal threads in blind hole: unthreaded length at bottom Avoid shallow blind tapped holes Chamfers at the ends Thread sections should not be interrupted with slots, holes Use standard thread inserts Min engage length of a fastener should be 1. 5 times its diam All cutting operations in one setup

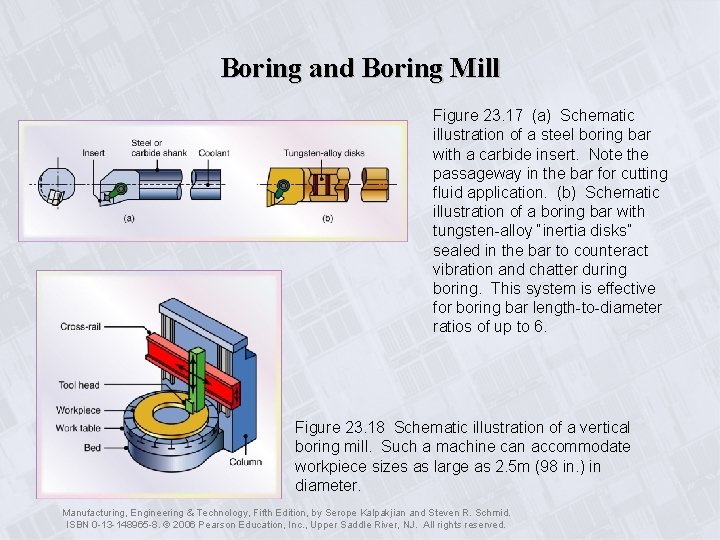
Boring and Boring Mill Figure 23. 17 (a) Schematic illustration of a steel boring bar with a carbide insert. Note the passageway in the bar for cutting fluid application. (b) Schematic illustration of a boring bar with tungsten-alloy “inertia disks” sealed in the bar to counteract vibration and chatter during boring. This system is effective for boring bar length-to-diameter ratios of up to 6. Figure 23. 18 Schematic illustration of a vertical boring mill. Such a machine can accommodate workpiece sizes as large as 2. 5 m (98 in. ) in diameter. Manufacturing, Engineering & Technology, Fifth Edition, by Serope Kalpakjian and Steven R. Schmid. ISBN 0 -13 -148965 -8. © 2006 Pearson Education, Inc. , Upper Saddle River, NJ. All rights reserved.

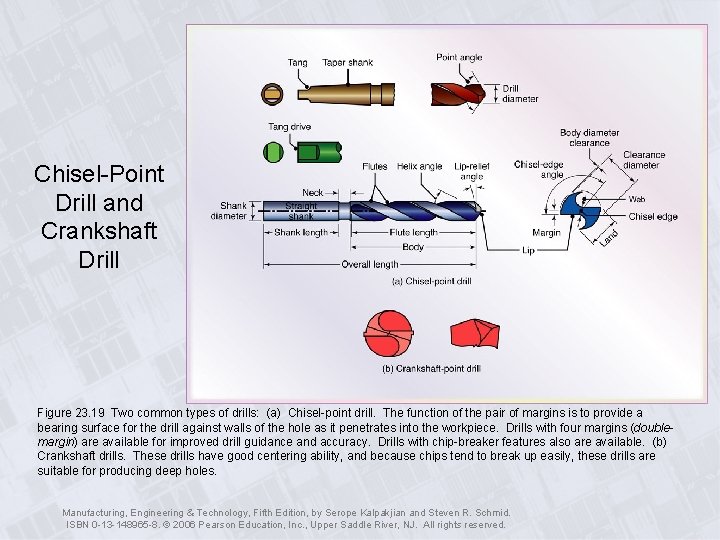
Chisel-Point Drill and Crankshaft Drill Figure 23. 19 Two common types of drills: (a) Chisel-point drill. The function of the pair of margins is to provide a bearing surface for the drill against walls of the hole as it penetrates into the workpiece. Drills with four margins (doublemargin) are available for improved drill guidance and accuracy. Drills with chip-breaker features also are available. (b) Crankshaft drills. These drills have good centering ability, and because chips tend to break up easily, these drills are suitable for producing deep holes. Manufacturing, Engineering & Technology, Fifth Edition, by Serope Kalpakjian and Steven R. Schmid. ISBN 0 -13 -148965 -8. © 2006 Pearson Education, Inc. , Upper Saddle River, NJ. All rights reserved.

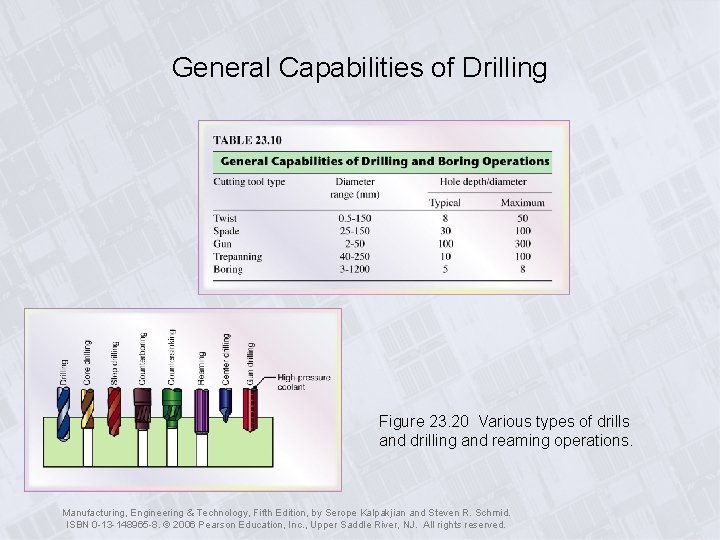
General Capabilities of Drilling Figure 23. 20 Various types of drills and drilling and reaming operations. Manufacturing, Engineering & Technology, Fifth Edition, by Serope Kalpakjian and Steven R. Schmid. ISBN 0 -13 -148965 -8. © 2006 Pearson Education, Inc. , Upper Saddle River, NJ. All rights reserved.

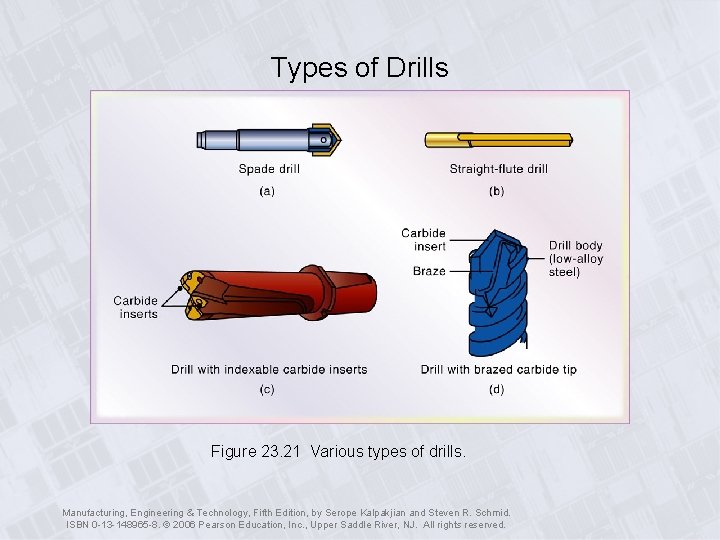
Types of Drills Figure 23. 21 Various types of drills. Manufacturing, Engineering & Technology, Fifth Edition, by Serope Kalpakjian and Steven R. Schmid. ISBN 0 -13 -148965 -8. © 2006 Pearson Education, Inc. , Upper Saddle River, NJ. All rights reserved.

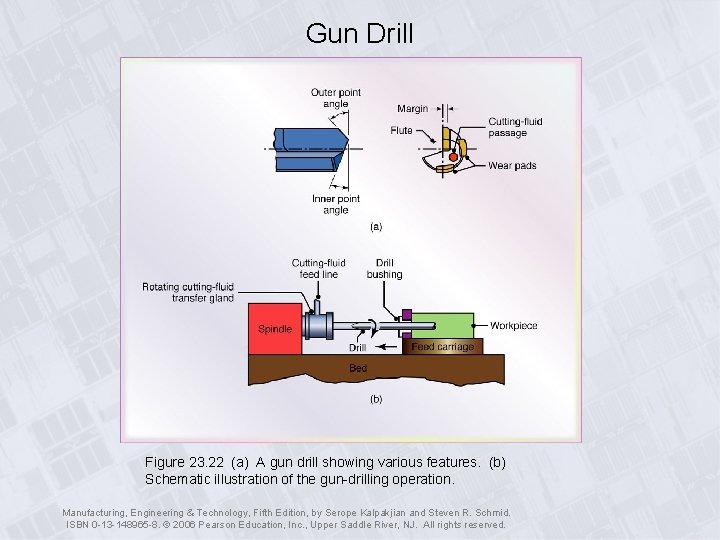
Gun Drill Figure 23. 22 (a) A gun drill showing various features. (b) Schematic illustration of the gun-drilling operation. Manufacturing, Engineering & Technology, Fifth Edition, by Serope Kalpakjian and Steven R. Schmid. ISBN 0 -13 -148965 -8. © 2006 Pearson Education, Inc. , Upper Saddle River, NJ. All rights reserved.

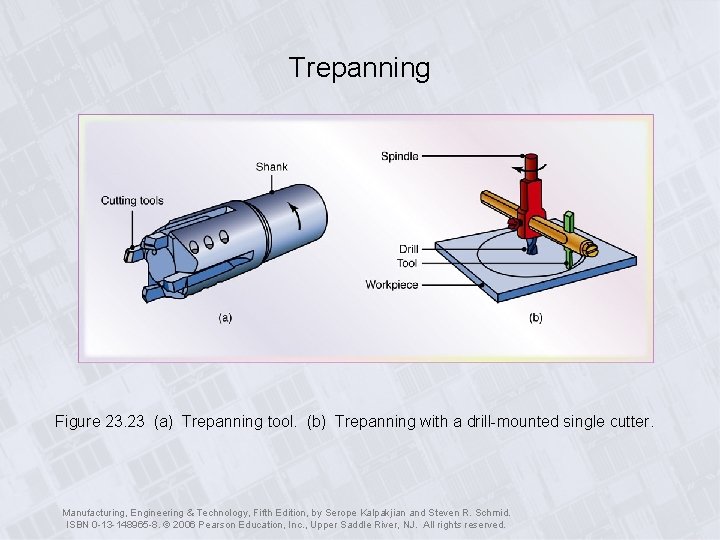
Trepanning Figure 23. 23 (a) Trepanning tool. (b) Trepanning with a drill-mounted single cutter. Manufacturing, Engineering & Technology, Fifth Edition, by Serope Kalpakjian and Steven R. Schmid. ISBN 0 -13 -148965 -8. © 2006 Pearson Education, Inc. , Upper Saddle River, NJ. All rights reserved.

General Recommendations for Speeds and Feeds in Drilling Manufacturing, Engineering & Technology, Fifth Edition, by Serope Kalpakjian and Steven R. Schmid. ISBN 0 -13 -148965 -8. © 2006 Pearson Education, Inc. , Upper Saddle River, NJ. All rights reserved.

Troubleshooting Guide for Drilling Manufacturing, Engineering & Technology, Fifth Edition, by Serope Kalpakjian and Steven R. Schmid. ISBN 0 -13 -148965 -8. © 2006 Pearson Education, Inc. , Upper Saddle River, NJ. All rights reserved.

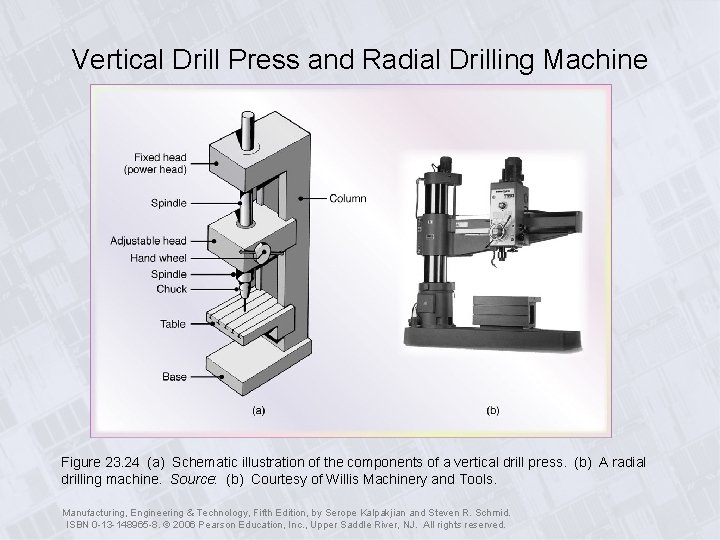
Vertical Drill Press and Radial Drilling Machine Figure 23. 24 (a) Schematic illustration of the components of a vertical drill press. (b) A radial drilling machine. Source: (b) Courtesy of Willis Machinery and Tools. Manufacturing, Engineering & Technology, Fifth Edition, by Serope Kalpakjian and Steven R. Schmid. ISBN 0 -13 -148965 -8. © 2006 Pearson Education, Inc. , Upper Saddle River, NJ. All rights reserved.

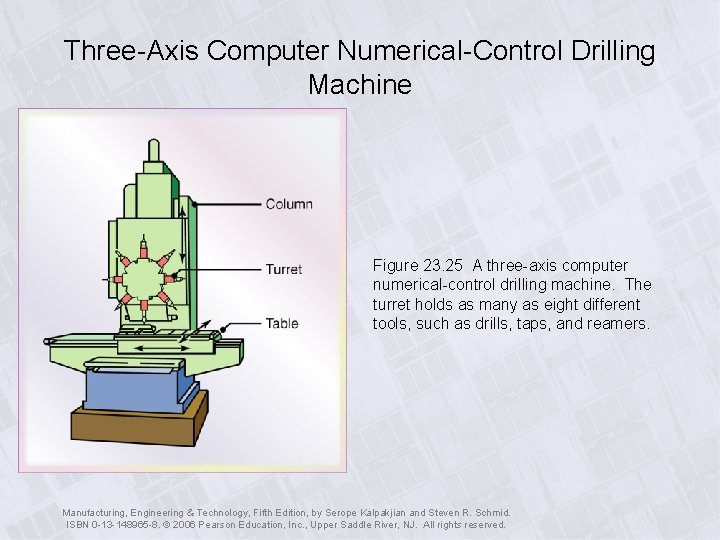
Three-Axis Computer Numerical-Control Drilling Machine Figure 23. 25 A three-axis computer numerical-control drilling machine. The turret holds as many as eight different tools, such as drills, taps, and reamers. Manufacturing, Engineering & Technology, Fifth Edition, by Serope Kalpakjian and Steven R. Schmid. ISBN 0 -13 -148965 -8. © 2006 Pearson Education, Inc. , Upper Saddle River, NJ. All rights reserved.

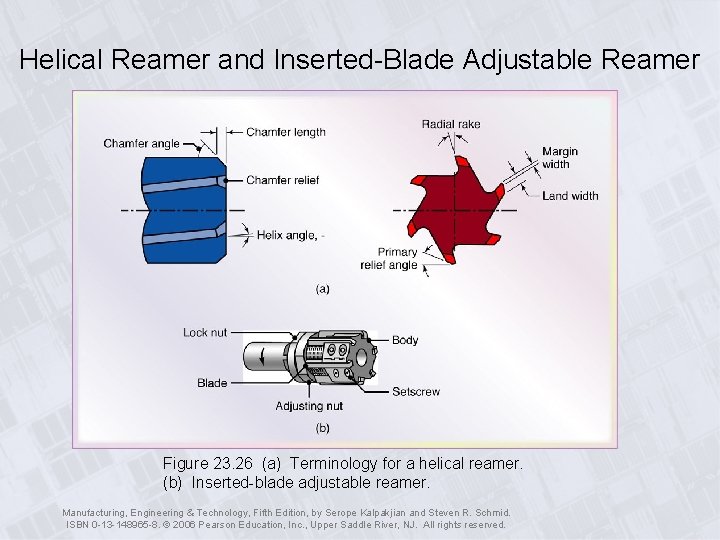
Helical Reamer and Inserted-Blade Adjustable Reamer Figure 23. 26 (a) Terminology for a helical reamer. (b) Inserted-blade adjustable reamer. Manufacturing, Engineering & Technology, Fifth Edition, by Serope Kalpakjian and Steven R. Schmid. ISBN 0 -13 -148965 -8. © 2006 Pearson Education, Inc. , Upper Saddle River, NJ. All rights reserved.

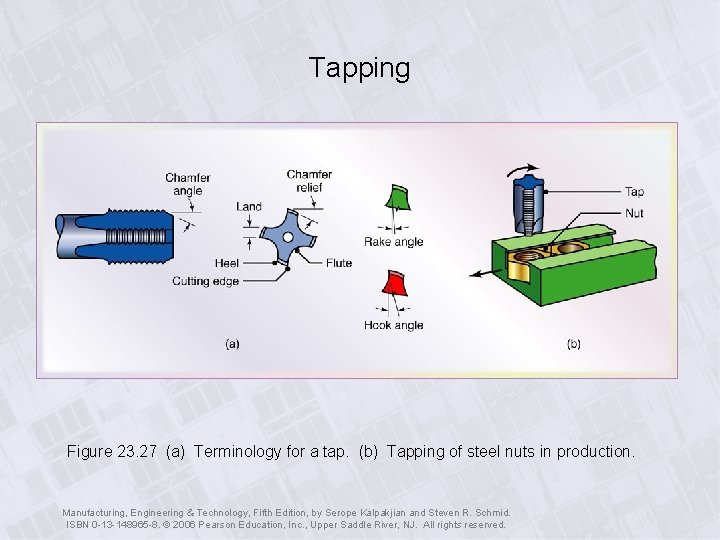
Tapping Figure 23. 27 (a) Terminology for a tap. (b) Tapping of steel nuts in production. Manufacturing, Engineering & Technology, Fifth Edition, by Serope Kalpakjian and Steven R. Schmid. ISBN 0 -13 -148965 -8. © 2006 Pearson Education, Inc. , Upper Saddle River, NJ. All rights reserved.

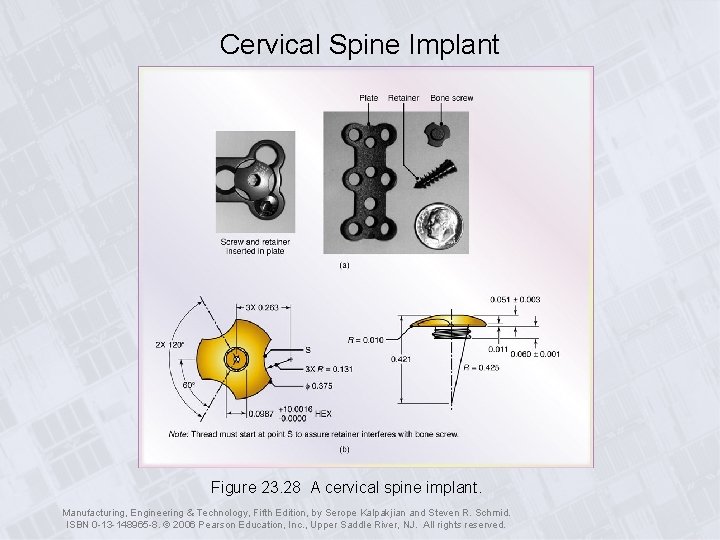
Cervical Spine Implant Figure 23. 28 A cervical spine implant. Manufacturing, Engineering & Technology, Fifth Edition, by Serope Kalpakjian and Steven R. Schmid. ISBN 0 -13 -148965 -8. © 2006 Pearson Education, Inc. , Upper Saddle River, NJ. All rights reserved.