Chapter 13 HOW TO USE SQL DATA SOURCES
 by Arhat Baid Presentation")


- Slides: 23
Chapter 13: HOW TO USE SQL DATA SOURCES (416 -431) by Arhat Baid Presentation ID #23
Outline • How to Ø Configure the select statment Ø Define the parameters Ø Use the Data. List control Ø Use Data Binding Ø Use the advanced features of a SQL data source
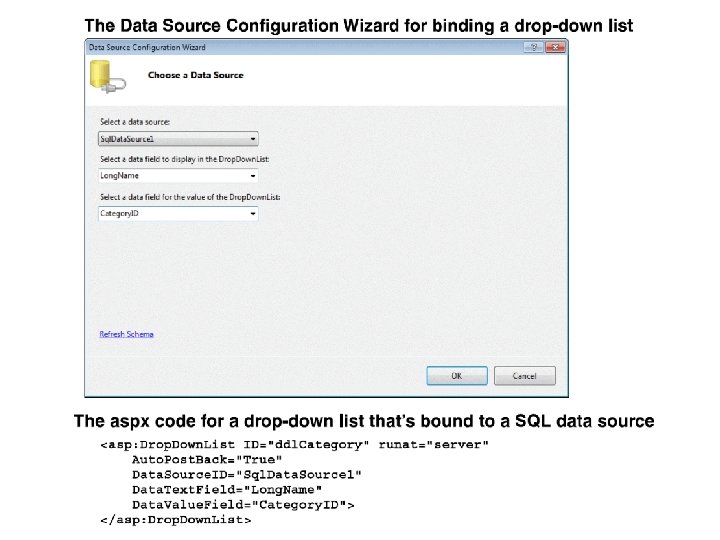
How to configure the select statment • To configure the select statement you choose whether you want to use custom SQL statement or specify the columns from the table or view in the database. • You can click the ORDER BY button to specify how the records should be stored. • You can click the WHERE button to specify the selection criteria
The dialog box for defining the select statement
How to define the parameters • If you specify one or more parameters when you use the Query Builder to define a Select statement, the next dailog box lets you define those parameters. • To define a parameter, you specify the source of the value for each parameter
Continued….
Continued… • The source of the Category. ID parameter is set to the Selected. Value property of the control named ddl. Category. • The Selected. Value property was selected by default. • If you want to use a different property as the source for a parameter, click the Show Advanced Properties link to display a list of the parameter properties. Then, you can set the Property. Name to the control property you want to use.
How to use Data. List Control • A Data. List control displays items from a repeating data source such as a data table. • Remind that, we can also create a list using the Repeater control. • Major drawback: We can’t define it using a visual interface. We have to enter code directly into the aspx file.
How the Data. List Controlworks Simple data list that consists of two columns of data • To create a list like this, use the Data. Source. ID attribute of the Data. List control to bind the control to a data source. • Define or more templates within the control that define the content and format of the list.
Continued… • The source of data for the data list is a SQL data source control named Sql. Data. Source 2. • Single Item template is used to create this list. • It includes two label controls that ate bound to the Name and Unit. Price columns of the data source
Continued… • To bind a data list to a data source, use the Choose Data Source command in the control’s smart tag menu. • To define the information to be displayed in a data list, create one or more templates. • To display the data from a column in the data source in a data list, add a control to a template and then bind the control. • We can use Data. List control for edit operations as well as display operations
How to define the templates for the data list • The templates you define for a data list, specify what content to display and what controls to use to display it. At the least, we must create an Item template that defines the items from the data source that you want to display. • To create a template, choose Edit Templates from the smart tag menu for the control to display the control in templateediting mode. • To add text, click the template and begin typing. To add a control, drag the control from the Toolbox onto the template, then use the properties window. • When finished, choose End Template Editing from smart tag menu.
Continued…
How to format a data list • The easiest way is to use the Auto Format dialog box. • It has 17 predefined schemes that use different combinations of colors and borders for the items in the data list. • Another way is to use the Format page of the Properties window dialog box. • It lets you set the colors, fonts, alignment, and other formatting options for the data list and each of its templates
Continued… • We can format a data list by applying a predefined scheme, by using the Properties dialog box, by using the Properties window, or by editing the aspx code. • To apply a scheme, choose Auto Format from the control’s smart tag menu and then select the scheme you want to apply. • To use the Properties dialog box, choose Property Builder from the control’s smart tag and then set the properties for the data list and its templates. • To use the properties window to format a template, expand the style property for that template and then set its properties.
Continued…
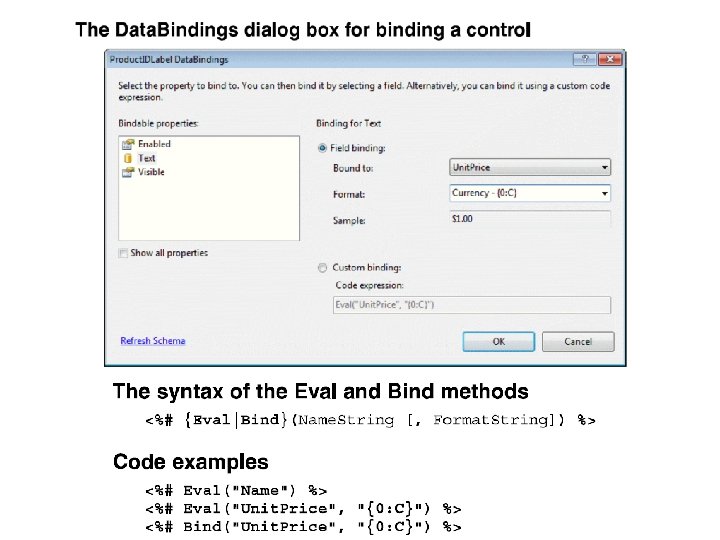
How to use data binding • Once a data source control is configured, we can bind it to a web form control to automatically display the data retrieved by the data source on the page. • We can bind any of the controls that inherit the List. Control class to a data source. It includes list box control, drop-down list control, check box control, radio button list control, and bulleted list control.
How to bind the controls in a template • Select the Edit Data. Bindings command from the smart tag menu. Then, select the property you want to bind to (usually Text), select the Field binding option, and select the field you want to bind. • If you want to apply a format to the bound data, select a format from the Format drop down list. • As you specify the binding for a control, Visual Studio generates a data binding expression that uses the Eval method. • The Eval method provides only for displaying data from a data source in a control. In contrast, the Bind method provides for twoway binding, which means that it can be used to display as well update data from a data source.
Continued… • Set the Enable. Caching attribute to True. Use Cache. Duration attribute to specify how long data should be kept in the cache
Any Queries ? ? ?
Thank You