Chapter 1 Overview of an Engineering Drawing TOPICS


 Drawing space d")


- Slides: 43
Chapter 1 Overview of an Engineering Drawing
TOPICS Graphics language Engineering drawing Drawing standards
GRAPHICS LANGUAGE
Effectiveness of Graphics Language 1. Try to write a description of this object. 2. Test your written description by having someone attempt to make a sketch from your description. You can easily understand that … The word languages are inadequate for describing the size, size shape and features completely as well as concisely.
Composition of Graphic Language Graphic language in “engineering application” use lines to represent the surfaces, surfaces edges and contours of objects. The language is known as “drawing” drawing or “drafting” drafting. A drawing can be done using freehand, freehand instruments or computer methods.
Freehand drawing The lines are sketched without using instruments other than pencils and erasers. Example
Instrument drawing Instruments are used to draw straight lines, circles, and curves concisely and accurately. Thus, the drawings are usually made to scale. Example
Computer drawing The drawings are usually made by commercial software such as Auto. CAD, solid works etc. Example
Engineering Drawing
Elements of Engineering Drawing Engineering drawing are made up of graphics language and word language Graphics language Describe a shape (mainly). Word language Describe size, location and specification of the object.
Basic Knowledge for Drafting Word language Graphics language Line types Projection method Geometric construction Lettering
Traditional Drawing Tools
DRAWING TOOLS
DRAWING TOOLS 1. T-Square 2. Triangles
DRAWING TOOLS 2 H or HB for thick line 4 H for thin line 3. Adhesive Tape 4. Pencils
DRAWING TOOLS 5. Sandpaper 6. Compass
DRAWING TOOLS 7. Pencil Eraser 8. Erasing Shield
DRAWING TOOLS 9. Circle Template 10. Tissue paper
DRAWING TOOLS 11. Sharpener 12. Clean paper
Drawing Sheet Trimmed paper of a size A 0 ~ A 4. Standard sheet size (JIS) A 4 A 3 A 2 A 1 A 0 210 x 297 x 420 x 594 x 841 x 1189 (Dimensions in millimeters) A 4 A 3 A 2 A 1 A 0
Preparation of Tools
Fastening Paper to Drafting Board 1. Place the paper close to the table’s left edge. 2. Move the paper until its lower edge place about the top edge of T-square.
Fastening Paper to Drafting Board 3. Align the top edge of the paper with Tsquare blade. 4. Attach the paper’s corners with tape.
Fastening Paper to Drafting Board 5. Move T-square down to smooth the paper. 6. Attach the remaining paper’s corners with tape.
Sharpening the Pencil 1. Remove the wood with penknife while expose a lead about 8 -10 mm. 2. Polish the lead into a conical shape with a sandpaper. 3. Clean the lead with tissue paper.
Preparing the Compass 1. Sharpen the lead with a sandpaper. 2. Adjust the needle and the lead so that the tip of the needle extends slightly more than the lead. needle lead
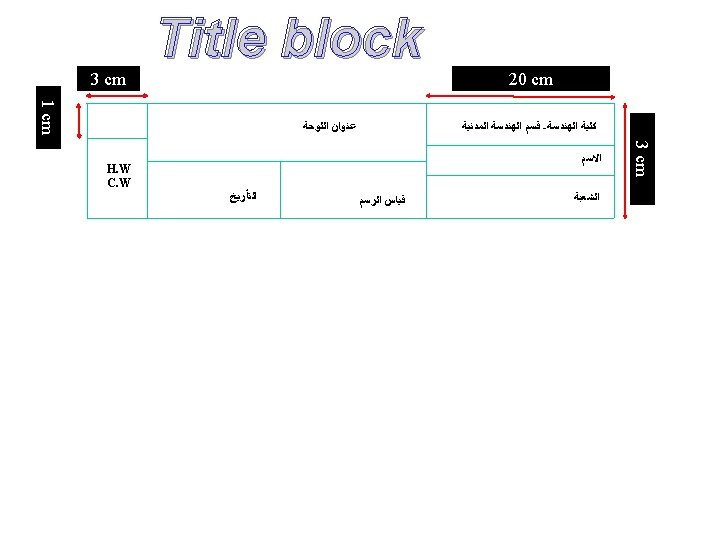
Orientation of drawing sheet c 1. Type X (A 0~A 4) Drawing space d Title block Drawing Title H. W C. . W date NAME 3 CM c Border lines C Sheet size A 4 A 3 A 2 A 1 A 0 c (min) d (min) 10 10 10 15 10 20 20 25
Engineering line
Drawing Scales Length, size Scale is the ratio of the linear dimension of an element of an object shown in the drawing to the real linear dimension of the same element of the object. Size in drawing Actual size :
Drawing Scales Designation of a scale consists of the word “SCALE” followed by the indication of its ratio, as follow SCALE 1: 1 for full size SCALE X: 1 for enlargement scales (X > 1) SCALE 1: X for reduction scales (X< 1)
Using the Tools
Function of the Tools 1. T-square Shape to be drawn Straight line 2. Triangles 3. Compass 4. Circle template Arc, Circle
Using the Compass 1. Locate the center of the circle by two intersecting lines. 2. Adjust the distance between needle and lead to a distance equal to radius of the circle. 3. Set the needle point at center.
Using the Compass 4. Start circle. Apply enough pressure to the needle, holding compass handle between thumb and index fingers. 5. Complete circle Revolve handle clockwise.
Draw a Horizontal Line 1. Press the T-square head against the left edge of the table. 2. Smooth the blade to the right.
Draw a Horizontal Line 3. Lean the pencil at an angle about 60 o with the paper in the direction of the line and slightly “toed in”. 4. Draw the line from left to right while rotating the pencil slowly.
Draw a Vertical Line 1. Set T-square as before. Place any triangle on T-square edge. 2. Slide your left hand to hold both T-square and triangle in position.
Draw a Vertical Line 3. Lean the pencil to the triangle. 4. Draw the line upward while rotating the pencil slowly.
Draw a line at 45 o with horizontal 1. Place 45 o triangle on the T-square edge and press them firmly against the paper. 2. Draw the line in the direction as shown below.
Draw a line at angle 30 o and 60 o 1. Place 30 o-60 o triangle on the T-square edge and press them firmly against the paper. 2. Draw the line in the direction as shown below.
Draw the lines at 15 o increment 0 deg. 15 deg. = 30 + 45 deg 30 deg. 45 deg. Already demonstrated. 60 deg. 75 deg. = 30 + 45 deg 90 deg. Already demonstrated.
Draw the line passing through two given points 1. Place the pencil tip at one of the points. 2. Place the triangle against the pencil tip. 3. Swing the triangle around the pencil tip until its edge align with the second point. 4. Draw a line. A Given B A B