Changing Velocity Explore changing the velocity of the


 1 Engineering Notebook 1.")


- Slides: 84
Changing Velocity Explore changing the velocity of the Autopilot robot while creating projects that drive the robot forward, move it in reverse, and turn the robot.
Discover new hands-on builds and programming opportunities to further your understanding of a subject matter.
The Completed Look of the Build The completed Autopilot robot build. This robot is designed so that it can be built quickly and drive around either autonomously or with the Controller in a short amount of time.
Build Instructions
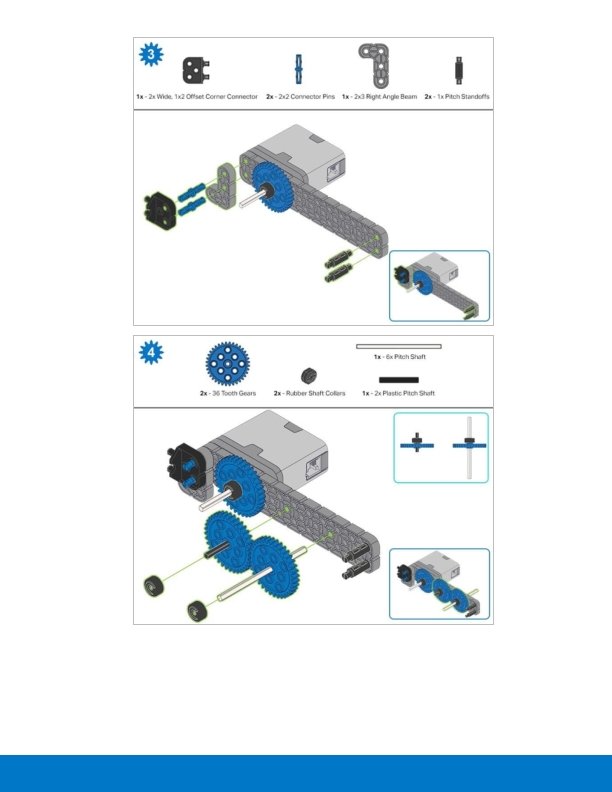
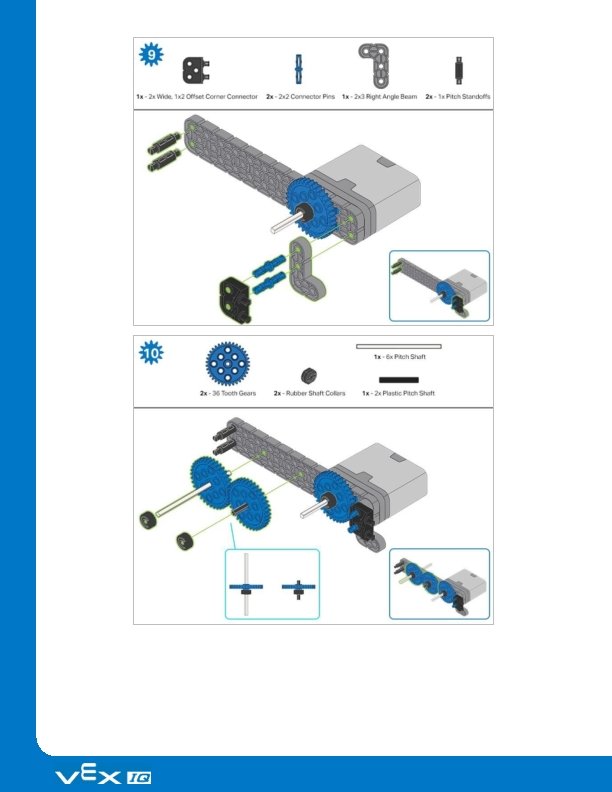
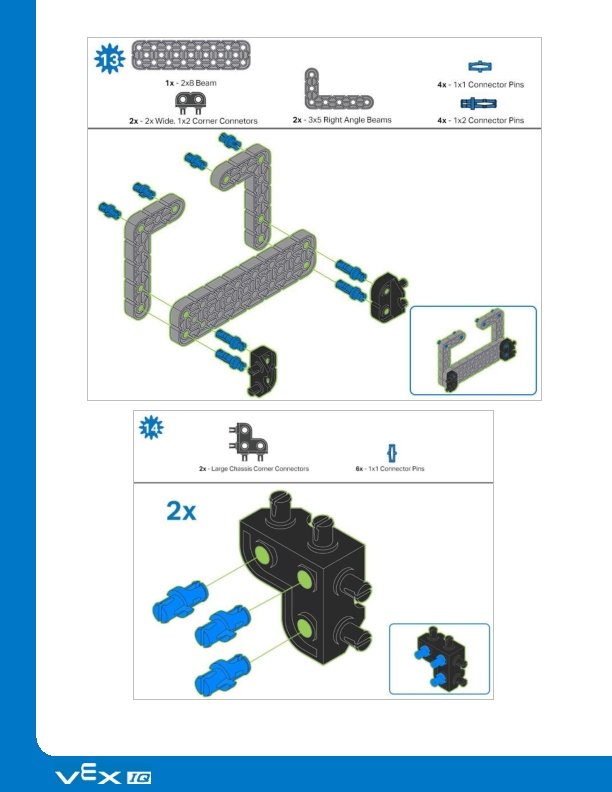
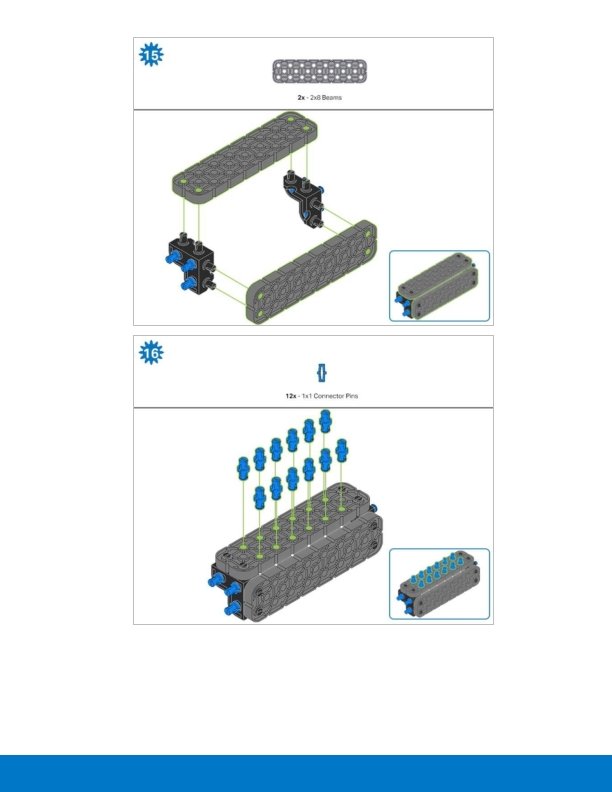
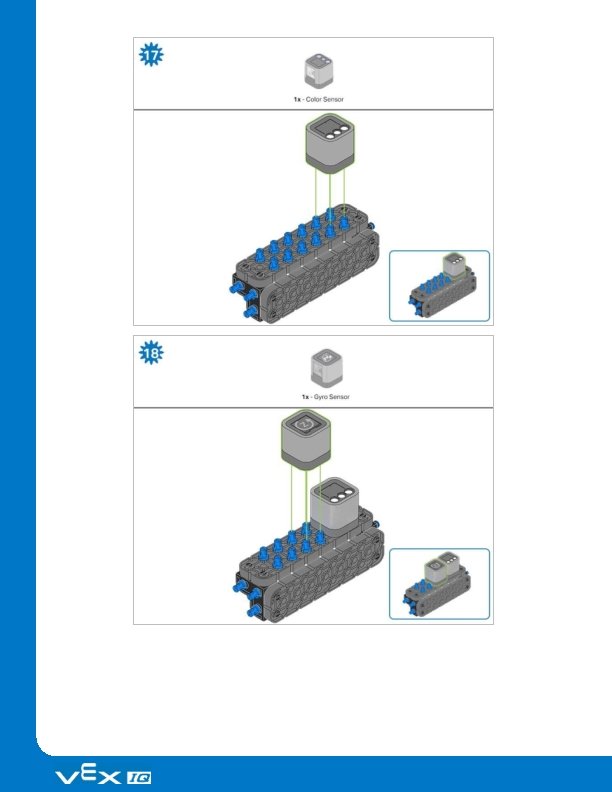
Steps 1 -6 will be repeated for steps 7– 12, so it’s possible to make both at once. Count all pieces before starting your build and have them readily available.
When adding the 4 x Pitch Shaft, twist the pitch shaft to check for tension while turning. If it spins freely, it is not properly inserted into the motor.
Make sure the gears fit together properly before locking the Beam in place. After attaching the wheels, twist the wheel that has the shaft going into the motor. If the wheel spins freely and without tension, the 4 x Pitch Shaft has slipped out of place.
The orange arrows indicate to turn the assembly around.
The highlighted blue numbers placed in gear shapes represent the assemblies completed from those specific steps.
Ensure the Smart Radio and Robot Battery are inserted before attaching the Brain to the rest of the assembly. Steps 29 -30, when you attach the Smart Cables, make sure they are tucked away so as to not block the Smart Sensors. The orange arrows indicate to turn the robot around.
Exploration Now that the build is finished, explore and see what it can do. Then answer these questions in your engineering notebook. Why does the Autopilot have four wheels instead of only two? Why is having four wheels better? VEX IQ calls their motors Smart Motors. Why do you think they call them smart? What might VEX IQ Smart Motors do that would make them seem smart? Should the Autopilot always drive as fast as it can? Why or why not? Give at least one example of when it should drive its fastest and at least one example of when it should drive more slowly.
Test your build, observe how it functions, and fuel your logic and reasoning skills through imaginative, creative play.
Changing Velocity VEX IQ Smart Motors can be programmed to spin or drive at many different velocities. If you have programmed your robot to drive or turn before, you probably did it with the default velocity. The default velocity is the velocity that the Smart Motors turn at automatically - if you don’t add any type of block for setting the velocity. The default velocity is 50% of the maximum velocity. The maximum velocity is 100%. The blocks for setting velocity are important because you might want your robot to drive or turn faster or slower. For example, you might be racing against another robot and want your robot to drive as fast as possible. Or, you might want your robot to drive or turn more slowly like when it has to carefully complete a task like moving through a maze.
Exploration of Velocity - Part 1 Autopilot is ready to drive at different velocities! This exploration will give you the tools to be able to start creating projects that can move the Autopilot’s motors at velocities that fit the robot's purpose. VEXcode IQ Blocks that will be used in the first part of this exploration: To find out more information about the block, open the Help and then select the block you want to read about.
The Builder in each group should get the hardware required. The Recorder should get the group’s engineering notebook. The Programmer should open VEXcode IQ Blocks. Hardware/Software Required: Quantity Hardware/Other Items 1 Autopilot Robot 1 1 x 1 Connector Pin 1 Charged Robot Battery 1 VEXcode IQ Blocks
Quantity Hardware/Other Items 1 USB Cable (if using a computer) 1 Engineering Notebook 1. Preparing for the Exploration Before you begin the activity, do you have each of these items ready? The Builder should check each of the following: Are all the motors and sensors plugged into the correct port? Are the smart cables fully inserted into all of the motors and sensors? Is the Brain turned on? Is the battery charged? 2. Start a New Project Before you begin your project, the Programmer needs to select the correct template project. The Autopilot template contains the Autopilot motors and sensors configuration. If the template is not used, your robot will not run the project correctly. The Programmer should complete the following steps: Open the File menu. Select Open Examples.
Use the filter bar at the top of the application and select "Templates. " Select and open the Autopilot (Drivetrain) Template. Rename your project Drive Velocity because we will be using the set drive velocity block. Save your project. Click on one of the following links for more information on saving: mac. OS, Windows, Chromebook, i. Pad. Check to make sure the project name Drive Velocity is now in the window in the center of the toolbar.
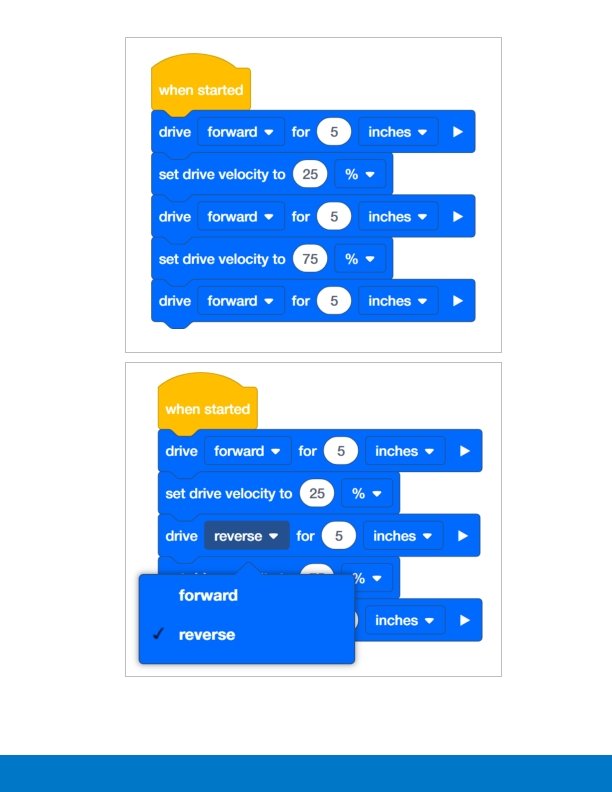
Exploration of Velocity - Part 2 1. Add a Connector Pin to the Wheel Hub. The Builder should add a 1 x 1 Connector Pin to one of the wheel hubs so that you can easily see how fast the motor and wheel are turning. 2. Drive Forward for 15 inches at Different Velocities The Programmer should build this project in VEXcode IQ Blocks.
Click on the Slot icon. You can download your project to one of the four available slots in the Robot Brain. Click on the number 1. The Programmer should connect the robot to your computer or tablet. The Brain icon in the toolbar turns green once a successful connection has been made. Then, click the Download button on the toolbar to download the Drive Velocity project to the Robot Brain.
The Operator should check to make sure your project has downloaded to the Autopilot’s Brain by looking at the Robot Brain’s screen. The project name should be listed in slot 1. The Driver should now run the project on the Autopilot robot by making sure the project is highlighted and then press the Check button. 3. Drive Forward and in Reverse at Different Velocities The Programmer should change the second drive for block to drive in reverse instead of forward. The Programmer should then download the project. The Driver should now run the project on the Autopilot robot by making sure the project is highlighted and pressing the Check button.
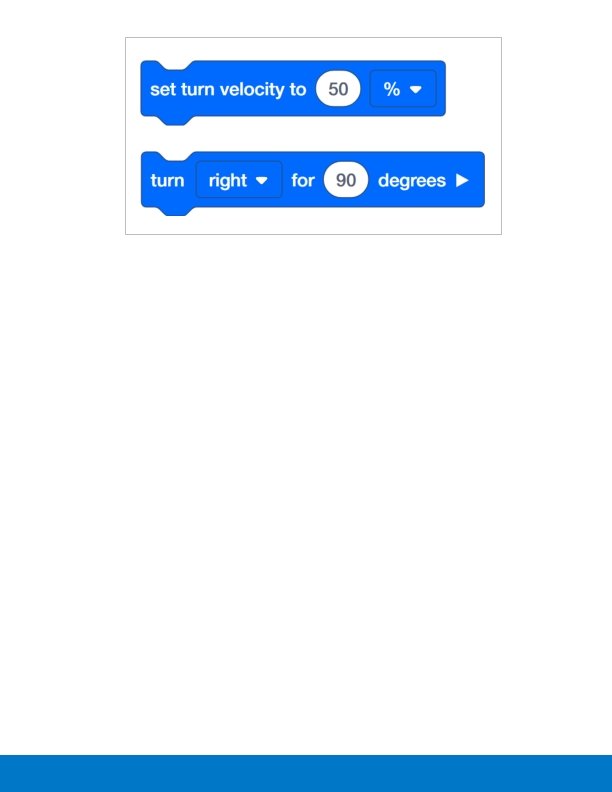
Turning at Different Velocities Next, turn the Autopilot at different velocities! Setting the velocity for driving and setting the velocity for turning are two separate blocks. This is helpful when you want the robot to drive at a certain velocity but turn at a different one. In a timed competition for example, the robot might drive very quickly around the field but turn more slowly and carefully. Add the following blocks to your Drive Velocities:
The Programmer should add these blocks to your project and then download it to your Autopilot. The Driver should then run the project. Notice how the turning velocities compare to each other. Also, notice how they are different than the driving velocities. Your group should discuss your observations and the Recorder should write them in your engineering notebook.
Become a 21 st century problem solver by applying the core skills and concepts you learned to other problems.
The Velocity of Vehicles A vehicle sensing objects in front of it in order to slow down or speed up. Adaptive Cruise Control Today’s robots and cars in particular have the ability to perform many automated movements. Some cars can park and even drive themselves. Many new vehicles and self- driving cars have Adaptive Cruise Control (ACC). This feature sets the vehicle at a certain velocity and uses sensors to determine if it should slow down or speed up depending on the objects in front of it. How is this helpful? The faster an object is moving, the more momentum or energy it has. So colliding with objects like other cars is dangerous. Let’s say you are driving on the highway and you set your ACC to 65 mph. Your car will drive at 65 mph until it needs to change its velocity. If a car in front of you suddenly uses their brakes, your car will be able to sense the car slowing down in front of you and also slow down so that you do not crash into them. When the car in front speeds up, your car will speed up. When the road starts up a hill, the car will speed up in order to maintain the 65 mph that you set. Elevators are another example of robots that need to change velocities in order to function properly. Can you imagine stepping into an elevator and it immediately started going up or down at its max velocity? You would probably fall over! Elevators must start and end at a lower velocity to ensure the safety of its passengers.
Changing the Velocity of Competition Robots Changing the velocity is an important skill in competitions Speed and Control Competition robots are required to move through a course with precise and accurate movements. They also move, stack, or grab certain objects in order to be awarded points. Robots have to be able to properly change velocity in order to make more controlled movements. For example, if a robot is required to pick up an object, having the robot approach the object at its full velocity before picking it up will likely cause the robot to run into or over the object. It would be more beneficial for the robot to slow down in front of the object before picking it up. Time is one of the biggest constraints in a competition match. The robot has to try to accumulate as many points as possible during the given time limit. To do this, the robot must move as fast as it can while still maintaining control. If the robot needs to move around a
specific object, reducing the velocity allows the robot to have more control while turning. In order to move the robot forward or in reverse as fast as it can, the velocity must also be able to increase. The challenge in competition matches is finding the balance between having the robot move at a high velocity and control in order to obtain as many points as possible!
Is there a more efficient way to come to the same conclusion? Take what you’ve learned and try to improve it.
Improve Your Project Setting Appropriate Velocities You got your Autopilot to move at different velocities! Let’s explore how to set appropriate velocities to program your Autopilot. The Builder in each group should get the hardware required. The Recorder should get the group’s engineering notebook. The Programmer should open VEXcode IQ Blocks. Hardware/Software Required: Quantity Hardware/Other Items 1 1 x 1 Connector Pin
Quantity Hardware/Other Items 1 Charged Robot Battery 1 VEXcode IQ Blocks (latest version, Windows, mac. OS, Chromebook, i. Pad) 1 USB Cable (if using a computer) 1 Engineering Notebook Before you begin the activity. . . Before you begin the activity, do you have each of these items ready? The Builder should check each of the following: Are all the motors and sensors plugged into the correct port? Are the smart cables fully inserted into all of the motors and sensors? Is the Brain turned on? Is the battery charged?
Remix Your Project The Programmer should complete the following steps: Open the File menu. Select Open Examples. Select and open the Autopilot Template. Name your project Velocity Remix. Save your project. Tag You’re It! Turn quickly, drive slowly, turn quickly to play a game of tag! The robot wants to play a game of tag-you’re it! Programmer, use the set turn velocity, turn for, set drive velocity, and drive for blocks to program the Autopilot to turn quickly to avoid being tagged, drive slowly to tag someone, and then turn quickly again to run away! The velocity percentage for turning should be at least twice as high as the velocity percentage for driving. The project below is started but incomplete. It needs more blocks and set velocities.
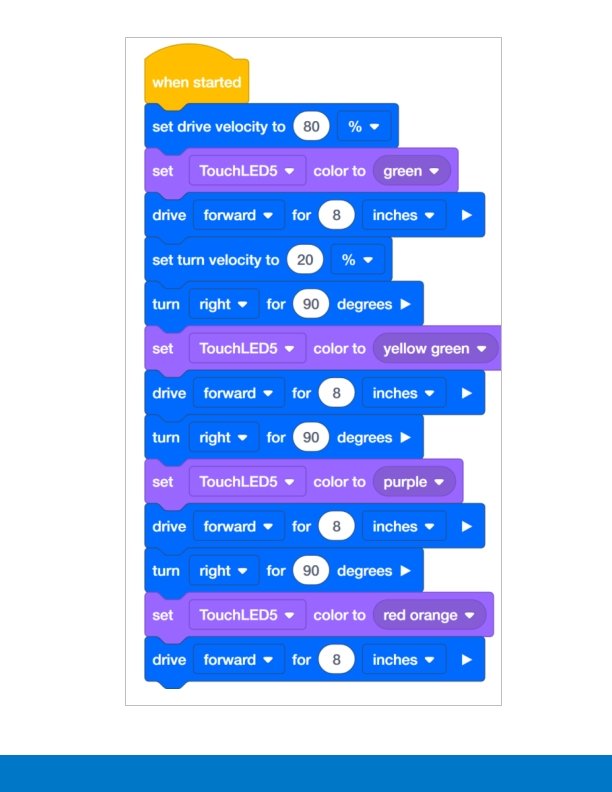
Programmer, save the Tag project and download it to the brain. Operator, run the Tag project. Does the robot turn quickly, drive slowly, and then turn quickly again? Recorder, take notes about the robot’s behavior. Bonus Challenge: Have the Autopilot play a sound once it tags someone! Protect the Castle! Move in a square to protect the castle from intruders! Your king asked you to protect the castle! You must drive around the square castle to make sure it is safe from intruders! Programmer, use the set turn velocity, turn for, set drive velocity, and drive for blocks to program the Autopilot to move in a square. The Autopilot should drive quickly along the sides of the square but turn slowly at the corners. The project below is started but incomplete. It needs more blocks and set velocities.
Programmer, save the Castle project and download it to the brain. Operator, run the Castle project. Does the robot move quickly in a square shape but turn slowly at the corners? Recorder, take notes about the robot’s behavior. Bonus Challenges: Have the Autopilot’s Touch LED display a different color while it drives on each side of the square. The perimeter of the square castle that needs to be guarded is 20 inches. Program the robot to move around the perimeter. The area of the square castle that needs to be guarded is 49 inches. Calculate the length of each side and move in a square that covers the area. Robot Waiter Don’t spill the drinks!
Your robot is training to be a waiter at a new restaurant in town. Program the robot waiter to be able to move quickly without spilling what it is carrying! Use the 6 x Pitch Standoff to simulate food or drinks that the waiter would be carrying. Programmer, use the set turn velocity, turn for, set drive velocity, and drive for blocks to program the Autopilot to turn 360 degrees and drive 12 inches as quickly as possible while balancing a 6 x Pitch Standoff on the Autopilot’s brain. The project below is started but incomplete. It needs to have the velocities and distances set. Builder, lay a 6 x Pitch Standoff from the VEX IQ Kit across where VEX IQ is written on the brain.
Programmer, set the velocities and distances. Then save the Robot Waiter project and download it to the brain. Operator, run the Robot Waiter project. Does the robot turn and drive while keeping the beam on top of the brain? How fast can the robot move before the beam slides off? Programmer, test faster and faster velocities until you find the limit. The limit for turning might be different than the limit for driving. Use the information from the Recorder in order to make decisions on which velocity is the best choice. Recorder, take notes about the robot’s behavior, its velocity, and whether the beam falls off. Make note of how the velocities are changing each time the project is tested.
Remix Questions Answer the following questions in your engineering notebook after completing the activities. In Protect the Castle!, did the robot turn in a perfect square? What might be the reason why the robot did not move and turn the exact distances written in the project? In Robot Waiter, the turn velocity could be set higher than the drive velocity. Why do you think that was true?
Understand the core concepts and how to apply them to different situations. This review process will fuel motivation to learn.
Review You have accomplished a lot in this STEM Lab! The following questions will help you think back over everything you have learned. You can only answer once, so think carefully before you submit! 1. True or False: You can program your robot to move without using a block that sets velocity. o True o False 2. When would it be appropriate to use a block that sets velocity in your project? o To change the robot's direction from driving forward to driving in reverse. o To drive the robot forward a certain number of inches. o To allow the robot to have more control when carefully completing a task such as maneuvering through an obstacle course or maze. o To stop all of the motors from moving. 3. True or False: There is only one block that sets velocity for both driving and turning. o True o False 4. In this example project, how far does the robot move at 10% velocity?
o 5 inches o 3 inches o 4 inches o 12 inches 5. Erin programmed her robot to drive forward for 12 inches at 50% velocity. If Erin wants to move the same 12 inches in a faster amount of time, how should she change the velocity if at all? o Increase the velocity so it is more than 50% o Decrease the velocity so it is less than 50% o Keep the velocity the same at 50% 6. Bobby wrote the example project below. He noticed that when he runs the project, the robot starts to move out of control when it begins to turn. What should Bobby do in order to have his robot make more controlled movements when it begins to turn?
o Increase the set drive velocity o Decrease the set turn velocity o Decrease the set drive velocity o Change the direction of the turn from right to left 7. Which of the following best describes how the robot will behave based on the project below?
o The robot will turn around at 75% velocity, drive forward for 5 inches at 25% velocity, then turn around again at 75% velocity. o The robot will turn around at 25% velocity, drive forward for 5 inches at 75% velocity, then turn around again at 25% velocity. o The robot will drive forward for 5 inches at 25% velocity, then turn around at 25% velocity. o The robot will spin in a circle at 25% velocity.
Additional information, resources, and materials.
Knowledge Base Articles Links to the VEX Robotics Knowledge Base Articles for this STEM Lab: How to Turn On/Off a VEX IQ Robot Brain https: //kb. vex. com/hc/en-us/articles/360035952571 -How-to-Turn-On-Off-a-VEX-IQ-Robot. Brain How to Read Indicator Lights on the VEX IQ Robot Brain https: //kb. vex. com/hc/en-us/articles/360035590672 -How-to-Read-Indicator-Lights-on-the. VEX-IQ-Robot-Brain How to Navigate the VEX IQ Robot Brain https: //kb. vex. com/hc/en-us/articles/360035952331 -How-to-Navigate-the-VEX-IQ-Robot. Brain How to Connect VEX IQ Devices to Smart Ports https: //kb. vex. com/hc/en-us/articles/360035952151 -How-to-Connect-VEX-IQ-Devices-to. Smart-Ports How to Install or Remove the VEX IQ Robot Battery https: //kb. vex. com/hc/en-us/articles/360035951991 -How-to-Install-or-Remove-the-VEXIQ-Robot-Battery How to Charge the VEX IQ Robot Battery https: //kb. vex. com/hc/en-us/articles/360035955011 -How-to-Charge-the-VEX-IQ-Robot. Battery How to Use the Autopilot Program in the Demos Folder https: //kb. vex. com/hc/en-us/articles/360035952031 -How-to-Use-the-Autopilot-Program-inthe-Demos-Folder Best Practices for Preserving the VEX IQ Robot Battery’s Life https: //kb. vex. com/hc/en -us/articles/360035953671 -Best-Practices-for-Preserving-the- VEX-IQ-Robot-Batterys-Life Ideas for Organizing the VEX IQ Super Kit https: //kb. vex. com/hc/en-us/articles/360035590332 -Ideas-for-Organizing-the-VEX-IQSuper-Kit VEX IQ Brain Status (USB Cable) https: //kb. vex. com/hc/en-us/articles/360035955411 -How-to-Understand-the-VEX-IQBrain-Status-Icon-USB-VEXcode-IQ-Blocks Links to VEXCode IQ Blocks Knowledge Base Articles for this STEM Lab: How to Begin a New Project in VEXcode IQ Blocks https: //kb. vex. com/hc/en-us/articles/360035954551 -How-to-Begin-a-New-Project. VEXcode-IQ-Blocks
How to Download and Run a Project https: //kb. vex. com/hc/en-us/articles/360035591232 -How-to-Download-and-Run-a-Project. VEXcode-IQ-Blocks How to Save a Project on Windows https: //kb. vex. com/hc/en-us/articles/360035954531 -How-to-Save-a-Project-on-Windows. VEXcode-IQ-Blocks How to Save a Project on mac. OS https: //kb. vex. com/hc/en-us/articles/360035954511 -How-to-Save-a-Project-on-mac. OSVEXcode-IQ-Blocks How to Save a Project on Chromebook https: //kb. vex. com/hc/en-us/articles/360035955351 -How-to-Save-on-a-Chromebook. VEXcode-IQ-Blocks How to Download to a Selected Slot on the Brain https: //kb. vex. com/hc/en-us/articles/360035591292 -How-to-Download-to-a-Selected-Sloton-the-Brain-VEXcode-IQ-Blocks
Identifying Angle Beams How to Identify the Different Angles of the Angled Beams There are four different types of beams that have a bend at an angle: 30 o Angle Beams, 45 o Angle Beams, 60 o Angle Beams, and Right Angle (90 o) Beams. There also three types of Right Angle Beams: 3 x 5, 2 x 3, and Offset. The best way to tell which angles are which is to stack the beams on top of each other. Then you can compare how they look. You can also use a protractor to measure the angle of the beam.
Installing Rubber Shaft Collars Using your hand to warm a Rubber Shaft Collar Rubber Softens as it gets Warm Hold the Rubber Shaft Collars in your hand for 15 -30 seconds before you slide them onto a shaft. Holding the Rubber Shaft Collar in your hand will warm and soften the rubber to make it easier to slide onto a shaft.
Removing Connectors from Beams and Plates Using a pitch shaft to remove a corner connector How to Easily Remove Connectors You can easily remove corner connectors from beams or plates by placing a metal shaft through one of the holes of the corner connector and pulling outward while holding down the beam or plate.
Removing Pins from VEX IQ Beams and Plates Removing a pin from a plate assembly using a beam How to Easily Remove Pins from Beams and Plates You can quickly remove connector pins from beams or plates by pressing a beam against the back of the pin, which partially pushes the pin out, so you can remove it with your fingers. You can use this technique to more easily remove pins from individual plates and beams, or from built structures.
Removing Standoffs from Mini Standoff Connectors Removal of a standoff from a Mini Standoff Connector How to Easily Remove Parts from Mini Standoff Connectors Standoffs and Mini Standoff Connectors can be separated by pushing a shaft through the Mini Standoff Connector. The same technique can be used for parts with similar ends in Mini Standoff Connectors, such as pins.
Supporting Shafts using Rubber Shaft Collars Unsupported Shaft Rubber Shaft Collar Added to Shaft Supported Shaft Supporting a shaft with a Rubber Shaft Collar How to Support Shafts with Rubber Shaft Collars Shafts can fall out of place or alignment very easily if they aren't supported properly. You can make a shaft more secure and prevent it from falling out of place by putting a Rubber Shaft Collar before the end of it. You can then connect the shaft to a support structure with the shaft collar positioned against it. That will allow the shaft to turn but will prevent it from wobbling or falling out.
Supporting Shafts using Shaft Bushings Unsupported Shaft Bushing Added to Shaft Supported Shaft Supporting a shaft with a Shaft Bushing How to Support Shafts Using Shaft Bushings Shafts can fall out of place or alignment very easily if they aren't supported properly. You can make a shaft more secure and prevent it from falling out of place by putting a bushing at the end of it. You can then connect that bushing into another beam or additional part. That will allow the shaft to turn but will prevent it from wobbling or falling out.
Popups within this STEM Lab
Tag You’re It! Solution Students were prompted with a very open-ended challenge. The Autopilot needs to turn quickly, drive slowly, and then turn quickly again. The definitions of quickly and slowly were not provided and so, they could be any velocities that are comparably faster or slower than each other. Any project that does all of the following is correct: Turns the robot quickly in any direction for any distance. Drives the robot slowly in any direction for any distance. Turns the robot quickly in any direction for any distance. Students might have a block to set the velocity each time the robot turns. This is a teachable moment when you can point out that setting the velocity for driving or turning can be done once unless they want to change the velocity. Note: Velocity settings close to 100% are unnecessary and not recommended. Bonus:
The Bonus Challenge requires the addition of only one play sound block. The students should have the play sound block after the robot has moved forward to indicate that the robot has moved forward to tag someone.
Robot Waiter Solution An example solution to Robot Waiter: Students were prompted with an open-ended challenge: to see how fast the Autopilot can turn 360 degrees and drive 12 inches while keeping a 6 x Pitch Standoff balanced on the brain. Because of the shape of the standoff, the velocity for turning can be set higher than the velocity for driving. Note: Velocity settings close to 100% are unnecessary and not recommended.
Protect the Castle! Solution An example solution to Protect the Castle!: Students were challenged to have the Autopilot move in a square. They were told to have the robot drive quickly along the sides and turn slowly at the corners. Again, the definitions of quickly and slowly were not provided and so, they could be any velocities that are
comparably faster or slower than each other. Any project that does all of the following is correct: Sets the velocity for driving higher than the velocity for turning. Drives the robot quickly forward at least four times. Turns the robot slowly for 90 degrees at least three times. Students might have additional blocks to set the velocity each time the robot drives or turns. This is a teachable moment when you can point out that setting the velocity for driving or turning can be done once unless they want to change the velocity. Note: Velocity settings close to 100% are unnecessary and not recommended. Bonus: The Bonus Challenge requires the addition of at least four set Touch LED color blocks positioned in the stack before each drive for block.
Programming Precise Distances and Velocities How are blocks like drive for, turn for, set drive velocity, and set turn velocity able to program a robot to move precise distances at precise velocities? In the Robot Configuration, you are able to specify the size of the wheels and the gear ratio of the drivetrain. For example, the typical wheel size for the Autopilot is 200 millimeters and the typical gear ratio is 1: 1. These are the default settings in the Robot Configuration. What does wheel size actually mean? The listed wheel size is the actual wheel circumference. This means that every time the wheel completes one full rotation, it travels 200 millimeters. When the drive for block is programmed to move forward for a specific amount of inches or millimeters, the programming logic inside of the drive for block performs math calculations. For example, if the drive for block is set to move forward for 2000 millimeters, that means that the wheels will travel for 10 complete rotations. The drive for block converts the distance into the number of degrees the motor needs to rotate for. The number of degrees is then sent to the Smart Motor, which uses sensors inside of the motor to travel for the set distance. All of this math is completed with the programming logic built into the drive for block. The programming logic for the turn for block uses the Autopilot’s Gyro Sensor to detect when the robot has turned for the set distance. The Gyro Sensor measures the amount of change in the robot’s position or heading. So the Autopilot turns until the Gyro Sensor’s data indicates the robot has turned for the set number of degrees and then the Drivetrain stops. The set drive velocity or set turn velocity block works because there is a microprocessor within the Smart Motor that sets how often the internal motor turns on. The internal motor does not actually have different "velocities" as it can only be turned "on" or "off" - like a light switch. A velocity of 50% velocity does not mean that the motor is half turned on - instead, it means that the motor is turned on at full speed, but only half of the time. What this means is that the microprocessor inside of the motor turns the motor off and on at different intervals - or duty cycles - to provide the illusion of different velocities. The microprocessor can turn the motor on and off over a thousand times a second to give a wide
range of different speeds. Imagine if you were able to turn a light on and off incredibly fast - you would effectively be able to change the brightness in the room depending upon how long the light was on versus how long the light was off each second. But, the brightness of the light’s bulbs would not be changing. The only factor changing would be the amount of time the light was on. That is how the Smart Motors set a velocity. They turn on and off faster than is perceivable so that they seem to be powered at specific speeds. The blocks for setting velocity let the programmer enter a velocity that is sent to the microprocessor which sets the rate at which the motor turns on and off.
Percentages, Fractions, & Decimals A percent is a ratio that compares a number to 100 using division. You can express percents as fractions and decimals by dividing by 100. For example: 65% = 65÷ 100 or 65/100 Provide the following example for the students before they begin trying to convert percents to fractions on their own: If I was working with a velocity of 65%, I would express this percent as a fraction by writing 65/100. Then, ask your students to choose a velocity that they have been working with and take a few moments to write that velocity as a fraction instead of a percent in their engineering notebooks. The students should write the velocity that they have been using over 100. Students may also reduce fractions as they see fit. For example, 60% written as a fraction is 60/100. This is the same as 30/50 or ⅗. Percents can also be written as decimals. Decimals are written using the scale of 10 (tenths, hundredths, thousandths). Decimals are commonly used to represent a whole number plus a fraction.
Since percentages are out of 100, decimals will also follow the same pattern extending two units to the right of the decimal point to the hundredths place. For example: 65% = 65÷ 100 or 65/100= 0. 65 Provide the following example for the students before they begin converting percents to decimals on their own: if I was working with a velocity of 65%. I would express this percent as a decimal by writing 0. 65. Then, ask your students to take a few moments to rewrite the velocity that they had converted to a fraction earlier. Now they should write it as a decimal in their engineering notebooks. The students should write the velocity out to two decimal places. Once the students have all three representations of the same amount (percent, fraction, and decimal) ask them to take a few moments to share ideas with a partner as to how these three representations are connected. Ask the students to write both of their explanations in their engineering notebook. Connect the concept of conversions to the projects the students have created. Ask the students to read the project they have just worked on in the groups that they were in previously (Builder, Programmer, Driver and Recorder). Ask the group to convert the percentages of the blocks used to set velocities to both fractions and decimals. Ask the Recorder to note all of the work used for the conversions in the engineering notebook. Once the group has done all of the necessary converting, ask the Programmer to insert the
conversion into a note attached to the set drive velocity block. If the group need assistance attaching a note to a block in the project, direct them here. Begin a discussion with the students about how all three of the representations are connected. Responses will vary, but students should notice how each representation is out of 100. Students who may have reduced their fractions may notice that fractions, percents and two-digit decimals are being represented with 100 being the whole. Even if a student redices 50/100 to ½, the student can still make a connection as to how this relates to some part out of the whole of 100. Students can practice writing percents as fractions by filling in or recognizing parts of a fraction grid to help students visually understand that a percent is comparative to 100 by using graph paper. Below is an example of how students can place all three representations together as well as a filled-in fraction grid:
Organizing Students into Groups for Exploration Organize the students into groups before beginning the exploration. Students can be organized groups of two to four students when participating in the exploration. The following roles can be utilized during the exploration: Builder — This person checks that the robot is properly built and ready (e. g. , Are all the motors and sensors plugged into the correct ports? Is the Robot Brain turned on? ) before a project is run. Programmer — This person will use the set drive velocity block and others to create a project on the computer or tablet. This person will also download the project to the robot. Driver — This person selects the project and then runs it on the robot. This person will also be the one to retrieve the robot after it as run. Recorder — This person writes down all of the group answers/reflections in the engineering notebook. If there are two students in each group, the students can each choose two roles. If there are three students in a group, one of the students can choose to do two roles. If there are four students in a group, each student can have one role. Provide the list of roles and their definitions to the students. Once students are in their groups, allow the members to choose their role. Circulate the classroom and makes sure that every student has a role. There is an optional collaboration rubric on this page. Remind the students of roles throughout the exploration. For roles to work, students have to feel as though they will be held accountable for fulfilling those roles. Therefore, interject if you see a student taking over someone else’s role or not fulfilling their assigned role. Reminders about who is supposed to be doing what can be useful interventions.
Exploration of Velocity Outline The outline for the Exploration of Velocity is as follows: Recognize the set drive velocity block. Review how to find Help information about blocks in VEX IQ Blocks. Check that the VEX IQ Autopilot is ready for the exploration. Start a new project in VEXcode IQ Blocks. Rename and save the project (Windows, Mac. OS, Chromebook). Create the Drive Velocity project that moves the Autopilot at different velocities. Download and run the project. Change the Drive Velocity project to move the Autopilot in reverse. Download and run the project. Add set turn velocity and turn for blocks to the Drive Velocity project. Download and run the project. Wrap up the activity with a discussion.
Changing the Autopilot's Velocity These are three versions of the project that students are asked to build in the Play section:
In order to set the Autopilot’s velocity, the student will need to change the default 50 to a value of their choosing. Anything editable inside of a block is called a parameter. For this STEM Lab, the student does not need to change the second parameter because all activities will only use the percentage (%) of the maximum velocity.
See the Help feature within VEXcode IQ Blocks for further information about these blocks or other blocks used in this project. Students might ask about the arrow at the end of the drive for and turn for blocks. Please see this page from the VEX Robotics Knowledge Base for an explanation of setting blocks that can be waiting or non-waiting.
Building the Autopilot Robot with a Team Teacher Toolbox The build instructions will show students step-by-step instructions on how to build the Autopilot Robot. The Build Instruction Tips section will point out additional information for specific steps which will help students be successful with their build, so be sure to point out that section to students. There is an optional rubric to evaluate the robot build on this page. If any rubrics are used to evaluate students, review the rubric or pass out copies before students begin working so they are clear on how they will be assessed. Before starting the build, consider how your students will be organized. Will each student have their own robot, or will they work in pairs or teams? If working in teams, each student could build a portion of steps or each student could be given a role. The following roles can be utilized during the building of Autopilot: Right wheel — This person follows steps 1 -6 to build the right wheel of Autopilot. This person is also responsible for making sure that the motor gets plugged into the correct port (port 6). Left wheel — This person follows steps 7 -12 to build the left wheel of Autopilot. This person is also responsible for making sure that the motor gets plugged into the correct port (port 1). Sensors — This person follows steps 13 -26 to build the frame and attach the sensors. Robot Brain — This person follows steps 27 -30 to connect all of the components including the Robot Brain and making sure the sensors are attached to the correct ports. This person is also responsible for making sure that the battery is charged and ready. o Port 2: Distance Sensor o Port 3: Color Sensor o Port 4: Gyro Sensor o Port 5: Touch LED o Port 8: Bumper Switch o Port 9: Bumper Switch If there are two students in each group, the students can each choose two roles. If there are three students in a group, one of the students can choose to do two roles. If there are four
students in a group, each student can have one role. Provide the list of roles and their responsibilities to the students. Once students are in their groups, allow the members to choose their role. Circulate the classroom and make sure that every student has a role. There is an optional collaboration rubric on this page. Remind the students of roles throughout the exploration. For roles to work, students have to feel as though they will be held accountable for fulfilling those roles. Therefore, interject if you see a student taking over someone else’s role or not fulfilling their assigned role. Reminders about who is supposed to be doing what can be useful interventions.
Configuration for Autopilot's Motors and Sensors The configuration for Autopilot’s motors and sensors are: Port 1: Left Motor Port 2: Distance Sensor Port 3: Color Sensor Port 4: Gyro Sensor Port 5: Touch LED Port 6: Right Motor Port 8: Bumper Switch Port 9: Bumper Switch