Cast Metal Restorations Dr S Mukhtarun Nisar Andrabi

Cast Metal Restorations Dr. S. Mukhtar-un- Nisar Andrabi Assistant Professor Conservative Dentistry & Endodontics

Contents Introduction Historical Perspective Indications & Contraindications Advantages & Disadvantages Tooth preparation for Cast Restorations General Principles Bevels, Margins & Flares Preparation for Metal Inlays & Onlays Partial & Full Cast Crown Step By Step Procedure For Cast Restorations Conclusion

Introduction TOOTH PREPARATION : “Tooth preparation is defined as the mechanical alteration of a defective, injured, or diseased tooth to best receive a restorative material that will reestablish a healthy state for the tooth, including esthetic corrections where indicated along with normal form and function”

Introduction contd. RESTORATION : “Restoration is defined as any material or prosthesis that restores or replaces lost tooth structure, teeth or oral tissue. CAST: “Life size likeness of some desired form” “To produce a shape by thrusting a molten liquid or plastic material into a mold possessing the desired shape” Casting: “Something that has been cast in a mold; an object formed by the solidification of a fluid that has been poured or injected in a mold” (Glossary of Prosthodontic Terms - 8)

Historical Background 1835 – John Murphy First Inlay Fabricated Porcelain inlays 1880 – Ames & Swasery Used burnished foil technique for fabricating Inlays 1897 - D. Philbrook First CAST INLAY is attributed to him Introduced the concept of forming an investment around a wax pattern Eliminating the wax and filling the mold with a “Gold alloy” 1907 – W. M. Taggart “Lost wax technique” Reported the development of “Pneumatic Pressure Casting” Introduced the technique for Cast Gold Dental restorations Popularized the Gold Inlay as a Dental restoration
 Restoration of endodontically treated teeth")
Indications Replace lost tooth structure (In extensively involved teeth) Restoration of endodontically treated teeth correction of Occlusion & Diastema closure support for partial or complete dentures Retainers for fixed prosthesis partially sub-gingival restorations Cracked teeth (Vertically, horizontally or diagonally) As an adjunct to successful PDL therapy by correction of tooth anomalies which predispose to PDL problem

Contraindications Developing or deciduous teeth High Plaque or Caries indices Occlusal disharmony Dissimilar metals Small restorations Esthetics
 Ability to reproduce precise form")
Advantages Higher strength (Compressive, Tensile, Shear & Yield) Ability to reproduce precise form and minute details Control of contours and contacts Biocompatibility of materials (Noble or passivated alloys) Not affected by tarnish & corrosion Increased longevity Fewer voids, less internal stresses, no layering effect when compared to amalgam Cast restorations can be better finished, polished or glazed, thus better tissue tolerance & no harm to PDL organ

Disadvantages Technique sensitive No. of appointments Higher chair time High Cost Splitting forces

Mouth preparation prior to Cast Restorations Every measure is to be taken to ensure longevity & success of a cast restoration Control of Plaque Control of Caries Control of periodontal problems Control of pulpal health of tooth

Initial Procedures 1. Occlusion 2. Anesthesia 3. Consideration for temporary restorations

Occlusion. Before an anesthetic is administered and before preparation of any tooth, evaluate the occlusal contacts of the teeth. An evaluation should include: (1) the occlusal contacts in maximum intercuspation (2) the occlusal contacts that occur during mandibular movements The pattern of occlusal contacts influences a. the preparation design, b. the selection of interocclusal records, and c. type of articulator or cast development needed.

Anesthesia. Local anesthesia of the tooth to be operated on, as well as the adjacent soft tissues, usually is advocated. Anesthetizing these tissues eliminates pain and reduces salivation, resulting in a more pleasant operation for both the patient and the operator.

Temporization Before preparation of the tooth, consideration must be given to fabricate the temporary restoration. Most temporary restoration techniques require the use of a preoperative impression to reproduce the occlusal, facial, and lingual surfaces of the temporary restoration to the preoperative contours
 Preservation of tooth structure (2) Retention and")
Principles of preparation for indirect restorations (1) Preservation of tooth structure (2) Retention and resistance (3) Marginal integrity (4) Strength and structural durability (5) Occlusal stability

Preservation of Tooth Structure • Protection from fracture and wear e. g. Providing cuspal coverage • Pattern of tooth substance removal e. g. Anatomical reduction. • Type of restoration The mechanical characteristics of the material chosen will dictate the amount of tooth substance removed

Retention & Resistance Retention prevents removal of the restoration along the path of insertion or long axis of the tooth preparation Resistance prevents the dislodgement of the restoration by forces directed in an apical or oblique direction and prevents any movement of the restoration under occlusal forces
. Preparation Path: * Prep should")
Retention & Resistance General features of tooth preparation: A). Preparation Path: * Prep should have a “Single Insertion path” * Path is parallel to long axis of tooth crown * Helps in retention & decreases the micro movements of restoration during function * All reductions in tooth structure should be oriented towards ONE path (Withdrawal & Insertion path of future wax pattern) B). Apico-Occlusal Taper: * For max retention, opposing walls & axial surfaces should be perfectly parallel to each other C). Circumferential Tie: * The peripheral marginal anatomy of the preparation is called as the “Circumferential Tie”
 Principal/Primary Retention forms: Box preparation and flat floor Parallelism: internal walls")
Retention Features 1) Principal/Primary Retention forms: Box preparation and flat floor Parallelism: internal walls must be almost parallel Dovetails : occlusal dovetails aid in retention Surface area- frictional retention Masticatory loads directed to seat the restoration 2) Secondary/Auxiliary Retention forms : Grooves , pins , slots, skirts etc. Luting Cements: Their action is primarily mechanical, locking the cast to tooth structure by filling the space between them. Luting cements used: Type I GIC, Zinc Polycarboxylate

Grooves Located completely in dentin and extend upto the entire wall. Can be located at the mesial & distal wall/the gingival floor of the facial or lingual portion of a cavity preparation Should be located as internally as possible, adjacent to the axial wall Prevent lateral displacement of the mesial, distal, facial & lingual parts of restoration Can also be located externally in extra coronal preparation, they can be placed anywhere there is sufficient dentin bulk without impinging on the pulp chamber, root canal system or other anatomy

Internal proximal grooves for added retention Inclusion of external facial grooves

Resistance to lingual & rotational forces may be provided by proximal grooves Internal grooves can be prepared in walls of inlays for added retention

Slots Slot is a internal cavity within a floor of preparation having a continuous surrounding walls & floors Junction between the floor & surrounding walls is round Slot should have a 2 to 3 mm depth The slot is cut in dentin so that if it were to be extended gingivally, it would pass midway between the pulp and the DEJ

A and B, Cutting distal slot for retention for MO onlay to treat terminal molar having large cement base (x) resulting from extensive occlusal and mesial caries. C, Section of A D and E Preparing mesial slot for retention for DO onlay to treat maxillary first premolar F, Section of D.

Skirts are thin extensions of the facial or lingual proximal margins of the cast metal onlay that extend from the primary flare to a termination just past the transitional line angle of the tooth. A skirt extension is a conservative method of improving both the retention form and the resistance form of the preparation. Usually the skirt extensions are prepared entirely in enamel. The addition of properly prepared skirts to three of four line angles of the tooth virtually eliminates the chance of post restorative fracture of the tooth because the skirting encompasses and braces the tooth against forces that might otherwise split the tooth.

Depth cut for skirt Blending of the skirt with primary flare

Indications For Skirting The addition of skirt extensions is recommended: Ø For teeth that exhibit the split-tooth syndrome. Ø when the proximal surface contour and contact are to be extended more than the normal dimension to develop a proximal contact. Ø when improving the occlusal plane of a mesially tilted molar by a cusp capping onlay Ø when splinting posterior teeth together with onlays.

Contraindications skirts are not placed on the mesiofacial margin of maxillary premolars and first molars because of esthetic reasons. A disadvantage of skirting is that it increases the display of metal on the facial and lingual surfaces of the tooth.

Collar Preparation To increase the retention and resistance forms when preparing a weakened tooth for a MOD onlay capping all cusps, a facial or lingual "collar, " or both, may be provided facial surfaces of maxillary premolars and first molars are not usually prepared for a collar.

A, First position of bur in preparing for lingual collar on weakened maxillary premolar. Section drawings of first position of bur and second and third positions (C). D, Bevelingual margin. E, Completed preparation. F, Completed onlay

Structural Durability Structural durability of a cast restoration depends upon the following: Occlusal reduction Functional Cusp Bevel Axial Reduction
 is the area at")
Marginal Integrity The margin of the restoration (or finishing line) is the area at which the restoration ends and presents a junction of restorative material and tooth substance at the tooth surface. In determining the shape of tooth reduction at the margin, the aim must be to produce as small a marginal gap or discrepancy as possible.

Marginal Integrity Marginal integrity is an important aspect of a restoration. The peripheral marginal anatomy of the preparation should exhibit the “Circumferential Tie”& Should fulfill the requirements advocated by Noy: If the prep ends on enamel, the enamel must be supported by sound dentin Enamel rods forming the cavosurface margin should be continuous with sound dentin- FLARES Enamel rods forming the cavosurface margin should be covered with a restorative material- BEVELS Angular cavosurface angles should be trimmed

Sub-gingival Margins A sub-gingival margin may be inevitable when: Ø Caries or a crack extends subgingivally. Ø A restoration extends subgingivally. Ø Extra axial length is required for retention. Ø Aesthetics are essential

Margin configurations

Bevels Cast metal restorations require beveled margins Bevels are defined as “flexible extensions” of a cavity preparation, allowing the inclusion of surface defects, supplementary grooves and other areas on the tooth surface. Bevels create an obtuse angled marginal tooth structure (Strong tooth anatomy) Produce an acute angled marginal cast alloy (most amenable to finishing & burnishing)

Types Of Bevels Partial Bevel: Involves part of the enamel only. Not used in cast restorations Short Bevel: Includes entire enamel wall but no dentin Long Bevel: Includes all of the enamel wall and up to one half of the dentinal wall Most frequently used bevel for cast materials Full Bevel: Includes all of the dentinal and enamel wall Well reproduced by all 4 classes of cast alloys Deprives prep of internal resistance & retention Counterbevel: When capping cusps this protects & supports them. Given opposite to an axial wall on the facial and lingual surfaces.

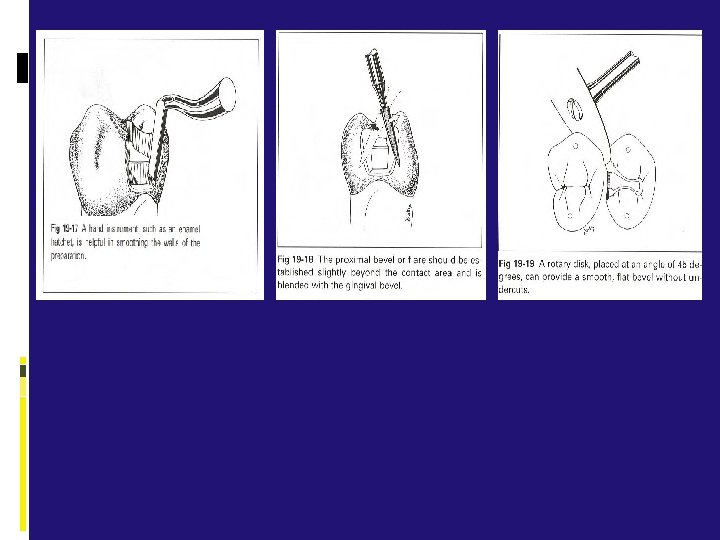
Functions Of The Bevels Beveling can serve four useful purposes in the tooth preparation for a casting: (1) it produces a stronger enamel margin, (2) it permits a marginal seal in slightly undersized castings (3) it provides marginal metal that is more easily burnished and adapted, and (4) it assists in adaptation of gingival margins of castings that fail to seat by a very slight amount. Ø The bevel of the margin in a preparation for castings should produce a cavosurface angle that results in 30 - to 40 -degree marginal metal

Facial and Lingual Flares Primary Flare: Conventional & basic part of circumferential tie facially & lingually for an Intra -coronal prepn. Similar to a Long bevel (enamel & part of dentin) Specific angulation - 45° to the Inner Dentinal wall proper Brings the facial and lingual margins of the cavity prepn to cleansable – finishable areas Indicated for the facial and lingual proximal walls of an intra-coronal prepn

Secondary Flare Is always a flat plane superimposed peripherally to a primary flare Prepared solely in Enamel (may contain dentin) Has various angulations depending on the involvement, extent and function Importance : Ø Extends the margins into the embrasures, making these margins more self-cleansing and more accessible to finishing procedures during the inlay insertion appointment Ø Results in 40 -degree marginal metal Ø A more blunted and stronger enamel margin is produced because of the secondary flare.

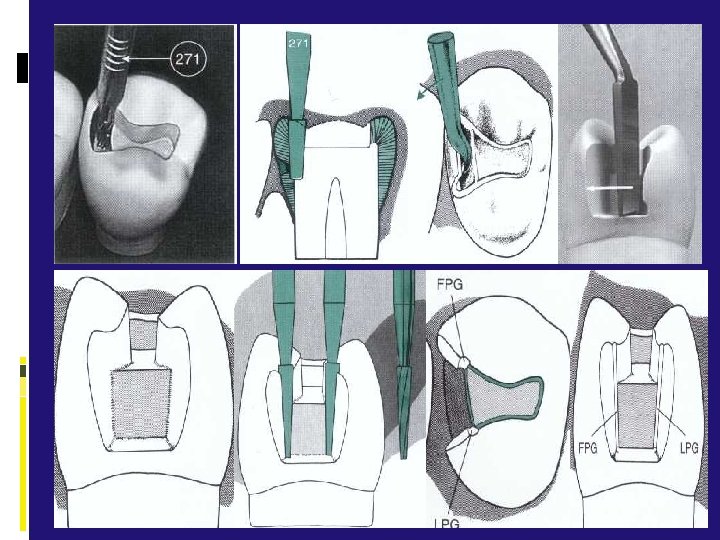
Tooth Preparation for Inlays An Inlay is an intra-coronal cast restoration which involves the occlusal and proximal surfaces of a posterior tooth The preparation should be as conservative as possible Occlusal width of the preparation should not exceed 1/3 rd of the Intercuspal distance The occlusal contacts should be entirely on gold or enamel & not on the margins of the restoration First occlusal preparation is done & then proximal box is prepared Maintain the long axis of the bur parallel to the long axis of the tooth crown at all times

Proposed outline form for DO preparation. B, Dimensions and configuration of No. 271, No. 169 L, and No. 8862 instruments. C, Conventional 4 -degree divergence from line of draw (line xy).

Punch cut to a depth of 1. 5 mm to establish the depth of the pulpal wall Dovetail retention form is created by extension Dovetail portion of inlay fits into dovetail portion of preparation only in an occlusal-to-gingival direction

Occlusal Preparation Of Inlay

Proximal Preparation For Inlay

Tooth Preparation For Onlays cast metal onlay by definition caps all of the cusps of a posterior tooth and can be designed to help strengthen a tooth that has been weakened by caries or previous restorative experiences. The cast metal onlay restoration spans the gap between the inlay, which is primarily an intracoronal restoration, and the full crown, which is a totally extracoronal restoration.

Tooth Preparation For Onlays

Tooth Preparation For Onlays

Partial Coverage restorations Covers only a portion of the outer circumference of the tooth but completely covers the occlusal surface. Advantages of partial-coverage restorations include: Ø Preservation of tooth structure due to part of the clinical crown not being reduced Ø Natural landmarks more likely to be preserved Ø Better seating on cementation Ø Access for pulp testing is maintained.

Disadvantages of partial-coverage restorations include: Ø Limited retention and resistance form. Ø Aesthetic limitations. Ø Technically demanding Partial-coverage Restorations Include: v Three quarter crown: indicated when buccal cusp is intact & needs to be protected for esthetics v Seven eight crown : indicated when a tooth needs cuspal coverage but a sound mesiobuccal cusp is present

¾ Crown On A Maxillary Premolar Occlusal View Buccal View 7/8 Crown On A Maxillary Molar

Full Cast Crown It includes the coverage of the entire coronal portion of the tooth Indication : Ø extensive loss of tooth structure is the most common indication Ø Correction of malposition occasionally It is the most retentive of the casting designs Retention is provided primarily by extracoronal walls
 reduction Refinement")
Full Crown tooth preparation Proximal reduction Occlusal reduction Facial & lingual (axial) reduction Refinement

Step By Step Procedure For Cast Metal Restorations Mouth preparation Tooth preparation Interocclusal records Temporization Final impression Working casts and dies Wax patterns Spruing, investing, and casting, Seating, adjusting, and polishing the casting Trying-in the casting, Cementation

Interocclusal Records Before preparation of the tooth, the occlusal contacts in MI and in all lateral and protrusive movements should be carefully evaluated. The necessary registration of the opposing teeth can be obtained by Ø (1)making a MI interocclusal record with commercially available bite registration pastes or Ø (2) making full-arch impressions and mounting the casts made from these impressions on a simple hinge articulator

Temporization Between the time the tooth is prepared and the cast metal restoration is delivered, it is important that the patient be comfortable and the tooth be protected and stabilized with an adequate temporary restoration. Temporaries can be fabricated: Intraorally directly on the prepared teeth (direct technique) Outside of the mouth using a postoperative cast of the prepared teeth (indirect technique).

Fabrication Of Direct Temporary Restoration

Final Impression The most common impression materials used for the indirect casting technique are the polyvinyl siloxanes (addition reaction silicones). Impression Technique: Ø Tissue retraction: ü Mechanical- Copper Band, Rotary Curettage ü Chemomechanical- Retraction Cords ü Electrosurgery Ø Tray Selection and Preparation Ø Inject light-bodied material around the preparation Ø Make the full impression with light body Ø Removing and Inspecting the Impression

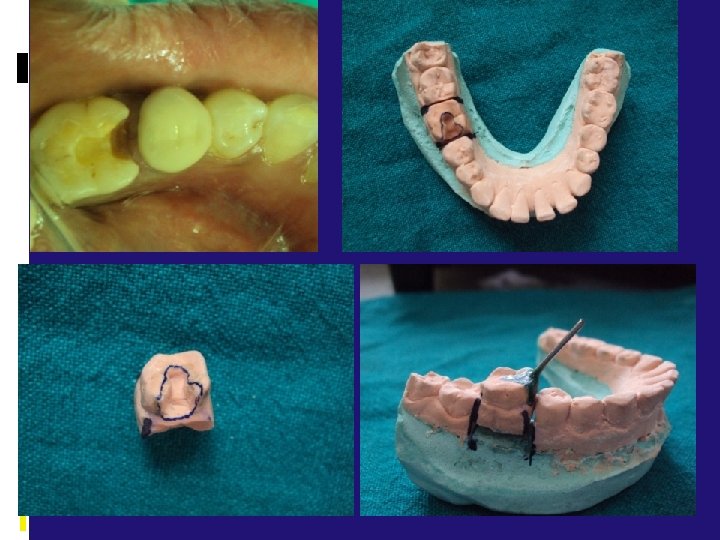
Working Casts And Dies The working cast is an accurate replica of the prepared and adjacent unprepared teeth A working cast with removable dies of the prepared teeth is desirable Individual die preparation is done by two pours – PINDEX SYSTEM

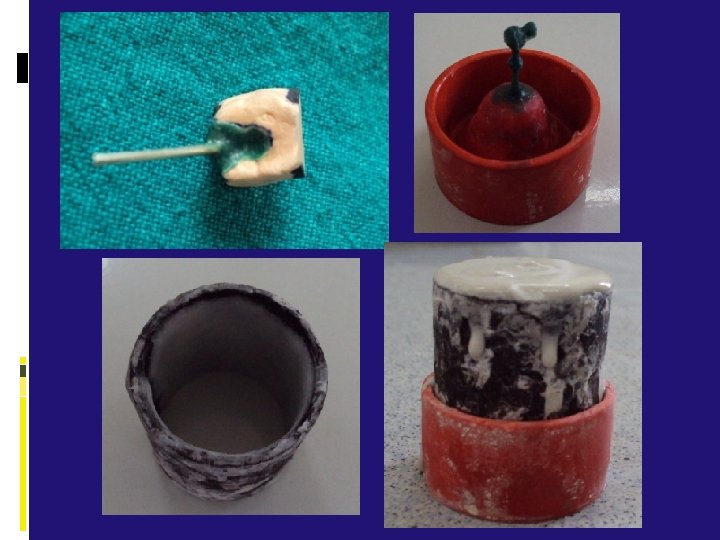
PINDEX SYSTEM Base of die segment is trimmed flat and approximately parallel to the occlusal surfaces with a model trimmer. Dies should be approximately 15 mm tall occlusogingivally. Die segment on Pindex machine, ready to drill hole, & holes drilled on die Dowels inserted into the holes with cynoacrylate

PINDEX SYSTEM Painting of separator Separation of base Boxing of the cast Final cast Cutting of individual dies & trimming of removable dies

Wax Patterns Direct Technique: a pattern directly intraorally from the tooth itself. Indirect Technique: a wax pattern formed on the prepared die

Spruing, Investing, And Casting A sprue must be attached to the bulkiest portion of the wax pattern & it must be at an obtuse angle to the pattern & should be directed away from thin or delicate parts of the pattern Wax patterns must be invested without any delay to avoid distortion, if delay is unavoidable the pattern must be stored as seated on the die. Investments: Ø Gypsum Bonded- Gold Alloys Ø Phosphate Bonded- Base Metal Alloys Casting Ø Centrifugal Ø Induction based

Types Of Casting Alloys q CLASS –I These are gold based alloys and includes all four types of gold alloys q CLASS-II low gold alloys with gold content as little as 5% q CLASS-III Non-gold platinum based alloys q CLASS-IV nickel chromium based alloys q CLASS-V Castable moldable ceramics

Seating, Adjusting, and Polishing the Casting The internal margins are inspected under magnification and adjusted as necessary with small diamond stones and carbide burs. Adjustments are restricted to areas where binding contact occurs. The sprue is removed by abrasive (carborandum) discs. Discs and stones are used for gross recontouring at the attachment area. A fine grit sand paper disc is applied for removing pits and irregularities from the axial walls. Rubber points and small carbides are used for selective finishing of occlusal morphology. Final polishing of the surface are done using rouge on a brush. The polished restoration is then cleaned using an ultrasonic cleaner.

Adjusting, and Polishing the Casting

Try In Of Casting Initially seat casting on tooth by applying ball burnisher in pit anatomy Ensure complete seating using masticatory pressure by having patient close on Burlew wheel interposed between casting and opponent tooth Inspect marginal fit within 0. 2 mm of seating If the discrepancy is greater than 0. 2 mm the casting should be discarded

Cementation Cement Selection. Cementation Technique Ø Isolate the tooth from saliva with the aid of cotton rolls (and saliva ejector if necessary) dry the preparation walls, but do not desiccate them Ø Mix the cement following the manufacturer's instructions Ø Apply the cement mix generously to the preparation side of the casting Ø Place the casting with the fingers or with operative pliers Ø Place a Burlew disc over the casting, and request the patient to close and exert biting force Ø After the cement has hardened, excess is cleaned off with an explorer and air -water spray Ø A cement line should not be visible at the margins

Conclusion Cast metal inlays and onlays offer excellent restorations that may be underutilized in dentistry. The technique requires multiple patient visits and excellent laboratory support, but the resulting restorations are durable and long lasting. Cast metal onlays in particular, can be designed to strengthen the restored tooth while conserving more tooth structure than a full crown. Disadvantages such as high cost and esthetics limit their use, but when indicated they provide a restorative option that is less damaging to pulpal and periodontal tissues than a full crown.

Thank you
- Slides: 75