BROILER MANAGEMENT Back To The Basic Houses Preparation

BROILER MANAGEMENT

Back To The Basic ØHouses Preparation and Biosecurity ØChick Quality and Transportation ØFeed Quality and Feeder ØWater Quality and Drinker ØManagement and Knowledge ØGood Production

CHICK QUALITY Ø Broiler placements should be planned to ensure: ✔ Differences in age and/or immune status of parent flocks are minimized. § One parent flock per broiler flock is the ideal. § For large farm complexes, one production house could be considered to be one flock.

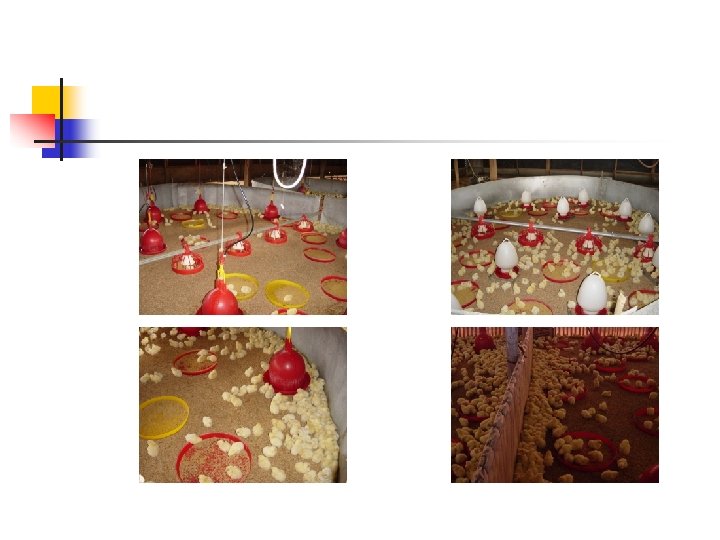
PREPARATION FOR CHICK ARRIVAL ØLitter material should be spread evenly to a depth of 3– 4 in (7. 5– 10 cm) and then levelled and compacted in the brooding area. Ø The necessary equipment must be assembled in the appropriate configuration.

PREPARATION FOR CHICK ARRIVAL Ø Equipment in the house (i. e. , feeders, drinkers, heaters and fans) should be arranged to allow chicks to maintain body temperature without dehydration and to find feed and water easily. Ø Configuration will depend on the brooding system and on other equipment being used.

PREPARATION FOR CHICK ARRIVAL Ø Supplementary feeders and drinkers shouldbe placed in close proximity to the main systems.

PREPARATION FOR CHICK ARRIVAL ØHouses should be pre-heated for a sufficient period to achieve target house and litter temperatures prior to chick arrival. ØTemperature should be monitored regularly to ensure a uniform environment exists throughout the whole brooding area.

WATER AND FEED

WATER AND FEED ØPrior to chick delivery, a final check must be made of feed and water availability and distribution within the house.

WATER AND FEED Ø Drinker lines should be flushed and sanitized prior to bird arrival. Ø The water quality, purity, and temperature must be checked in advance. Ø Water should be within the correct temperature range (65– 75ºF; . (24ºC– 18

WATER AND FEED ØContaminated water can spread disease and cause diarrhea, leading to dehydration and death in younger flocks. ØAll chicks must be able to eat and drink immediately on placement in the house.

WATER AND FEED ØIdeally, the chicks should be placed at the farm and provided water and feed in less than 8 hours from time of hatch. Ø Longer delays could lead to dehydration and chick weight shrinkage.

WATER AND FEED ØIf the chicks have been in transport for a long period (3 hrs. up) , providing water for the first 3 or 4 hours, and then providing feed is suggested. ØIt is imperative that chicks be encouraged to consume water as soon as possible.

WATER AND FEED Ø add some sort of sweetener substance, like sugar to the water (4% solution) for the first few hours of life. ØThe sugar helps to replenish the depleted energy in the chicks, and may stimulate the chicks to consume feed.

WATER AND FEED Ø The sweet water can also may loosen up the impacted intestine and prepare the gut linings for the incoming feed. ØAfter the addition of sugar, it is recommended to add a vitamin supplement to the water for the first three days of life, to boost the chicks' vitality.

WATER AND FEED Ø With the exception of water vaccination time, drinking water must be adequately chlorinated. ØThe chlorine level at the drinker level should be Ø, 1 PPM-nipple drinkers Ø 2 PPM-plasson drinkers, and Ø 3 PPM-trough drinkers

WATER AND FEED Ø A newly hatched chick is 85% water. When 10% of this water is lost, it becomes a cull chick, and when there is 20% dehydration, the chick could die. ØIt is important to hydrate the chick adequately and promptly. ØThis will promote feed consumption and better body weights.

WATER AND FEED Ø If water and feed are consumed in sufficient amounts and correct brooding temperature and air quality are provided , ØA broiler chick should be able to quadruple(4 x) the post-hatch body weight by seven days of age. DOC =40 g 7 Days=160 g

WATER AND FEED Ø To monitor if chicks are consuming adequate feed, it is recommended to select chicks and palpate their crops. Ø The crops should be quite full.

How to achieve 4 x body weight 1 Proper Feed Allocation X X OK

How to achieve 4 x body weight 2. Light Intensity at lease 20 lug at feeder level X

How to achieve 4 x body weight 3. Water available all time

How to achieve 4 x body weight 4. Temperature adjust properly

How to achieve 4 x body weight 5. Ventilation

WATER AND FEED ØIf the crop feels half empty or empty , Øthere must be something wrong in the management, and the above-discussed points must be reviewed very carefully. Ø It is never too late to act and make corrections, but a problem must be detected before it can be corrected.

WATER AND FEED ØSupplemental feeders should be filled and placed in the brooding area in a proper ratio (e. g. with box lids – 1/100 chicks).

CHICK PLACEMENT ØIf the mixing of chicks from different age breeder flocks is unavoidable, chicks should be grouped by breeder age as much as possible ØEnsure light intensity and duration are set prior to chick arrival (2. 5 foot candles / 25 lux; 23 hr. (

CHICK PLACEMENT ØExpected delivery time of chicks should be established so they may be unloaded and correctly placed as quickly as possible.

CHICK PLACEMENT ØThe longer chicks are in transport boxes, the greater the degree of dehydration. Ø This may result in early mortality and reduced growth potential.

Normal Mortality

Dehydration Mortality

CHICK PLACEMENT ØChicks must be tipped quickly, gently and evenly over the brooding area. Ø Empty boxes should be removed from the house as soon as possible.

CHICK PLACEMENT ØChicks should be left to settle for 1– 2 hr to become accustomed to their new environment. ØAfter this time, a check should be made to see that all chicks have easy access to feed and water and that chicks are active. ØAdjustments should be made to equipment and temperatures where necessary.

CHICK PLACEMENT ØThese checks should be made every 4– 6 hr after placement for the first 24 hr. ØFrom two to three days of age, existing feeders and drinkers should be repositioned and adjusted and additional ones introduced as the illuminated area is increased.

CHICK PLACEMENT ØDuring the early brooding period, feed should be provided in crumble form on supplemental feeders (1/100 chicks) so chicks have easy access.

CHICK PLACEMENT Ø Mechanical feeders should also be charged before arrival. ØRemove 1/3 of the supplemental feeders on each of days 9 , 8 and 10. Ø Chicks should be gradually trained to the main feeding system within the first 10 days of placement.

BROODING MANAGEMENT THE CRITICAL POINT

BROODER MANAGEMENT ØThe objective of proper brooding is to develop appetite as early as possible. ØFeed intake will be reduced if chicks are kept at temperatures greater than those appearing in Table 2. 2
 Temperature at RH of 60%. See also Table 2. 3,")
BROODER MANAGEMENT (Ross 2003) Temperature at RH of 60%. See also Table 2. 3,

BROODER MANAGEMENT ØTwo basic practices for brooding broilers are: n Spot brooding n Whole/partial house brooding ØBoth systems are effective in getting chicks off to a good start if managed properly.

Brooding

BROODER MANAGEMENT Ø Brooder guards may be employed to assist in controlling early chick movement. Ø The contained area should be expanded from three days of age until finally removed by five to seven days.

BROODER MANAGEMENT Ø Chicks should be placed evenly throughout the brooding area. ØThe use of stirring fans will enhance air quality and uniformity of temperature and RH. Ø Refer to Figure 2. 1 for typical spot brooding layout.

BROODER MANAGEMENT

BROODER MANAGEMENT ØHeat is provided by conventional canopy brooders. ØFor maximum effectiveness, brooder guards should be used to keep birds confined to the desired area of heat, feed and water.

BROODER MANAGEMENT Ø In spot brooding, a temperature gradient is provided ( Table 2. 2 ).
 Temperature at RH of 60%. See also Table 2. 3,")
BROODER MANAGEMENT (Ross 2003) Temperature at RH of 60%. See also Table 2. 3,

Arbor Acre

AVIAN

COBB 500 Brooding Temperature

BROODER MANAGEMENT • For whole/partial house brooding measured at feed and water sources; • For spot brooding , measured at brooder edge. Assumes RH of 60%. • Recommended temperatures will increase or decrease relative to ambient RH. See Table 2. 3
")
BROODER MANAGEMENT (Ross 2003)

BROODER MANAGEMENT ØChick behavior is the best indicator of correct brooder temperature. ØWith spot brooding, correct temperature is indicated by chicks being evenly spread throughout the brooding area (Figure 2. 2).

BROODER MANAGEMENT

VENTILATION

VENTILATION ØAir quality is critical during the brooding period. ØVentilation is required during the brooding period to maintain temperatures at the targeted level and to allow sufficient air exchange to prevent the accumulation of harmful gases such as carbon monoxide, carbon dioxide and ammonia.

Harmful Gas

VENTILATION ØEstablishing minimum ventilation rates from one day of age will ensure fresh air is supplied to chicks at frequent, regular intervals. Ø Stirring fans can be used to maintain evenness of air quality at chick level.

LIGHTING

LIGHTING ØHistorically, lighting programs have consisted of continuous light regimens to maximize daily weight gain. Ø These regimens consist of a long continuous period of light, followed by a short dark period (e. g. 0. 5– 1 hr) to allow birds to become accustomed to darkness in the event of a power failure.

LIGHTING ØOther lighting programs have been devised to modify growth, minimize FCR or reduce mortality. ØTo stimulate early feed intake, any lighting program should provide a long day length (e. g. 23 hr light) and adequate intensity for the first seven days.
lux)")
LIGHTING ØLight intensity at placement should be 2– 2. 5 foot candles 25– 20)lux) at the feeder level, then be gradually reduced so that by 28 days it is approximately 0. 30– 0. 50 foot candles 5– 3)lux. ( ØLight intensity should be uniform throughout the house.

Lighting Program - AA

Hubbard classic and Hi-Y

MONITORING EARLY CHICK PERFORMANCE

MONITORING EARLY CHICK PERFORMANCE ØAs a result of continued genetic gains in growth rate, brooding has become an increasingly greater proportion of the life of the flock. In addition,

MONITORING EARLY CHICK PERFORMANCE ØSeven-day body weight is highly correlated to market age weight. Ø It is strongly recommended that a sample of each flock be weighed at seven days to evaluate growth performance against standards for the given product.

MONITORING EARLY CHICK PERFORMANCE ØScales used should be capable of weighing in 1 g increments. ØMinimum sample size should be 1 percent of the flock, Ø With sampling done in at least three separate areas of the house. ØRefer to the attachments for product weight objectives.

MONITORING EARLY CHICK PERFORMANCE ØA general rule of thumb would be a seven-day target of 4 x dayold chick weight. Ø Average weights below 130 g should prompt investigation as to causative reasons. ØSeven days weight below 1 g release 6 g at 42 days.

RELATIVE HUMIDITY
 in the hatcher, at the end of the incubation process")
HUMIDITY ØRelative humidity (RH) in the hatcher, at the end of the incubation process will be high (approx. 80 percent). Ø Houses with whole house heating, especially where nipple drinkers are used, can have RH levels as low as 25 percent.

HUMIDITY ØHouses with more conventional equipment (i. e. , spot brooders, which produce moisture as a byproduct of combustion and bell drinkers, which have open water surfaces) have a much higher RH (usually over 50 percent. (

HUMIDITY ØTo limit the shock to the chicks of transfer from the incubator, ØRH levels in the first three days should be maintained near 70 percent.

HUMIDITY ØRH within the broiler house should be monitored daily. ØIf it falls below 50 percent in the first week, chicks will begin to dehydrate , ØCausing negative effects on performance. Ø In such cases, action should be taken to increase RH.

HUMIDITY Ø If the house is fitted with high-pressure spray nozzles (i. e. , foggers) for cooling in high temperatures, then these can be used to increase RH during brooding. Ø Chicks kept at appropriate humidity levels are less prone to dehydration and generally make a better, more uniform start.

HUMIDITY ØAs the chick grows, ideal RH falls. Ø High RH from 18 days onward can cause wet litter and its associated problems. ØAs broilers increase in live weight, RH levels can be controlled using ventilation and heating systems.

INTERACTION BETWEEN TEMPERATURE AND HUMIDITY ØChickens lose heat to the environment by evaporation of moisture primarily from the respiratory tract. ØAt high RH, less evaporative loss occurs increasing the birds’apparent temperature. ØThe temperature experienced by the birds is dependent on the dry bulb temperature and RH.

INTERACTION BETWEEN TEMPERATURE AND HUMIDITY ØHigh RH increases the apparent temperature at a particular dry bulb temperature, ØWhereas low RH decreases apparent temperature. ØThe temperature profile in Table 2. 2, assumes RH in the range of 60 percent.

Temperature o. C 35. 0 34. 4 33. 9 33. 3 32. 8 32. 2 31. 7 31. 1 30. 6 30. 0 29. 4 28. 9 28. 3 40 37. 2 36. 1 35. 0 34. 4 33. 3 32. 8 31. 7 31. 1 30. 6 29. 4 28. 9 28. 3 27. 8 45 38. 9 37. 8 36. 7 35. 6 34. 4 33. 3 32. 8 31. 7 31. 1 30. 6 29. 4 28. 9 28. 3 Heat Stress Index Calculation %RH 50 55 60 65 70 75 40. 6 42. 8 45. 0 47. 8 50. 6 53. 3 39. 4 41. 1 43. 3 45. 6 48. 3 51. 1 38. 3 40. 0 41. 7 43. 9 46. 7 48. 9 37. 2 38. 3 40. 6 42. 2 44. 4 46. 7 36. 1 37. 2 38. 9 40. 6 42. 8 45. 0 36. 1 37. 8 39. 4 41. 1 42. 8 33. 9 35. 0 36. 1 37. 8 39. 4 41. 1 32. 8 33. 9 35. 0 36. 7 37. 8 39. 4 31. 7 32. 8 33. 9 35. 0 36. 7 37. 8 31. 1 31. 7 32. 8 33. 9 35. 0 36. 1 30. 0 31. 1 31. 7 32. 8 33. 9 35. 0 29. 4 30. 0 31. 1 31. 7 32. 2 33. 3 28. 9 29. 4 30. 0 30. 6 31. 1 31. 7 80 56. 7 53. 9 51. 7 49. 4 47. 2 45. 0 43. 3 41. 1 39. 4 37. 8 36. 1 34. 4 32. 8 85 60. 0 57. 2 54. 4 52. 2 50. 0 47. 2 45. 0 43. 3 41. 1 38. 9 37. 2 35. 6 33. 9 90 63. 9 60. 6 57. 8 55. 0 52. 2 50. 0 47. 2 45. 0 42. 8 40. 6 38. 9 36. 7 35. 0 95 67. 8 64. 4 61. 1 58. 3 55. 6 52. 8 50. 0 47. 2 45. 0 42. 2 40. 0 37. 8 36. 1 100 71. 7 68. 3 65. 0 61. 7 58. 3 55. 6 52. 2 49. 4 46. 7 44. 4 41. 7 39. 4 37. 2

INTERACTION BETWEEN TEMPERATURE AND HUMIDITY ØTable 2. 3 shows the predicted dry bulb temperature required to achieve the target temperature profile over a range of RH. ØThe information in Table 2. 3 can be used in situations where RH varies from the target range (60 percent).

INTERACTION BETWEEN TEMPERATURE AND HUMIDITY ØIf RH is outside the target range, Ø the temperature of the house at chick level can be adjusted to match that given in Table 2. 3. Ø At all stages, chick behavior should be monitored to ensure chicks are experiencing an adequate temperature.

INTERACTION BETWEEN TEMPERATURE AND HUMIDITY Ø If subsequent behavior indicates chicks are too cold or too hot, Ø the house temperature should be adjusted appropriately.

Conclusion ØBefore chicks arrive, inspect the house closely to ensure proper setup. Ø After a poor start, there is little time to compensate for the lost growth as a chick's life is only approximately 1000 hours.

Conclusion ØThus, every hour represents 0. 10% of the chick's life. In a 24 -hour period, 2. 4% performance can be lost. Ø Many producers recognize that performance lost the first day or first week will be reflected in final performance results.

HEAT STRESS

HEAT STRESS ØHeat stress negatively affects growth rate and livability. Ø Effects of heat stress can be minimized by altering the environment to reduce the temperature experienced by the bird.

CONTROL OF HEAT STRESS Ø Normal body temperature of a broiler chicken is 106ºF. (41ºC) Ø Absolute temperature at which a broiler is under heat stress is related to its age, temperature and RH. Ø As a rule of thumb, for fully feathered birds, a “heat stress index” (RH plus temperature in ºF) of 160 is considered heat stress.

CONTROL OF HEAT STRESS ØThe longer the exposure to high temperatures, the greater the stress and its effects. (See Figure 2. 8).

CONTROL OF HEAT STRESS

CONTROL OF HEAT STRESS ØBroilers regulate their body temperature by two methods: radiation/convection of heat and evaporative cooling through respiration. Ø Within the temperature range 55– 77ºF (13– 25ºC), heat loss is mainly accomplished through physical radiation and convection to the cooler environment.
 the majority of")
CONTROL OF HEAT STRESS ØAs the temperature rises above 86ºF (30ºC) the majority of heat loss is accomplished by evaporative cooling and panting, and increased respiration rate. ØThe relationship between the two types of heat loss and environmental temperature is illustrated in Table 2. 4.

CONTROL OF HEAT STRESS

CONTROL OF HEAT STRESS Ø Panting allows the bird to control body temperature by evaporation of water from the respiratory surfaces and air sacs. Ø The process uses energy. In conditions of high humidity, panting is less effective. Ø Where high temperatures are maintained for long periods, or humidity is very high, panting may be insufficient to control body temperature and the bird may experience heat stress.

CONTROL OF HEAT STRESS ØAs the bird passes into a condition of heat stress, rectal temperature rises, heart rate and metabolic rate increase and oxygenation of the blood decreases.

ACTIONS TO REDUCE HEAT STRESS ØLowering stocking density will reduce temperature experienced by the bird. Ø Birds lose heat by evaporation of moisture during panting and therefore require increased amounts of drinking water. ØAdequate fresh water should be available at all times. ØInsulation of storage tanks and water pipes will help reduce heat stress.

ACTIONS TO REDUCE HEAT STRESS ØDigestion generates heat; therefore, feeding during the hottest part of the day should be avoided in open-sided housing. ØA significant amount of heat is lost by convection and, at high humidity, convective heat loss becomes more important.

ACTIONS TO REDUCE HEAT STRESS ØIncreasing the air flow over the bird promotes heat loss by convection. Ø An air flow of at least 500 ft/min (152 m/min), measured just above bird level, provides optimum heat loss by convection.

ACTIONS TO REDUCE HEAT STRESS ØIn open-sided housing, this can be achieved by using supplemental, 36 in (91 cm) fans, placed at an angle of 32º, every 33 ft (10 m) across the house. ØFans should be set to move air in the same direction as the prevailing wind.

ACTIONS TO REDUCE HEAT STRESS ØHigh humidity reduces the effectiveness of evaporative heat loss. Ø The litter is a significant source of moisture in the chicken house, so litter condition should be managed carefully.

ACTIONS TO REDUCE HEAT STRESS ØRadiant heat from the sun will increase house temperature, particularly if roof insulation is inadequate. Ø Water sprinklers on the roof ridge will reduce this source of heat.

ACTIONS TO REDUCE HEAT STRESS ØIn open-sided houses, plastic netting hung from the eaves to cover 30 percent of the open area may be used as a screen against radiant heat. Ø Install tunnel ventilation and evaporative cooling systems.

ACTIONS TO REDUCE HEAT STRESS ØRefer to Avia. Tech bulletin on “Getting Broiler Houses Ready for Hot Weather” (Vol I No 3).

NUTRITION AND HEAT STRESS ØRisks of feed spoilage due to mold growth and/or vitamin loss are increased at high temperatures. ØFeed storage time should be minimized.

NUTRITION AND HEAT STRESS ØThe two main changes which can be made to diet composition to partially compensate for heat stress are: ✔ Adjustment of nutrient levels to take account of lower feed intake ✔ Reduction of heat increment of the feed

NUTRITION AND HEAT STRESS ØIncreasing feed nutrient density will be effective in reducing heat stress providing the birds have the capacity to respond by increased growth. ØThe effectiveness of this treatment will depend on the temperature and the amount of stress experienced by the birds.

NUTRITION AND HEAT STRESS Ø As an approximate guide, feed intake is reduced by 5 percent per degree temperature rise between 90º and 100ºF (32º and 38ºC) compared with 1 percent to 1. 5 percent between 68º and 86ºF 20º ) and 30ºC. (

NUTRITION AND HEAT STRESS ØIf feed intake is down by 5 percent or 10 percent, then the nutrient concentration should be increased in proportion. Ø It is particularly important to adjust the amino acid, vitamin and mineral fractions of the feed.

NUTRITION AND HEAT STRESS ØAn increase in amino acid levels may be beneficial if feed intake is reduced due to high ambient temperatures. ØExcess protein is broken down and eliminated from the bird by deamination and excretion, processes which have a high heat increment.

NUTRITION AND HEAT STRESS ØUnder all circumstances of heat stress, amino acid requirements should be met at the lowest possible total protein content. Ø Sources of high quality protein and synthetic amino acids will help to achieve this aim.

NUTRITION AND HEAT STRESS ØIn addition to minimizing protein excess, the heat increment of the feed may be reduced by substituting good quality fat for carbohydrate. ØFat inclusion may also stimulate intake and, under some circumstances, give a beneficial boost to energy intake.

NUTRITION AND HEAT STRESS ØBirds suffering heat stress exhibit reduced levels of plasma carbon dioxide and bicarbonate.

NUTRITION AND HEAT STRESS ØPanting induces respiratory alkalosis, which may be corrected by a variety of supplements to either the feed or the water (e. g. sodium bicarbonate). ØThere is also a loss of potassium by birds suffering heat stress, which may be corrected by administration of potassium chloride.

CATCHING

CATCHING AND LIVE HAUL OBJECTIVE ØTo manage the final phase of the production process so that broilers are transferred to the processing plant in optimum condition, ensuring the processing requirements are met and humane treatment is maintained.

PREPARATION FOR CATCHING ØWhen using lighting programs, it is essential to return to 23 hr of light at least two to four days prior to depletion.

PREPARATION FOR CATCHING ØThis will ensure the birds are calm during catching. ØA withdrawal ration must be fed in accordance with local legal regulations prior to slaughter to eliminate the risk of controlled feed additive residues in the meat.

PREPARATION FOR CATCHING ØFeed should be withdrawn 8– 10 hr before processing. ØThis period should include catching, transport and holding time.

PREPARATION FOR CATCHING ØIf feed withdrawal time is prolonged, water absorbed from body tissues accumulates in the digestive tract resulting in reduced yield. Ø Fecal contamination may also be increased.

PREPARATION FOR CATCHING Ø Unlimited access to water should be available for as long as possible prior to catching to reduce shrink loss. Ø Prior to catching, all feeding equipment should be raised above head height of the catching personnel (i. e. , >6 ft, 2 m), removed from the house or positioned to avoid obstruction to birds or personnel.

PREPARATION FOR CATCHING ØIn larger houses, separation of birds into pens will avoid unnecessary crowding. Ø It will also allow access to water for birds not immediately due for catching.

PREPARATION FOR CATCHING ØHigh humidity reduces the effectiveness of evaporative heat loss. ØThe litter is a significant source of moisture in the chicken house, so litter condition should be managed carefully.

PREPARATION FOR CATCHING ØLight intensity within the house must be reduced to a minimum, but must be sufficient to allow safe and careful catching.

PREPARATION FOR CATCHING ØBlue light has been found to be satisfactory for this purpose. ØThe best results are achieved when birds are allowed to settle after lights have been dimmed and when there is minimal disturbance.

PREPARATION FOR CATCHING ØThe use of curtains over main doors of the house is helpful when catching during daylight hours.

PREPARATION FOR CATCHING ØThe opening of doors and removal of birds will affect ventilation of thermostatically controlled environments. ØThe ventilation system should be monitored and adjusted carefully throughout the catching procedure.

CATCHING AND HAULING ØMost downgrading observed at slaughter will have occurred during the previous 24 hours when birds were being caught and handled. ØCatching is an operation which should be planned carefully in advance and supervised closely at all stages.

CATCHING AND HAULING ØHandling of birds must be carried out by appropriately trained, competent personnel in order to avoid unnecessary struggling by the birds to minimize bruising, scratching or other injuries.

CATCHING AND HAULING ØBroilers should be held by their feet and shanks, never by their thighs. Ø They should be caught and held by both legs to minimize distress, damage and injury. ØBirds should be placed carefully into modules or crates.

CATCHING AND HAULING Ø Modules have been shown to result in less distress and damage than conventional crates. ØCrates or modules should never be overfilled.

CATCHING AND HAULING Ø The number of broilers per crate or module must be reduced in high temperatures. Ø Transport time should be within current guidelines or regulations.

CATCHING AND HAULING ØAt all times, from loading to the holding sheds, adequate protection from the elements is essential. ØVentilation, extra heating and/or cooling should be used when necessary. Ø Bird stress will be minimized in trailers designed to provide adequate ventilation.

CATCHING AND HAULING ØHeat stress will develop rapidly when the transport vehicle is stationary, particularly if on-board ventilation is not available or in hot weather. ØVehicles should leave the farm as soon as loading is completed. Ø Supplementary ventilation in the holding sheds should be available to inimize heat stress.

Thanks
- Slides: 134