BPMN Fundamentals 3 BPMN Simulation Romi Satria Wahono

BPMN Fundamentals: 3. BPMN Simulation Romi Satria Wahono romi@romisatriawahono. net http: //romisatriawahono. net/bpmn WA: +6281586220090

Romi Satria Wahono • SD Sompok Semarang (1987) • SMPN 8 Semarang (1990) • SMA Taruna Nusantara Magelang (1993) • B. Eng, M. Eng and Ph. D in Software Engineering from Saitama University Japan (1994 -2004) Universiti Teknikal Malaysia Melaka (2014) • Research Interests: Software Engineering, Machine Learning • Founder dan Koordinator Ilmu. Komputer. Com • Peneliti LIPI (2004 -2007) • Founder dan CEO PT Brainmatics Cipta Informatika 2

Course Outline 1. Introduction 2. BPMN Elements 3. 1 Swimlane 3. 2 Connecting Objects 3. 3 Flow Objects 3. 4 Artifacts 3. BPMN Simulation 4. BPMN Refactoring 5. BPMN Guide and Examples 3

3. BPMN Simulation 3. 1 Introduction to Simulation 3. 2 Process Validation 3. 3 Time Analysis 3. 4 Resource Analysis 3. 5 Calendar Analysis 4

3. 1 Introduction to Simulation 5

What is Simulation • Simulation is a tool: • to evaluate the performance of a model, under different configurations and over long periods of real time • to reduce the chances of failure to meet specifications, to eliminate unforeseen bottlenecks • to prevent under or over-utilization of resources (including people and money) • to optimize system performance • Simulation requires a clear objective to get maximum value for effort • This objective strongly influences the level of detail in the required data 6

What is Simulation • Randomness is simulated by: • Using probabilities for sequence flows and token routing • Using statistical distributions to reflect variability in process times of activities etc • To make sure results are valid: • the simulation needs be run for long enough to yield random behavior without chance • Provision should be made to compare results from the same scenario, but different run lengths or replications • The required run length to yield usable outcomes depends on the process model structure, amount of variability and the objective • Consequently, a single recommended run length cannot be provided • A replication shares the same scenario configuration and runs for the same length of time, but uses an alternative random stream 7

Simulation in Bizagi • Bizagi Modeler allows simulation your business processes under the BPSim (Business Process Simulation) to support decision making and boost their continuous improvement • To start using simulation in Bizagi all you need is a complete Process model • otherwise, it will not be able to be simulated • For a complete simulation analysis we recommend using four levels: 1. 2. 3. 4. Level 1 -Process Validation Level 2 - Time Analysis Level 3 - Resources Analysis Level 4 - Calendars Analysis 8

Simulation in Bizagi • Each subsequent level incorporates additional information that adds more complexity, providing a coherent analysis of your processes • Levels are not interdependent, you may start at any level if you hold the required process data • By default the Simulation mode will start at Level one, the first time a Simulation is run for the process model • It is best practice to start simulation at level one, and progress one level at a time • It is possible to move between levels at any time • For each simulation level follow these steps: 1. Collect process data for the simulation 2. Add the data to the relevant shapes in the diagram 3. Interpret and present the outcomes 9

Supported Elements and Diagrams • The following BPMN elements are not supported by the simulation engine: • Multiple events: Start, Intermediate and End • Complex gateways • Event based gateways followed by none intermediate events or tasks. • Multiple instance tasks • Multiple instance Sub-processes • The following diagrams are not supported by the simulation engine: • • BPMN Choreography diagrams BPMN Conversation diagrams Transactional process Ad Hoc process 10

How to Create and Run Simulation Models? 1. Click Simulation View to simulate your process model 11

How to Create and Run Simulation Models? 2. The shapes that require information will be highlighted 12

How to Create and Run Simulation Models? 3. Select highlighted shape in turn and enter the information 13

How to Create and Run Simulation Models? 4. Click Run to launch the Process Simulation 14

How to Create and Run Simulation Models? 5. Click Start to run the simulation 15

How to Create and Run Simulation Models? 6. Click Stop to stop the simulation 16

How to Create and Run Simulation Models? 7. Click Results to view the outcomes 17

How to Create and Run Simulation Models? 8. Click the Export to Excel button 18

How to Create and Run Simulation Models? 9. Process to the next level and repeat step 1 -8 19

How to Create and Run Simulation Models? 10. Click Close Simulation View to return 20

Simulation Levels • Bizagi Simulation comprises of four levels • Each subsequent level incorporates additional information exhibiting more complexity than the preceding one, thereby providing a detailed analysis of your processes • Levels are not interdependent, you may start at any level if you hold the required process data 21

Level 1 - Process Validation • The first and most basic simulation level to evaluate the structure of the process diagram • Data: • It requires estimated percentage splits of sequence flows to provide a basis for routing • It also needs the value of the trigger counter contained in the Start Event shape • Results: • The outcomes show all paths activated during the execution and whether all tokens actually finished • It evaluates how many tokens passed through each Sequence Flow, Activity and Event 22

Level 2 – Time Analysis • Second level of simulation to measure the end-toend process time • Data: • Apart from the data entered in Process Validation, estimated timings (service times) of each activity and the interval time between token generation is required • This data can either be constant or samples from statistical distributions • Results: • The results show process throughput times for tokens, presented as minimum, maximum, mean and sum (total of all processing times) • Similar results can be presented for individual key activities 23

Level 3 – Resource Analysis • Predicts how the process will perform with different levels of resources. This level of detail provides a reliable estimate of how the process will perform in operation • Data: • In addition to the data entered in Time Analysis, this level includes the definition of resources (and/or roles): how many are available and where they are used • Due to the inclusion of resources, the activity times should be adjusted to represent the actual work time; delay due to unavailability of staff will be explicitly indicated • Results: • The structure of the results is similar to Time Analysis • The time spent, the time spent busy or idle for each type of resource is presented • This level assume an unlimited number of resources 24

Level 4 – Calendar Analysis • Includes calendar information that reflects the process performance over dynamic periods of time, such as shifts, days schedules or weeks • By default Bizagi includes a chosen calendar that works 24/7 • If no calendars are defined, Bizagi will assume that the defined Resources will always be available • Data: • Apart from the data entered in Resource Analysis, it includes the definition of resource calendars • Results: • The structure of the results is similar to Resource Analysis 25

Case Study: Patient Assistance • A call center receives a report of an emergency. A call center agent enters details on the person affected, the symptoms and the physical address • A qualified nurse classifies the emergency according to its severity • Green: Low severity. The patient can be easily stabilized • Yellow: Medium severity. The patient requires special attention but can be stabilized at the place of emergency • Red: High severity. The patient must be collected and taken to the nearest hospital • According to the priority assigned, the Emergency attendance department presents a different level of response • Green: This triage is assisted by a quick response vehicle carrying two people: a paramedic and a doctor • Yellow: This triage is assisted by a basic ambulance having a doctor, nurse and a paramedic on Board • Red: This triage is assisted by a fully equipped ambulance holding two doctors, a nurse and a paramedic • If the emergency is green or yellow, the process finishes once the response team arrives at the place of emergency • If the emergency is red, the fully equipped ambulance transfers the patient to the nearest hospital • During the transfer a nurse carries out the necessary paperwork to ensure quick admittance • When the patient arrives at the hospital with the necessary paperwork, the receptionist will be able to admit the patient quickly and provide medical assistance immediately • This process must be carefully analyzed in order to reduce the time between receiving the request and providing medical assistance 26

Case Study: Patient Assistance 27

3. 2 Process Validation 28

Overview • The first level of the simulation validates the Process Model, making sure the process passes through all the sequence flows, and behaves as expected • Resources, processing times and costs are not included in this level • Such parameters will be included later in subsequent levels • When validating a Process Model the simulation results will show if: • • • Gateways are synchronized Messages are synchronized Decisions probabilities are correctly assigned Routing behaves as expected All tokens have ended • Bizagi offers real-time animation of simulations to easily identify problems. The Results report will show the behavior during execution 29

1. Defining the Input Data Required for This Level • In the Process Validation level you will note that only Start Events and Gateways are enabled for editing • For this level you need to define: • Max. arrival count: • Define the number of token instances the process will generate • We recommend defining a large enough number (at least 1000) to allow the execution to stabilize and present reliable outcomes • Select the Start Event of the process and click the Gear icon on the pie menu. Enter the Max. arrival count in the pop-up window • Gateways routing: • Inclusive and exclusive Gateways have activation probabilities • Probabilities are values between 0 and 100% • Select the Gateway and click the scroll arrow icons (icon) to set the probabilities. 30

Max. arrival count 31

Gateways routing 32

2. Running the simulation • Once the required data for this level have been defined, click the Run button to execute the simulation • In the new window, click Start to run the simulation 33

Analysis Data Display 1. 2. 3. 4. Number of completed tokens Number of token instances created Number of instances that activate each shape Number of finished instances 34

3. Results When the simulation is finished, view the results by selecting the Results option 35

Result Display • Name: Identifies the specific BPM shape for which the results are displayed • Type: Identifies the element type of the BPM shape • Tokens completed: Indicates how many tokens were processed (instances) during the execution of the simulation 36

Case Study: Process Validation for Patient Assistance 37

Case Study: Patient Assistance 38

1. Set the Max. Arrival Count = 1000 39

2. Define the Probabilities for All Outgoing Paths of the Gateway • Suppose the emergency department has estimated, based on historical data, that the probabilities for the different sequence flows are: • Green: 20% • Yellow: 30% • Red: 50% • Define each probability for the Gateway named Triage type. 40

3. Click the Run and Start button 41

When the Simulation is Complete, Select Results 42

4. Analyzing the Results • Analyzing the results we conclude that something is wrong: • The number of tokens (1000) created at the Start Event of the process differs to the sum of tokens completed at the End Events (1006+311+186) • Can you identify what is wrong in the flow? 43

Problem If you watch the diagram carefully, you will see there is no point of convergence, that is, no shape has been defined to synchronize the paths that exit the Parallel Gateway 44

5. Solution • It is necessary to merge the outgoing flows into a single flow before the token continues to the next activity • To do this, include a Parallel Gateway (as a convergence element) to synchronize them 45

Solution • Once the change is done, Run the simulation again • Looking at the new results we can see that all is working as expected: • The number of tokens created (1000) is equal to the sum of tokens completed (483+315+202) • In addition, each token is passed correctly to the triage based on the probabilities defined 46

Case Study: Patient Assistance 47

3. 3 Time Analysis 48

1. Defining the input data required for this level • Arrival interval time: • Defines the time interval between token instances generation • Instances will be created until the max. arrival count is reached • This applies to Start Events, Activities that start processes or Timer Events • Select the Start Event of the process and click the Gear icon on the pie menu. Set the value for the control • One option is to define the arrival interval time as a constant by entering a value. The time units for this value are defined in the scenario´s configuration 49

Arrival Interval Time 50

Arrival Interval Time In the following image tokens instances are generated every 5 minutes 51

Arrival Interval Time - Statistical Distribution • Alternatively, define a statistical distribution • Click the advanced icon alongside the field to view and select a distribution 52

Arrival Interval Time - Statistical Distribution • Once selected, you will be able to set the parameters of the distribution • In the following image the time between generation of tokens instances is exponentially distributed with mean equals to 5 minutes • Tokens will be generated until 100 are reached 53

Processing Time • Processing times: • Defines the amount of time an Activity or Event needs to process a token • That is, it defines a service time period from the moment a token arrives at an Activity or Event until it is executed • Click the Activity or Event. Select the Clock on the pie menu, and enter a processing period in the Time Control 54

Processing Time - Constant • You have the option of defining the processing time as a constant by entering values in the corresponding units. 55

Processing Time - Statistical Distribution Alternatively, define a statistical distribution. Click the advanced icon alongside the field to view and select a distribution 56

Processing Time - Statistical Distribution • Once selected, you will be able to set the parameters of the distribution • In the following image the processing time of a token in a specific activity is normally distributed with mean 5 minutes and standard deviation of 3 minutes 57

2. Running the simulation 58

Analysis Data Display • Number of tokens completed • Average time per activity • Total processing time per activity 59

3. Results When the simulation is complete, select Results to view the outcome 60

Result Display 61

Result Display • Name: Identifies the specific BPM shape for which the results are displayed • Type: Identifies the element type of the BPM shape • Tokens completed: Indicates how many tokens were processed (instances) • Tokens started: Indicates how many tokens arrived at the shape • Minimum time: Indicates the minimum processing time of the shape • Maximum time: Indicates the maximum processing time of the shape • Average time: Indicates the average processing time of the shape • Total time: Indicates the total time employed to process the shape 62

Case Study: Time Analysis for Patient Assistance 63

Example: Performing a time analysis for the Emergency attendance process In order to provide a general insight into processing times, the emergency response department has decided to perform a time analysis 64

Assumptions • Necessary resources to perform activities have infinite capacity • The expected time between reports is 5 minutes • The simulation will evaluate a period of 1 week • The estimated processing times for each of the activities are fixed as shown in the next table: Activity Processing time (min) Receive emergency report 4 Classify Triage 5 Manage patient entry 11 Pick up patient 20 Arrive at patient place QAV 7 Arrive at patient place BA 10 Authorize entry 4 65

1. Define Trigger Times • To do so, click the Start Event and then the Gear icon on the pie menu • For this example, the expected time between reports is 5 minutes, so set the time to this value • Note the value entered is in minutes 66

2. Define the Activities' processing times • Click the Activity, select Clock on the pie menu and set a value for the Time control • In the following image the processing time for the first activity is set to 4 minutes 67

3. Run the Simulation The simulation shows analysis findings for each shape in real time as it executes, such as average time, total processing time and the number of completed tokens 68

4. Select Results to View the Outcome 69

5. Analyzing the results • A patient waits at least 16 minutes before receiving medical attention • A patient waits no more than 33 minutes for medical attention • The expected time a patient waits to receive medical attention is 25, 06 minutes 70

3. 4 Resource Analysis 71

Overview • This analysis shows the potential effect of resource constrains on process performance. • Remember that a Resource is defined as a person, equipment, or space necessary for the execution of a specific task • In the previous level, Time Analysis, we assumed infinite resource capacity, that is, activities are able to process infinite quantity of tokens at the same time. However this assumption is not practical at all. In real terms there always resources constraints • The most common issue arising from introducing resources constraints is that tokens need to wait to be processed at a given moment • This results in bottlenecks and increase in cycle time, thereby reducing the capacity of the process • Money is another resource directly or indirectly involved in a process • Consequently, this level also allows you to analyze your business operation in terms of costs 72

Overview • The purpose of this analysis is to identify and minimize the impact of these constraints • in terms of cycle time and costs • The resource analysis results will allow you to evaluate the following performance measures: • • • Sub- or over-utilization of resources Total resources costs Total activity costs Delays (time an activity waits for a resource) A more accurate expected cycle time 73

1. Defining the input Data required for this level • By default the Performers defined in the process documentation are defined as resources • In the Resources Analysis level you need to define the following parameters: • Resources: Remember that a resource is a person, equipment or space necessary for the execution of a specific task • To define a Resource click the Resources option found in the ribbon 74

Add Resource • A new window will display the available resources • To add a new resource, click Add resource 75

Add Performer • Select Add performer 76

New Resource • Enter the name, description and type of the new resource. Click OK 77

Availability and costs of resources • To define availability and costs of resources, select the Resources option found in the Ribbon • The availability of Resources determines how many resources of a given type you have as a whole (not for a particular activity) 78

Define the Costs of Resources • To define the costs of Resources, proceed to the Costs tab • You can define the fixed and per hour costs for each Resource • Fixed cost: This cost is generated each time a resource processes a token • Per hour cost: This cost is generated for each hour a resource employs processing a token • The cost units are defined in the scenario's configuration 79

Resources requirements • Resources Requirements: Tasks require resources to be performed. Once you have defined the process' resources, you have to define how many are required in order to perform a task • To define the Resources requirements for a task, click the task and select the Resource icon in the pie menu 80

Resource Window • Select the desired resources from the list available in the Resource window • You can select one or more resources • The AND/OR selection mode is available in order to define if all the selected resources are required by the task at the same time or only one at a time 81

Resource Window • For each resource selected you must define how many of them are used in the task 82

Activity Costs • Activity costs: The cost of performing an activity, that is, how much an activity costs once executed. • To define the cost of performing an activity, select the Activity and click Cost on the pie menu. 83

Fixed Cost Amount • Set a fixed cost amount • The cost units are defined in the scenario's configuration 84

2. Running the Simulation Once the required data has been entered, click the Run and then Start button to execute the simulation 85

Analysis Data Display • Resource usage status • Number of tokens completed • Average time per activity • Total processing time per activity • Average waiting time per activity 86

3. Results • When the simulation is complete, select Results to view the outcome. 87

For Process and activities For the Resource Analysis level, the results of the simulated outcome will contain the following information for Process and Resources 88

For Process and activities • Name: Identifies the specific BPM shape for which the results are displayed • Type: Identifies the element type of the BPM shape • Tokens completed: Indicates how many tokens were processed for each specific BPM shape • Tokens started: Indicates how many tokens arrived at the shape • Minimum time: Indicates the minimum processing time at the shape • Maximum time: Indicates the maximum processing time at the shape • Average time: Indicates the average processing time at the shape • Minimum time waiting resource: Indicates the minimum time a task had to wait for a resource • Maximum time waiting resource: Indicates the maximum time a task had to wait for a resource • Average time waiting resource: Indicates the average time a task had to wait for a resource • Standard deviation: Indicates the standard deviation of the average time a task had to wait for a resource • Total fixed cost: Indicates the total cost of performing a task during execution of the simulation 89

For Resources • Usage: Indicates the percentage of time the resource was busy • Total fixed cost: Indicates the fixed component cost of using the resource • Total unit cost: Indicates the variable component cost of using the resource 90

Case Study: Resource Analysis for Patient Assistance 91

Example: Performing a resource analysis for the Patient Assistance • Assumptions: • The expected time between reports is 5 minutes • The simulation will evaluate a period of 1 week • Resources can be shared between activities 92

1. Define the resources involved in the process • Create the necessary resources from the Resources option 93

2. For each resource define the available quantity, fixed cost and unit cost. 94

Resource, Quantity and Cost Resource Quantity Call center agent 2 Nurse 2 Fully equipped 4 ambulance Basic ambulance 2 Quick attention vehicle 2 Receptionist 2 Fixed Cost (US) 3 5 30 Unit Cost (US) 0 0 0, 4 25 18 3 0, 22 0 95

3. Define the resources requirements for each activity • Click the activities and then the Resources icon. Set the resource and number of instances to perform the activity. • For example, here we are defining that the second activity requires a nurse in order to be performed. 96

Quantity of Resources for Each Activity Receive emergency report Classify Triage Manage patient entry Pick up patient Arrive at patient place QAV Arrive at patient place BA Authorize entry Resource Call center agent Nurse Fully equipped ambulance Basic ambulance Quick attention vehicle Receptionist 97 Quantity 1 1 1 1

4. Finally, define the cost of performing each activity • Click the activity, select Cost and enter the corresponding cost • Here we are defining the cost of performing the Manage patient entry activity is 1 dollar. This cost is related to paperwork and calls. 98

Cost of the Performance of Each Activity Receive emergency report Classify Triage Manage patient entry Pick up patient Arrive at patient place QAV Arrive at patient place BA Authorize entry 99 Cost (US dollars) 2 1 1 0 0 0 1

Processing Times for Each of the Activities Activity Receive emergency report Classify Triage Manage patient entry Pick up patient Arrive at patient place QAV Arrive at patient place BA Authorize entry Processing time (min) 4 5 11 20 7 10 4 100

5. Click Run and Select Start • Note the number of completed Events are displayed • When the simulation is finished, select Results to view the outcome 101

6. Analyzing the Results • The results of a resource analysis give us a general insight into the cycle time of the process • Consequently, we can identify how the cycle time is affected 102

Analyzing the Results • Compared with the best case scenario achieved in the previous level, the inclusion of resources constraints has significantly increased the cycle times. • The minimum time remains at 16 minutes but the maximum increased to 657 minutes and now the average is 204, 91 minutes • The previous results only had an average waiting time of 25, 06 minutes • As is evident, the processing times for each activity have changed. Now, they reflects delays • The highest average processing times are recorded at Classify triage and Manage patient • The average waiting times confirm there is a problem in those activities. Possibly, resources used in them are not enough. 103

Analyzing the Results • The usage of the resources indicates some sub and over-utilization • For this case we confirm our hypothesis about a possible problem of resources capacity • The nurse who performs the Classify triage and Manage patient reception has a usage of 99, 91% • This means she is utilized at full capacity and tokens have to wait until she becomes available • The emergency department should consider increasing the number of triage nurses to reduce service and waiting times, and thereby reducing the cycle time 104

Analyzing the Results 105

Analyzing the Results We'll see if the situation gets better including a new nurse in the available resources. Now we would have three nurses. Click Run to simulate the new scenario 106

Analyzing the Results • Introducing another resource brings us closer to the best case scenario with no process delays. The minimum time remains at 16 minutes, the maximum now becomes 35 minutes and the average 25, 26 • The results also show waiting times close to 0 in the activities where they exist. The current resources are sufficient to avoid critical delays 107

Analyzing the Results • Usages are acceptable. Nurses now have a utilization of 69, 88%. • From the resources cost perspective, there was a total cost of 84. 163 US • The new cost of 86. 986 US includes the additional nurse • The increase of 2. 823 US offsets the benefit in reducing the average waiting time to 179, 5 minutes. • There may be other ways to reduce the cost even further and to improve resource utilization, but for now we can accept the state of affairs 108

3. 5 Calendar Analysis 109

Overview • In addition to the resources constrains discussed in the previous level, we should also consider the effect of resources availability over time to obtain a better understanding of true process performance • In real scenarios, processes are subjected to ever changing conditions in the availability of resources. Holidays, weekends, shifts and breaks restrict and define the true performance of a process • This level predicts how a process will perform during dynamic periods of time, such as shifts, days schedules or weeks. • At the end of this level you will obtain more accurate information on: • • • Sub- or over-utilization of resources Total resources costs Total activity costs Delays (time an activity waits for a resource) Expected cycle time 110

1. Defining the input data required for this level • Additional to the information required in the previous level, the following must be defined in the Calendar Analysis: • Calendars: A Calendar defines resource capacity over certain periods of times. They define the schedules, shifts, holidays and other time constraints to reflect the process in real life. • To create a Calendar click the Calendars option. Click Add calendar. 111

Calendar configuration • Name: Defines the name of the calendar. It should be short and clear in order to allow identifying the period of time it represents. For example night shift, coffee break, lunch hour etc • Start Time: Defines the starting time of the calendar • Duration: Defines the total duration of the calendar • Recurrence Pattern: Defines the frequency with which a Calendar will be repeated • It can be daily, weekly, monthly or yearly • Range of recurrence: Defines the period of time for which the calendar applies • Start of recurrence: Defines start date of the period of time for which the calendar applies • End of recurrence Defines the end date of the period of time in which the calendar applies. It can also be defined in terms of number of recurrences 112

113
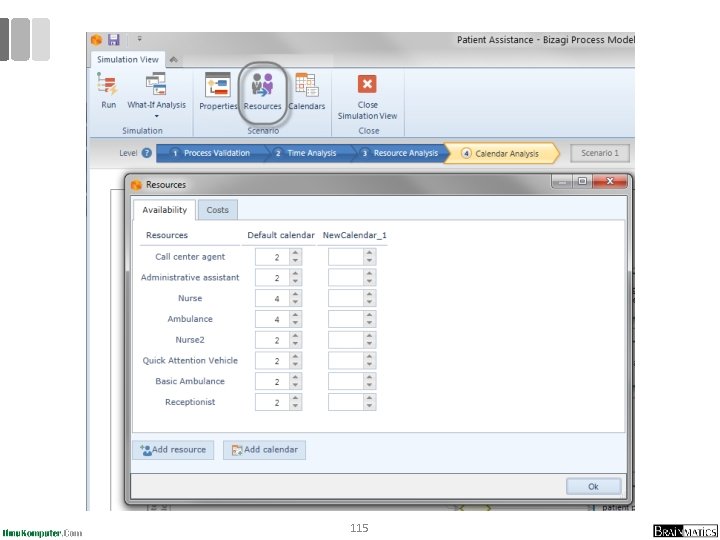
Calendars Assignment • Additionally in this level, you have to define the availability of resources for each defined calendar • To define the calendars assignment click the Resources option • For each Resource (row) you must define the availability for each calendar (column) • Keep in mind that if you leave a Calendar blank, Bizagi will assume the availability value of a resource is the one defined in the Default Calendar • This calendar includes the same resources availability defined in Level 3 (Resources Analysis) 114
115
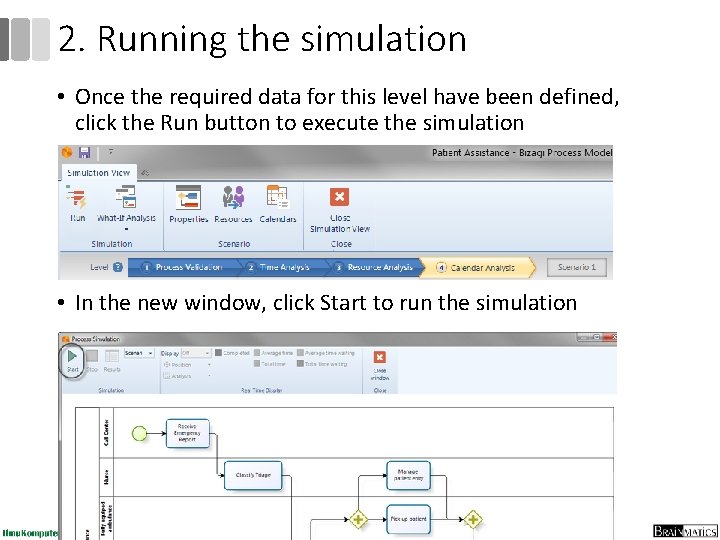
2. Running the simulation • Once the required data for this level have been defined, click the Run button to execute the simulation • In the new window, click Start to run the simulation 116
Running the simulation • When running a simulation, the following analysis data will display. • • • Status of resource usage Number of tokens completed Average time per activity Total processing time for each activity Average waiting time for each activity 117
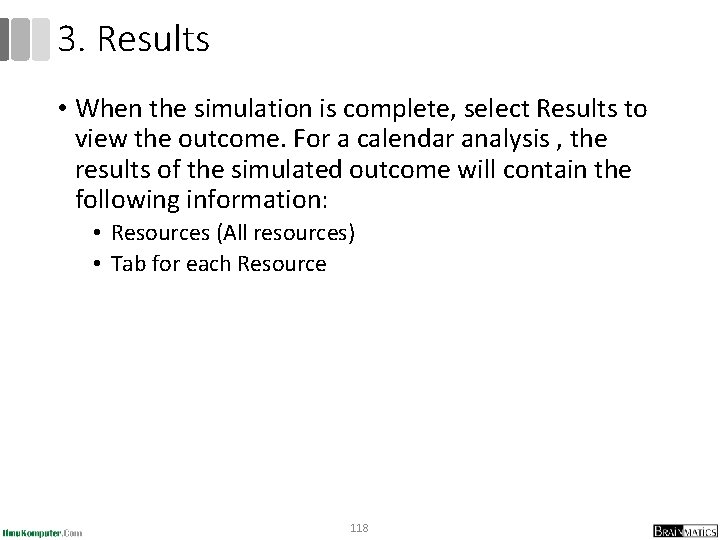
3. Results • When the simulation is complete, select Results to view the outcome. For a calendar analysis , the results of the simulated outcome will contain the following information: • Resources (All resources) • Tab for each Resource 118
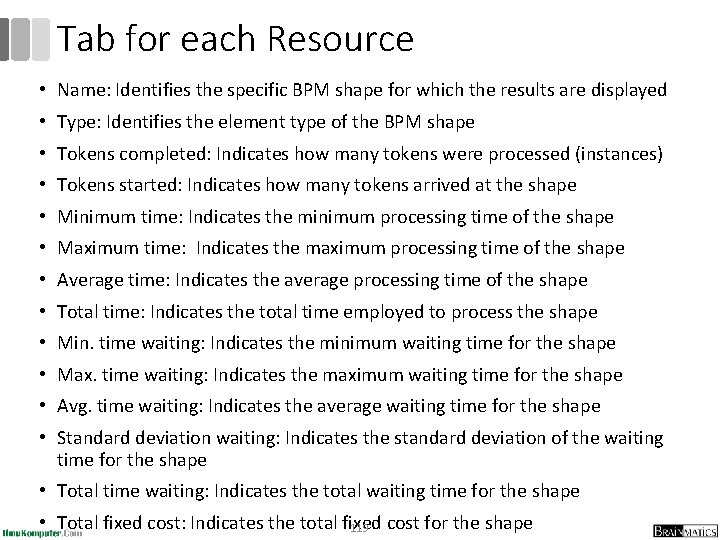
Tab for each Resource • Name: Identifies the specific BPM shape for which the results are displayed • Type: Identifies the element type of the BPM shape • Tokens completed: Indicates how many tokens were processed (instances) • Tokens started: Indicates how many tokens arrived at the shape • Minimum time: Indicates the minimum processing time of the shape • Maximum time: Indicates the maximum processing time of the shape • Average time: Indicates the average processing time of the shape • Total time: Indicates the total time employed to process the shape • Min. time waiting: Indicates the minimum waiting time for the shape • Max. time waiting: Indicates the maximum waiting time for the shape • Avg. time waiting: Indicates the average waiting time for the shape • Standard deviation waiting: Indicates the standard deviation of the waiting time for the shape • Total time waiting: Indicates the total waiting time for the shape • Total fixed cost: Indicates the total fixed 119 cost for the shape
Case Study: Calendar Analysis for Patient Assistance 120
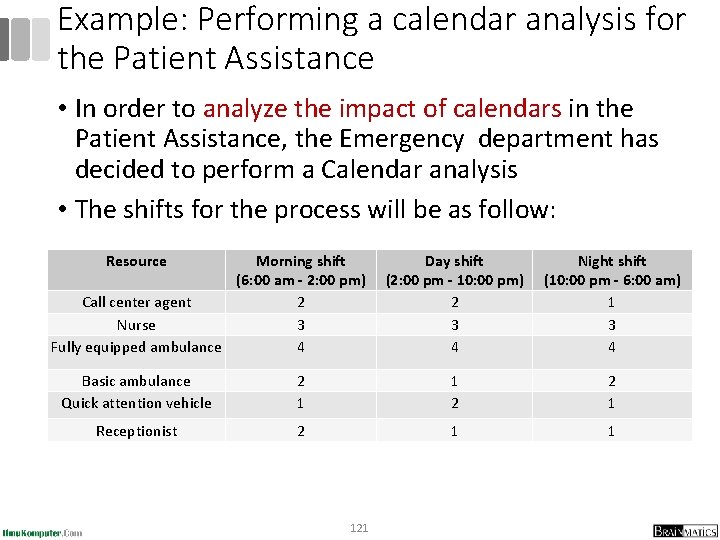
Example: Performing a calendar analysis for the Patient Assistance • In order to analyze the impact of calendars in the Patient Assistance, the Emergency department has decided to perform a Calendar analysis • The shifts for the process will be as follow: Resource Morning shift (6: 00 am - 2: 00 pm) Call center agent 2 Nurse 3 Fully equipped ambulance 4 Day shift (2: 00 pm - 10: 00 pm) 2 3 4 Night shift (10: 00 pm - 6: 00 am) 1 3 4 Basic ambulance Quick attention vehicle 2 1 1 2 2 1 Receptionist 2 1 1 121
1. Create three calendars (working shifts) • Click the Calendars and add a new Calendar • We are going to create the Night shift. In the Calendar configuration options enter the following information: • Name: Type Night Shift • Start Time: This calendar starts at 10: 00 pm (see table above) so this is the start time • Duration: This calendar starts at 10: 00 pm and finishes at 6: 00 am so the calendar duration is 8 hours • Recurrence Pattern: This calendar is repeated everyday so select Daily and type 1 in the alongside field • Start of recurrence: This calendar applies always so the start date is the same start date of the simulation. • End of recurrence This calendar applies always so it has no end date. 122
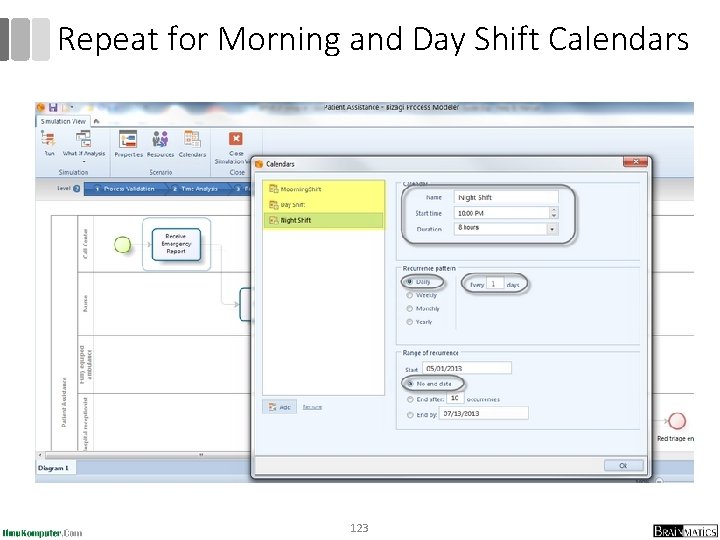
Repeat for Morning and Day Shift Calendars 123
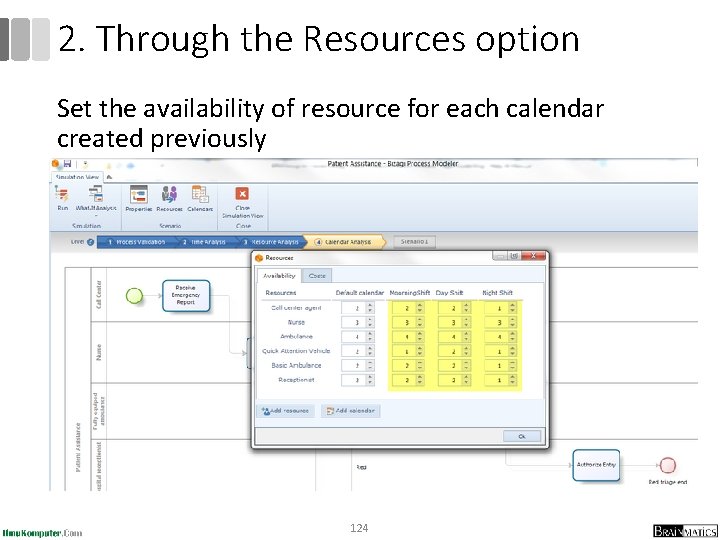
2. Through the Resources option Set the availability of resource for each calendar created previously 124
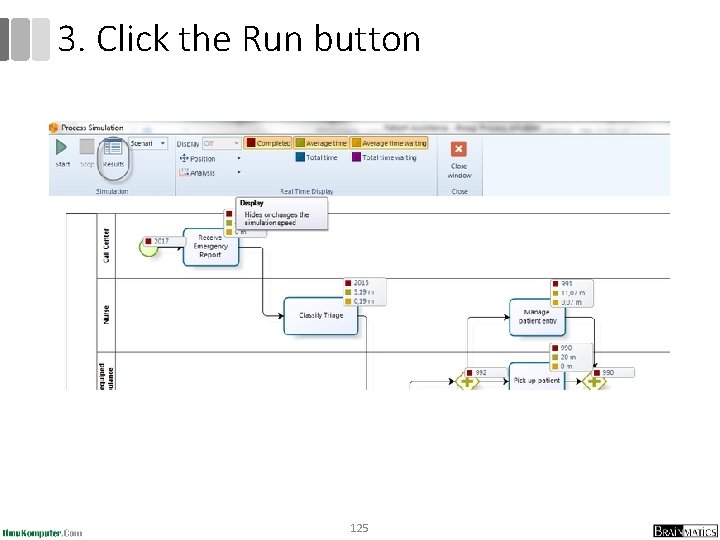
3. Click the Run button 125
4. Analyzing the results • Recall that incorporating ever changing conditions in the resource availability gives us a better understanding of true process performance • The results of the calender analysis will reflect this change. Let us analyze them 126
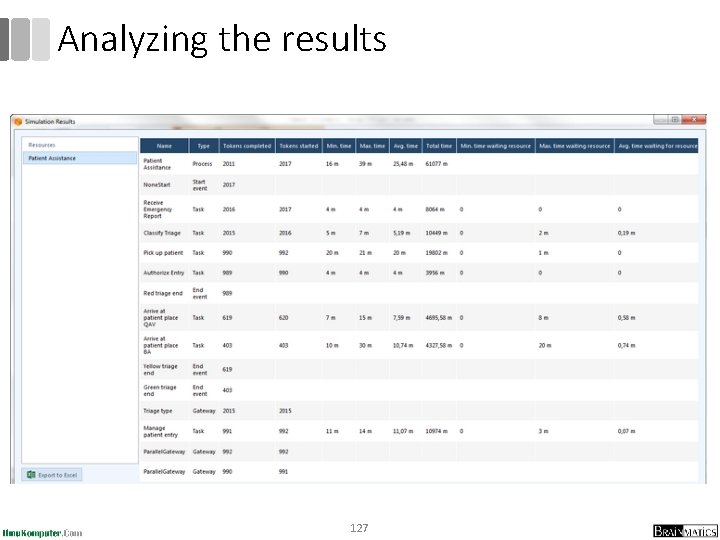
Analyzing the results 127
Analyzing the results • The average time a patient waits for assistance suffered a little increase from 25, 06 minutes to 25, 48 minutes • This is not significant • The increase from 35 to 39 minutes in the maximum time can be explained by the existing waiting times in some of the activities of the process that were not present in the previous level • The Arrive at patient place BA task has a maximum waiting time of 20 min. It could be critical for a patient, however the average waiting time is 0, 74 min • It is clear that high waiting times in this task are rare • Despite the presence of waiting times, they are not regarded critical 128
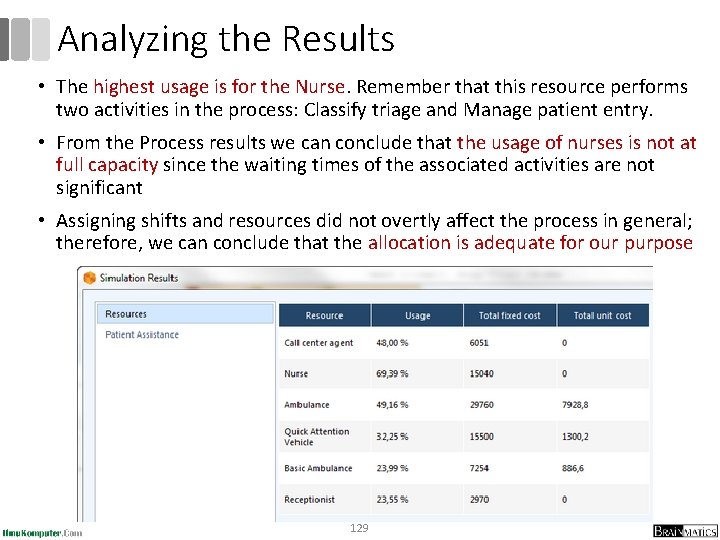
Analyzing the Results • The highest usage is for the Nurse. Remember that this resource performs two activities in the process: Classify triage and Manage patient entry. • From the Process results we can conclude that the usage of nurses is not at full capacity since the waiting times of the associated activities are not significant • Assigning shifts and resources did not overtly affect the process in general; therefore, we can conclude that the allocation is adequate for our purpose 129
Reference 1. Object Management Group, Business Process Model and Notation (BPMN), OMG Document Number: formal/2011 -01 -04, 2011 2. Object Management Group, BPMN 2. 0 by Example, OMG Document Number: dtc/2010 -06 -02, 2011 3. Bruce Silver, BPMN Method and Style Second Edition, Cody. Cassidy Press, 2011 4. Layna Fischer (edt. ), BPMN 2. 0 Handbook Second Edition, Future Strategies, 2012 5. Tom Debevoise, Rick Geneva, and Richard Welke, The Microguide to Process Modeling in BPMN 2. 0 Second Edition, Create. Space, 2011 6. Bizagi Proses Modeler User Guide, Bizagi, 2012 7. Bizagi BPM Suite User Guide, Bizagi, 2013 8. Thomas Allweyer, BPMN 2. 0, Bo. D, 2010 130
- Slides: 130