boolean on Touch Event Motion Event event boolean


뷰의 이벤트 처리하기 뷰를 상속할 때 이벤트 처리를 위한 메소드 재정의 boolean on. Touch. Event (Motion. Event event) boolean on. Key. Down (int key. Code, Key. Event event) boolean on. Key. Up (int key. Code, Key. Event event) [버튼에 On. Click. Listener를 설정할 때의 패턴] 뷰 객체에 전달되는 이벤트를 처리하기 위한 리스너 설정 View. On. Touch. Listener : boolean on. Touch (View v, Motion. Event event) View. On. Key. Listener : boolean on. Key (View v, int key. Code, Key. Event event) View. On. Click. Listener : void on. Click (View v) View. On. Focus. Change. Listener : void on. Focus. Change (View v, boolean has. Focus) 1. 이벤트 처리 -8 -
 { if (m.")
메인 액티비티 코드 만들기 public boolean on. Touch. Event(Motion. Event event) { if (m. Gestures != null) { return m. Gestures. on. Touch. Event(event); } else { 1 터치 이벤트를 제스처와 구분하여 처리 return super. on. Touch. Event(event); } } … public void on. Create(Bundle saved. Instance. State) { … 2 Gesture. Detector 객체 정의 m. Gestures = new Gesture. Detector(new Gesture. Detector. Simple. On. Gesture. Listener() { … Continued. . 1. 이벤트 처리 - 12 -
 public boolean on. Fling(Motion. Event e 1, Motion. Event")
메인 액티비티 코드 만들기 (계속) public boolean on. Fling(Motion. Event e 1, Motion. Event e 2, float velocity. X, float velocity. Y) { Text. View 01. append("non. Fling ntx = " + velocity. X + "nty=“ + velocity. Y); 3 Fling 이벤트 처리 return super. on. Fling(e 1, e 2, velocity. X, velocity. Y); } public boolean on. Scroll(Motion. Event e 1, Motion. Event e 2, float distance. X, float distance. Y) { Text. View 01. append("non. Scroll ntx = " + distance. X + "nty = “ + distance. Y); return super. on. Scroll(e 1, e 2, distance. X, distance. Y); } 4 Scroll 이벤트 처리 }); Continued. . 1. 이벤트 처리 - 13 -
 Text. View 01. set. On. Long. Click. Listener(new View.")
메인 액티비티 코드 만들기 (계속) Text. View 01. set. On. Long. Click. Listener(new View. On. Long. Click. Listener() { public boolean on. Long. Click(View v) { Text. View 01. append("non. Long. Click: " + v. to. String()); return true; 6 Long. Click 이벤트 처리 } }); Text. View 01. set. On. Focus. Change. Listener(new View. On. Focus. Change. Listener() { public void on. Focus. Change(View v, boolean has. Focus) { if (has. Focus) { Text. View 01. append("non. Focus. Change, has. Focus : " + has. Focus); } else { Text. View 01. append("non. Focus. Change, has. Focus : " + has. Focus); } } }); } } 1. 이벤트 처리 - 14 - 7 Focus. Change 이벤트 처리
![키 입력 이벤트 처리하기 [키를 눌렀을 때 전달되는 대표적인 키값 ] 키 코드 뷰를](http://slidetodoc.com/presentation_image_h/cf5f78da24a8b35cdca0b3eac226342c/image-16.jpg "키 입력 이벤트 처리하기 [키를 눌렀을 때 전달되는 대표적인 키값 ] 키 코드 뷰를")
키 입력 이벤트 처리하기 [키를 눌렀을 때 전달되는 대표적인 키값 ] 키 코드 뷰를 상속할 때 키 이벤트 처리를 위한 메소드 재정의 boolean on. Key. Down (int key. Code, Key. Event event) boolean on. Key (View v, int key. Code, Key. Event event) 1. 이벤트 처리 설명 KEYCODE_DPAD_LEFT - 왼쪽 화살표 KEYCODE_DPAD_RIGHT - 오른쪽 화살표 KEYCODE_DPAD_UP - 위쪽 화살표 KEYCODE_DPAD_DOWN - 아래쪽 화살표 KEYCODE_DPAD_CENTER - [중앙] 버튼 KEYCODE_CALL - [통화] 버튼 KEYCODE_ENDCALL - [통화 종료] 버튼 KEYCODE_HOME - [홈] 버튼 KEYCODE_BACK - [뒤로 가기] 버튼 KEYCODE_VOLUME_UP - [소리 크기 증가] 버튼 KEYCODE_VOLUME_DOWN - [소리 크기 감소] 버튼 KEYCODE_0 ~ KEYCODE_9 - 숫자 0부터 9까지의 키값 KEYCODE_A ~ KEYCODE_Z - 알파벳 A부터 Z까지의 키값 - 16 -
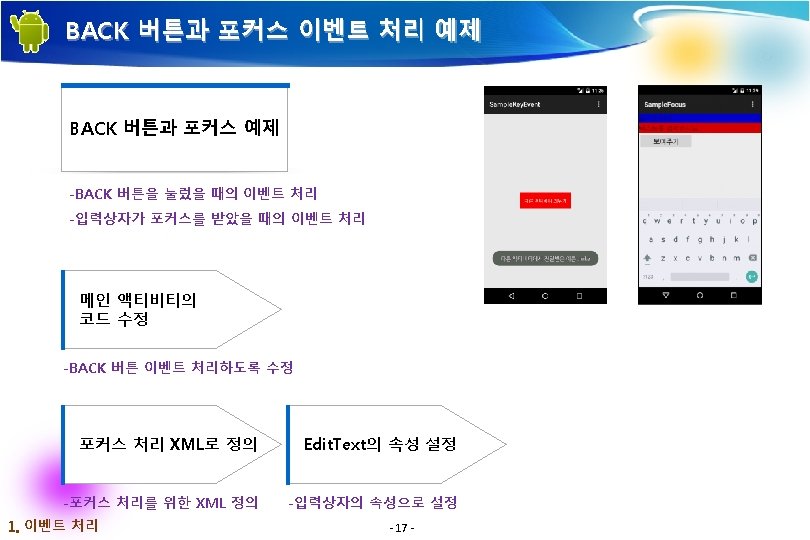

BACK 버튼 처리를 위한 액티비티 코드 만들기 public boolean on. Key. Down(int key. Code, Key. Event event) { if(key. Code == Key. Event. KEYCODE_BACK) { close(); 1 하드웨어 [BACK] 버튼이 눌렸을 경우 새로 정의한 close() 메소드 호출 return true; } return false; } private void close() { Intent result. Intent = new Intent(); result. Intent. put. Extra("name", "mike"); set. Result(1, result. Intent); finish(); 3 2 호출한 액티비티로 결과값 전송 액티비티 없애기 } } 1. 이벤트 처리 - 18 -

포커스 이벤트 처리를 위한 XML 레이아웃 <Edit. Text android: id="@+id/edit 01" android: layout_width="match_parent" android: layout_height="wrap_content" 1 android: hint="텍스트를 입력하세요. " android: text. Size="20 dp" android: background="@drawable/button_selector" /> <Button android: id="@+id/btn. Show" android: layout_width="160 dp" android: layout_height="wrap_content" android: text="보여주기" android: text. Size="20 dp" android: text. Style="bold" /> </Linear. Layout> 1. 이벤트 처리 - 19 - 입력 상자 정의

포커스 처리를 위한 XML 정의 <? xml version="1. 0" encoding="utf-8"? > <selector xmlns: android="http: //schemas. android. com/apk/res/android"> <item android: state_focused="true" android: state_pressed="true" android: drawable="@drawable/red" /> <item android: state_focused="false" android: state_pressed="true" android: drawable="@drawable/green" /> <item android: drawable="@drawable/blue" /> </selector> 1. 이벤트 처리 - 20 -
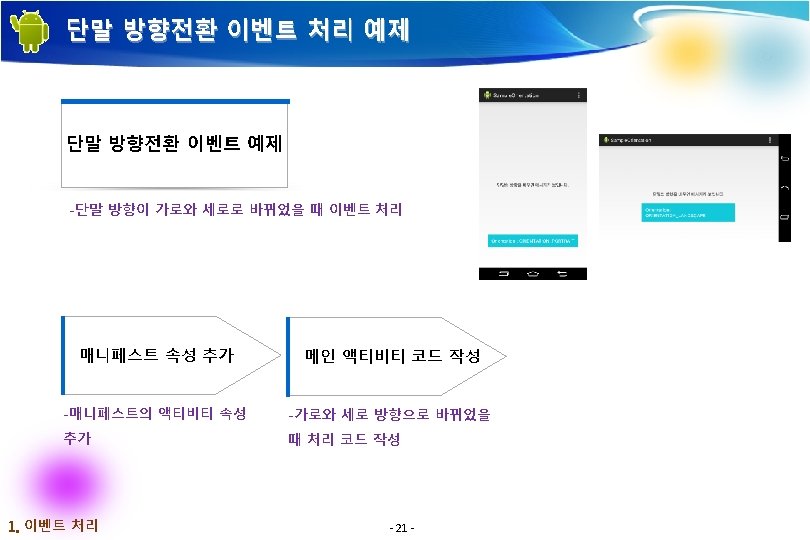

매니페스트 파일에 속성 추가 <activity android: name=". Main. Activity" android: label="@string/title_activity_main" android: config. Changes="orientation|screen. Size" 1 방향 전환을 알 수 있도록 config. Changes 속성 설정 > <intent-filter> <action android: name="android. intent. action. MAIN" /> <category android: name="android. intent. category. LAUNCHER" /> </intent-filter> </activity> 1. 이벤트 처리 - 22 -
 { super.")
메인 액티비티 코드 만들기 … public void on. Configuration. Changed(Configuration new. Config) { super. on. Configuration. Changed(new. Config); if (new. Config. orientation == Configuration. ORIENTATION_LANDSCAPE) { Toast. make. Text(get. Application. Context(), "Orientation : ORIENTATION_LANDSCAPE", 4 Toast. LENGTH_LONG). show(); 가로 방향 전환 시 처리 } else if (new. Config. orientation == Configuration. ORIENTATION_PORTRAIT) { Toast. make. Text(get. Application. Context(), "Orientation : ORIENTATION_PORTRAIT", 5 Toast. LENGTH_LONG). show(); } } … 1. 이벤트 처리 - 23 - 세로 방향 전환 시 처리
![액티비티를 가로 또는 세로 방향으로 고정 [Code] <activity android: name=". Main. Activity" android: theme="@android:](http://slidetodoc.com/presentation_image_h/cf5f78da24a8b35cdca0b3eac226342c/image-24.jpg "액티비티를 가로 또는 세로 방향으로 고정 [Code] <activity android: name=\". Main. Activity\" android: theme=\"@android:")
액티비티를 가로 또는 세로 방향으로 고정 [Code] <activity android: name=". Main. Activity" android: theme="@android: style/Theme. No. Title. Bar" android: screen. Orientation="landscape" android: config. Changes="orientation" > </activity> 1. 이벤트 처리 - 24 -
 find. View. By. Id(R. id.")
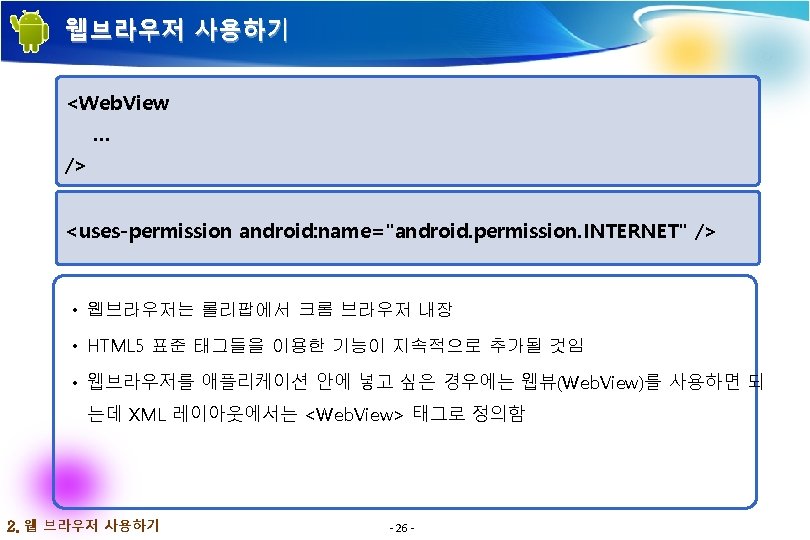
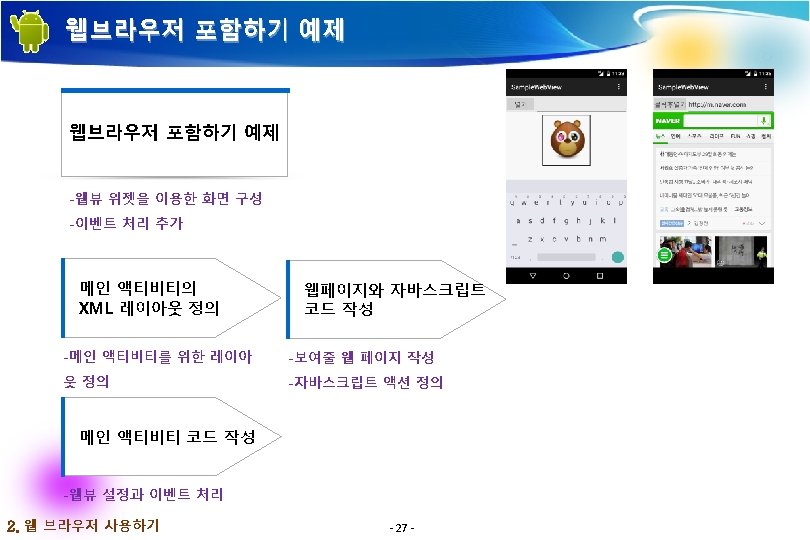
메인 액티비티 코드 만들기 web. View = (Web. View) find. View. By. Id(R. id. webview); 1 웹뷰 객체 참조 2 웹뷰에 Web. Settings 설정 … Web. Settings web. Settings = web. View. get. Settings(); web. Settings. set. Save. Password(false); web. Settings. set. Save. Form. Data(false); web. Settings. set. Java. Script. Enabled(true); web. Settings. set. Support. Zoom(false); web. View. set. Web. Chrome. Client(new Web. Browser. Client()); 3 웹뷰에 클라이언트 객체 지정 web. View. add. Javascript. Interface(new Java. Script. Methods(), "sample"); 4 web. View. load. Url("file: ///android_asset/sample. html"); 웹뷰에 자바스크립트 인터페이스 객체 지정 Continued. . 2. 웹 브라우저 사용하기 - 28 -

자바스크립트 함수 정의 <html> <script language="javascript"> 1 자바스크립트 함수 정의한 것으로 애플리케이션에서 호출할 대상 function change. Face() { document. get. Element. By. Id("face"). src="face_angry. png"; } </script> <body> <a on. Click="window. sample. click. On. Face()"> 2 <div style="width: 120 px; margin: 0 px auto; padding: 10 px; text-align: center; border: 2 px solid #202020; " > <img id="face" src="face_normal. png"/> </div> 3 웹페이지의 이미지 ID를 “face"로 지정 </a> </body> </html> 2. 웹 브라우저 사용하기 - 29 - 웹페이지에서 보이는 그림을 눌렀을 때 click. On. Face() 메소드 호출

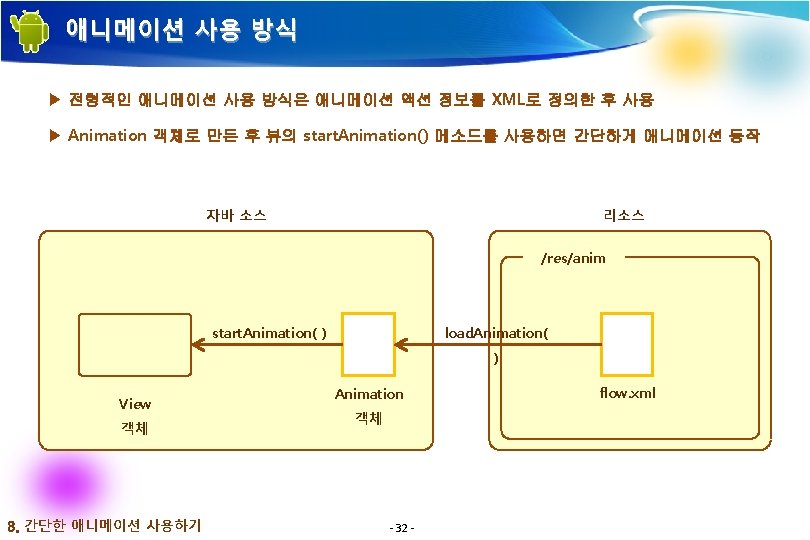
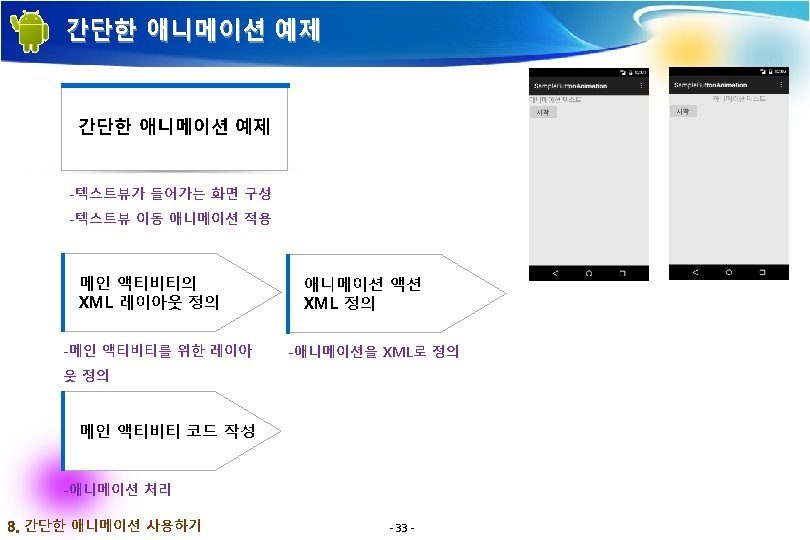

애니메이션 액션 XML 정의 <? xml version="1. 0" encoding="utf-8"? > <set xmlns: android="http: //schemas. android. com/apk/res/android"> <translate android: from. XDelta="100%p" 1 위치 이동을 위한 애니메이션 액션 정의 2 투명도 변경을 위한 애니메이션 액션 정의 android: to. XDelta="0%p" android: duration="6000" android: repeat. Count="3" /> <alpha android: from. Alpha="0. 5" android: to. Alpha="1" android: duration="6000" android: repeat. Count="3" /> </set> 3. 간단한 애니메이션 사용하기 - 34 -

메인 액티비티 코드 만들기 package org. androidtown. ui. anim; . . . public class Main. Activity extends Activity { 1 애니메이션 객체 선언 Animation flow. Anim; Text. View text 01; public void on. Create(Bundle saved. Instance. State) { super. on. Create(saved. Instance. State); set. Content. View(R. layout. activity_main); flow. Anim = Animation. Utils. load. Animation(this, R. anim. flow); text 01 = (Text. View) find. View. By. Id(R. id. text 01); 2 XML에 정의한 애니메이션 액션 정보 로딩 Button start. Btn = (Button) find. View. By. Id(R. id. start. Btn); start. Btn. set. On. Click. Listener(new On. Click. Listener() { public void on. Click(View v) { Continued. . 3. 간단한 애니메이션 사용하기 - 35 -
 flow. Anim. set. Animation. Listener(new Flow. Animation. Listener()); text")
메인 액티비티 코드 만들기 (계속) flow. Anim. set. Animation. Listener(new Flow. Animation. Listener()); text 01. start. Animation(flow. Anim); 3 애니메이션 리스너 설정 텍스트뷰 객체의 애니메이션 시작 4 } }); } private final class Flow. Animation. Listener implements Animation. Listener { public void on. Animation. End(Animation animation) { Toast. make. Text(get. Application. Context(), "애니메이션 종료됨. ", Toast. LENGTH_LONG). show(); } public void on. Animation. Repeat(Animation animation) { } public void on. Animation. Start(Animation animation) { } } } 3. 간단한 애니메이션 사용하기 - 36 - 5 애니메이션 종료 시 토스트 메시지 표시

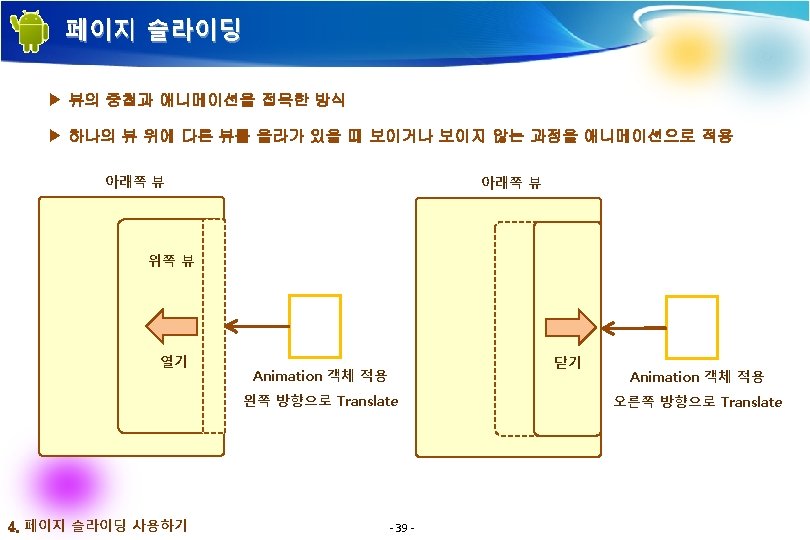
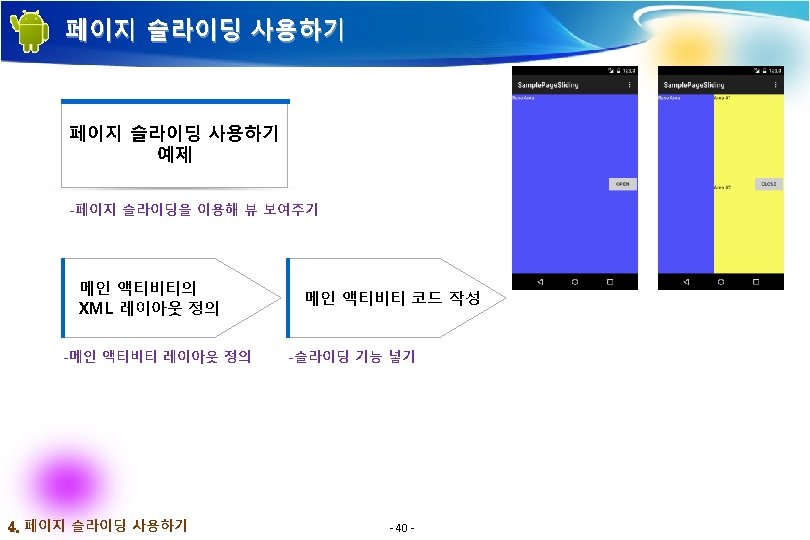

레이아웃 만들기 <Linear. Layout android: orientation="vertical" android: layout_width="match_parent" android: layout_height="match_parent" android: background="#ff 5555 ff"> 1 첫 번째 레이아웃 : 바탕 레이아웃 <Text. View android: layout_width="wrap_content" android: layout_height="wrap_content" android: text="Base Area" android: text. Color="#ffff" /> </Linear. Layout> Continued. . 4. 페이지 슬라이딩 사용하기 - 41 -
 <Linear. Layout android: id=\"@+id/sliding. Page 01\" android: orientation=\"vertical\" android: layout_width=\"200 dp\"")
레이아웃 만들기 (계속) <Linear. Layout android: id="@+id/sliding. Page 01" android: orientation="vertical" android: layout_width="200 dp" android: layout_height="match_parent" android: layout_gravity="right" android: background="#ffffff 66" 2 android: visibility="gone"> 두 번째 레이아웃 : 슬라이딩으로 보일 레이아웃 <Text. View android: layout_width="wrap_content" android: layout_height="wrap_content" android: layout_weight="1" android: text="Area #1" android: text. Color="#ff 000000" /> Continued. . 4. 페이지 슬라이딩 사용하기 - 42 -
 <Text. View android: layout_width=\"wrap_content\" android: layout_height=\"wrap_content\" android: layout_weight=\"1\" android: text=\"Area #2\"")
레이아웃 만들기 (계속) <Text. View android: layout_width="wrap_content" android: layout_height="wrap_content" android: layout_weight="1" android: text="Area #2" android: text. Color="#ff 000000" /> </Linear. Layout> <Linear. Layout android: orientation="vertical" android: layout_width="wrap_content" android: layout_height="wrap_content" android: layout_gravity="right|center_vertical" android: background="#0000"> 3 <Button android: id="@+id/open. Btn 01" android: layout_width="wrap_content" android: layout_height="wrap_content" android: text="Open" /> </Linear. Layout> </Frame. Layout> 4. 페이지 슬라이딩 사용하기 - 43 - 세 번째 레이아웃 : 버튼이 들어 있는 레이아웃

메인 액티비티 코드 만들기 package org. androidtown. ui. sliding; . . . public class Main. Activity extends Activity { boolean is. Page. Open = false; 1 슬라이딩 페이지가 보이는지 여부 Animation translate. Left. Anim; 2 Animation translate. Right. Anim; 3 왼쪽으로 이동 애니메이션 객체 오른쪽으로 이동 애니메이션 객체 Linear. Layout sliding. Page 01; Button open. Btn 01; public void on. Create(Bundle saved. Instance. State) { super. on. Create(saved. Instance. State); set. Content. View(R. layout. activity_main); sliding. Page 01 = (Linear. Layout) find. View. By. Id(R. id. sliding. Page 01); 4 슬라이딩으로 보여줄 페이지와 애니메이션 객체 참조 translate. Left. Anim = Animation. Utils. load. Animation(this, R. anim. translate_left); translate. Right. Anim = Animation. Utils. load. Animation(this, R. anim. translate_right); 4. 페이지 슬라이딩 사용하기 - 44 - Continued. .
 Sliding. Page. Animation. Listener anim. Listener = new Sliding.")
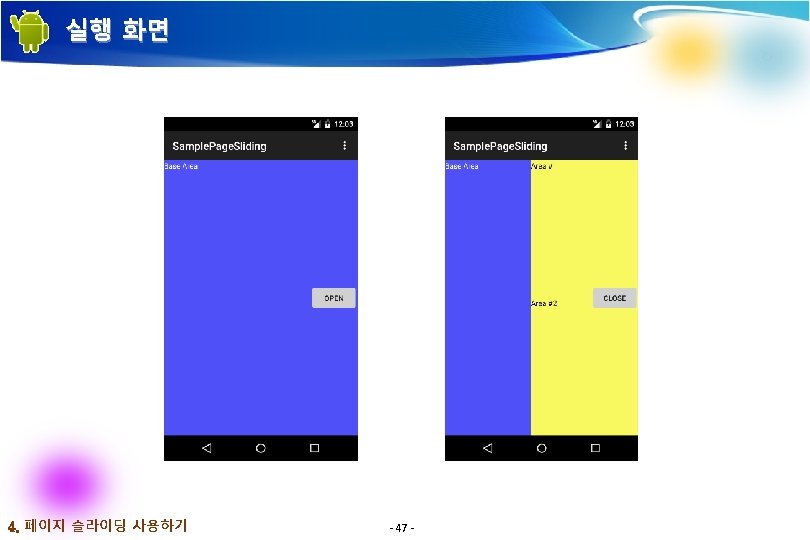
메인 액티비티 코드 만들기 (계속) Sliding. Page. Animation. Listener anim. Listener = new Sliding. Page. Animation. Listener(); translate. Left. Anim. set. Animation. Listener(anim. Listener); 5 슬라이딩 애니메이션을 감시할 리스너 translate. Right. Anim. set. Animation. Listener(anim. Listener); open. Btn 01 = (Button) find. View. By. Id(R. id. open. Btn 01); open. Btn 01. set. On. Click. Listener(new On. Click. Listener() { public void on. Click(View v) { if (is. Page. Open) { 6 페이지가 열려 있으면 오른쪽으로 애니메이션 sliding. Page 01. start. Animation(translate. Right. Anim); } else { 7 sliding. Page 01. set. Visibility(View. VISIBLE); sliding. Page 01. start. Animation(translate. Left. Anim); 페이지가 닫혀 있으면 보이도록 한 후 왼쪽으로 애니메이션 } } }); } 4. 페이지 슬라이딩 사용하기 Continued. . - 45 -
 private class Sliding. Page. Animation. Listener implements Animation. Listener")
메인 액티비티 코드 만들기 (계속) private class Sliding. Page. Animation. Listener implements Animation. Listener { public void on. Animation. End(Animation animation) { if (is. Page. Open) { 8 페이지가 열려 있으면 안보이도록 하고 버튼의 텍스트를 “Open"으로 변경 sliding. Page 01. set. Visibility(View. INVISIBLE); open. Btn 01. set. Text("Open"); is. Page. Open = false; } else { open. Btn 01. set. Text("Close"); is. Page. Open = true; } } 9 페이지가 닫혀 있으면 버튼의 텍스트를 “Close"로 변경 public void on. Animation. Repeat(Animation animation) { } public void on. Animation. Start(Animation animation) { } } } 4. 페이지 슬라이딩 사용하기 - 46 -


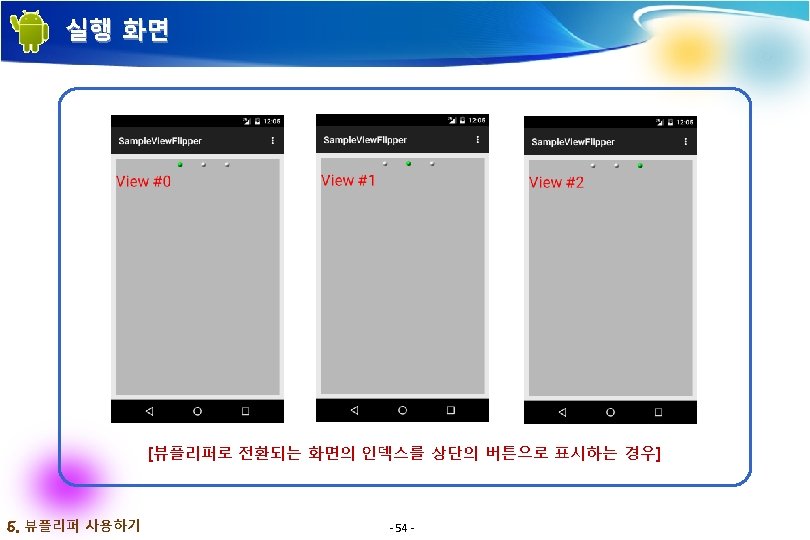
레이아웃 만들기 <View. Flipper android: id="@+id/flipper" android: layout_width="match_parent" android: layout_height="match_parent" > </View. Flipper> 5. 뷰플리퍼 사용하기 - 51 -

메인 액티비티 만들기 . . . public class Main. Activity extends Activity { Screen. View. Flipper flipper; public void on. Create(Bundle saved. Instance. State) { super. on. Create(saved. Instance. State); View. Group. Layout. Params params = new View. Group. Layout. Params( View. Group. Layout. Params. match_parent, View. Group. Layout. Params. match_parent); flipper = new Screen. View. Flipper(this); set. Content. View(flipper, params); } } 5. 뷰플리퍼 사용하기 - 52 -
, R.")
뷰플리퍼 화면을 위한 클래스 정의 flipper. set. In. Animation(Animation. Utils. load. Animation(get. Context(), R. anim. wallpaper_open_enter)); flipper. set. Out. Animation(Animation. Utils. load. Animation(get. Context(), R. anim. wallpaper_open_exit)); 5. 뷰플리퍼 사용하기 - 53 -

![프로그레스바 사용 메소드 • 진행률이 변경되면 progress 속성으로 설 [Code] 정되었던 값을 바꿈 void](http://slidetodoc.com/presentation_image_h/cf5f78da24a8b35cdca0b3eac226342c/image-57.jpg "프로그레스바 사용 메소드 • 진행률이 변경되면 progress 속성으로 설 [Code] 정되었던 값을 바꿈 void")
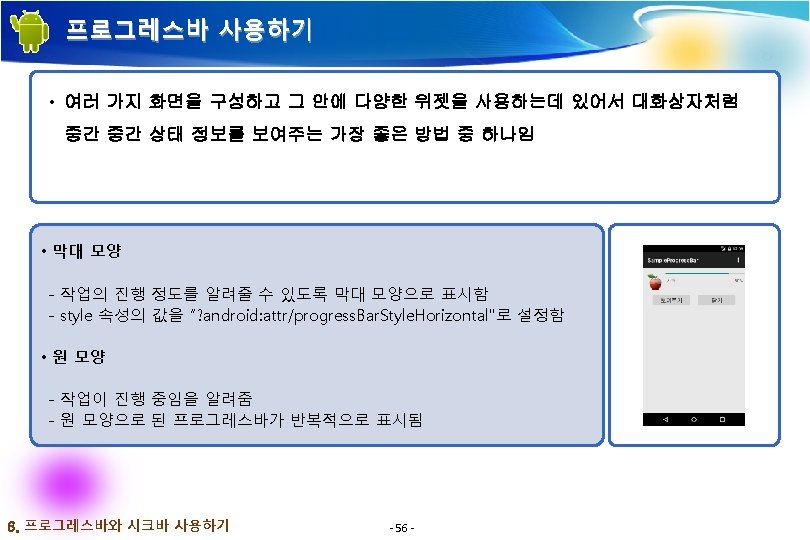
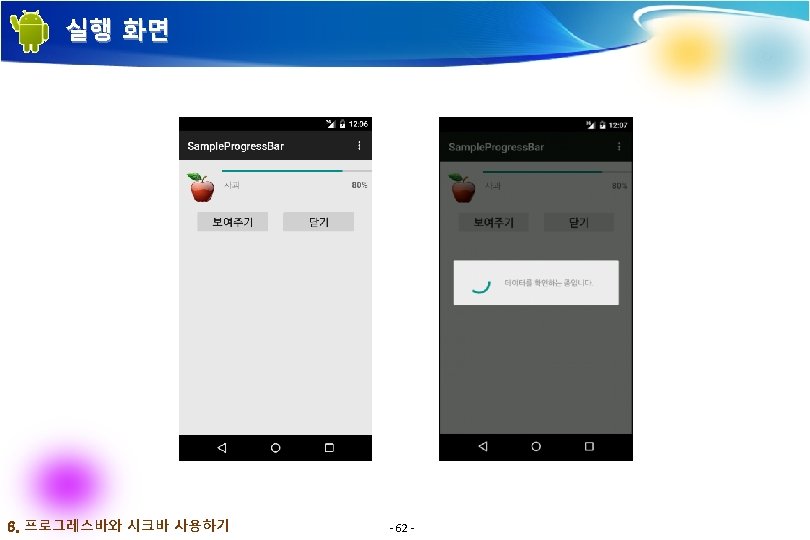
프로그레스바 사용 메소드 • 진행률이 변경되면 progress 속성으로 설 [Code] 정되었던 값을 바꿈 void set. Progress (int progress) void increment. Progress. By (int diff) [Code] request. Window. Feature(Window. FEATURE_PROGRESS); 6. 프로그레스바와 시크바 사용하기 - 57 -

레이아웃 만들기 <Progress. Bar style="? android: attr/progress. Bar. Style. Horizontal" android: id="@+id/progress. Bar 01" android: layout_width="match_parent" android: layout_height="wrap_content" android: indeterminate. Only="false" android: min. Height="20 dp" android: max="100" /> 6. 프로그레스바와 시크바 사용하기 - 59 - 1 프로그레스바 정의
 find. View. By. Id(R.")
메인 액티비티 만들기 Progress. Bar pro. Bar = (Progress. Bar) find. View. By. Id(R. id. progress. Bar 01); pro. Bar. set. Indeterminate(false); pro. Bar. set. Max(100); pro. Bar. set. Progress(80); 6. 프로그레스바와 시크바 사용하기 - 60 -
 progress. Dialog = new Progress. Dialog(this); progress. Dialog. set. Progress.")
메인 액티비티 만들기 (계속) progress. Dialog = new Progress. Dialog(this); progress. Dialog. set. Progress. Style(Progress. Dialog. STYLE_SPINNER); progress. Dialog. set. Message("데이터를 확인하는 중입니다. "); 6. 프로그레스바와 시크바 사용하기 - 61 -
는 프로그레스바를 확장하여 만들어진 것임 • 프로그레스바의 속성을 가지고 있으면서도")
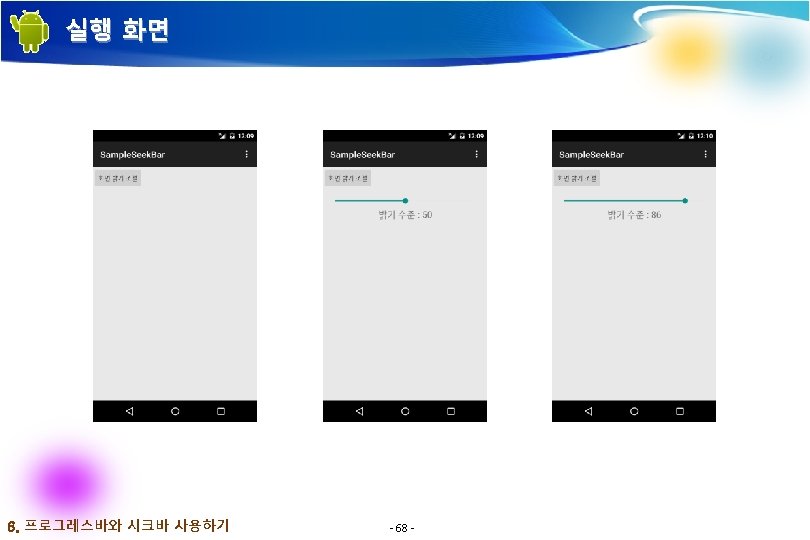
시크바 사용하기 • 시크바(Seek. Bar)는 프로그레스바를 확장하여 만들어진 것임 • 프로그레스바의 속성을 가지고 있으면서도 사용자가 값을 조정할 수 있도록 해 줌 [Code] void on. Start. Tracking. Touch (Seek. Bar seek. Bar) void on. Stop. Tracking. Touch (Seek. Bar seek. Bar) void on. Progress. Changed (Seek. Bar seek. Bar, int progress, boolean from. User) 6. 프로그레스바와 시크바 사용하기 - 63 -
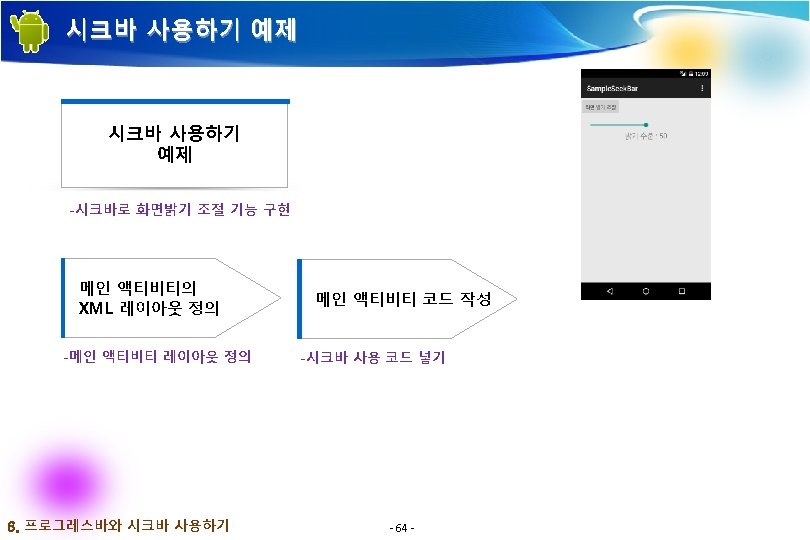

레이아웃 만들기 <Seek. Bar android: id="@+id/seekbar 01" android: layout_width="match_parent" android: layout_height="wrap_content" android: progress="100" android: max="100" /> 6. 프로그레스바와 시크바 사용하기 - 65 -
 find. View. By. Id(R. id. seekbar 01);")
메인 액티비티 만들기 seekbar = (Seek. Bar) find. View. By. Id(R. id. seekbar 01); Button show. Btn = (Button) find. View. By. Id(R. id. show. Btn); show. Btn. set. On. Click. Listener(new View. On. Click. Listener() { public void on. Click(View v) { show. Panel(); } }); 6. 프로그레스바와 시크바 사용하기 - 66 -
 private void show. Panel() { Animation animation = Animation. Utils.")
메인 액티비티 만들기 (계속) private void show. Panel() { Animation animation = Animation. Utils. load. Animation(this, R. anim. translate_left); seekbar. set. Progress(this. brightness); panel. set. Visibility(View. VISIBLE); panel. start. Animation(animation); } 6. 프로그레스바와 시크바 사용하기 - 67 -
와 on. Create. Context. Menu() 메소드")
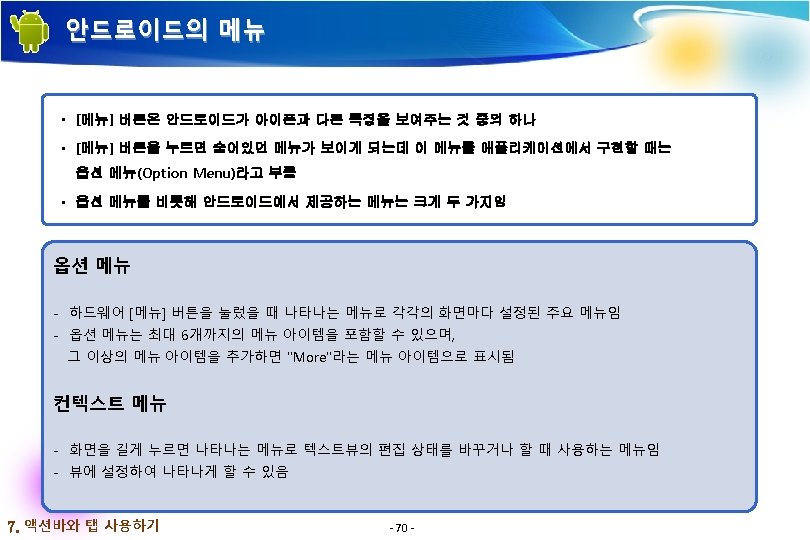
메뉴 사용 방식의 기본 • on. Create. Options. Menu()와 on. Create. Context. Menu() 메소드 재정의 • 메뉴 선택 시의 이벤트 처리 ü 컨텍스트 메뉴의 아이템 선택 : on. Context. Item. Selected() 호출 ü on. Options. Item. Selected() 메소드와 on. Context. Item. Selected() 메소드는 모두 apply. Menu. Choice() 메소드로 위임되어 상위 클래스로 전달됨 @Override public boolean on. Options. Item. Selected(Menu. Item item) { return (apply. Menu. Choice(item) || super. on. Options. Item. Selected(item)); } @Override public boolean on. Context. Item. Selected(Menu. Item item) { return (apply. Menu. Choice(item) || super. on. Context. Item. Selected(item)); } [Reference] void Activity. register. For. Context. Menu (View view) 7. 액션바와 탭 사용하기 - 72 -
 { super. on.")
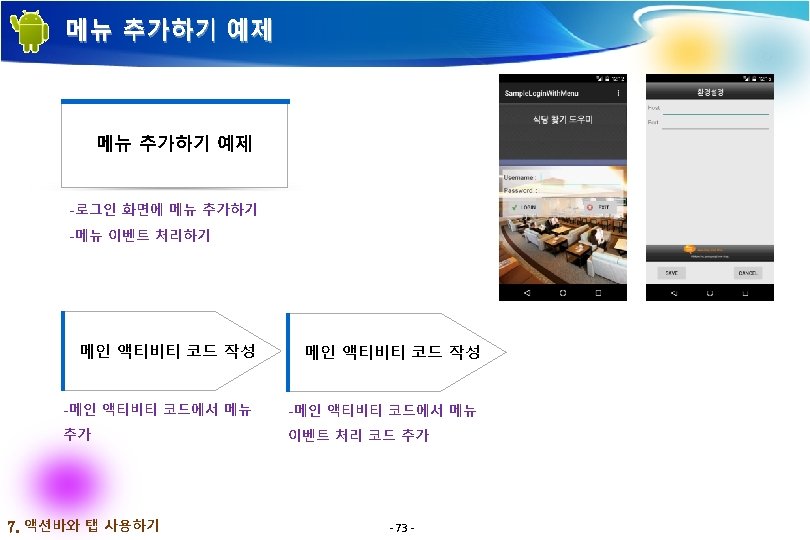
메인 액티비티 코드 만들기 public boolean on. Create. Options. Menu(Menu menu) { super. on. Create. Options. Menu(menu); 1 옵션 메뉴가 만들어질 때 자동 호출되는 메소드 add. Option. Menu. Items(menu); return true; } 2 옵션 메뉴에 메뉴 아이템 추가 private void add. Option. Menu. Items(Menu menu) { int base = Menu. FIRST; Menu. Item item 01 = menu. add(base, Menu. NONE, "Settings"); Menu. Item item 02 = menu. add(base, base+1, Menu. NONE, "About"); item 01. set. Icon(R. drawable. settings_icon); item 02. set. Icon(R. drawable. about_icon); } Continued. . 7. 액션바와 탭 사용하기 - 74 -
 public boolean on. Options. Item. Selected(Menu. Item item) {")
메인 액티비티 코드 만들기 (계속) public boolean on. Options. Item. Selected(Menu. Item item) { if (item. get. Item. Id() == 1) { 4 옵션 메뉴를 눌렀을 때의 이벤트 처리 Intent intent = new Intent(get. Base. Context(), Settings. Activity. class); start. Activity. For. Result(intent, REQUEST_CODE_SETTINGS); 5 설정 화면 띄우기 } else if (item. get. Item. Id() == 2) { Intent intent = new Intent(get. Base. Context(), About. Dialog. class); start. Activity. For. Result(intent, REQUEST_CODE_ABOUT); } return true; } } 7. 액션바와 탭 사용하기 - 75 - 6 정보 화면 띄우기
; 액션바 참조")
메인 액티비티 코드 만들기 . . . abar = get. Action. Bar(); 액션바 참조 1. . . Button button 01 = (Button) find. View. By. Id(R. id. button 01); button 01. set. On. Click. Listener(new On. Click. Listener() public void on. Click(View v) 2 디스플레이 옵션 설정 abar. set. Display. Options(Action. Bar. DISPLAY_SHOW_HOME| Action. Bar. DISPLAY_USE_LOGO| Action. Bar. DISPLAY_HOME_AS_UP); ); Continued. . 7. 액션바와 탭 사용하기 - 78 -

레이아웃 만들기 <Linear. Layout xmlns: android="http: //schemas. android. com/apk/res/android" xmlns: tools="http: //schemas. android. com/tools" android: layout_width="match_parent" android: layout_height="wrap_content" android: orientation="horizontal" > <Text. View android: id="@+id/text 01" android: layout_width="wrap_content" android: layout_height="wrap_content" android: text="검색 : " android: text. Size="16 dp" android: text. Color="#ffad 8745" /> <Edit. Text android: id="@+id/edit 01" android: layout_width="100 dp" android: layout_height="wrap_content" android: layout_margin. Left="4 dp" android: input. Type="text" android: ime. Action. Id="1337" android: ime. Options="action. Done" /> </Linear. Layout> 7. 액션바와 탭 사용하기 - 80 - Continued. .

메뉴 설정하기 <item android: id="@+id/menu_search" android: title="@string/menu_search" android: icon="@drawable/menu_search" android: order. In. Category="102" android: show. As. Action="always|with. Text" android: action. Layout="@layout/search_layout" /> 7. 액션바와 탭 사용하기 - 81 - Continued. .
 get.")
메인 액티비티 코드 만들기. . . public boolean on. Create. Options. Menu(Menu menu) get. Menu. Inflater(). inflate(R. menu. activity_main, menu); View v = menu. find. Item(R. id. menu_search). get. Action. View(); edit 01 = (Edit. Text) v. find. View. By. Id(R. id. edit 01); if (edit 01 != null) edit 01. set. On. Editor. Action. Listener(on. Search. Listener); return true; . . . Continued. . 7. 액션바와 탭 사용하기 - 82 -
 this.")
메인 액티비티에서 액션바 코드 만들기 . . . tabhost = (Material. Tab. Host) this. find. View. By. Id(R. id. tabhost); pager = (View. Pager) this. find. View. By. Id(R. id. pager); pager. Adapter = new View. Pager. Adapter(get. Support. Fragment. Manager()); pager. set. Adapter(pager. Adapter); pager. set. On. Page. Change. Listener(new View. Pager. Simple. On. Page. Change. Listener() { @Override public void on. Page. Selected(int position) { tabhost. set. Selected. Navigation. Item(position); } }); . . . 7. 액션바와 탭 사용하기 - 84 - Continued. .

프래그먼트 코드 작성 private class View. Pager. Adapter extends Fragment. State. Pager. Adapter { public View. Pager. Adapter(Fragment. Manager fm) { super(fm); } public Fragment get. Item(int index) { Fragment frag = null; if (index == 0) { frag = new Fragment 01(); } else if (index == 1) { frag = new Fragment 02(); } else if (index == 2) { frag = new Fragment 03(); } return frag; } 7. 액션바와 탭 사용하기 - 85 - Continued. .

프래그먼트 XML 작성 <Relative. Layout xmlns: android="http: //schemas. android. com/apk/res/android" android: layout_width="match_parent" android: layout_height="match_parent" > <Text. View android: id="@+id/text 01" android: layout_width="wrap_content" android: layout_height="wrap_content". . . android: text="제품 내용 01". . . /> </Relative. Layout> 7. 액션바와 탭 사용하기 - 86 -

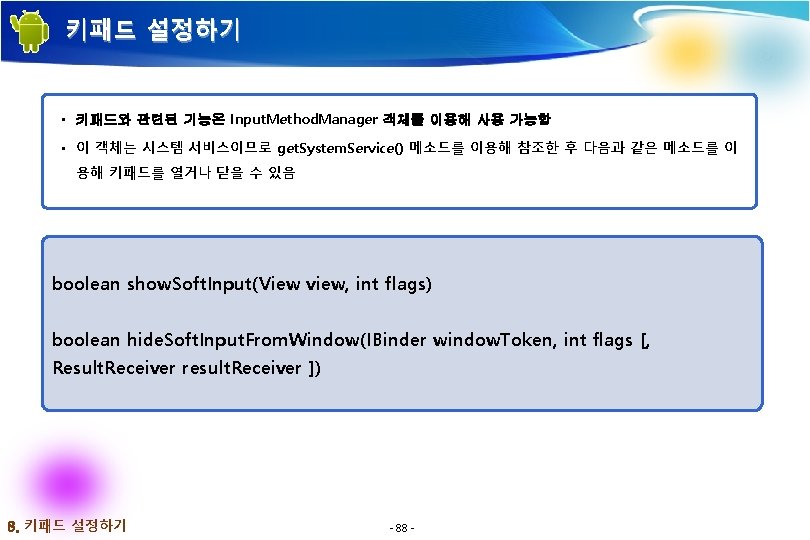

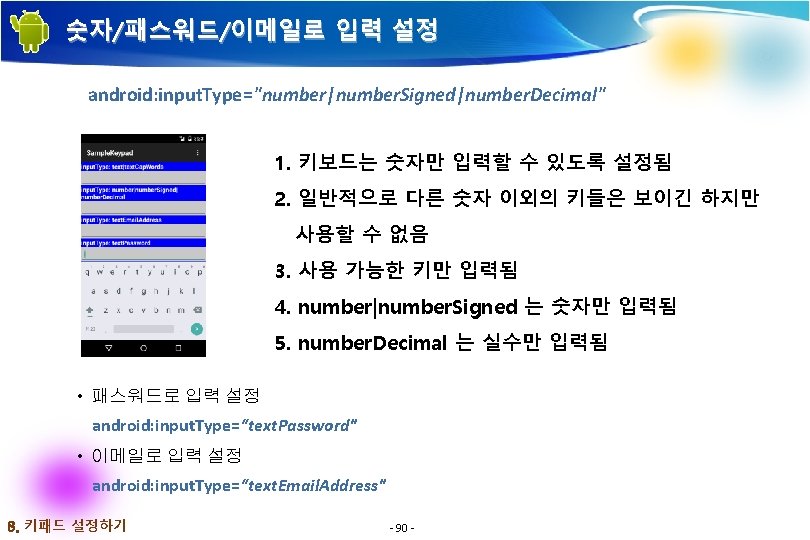
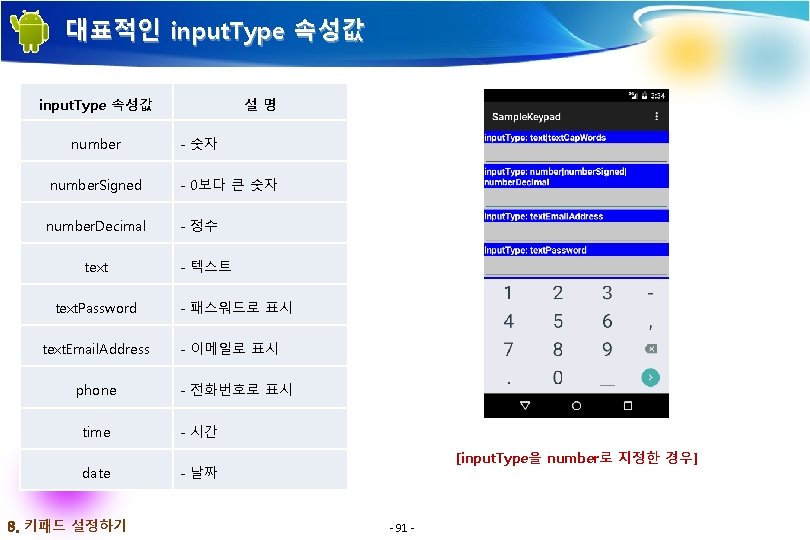
입력될 데이터의 타입 지정 • 텍스트뷰에 입력되는 데이터의 타입 지정 방법 - XML과 자바 코드에서 아래와 같은 속성과 메소드 사용 가능 android: input. Type=“. . . ” edit. Text. Box. set. Raw. Input. Type(int) • 아래는 첫글자가 대문자 입력으로 되도록 설정한 예 <Edit. Text android: id="@+id/edit. Text. Box" android: layout_width="match_parent" android: layout_height="wrap_content" android: padding="10 px" android: text. Size="18 sp" android: input. Type="text|text. Cap. Words" /> 8. 키패드 설정하기 - 89 -
![참고 문헌 [ References] • 기본 서적 2015, 정재곤, “Do it! 안드로이드 앱 프로그래밍(개정](http://slidetodoc.com/presentation_image_h/cf5f78da24a8b35cdca0b3eac226342c/image-92.jpg "참고 문헌 [ References] • 기본 서적 2015, 정재곤, “Do it! 안드로이드 앱 프로그래밍(개정")
참고 문헌 [ References] • 기본 서적 2015, 정재곤, “Do it! 안드로이드 앱 프로그래밍(개정 2판)”, 이지스퍼블리싱(주) • Android Website http: //www. android. com/ • Google Developer’s Conference http: //code. google. com/events/io/ • Android SDK Documentation References - 92 -
- Slides: 92