Bloodstain Pattern Analysis Crime Scene Reconstruction And you

Bloodstain Pattern Analysis Crime Scene Reconstruction

And you think your job is bad

Can be done by: l Direct scene evaluation l Best done before scene l The photos MUST be is disturbed properly done l Careful study of scene photos

Information possible l Origin of the stain pattern l Distances between impact & area of origin l Type & direction of impact l Object(s) that produced stain(s) l # of shots or blows l Position of victim, suspect & objects

Position of victim

Object that produced stain

Object that produced stain

Position of object

l l Movement & direction of victim, suspect & object after bloodshed Support or contradict statements l More info for post mortem interval l Correlate with pathology findings (arterial spurt)

Movement after bloodshed

Characteristics used l Number l Their of spots location, size and shape l Surface characteristics where stain is deposited

Stain size and shape l The tapered end of the drop will point in the direction of travel

Surface Tension l. A “skin” is formed around the blood drop l This causes the surface area of the drop to minimize l The drop is spherical – NOT tear drop shaped as they are often shown

Surface tension l The drop will oscillate early during the flight but that is quickly damped because of the drop’s viscosity

Average volume of a blood drop l There is no average volume of a blood drop l Some literature will suggest a volume of. 05 ml. l The drop volume is directly related to the surface texture from where the blood drops

l. A different sized drop will form from a machete than will form on the end of a screwdriver

Terminal velocity l The maximum speed the blood drop can reach l The acceleration rate is offset by air resistance

l The larger the droplet the less the effect and the smaller the droplet the greater the effect l There will be more smaller drops but they will not travel as much distance

Shape of spot l Surface texture is CRITICAL when evaluating the shape of the spot l A smooth, hard, nonporous surface will result in less spatter – generally l A porous or irregular surface usually results in more spatter

Surface texture l The surface texture may vary considerably even if the material is the same

Horizontal motion l Directionality can be determined from the stain shape & edge characteristics l A tapered or scalloped edge indicates the direction of travel


 or the")
Horizontal motion & impact angle l The greater the horizontal motion (faster) or the lower the impact angle – the more elongated the stain will appear

Horizontal motion & impact angle l As the impact angle gets closer to 90° - the “teardrop” pattern is less obvious and the leading edge is determined by small edge scallops

Impact angle & origin l Origin can be determined in two dimensions by drawing lines through the individual blood drops along their direction of travel l The actual spatter occurred at some point above this 2 -D convergence

Impact angle By calculating the impact angle of drops within the stain we can add the third dimension of height l This is extremely useful for repositioning a victimprone, kneeling, standing l

Impact angle We are determining the internal angle – the bloodshed occurred within that angle l It is impossible for the bloodshed to have occurred outside of that angle l

Impact angle l By measuring the width and the length of the stain in millimeters – we can calculate the impact angle

Measurement of the stain The stain is measured as an ellipse – a closed curve in the form of a symmetrical oval l Be careful measuring the stain l Especially as the stains get closer to 90° l

To measure a stain Find the widest point of the stain l Measure across at that point (mm) l From that point measure to the top of the stain (mm) l Double the measurement you’ve made to the top l

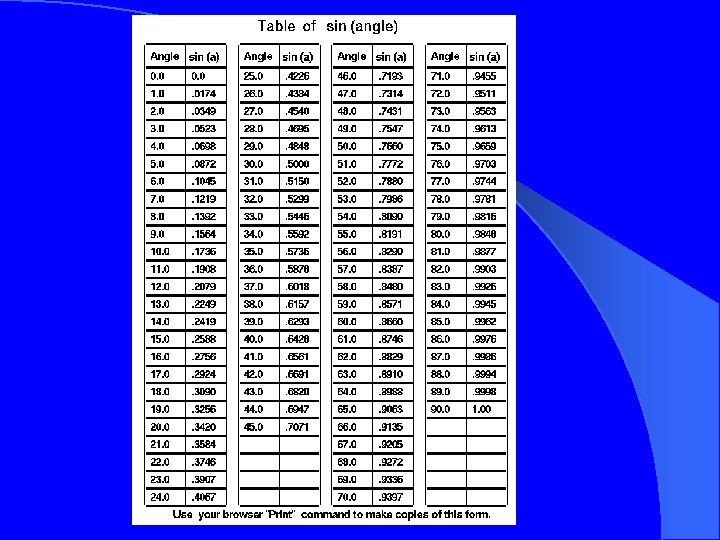
To calculate impact angle l Width in millimeters l Length in millimeters l Width ÷ Length =. something l Find the closest # to. something on the sine table

Impact angle & sine table l Example – Width = 15 mm – Length = 30 mm – 15÷ 30 =. 50 –. 50 = 30 degrees on the sine table – The stain has an impact angle of 30°

Dripped blood A primary pattern area and small droplets around that area l The droplets will not “rebound” high off the impact surface l

Dripped blood

Dripped blood – victim standing still


Arterial Spurt


Dripped blood


Cast off blood Smaller droplets l Spot size is nearly uniform l More of a linear pattern – but not always a straight line l Can calculate impact angle to reposition attacker l

Spatter evidence - generally Most of the blood will go in the direction of force l A lesser amount will come back toward the force l Always check those involved for back spatter l

Spatter evidence - generally l Look for where the blood is…and where the blood isn’t l Do you find blood where you would expect to find it? l Back spatter will be limited to about 3 feet l Spatter found on a suspect puts them in proximity when the blood was shed

Medium force spatter Small droplets – about 1/8 th inch or smaller l Impact speed of about 5 -25 feet per second l Consistent with an attack involving a fist, axe, knife, club etc. l Consider surface texture l

High force spatter Mist-like pattern l Like an aerosol spray l Do not travel more then 3 -4 feet l All gunshots, machinery accidents l

High force spatter l Back spatter – will depend upon: – Weapon – Ammo – Target distance – Clothing – Location of wound

High force spatter Always check the cuff, sleeve, watch, ring etc. l Check the inside of the pants pocket l

High force back spatter Will only travel about 3 feet – at best l A second shot (into a bloodied area) will increase back spatter l

High force – 6 inches in front

High force – 6 inches in back

High force – 12 inches in front

High force – 12 inches behind

A day many waited for
- Slides: 60