Blood Spatter Patterns Bits and pieces Use of

Blood Spatter Patterns Bits and pieces…

Use of force to describe the blood spatter • In the past, forensic investigators used ‘velocity’ to describe a pattern of blood dispersion. Low velocity (gravity/drop, 5 ft/s) medium velocity (punch, 25 ft/s) high velocity (gunshot, 100 ft/s) • While velocity described the speed and direction of the blood spatter dispersion • Force describes impact. • To find the force, F=ma, which is measured in Newtons • F=force • m=mass • a=acceleration • The goal is to describe the stain first, then determine the impact force

Other Blood Spatter Patterns • Blood flow patterns • High elevation to low elevation • Shows if a body has been moved

Arterial Bleeding • Typically found on walls or ceilings and are caused by the pumping action of the heart

Blood Trails • Show directionality • One end of the blood drop will be more scalloped than the other • Shows movement of the victim

Blood Pools • Pools of blood form around a victim who is bleeding heavily and remains in one place • If victim is moved, • May appear to be droplets or swipes/wipes connecting first location to second
 • Does not")
Cast off Patterns • Show where a person was standing (suspect/assailant) • Does not indicate what weapon is used

Any pattern that occurs when a bloody object or surface comes in contact with another object or surface.

Sometimes the transfer pattern can assist in identifying the bloody object.

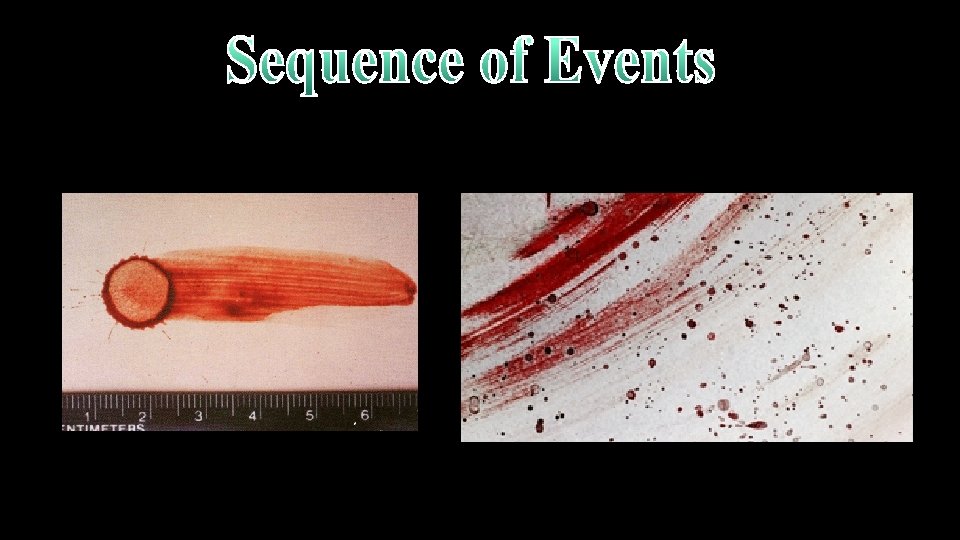
A “swipe” occurs when a bloody object moves across a clean surface and deposits blood on that surface.

A “wipe” occurs when an object moves through and disturbs wet blood that has already been deposited on a surface. • Dark ring around blood drop = skeletonization • Starts drying at perimeter • Wiping through blood at different times gives different skeletonization

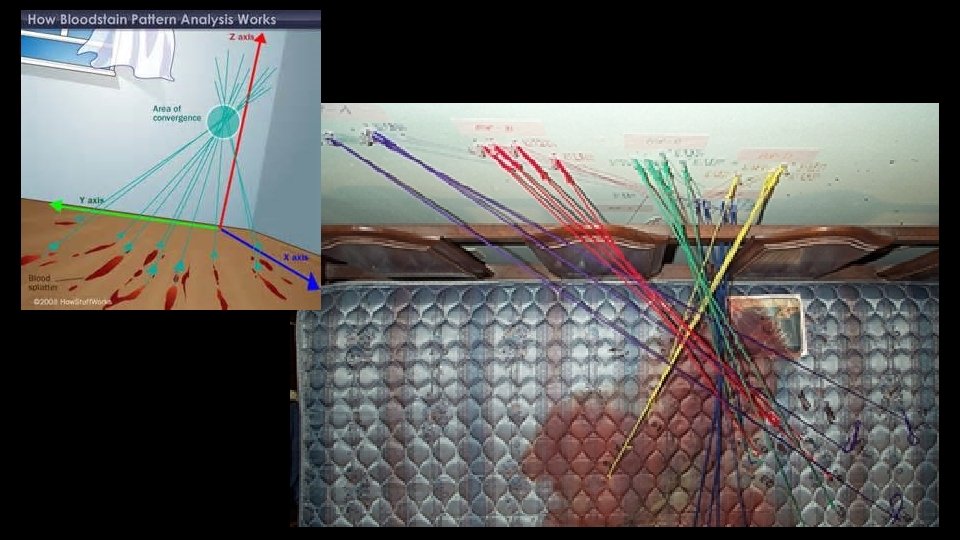
Blood Spatter Analysis Lines of convergence—two or blood spatters can pinpoint the location of the blood source (forms area of convergence) 13
 Passive drops b) Arterial")
Blood Spatter Analysis —Six Patterns Describe each of these: a) Passive drops b) Arterial gushes c) Splashes d) Smears e) Trails f) Pools 14

Scenario next class! • Discuss roles for next class • Lead investigator • Make sure all steps are covered in correct order • Keep squad on task • Assist any squad member with their task • Take lead on assigning roles to complete the investigative report • Photographer • 3 images for each scene • Detailed photos for 5 -6 blood spatters for analysis later (if needed) • Responsible for uploading photos into report • Crime scene Sketcher • Record scene measurements • Sketch (general) location of blood spatter • Record 5 -6 width/length measurements for analysis • Evidence technician • Presumptive blood test • Measure blood spatters (5 -6) for width and length-make sure photographer takes pictures of these • Evidence Technician 2 • Assist with angle of impact calculations • Set up strings to determine area of convergence

Steps on Scene 1. 2. 3. 4. 5. 6. 7. Photograph scene Presumptive blood test Sketch and measure scene Determine how many impacts are on scene Pick 5 -6 spatters/direction of impact to calculate angle of impact Use stringing method to find area of convergence Photograph after strings are set up and document height, distance of blood travel from convergence

Stringing Method 1. Find angle of impact: 1. width/length of blood spatter 1. Actual size doesn’t matter, you can measure on a photo as the ratio will be the same 2. Sin-1(width/length) 2. 3. 4. 5. Put a protractor along the long axis of the spatter Tape string to the bottom of the stain Move the string until it matches the angle of impact and tape down Repeat for 5 -6/direction of impact
- Slides: 18