BIOT 309 BLOOD SMEAR PRACTICAL Feb 2013 Microscopic

BIOT 309: BLOOD SMEAR PRACTICAL Feb. , 2013

Microscopic Views Fish Blood Bird Blood Horse Blood Frog Blood Cat Blood Dog Blood Human Blood Snake Blood

ASH Teaching Slides: Blood Cells Normal blood smear. The four larger cells shown are called granulocytes, a type of white blood cell. Maslak, P. ASH Image Bank 2008; 2008: 8 -00067. Copyright © 2008 American Society of Hematology.

Photomicrograph of a Blood Smear Figure 10. 2

Cells you will see • Red blood cells, erythrocytes, no nucleus, transport O 2 • Platelets, deliver fibrin • White blood cells, leukocytes: complete cells with a nucleus and organelles, defenders against disease,

Cell Differentiation and Lineages • Granulocytes – Granules in their cytoplasm can be stained – Include neutrophils, eosinophils, and basophils Figure 10. 4

Eosinophiles • Function: Phagocytosis of antigen-antibody complexes; allergens • Release enzymes to weaken or destroy parasites such as worms. • Appearance: Nuceus has 2 large lobes
 • Secretes heparin (")
Basophil • Appearance: • Function: Secretes Histamine, ( a vasodilator) • Secretes heparin ( an anticoagulant)

Neutrophils Appearance • Nucleus usually with 35 lobes in S-C shaped array Functions: Phagocytosis of bacteria Release of antimicrobial chemicals

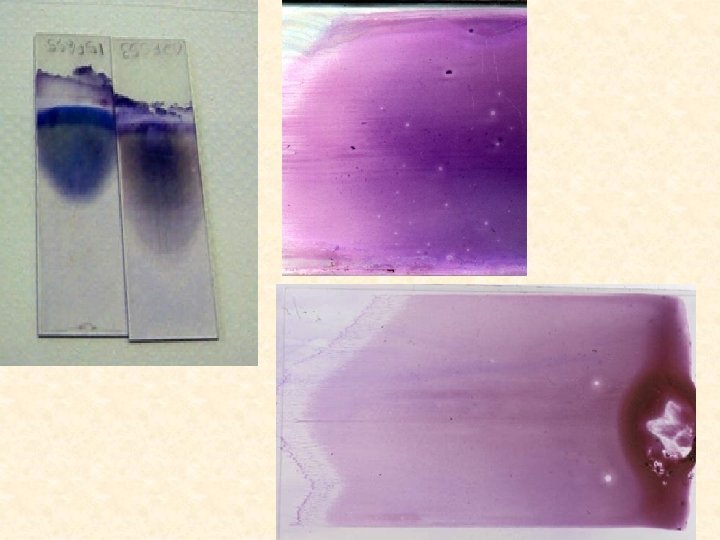
Peripheral Smear Preparation Precaution: You need the right size drop to get a good smear • Too large drop = too thick smear too many cells • Too small drop = too thin smear too few cells • Thick and thin also depend on (de)hydration, hematocrit (anemia)

Peripheral Smear Preparation 2. The pusher slide is held securely with the dominant hand in a 30 -45 deg angle. - quick, swift and smooth gliding motion to the other side of the slide creating a wedge smear

Peripheral Smear Preparation

Peripheral Smear Preparation Precautions: Ensure that the whole drop of blood is picked up and spread Too slow a slide push will accentuate poor leukocyte distribution, larger cells are pushed at the end of the slide Maintain an even gentle pressure on the slide – not doing so leads to ridges and valleys Keep the same angle all the way to the end of the smear.

Peripheral Smear Preparation • Allow the blood smear to thoroughly dry – thicker will take longer • Fix the blood smear with 70% methanol for 5 seconds; blot slide edge: let surface thoroughly dry • Stain cells with Giemsa or Wright stain for 5’ - both are available; write in notebook which one you use – they color cells differently • Dip slide in distilled water, 3 – 5 times • Blot edge; thoroughly dry You are now ready to observe without and with microscope!!!

Feature of a Well Made Wedge Smear • Smear is 2/3 or ¾ the entire slide • Smear is finger shaped, very slightly rounded at the feathery edge: widest area of examination • Lateral edges of the smear visible • Smear is smooth without irregularities, holes or streaks • When held up in light: feathery edge should show rainbow appearance • Entire whole drop of blood is picked up and spread

• See shape, internal morphology, comparative size, count cells, identify disease conditions

Peripheral Smear Examination • Visual – no microscope: record in lab notebook – • • Accurately draw both smears Measure length and width in mm – – • • Assess overall quality, i. e. , Does it have a feathery edge? Fingerprint shape? Quality of the staining –also assess at Microscopic: 10 x Objective record in lab notebook – • • • Observe types and distribution of the cells – use systematic approach, i. e. , serpentine where do you find red blood cells; are they easily distinguished, i. e. , separated Check lateral edges for WBC (white blood cells) distribution; do you see them distinctly Quick sketch of 2 different fields; label and describe cells

Choose the best areas for assessment • Systematic search • Back and forth serpentine or battlement track patterns are preferred – move the slide mount

Peripheral Smear Examination • • Microscopic: 40 x Objective this week and next 1. Determine correct area to view – cells spread apart but not too much Optimal Assessment Area: 1. RBCs are uniformly and singly distributed 2. Few RBC are touching or overlapping 3. Normal biconcave appearance

Peripheral Smear Examination • Too thin Too thick

Assessment at 40 X • Pick 5 fields that show different types of cells and sketch all cells; describe these cells in your own words • Determine which cells you are seeing

Before you leave at 9: 50 • Make sure your slides have your student ID# • Give to Younis; he will save for next week • Clean up your area

Final Assessment – Next Week • Microscopic: • 100 x objective, oil immersion
- Slides: 24