Basic Rules on TEXT 1 Text is added
Basic Rules on TEXT 1. Text is added in “TXT” font style. 2. All drawing notes are added IN CAPITAL LETTERS. 3. The minimum text height is 0. 125” or 3 millimeters in the final printout. 4. Text height in drawing notes and the text height of dimensions should be equal. 5. Notes and dimensions should be placed outside of the part geometry.
Dimensioning Terminology n n n A dimension is the numerical value that defines the size or geometric characteristic of a feature. A basic dimension is the numerical value defining theoretically exact size of a feature. A dimension line is the thin solid line which shows the extent and direction of a dimension. Dimension lines are broken for insertion of dimension numbers. An extension line is the thin solid line perpendicular to a dimension line indicating which feature is associated with the dimension. There is a visible gap between the feature and the end of an extension line. A leader line is the thin solid line used to indicate the feature with which a dimension, note, or symbol is associated.
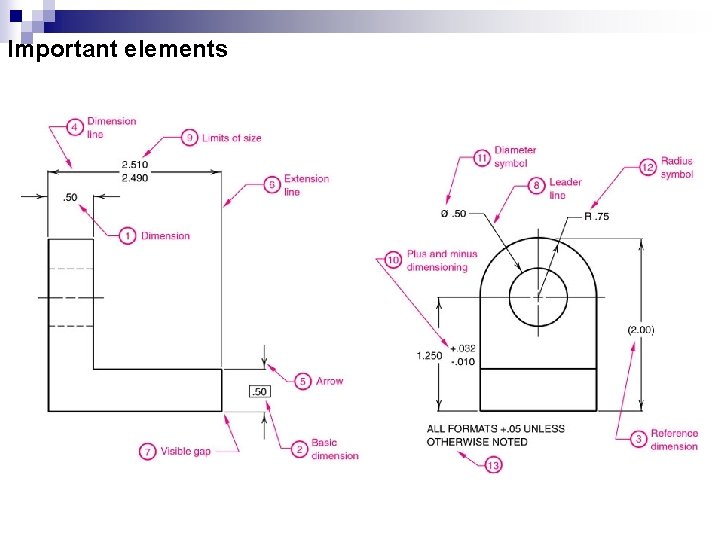
Important elements
Terminology: n n n Arrows are placed at the ends of dimension lines to show the limits of the dimension. Arrows are uniform in size and style no matter what the size of the drawing. A tolerance is the amount a particular dimension is allowed to vary. Limits of size is the largest acceptable size and the minimum acceptable size of a feature. Plus and minus dimensioning is the allowable positive and negative variance from the dimension specified The datum is theoretically exact point used as a reference for tabular dimensioning. Datum dimensioning, or baseline dimensioning. All dimensions are calculated as X and Y distances from an origin point, usually placed at the lower left corner of the part.
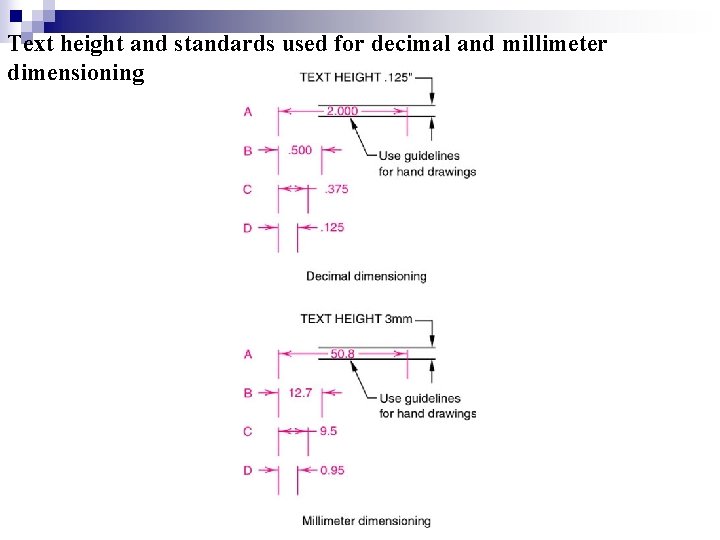
Text height and standards used for decimal and millimeter dimensioning
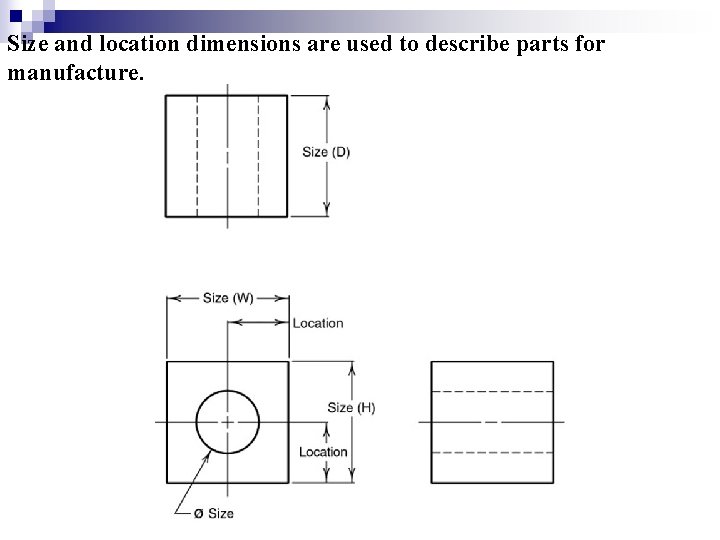
Size and location dimensions are used to describe parts for manufacture.
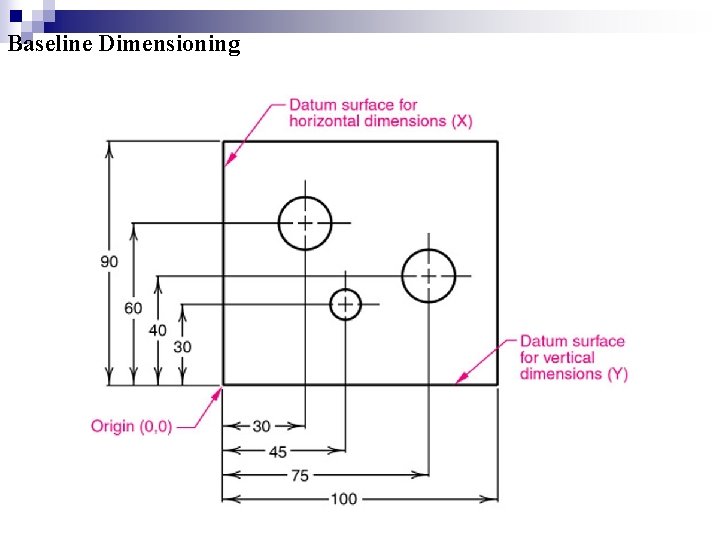
Baseline Dimensioning
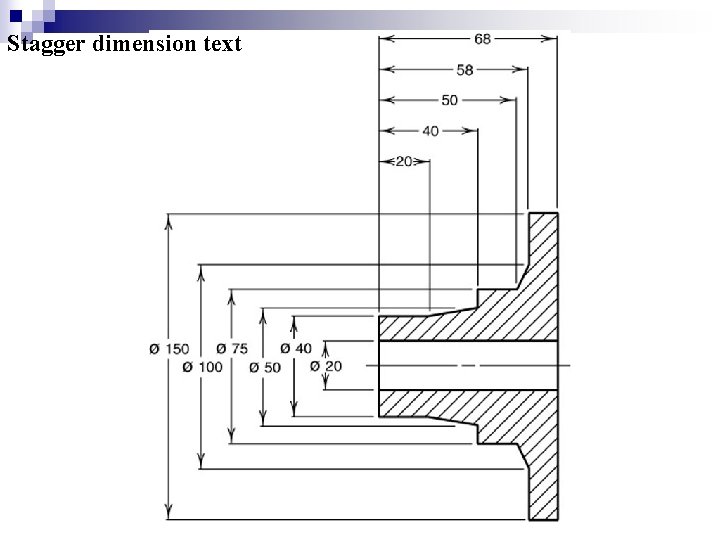
Stagger dimension text
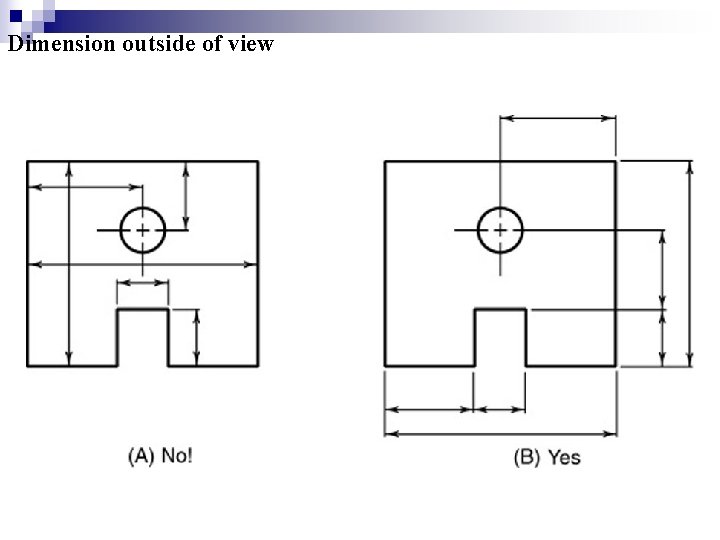
Dimension outside of view
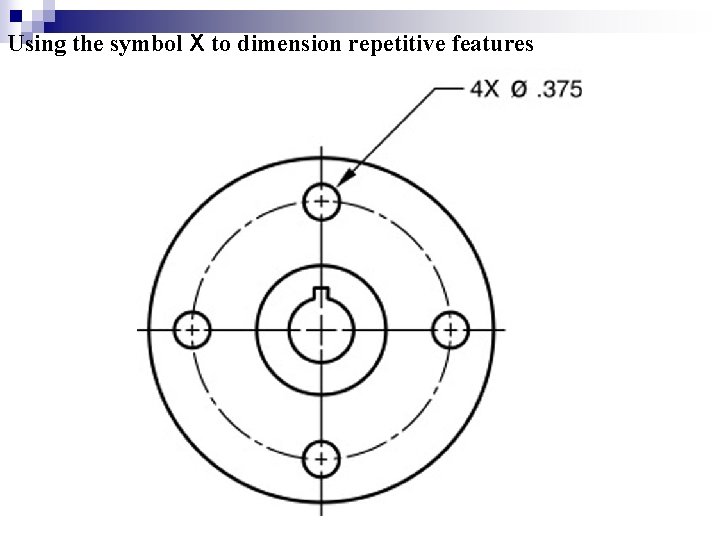
Using the symbol X to dimension repetitive features
Detail Dimensioning n n n The diameter is specified for holes and blind holes. Blind holes are ones that do not go through the part. If the hole does not go through, the depth is specified, preceded by the depth symbol. Holes with no depth call out are assumed to go through. A counterbore symbol is placed before the diameter callout, and the depth of the counterbore is added with a depth symbol. If a depth is stated, it is a counterbore. If not, then it is a spotface. The full note shows the diameter of the through hole followed by the diameter of the counterbore then the depth of the counterbore. A countersink symbol is placed with a diameter of the finished countersink, followed by the angle specification. The reason the depth is not given is that the resultant diameter is much easier to measure.
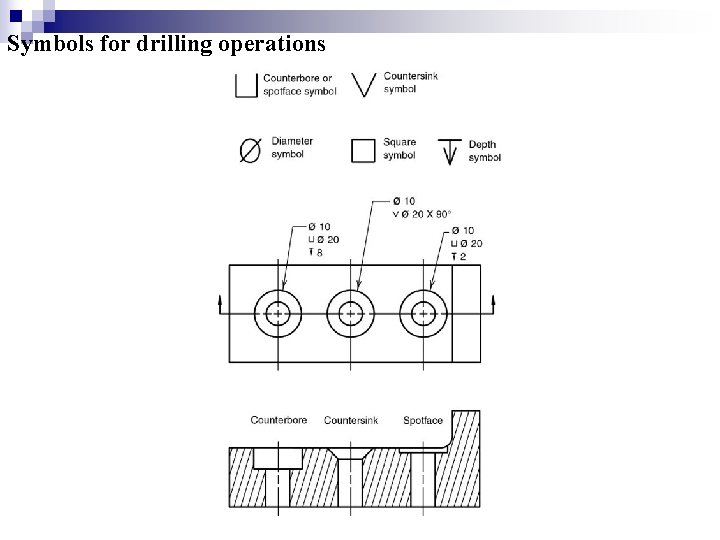
Symbols for drilling operations
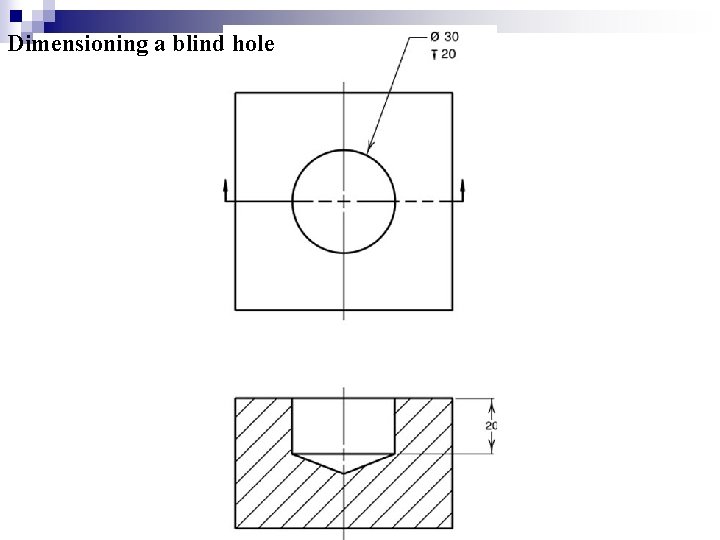
Dimensioning a blind hole
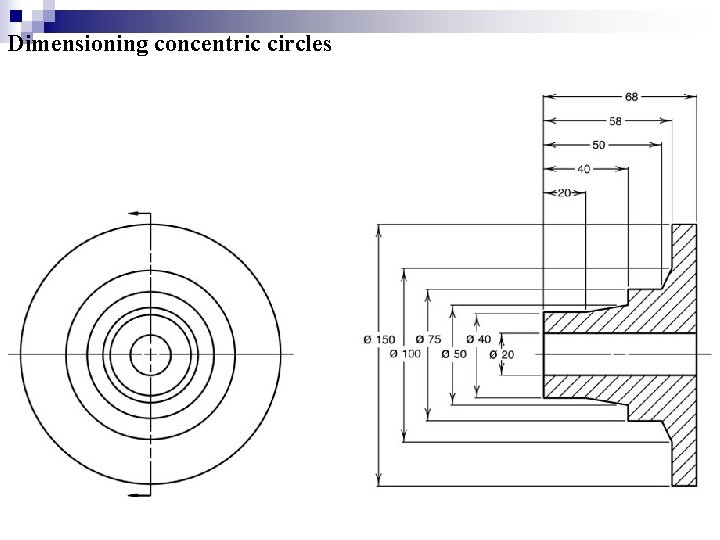
Dimensioning concentric circles
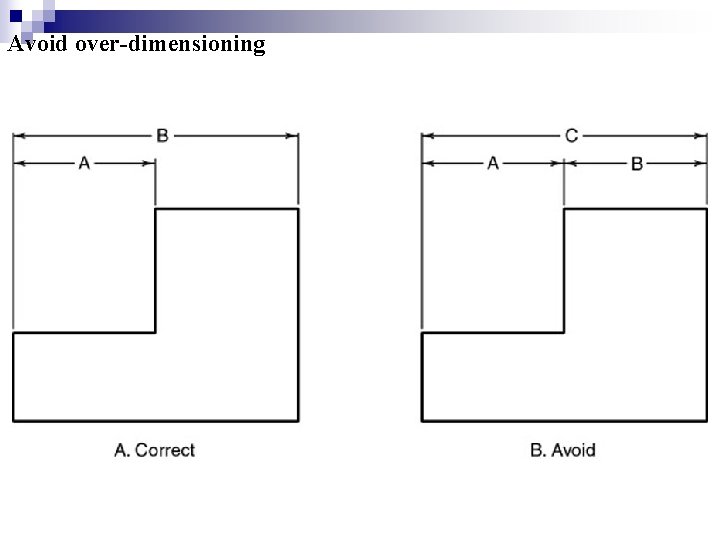
Avoid over-dimensioning
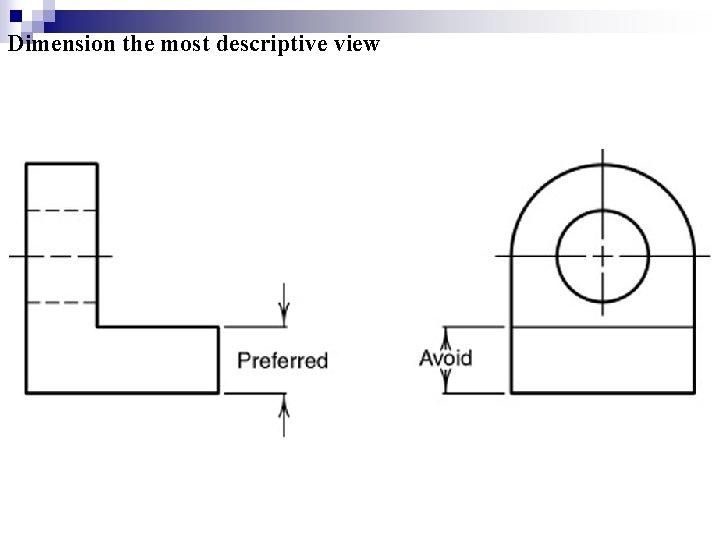
Dimension the most descriptive view
Fundamental Rules of Dimensioning: 1. Size dimensions are used to define length, width, height, diameter of circles and radius of arcs. 2. Position dimensions locate the center of circles and other key features. 3. The size and position of each feature is defined only once. 4. Dimension the feature in a view where its characteristic shape is shown. 5. English parts are dimensioned in inches with decimals, not fractions. 6. Metric parts are dimensioned in mm w/ decimals. 7. Units are omitted from the dimension numbers since they are normally understood to be in millimeters or inches. 8. Always leave at least 3/8 in. (10 mm) between the object and the first row of dimensions. Successive rows of dimensions should be equal and at least 0. 25 in. (6 mm) apart. 9. Place dimensions outside of the views except for large circles. Keep dimensions at least 3/8 inches or 10 mm from the view.
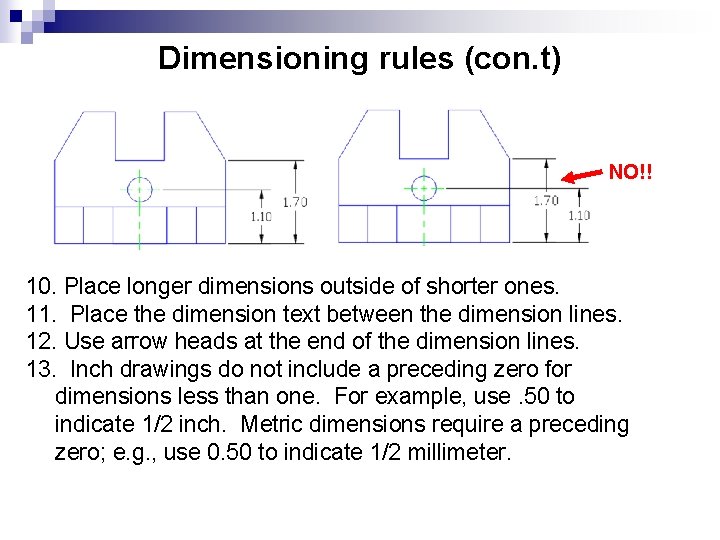
Dimensioning rules (con. t) NO!! 10. Place longer dimensions outside of shorter ones. 11. Place the dimension text between the dimension lines. 12. Use arrow heads at the end of the dimension lines. 13. Inch drawings do not include a preceding zero for dimensions less than one. For example, use. 50 to indicate 1/2 inch. Metric dimensions require a preceding zero; e. g. , use 0. 50 to indicate 1/2 millimeter.
Dimensioning Checklist 1. All overall dimensions for the object are shown. 2. Dimensions are not duplicated in two views. 3. No dimension is included that is not needed to produce the object. 4. There is no need to calculate, scale, or assume any dimension to define or check features of the object. 5. Dimensions are related to the view that best shows the features being dimensioned. 6. Dimensions that apply to two views are placed between those views whenever possible. 7. Multiple rows of dimensions are spaced uniformly, with at least 1/4” between rows and 3/8” from views.
Checklist (Cont. ) 8. Longer dimensions are placed outside shorter ones so that witness lines do not cross dimension lines. 9. All strings of dimensions are lined up. 10. Whenever possible, dimensions are not given to hidden lines. 11. Dimension lines do not cross other dimension lines or witness lines. 12. Center lines of all arcs and circles are located with respect to important features of the object. 13. The radius of all arcs and fillets, and the diameters of all circles have been specified.
Types of Tolerances n n Limit Tolerance ¨ dimension has its high and low limits stated ¨ Ex. 12. 0 -12. 5 Plus-minus tolerance ¨ the nominal or target value of the dimension is given first, followed b a plus-minus expression of a tolerance ¨ Ex. 12. 25 ±. 25
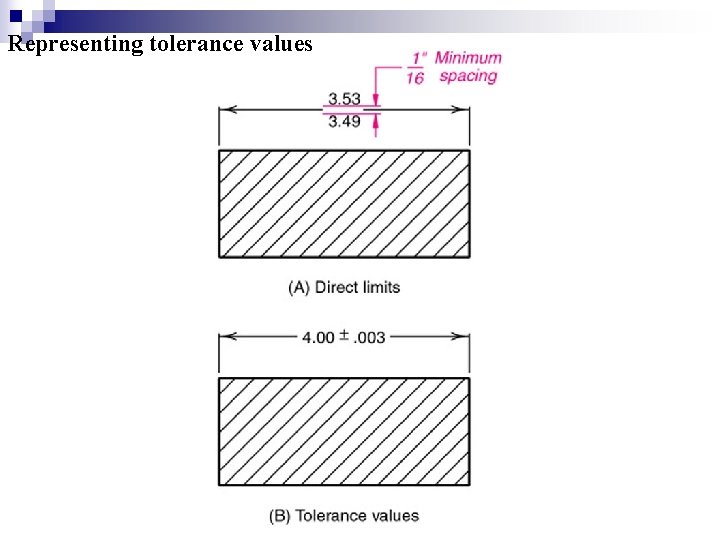
Representing tolerance values
Forms of Plus-Minus Tolerance n n Bilateral Tolerance - allows dimension to vary in both the plus or minus directions 1. Equal bilateral tolerance - allowable variation from the nominal value is the same for both directions. 2. Unequal bilateral tolerance - variation is not the same in both directions Unilateral tolerance - variation from the target value is all in one direction and zero in the other direction
- Slides: 23