Basic Css Learn Css What is CSS Cascading

Basic Css Learn Css

What is CSS? • Cascading: Multiple styles can overlap in order to specify a range of style from a whole web site down to a unique element. Which style gets applied pertains to the rules of CSS cascading logic. • Style: CSS deals specifically with the presentation domain of designing a web page (color, font, layout, etc). • Sheet: Normally, CSS is a file separate from the HTML file –linked to the HTML file through its <head> (exceptions apply).

Why CSS? • Allows for much richer document appear acnes than HTML. • Reduce work load by centralizing commands for visual appearance instead of scattered throughout the HTML doc. • Use same style on multiple pages. • Reduce page download size. Use HTML for content; CSS for Presentation

CSS can be added to HTML elements in 3 ways: Inline - by using the style attribute in HTML elements Internal - by using a <style> element in the <head> section External - by using an external CSS file Ways in adding css

Inline Ex. : - by using the style attribute in HTML elements <html> <body> <h 1 style="color: blue; margin-left: 30 px; ">This is a heading</h 1> <p>This is a paragraph. </p> </body> </html> Inline style

Internal - by using a <style> element in the <head> section <html> <head> <style> h 1, h 2, p { text-align: center; color: red; } </style> </head> <body> <h 1>Hello World!</h 1> <h 2>Smaller heading!</h 2> <p>This is a paragraph. </p> </body> </html> Internal style

External - by using an external CSS file Ex: <html> <head> <link rel="stylesheet" type="text/css" href="mystyle. css"> </head> <body> </html> External style

CSS Syntax A CSS comprises of style rules that are interpreted by the browser and then applied to the corresponding elements in your document. A style rule is made of three parts − Selector − A selector is an HTML tag at which a style will be applied. This could be any tag like <h 1> or <table> etc. Property - A property is a type of attribute of HTML tag. Put simply, all the HTML attributes are converted into CSS properties. They could be color, border etc. Value - Values are assigned to properties. For example, color property can have value either red or #F 1 F 1 F 1 etc. You can put CSS Style Rule Syntax as follows :

selector { property: value }

Here table is a selector and border is a property and given value 1 px solid #C 00 is the value of that property. You can define selectors in various simple ways based on your comfort.

CSS Backgrounds The CSS background properties are used to define the background effects for elements. CSS 1. 2. 3. 4. 5. background properties: background-color background-image background-repeat background-position background-attachment

CSS Backgrounds 1. background-color specifies the background color of an element. The background color of a page is set like this: body } { background-color: lightblue;

CSS Backgrounds 1. background-color In the example below, the <h 1>, <p>, and <div> elements have different background colors: h 1 { background-color: green; } div { background-color: lightblue; } p{ background-color: yellow; }

CSS Backgrounds 2. background-image property specifies an image to use as the background of an element. By default, the image is repeated so it covers the entire element. The background image for a page can be set like this: body } { background-image: url("paper. gif");

CSS Backgrounds 3. background-repeat By default the background-image property repeats an image both horizontally and vertically. Some images should be repeated only horizontally or vertically, or they will look strange body { background-image: url("gradient_bg. png"); background-repeat: repeat-x; } repeat-x; repeat-y; no-repeat;

CSS Backgrounds 4. background-position The background image is shown in the same place as the text. We want to change the position of the image, so that it does not disturb the text too much. body { background-image: url("img_tree. png"); background-repeat: no-repeat; background-position: right top; }

CSS Backgrounds 5. background-attachment Specify that the background image should be fixed (will not scroll with the rest of the page). body { background-image: url("img_tree. png"); background-repeat: no-repeat; background-position: right top; background-attachment: fixed; }
, If the image")
If the image is repeated only vertically (background-repeat: repeat-Y; ), If the image is repeated only horizontally(background-repeat: ; repeat-x), Ex: <html> <head> <style> body { background-image: url(" blue. jpg "); background-repeat: repeat-y; } </style> </head> <body> <h 1>Hello World!</h 1> <p>Here, a backgound image is repeated only horizontally!</p> </body> </html>
; background-repeat: } </style> </head> <body> no-repeat; <")
<html> <head> <style> body {baby. jpg"); background-repeat: } </style> </head> <body> no-repeat; < background image example. </p> <p>The background image is only showing once, but it is disturbing the reader!</p> </body> </html>
; background-repeat: no-repeat; background-position: right")
<html> <head> <style> body { background-image: url(" baby. jpg"); background-repeat: no-repeat; background-position: right top; } </style> </head> <body> <h 1>Hello World!</h 1> <p> background no-repeat, set position example. </p> <p>Now the background image is only shown once, and positioned away from the text. </p> <p>In this example we have also added a margin on the right side, so the background image will never disturb the text. </p> </body> </html>
; background-repeat: no-repeat; background-position: right top;")
<html> <head> <style> body { background-image: url("baby. jpg"); background-repeat: no-repeat; background-position: right top; background-attachment: fixed; } </style> </head> <body> <h 1>Hello World!</h 1> <p>The background-image is fixed. Try to scroll down the page. </p> </body> </html>

To shorten the code, it is also possible to specify all the background properties in one single property. This is called a shorthand : <html> <head> <style> body { background: white url(" baby. jpg") no-repeat right top; } </style> </head> <body> <h 1>Hello World!</h 1> <p>Now the background image is only shown once, and it is also positioned away from the text. </p> <p>In this example we have also added a margin on the right side, so that the background image will not disturb the text. </p> </body> </html>

The float Property The float property is used for positioning and layout on web pages. The v v v float property can have one of the following values: left - The element floats to the left of its container right- The element floats to the right of its container none - The element does not float (will be displayed just where it occurs in the text). This is default inherit - The element inherits the float value of its parent. In its simplest use, the float property can be used to wrap text around images.

Font Properties font-family: times, arial, serif, sans-serif, monospace; font-style: italic; font-weight: (bold, bolder, lighter, or 100 – 900; ) font-size: size; …or shorthand font: style weight size family;

Text Properties text-indent: indents first line of a paragraph according to size text-align: right; or left; or center; or justify; text-decoration: text-transform: Line-height: none; or underline; Capitalize; added vertical space to each line of text according to size
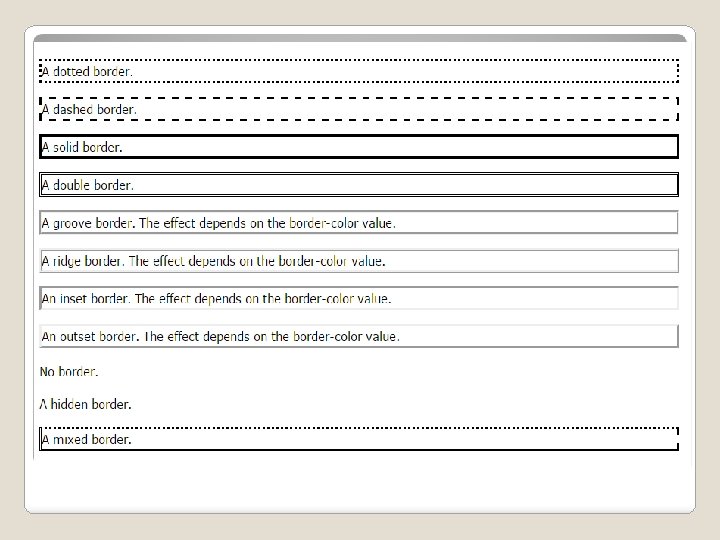
 border-style: (none, hidden, dotted, dashed, solid,")
Border Properties border-width: (thin, medium, thick, or size) border-style: (none, hidden, dotted, dashed, solid, double, groove, ridge, inset, or outset) border-color: …or color shorthand border(-top, -right, -left, -bottom): width style color Example short hand : Borer : 1 px solid red;

The padding property allows you to specify how much space should appear between the content of an element and its border − The value of this attribute should be either a length, a percentage, or the word inherit. If the value is inherit, it will have the same padding as its parent element. If a percentage is used, the percentage is of the containing box. The following CSS properties can be used to control lists. You can also set different values for the padding on each side of the box using the following properties − The The The padding-bottom specifies the bottom padding of an element. padding-top specifies the top padding of an element. padding-left specifies the left padding of an element. padding-right specifies the right padding of an element. padding serves as shorthand for the preceding properties. Padding

<html> <head> <style> div { border: 1 px solid black; background-color: lightblue; padding: 50 px 30 px 50 px 80 px; } </style> </head> <body> <h 2>Using the padding shorthand property</h 2> <div>This div element has a top padding of 50 px, a right padding of 30 px, a bottom padding of 50 px, and a left padding of 80 px. </div> </body> </html> Padding example

The margin property defines the space around an HTML element. It is possible to use negative values to overlap content. The values of the margin property are not inherited by the child elements. Remember that the adjacent vertical margins (top and bottom margins) will collapse into each other so that the distance between the blocks is not the sum of the margins, but only the greater of the two margins or the same size as one margin if both are equal. We have the following properties to set an element margin. The margin specifies a shorthand property for setting the margin properties in one declaration. The margin-bottom specifies the bottom margin of an element. The margin-top specifies the top margin of an element. The margin-left specifies the left margin of an element. The margin-right specifies the right margin of an element. The margin: auto to horizontally center the element within its container. Margin

<html> <head> <style> div { border: 1 px solid black; margin: 100 px 150 px 100 px 80 px; background-color: lightblue; } </style> </head> <body> <h 2>Using the margin shorthand property</h 2> <div>This div element has a top margin of 100 px, a right margin of 150 px, a bottom margin of 100 px, and a left margin of 80 px. </div> </body> </html> Margin example

Element Selector Grouping Element selectors can be grouped together if you want to apply one CSS rule to a range of elements. Example: h 1, h 2, h 3, h 4, h 5, h 6 { color: #FF 0000; } Each element is separated by a comma (except for the last element before the start of the declaration). However…

Inheritance Certain CSS properties are inherited by the descendents of the elements those styles are applied to. For example, if you give the <body> element a color style of gray, all descendents of <body> will inherit the color gray, until you specify otherwise.

Inheritance By setting a number of ‘basic’ styles in top-most elements, such as <body>, you can avoid having to style many descendent elements. This… body { color: gray; } Is much better than having to write this… p, div, h 1, h 2, h 3, ul, ol { color: gray; }

https: //www. w 3 schools. com/css/ css_background. asp
- Slides: 35