Axis measurement with AC mole Geometric and Magnetic

- Slides: 19

Axis measurement with AC mole: Geometric and Magnetic calibration J. García Pérez, P. Galbraith, M. Buzio, C. Charrondiere, M. Coccoli, E. Laface, S. Pauletta, A. Ruccio 27/09/2005 J. GARCIA PEREZ CERN – Geneva – CH Juan. Garcia. Perez@cern. ch 14 th International Magnetic Measurement Workshop 26 -29 September 2005, Geneva, Switzerland 1 / 19

Axis measurement with AC mole: Geometric and Magnetic calibration People involved • J. Billan, G. Peiro, D. Cote, O. Dunkel, L. Gaborit, R. Beltron, C. Rathjen, R. Camus, 27/09/2005 J. GARCIA PEREZ CERN – Geneva – CH Juan. Garcia. Perez@cern. ch 14 th International Magnetic Measurement Workshop 26 -29 September 2005, Geneva, Switzerland 2 / 19

Axis measurement with AC mole: Geometric and Magnetic calibration Outline • • Introduction Recall of working principle Measurement Capabilities Geometric and Magnetic calibration Series measurements performance Future developments Conclusions 27/09/2005 J. GARCIA PEREZ CERN – Geneva – CH Juan. Garcia. Perez@cern. ch 14 th International Magnetic Measurement Workshop 26 -29 September 2005, Geneva, Switzerland 3 / 19

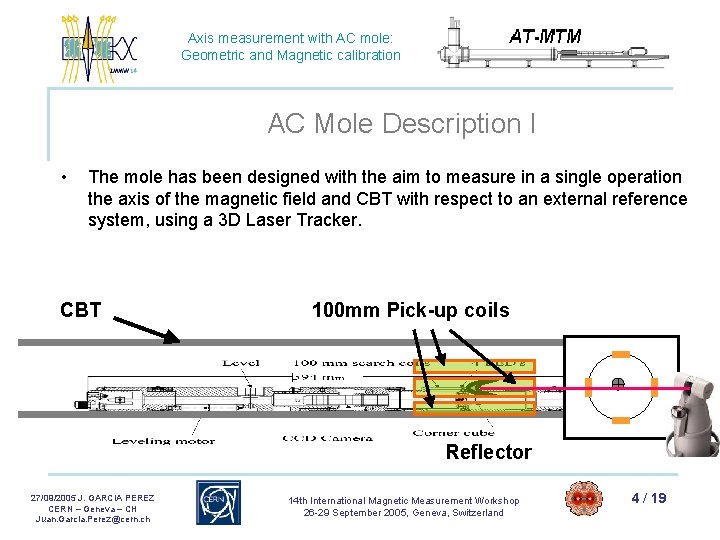
Axis measurement with AC mole: Geometric and Magnetic calibration AC Mole Description I • The mole has been designed with the aim to measure in a single operation the axis of the magnetic field and CBT with respect to an external reference system, using a 3 D Laser Tracker. CBT 100 mm Pick-up coils Reflector 27/09/2005 J. GARCIA PEREZ CERN – Geneva – CH Juan. Garcia. Perez@cern. ch 14 th International Magnetic Measurement Workshop 26 -29 September 2005, Geneva, Switzerland 4 / 19

Axis measurement with AC mole: Geometric and Magnetic calibration AC Mole Description II • The mole has been designed with the aim to measure in a single operation the axis of the magnetic field and CBT with respect to an external reference system, using a 3 D Laser Tracker. Acquisition Image CBT 4 Reflections Camera 27/09/2005 J. GARCIA PEREZ CERN – Geneva – CH Juan. Garcia. Perez@cern. ch 4 LED’s Reflector 14 th International Magnetic Measurement Workshop 26 -29 September 2005, Geneva, Switzerland 5 / 19

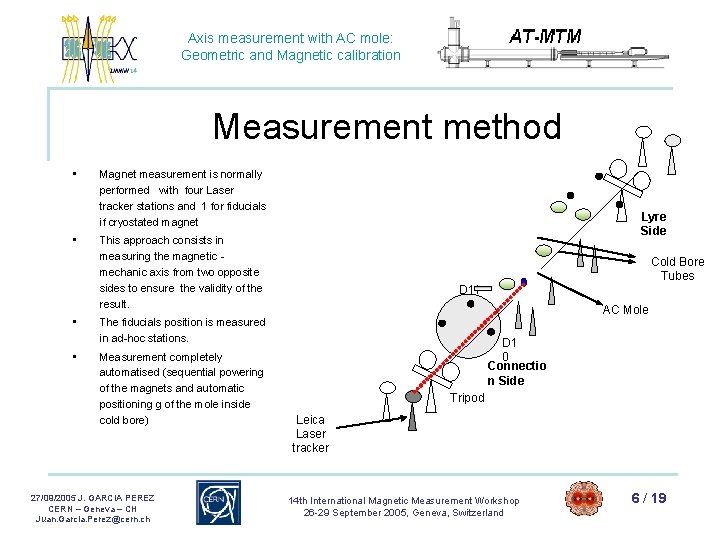
Axis measurement with AC mole: Geometric and Magnetic calibration Measurement method • • Magnet measurement is normally performed with four Laser tracker stations and 1 for fiducials if cryostated magnet Lyre Side This approach consists in measuring the magnetic mechanic axis from two opposite sides to ensure the validity of the result. Cold Bore Tubes D 11 AC Mole The fiducials position is measured in ad-hoc stations. Measurement completely automatised (sequential powering of the magnets and automatic positioning g of the mole inside cold bore) 27/09/2005 J. GARCIA PEREZ CERN – Geneva – CH Juan. Garcia. Perez@cern. ch D 1 0 Connectio n Side Tripod Leica Laser tracker 14 th International Magnetic Measurement Workshop 26 -29 September 2005, Geneva, Switzerland 6 / 19

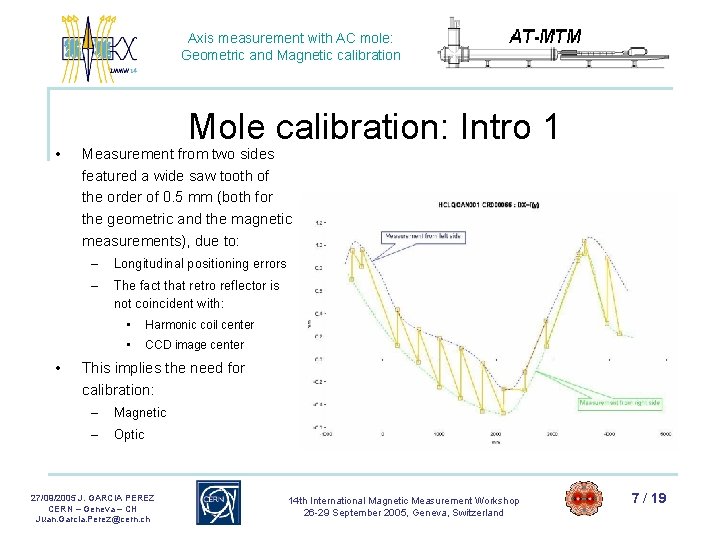
Axis measurement with AC mole: Geometric and Magnetic calibration • • Mole calibration: Intro 1 Measurement from two sides featured a wide saw tooth of the order of 0. 5 mm (both for the geometric and the magnetic measurements), due to: – Longitudinal positioning errors – The fact that retro reflector is not coincident with: • Harmonic coil center • CCD image center This implies the need for calibration: – Magnetic – Optic 27/09/2005 J. GARCIA PEREZ CERN – Geneva – CH Juan. Garcia. Perez@cern. ch 14 th International Magnetic Measurement Workshop 26 -29 September 2005, Geneva, Switzerland 7 / 19

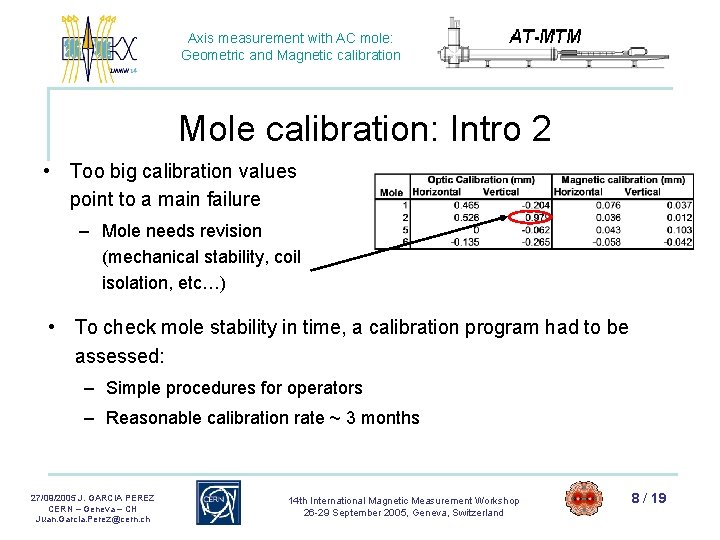
Axis measurement with AC mole: Geometric and Magnetic calibration Mole calibration: Intro 2 • Too big calibration values point to a main failure – Mole needs revision (mechanical stability, coil isolation, etc…) • To check mole stability in time, a calibration program had to be assessed: – Simple procedures for operators – Reasonable calibration rate ~ 3 months 27/09/2005 J. GARCIA PEREZ CERN – Geneva – CH Juan. Garcia. Perez@cern. ch 14 th International Magnetic Measurement Workshop 26 -29 September 2005, Geneva, Switzerland 8 / 19

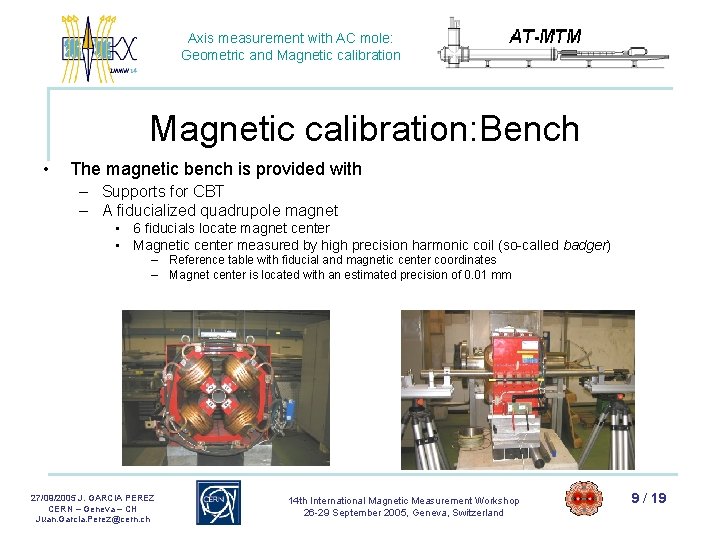
Axis measurement with AC mole: Geometric and Magnetic calibration: Bench • The magnetic bench is provided with – Supports for CBT – A fiducialized quadrupole magnet • 6 fiducials locate magnet center • Magnetic center measured by high precision harmonic coil (so-called badger) – Reference table with fiducial and magnetic center coordinates – Magnet center is located with an estimated precision of 0. 01 mm 27/09/2005 J. GARCIA PEREZ CERN – Geneva – CH Juan. Garcia. Perez@cern. ch 14 th International Magnetic Measurement Workshop 26 -29 September 2005, Geneva, Switzerland 9 / 19

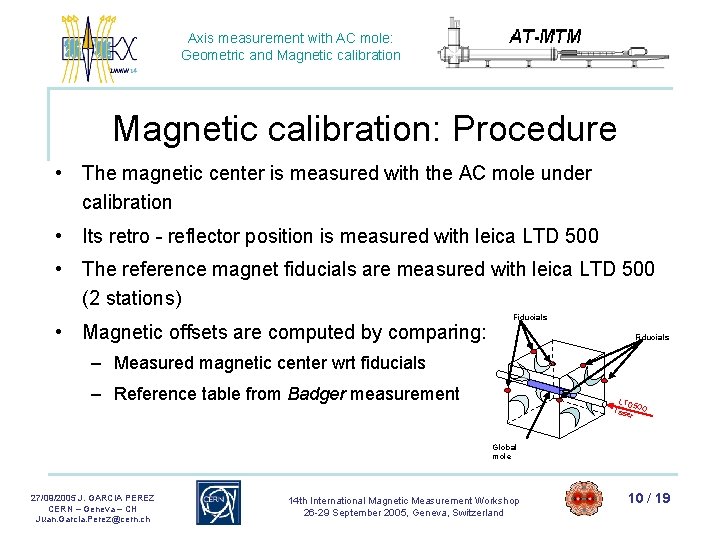
Axis measurement with AC mole: Geometric and Magnetic calibration: Procedure • The magnetic center is measured with the AC mole under calibration • Its retro - reflector position is measured with leica LTD 500 • The reference magnet fiducials are measured with leica LTD 500 (2 stations) • Magnetic offsets are computed by comparing: Fiducials – Measured magnetic center wrt fiducials – Reference table from Badger measurement LTD 50 lase 0 r Global mole 27/09/2005 J. GARCIA PEREZ CERN – Geneva – CH Juan. Garcia. Perez@cern. ch 14 th International Magnetic Measurement Workshop 26 -29 September 2005, Geneva, Switzerland 10 / 19

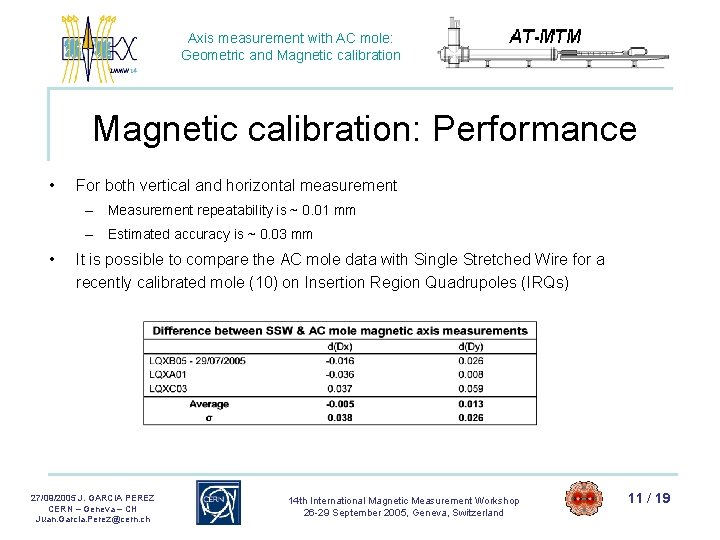
Axis measurement with AC mole: Geometric and Magnetic calibration: Performance • For both vertical and horizontal measurement – Measurement repeatability is ~ 0. 01 mm – Estimated accuracy is ~ 0. 03 mm • It is possible to compare the AC mole data with Single Stretched Wire for a recently calibrated mole (10) on Insertion Region Quadrupoles (IRQs) 27/09/2005 J. GARCIA PEREZ CERN – Geneva – CH Juan. Garcia. Perez@cern. ch 14 th International Magnetic Measurement Workshop 26 -29 September 2005, Geneva, Switzerland 11 / 19

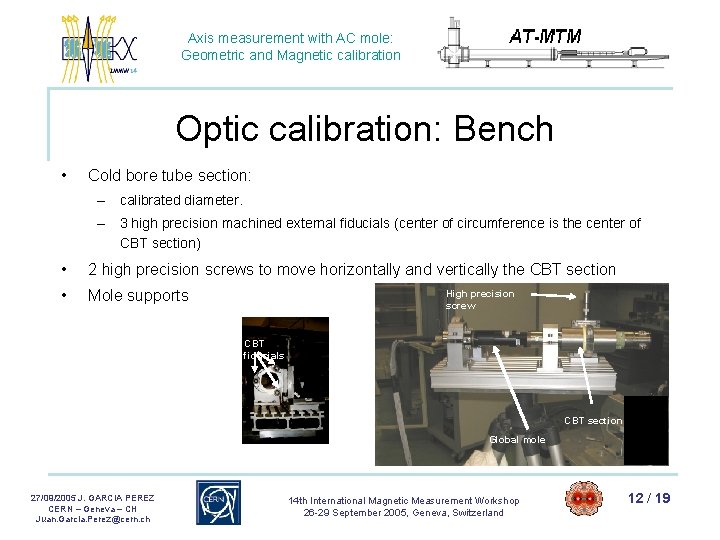
Axis measurement with AC mole: Geometric and Magnetic calibration Optic calibration: Bench • Cold bore tube section: – calibrated diameter. – 3 high precision machined external fiducials (center of circumference is the center of CBT section) • 2 high precision screws to move horizontally and vertically the CBT section • Mole supports High precision screw CBT fiducials CBT section Global mole 27/09/2005 J. GARCIA PEREZ CERN – Geneva – CH Juan. Garcia. Perez@cern. ch 14 th International Magnetic Measurement Workshop 26 -29 September 2005, Geneva, Switzerland 12 / 19

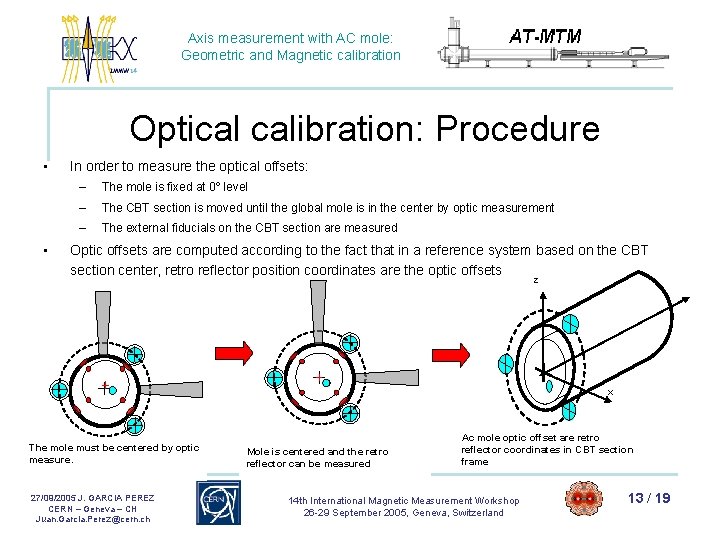
Axis measurement with AC mole: Geometric and Magnetic calibration Optical calibration: Procedure • • In order to measure the optical offsets: – The mole is fixed at 0º level – The CBT section is moved until the global mole is in the center by optic measurement – The external fiducials on the CBT section are measured Optic offsets are computed according to the fact that in a reference system based on the CBT section center, retro reflector position coordinates are the optic offsets z x The mole must be centered by optic measure. 27/09/2005 J. GARCIA PEREZ CERN – Geneva – CH Juan. Garcia. Perez@cern. ch Mole is centered and the retro reflector can be measured Ac mole optic offset are retro reflector coordinates in CBT section frame 14 th International Magnetic Measurement Workshop 26 -29 September 2005, Geneva, Switzerland 13 / 19

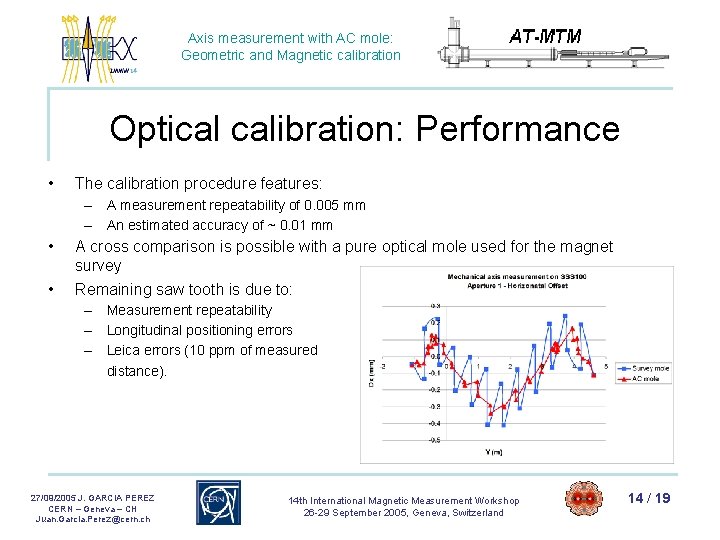
Axis measurement with AC mole: Geometric and Magnetic calibration Optical calibration: Performance • The calibration procedure features: – A measurement repeatability of 0. 005 mm – An estimated accuracy of ~ 0. 01 mm • • A cross comparison is possible with a pure optical mole used for the magnet survey Remaining saw tooth is due to: – Measurement repeatability – Longitudinal positioning errors – Leica errors (10 ppm of measured distance). 27/09/2005 J. GARCIA PEREZ CERN – Geneva – CH Juan. Garcia. Perez@cern. ch 14 th International Magnetic Measurement Workshop 26 -29 September 2005, Geneva, Switzerland 14 / 19

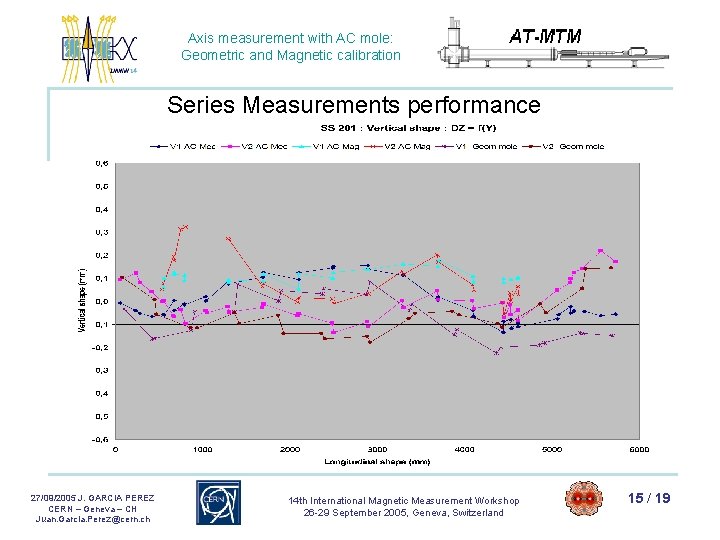
Axis measurement with AC mole: Geometric and Magnetic calibration Series Measurements performance 27/09/2005 J. GARCIA PEREZ CERN – Geneva – CH Juan. Garcia. Perez@cern. ch 14 th International Magnetic Measurement Workshop 26 -29 September 2005, Geneva, Switzerland 15 / 19

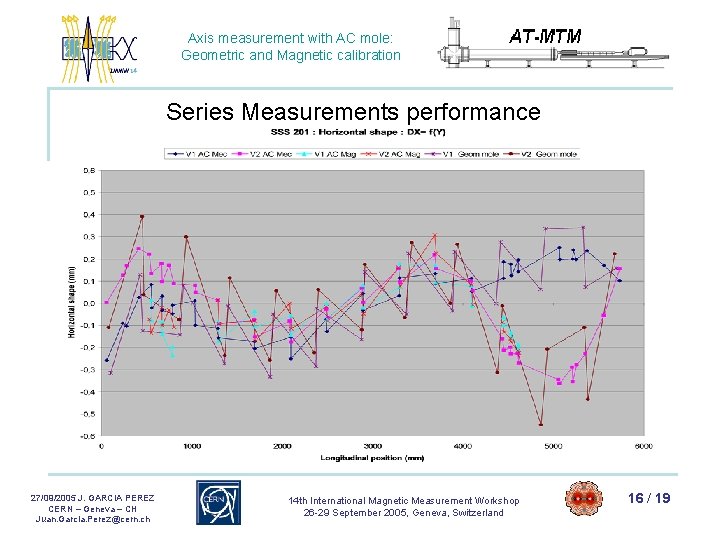
Axis measurement with AC mole: Geometric and Magnetic calibration Series Measurements performance 27/09/2005 J. GARCIA PEREZ CERN – Geneva – CH Juan. Garcia. Perez@cern. ch 14 th International Magnetic Measurement Workshop 26 -29 September 2005, Geneva, Switzerland 16 / 19

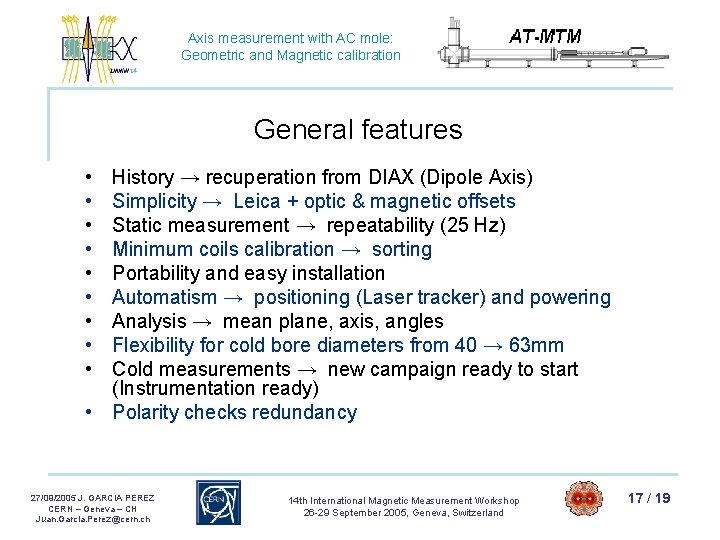
Axis measurement with AC mole: Geometric and Magnetic calibration General features • • • History → recuperation from DIAX (Dipole Axis) Simplicity → Leica + optic & magnetic offsets Static measurement → repeatability (25 Hz) Minimum coils calibration → sorting Portability and easy installation Automatism → positioning (Laser tracker) and powering Analysis → mean plane, axis, angles Flexibility for cold bore diameters from 40 → 63 mm Cold measurements → new campaign ready to start (Instrumentation ready) • Polarity checks redundancy 27/09/2005 J. GARCIA PEREZ CERN – Geneva – CH Juan. Garcia. Perez@cern. ch 14 th International Magnetic Measurement Workshop 26 -29 September 2005, Geneva, Switzerland 17 / 19

Axis measurement with AC mole: Geometric and Magnetic calibration • Future developments • Auto calibration from two sides measurement for geometric and magnetic measurement (horizontal projection) in the online software analysis • Search coils calibration (surface, radius and angular orientation) for improving field quality result • Validation of the field angle measurement (0. 1 mrad) • DC level under AC excitation current to study alignment issues due to magnetic field intensity • Piezo electric motor to work on relatively high magnetic field • Combination of tangential and radial coils for high-order harmonics measurement (2 radial + 1 tangential) • Study the feasibility of having field quality and axis on a single instrument 27/09/2005 J. GARCIA PEREZ CERN – Geneva – CH Juan. Garcia. Perez@cern. ch 14 th International Magnetic Measurement Workshop 26 -29 September 2005, Geneva, Switzerland 18 / 19

Axis measurement with AC mole: Geometric and Magnetic calibration Conclusions • AC mole system has proven its utility in series measurements • Most of all superconducting quadrupoles for the LHC are being fiducialised with this instrument • Measurement has been fully automatised • Harmonic measurement method has been made possible and results provide many useful information for the final magnet acceptance : geometric fiducialisation, local magnetic axis and field angle • Improvements of the system seem still possible in order to have a single axis + field quality instrument which could save a lot of money and effort in the series magnetic measurements 27/09/2005 J. GARCIA PEREZ CERN – Geneva – CH Juan. Garcia. Perez@cern. ch 14 th International Magnetic Measurement Workshop 26 -29 September 2005, Geneva, Switzerland 19 / 19