Automotive Grade 10 Joining Methods Rivets Split pins


 with various setting tools. They can")


 arrangement and double butt")


 = 1, 5 x D = 1, 5 x 18 = 27")


 Cotter pins are used as locking devices for other fasteners.")


 Mechanical Technology: Automotive Grade 10 Textbook")
- Slides: 37
Automotive Grade 10 Joining Methods: Rivets, Split pins & Keys
RIVETS Rivets are divided into two main groups: § blind rivets § solid rivets BLIND RIVETS Blind rivets, also known as pop rivets, are called this because it is not necessary to reach below the drilled hole to insert and set the rivet. There a multitude of different types of blind rivets, used everywhere from motor vehicle construction to the aerospace industry. Blind rivets are particularly useful for joining light, thin metal plate and dissimilar materials.
Standard open type The standard open type rivet is a hollow rivet, pre-assembled onto a headed pin or mandrel. The mandrel is designed to fracture at a predetermined point during setting operation, when the materials to be fastened have been drawn closely together and the joint is tight. This type is most commonly used for general riveting purposes.
Sealed type The sealed rivet is a sealed blind rivet, completely enclosing the mandrel head. This feature, combined with a high rate of radial expansion in setting, ensures that the set rivet is water tight and pressure tight. It is a fastener of high shear load and vibration resistance. Owing to its high rate of expansion in setting, it is not recommended for use in very soft or brittle materials.
Grooved type Like standard open and sealed types, rivets With grooved shanks are set in one operation. They are scientifically developed for use in Soft or brittle materials such as: § hardboard § plywood § glass fibre § fibreboard, etc. Cost-saving grooved rivets have fastening applications in construction, furniture, coach building and other industries.
Peel type Specifically developed for the fastening of soft or friable materials, peeltype rivets will secure blow-moulded or glass-reinforced plastics, rubbers and plywood as well as metallic panels and sections. On setting, the rivet body is split into four segments by the action of the mandrel head, to generate a large blind-side bearing area capable of withstanding high pull-out loads.
Head styles Dome-head rivet: Dome-head rivets are available in different standard-head styles to fit a particular application. The most commonly used style is the low profile dome-head. With twice the diameter of the rivet body, the dome-head has enough bearing surface to retain all but extremely soft or brittle materials.
Large flange rivet: Large flange rivets have twice the under-head bearing surface of compatible dome-head rivets, which makes them ideal for applications where soft or brittle materials such as fibreglass, wood, fabric or plastic are joined to a rigid backing such as steel.
Countersunk rivets: Countersunk rivets are used where smooth flush surface is required. They are commonly used in sheet metal work, metal windows and door frames and in the automotive industry.
Materials and finish Aluminium is largely used for blind rivets (and for general engineering purposes) because of its rust resistant properties. It is mechanically weaker than other materials. Zinc-plated steel Steel rivets have tensile and shear strength superior to aluminium rivets and are used in stricter specifications for greater quality control. They do, however, have the disadvantage of being less resistant to corrosion than aluminium or stainless steel and more difficult to set.
Setting tools Pop rivets are set (or fastened) with various setting tools. They can be set with hand-operated tools or pneumatic (air pressure powered) tools. Hand-setting tools Hand setting tools are available in three basic configurations for general fabrication. They all use a system of levers to achieve maximum mechanical advantage when riveting.
Rivets are normally manufactured in natural colour but are available in other colours to suit the application. Practically all blind rivets have zinc plated mild steel mandrels designed to break at a certain point during rivet setting. Once the mandrel has broken loose, it has no further use. The sealed off blind rivet is used for water tight joints, because its end remains sealed and does not open like the other types/ The sealed rivt also expands more, resulting in a better seal and stronger joint. A stainless steel finish also keeps the rivet from rusting in water.
Pneumatic setting tools Pneumatic riveting setting tools are mainly Used in mass production and on assembly Lines. They are ergonomically designed to Reduce worker fatigue and maximise production. Some machine systems can be designed to load their own rivets and expel spent mandrills (the shafts of the rivets), which are automatically counted for quality control purposes. In the aerospace industry there is very little margin for error and all spent mandrills must be accounted for.
SOLID RIVETS Large rivets are used in buildings and bridges. Previously most ship’s hulls and boilers were riveted together. Today, however, arc (electric) welding and high-tensile Bolts have almost completely replaced rivets because of cost, strength and noise factor. The following diagram illustrates how a riveted joint is set up. A hole is drilled or punched in the plates to be joined. 1 mm larger than the rivet shank. The protruding rivet is then cut in such a way that its
Shank protrudes 1, 5 times more than its own diameter. The rivet is then heated red hot and expands (hence the 1 mm oversize hole). The formed head is then placed in a dolly (hollow dome-shaped receptacle) while a set is put over the free end. Pressure is then applied by means of hammering or hydraulic pressure with the other setting tool to form a head on the free end as well. As the rivet cools down it contracts and pulls the plates together.
RIVET HEADS These are a few of the most common head configurations of solid rivets in engineering. There are however many more.
Constructing riveted joints There are two main types of joint: § Lap joints entail two overlapping pieces of plate riveted or bolted together. § Butt joints are used where pieces of plate are joined edge to edge, being secured by another plate on top or beneath, riveted or bolted through both of them. (Note: that in this section ‘bolted joints’ and ‘riveted joints’ are interchangeable).
LAP JOINTS There are three basic different types of lap joints. They vary in the number of rows and in the arrangement of the bolts or rivets in the rows. Single-row lap joints A single-row lap joint is the simplest form of Bolted or riveted joint. As the name states, It has only one row of bolts or rivets. The pitch (P) is the distance between hole centres and is stated in multiples of the bolt diameter.
Double-row lap joints can have their rivets or bolts arranged in two different ways: The first arrangement is called a ‘chain’, where the fasteners are located directly opposite each other. The distance between the hole centre lines (C), is calculated by multiplying the pitch (P) by 0, 8, which is 0, 8 D. There is an alternate (see figure 5. 53) arrangement where the fasteners are located in a double row or zigzag pattern. Here the distance between the hole centre lines (C) is calculated by multiplying the pitch (P) by 0, 6, which is 0, 6 D. The distance between the hole centres (C) is less than in the chain hence there is a lower risk of cracks forming between holes.
Figure 5. 35: Double row or zig-zag lap joint
Double row butt joints As with single row lap joints, double row joints can have either chain or alternate arrangements. They can also have either a single or double butt strap. The thickness of a double butt strap is calculated by multiplying the plate thickness (t) by 0, 625, which gives 0, 625 t. (In the next section you will learn how to lay out a bolted or riveted joint to correct proportions and specifications).
Figure 5. 38: Double row butt joint with alternate (zig-zag) arrangement and double butt strap.
JOINT LAYOUT As you have learnt previously, we use certain simple formulas to determine the exact position of the holes in any given joint. These formulas are a function of the plate thickness and bolt diameter. The very first calculation that you have to do is to determine the correct size of bolt to be used. To determine this, you need to know the plate thickness. The formula used to calculate the bolt diameter is 6, 05 x √t. Now, let’s look at an example: Two pieces of 9 mm thick steel plate are joined together by means of a double bolted butt joint with an alternate arrangement and double butt strap. Calculate the butt diameter pitch (P), distance between the centre lines (C) and the margin (M) and draw the top view of the bolted joint.
Start by calculating the relevant formulas: Bolt diameter = 6, 05 x √t = 6, 05 x √ 9 = 18, 15 mm ( Note that the bolt diameter is always rounded up or down to the nearest metric bolt size). The bolt diameter is therefore 18 mm or M 18. Pitch (P) = = = 3 x D (bolt diameter) 3 x 18 54 mm Distance between centre lines (C): = 0, 8 x P (chain arrangement) = 0, 6 x P (alternate arrangement) = 0, 6 x 54 mm = 32, 4 mm
Margin (M) = 1, 5 x D = 1, 5 x 18 = 27 mm In this case butt strap thickness = 0, 625 x 9 = 5, 62 mm (Round to 6 mm) • Once all the necessary calculations have been • done, the joint can be drawn out to scale. It is • useful to start the drawing with hole centre lines and add the various pitches and margins to find the edges of the joint. The diagram alongside indicates how the final joint is drawn.
The following table summarises all the formulas you will need to construct any bolted or riveted joint. COMPONENT OF JOINT FORMULA Bolt diameter (D) 6, 05 x √t Pitch (P) 3 D (bolt diameter) Distance between centre lines (C) Margin (M) 0, 8 x P (chain arrangement) 0, 6 x P (alternate arrangement) 1, 5 D Butt strap thickness 1, 5 t (for single butt straps) 0, 625 t (for double butt straps)
MACHINE PINS The following types of pins are generally considered to be most commonly used: § hardened and ground dowel pins; § commercial straight pins, taper pins, clevis pins, and § standard cotter pins (split pins) Hardened and ground pins Hardened and ground dowel pins are mainly used to fasten machine parts where accuracy of alignment and precision are most important
Taper pins Standard pins of taper 1 : 48, measured on The diameter. They are used in light-duty Applications in the attachment of wheels, Levers, and similar components to shafts. Clevis pins The basic function of the clevis pin is to connect yokes, (see figure 5. 43) And eye members in knuckle-joint assemblies. Held in place by a small cotter pin or other fastener, a clevis pin provides a mobile joint construction which can be readily disconnected for adjustment or maintenance.
Cotter pins (split pins) Cotter pins are used as locking devices for other fasteners. They ae employed with castle or slotted nuts, on bolts screws, or studs (as seen in locking devices). Split pins provide a convenient, low-cost locknut assembly and hold standard clevis pins in place. They can also ]be used with or without a plain washer as artificial shoulders to lock parts in position on shafts.
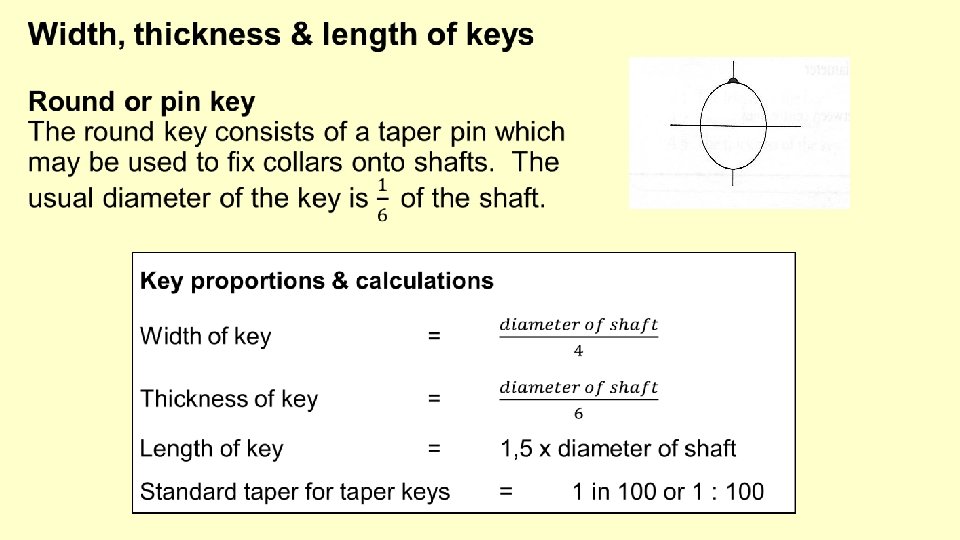
KEYS A key is a piece of steel lying partially in a groove in the shaft and extending into another groove in the hub. These grooves are called keyways or key seats. A key is used to secure gears, pulleys, sprockets, cranks, handles, and similar machine parts to shafts, so that the motion of the part is transmitted to the shaft or vice versa without any slippage. The key can also act in a safety capacity; its size is generally calculated so that, when overloading takes place the key will shear or break before the part or shaft breaks.
Figure 5. 48 indicates how the key fits into the key seat. There a wide variety of keys used in engineering, but we will look only at the square and flat keys, Gib head keys, Pratt and Whitney keys and Woodruff keys.
Square & flat keys Square and flat keys are widely used in industry. The width of the square and flat key should be approximately one-quarter of the shaft diameter. These keys are also available with a 1 : 100 taper on their top surfaces and then are known as square tapered or flat tapered keys. The key seat in the hub is tapered to accommodate the taper on the key.
Taper key The tapered key is tapered only on the side that engages the hub. The keyway in the hub has a taper that matches that of the tapered key. Some tapered keys have a gib, or tab, for easier removal during assembly. The purpose of the taper is to ensure the key itself, as well as, to firmly engage the shaft to the hub without the need for a set screw. The problem with the taper keys is that they can cause the centre of the shaft rotation to be slightly off of the mating part. It is different from a tapered shaft lock in that tapered keys have a matching taper on the keyway, while tapered shaft locks do not.
Gib head key The Gib head key is the same as the square or flat tapered key but has a head added for easy removal. Pratt & Whitney key (feather key) The Pratt and Whitney key is rectangular with rounded ends. Two-thirds of its diameter fits in the shaft; one-third in the hub.
Woodruff key The Woodruff key is semi-circular and fits into a semi-circular key seat in the shaft and a rectangular key seat in the hub. The width of the key should be approximately one-quarter the diameter of the shaft, and its diameter should approximate the diameter of the shaft. Half the width of the key extends above the shaft and into the hub.
Now complete…. Activity 1 and 2 (p 102) Mechanical Technology: Automotive Grade 10 Textbook Aurthor: André Lategan