AUTOCAD 101 Drawing Setup Introduction to CADD Open


.")


 and it asks you to")


- Slides: 18
AUTOCAD 101 Drawing Set-up & Introduction to CADD
Open Auto. CAD Architecture. 1 1. Open the start menu, choose ALL PROGRAMS 2. Find the folder labeled AUTODESK. 2 3 3. Open the folder labeled AUTOCAD ARCHITECTUR E 2016 – ENGLISH. 4. Open AUTOCAD ARCHITECTUR E 2016 – ENGLISH. 4
Set-up a metric drawing. Be patient, it may take a moment to load. Choose template. Scroll down to find acadiso. dwt. Select it.
Auto. CAD TIP #1 • To scroll in and out, use the ‘wheelie-ball’ on your mouse. Try that now. • To move around the screen, push down the ‘wheelie-ball’ and move your mouse around the screen.
Auto. CAD TIP #2 • When you type a command, it will show up in the COMMAND BAR. • Watch the command bar for prompts or instructions throughout your drawing(s).
Set-up layers. • Type in LAYER hit ENTER • Find the NEW LAYER button click it. • Create the following layers. Be sure that you are using all capital letters. Note: watch for changes in each column.
Auto. CAD TIP #3 • Tabs are found at the top of your screen. • Each tab categorizes various commands in organized groups. • Click on various tabs to explore Auto. CAD.
Set-up text. • Click on the ANNOTATE tab. • Find the small arrow in the bottom right corner of the TEXT block click it. • Choose STANDARD, in left box then click NEW on the right side. • Create the following TEXT STYLES (all capitals): TITLEBLOCK DIMENSION ISO 30 ISO 330 HT: 4. 0 mm HT: 2. 0 mm OBLIQUE ANGLE: 30. 0 OBLIQUE ANGLE: 330. 0 • Click APPLY click CANCEL.
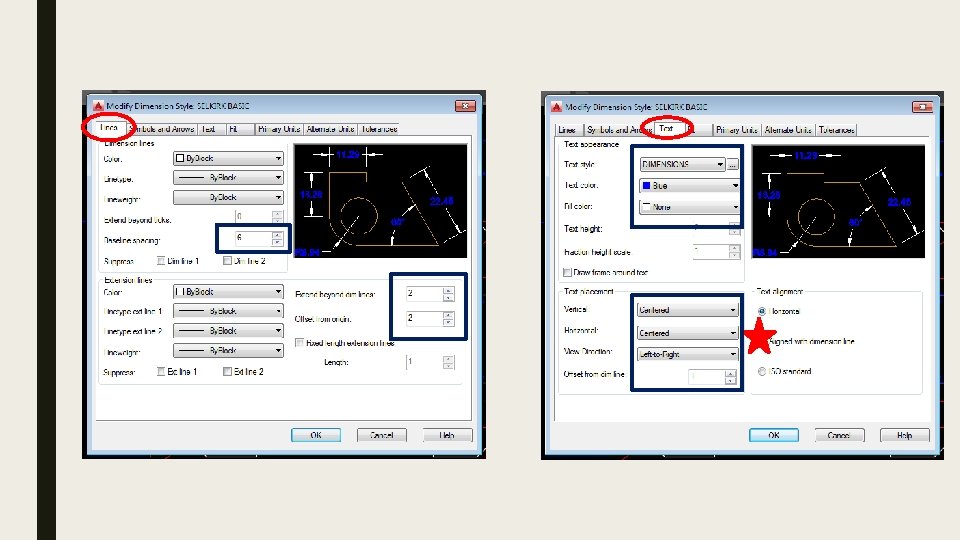
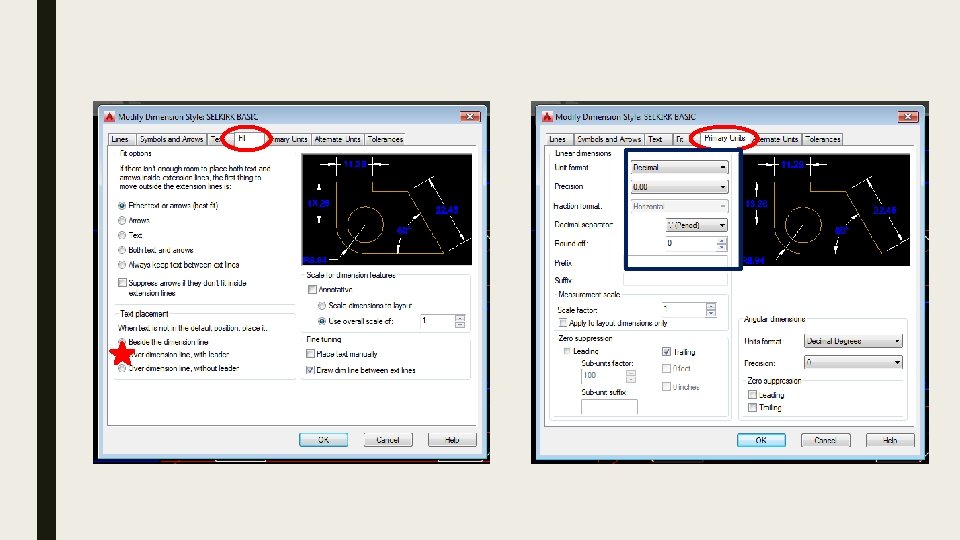
Set-up dimension. • Click on the ANNOTATE tab. • Find the box in the DIMENSION block click it to show a drop down menu. • Click MANAGE DIMENSION STYLE. • Choose ISO-25, in left box then click NEW on the right side. On the next slide, follow along and complete each of the windows. Be sure that you do not miss anything.
Dimension settings. ISO-25 1. Name your new dimension style SELKIRK BASIC 2. Start with: ISO-25 Note: Follow the next few slides. Check each window VERY carefully for any changes. Small discrepancies can make a huge difference in the appearance of your dimensions. If you would like a PDF copy of the dimension setup, it can be found on selkirkdrafting. weebly. com under Videos & Resources.
Be sure to save the drawing to your STUDENT NUMBER directory (on the server). DO NOT SAVE TO MY DOCUMENTS! SAV
Common Auto. CAD commands to know. SHORTCUT COMMAND L DT COMMAND LINE DYNAMIC TEXT E ERASE EX EXTEND C CIRCLE F FILLET M MOVE H HATCH RO ROTATE A ARC CO COPY O OFFSET MA PROPERTIES PROP F 3 ON/OFF MATCH PROPERTIES MENU OBJECT SNAP
Auto. CAD TIP #4 • If you need to change any item (line, circle, dimension), you will find it in the PROPERTIES MENU. • If you do not see the properties menu – type, PROP (followed by ENTER) to make it appear.
SAVE OFTE If Auto. CAD shuts down unexpectedly (crashes) and it asks you to save, DO NOT SAVE! You could lose your entire drawing.
How to submit an Auto. CAD file.
Auto. CAD Rubric