Audiology for School Based Professionals Nancy Gillispie Au

Audiology for School Based Professionals Nancy Gillispie, Au. D. CCC-A, F. A. A. A.

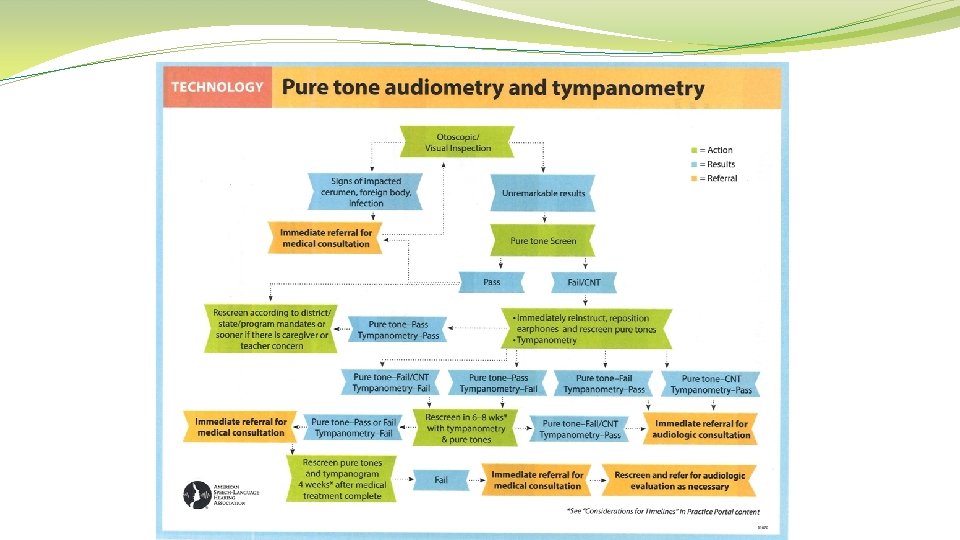
Agenda �Overview of the State Guidelines �Otoscopy �Tympanometry �Pure Tone Screening �Hearing Aid Basics

West Virginia Council of School Nurses Reference WV § Code 18 -5 -17 � Requires a compulsory pre-enrollment screening for children entering public school for the first time in the state. � An audiologist, speech pathologist or support personnel under the supervision of an audiologist should complete the screenings. RESA audiologists have developed screening guidelines in accordance with ASHA recommendations (1997). � Audiometers and Tympanometers must meet ANSI requirements. � Requires 25 d. B response at 500 Hz and 20 d. B response at 1000 Hz, 2000 Hz, and 4000 Hz. � Results are pass or refer � Failure to pass this criteria results as a referral to an audiologist or physician. � Results should be sent to the family as soon as possible. � Results must be tracked The guidelines and referral preferences should be established with an audiologist or other professionals prior to initiating screenings in your county.

Otoscopy The purpose of an otoscopic examination is to describe normal and abnormal physical findings in the referral process.

Otoscopy �The otoscopic exam is to ensure that the ear canals are free of any obvious problems prior to performing tympanometry, administering hearing tests, and fitting hearing protection. �One should be able to identify or rule out disorders of the Outer Ear and Middle Ear disorders involving the eardrum. �Please note that viewing the tympanic membrane/eardrum through the otoscope provides information about condition of Middle Ear. �However, main purpose of otoscopy is to rule out disorders of the Outer Ear

Otoscopy

Otoscopy � 1. Observe proper hygiene �wash �note � 2. hands or use gloves any bodily fluid or secretion Select a speculum of proper size �larger size ensures a good view � 3. Lock speculum into place � 4. Change/discard the speculum after each patient

Otoscopy Successful Outcomes Require #1 Otoscope placement #2 Eye placement

Otoscopy �Grip otoscope firmly and comfortably with the handle �The hand holding the otoscope should have the pinky extended �Grasp upper edge of the ear (helix) with the opposite hand �Pull pinna gently upward & back to straighten the ear canal �Examine the pinna and concha area while inserting lighted otoscope past the first canal bend �Rest your fingers against the patient’s head to avoid injury if patient moves suddenly

Otoscopy �NOW put your eye up to the otoscope eyepiece �Examine the ENTIRE canal and tympanic membrane �SLOWLY move the otoscope if needed to see all of the canal and eardrum �Dispose speculum and turn off otoscope light �Should you be satisfied with a partial viewing? – NO! �NO discomfort to the patient if properly conducted �If discomfort is experienced, note this in the referral

Otoscopy We are NOT to diagnose or label a problem or pathology. However, it is OK to describe what you see – for example … a. b. c. d. e. “your ear canal appears very swollen” “there is too much wax to see the eardrum” “your eardrum looks very red” “there is a yellowish wetness in your ear” “I need to refer you to your family physician/pediatrician”

Otoscopy The goal of the examination is to make sure the ear canal is clear of debris or conditions as part of the hearing screening protocol.

Otoscopy

Otoscopy Ideally, otoscopy should be done before any testing to rule outer ear disorders/abnormalities. However, otoscopy is not typical practice, particularly when testing more than one person at a time.

Otoscopy

Otoscopy Normal Tympanic Membrane

Otoscopy Normal Tympanic Membrane

Otoscopy ? Normal Tympanic Membrane ?
 Filled Canal")
Otoscopy Cerumen (Wax) Filled Canal

Otoscopy Keratin Patches

Otoscopy Abnormal Findings – Insect in the Canal

Otoscopy Abnormal Findings – Bead in the Canal

Otoscopy Abnormal Findings – Abrasion

Otoscopy Abnormal Findings – Cerumen

Otoscopy Pressure Equalization Tube

Otoscopy Pressure Equalization Tube

Otoscopy Permanent Pressure Equalization Tube

Otoscopy Abnormal Findings – Tympanosclerosis

Otoscopy Abnormal Findings – Otitis Externa – Inflamed Epithelium

Otoscopy Otomycosis – Fungal Infection

Otoscopy Otomycosis – Fungal Infection

Otoscopy Otomycosis – Fungal Infection

Otoscopy Abnormal Findings – Keratosis Oburans – Abnormal Process of Epithelial Migration

Otoscopy Serous Otitis Media

Otoscopy Serous Otitis Media

Otoscopy Otitis Media

Otoscopy Otitis Media

Otoscopy Otitis Media Associated with Upper Respiratory Tract Infection

Otoscopy Tympanic Membrane Perforation with Current Infection

Otoscopy Tympanic Membrane Perforation without Infection

Otoscopy Otitis Media with Pressure Equalization Vent

Otoscopy Retracted Tympanic Membrane - Severe

Otoscopy Retracted Tympanic Membrane

Tympanometry

Tympanometry Supports the Otoscopic Examination.

Tympanometry �Based on physical principles and mathematical algorithms but conducting the test is fast and simple. �Results indicate the flexibility or the stiffness of the eardrum and middle ear bones. �The stiffness or flexibility of the eardrum is measured and consistently identifies if there is a middle ear disorder/disease present.

Tympanometry 1. A soft tipped probe is inserted just inside the ear canal and seals it. 2. A pump varies pressure against eardrum. 3. Simultaneously a pure tone is sent into the ear (typically 240 Hz). 4. Results are displayed in numerical form and in a graph called a tympanogram. NOTE: The equipment will not start the procedure if an acoustic seal is not obtained.

Tympanometry � 1. Observe proper hygiene �wash �note hands or use gloves any bodily fluid or secretion � 2. Select a probe tip of proper size � 3. Ensure the probe tip is placed correctly � 4. Change/discard/clean the tip after each patient

Tympanometry �Grip the probe comfortably by the handle �The hand holding the handle should have the pinky extended to avoid injury if the patient moves suddenly �Grasp upper edge of the ear (helix)with the opposite hand �Pull pinna gently upward & back to straighten the ear canal �Insert the probe into the canal and release the helix to relax the canal �Press the button on the equipment to begin if it is not an automatic system �If an acoustic seal is not obtained, ensure the probe tip is fitting well in the canal (change probe tip if needed) and repeat the previous steps
 �Note first during the")
Tympanometry Ear Canal Volume (EVC or Equivalent Ear Canal Volume) �Note first during the examination �Vary and are age dependent �Should be similar between ears �Measures the volume from the probe tip to the tympanic membrane
 0. 3 to 1.")
Tympanometry Ear Canal Volume Children (3 years to 5 years) 0. 3 to 1. 0 Adults 0. 6 to 1. 5 Volumes below ranges are indicative of debris in the ear canal. Volumes larger than the ranges are indicative of perforations or PE tubes if an acoustic seal is obtained.

Tympanometry – Type A “Mountain” Peak placement Horizontal Vertical -150 to +50 0. 2 to 1. 8 Display uses “box” or shaded area to show normal range 53

Tympanometry – Type A Variations of Type A Tympanograms Peak Horizontal -150 to +50 Vertical 0. 2 to 1. 8 54

Tympanometry – Type A Identifies: �Normal Eardrum Movement �Normal Middle Ear Pressure �Normal Middle Ear Functioning �Normal Eustachian Tube Functioning �Normal Outer and Middle Ear You cannot identify Normal Hearing Acuity. 55

Tympanometry – Type B Flat or poorly defined peak Placement Absent or poorly defined Horizontal Vertical > -150 < 0. 2 56

Tympanometry – Type B Identifies: • • Minimal or Absent Eardrum Movement Confirms Outer and/or Middle Ear Dysfunction such as: �Ear canal occlusion �Eustachian Tube dysfunction �Otitis Media or Middle Ear Effusion Results are typically indicative of a Mild Hearing Loss in the LOW Frequencies. 57

Tympanometry - Type C Clearly defined Peak to the Left Peak Placement Horizontal > -150 Vertical 0. 2 to 1. 8 58

Tympanometry - Type C Identifies: Negative Middle Ear Pressure Abnormal Eustachian Tube Functioning Etiologies Include: � � � 1. 2. 3. 4. Recent Cold and/or Congestion Sinus Infection Upper Respiratory Infection Allergies 59

Tympanometry Request a RETEST for follow-up tympanogram Otitis Media or Middle Ear Effusion onset to resolution can be tracked via Tympanogram progress Type C >> Type B >> Type C >> Type A over 10 -14 day period

Otoscopy & Tympanometry �Ear Canals clear and free of obvious problems such as discharge, masses, impacted cerumen, foreign bodies, inflammation �Tympanic membrane appearance is translucent, pearly gray, healthy in color �Eardrum landmarks to note include the cone of light from center to membrane edge and shadow of the first middle ear bone attached to the center �Cerumen is normal unless occludes view of TM > 50% and a warning can be made to parents regarding Q-Tip use and the damming effect.

Otoscopy & Tympanometry Referral �Pain or discomfort is reported �Drainage is visible �Perforation is visible �Tympanic membrane is bulging �Ear canal is blocked by cerumen or foreign body �Complaint of sudden severe hearing loss with tinnitus and/or dizziness �When in doubt

Pure Tone Screening Set Up should be in the quietest area available and not shared with another professional completing other tasks such as speech screenings simultaneously. Complete a listening check to ensure that the equipment is working and the stimuli can be heard by you or a normal hearing listener without distortion. Make sure that the headphones are free from frayed wires and broken cushions. Instruction should fit the student. This can be based upon the introduction and question/answer period prior to the pure tone portion of the screening. Make the task something other than raising the hand each time you hear the beeps.

Pure Tone Screening Set the audiometer to a loudness level louder than the minimum requirement of 20 d. B and at a pulsed signal if this is an option. Extend the headband larger than needed for the student. Use both hands to bring headphones over the head and place the cushions on the ears. Pull the headband taut but comfortable to fit the head. Ask the student if the headphones are comfortable and adjust if necessary.

Pure Tone Screening Present the pulsed pure tone at 1000 Hz at least at 40 d. B to illustrate the sensation in which they are listening and note the student‘s response. Reinstruction might be necessary. Give positive reinforcement especially during this point in the screening. Make the decision at this point to continue with the screening or practice once again.

Pure Tone Screening Once the presentation of the pulsed stimulus begins at 20 d. B at 1000 Hz, continue thru 2000 Hz and 4000 Hz for each ear. If the environment supports testing at 500 Hz based upon the listening check, continue with this frequency at 25 d. B. Some professionals support not screening 500 Hz based upon the completion of tympanometry. If a child does not respond to all frequencies, go back and double check them prior to completion of the process.

Pure Tone Screening Be careful not to cue the student to respond by our own �Hand gestures �Eye movements �Reactions to their responses �Observation of the equipment

Results The results are simply pass or refer. Results should be communicated to the family as soon as possible with the appropriate plan of action outlined. Track the results in a manner that works for your county and school, which might include but not limited to WVEIS.

Putting It Together

Putting It Together Reduced Ear Canal Volume

Putting It Together

Putting It Together

Putting It Together

Putting It Together Only IF an Acoustic Seal is Obtained! Expect a very large Ear Canal Volume!

Goals To effectively establish screening protocols and referral processes To identify hearing impairments among school aged children to eliminate any barriers to academic success

Target Population Approximately 3 in 100 in the school-age population have a mild hearing loss. (Bess et al. , 1998)

Target Population Joint Committee on Infant Hearing identifies a target population of permanent bilateral or unilateral, sensory or conductive, hearing loss that averages 30 -40 d. B HL or more in the frequency region important for speech recognition (approx. 500 - 4000 Hz) and a non-target population of children with hearing losses < 30 d. B HL A study of 86, 000 infants within the newborn hearing screening project resulted in 4% of the group failing OAEs and passing A-ABR. Of that population 77% of those had permanent hearing loss of mild severity (PTA < 40 d. B) 57% had unilateral hearing loss Of those with a hearing loss 86% were sensorineural

Why is this important? The fatigue scores reported herein indicated more fatigue experienced by children with hearing loss than children with cancer, rheumatoid arthritis, diabetes, and obesity (Varni et. Al, 2002; 2004; 2009; 2010) What are the contributing stressors to this population? • Listening conditions? • Listening effort? • Lack of early or aggressive intervention? • Lack of effective amplification? • Concomitant otitis media and other ear conditions?

Hearing Aids Assistance/Support for the student within the schools vary among professionals. The school should be quipped with extra batteries, listening scope, and possibly a cleaning kit. A daily listening check should be completed daily and recorded on the designated form provided by the county. Training amongst professionals with the actual hearing aid instrument is strongly recommended based upon the availability of diverse devices.

? QUESTIONS ?
- Slides: 80