ASEPTIC TECHNIQUE AND STERILIZATION METHODS CTVT PGS 1158


 Takes longer than")

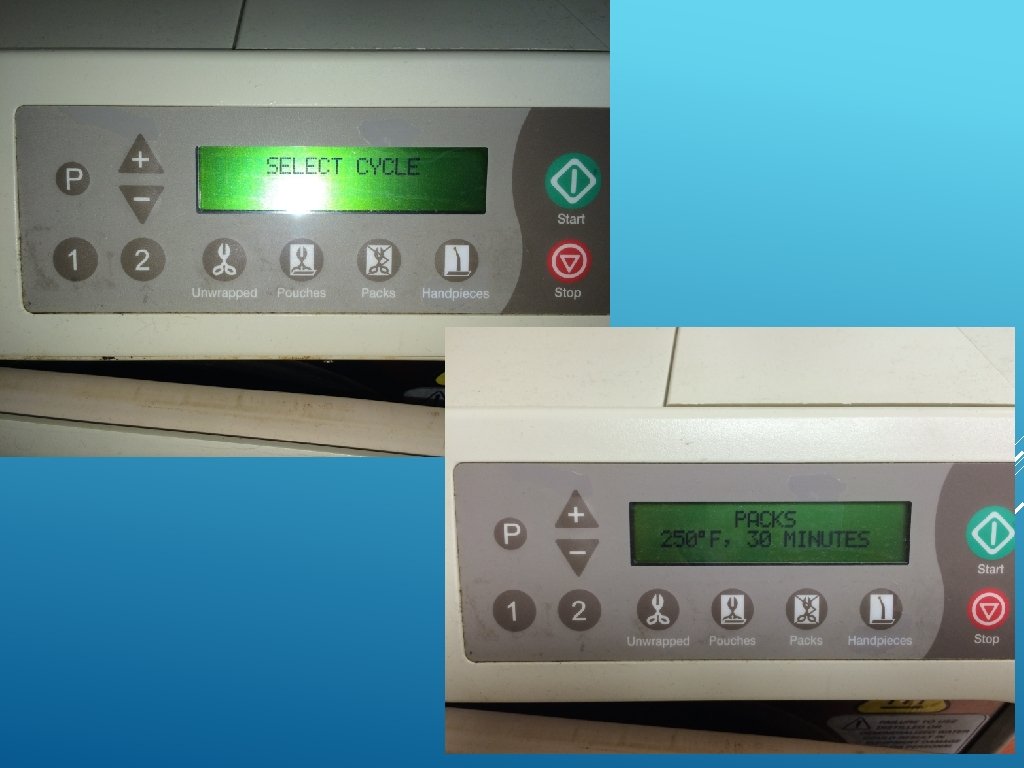
 Used most commonly for “packs” Heat = 250 °F minimum")


 Instruments are placed unwrapped in a perforated metal tray 270°F")
- Slides: 27
ASEPTIC TECHNIQUE AND STERILIZATION METHODS CTVT PGS 1158 -1168 Objectives: Understand aseptic technique Learn how to properly sterilize instruments and equipment
Asepsis- condition of sterility where no living organisms are present Aseptic technique- all steps taken to prevent contamination of surgical site by infectious agents Goal: to “maintain asepsis“ and watch for “breaks” in aseptic technique
Where do contaminants come from? Exogenous sources: o You, patient’s fur/skin, instruments, air Endogenous: o Inside the patient reach the incision through blood stream • Example – Periodontal disease
Ways to Maintain Aseptic Technique Disinfection - destruction of pathogens on inanimate objects (Kennel Care) o Doesn’t effect bacteria spores Sanitization - acceptable level of contaminants present Antiseptic – inhibits growth of infectious agents on living tissue (Chlorhexidine) Sterilization - complete destruction or elimination of all living organisms Including viruses and bacterial spores o Always inorganic material o
When does aseptic technique begin? It’s always happening! o Cleaning of instruments o Surgery suite sanitation/disinfection o Patient prep o Sx team scrub o Surgical suite etiquette Contamination cannot always be avoided o Skin abscess, dental disease
Contamination Risk of contamination doubles every hour under Ax Contamination does not mean infection Dependent on: Ø o Patient health o Tissue damage o Virulence and quantity of agent Level of contamination determines: o Use of perioperative antimicrobials o Degree of asepsis required
Classification of Surgical Procedures Clean = non-contaminated, routine, placement of hardware o Ex. permanent implants (IM pins), benign laparotomy Clean-contaminated = entering a hollow organ o Ex. enterotomy, cystotomy Contaminated = leakage during Sx or major breach of aseptic technique o Ex. enterotomy, cystotomy Dirty = previously ruptured hollow organ or abscess o Ex. cutaneous abscess, septic peritonitis, ruptured pyo
Methods of Sterilization 1. Physical Sterilization Filtration Radiation Heat 2. Chemical Sterilization Liquid Gas
Filtration and Radiation Sterilization Filtration – microorganisms separated From liquid or gas materials o Pharmaceuticals o Can be placed on IV line or syringe Radiation - destruction of microorganism without significant increase in temperature o Gloves and suture material *Filtration and radiation are typically performed by the manufacturer before shipments - anything that comes pre-sterilized - a lot of “one time use” products - items which cannot be heat sterilized
Heat Sterilization Most common sterilization technique Destroys bacteria by denaturing their proteins 1. Dry Heat Sterilization o High temperatures for a long period of time 2. Wet Heat Sterilization o Creating steam under pressure at high temperatures o Ex. Autoclave
Dry Heat Sterilization Does not involve moisture (no rust, no corrosion) Takes longer than wet heat and requires higher temperatures (no steam to achieve the higher temperature) Ex. 300°f for 2 ½ hours
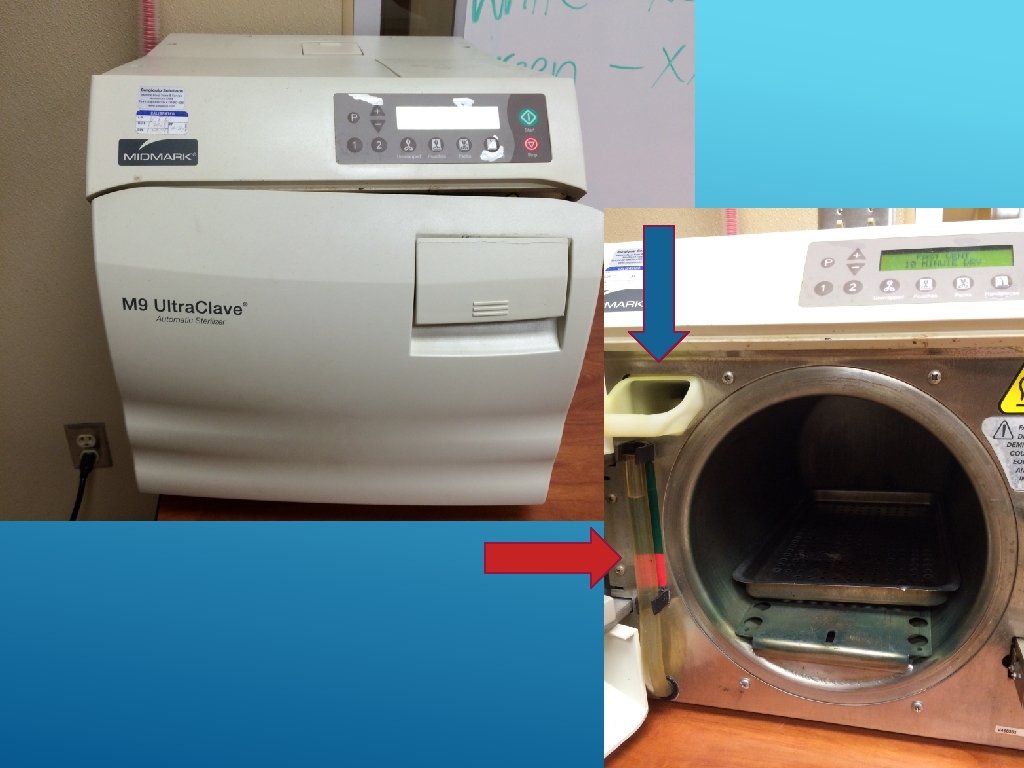
Wet Heat: Autoclave Sterilization Pack must be able to withstand heat AND moisture! 1. Pre-vacuum sterilizer A pump evacuates the air before the steam enters More even penetration of steam o Shorter duration o 2. Gravity Displacement Sterilizer Steam enters the top and forces air to bottom Most commonly used type
Autoclave Sterilization (Gravity Displacement) Used most commonly for “packs” Heat = 250 °F minimum Pressure = 20 PSI Time = 13 minutes at temp (exposure time) o Total cycle =Heat-up time + exposure time o Usually 30 - 45 minute cycle Always use distilled water! *Every machine is different, refer to the operator's manual (usually pre-set values)
There should be space between each pack Steam should be allowed to flow around every surface of each pack Use racks if sterilizing a lot of packs
Pack Preparation Proper pack preparation is critical Instruments must be clean and dry All locking instruments should be unlocked Wrap materials must be steam permeable 1. Woven = double thickness muslin o Reusable 2. Non-woven =crepe paper or plastic pouch o One time use (mostly) Many practices double wrap (AAHA)
Pack Preparation Peel packs – clear plastic pouches made of plastic and paper o Self-sealing or heat sealed o Instrument is placed into pouch with the handles toward the closed in o Pack will be opened from the closed end
Labeling of Packs What is in it Initials of who prepared it Date it was sterilized *VTI- which patient it is for
Sterility Indicators Tape – outside of pack was exposed to steam Chemical Indicator Strips- change color when exposed to steam for adequate time Examples: o Peel packs – indicator on the outside of the paper o OK Strip - can be placed in the center of the pack o Stickers- can be placed anywhere (mostly for gas)
Sterility Indicators Pellet glass – glass ampule containing a temperature sensitive pellet that melts between 244 -250 °F Biological/Culture tests – contain a spore population of bacteria (usually Bacillus sp. ) o Takes minimum of 24 hours for results o Confirms that microorganisms were in fact killed if the sample does not grow anything
Autoclave Quality Control Performed by technicians- ensures proper technique Sterility Indicators Must be used in combination, as not just one will cover all requirements Temperature graphs Autoclave maintenance - autoclave cleaner o Ex. Speed-Clean – mixed in the water o Ex. Chamber Brite – powder is sprinkled on the bottom of cold chamber; cycle is ran without drying o Both require a “rinse” cycle to be ran after use
After the Autoclave Cycle Packs must cool slowly to prevent condensation which could: o Wick bacteria o Rust metal o Tear paper Let the dry cycle finish completely! Door should be cracked to vent slowly ~ 20 minutes o Opening door wide causes steam to condense inside the pack Don’t leave paper packs in autoclave longer than needed (makes paper more brittle, easy to tear)
Maintaining Sterile Packs The outside is not sterile Storage: dust free, dry, well-ventilated, away from contaminated areas - closed cabinet is safer than open Broken sterility: dropped on floor, wet, broken outer wrap (instruments penetrates paper) o Never assume sterility - autoclave again o Error on the side of caution Monitor dates for expired sterility (clinic protocol)
Length of Sterility Table on page 1163 in CTVT 1. Date related practice: Which one lasts longer? Double vs. single wrapped Non-woven vs. Woven Closed vs. open cabinet Heat sealed vs. Self-sealed 2. Event related practice: item is sterile until an event in which the sterility is broken
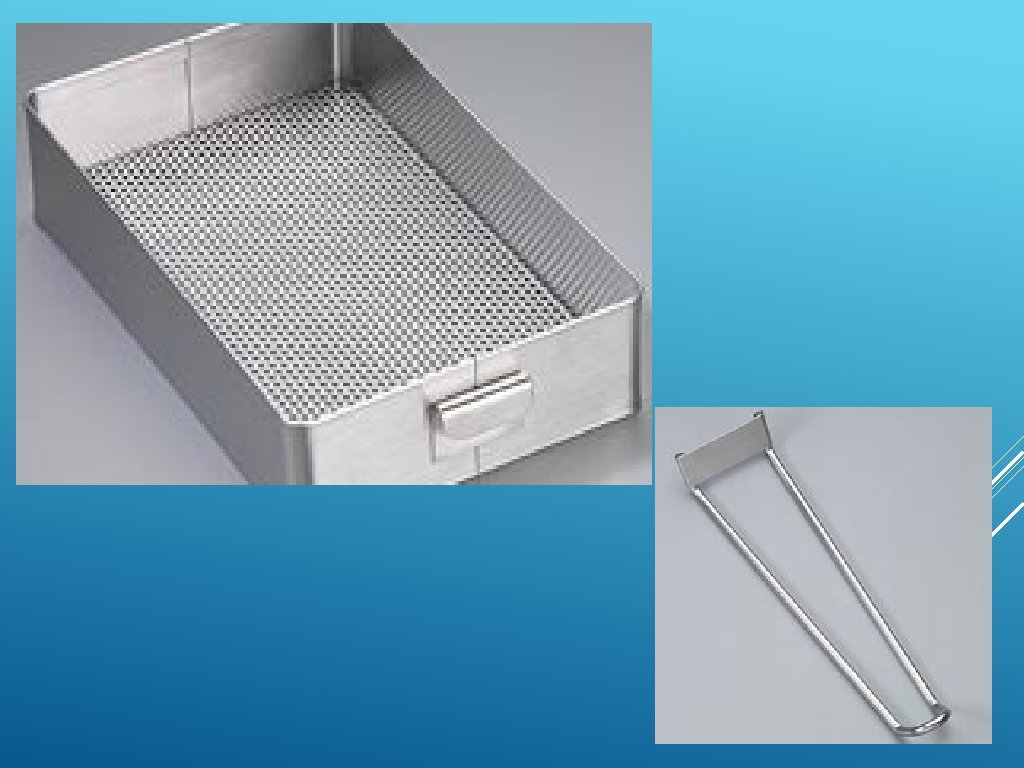
Flash Sterilization (Emergency situation) Instruments are placed unwrapped in a perforated metal tray 270°F for 3 minute exposure time Removed with detachable metal handles and carried straight to surgery (or huck towel) Instruments must cool before use Some machines have a preset for this