Arduino Contents What is Arduino Why Arduino Arduino


")
 • digital. Write() • digital. Read()")

 void setup() { pin. Mode(8, OUTPUT); } void loop() { digital. Write(8,")
 void setup() { pin. Mode(8, OUTPUT); pin. Mode(7, INPUT); } void loop()")

 // include the library code: #include <Liquid. Crystal. h> // initialize")
 • Serial. print(val, format) • • • Serial.")


- Slides: 21
Arduino
Contents • What is Arduino • Why Arduino • Arduino IDE • Features of Arduino • Applications of Arduino • References
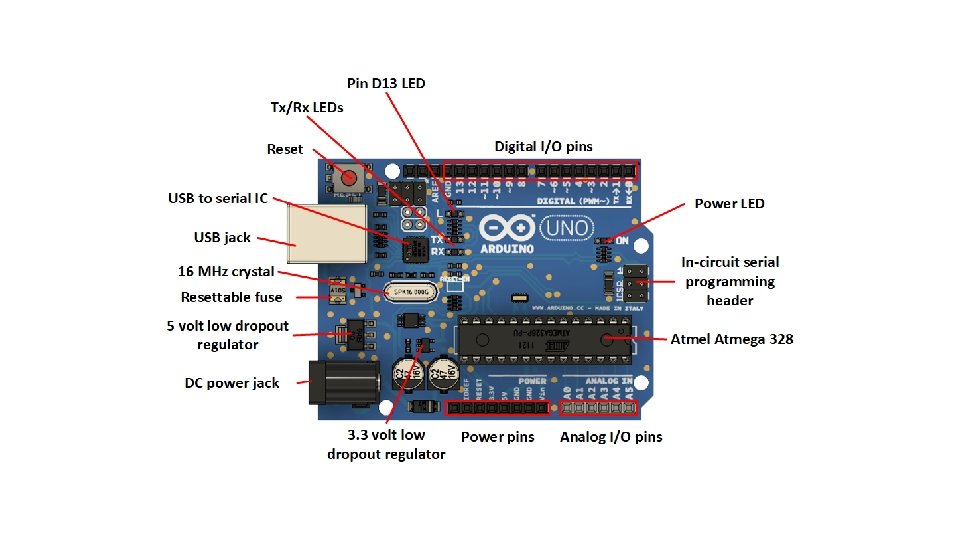
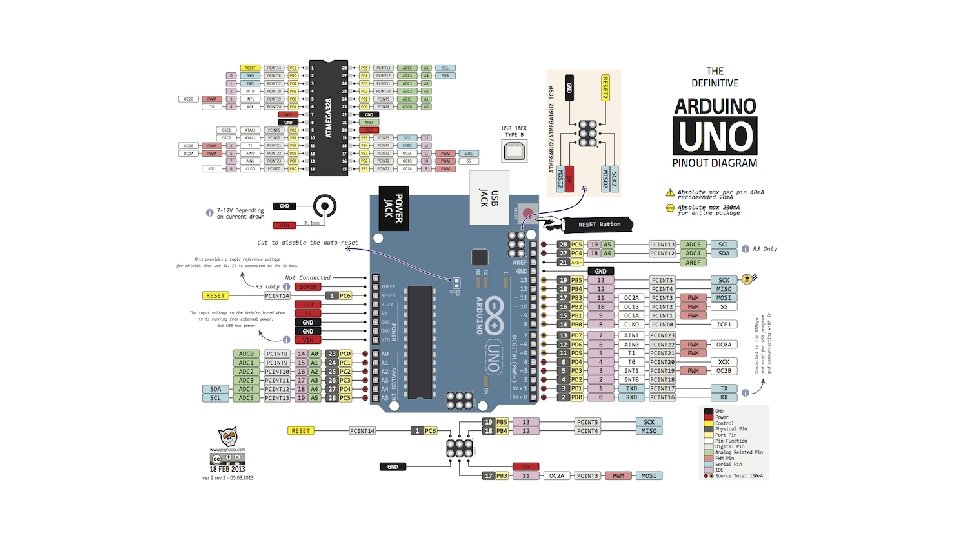
What is Arduino?
Atmega 328 • High Performance, Low Power AVR® 8 -Bit Microcontroller • Advanced RISC Architecture • 131 Powerful Instructions • Up to 20 MIPS Throughput at 20 MHz • On-chip 2 -cycle Multiplier • • • Pin Count: 28/32 Max I/O Pins: 23 SPI: 2 UART: 1 ADC: 8 channels, 10 -bit resolution Analog Comparators: 1 Flash (Kbytes): 32 EEPROM (Kbytes): 1 SRAM (Kbytes): 2 Temp. Range: -40 to 85°C
Arduino Integrated Development Environment (IDE)
Arduino Digital I/O • pin. Mode() • digital. Write() • digital. Read()
Circuit for Digital I/O
digital. Write() void setup() { pin. Mode(8, OUTPUT); } void loop() { digital. Write(8, delay(1000); // } HIGH); Wait for 1000 millisecond(s) LOW); Wait for 1000 millisecond(s)
digital. Read() void setup() { pin. Mode(8, OUTPUT); pin. Mode(7, INPUT); } void loop() { if(digital. Read(7)){ digital. Write(8, HIGH); } else{ digital. Write(8, LOW); } }
Arduino Analog pins
analog. Read(A 0) // include the library code: #include <Liquid. Crystal. h> // initialize the library with the numbers of the interface pins Liquid. Crystal lcd(12, 11, 5, 4, 3, 2); void setup() { // set up the LCD's number of columns and rows: lcd. begin(16, 2); // Print a message to the LCD. lcd. print("hello, world!"); } void loop() { // set the cursor to column 0, line 1 // (note: line 1 is the second row, since counting begins with 0): lcd. set. Cursor(0, 1); // print the number of seconds since reset: lcd. print(analog. Read(A 0)); }
Arduino Serial Port • Serial. print(val) • Serial. print(val, format) • • • Serial. print(78) gives "78" Serial. print(1. 23456) gives "1. 23" Serial. print('N') gives "N" Serial. print("Hello world. ") gives "Hello world. " Serial. print(78, BIN) gives "1001110" Serial. print(78, OCT) gives "116" Serial. print(78, DEC) gives "78" Serial. print(78, HEX) gives "4 E" Serial. println(1. 23456, 0) gives "1" Serial. println(1. 23456, 2) gives "1. 23" Serial. println(1. 23456, 4) gives "1. 2346"
Tinker. CAD • Go to the website: https: //www. tinkercad. com • Register for Autodesk account using your Illinois Tech email address • Click “Circuits” on the left panel
Tinker. CAD • Click “Create” -> “Circuit” -> “+ Component” and add “Arduino Blink” from the “Starters” Tab.
Tinker. CAD • Go to “Code Editor” and disable “Block” function since we don’t want to program it using the block diagram. Read the C code to gain a better understanding of the program flow.
Tinker. CAD • Click “Start Simulation” and observe the result.
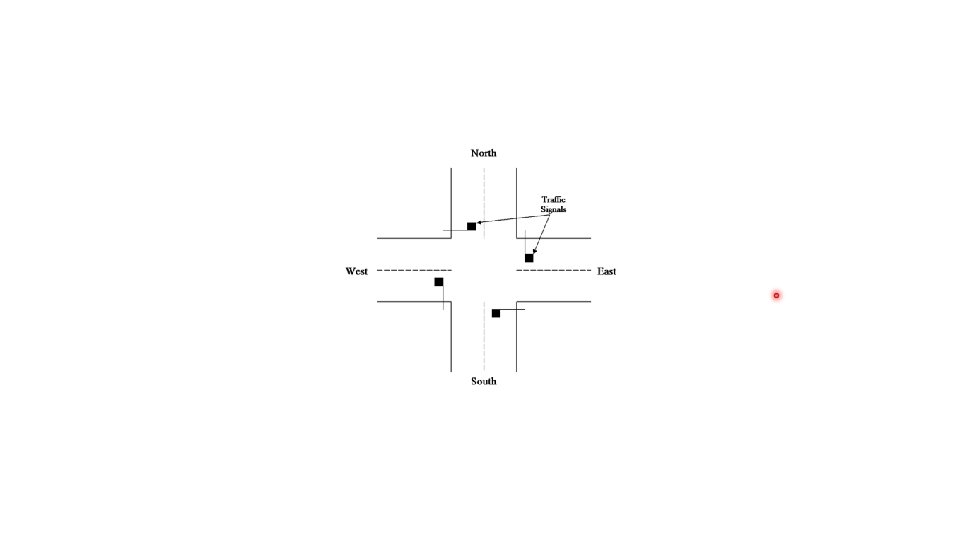
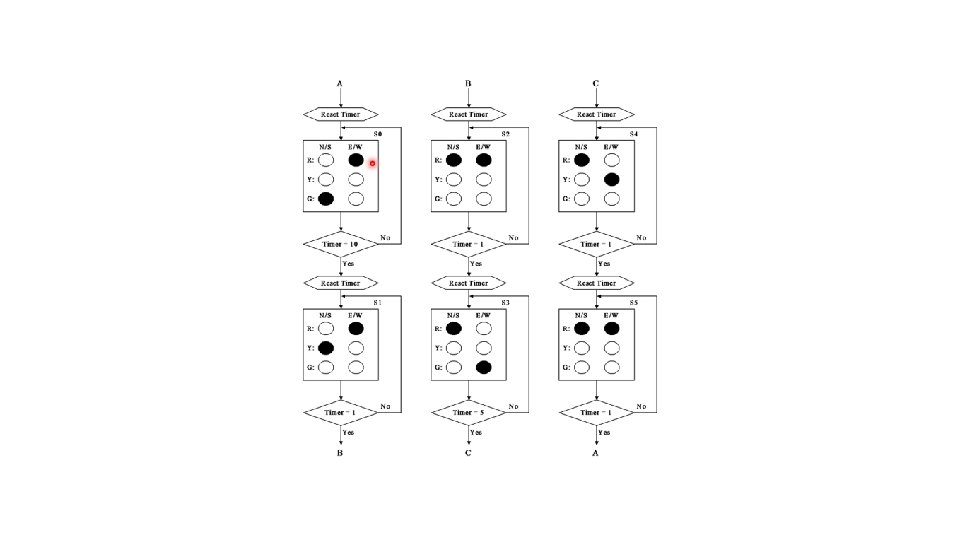
Tinker. CAD • Following the same procedure, simulate “Button”, “Debounce” from “Starters”. Practice with the tool to gain a better understanding of building peripheral circuit and programming the microcontroller. • Refer to the 3. 0 Background B-1 Simple Two-Way Intersection and build the circuit in Tinker. CAD. Use the code from Table 1. 1 and simulate the circuit. Show your result to your TA in the beginning of the lab.