Angular position sensor calibration bench results Sources of
Angular position sensor & calibration bench results: Sources of incertitude and preliminary results F. Roncarolo, L. Garcia, J. L. Sirvent BE-BI-PM LIU BWS Follow-up meeting 03/03/2017 BE-BI-PM Jose Luis Sirvent Blasco (jsirvent@cern. ch) 1
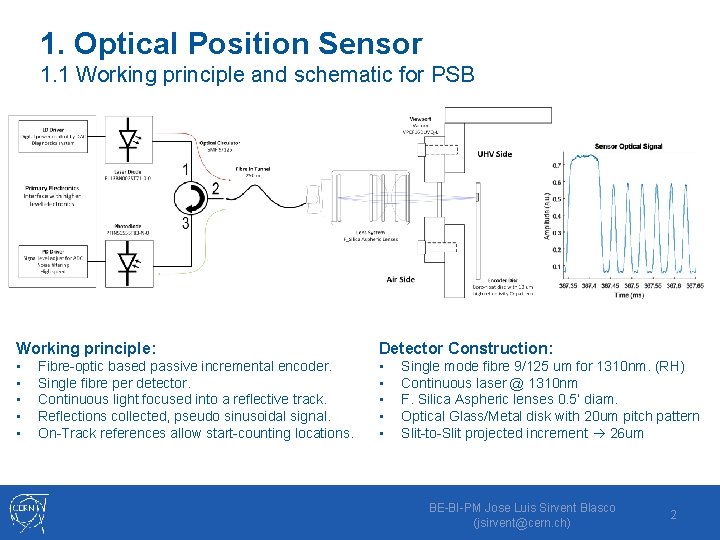
1. Optical Position Sensor 1. 1 Working principle and schematic for PSB Working principle: Detector Construction: • • • Fibre-optic based passive incremental encoder. Single fibre per detector. Continuous light focused into a reflective track. Reflections collected, pseudo sinusoidal signal. On-Track references allow start-counting locations. Single mode fibre 9/125 um for 1310 nm. (RH) Continuous laser @ 1310 nm F. Silica Aspheric lenses 0. 5’ diam. Optical Glass/Metal disk with 20 um pitch pattern Slit-to-Slit projected increment 26 um BE-BI-PM Jose Luis Sirvent Blasco (jsirvent@cern. ch) 2
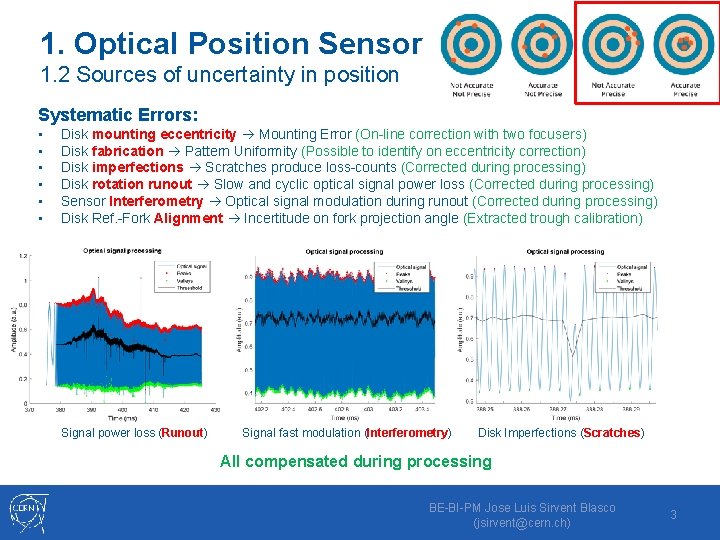
1. Optical Position Sensor 1. 2 Sources of uncertainty in position Systematic Errors: • • • Disk mounting eccentricity Mounting Error (On-line correction with two focusers) Disk fabrication Pattern Uniformity (Possible to identify on eccentricity correction) Disk imperfections Scratches produce loss-counts (Corrected during processing) Disk rotation runout Slow and cyclic optical signal power loss (Corrected during processing) Sensor Interferometry Optical signal modulation during runout (Corrected during processing) Disk Ref. -Fork Alignment Incertitude on fork projection angle (Extracted trough calibration) Signal power loss (Runout) Signal fast modulation (Interferometry) Disk Imperfections (Scratches) All compensated during processing BE-BI-PM Jose Luis Sirvent Blasco (jsirvent@cern. ch) 3
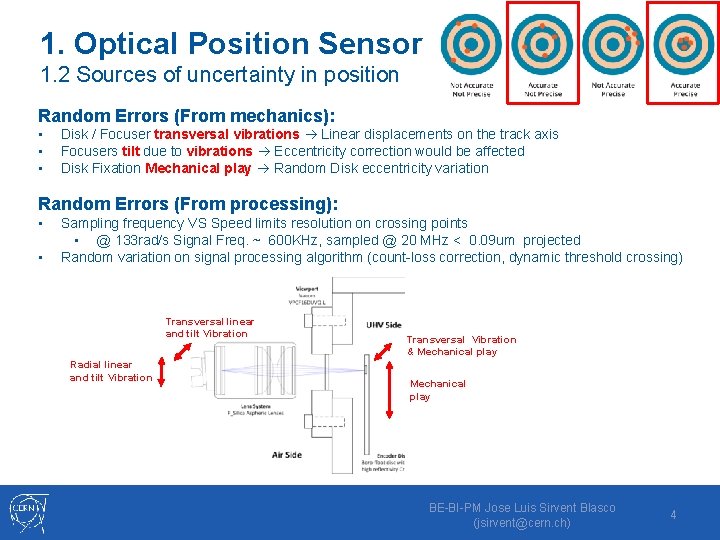
1. Optical Position Sensor 1. 2 Sources of uncertainty in position Random Errors (From mechanics): • • • Disk / Focuser transversal vibrations Linear displacements on the track axis Focusers tilt due to vibrations Eccentricity correction would be affected Disk Fixation Mechanical play Random Disk eccentricity variation Random Errors (From processing): • • Sampling frequency VS Speed limits resolution on crossing points • @ 133 rad/s Signal Freq. ~ 600 KHz, sampled @ 20 MHz < 0. 09 um projected Random variation on signal processing algorithm (count-loss correction, dynamic threshold crossing) Transversal linear and tilt Vibration Radial linear and tilt Vibration Transversal Vibration & Mechanical play BE-BI-PM Jose Luis Sirvent Blasco (jsirvent@cern. ch) 4
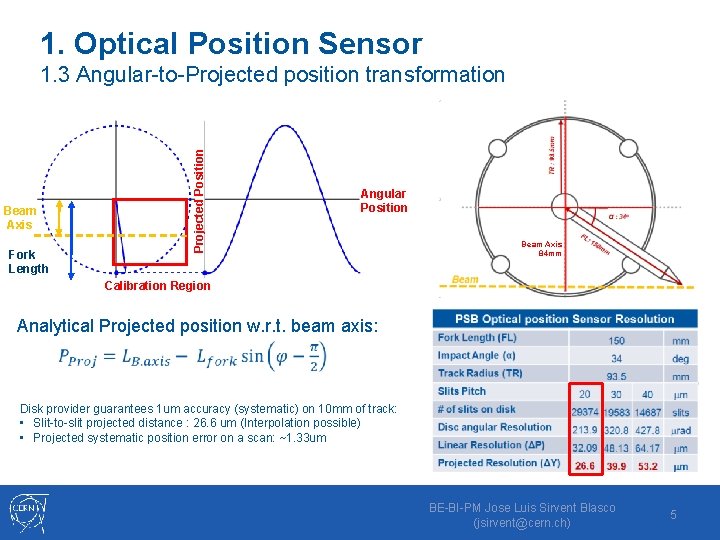
1. Optical Position Sensor Projected Position 1. 3 Angular-to-Projected position transformation Beam Axis Fork Length Angular Position Beam Axis 84 mm Calibration Region Analytical Projected position w. r. t. beam axis: Disk provider guarantees 1 um accuracy (systematic) on 10 mm of track: • Slit-to-slit projected distance : 26. 6 um (Interpolation possible) • Projected systematic position error on a scan: ~1. 33 um BE-BI-PM Jose Luis Sirvent Blasco (jsirvent@cern. ch) 5
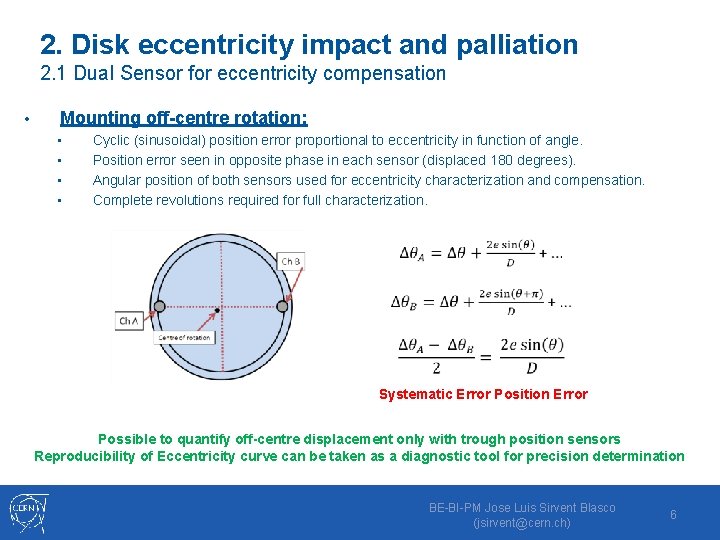
2. Disk eccentricity impact and palliation 2. 1 Dual Sensor for eccentricity compensation • Mounting off-centre rotation: • • Cyclic (sinusoidal) position error proportional to eccentricity in function of angle. Position error seen in opposite phase in each sensor (displaced 180 degrees). Angular position of both sensors used for eccentricity characterization and compensation. Complete revolutions required for full characterization. Systematic Error Position Error Possible to quantify off-centre displacement only with trough position sensors Reproducibility of Eccentricity curve can be taken as a diagnostic tool for precision determination BE-BI-PM Jose Luis Sirvent Blasco (jsirvent@cern. ch) 6
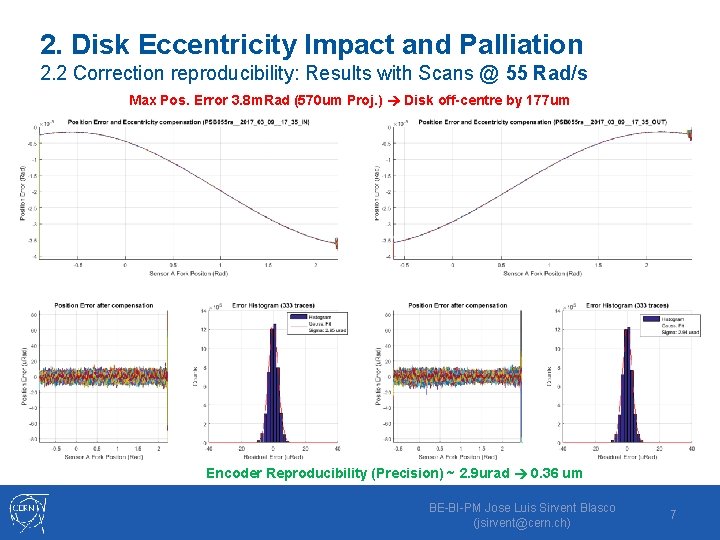
2. Disk Eccentricity Impact and Palliation 2. 2 Correction reproducibility: Results with Scans @ 55 Rad/s Max Pos. Error 3. 8 m. Rad (570 um Proj. ) Disk off-centre by 177 um Encoder Reproducibility (Precision) ~ 2. 9 urad 0. 36 um BE-BI-PM Jose Luis Sirvent Blasco (jsirvent@cern. ch) 7
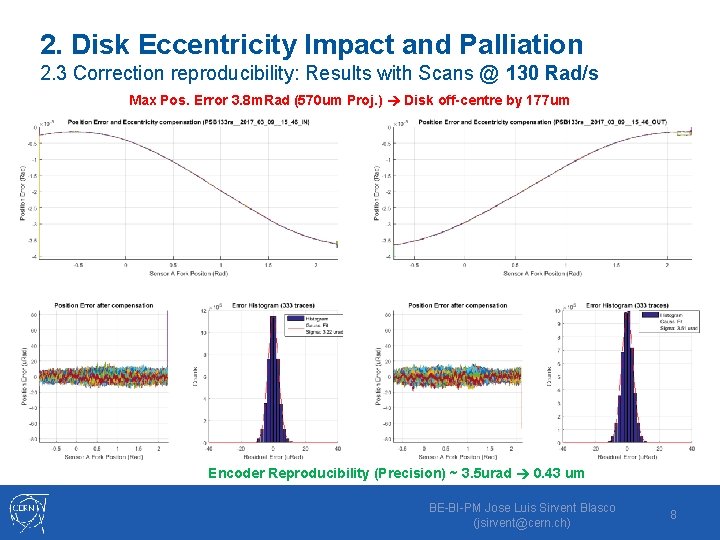
2. Disk Eccentricity Impact and Palliation 2. 3 Correction reproducibility: Results with Scans @ 130 Rad/s Max Pos. Error 3. 8 m. Rad (570 um Proj. ) Disk off-centre by 177 um Encoder Reproducibility (Precision) ~ 3. 5 urad 0. 43 um BE-BI-PM Jose Luis Sirvent Blasco (jsirvent@cern. ch) 8
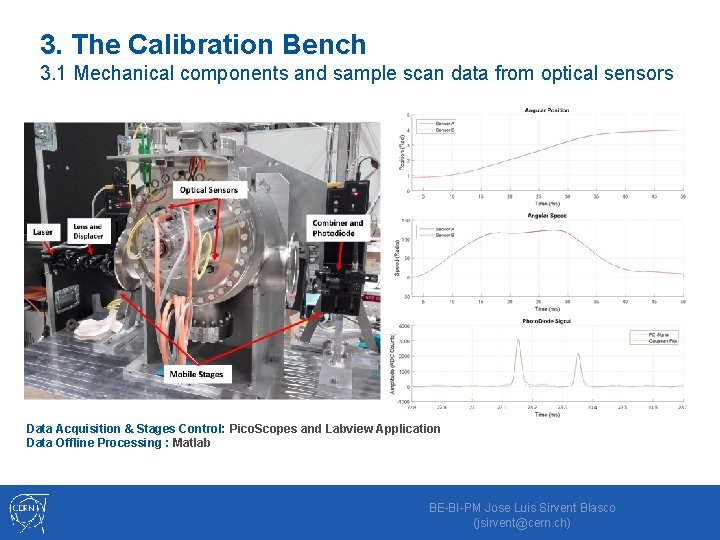
3. The Calibration Bench 3. 1 Mechanical components and sample scan data from optical sensors Data Acquisition & Stages Control: Pico. Scopes and Labview Application Data Offline Processing : Matlab BE-BI-PM Jose Luis Sirvent Blasco (jsirvent@cern. ch)
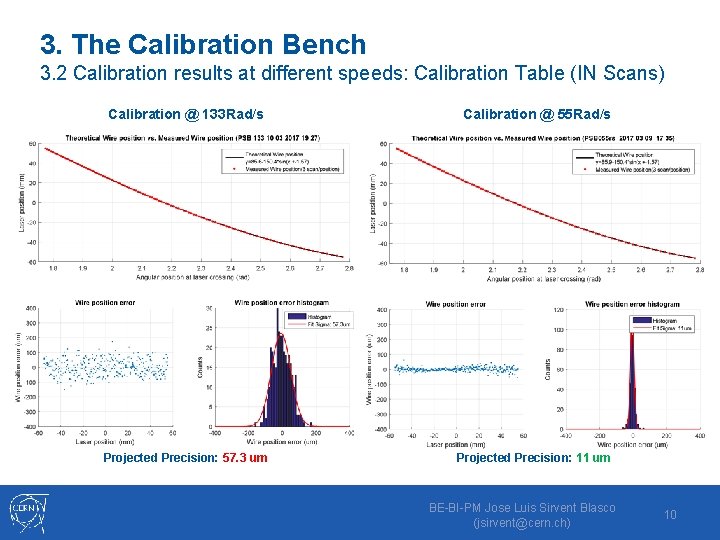
3. The Calibration Bench 3. 2 Calibration results at different speeds: Calibration Table (IN Scans) Calibration @ 133 Rad/s Calibration @ 55 Rad/s Projected Precision: 57. 3 um Projected Precision: 11 um BE-BI-PM Jose Luis Sirvent Blasco (jsirvent@cern. ch) 10
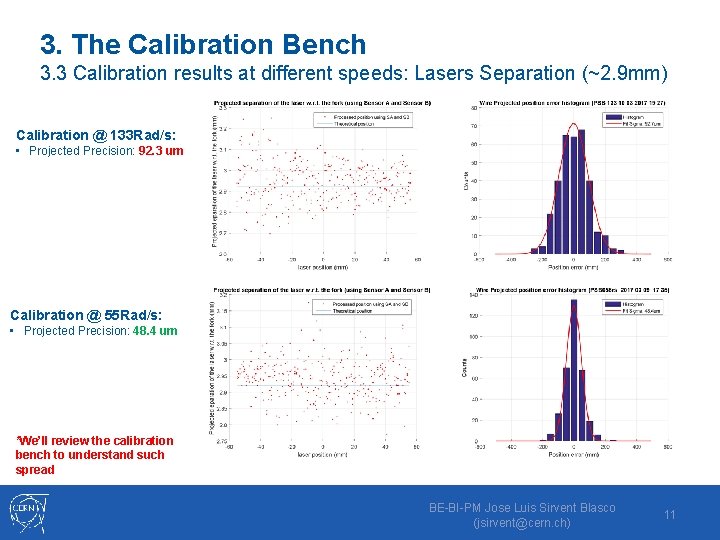
3. The Calibration Bench 3. 3 Calibration results at different speeds: Lasers Separation (~2. 9 mm) Calibration @ 133 Rad/s: • Projected Precision: 92. 3 um Calibration @ 55 Rad/s: • Projected Precision: 48. 4 um *We’ll review the calibration bench to understand such spread BE-BI-PM Jose Luis Sirvent Blasco (jsirvent@cern. ch) 11
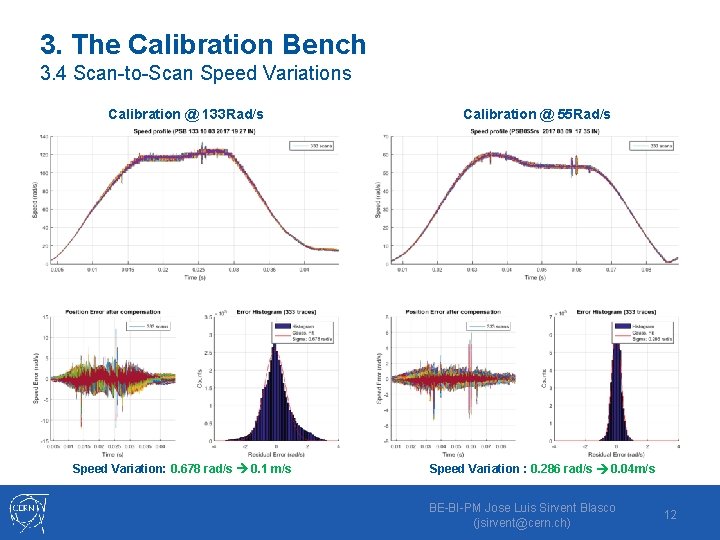
3. The Calibration Bench 3. 4 Scan-to-Scan Speed Variations Calibration @ 133 Rad/s Speed Variation: 0. 678 rad/s 0. 1 m/s Calibration @ 55 Rad/s Speed Variation : 0. 286 rad/s 0. 04 m/s BE-BI-PM Jose Luis Sirvent Blasco (jsirvent@cern. ch) 12
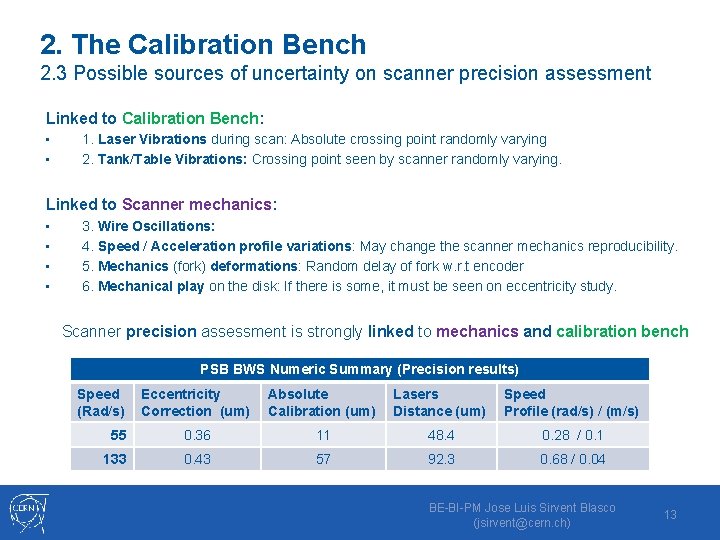
2. The Calibration Bench 2. 3 Possible sources of uncertainty on scanner precision assessment Linked to Calibration Bench: • • 1. Laser Vibrations during scan: Absolute crossing point randomly varying 2. Tank/Table Vibrations: Crossing point seen by scanner randomly varying. Linked to Scanner mechanics: • • 3. Wire Oscillations: 4. Speed / Acceleration profile variations: May change the scanner mechanics reproducibility. 5. Mechanics (fork) deformations: Random delay of fork w. r. t encoder 6. Mechanical play on the disk: If there is some, it must be seen on eccentricity study. Scanner precision assessment is strongly linked to mechanics and calibration bench PSB BWS Numeric Summary (Precision results) Speed (Rad/s) Eccentricity Correction (um) Absolute Calibration (um) Lasers Distance (um) Speed Profile (rad/s) / (m/s) 55 0. 36 11 48. 4 0. 28 / 0. 1 133 0. 43 57 92. 3 0. 68 / 0. 04 BE-BI-PM Jose Luis Sirvent Blasco (jsirvent@cern. ch) 13
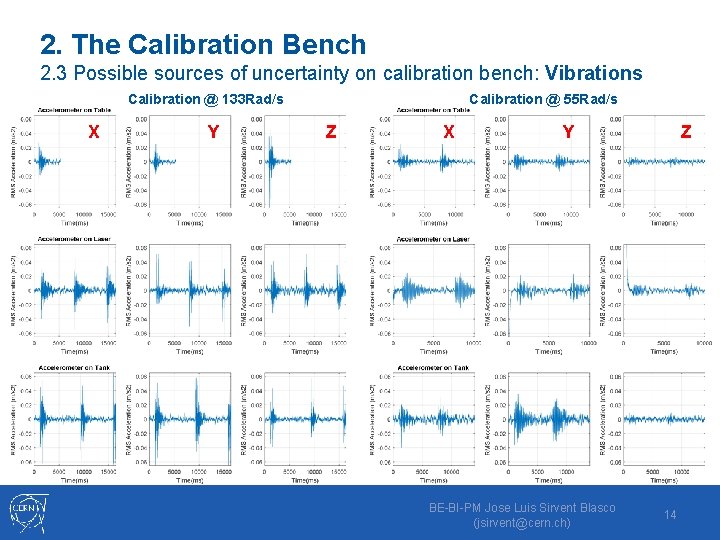
2. The Calibration Bench 2. 3 Possible sources of uncertainty on calibration bench: Vibrations Calibration @ 55 Rad/s Calibration @ 133 Rad/s X Y Z X Y BE-BI-PM Jose Luis Sirvent Blasco (jsirvent@cern. ch) Z 14

BE-BI-PM Jose Luis Sirvent Blasco 15 (jsirvent@cern. ch)
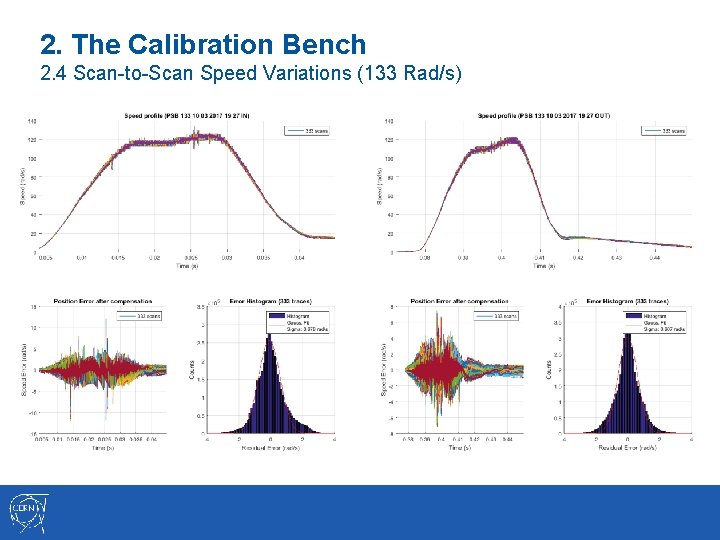
2. The Calibration Bench 2. 4 Scan-to-Scan Speed Variations (133 Rad/s)
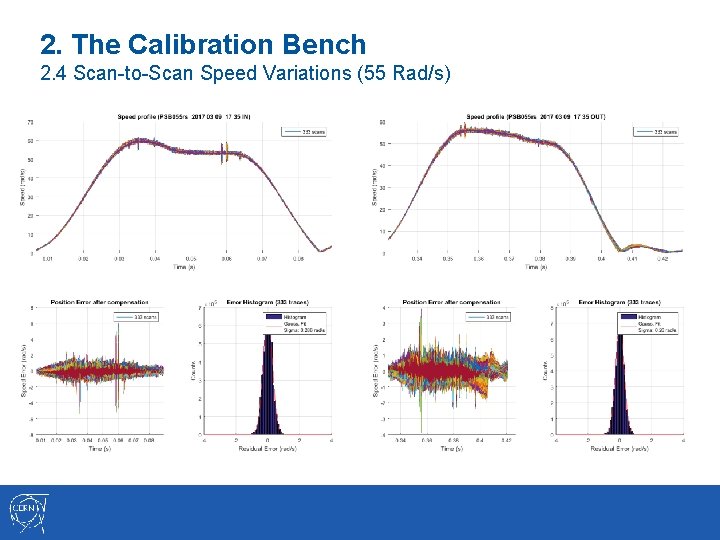
2. The Calibration Bench 2. 4 Scan-to-Scan Speed Variations (55 Rad/s)
- Slides: 17