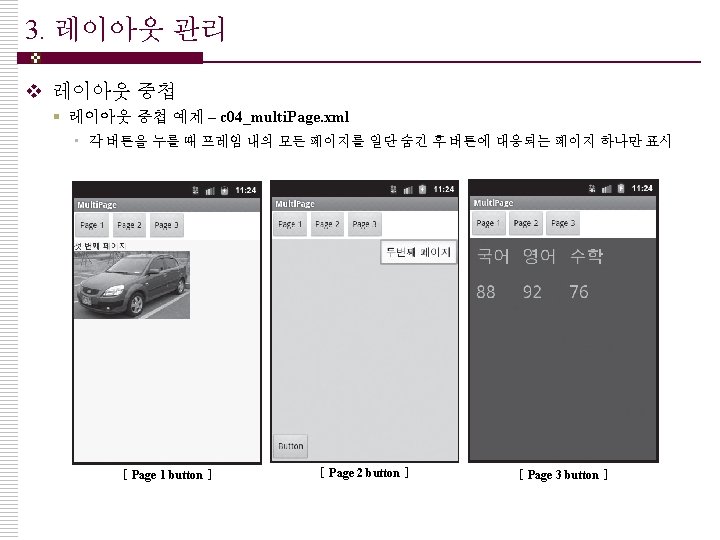
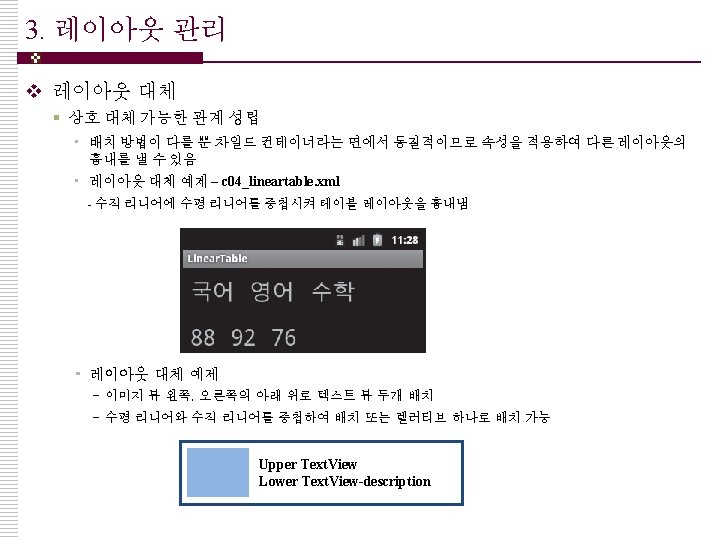
Android Programming Complete Guide 2 v Manifest Android
")


 안드로이드 프로그래밍 정복(Android Programming Complete Guide)")
 v 뷰의 계층 § View도 자바 클래스의 일종이므로 루트인 Object로부터 파생")
 v 뷰의 계층 § View로부터 파생된 View. Group의 서브 클래스 §")
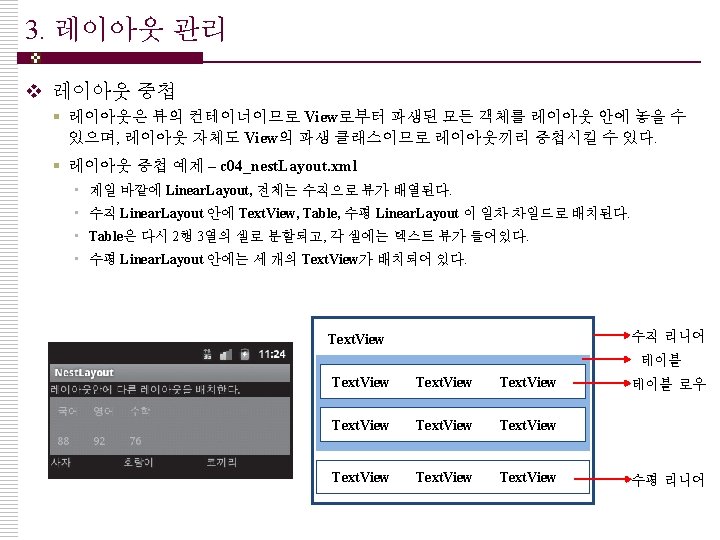
 v Text. View § single. Line • 텍스트가 위젯의 폭보다 길")
 v Image. View 고해상도 이미지 § jpg, png, gif 등의 이미지")
 v 버튼과 에디트 § View, Text. View의 서브 클래스이며 고유의 속성은")
 v 버튼과 에디트 § SDK 2. 3(진저 브레드)에서 에디트의입력 기능 개선")


 § 높이가 다른 차일드 뷰를 수평으로")
 § 중요도에 따라 차일드의 크기를 균등")
 c 03_weight 3. xml <? xml")
 c 03_padding 2. xml <Linear. Layout")
")


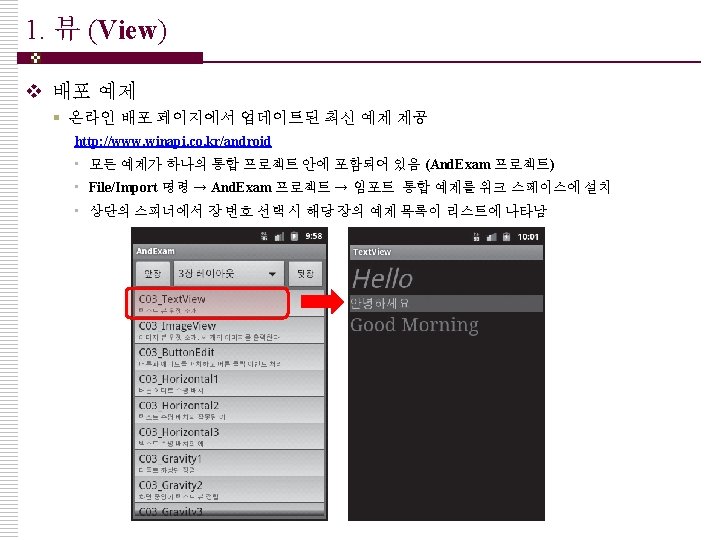
- Slides: 90
첫 번째 예제 안드로이드 프로그래밍 정복(Android Programming Complete Guide)
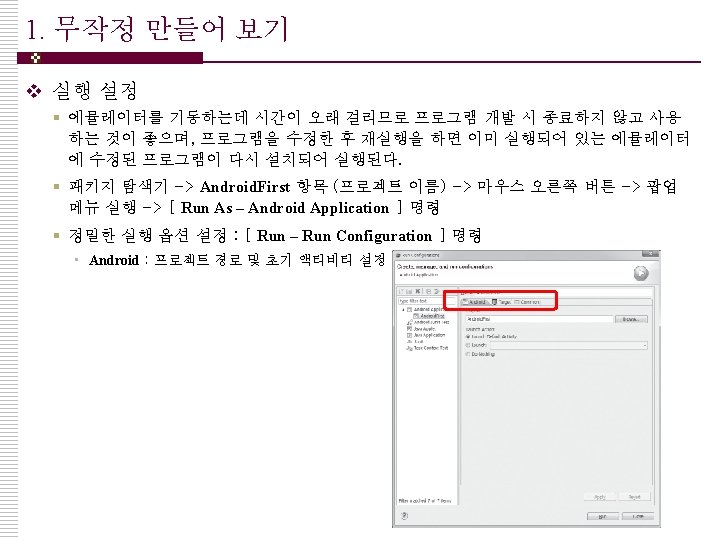
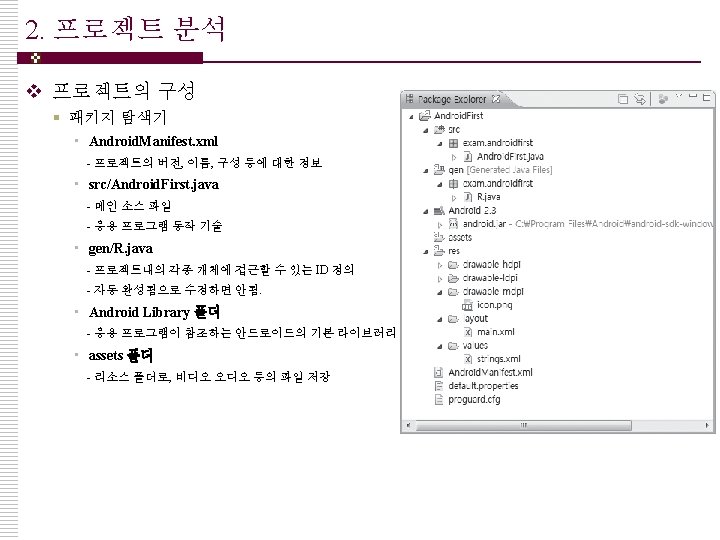
2. 프로젝트 분석 v 프로젝트 구성 § Manifest • 응용 프로그램의 구성 정보 관리 • 프로젝트에 상관없이 [ Android. Manifest. xml ]으로 이름 고정 • 각 페이지는 매니페스트를 구성하는 엘리먼트들을 그래픽 환경에서 편집할 수 있도록 구성 • 하단의 마지막 탭 [ Android. Manifest. xml ] 클릭 -> 텍스트 형태로 편집 가능 <? xml version=“ 1. 0” encoding=“utf-8”? > <manifest xmlns: android=http: //schemas. android. com/apk/res/android package=“exam. Android. First” android: version. Code=“ 1” android: version. Name=“ 1. 0”> <application android: icon=“@drawable/icon” android: label=“@string/app_name”> <activity android: name=“. Android. First” android: label=“@string/app_name”> <intent-filter> <action android: name=“android. intent. action. MAIN”/> <category android: name=“android. intent. cetegory. LAUNCHER”/> </intent-filter> </activity> </application> <uses-sdkandroid: min. Sdk. Version=“ 9”/> </manifest>
2. 프로젝트 분석 v 프로젝트 구성 § Manifest • 메인 소스 파일인 Android. First. java 파일 - 이 파일의 자바 코드에 의해 프로그램이 초기화됨 - 메인 클래스인 Android. First는 Activity 클래스를 상속받음 package exam. androidfirst; import android. app. Activity; import android. os. Bundle; public class Android. First extends Activity { /** Called when the activity is first created. */ @Override public void on. Create(Bundle saved. Instance. State) { super. on. Create(saved. Instance. State); set. Content. View(R. layout. main); } } • set. Content. View 메서드는 세 가지 원형으로 정의됨 • 인수의 타입에 따른 레이아웃 정의 방법 - XML 파일에 레이아웃을 기술, 레이아웃 파일의 리소스 ID를 set. Content. View 메서드로 전달 - 뷰 객체를 동적으로 생성한 후 set. Content. View 메서드로 전달 void Activity. set. Content. View (int layout. Res. ID) void Activity. set. Content. View (View view [, View. Group. Layout. Params params])
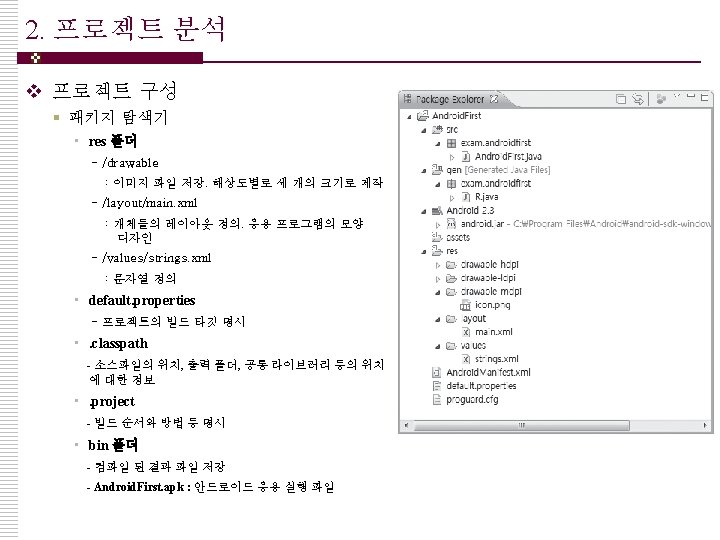
2. 프로젝트 분석 v 프로젝트 구성 § Layout • 패키지 탐색기 -> res/layout 폴더 -> main. xml 파일 • GUI 디자인 뷰에서 마우스로 레이아웃 편집 및 확인 가능 • 하단의 main. xml 탭 클릭 시 텍스트 형 태로 XML 파일 편집 가능 • 루트 엘리먼트에 android 네임 스페이 스 정의 • Linear Layout - 가장 흔하게 사용되는 레이아웃 - 차일드를 수평으로나 수직으로 나란히 배 열하는 컨테이너 • @ : 리소스에서 ID를 참조함 <? xml version=“ 1. 0” encoding=“utf-8”? > <Linear. Layout xmlns: android=http: //schemas. android. com/apk/res/android: orientation=“vertical” android: layout_width=“fill_parent” android: layout_height=“fill_parent”> <Text. View android: layout_width=“fill_parent” android: layout_height=“wrap_content” android: text=“@string/hello”/> </Linear. Layout> *네임 스페이스 : 어휘의 중복을 방지하기 위한 XML 표준 장치
2. 프로젝트 분석 v 프로젝트 구성 § Layout • 패키지 탐색기 -> values 폴더 -> strings. xml 파일 • GUI 뷰에서 마우스로 편집 및 확인 가능 • 하단의 strings. xml 탭 -> 텍스트 형 태로 XML 편집 가능 • 문자열 수정 후 재실행 ( Ctrl + S , Ctrl + F 11 ) § R. java • 코드 및 XML 파일에서 참조하는 리 소스 ID 정의 • 개발툴이 자동으로 관리하므로 개발 자가 임의로 편집해서는 안되며 그 럴 필요도 없다. • 비주얼 C++의 resource. h에 해당 <? xml version=“ 1. 0” encoding=“utf-8”? > <resources> <string name=“hello”>Hello World, Android. First!</string> <string name=“app_name”>Android. First</string> </resources> /* AUTO-GENERATED FILE. DO NOT MODIFY. * * This class was automatically generated by the aapt tool from the resource data it found. * It should not be modified by hand. */ package exam. Android. First; public final class R { public static final class attr { } public static final class drawable { public static final int icon=0 x 7 f 020000; } public static final class layout { public static final int main=0 x 7 f 030000; } public static final class string { public static final int app_name=0 x 07 f 040001; public static final int hello=0 x 7 f 040000; } }
2. 프로젝트 분석 v 프로젝트 구성 § strings. xml : hello 문자열 정의 § main. xml : 정의된 문자열을 Linear Layout의 Text View에 넣는다 § Android. First. java : set. Content. View 메서드 호출, 레이아웃을 액티비티에 배치 § R. java : 각 파일들이 참조하는 객체의 ID 정의 Android. First. java 액티비티 생성 R. layout. main 레이아웃 배치 R. java main, hello 등의 명칭 정의 main. xml Linear. Layout Text. View @string/hello strings. xml Hello = Hello World, Android. First
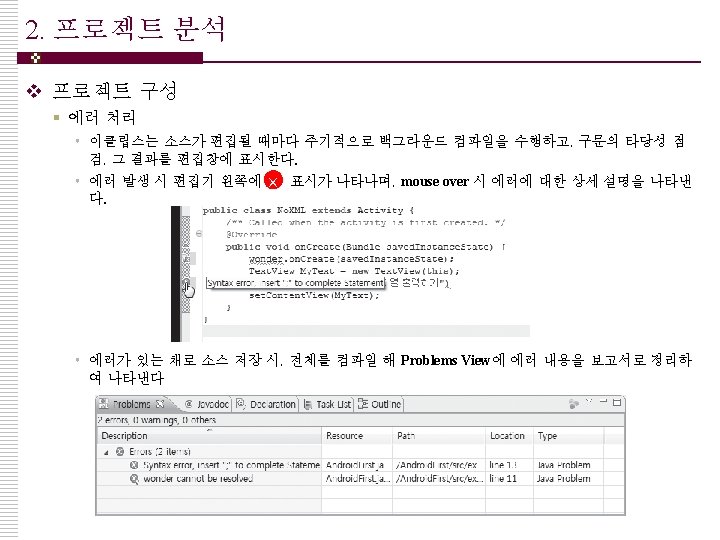
2. 프로젝트 분석 v 프로젝트 구성 § XML 레이아웃의 장점 • XML 레이아웃과 코드 레이아웃 모두 사용 가능 • 패키지 탐색기 -> src/exam. Android. First 노드 -> Android. First. java package exam. Android. First; import android. app. Activity; import android. os. Bundle; import android. widget. Text. View; public class Android. First extends Activity { public void on. Create(Bundle saved. Instance. State) { super. on. Create(saved. Instance. State); Text. View My. Text = new Text. View(this); My. Text. set. Text(“코드로 문자열 출력하기”); set. Content. View(My. Text); } } • Text. View 객체를 생성 및 초기화 한 후 set. Content. View 매서드로 전달 • 안드로이드는 유니코드 기반이므로 한글 출력 가능하지만, 에뮬레이터 상에서 한글 입력은 불가 능
레이아웃 (Layout) 안드로이드 프로그래밍 정복(Android Programming Complete Guide)
1. 뷰 (View) v 뷰의 계층 § View도 자바 클래스의 일종이므로 루트인 Object로부터 파생 § View로부터 직접 파생되는 모든 클래스가 바로 위젯이며 스스로를 그릴 수 있는 능력을 가 짐 Object Analog. Clock View Text. View Edit. Text Button Auto. Complete. Text. View Compound. Button Chronometer Digital. Clock Image. View Image. Button Surface. View GLSurface. View Progress. Bar Check. Box Radio. Button Toggle. Button Video. View Seek. Bar Abs. Seek. Bar Rating. Bar
1. 뷰 (View) v 뷰의 계층 § View로부터 파생된 View. Group의 서브 클래스 § 다른 뷰들을 차일드로 포함하며 차일드를 정렬하는 기능을 가짐 Object Frame. Layout Scroll. View, Horizontal. Scroll. View Tab. Host, Time. Picker, Date. Picker View. Animator View. Group Absolute. Layout View. Flipper Text. Switcher View. Switcher Image. Switcher Web. View Relative. Layout Linear. Layout Radio. Group, Zoom. Controls Table. Layout, Table. Row Tab. Widget Adapter. View Abs. List. View Grid. View Abs. Spinner Gallery
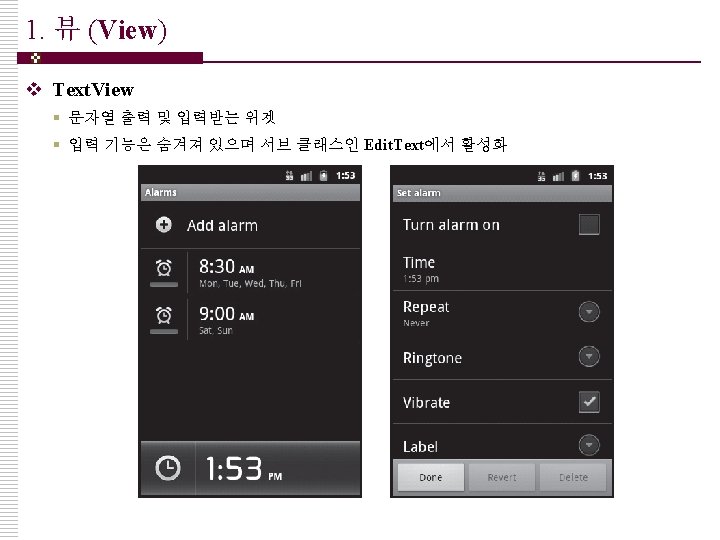
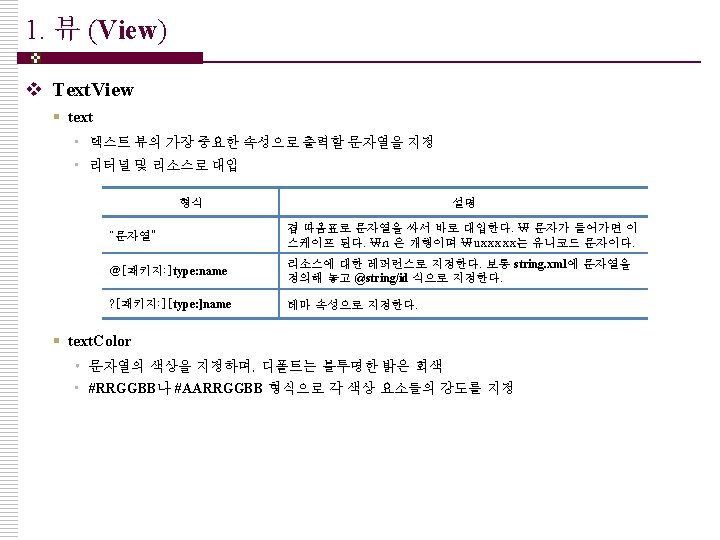
1. 뷰 (View) v Text. View § single. Line • 텍스트가 위젯의 폭보다 길 때 강제로 한 줄 에 출력 • 속성의 디폴트는 false로 폭보다 더 긴 줄은 자동으로 아래쪽으로 개행 [ Text. View 예제 실행 결과 ] string. xml <? xml version=“ 1. 0” encoding=“utf-8”> <resources> <string name=“hello”>Hello World, Text. View. Test!</string> <string name=“app_name”>Text. View. Test</string> <string name=“insa”>Hello</string> <string name=“anyoung”>안녕하세요</string> </resources> main. xml <? xml version=“ 1. 0” encoding=“utf-8”> <Linear. Layout xmlns: android=http: //schemas. android. com/apk/res/android: orientation=“vertical” android: layout_width=“fill_parent” android: layout_height=“fill_parent”> <Text. View android: layout_width=“fill_parent” android: layout_height=“wrap_content” android: text=“@string/insa” android: text. Color=“#ff 0000” android: text. Size=“ 20 pt” android: text. Style=“italic”/> <Text. View android: layout_width=“fill_parent” android: layout_height=“wrap_content” android: text=“@string/anyoung” android: text. Size=“ 20 sp” android: background=“@0000 ff”/> <Text. View android: layout_width=“fill_parent” android: layout_height=“wrap_content” android: text=“Good Morning” android: text. Color=“#8000 ff 00” android: text. Size=“ 5 mm” android: typeface=“serif”/> </Linear. Layout>
1. 뷰 (View) v Image. View 고해상도 이미지 § jpg, png, gif 등의 이미지 포맷을 지원 저해상도 이미지 § SDK 1. 6 이후 밀도 별로 세 개의 폴더가 존재하며, 해상도 별로 각 폴더에 이미지 를 넣어두면 운영체제가 사용할 이미지 를 결정 중해상도 이미지 c 03_imageviewtest. xml [ Image. View 예제 실행 결과 ] <? xml version=“ 1. 0” encoding=“utf-8”> <Linear. Layout xmlns: android=http: //schemas. android. com/apk/res/android: orientation=“vertical” android: layout_width=“fill_parent” android: layout_height=“fill_parent”> <Image. View android: layout_width=“fill_parent” android: layout_height=“wrap_content” android: src=“@drawable/pride”/> <Image. View android: layout_width=“fill_parent” android: layout_height=“wrap_content” android: src=“@drawable/pride” android: max. Height=“ 70 px” android: max. Width=“ 120 px” android: adjust. View. Bounds=“true”/> <Image. View android: layout_width=“fill_parent” android: layout_height=“wrap_content” android: src=“@drawable/dog” android: tint=“#4000 ff 00”/> </Linear. Layout>
1. 뷰 (View) v 버튼과 에디트 § View, Text. View의 서브 클래스이며 고유의 속성은 따로 가지지 않음 § Button : 사용자로부터 명령을 입력 받음 § Edit. Text : 문자열을 입력 받음 (에디트) c 03_buttonedit. xml <? xml version=“ 1. 0” encoding=“utf-8”> <Linear. Layout xmlns: android=http: //schemas. android. com/apk/res/android: orientation=“vertical” android: layout_width=“fill_parent” android: layout_height=“fill_parent”> <Edit. Text android: layout_width=“wrap_content” android: layout_height=“wrap_content” android: id=“@+id/edit” android: text=“여기다 입력”/> <Button android: layout_width=“wrap_content” android: layout_height=“wrap_content” android: id=“@+id/btn” android: text=“입력 완료”/> </Linear. Layout>
1. 뷰 (View) v 버튼과 에디트 § SDK 2. 3(진저 브레드)에서 에디트의입력 기능 개선 • 입력하는 위치 아래 쪽에 나타나는 오각형 모양의 마커를 드래그하면 입력 위치를 옮길 수 있음 • 에디트를 롱 프레스하면 팝업 메뉴가 나타나고, Select word 명령 선택 시 현재 단어가 선택됨 • 선택 영역 좌우의 사각형 마커를 드래그하여 선택 영역 변경 및 클립보드로 복사, 붙이기 가능 • 화면 키보드는 입력하는 글자를 보고 후보 단어를 보여주어 긴 단어의 입력을 도와줌 c 03_Buttonedit. java package exam. andexam; import android. app. *; import android. os. *; import android. view. *; import android. widget. *; public class C 03_Button. Edit extends Activity { public void on. Create(Bundle saved. Instance. State) { super. on. Create(saved. Instance. State); set. Content. View(R. layout. c 03_buttonedit); Button btn = (Button)find. View. By. Id(R. id. btn); btn. set. On. Click. Listener(new Button. On. Click. Listener() { public void on. Click(View v) { Edit. Text edit = (Edit. Text)find. View. By. Id(R. id. edit); String str = edit. get. Text(). to. String(); Toast. make. Text( C 03_Button. Edit. this, str, Toast. LENGTH_SHORT). show(); } }
2. 리니어 레이아웃 v 방향 설정 c 03_horizontal 1. xml <Linear. Layout xmlns: android=http: //schemas. android. com/apk/res/android: orientation=“horizontal” android: layout_width=“fill_parent” android: layout_height=“fill_parent” > … [ Horizontal ] c 03_horizontal 2. xml <? xml version="1. 0" encoding="utf-8"? > <Linear. Layout xmlns: android="http: //schemas. android. com/apk/res/android" android: orientation="horizontal" android: layout_width="fill_parent" android: layout_height="fill_parent" >. . [ Horizontal 2 ] c 03_horizontal 3. xml … <Text. View android: layout_width=“wrap_content” android: layout_height=“wrap_content” android: text=“@string/insa” android: text. Color=“#ff 0000” android: text. Size=“ 20 pt” android: text. Style=“italic”/> … 에뮬레이터 방향 가로로 변경 [ Horizontal 3 ]
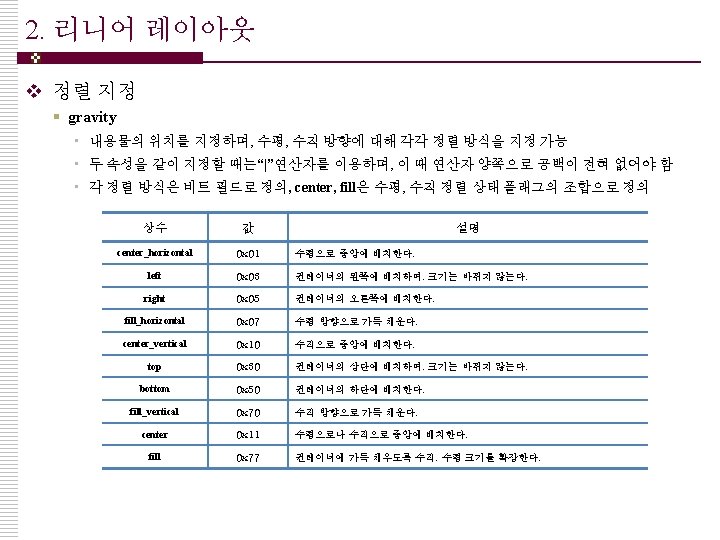
2. 리니어 레이아웃 v 정렬 지정 § gravity c 03_gravity 1. xml c 03_gravity 2. xml <? xml version=“ 1. 0” encoding=“utf-8”> <Linear. Layout xmlns: android=http: //schemas. android. com/apk/res/android: orientation=“vertical” android: layout_width=“fill_parent” android: layout_height=“fill_parent” > <Text. View android: layout_width=“fill_parent” android: layout_height=“fill_parent” android: text=“정렬 테스트” android: text. Size=“ 30 pt” android: text. Color=“#00 ff 00”/> </Linear. Layout> <Text. View android: layout_width=“fill_parent” android: layout_height=“fill_parent” android: text=“정렬 테스트” android: text. Size=“ 30 pt” android: text. Color=“#00 ff 00” android: gravity=“center”/>
2. 리니어 레이아웃 v 정렬 지정 § gravity c 03_gravity 3. xml c 03_gravity 4. xml <Text. View android: layout_width=“fill_parent” android: layout_height=“fill_parent” android: text=“정렬 테스트” android: text. Size=“ 30 pt” android: text. Color=“#00 ff 00” android: gravity=“center_vertical”/> <Text. View android: layout_width="fill_parent" android: layout_height="fill_parent" android: text="정렬 테스트" android: text. Size="30 sp" android: text. Color="#00 ff 00“ android: gravity="center_vertical|right"/>
2. 리니어 레이아웃 v 정렬 지졍 § gravity c 03_lgravity 1. xml <Text. View android: layout_width=“wrap_content” android: layout_height=“fill_parent” android: text=“정렬 테스트” android: text. Size=“ 30 pt” android: text. Color=“#00 ff 00” android: background=“#ff 0000” android: layout_gravity=“center”/> <Text. View android: layout_width=“wrap_content” android: layout_height=“wrap_content” android: text=“정렬 테스트” android: text. Size=“ 30 pt” android: text. Color=“#00 ff 00” android: background=“#ff 0000” android: layout_gravity=“center”/> [ lgravity 1 – width 만 변경 ] [ lgravity 1 – width, height 모두 변경 ]
2. 리니어 레이아웃 c 03_lgravity 2. xml v 정렬 지정 <? xml version=“ 1. 0” encoding=“utf-8”> <Linear. Layout xmlns: android=http: //schemas. android. com/apk/res/android: orientation=“vertical” android: layout_width=“fill_parent” android: layout_height=“fill_parent” android: gravity=“center” > <Text. View android: layout_width=“wrap_content” android: layout_height=“wrap_content” android: text=“정렬 테스트” android: text. Size=“ 30 pt” android: text. Color=“#00 ff 00” android: background=“#ff 0000”/> </Linear. Layout> § gravity c 03_lgravity 3. xml [ lgravity 2 ] [ lgravity 3 ] <? xml version=“ 1. 0” encoding=“utf-8”> <Linear. Layout xmlns: android=http: //schemas. android. com/apk/res/android: orientation=“vertical” android: layout_width=“fill_parent” android: layout_height=“fill_parent” android: gravity=“center” > <Text. View android: layout_width=“wrap_content” android: layout_height=“wrap_content” android: text=“정렬 테스트” android: text. Size=“ 30 pt” android: text. Color=“#00 ff 00” android: background=“#ff 0000”/> <Button android: layout_width=“wrap_content” android: layout_heigth=“wrap_content” android: text=“버튼이다. ”/> </Linear. Layout>
2. 리니어 레이아웃 v 정렬 지정 § gravity c 03_lgravity 4. xml <? xml version=“ 1. 0” encoding=“utf-8”> <Linear. Layout xmlns: android=http: //schemas. android. com/apk/res/android: orientation=“vertical” android: layout_width=“fill_parent” android: layout_height=“fill_parent” android: gravity=“center” > <Text. View android: layout_width=“wrap_content” android: layout_height=“wrap_content” android: text=“정렬 테스트” android: text. Size=“ 30 pt” android: text. Color=“#00 ff 00” android: background=“#ff 0000” android: layout_gravity=“center_horizontal” android: gravity=“right|bottom”/> </Linear. Layout> [ lgravity 4 ]
2. 리니어 레이아웃 v 베이스 정렬 (baseline. Aligned) § 높이가 다른 차일드 뷰를 수평으로 정렬 시 하단 정렬 지정 (디폴트 true) c 03_base 1. xml ~ base 2. xml <? xml version=“ 1. 0” encoding=“utf-8”> <Linear. Layout xmlns: android=http: //schemas. android. com/apk/res/android: orientation=“horizontal” android: layout_width=“fill_parent” android: layout_height=“fill_parent” android: baseline. Aligned=“ture” > <Text. View android: layout_width=“wrap_content” android: layout_height=“wrap_content” android: text=“Medium” android: text. Size=“ 10 pt”/> <Text. View android: layout_width=“wrap_content” android: layout_height=“wrap_content” android: text=“Small” android: text. Size=“ 5 pt” android: background=“#0000 ff”/> <Text. View android: layout_width=“wrap_content” android: layout_height=“wrap_content” android: text=“Large” android: text. Size=“ 20 pt” android: typeface=“serif”/> </Linear. Layout> [ base 1 ] [ base 2 ]
2. 리니어 레이아웃 v 차일드 영역 분할 (layout_weight) § 중요도에 따라 차일드의 크기를 균등 분할 § 중요도가 0이면 자신의 고유한 크기만큼, 1 이상이면 형제 뷰와의 비율에 따라 부모의 영 역을 균등하게 배분 c 03_weight 1. xml ~ weight 2. xml <? xml version=“ 1. 0” encoding=“utf-8”> <Linear. Layout xmlns: android=http: //schemas. android. com/apk/res/android: orientation=“vertical” android: layout_width=“fill_parent” android: layout_height=“fill_parent”> <Button android: layout_width=“fill_parent” android: layout_height=“wrap_content” android: text=“위쪽 버튼” android: layout_weight=“ 1”/> <Edit. Text android: layout_width=“fill_parent” android: layout_height=“wrap_content” android: text=“가운데 에디트” android: layout_weight=“ 3”/> <Button android: layout_width=“fill_parent” android: layout_height=“wrap_content” android: text=“아래쪽 버튼” android: layout_weight=“ 1”/> </Linear. Layout> [ weight 1 ] [ weight 2 ]
2. 리니어 레이아웃 v 차일드 영역 분할 (layout_weight) c 03_weight 3. xml <? xml version=“ 1. 0” encoding=“utf-8”> <Linear. Layout xmlns: android=http: //schemas. android. com/apk/res/android: orientation=“vertical” android: layout_width=“fill_parent” android: layout_height=“fill_parent”> <Button android: layout_width=“fill_parent” android: layout_height=“ 64 px” android: text=“Tool Bar” android: layout_weight=“ 0”/> <Edit. Text android: layout_width=“fill_parent” android: layout_height=“fill_parent” android: layout_weight=“ 1”/> <Button android: layout_width=“fill_parent” android: layout_height=“ 64 px” android: text=“Menu Bar” android: layout_weight=“ 0”/> </Linear. Layout> [ weight 3 ]
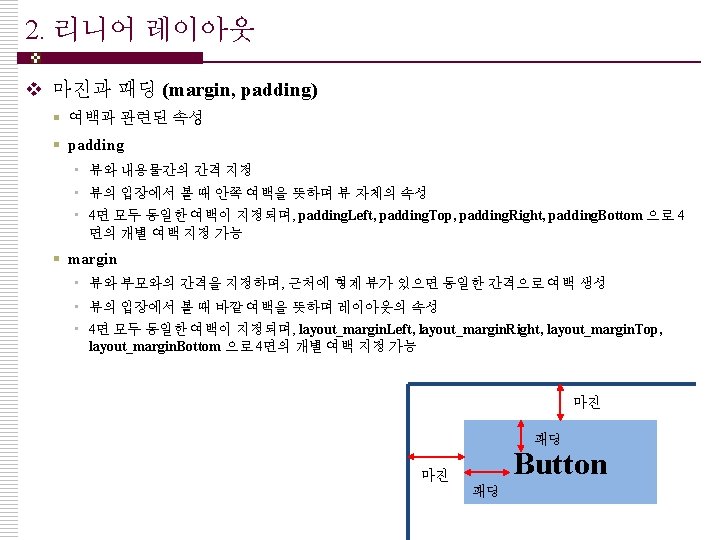
2. 리니어 레이아웃 v 마진과 패딩 (margin, padding) c 03_padding 2. xml <Linear. Layout android: layout_width=“fill_parent” android: layout_height=“wrap_content” android: background=“#ff 0000” android: layout_margin=“ 10 px”> c 03_padding 3. xml <Linear. Layout android: layout_width=“fill_parent” android: layout_height=“wrap_content” android: background=“#ff 0000” android: layout_margin=“ 10 px” android: padding=“ 10 px”> [ padding 2 ] [ padding 3 ] c 03_padding 1. xml <? xml version=“ 1. 0” encoding=“utf-8”> <Linear. Layout xmlns: android=http: //schemas. android. com/apk/res/android: orientation=“vertical” android: layout_width=“fill_parent” android: layout_height=“fill_parent”> <Edit. Text android: layout_width=“fill_parent” android: layout_height=“wrap_content” android: text=“Upper Text”/> <Linear. Layout android: layout_width=“fill_parent” android: layout_height=“wrap_content” android: background=“#ff 0000”> <Button android: layout_width=“fill_parent” android: layout_height=“wrap_content” android: text=“Button”/> </Linear. Layout> <Edit. Text android: layout_width=“fill_parent” android: layout_height=“wrap_content” android: text=“Lower Text”/> </Linear. Layout> [ padding 1 ]
레이아웃 관리 안드로이드 프로그래밍 정복(Android Programming Complete Guide)
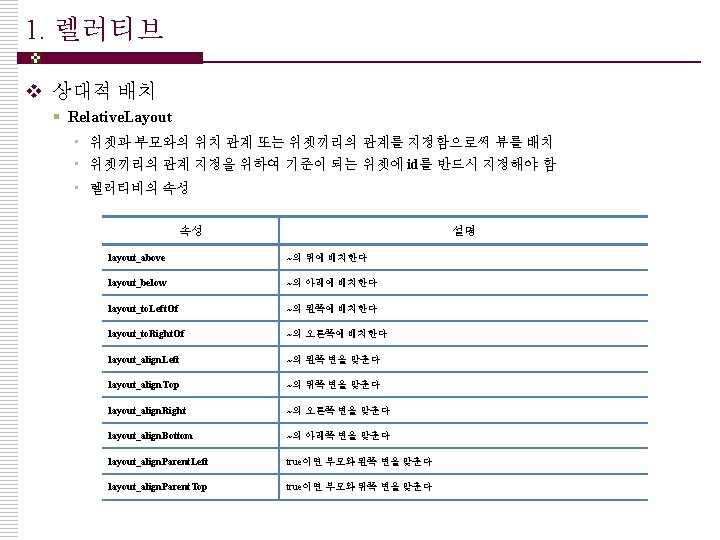
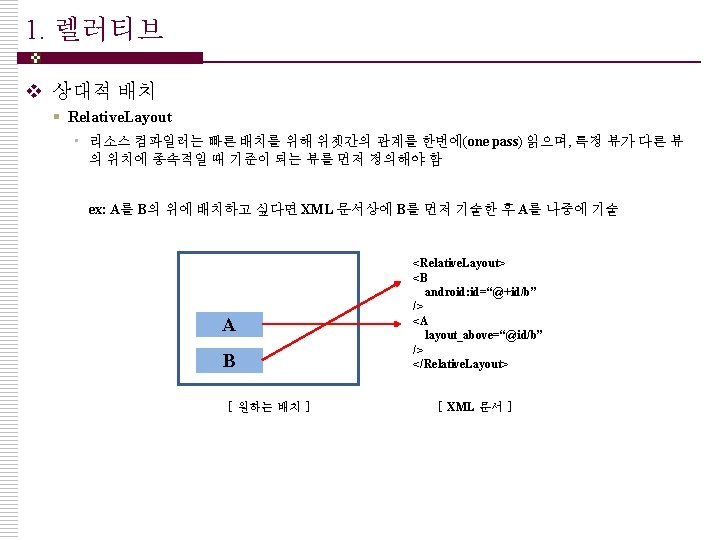
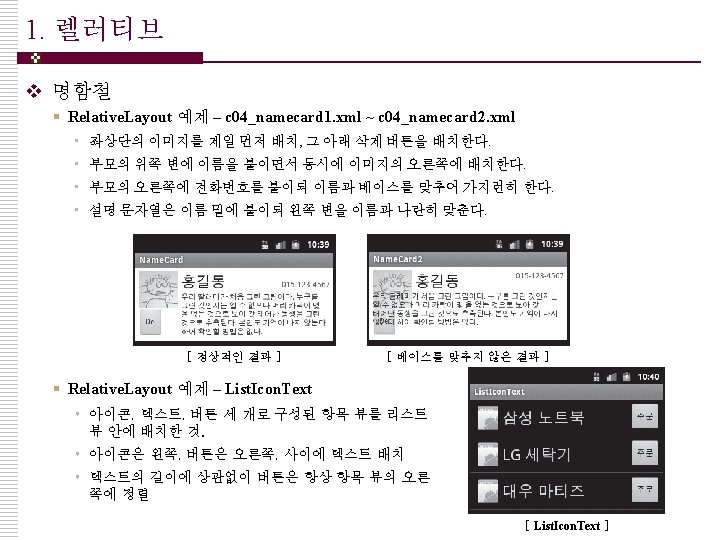
1. 렐러티브 c 04_relative 1. xml v 상대적 배치 § Relative. Layout [ relative 1 예제 실행 결과] § 레이아웃이 배치되는 순서 철수 철수 영희 <? xml version=“ 1. 0” encoding=“utf-8”> <Relative. Layout xmlns: android=http: //schemas. android. com/apk/res/android: orientation=“vertical” android: layout_width=“fill_parent” android: layout_height=“wrap_content”> <Text. View android: id=“@+id/chulsoo” android: layout_width=“wrap_content” android: layout_height=“wrap_content” android: layout_margin. Right=“ 20 px” android: text. Size=“ 15 pt” android: text=“철수”/> <Text. View android: id=“@+id/younghee” android: layout_width=“wrap_content” android: layout_height=“wrap_content” android: layout_to. Right. Of=“@id/chulsoo” android: text. Size=“ 15 pt” android: text=“영희”/> <Text. View android: id=“@+id/mongryong” android: layout_width=“wrap_content” android: layout_height=“wrap_content” android: layout_below=“@id/younghee” android: align. Parent. Right=“true” android: layout_margin. Left=“ 10 px” android: text. Size=“ 15 pt” android: text=“몽룡”/> <Text. View android: id=“@+id/chunhyang” android: layout_width=“wrap_content” android: layout_height=“wrap_content” android: layout_to. Right. Of=“@id/mongryong” android: layout_align. Bottom=“@id/mongryong” android: text. Size=“ 15 pt” android: text=“춘향”/> </Relative. Layout> 철수 영희 몽룡 좌상단에 철수 오른쪽에 영희 밑에 부모의 오른쪽에 철수 영희 춘향 몽룡 몽룡 왼쪽에 몽룡의 아래쪽 정렬
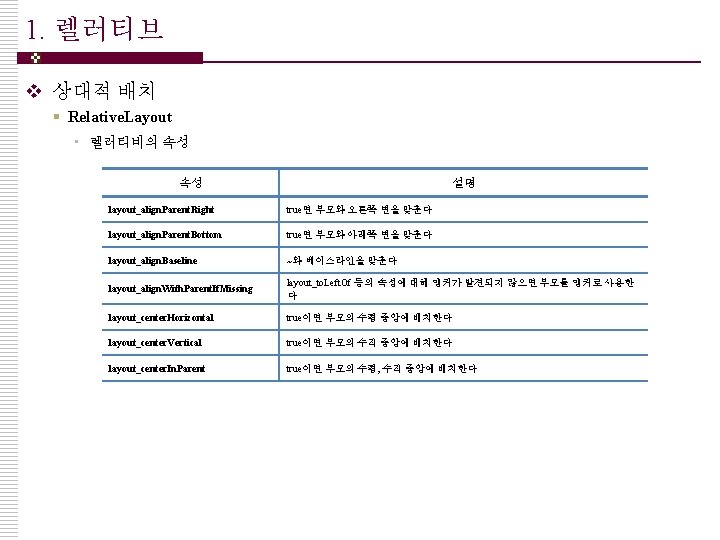
1. 렐러티브 v 앵커 변경 § 배치나 정렬과 직접적인 상관이 없는 특이한 속성 § layout_align. With. Parent. If. Missing : “사라졌을 때 부모에게 붙어라” • 위젯의 배치가 실행 중 변경될 시 동작을 지정 - 렐러티브 레이아웃은 위젯끼리의 상호 관계를 정의하며 기준이 되는 앵커의 상대적인 위치에 위젯을 배치 - 배치가 영구적이지 않고 실행 중 변경 가능 → 기준이 되는 앵커가 사라질 수 있음 c 04_ifmissing. xml <? xml version=“ 1. 0” encoding=“utf-8”> <Relative. Layout xmlns: android=http: //schemas. android. com/apk/res/android: layout_width=“fill_parent” android: layout_height=“wrap_content”> <Button android: id="@+id/btntoggle" android: layout_width="wrap_content" android: layout_height="wrap_content" android: text="아이콘토글" android: layout_align. Parent. Left="true" /> <Image. View android: id="@+id/icon" android: layout_width="wrap_content" android: layout_height="wrap_content" android: src="@drawable/icon" android: layout_align. Parent. Right="true" /> <Text. View android: layout_width="wrap_content" android: layout_height="wrap_content" android: text. Size="20 sp" android: text="안드로이드 정복" android: layout_to. Left. Of="@id/icon" android: layout_center. Vertical="true" android: layout_align. With. Parent. If. Missing="true" /> </Relative. Layout>
1. 렐러티브 v 앵커 변경 § 앵커 변경 테스트 – If. Missing. java ~ If. Missing 2. java c 04_If. Missing. java package exam. andexam; import android. app. *; import android. os. *; import android. view. *; import android. widget. *; [ If. Missing 실행 결과 ] public class C 04_If. Missing extends Activity { public void on. Create(Bundle saved. Instance. State) { super. on. Create(saved. Instance. State); set. Content. View(R. layout. c 04_ifmissing); find. View. By. Id( R. id. btntoggle). set. On. Click. Listener(new View. On. Click. Listener() { public void on. Click(View v) { Image. View img = (Image. View)find. View. By. Id(R. id. icon); if (img. get. Visibility() == View. VISIBLE) { img. set. Visibility(View. GONE); } else { img. set. Visibility(View. VISIBLE); } } }); [ If. Missing 2 실행 결과 ] } }
2. 기타 레이아웃 v Absolute. Layout § 관계나 순서에 상관없이 지정한 절대 좌표에 차일드 뷰를 배치한다. § 공식 문서에는 사용을 금지하였으며, Relative. Layout, Fream. Layout을 사용한다. c 04_absolute. xml <? xml version=“ 1. 0” encoding=“utf-8”> <Absolute. Layout xmlns: android=http: //schemas. android. com/apk/res/android: layout_width=“fill_parent” android: layout_height=“fill_parent”> <Text. View android: layout_width=“wrap_content” android: layout_height=“wrap_content” android: layout_x=“ 50 px” android: layout_y=“ 100 px” android: text. Size=“ 15 pt” android: text=“(50, 100)”/> <Text. View android: layout_width=“wrap_content” android: layout_height=“wrap_content” android: layout_x=“ 200 px” android: layout_y=“ 70 px” android: text. Size=“ 15 pt” android: text=“(200, 70)”/> </Absolute. Layout>
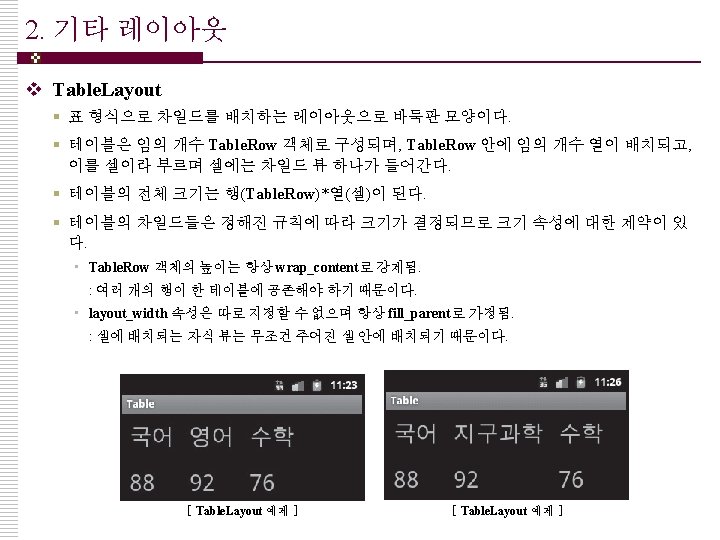
2. 기타 레이아웃 v Frame. Layout c 04_frame. xml <? xml version=“ 1. 0” encoding=“utf-8”> <Frame. Layout xmlns: android=http: //schemas. android. com/apk/res/android: layout_width=“fill_parent” android: layout_height=“fill_parent”> <Button android: id=“@+id/btn” android: layout_width=“wrap_content” android: layout_height=“wrap_content” android: text=“Push Button”/> <Imabe. View android: id=“@+id/img” android: layout_width=“wrap_content” android: layout_height=“wrap_content” android: src=“@drawable/pride”/> </Frame. Layout> c 04_Frame. java package exam. Layout; import android. app. *; import android. os. *; import android. view. *; import android. widget. *; public class Frame extends Activity { public void on. Create(Bundle saved. Instance. State) { super. on. Create(saved. Instance. Satae); set. Content. View(R. layout. frame); Button btn = (Button)find. View. By. Id(R. id. btn); btn. set. On. Click. Listener(new Button. On. Click. Listener() { public void on. Click(View v) { Image. View img=(Image. View)find. View. By. Id(R. id. img); if(img. get. Visibility() == View. VISIBLE) { img. set. Visibility(View. INVISIBLE); } else { img. set. Visibility(View. VISIBLE); } } }); } }
3. 레이아웃 관리 v 실행 중 속성 바꾸기 § 실행 중 속성 변경 예제 – c 04_codelayout. xml • 각 위젯에 id 속성이 지정되어 있음 • 위젯의 ID는 파일 형태의 리소스가 아니므로 대문자 사용 가능 • XML 문서에서 지정한 ID는 R. java 파일에 자동으로 정의됨 c 04_codelayout. xml R. java <? xml version="1. 0" encoding="utf-8"? > <Linear. Layout xmlns: android="http: //schemas. android. com/apk/res/android" android: id="@+id/mylinear" android: orientation="vertical" android: layout_width="fill_parent" android: layout_height="fill_parent" > <Button android: id="@+id/mybutton" android: layout_width="wrap_content" android: layout_height="wrap_content" android: text="버튼" /> <Text. View android: id="@+id/mytext" android: layout_width="wrap_content" android: layout_height="wrap_content" android: text="문자열" /> <Edit. Text android: id="@+id/myedit" android: layout_width="wrap_content" android: layout_height="wrap_content" android: text="에디트" /> </Linear. Layout> public final class R { public static final class attr { } public static final class drawable { public static final int icon=0 x 7 f 020000; } public static final class id { public static final int mybutton =0 x 7 f 050001; public static final int myedit =0 x 7 f 050003; public static final int mylinear =0 x 7 f 050000; public static final int mytext =0 x 7 f 050002; } public static final class layout { public static final int main=0 x 7 f 030000; } public static final class string { public static final int app_name=0 x 7 f 040001; public static final int hello=0 x 7 f 040000; } } c 04_Code. Layout. java public class C 04_Code. Layout extends Activity { public void on. Create(Bundle saved. Instance. State) { super. on. Create(saved. Instance. State); set. Content. View(R. layout. c 04_codelayout); } }
3. 레이아웃 관리 v 실행 중 속성 바꾸기 § 실행 중 속성 변경 예제 – c 04_Code. Layout 2. java • 메서드를 호출하기 전에 속성 변경의 대상이 되는 뷰를 찾음 • 이 메서드는 액티비티와 뷰에 정의되어 거의 모든 위치에서 호출이 가능 • 호출 객체에 따라 달리 사용되며, 액티비티에서 호출 시 전체 레이아웃에서 검색, 특정 뷰에서 검색 시 뷰의 차일드 중 하나를 검색 View Activity. find. View. By. Id (int id) View. find. View. By. Id (int id) • ID로부터(By. Id) 대응되는 뷰 객체(View) 를 찾는다(find). • id 인수로 검색 대상 뷰에 지정해 놓은 ID 를 전달 c 04_Code. Layout 2. java public class C 04_Code. Layout 2 extends Activity { public void on. Create(Bundle saved. Instance. State) { super. on. Create(saved. Instance. State); set. Content. View(R. layout. c 04_codelayout); Linear. Layout My. Linear=(Linear. Layout)find. View. By. Id(R. id. mylinear); My. Linear. set. Orientation(Linear. Layout. HORIZONTAL); Button My. Btn = (Button)find. View. By. Id(R. id. mybutton); My. Btn. set. Text. Size(40); Edit. Text My. Edit = (Edit. Text)find. View. By. Id(R. id. myedit); My. Edit. set. Background. Color(0 xff 00); } }
3. 레이아웃 관리 v 레이아웃 전개 § 레이아웃 전개 예제 – c 04_inflation. xml • 리니어 안에 텍스트 뷰 하나만 배치하되 몇 가지 속성을 대입 c 04_inflation. xml <? xml version="1. 0" encoding="utf-8"? > <Linear. Layout xmlns: android=http: //schemas. android. com/apk/res/android: orientation="vertical" android: layout_width="fill_parent" android: layout_height="fill_parent" android: background="#cccccc" > <Text. View android: layout_width=“fill_content" android: layout_height="wrap_content" android: gravity="center" android: text. Color="#ff 0000" android: text. Size="20 px" android: text=“Text. View" /> </Linear. Layout> c 04_Inflation. java public class C 04_Code. Layout extends Activity { public void on. Create(Bundle saved. Instance. State) { super. on. Create(saved. Instance. State); set. Content. View(R. layout. c 04_codelayout); } }
3. 레이아웃 관리 v 레이아웃 전개 § 레이아웃 전개 예제 – c 04_Inflation 2. java public class C 04_Inflation 2 extends Activity { public void on. Create(Bundle saved. Instance. State) { super. on. Create(saved. Instance. State); • new 연산자로 Linear. Layout 객체 생성 Linear. Layout linear = new Linear. Layout(this); linear. set. Orientation(Linear. Layout. VERTICAL); linear. set. Background. Color(Color. LTGRAY); • 객체 생성 후 속성값 변경 메서드 호출 Text. View text = new Text. View(this); text. set. Text("Text. View"); text. set. Gravity(Gravity. CENTER); text. set. Text. Color(Color. RED); text. set. Text. Size(20); - 방향, 배경색 등 지정 • Text. View 객체 생성 및 속성 지정 • View. Group의 메서드를 사용하여 텍스트 뷰를 리니어의 차일드로 넣어 둘 사이의 관계 정의 linear. add. View(text); set. Content. View(linear); } } void add. View (View child) void add. View (View child, int index) void add. View (View child, View. Group. Layout. Params params) • 뷰 그룹을 액티비티의 내용물로 등록 public void set. Content. View (int layout. Res ID) public void set. Content. View (View view [, View. Group. Layout. Params params])
3. 레이아웃 관리 v 레이아웃 전개 § 레이아웃 전개 예제 – c 04_Inflation 3. java • 앞 예제의 new 연산자와 속성 변경 메서드 호출이 전개자에 의해 대신 수행됨 c 04_Inflation 3. java public class C 04_Inflation 3 extends Activity { public void on. Create(Bundle saved. Instance. State) { super. on. Create(saved. Instance. State); Layout. Inflater inflater = (Layout. Inflater)get. System. Service( Context. LAYOUT_INFLATER_SERVICE); Linear. Layout linear = ( Linear. Layout)inflater. inflate(R. layout. c 04_inflation, null); set. Content. View(linear); } }
3. 레이아웃 관리 v 레이아웃 전개 § 레이아웃 전개 예제 – c 04_Inflation 4. java • Text. View 하나에 대해서만 XML 문서를 만들어 놓고 전개해서 사용 가능 • 패키지 탐색기의 layout 노드 팝업 메뉴 → New/File을 선택 → c 04_mytext. xml 문서를 추가 c 04_mytext. xml <? xml version="1. 0" encoding="utf-8"? > <Text. View xmlns: android="http: //schemas. android. com/apk/res/android" android: layout_width="fill_parent" android: layout_height="wrap_content" android: gravity="center" android: text. Color="#ff 0000" android: text. Size="20 px" android: text="Text. View" /> c 04_Inflation 4. java public class C 04_Inflation 4 extends Activity { public void on. Create(Bundle saved. Instance. State) { super. on. Create(saved. Instance. State); Linear. Layout linear = new Linear. Layout(this); linear. set. Orientation(Linear. Layout. VERTICAL); linear. set. Background. Color(Color. LTGRAY); Text. View text = (Text. View)View. inflate(this, R. layout. c 04_mytext, null); linear. add. View(text); set. Content. View(linear); } }
3. 레이아웃 관리 v 레이아웃 파라미터 § 레이아웃 파라미터 예제 – layoutparmeter, marginparameter c 04_layoutparameter. xml <? xml version=“ 1. 0” encoding=“utf-8”> <Linear. Layout xmlns: android=http: //schemas. android. com/apk/res/android: orientation=“vertical” android: layout_width=“fill_parent” android: layout_height=“fill_parent” android: background=“#ffffff” android: gravity=“center”> <Text. View android: layout_width=“wrap_content” android: layout_height=“wrap_content” android: text. Color=“#ff 0000” android: text. Size=“ 20 px” android: text=“Text. Vieiw” android: background=“#00 ff 00”/> </Linear. Layout> c 04_Layout. Parameter 2. java public class C 04_Layout. Parameter 2 extends Activity { public void on. Create(Bundle saved. Instance. State) { super. on. Create(saved. Instance. State); Linear. Layout linear = new Linear. Layout(this); linear. set. Orientation(Linear. Layout. VERTICAL); linear. set. Gravity(Gravity. CENTER); linear. set. Background. Color(Color. LTGRAY); Text. View text = new Text. View(this); text. set. Text("Text. View"); text. set. Text. Color(Color. RED); text. set. Text. Size(20); text. set. Background. Color(Color. GREEN); Linear. Layout. Params paramtext = new Linear. Layout. Params( Linear. Layout. Params. WRAP_CONTENT, Linear. Layout. Params. WRAP_CONTENT); linear. add. View(text, paramtext); set. Content. View(linear); } } [ layoutparameter 예제 ] [ Layout. Parameter 2 예제 ]
3. 레이아웃 관리 v 레이아웃 파라미터 § 레이아웃 파라미터 예제 – layoutparmeter, marginparameter c 04_marginparameter. xml <? xml version="1. 0" encoding="utf-8"? > <Linear. Layout xmlns: android="http: //schemas. android. com/apk/res/android" android: orientation="vertical" android: layout_width="fill_parent" android: layout_height="fill_parent" android: background="#cccccc" > <Button android: layout_width="wrap_content" android: layout_height="fill_parent" android: text="Button With Margin" android: layout_margin. Top="30 px" android: layout_margin. Bottom="30 px" /> </Linear. Layout> c 04_Margin. Parameter 2. java public class C 04_Margin. Parameter 2 extends Activity { public void on. Create(Bundle saved. Instance. State) { super. on. Create(saved. Instance. State); Linear. Layout linear = new Linear. Layout(this); linear. set. Orientation(Linear. Layout. VERTICAL); linear. set. Background. Color(Color. LTGRAY); Button btn = new Button(this); btn. set. Text("Button With Margin"); Linear. Layout. Params parambtn = new Linear. Layout. Params( Linear. Layout. Params. WRAP_CONTENT, Linear. Layout. Params. FILL_PARENT); parambtn. set. Margins(0, 30, 0, 30); linear. add. View(btn, parambtn); set. Content. View(linear); } }
3. 레이아웃 관리 v 레이아웃 파라미터 변경 § 배치 상태를 지정하는 레이아웃 파라미터는 자주 변경되지 않음 § 변경 시 아래의 메서드 사용 View. Group. Layout. Params get. Layout. Params () void set. Layout. Params (View. Group. Layout. Params params) § 레이아웃 파라미터 변경 예제 – c 04_setparameter. xml • 리니어의 layout_weight 속성을 실행 중 변경 c 04_setparameter. xml <? xml version="1. 0" encoding="utf-8"? > <Linear. Layout xmlns: android="http: //schemas. android. com/apk/res/android" android: layout_width="fill_parent" android: layout_height="fill_parent" > <Button android: id="@+id/btnleft" android: layout_width="0 px" android: layout_weight="1" android: layout_height="wrap_content" android: text="Left" /> <Button android: id="@+id/btnright" android: layout_width="0 px" android: layout_weight="1" android: layout_height="wrap_content" android: text="Right" /> </Linear. Layout>
3. 레이아웃 관리 v 레이아웃 파라미터 변경 § 레이아웃 파라미터 변경 예제 – c 04_Set. Parameter. java • 각 버튼을 누를 때 클릭한 버튼의 폭을 상대편 버튼의 3배로 변경 c 04_Set. Parameter. java public class C 04_Set. Parameter extends Activity { Button m. Left; Button m. Right; public void on. Create(Bundle saved. Instance. State) { super. on. Create(saved. Instance. State); set. Content. View(R. layout. c 04_setparameter); m. Left = (Button)find. View. By. Id(R. id. btnleft); m. Right = (Button)find. View. By. Id(R. id. btnright); m. Left. set. On. Click. Listener(new View. On. Click. Listener() { public void on. Click(View v) { set. Param(3, 1); } }); m. Right. set. On. Click. Listener(new View. On. Click. Listener() { public void on. Click(View v) { set. Param(1, 3); } }); [ Left 버튼을 누른 경우 ] } void set. Param(int left, int right) { Linear. Layout. Params lparam = (Linear. Layout. Params)m. Left. get. Layout. Params(); lparam. weight = left; m. Left. set. Layout. Params(lparam); Linear. Layout. Params rparam = (Linear. Layout. Params)m. Right. get. Layout. Params(); rparam. weight = right; m. Right. set. Layout. Params(rparam); } } [ Right 버튼을 누른 경우 ]