An introduction to programming concepts with Scratch in
 1")


 • • Choose the Looks menu Click on the “say")
 • • Change color effect")

 12")


 Move 200 steps Turn")


 Get bat 2 -a sprite")
 When and repeat from Control")


 to move the bat up with the up")


 Ask the user for age; 2) user types in")


 Click Variables menu; 2) click “Make a variable” 2)")


 Set")

 • Make 3 variables, A,")
 • Make 3 variables, A,")
 • Make 3 variables, A,")


 1. Plug")
")


- Slides: 86
An introduction to programming concepts with Scratch (in 5 hours + homework) 1
Who computes? • • • Scientists Engineers Businessmen Social scientists Artists FBI agents Brain surgeons Gamers Grandparents Everyone uses information in some way. Computers do information processing. 2
What can we do with Scratch? • • Learn some computing concepts. Learn some practical algorithms. Use Scratch as computing tool. Have fun with Scratch creating stories, games, art. 3
Part I: Looks and Motion • Goals: – – – Learn Scratch programming environment Learn the looks and motion menus Write a sequence of instructions 4
Start scratch and let’s go! • Click on the cat icon • Scratch programming environment comes up • We will first do simple things 5
Our Scratch environment • Stage is at upper right (where actors act and information is displayed) • Sprite is another name for actor. • Instruction menus/panel at left (instructions for the actors) • A script is another name for program or method; a script tells the actor what to do. • Programming area in center; here is where we construct scripts for the sprites 6
We start with the cat sprite We will learn to use many other sprites later. For now we use the cat as our only actor. We script the BEHAVIOR of our cat. 7
The LOOKS menu Has instructions for setting the color, size, and visibility of a sprite. Costumes will be used later. 8
The “hello” script (program) • • Choose the Looks menu Click on the “say hello” lego block Check your sprite behavior at the right Then click “say hello for 2 secs” Your very first Scratch program! 9
Try some other looks operations (click on menu items) • • Change color effect by 25 again Hide Show Change size by 10 again Set size to 100% 10
Let’s write a script to • • • Say “hello” for 2 seconds Then change color by 25 Then think “Hmm. . ” for 4 seconds Then change color by 75 Then change size by 200 Drag each instruction from the menu to the center script area. Connect them into a single block. Edit the parameters to get the numbers we want. 11
Our script (program) 12
A sequence or block is a simple script or program • • The first instruction is done first The second instruction is done second The last instruction is done last. (if any one instruction is done, then every on of them is done) 13
The WAIT instruction • WAIT is needed to slow down the acting so we can see or hear it properly (computers are too fast sometimes) • Get the wait instruction from the CONTROL menu. Ignore the other menu options for now. • Insert a wait in our looks script 14
3 second pause between changing color and size 15
Student exercise: write a script to do the following • • • Double the size of the sprite Wait 2 seconds Change the color of the sprite to green Wait 4 seconds Change the whirl effect to 100 Say “That’s all folks!” 16
The MOTION menu How to locate and orient a sprite; moving a sprite. 17
Position on the stage • Using the Looks menu, shrink our cat to 25%. • Click on the Motion menu. • Click to check the box for x-position and y-position • Drag your cat around and note its x-y position. 18
Exercises: goto instruction • In the Motion menu, drag the “goto xy” instruction to the script panel. • Edit the coordinates and click to see the sprite’s position • A) goto x=200, y=0 Where • B) goto x=-200, y=0 does the • C) goto x=200, y=-100 cat go? 19
The “glide-to” instruction • Drag the “glide-to” instruction into your script panel. • Edit the coordinate values and click to see where your sprites goes. 20
Exercise • Create a script to glide the sprite along the sides of a triangle. The first vertex of the triangle is (-100, -100). The second vertex is (200, -100). The third vertex is (50, 100). Make sure you complete the triangle. • Change the speed of gliding and run again. 21
Angles and directions Making your sprite go this way and that way 22
Exercise Script • • Start at ( -100, 100 ) Move 200 steps Turn right 90 degrees Move 200 steps Use waits if needed to make the motion look smooth 23
Exercise/Homework Script Sprite starts at home base at x=-100; y=-50 Sprite says “I hit the ball” for 2 seconds Sprite runs (east) 200 steps to 1 st base Sprite changes color Sprite runs 200 steps to 2 nd base (north: left turn from 1 st base) • Sprite doubles size • Sprite says “I hit a double” for 5 seconds • • • 24
End of Part I: Outcomes Student should be able to control the looks of a sprite and its location on the stage. Students should be able to construct sequences of instructions controlling looks and location on the stage. 25
Part 2: Repetition and Variation • Goals: – – – Learn how to program with repetition Learn how to change costumes Learn to controll execution (behavior) using special keys 26
The sneezing cat script • We repeat 20 times Say “AAAHHHH” for a short time Then grow the cat 5 bigger 27
Exercise: bring the cat size down to normal Repeat 20 times Briefly say “CCHHEEEW” Then shrink the cat’s size by 5 Repeat N times and repeat forever are in the Control menu 28
Exercise: Have the cat do a flip by rotating 20 degrees 18 times. • Repeat from the Control menu: set the number of repetitions to 18 • Rotate from the Motion menu: set the size of each small rotation to 20 degrees 29
Changing costumes Another way to change the appearance of a sprite. 30
Making a new costume to animate the bat 1) Get bat 2 -a sprite from the “sprite box”. 2) Click on sprite 3) Click on “Costumes” 4) Click on “Import” 5) Now get bat-2 b sprite from the sprite box 31
Use a loop to make the bat fly! 1) When and repeat from Control menu and 2) next costume from Looks menu. 32
Changing coordinates • We can randomly set the location of the bat so it will “flutter”. • Set X to a random number • Set Y to a random number • Move the bat to location (X, Y) • Of course, the bat should remain on stage! 33
Using pick random Click the stop sign at the stage upper right to stop the forever loop. Do we need a wait in the loop? Try it to see the change in flying. 34
Controlling the bat’s direction Let’s create multiple scripts. Click space bar for random moves Click right arrow to move right Click left arrow to move left The bat will behave differently depending upon which key is typed! • (So, could a gamer catch the bat? ) • • • 35
Multiple interactive bat flight 3 different behaviors for the bat 36
Adding a background • Click on the Stage icon at lower right • Click on Backgrounds • Click on bat icon (Sprite 1) • Click on Scripts • FLY AGAIN! 37
Homework/Exercise: • Add a behavior (script) to move the bat up with the up arrow. • Add a behavior to move the bat down with the down arrow. 38
End of Part 2: outcomes Student should be able to write a program controlled by a loop, and execute a script by clicking special keys. The student should also know how to use “costumes” to change the appearance of a sprite. 39
Part 3: Input/Output, Variables, Simple computing • Goals: – – – Learn how the user and the program can communicate Learn how to compute with formulas Computing an average, perimeter of a geometric figure, etc 40
The SENSING menu Getting information from the user or some other machine 41
Asking the age of the user • Program wants age of user (maybe to set a level of difficulty in a game) • Program asks user for age • User types in age • Program stores the answer in a variable named “answer” 42
What is your age? • • • Depends on who you are For one person it’s 12 For another person it’s 27 For yet another, it’s 19 IT’S VARIABLE! 43
Use the SENSING menu 1) Ask the user for age; 2) user types in age; 3) result stored in “answer” 44
User types “ 13” and the script stores the answer “answer” is a Special Scratch variable 45
OUTPUT: Giving the user information with say answer Say is in Looks menu; drag “answer” from Sensing menu; click 46
Using the Variables menu We can save an answer in our own named variable; Then we can program with many data items using many variables 47
Making an “age variable” 1) Click Variables menu; 2) click “Make a variable” 2) Type in “age” and click OK Do you want to display for all sprites or just one? 48
We have an “age variable” Operations for “age” Displaying variable “age” 49
We can join text and a number to say things From Looks From Operators From Sensing Make the join Build this instruction from the parts above it. 50
Storing a value in a variable; then saying it to the user 1) Set from Variables menu; 2) Say from Looks menu; 3) Join from the Operators menu joins your text with the “answer” 51
Using variables in programs • • • A script might have to remember information How far is the cat from the dog? How fast is the rocket moving? Where did the user click on the stage? What is my score in the game? What is the user’s skill level? 52
Computing C = A + B (1 of 3) • Make 3 variables, A, B, and C • Type in the values of A and B • Set the value of C to the sum of A and B 53
Computing C = A + B (2 of 3) • Make 3 variables, A, B, and C • Type in the values of A and B • Set the value of C to the sum of A and B 54
Computing C = A + B (3 of 3) • Make 3 variables, A, B, and C • Type in the values of A and B • Set the value of C to the sum of A and B Drag + operator from Operators menu From Variables menu drag variables A and B into the slots 55
Algorithm for computing the average of two numbers • • Let the first number be A; say A=12 And the second number be B; say B=15 To compute the average _______ So the average of 12 and 15 = ____ 56
Programming the average A is the first “variable”: A = _____ B is the second “variable”: B = _____ V is the third variable: V = _____ Take the value of A, add the value of B, divide this sum by 2, then set the value of V to this answer. • V = (A+B)/2 (how to do it in Scratch? ) • • 57
Script from Variables and Operators menus Drag the variable names into the slots of the operators Script not yet executed A formula from the Operators menu 58
After clicking to execute script The variable V now stores the computed average of A and B 59
Exercise • Put a Wait 5 secs in the script between the two set operations for variable V • Execute the script and observe the changes in the value of V 60
Exercise Change the values of A and B by editing the script (keep the Wait); Input the age of grandchild and age of grandparent; Click on your script to compute the average of the new A and B 61
Homework/Exercise: average program • • • Modify the average program Ask the user for a value of A Ask the user for a value of B Compute V as the average Report the average to the user Run the program for different As and Bs 62
HW Exercises • Average 3 numbers; say 12, 33, and 21 63
Computing perimeter of a rectangle: algorithm • • Ask the user for length L Ask the user for width W Compute P = (L+W)*2 Report P to the user W= 10 example L=15 P = (15+10)*2 = 50 64
Review: Getting length from user Drag from Sensing menu • Ask “What’s the length” and wait • Set length to answer Create this variable Drag from sensing menu 65
Review: Reporting the value of a variable to the user Looks menu You type this in • Say join “length =“ length for 2 sec Operators menu Drag length variable from Variables menu 66
Review: Program with user input and output 67
HW Exercise: create the Scratch program we designed • • Ask the user for length L Ask the user for width W Compute P = (L+W)*2 Report P to the user Show your program to your Grandparent. 68
End of Part 3: outcomes Student should be able to write a program to ask the user for data, compute using the data, and report the answer to the user. Students should be able to compute using common formulas. 69
Part 4: working with sounds and sprite communication
Part 4 goals Learn how sprites can communicate by sending messages Learn how to play sounds and to input your own voice
Communicating sprites: taking turns by message passing Get cat and dog sprites Suppose cat speaks first When finished, the cat can send a message to the dog to speak When the dog is finished, the dog can send a message to the cat to speak
First behavior for the cat After saying hello, cat sends a message to dog (actually to all sprites)
Dog is activated by hidog 1 message Dog send message back to cat (and any other sprites)
Cat’s turn again after hicat 2 message from the dog
Dog can have 2 nd touching behavior
Sprites can have many behaviors Activated by clicking green flag Activated by clicking the sprite Activated by a key being pressed Activated by a message from another sprite Activated by touching another sprite
Using sounds Sound library; Speaking in the mike; Importing music
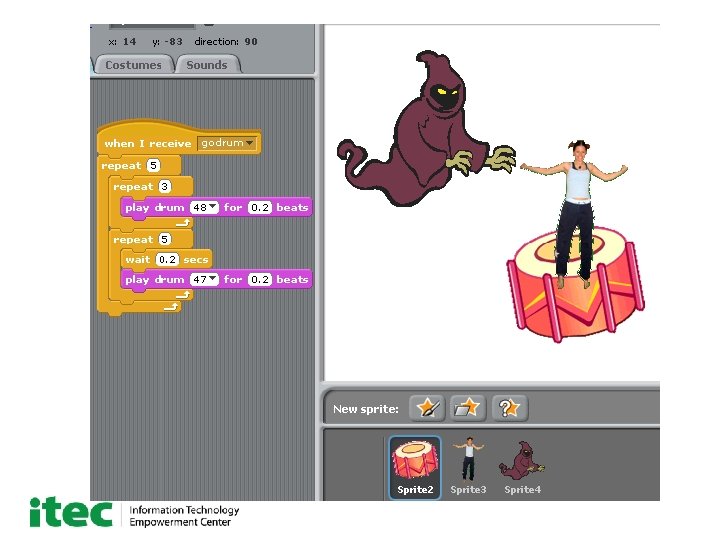
Composing with drum beats
Jodi jumps on the drum Story teller script Jodi’s script
Recording from a mike (or an i. Pod or other music player) 1. Plug in microphone 2. Pick the speaker sprite 3. Click “Sounds” 4. Click “Record” 5. Click red button and speak 6. Click square button to stop 7. Click triangle to hear it 8. Click “OK” if it’s OK 9. Use name of sound in a play-sound instruction
The Friends Story (play it)
Variations in stories Have several scenes Scenes change with messages or variables Make characters move Make characters hide or show Behavior can change with variables, touching, mousing. Background music for each scene
Learning from examples 1. 2. 3. 4. 06/02/10 Click on the FILE tab Click on the OPEN tab Click on the Examples tab Choose an example: for example, try STORIES and MAD LIB
End of Part 4: outcomes Students should be able to program by passing messages. Students should be able to program their sprites to make sounds.