An introduction to GDT Open Geometric Dimensioning pdf
- Slides: 42

An introduction to GD&T

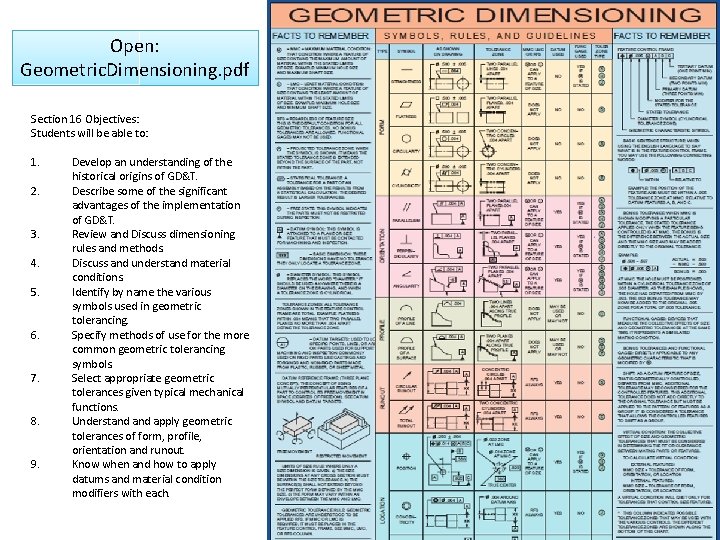
Open: Geometric. Dimensioning. pdf Section 16 Objectives: Students will be able to: 1. 2. 3. 4. 5. 6. 7. 8. 9. Develop an understanding of the historical origins of GD&T. Describe some of the significant advantages of the implementation of GD&T. Review and Discuss dimensioning rules and methods. Discuss and understand material conditions. Identify by name the various symbols used in geometric tolerancing. Specify methods of use for the more common geometric tolerancing symbols. Select appropriate geometric tolerances given typical mechanical functions. Understand apply geometric tolerances of form, profile, orientation and runout. Know when and how to apply datums and material condition modifiers with each.

Geometric Dimensioning and Tolerancing • First united standard published by ANSI – 1966 • Updated in 1973 replacing notes w/ symbols in all tolerancing • Updated again in 1982 • Updated again in 1994 • Current version updated in 2009

GD&T • Is based on the principle of functional dimensioning – Define the part based on how it functions in product • An international language • Describes size, form, orientation, and location of part features • Applicable at room temperature (68 o. F) and at a free state condition – Free state condition = distorted state of a part after removal of forces applied during manufacturing

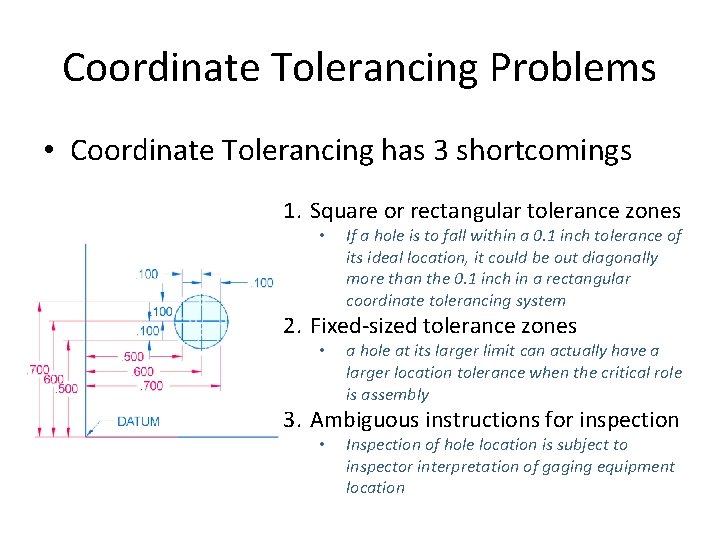
Coordinate Tolerancing Problems • Coordinate Tolerancing has 3 shortcomings 1. Square or rectangular tolerance zones • If a hole is to fall within a 0. 1 inch tolerance of its ideal location, it could be out diagonally more than the 0. 1 inch in a rectangular coordinate tolerancing system 2. Fixed-sized tolerance zones • a hole at its larger limit can actually have a larger location tolerance when the critical role is assembly 3. Ambiguous instructions for inspection • Inspection of hole location is subject to inspector interpretation of gaging equipment location

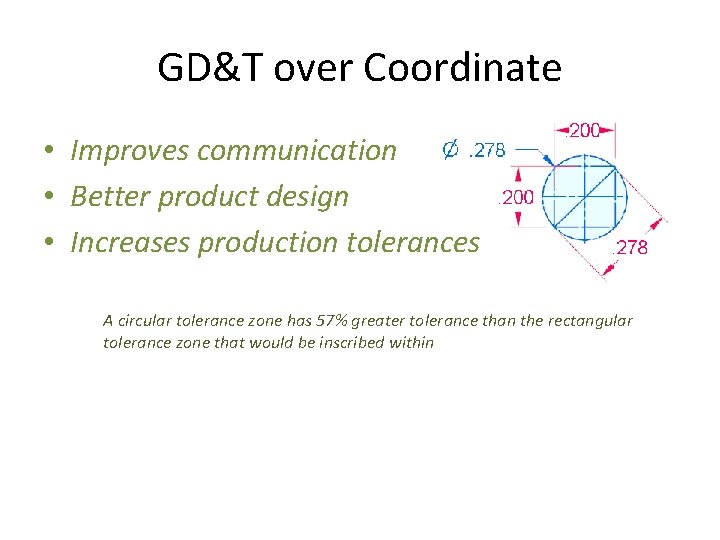
GD&T over Coordinate • Improves communication • Better product design • Increases production tolerances A circular tolerance zone has 57% greater tolerance than the rectangular tolerance zone that would be inscribed within

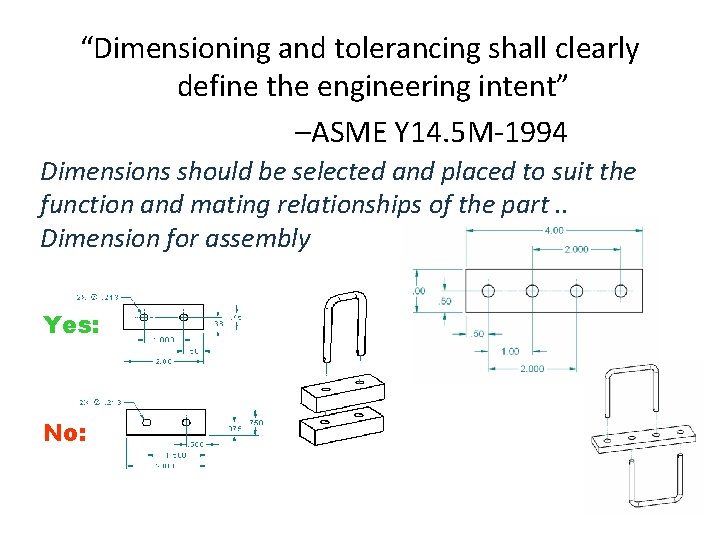
“Dimensioning and tolerancing shall clearly define the engineering intent” –ASME Y 14. 5 M-1994 Dimensions should be selected and placed to suit the function and mating relationships of the part. . Dimension for assembly Yes: No:

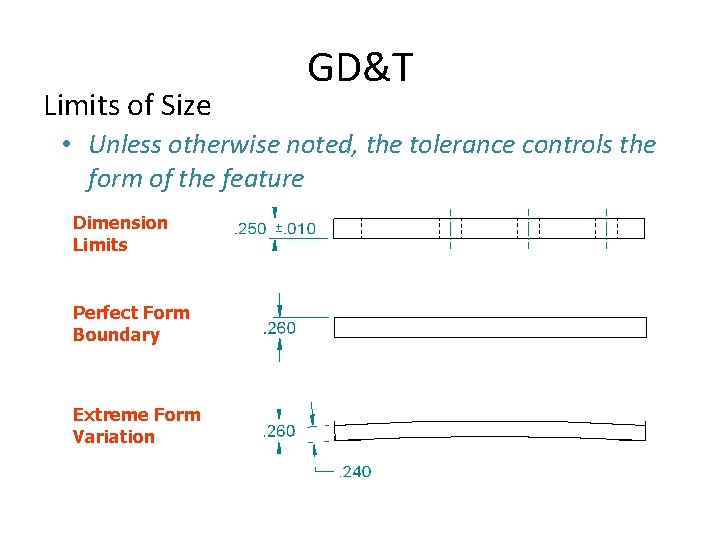
Limits of Size GD&T • Unless otherwise noted, the tolerance controls the form of the feature Dimension Limits Perfect Form Boundary Extreme Form Variation

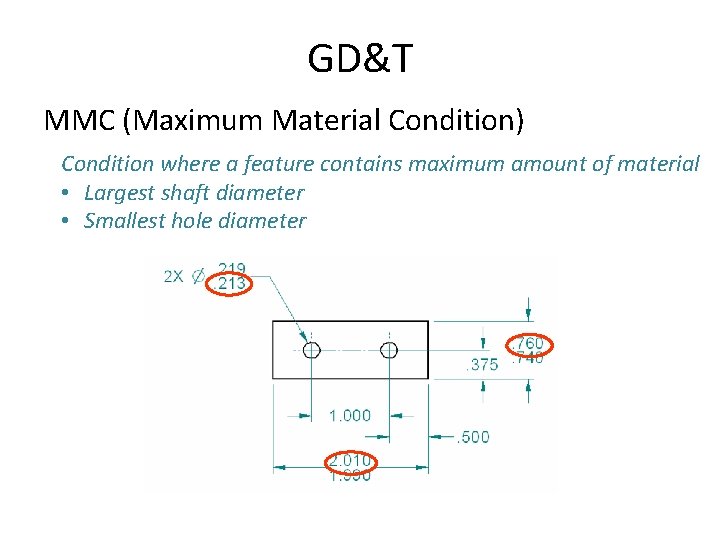
GD&T MMC (Maximum Material Condition) Condition where a feature contains maximum amount of material • Largest shaft diameter • Smallest hole diameter

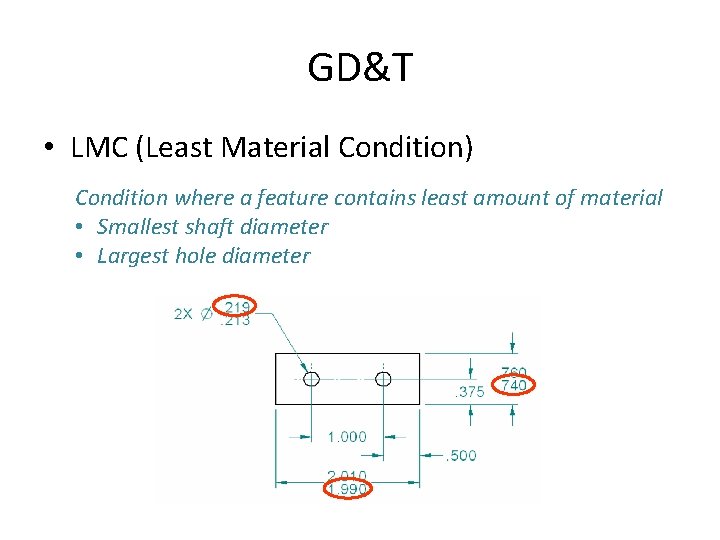
GD&T • LMC (Least Material Condition) Condition where a feature contains least amount of material • Smallest shaft diameter • Largest hole diameter

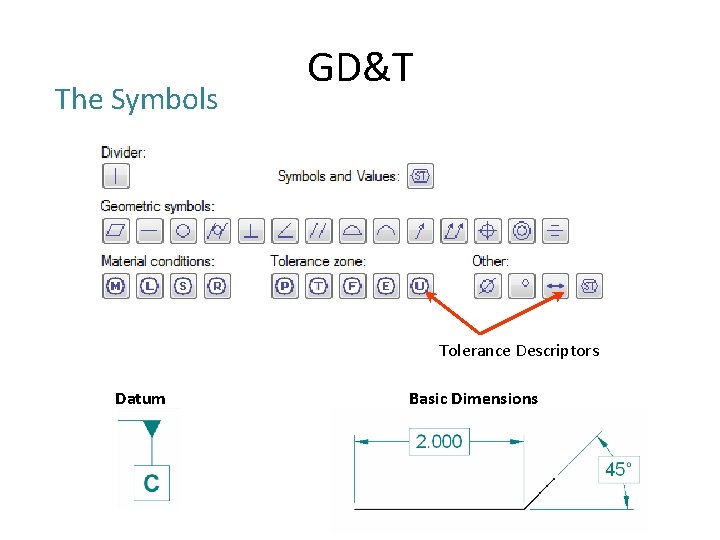
The Symbols GD&T Tolerance Descriptors Datum Basic Dimensions

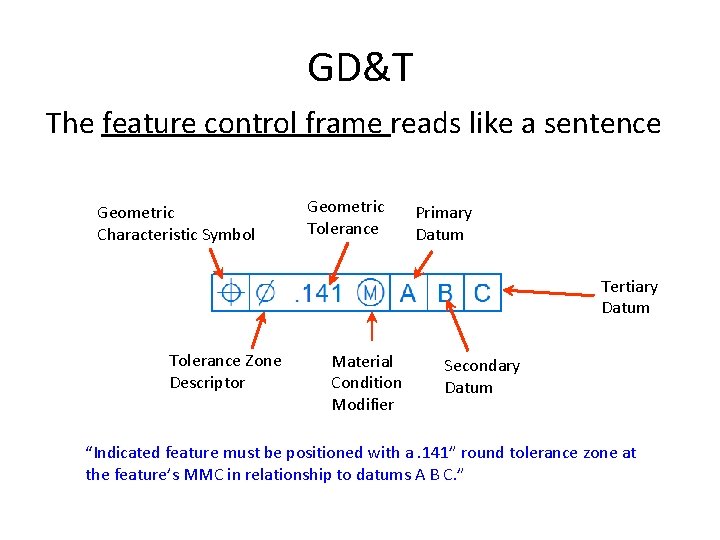
GD&T The feature control frame reads like a sentence Geometric Characteristic Symbol Geometric Tolerance Primary Datum Tertiary Datum Tolerance Zone Descriptor Material Condition Modifier Secondary Datum “Indicated feature must be positioned with a. 141” round tolerance zone at the feature’s MMC in relationship to datums A B C. ”

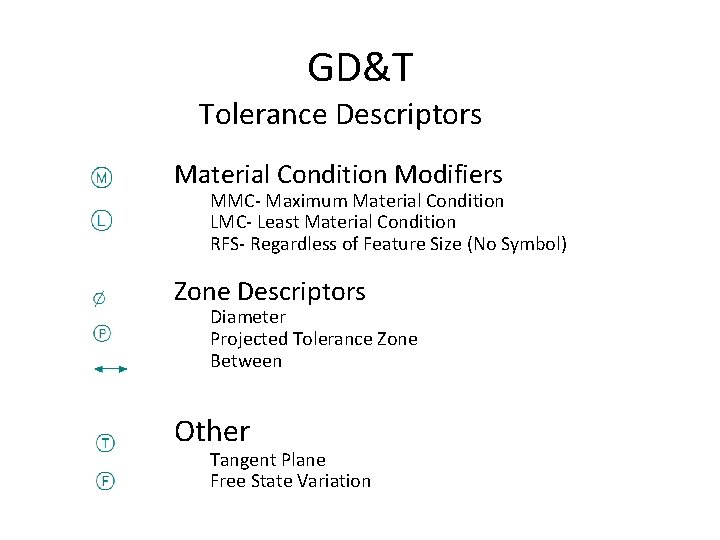
GD&T Tolerance Descriptors Material Condition Modifiers MMC- Maximum Material Condition LMC- Least Material Condition RFS- Regardless of Feature Size (No Symbol) Zone Descriptors Diameter Projected Tolerance Zone Between Other Tangent Plane Free State Variation

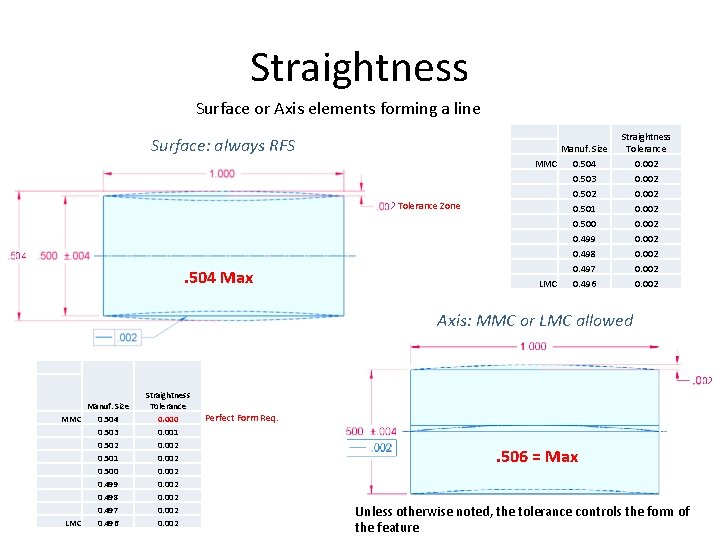
Straightness Surface or Axis elements forming a line Surface: always RFS Tolerance Zone . 504 Max Manuf. Size MMC 0. 504 0. 503 0. 502 0. 501 0. 500 0. 499 0. 498 0. 497 LMC 0. 496 Straightness Tolerance 0. 002 0. 002 Axis: MMC or LMC allowed Manuf. Size MMC 0. 504 0. 503 0. 502 0. 501 0. 500 0. 499 0. 498 0. 497 LMC 0. 496 Straightness Tolerance 0. 000 0. 001 0. 002 0. 002 Perfect Form Req. . 506 = Max Unless otherwise noted, the tolerance controls the form of the feature

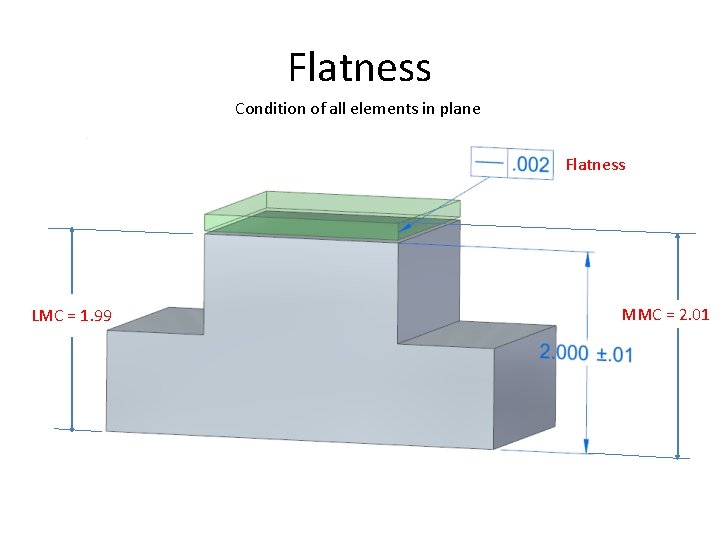
Flatness Condition of all elements in plane Flatness LMC = 1. 99 MMC = 2. 01

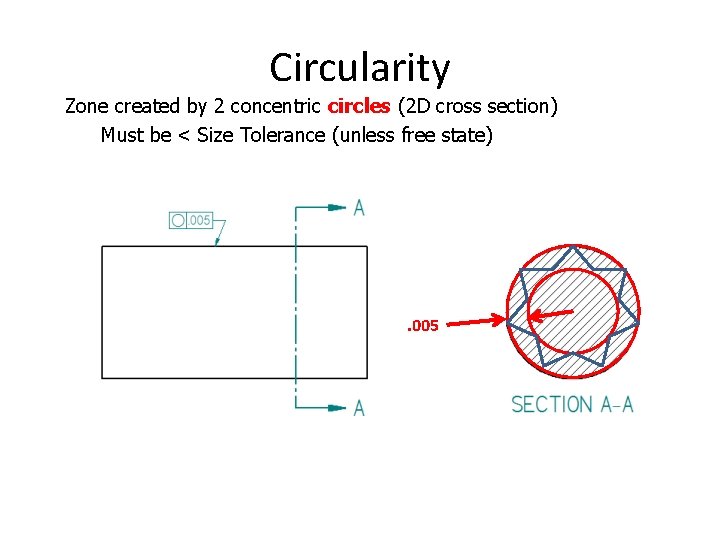
Circularity Zone created by 2 concentric circles (2 D cross section) Must be < Size Tolerance (unless free state) . 005

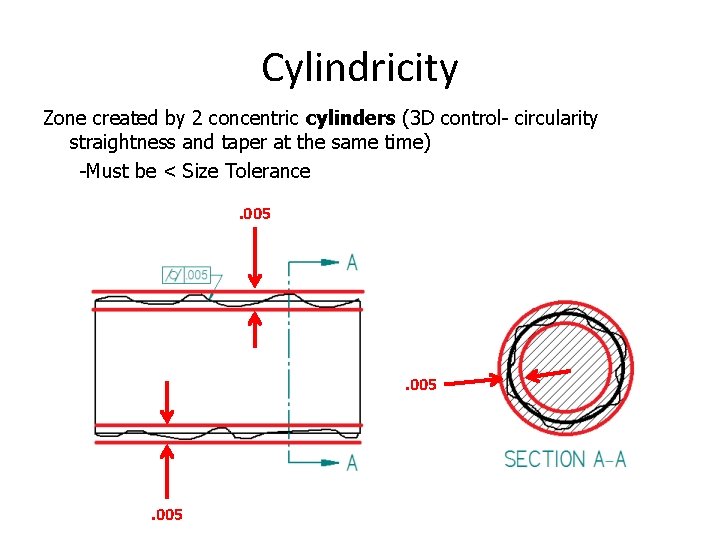
Cylindricity Zone created by 2 concentric cylinders (3 D control- circularity straightness and taper at the same time) -Must be < Size Tolerance. 005

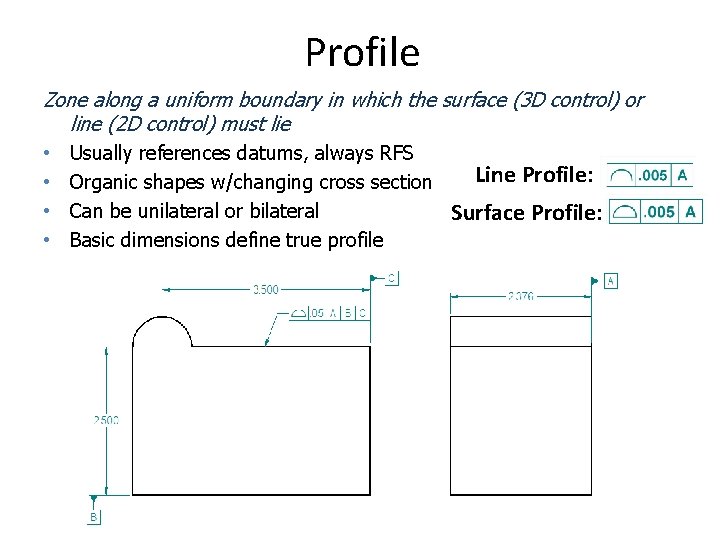
Profile Zone along a uniform boundary in which the surface (3 D control) or line (2 D control) must lie • Usually references datums, always RFS Line Profile: • Organic shapes w/changing cross section • Can be unilateral or bilateral Surface Profile: • Basic dimensions define true profile

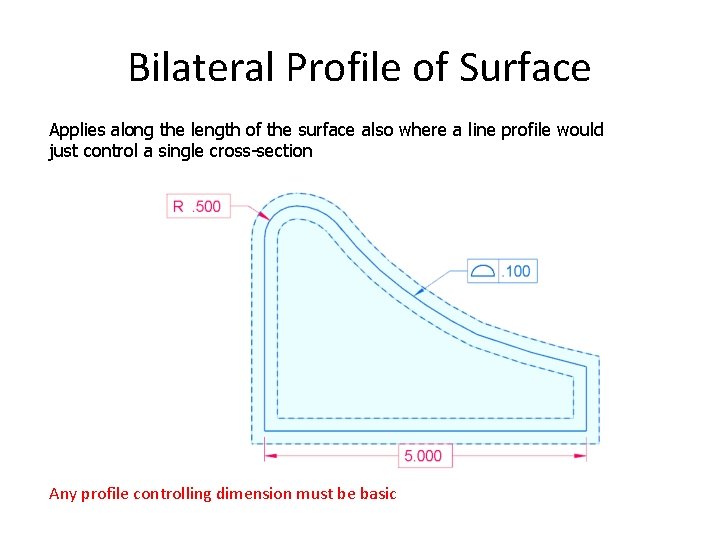
Bilateral Profile of Surface Applies along the length of the surface also where a line profile would just control a single cross-section Any profile controlling dimension must be basic

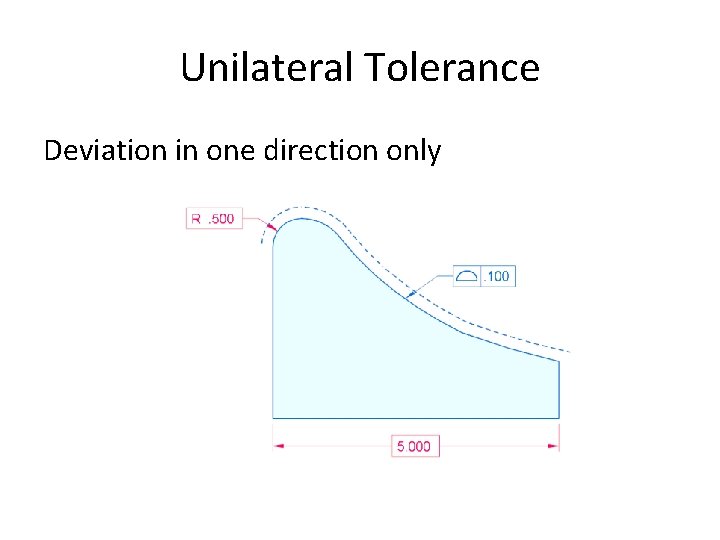
Unilateral Tolerance Deviation in one direction only

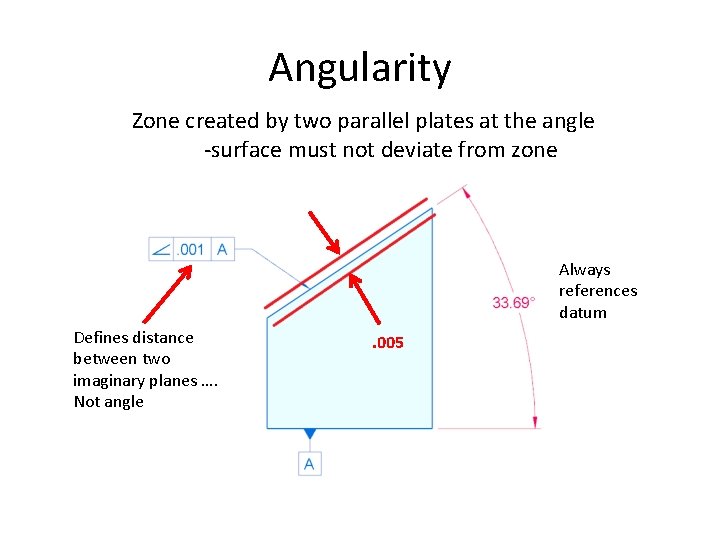
Angularity Zone created by two parallel plates at the angle -surface must not deviate from zone Always references datum Defines distance between two imaginary planes …. Not angle . 005

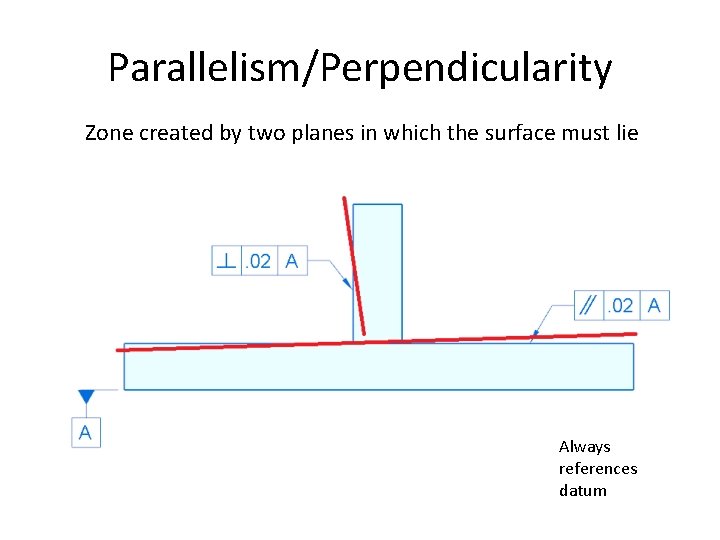
Parallelism/Perpendicularity Zone created by two planes in which the surface must lie Always references datum

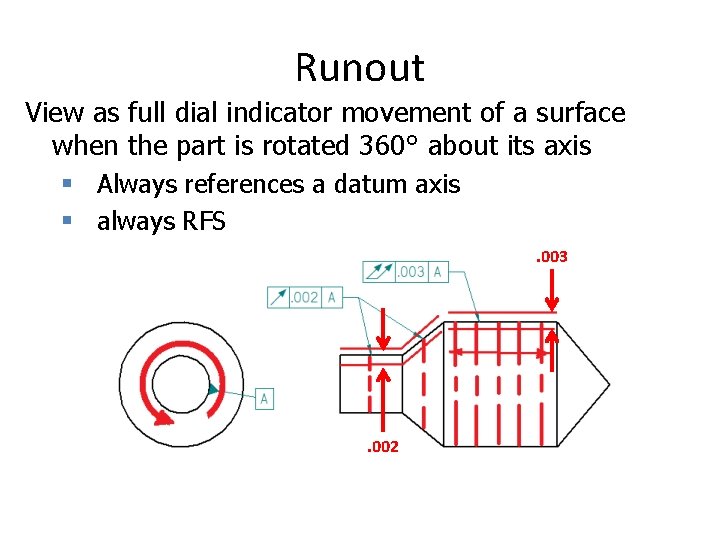
Runout View as full dial indicator movement of a surface when the part is rotated 360° about its axis § Always references a datum axis § always RFS. 003 . 002

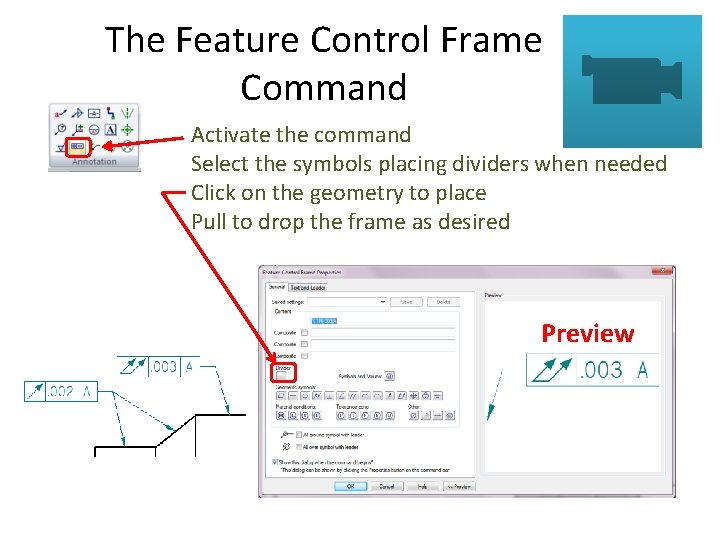
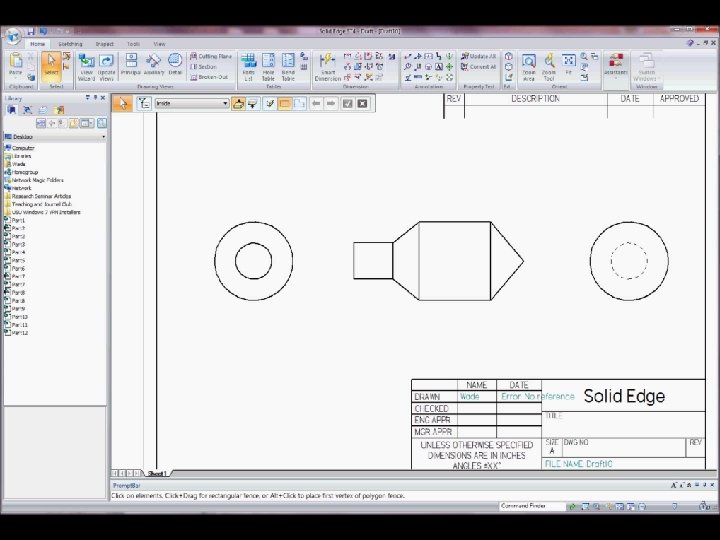
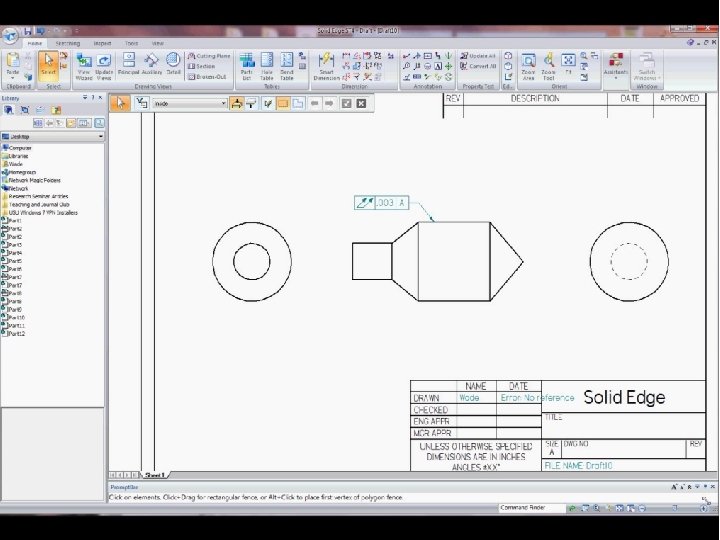
The Feature Control Frame Command Activate the command Select the symbols placing dividers when needed Click on the geometry to place Pull to drop the frame as desired Preview


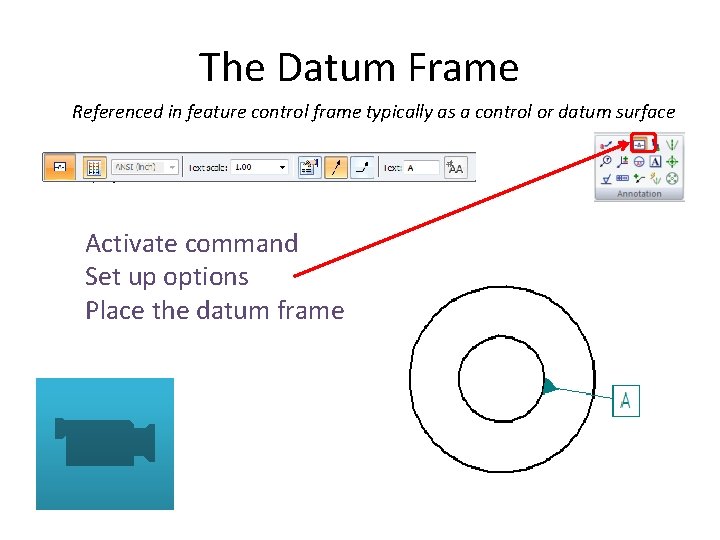
The Datum Frame Referenced in feature control frame typically as a control or datum surface Activate command Set up options Place the datum frame


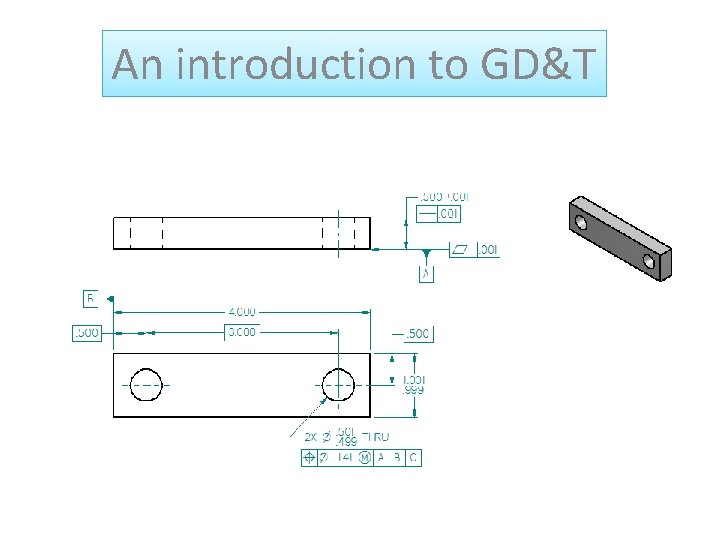
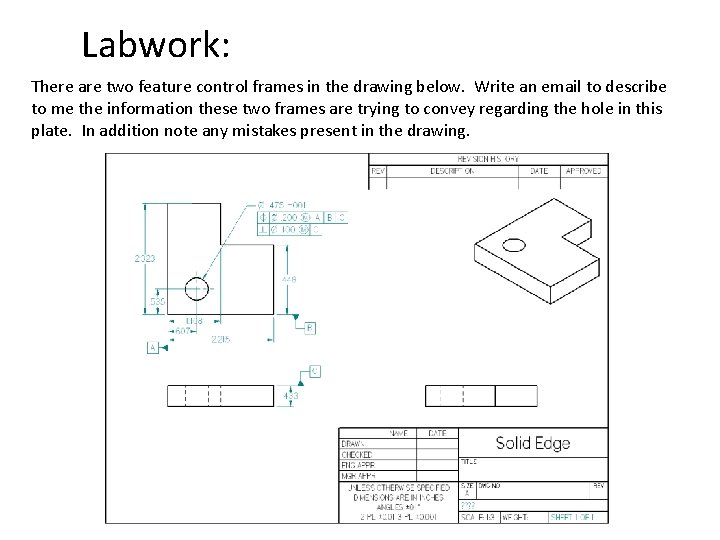
Labwork: There are two feature control frames in the drawing below. Write an email to describe to me the information these two frames are trying to convey regarding the hole in this plate. In addition note any mistakes present in the drawing.

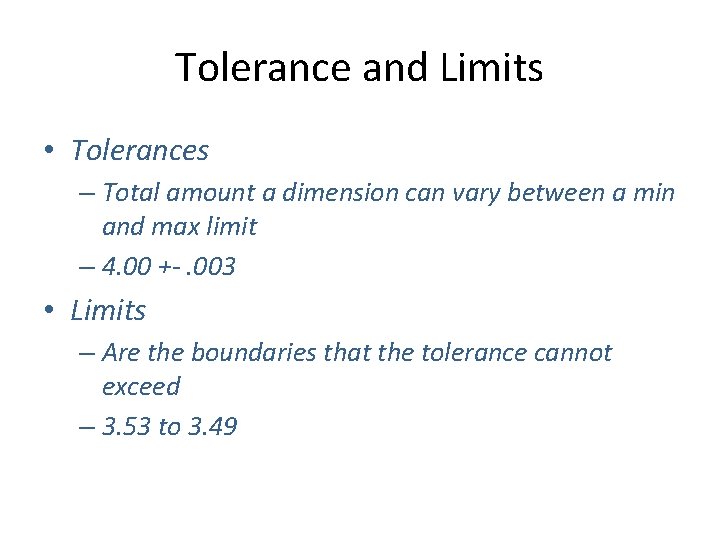
Tolerance and Limits • Tolerances – Total amount a dimension can vary between a min and max limit – 4. 00 +-. 003 • Limits – Are the boundaries that the tolerance cannot exceed – 3. 53 to 3. 49

Tolerance and Limits • General tolerances can be given in a note – i. e. ALL DECIMAL DIMENSIONS TO BE HELD TO +. 002” – i. e. ALL ANGULAR TOLERANCES TO +- 1 DEGREE

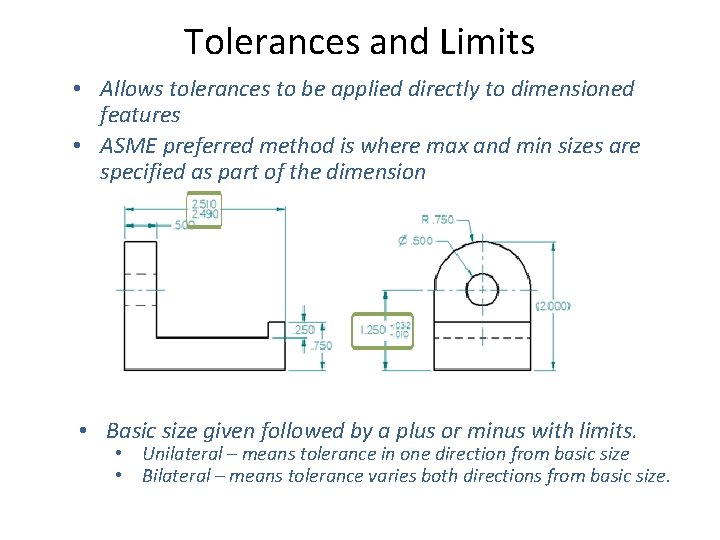
Tolerances and Limits • Allows tolerances to be applied directly to dimensioned features • ASME preferred method is where max and min sizes are specified as part of the dimension • Basic size given followed by a plus or minus with limits. • Unilateral – means tolerance in one direction from basic size • Bilateral – means tolerance varies both directions from basic size.

Single Limit Dimensions • When one element of a feature will determine one limit dimension, MIN or MAX is placed after the other limit dimension. – i. e. depth of holes, length of threads, corner radii, chamfers

Important Terms • Nominal size – general size dimension • Basic Size – theoretical size used as starting point for tolerances to vary from • Actual Size – Measured size of finished part after machining • Limits – max and min sizes shown by the toleranced dimension. • Allowance – minimum clearance or maximum interference between parts…the tightest fit possible given the limits for both parts

Important Terms • Tolerance – total allowable variance in a dimension…. . the difference between upper and lower limits • MMC (Maximum Material Condition) – condition of part when it contains the greatest amount of material – For external feature it will be the upper limit – For internal feature it will be the lower limit

Important Terms • LMC (Least Material Condition) – the condition of the part when it contains the least amount of material possible – For external feature it is the lower limit – For internal feature it is the upper limit • Piece tolerance – difference between upper and lower limits for a single part • System Tolerance – sum of all the piece tolerances

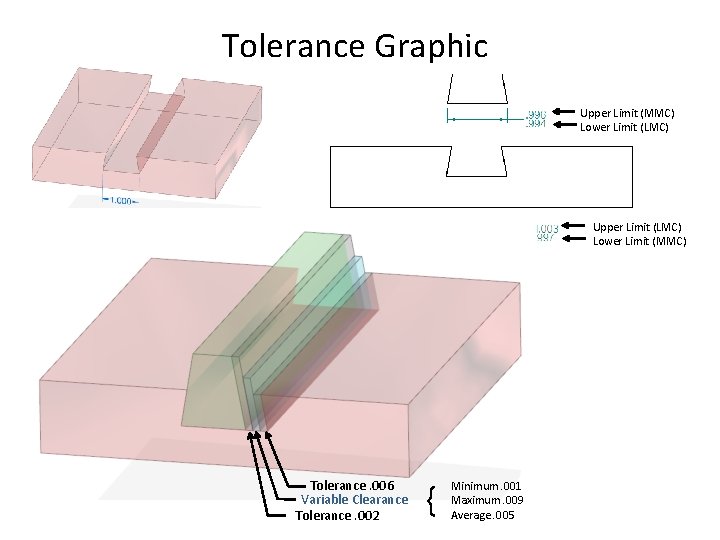
Tolerance Graphic Upper Limit (MMC) Lower Limit (LMC) Upper Limit (LMC) Lower Limit (MMC) Tolerance. 006 Variable Clearance Tolerance. 002 { Minimum. 001 Maximum. 009 Average. 005

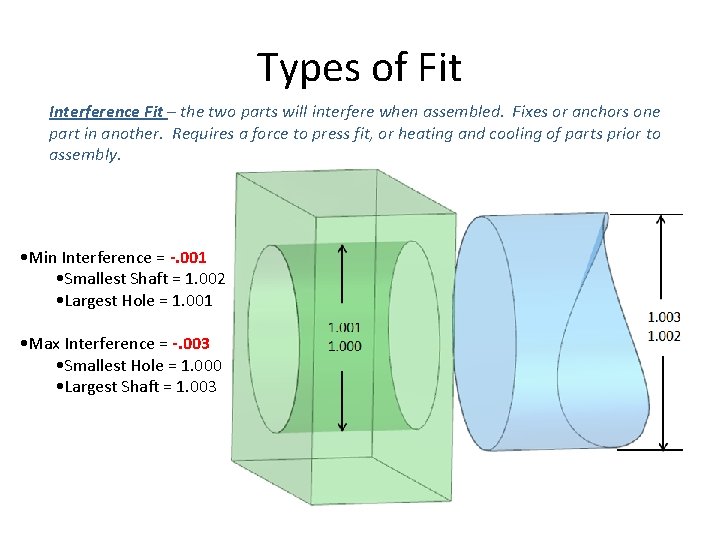
Types of Fit Interference Fit – the two parts will interfere when assembled. Fixes or anchors one part in another. Requires a force to press fit, or heating and cooling of parts prior to assembly. • Min Interference = -. 001 • Smallest Shaft = 1. 002 • Largest Hole = 1. 001 • Max Interference = -. 003 • Smallest Hole = 1. 000 • Largest Shaft = 1. 003

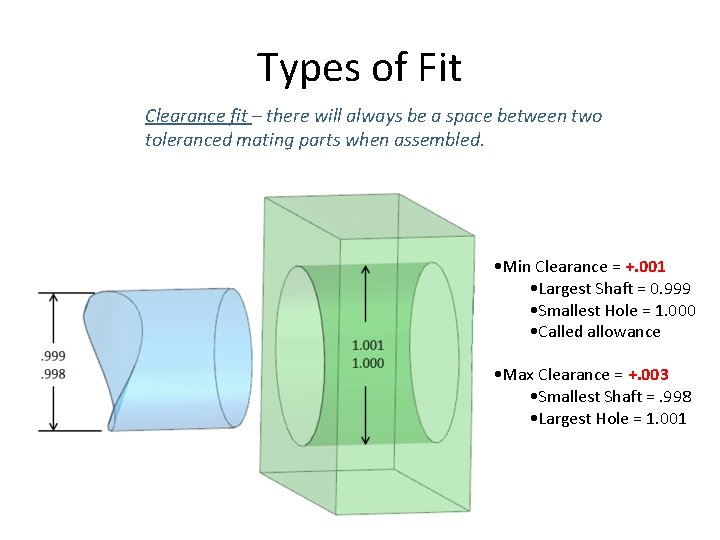
Types of Fit Clearance fit – there will always be a space between two toleranced mating parts when assembled. • Min Clearance = +. 001 • Largest Shaft = 0. 999 • Smallest Hole = 1. 000 • Called allowance • Max Clearance = +. 003 • Smallest Shaft =. 998 • Largest Hole = 1. 001

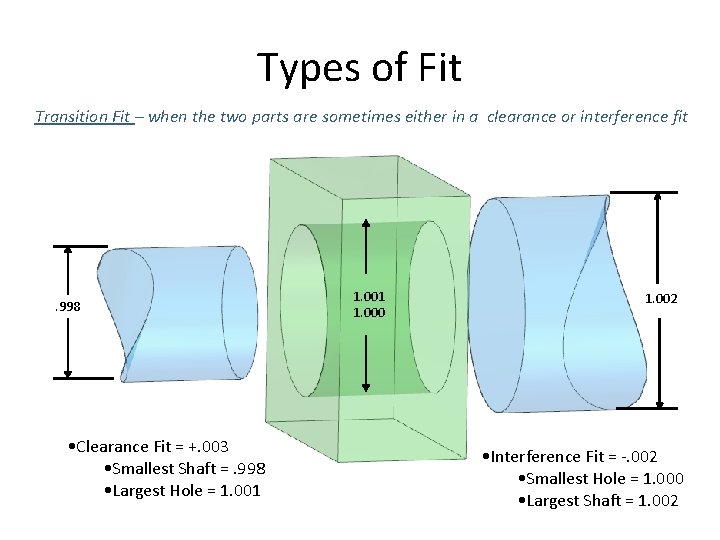
Types of Fit Transition Fit – when the two parts are sometimes either in a clearance or interference fit . 998 • Clearance Fit = +. 003 • Smallest Shaft =. 998 • Largest Hole = 1. 001 1. 000 1. 002 • Interference Fit = -. 002 • Smallest Hole = 1. 000 • Largest Shaft = 1. 002

Costs • Tightening of tolerances rapidly increases manufacturing costs – From plus or minus 0. 010 to plus or minus 0. 005 can more than double cost of part – A new method may be needed to get that good a tolerance or more precise and expensive machining

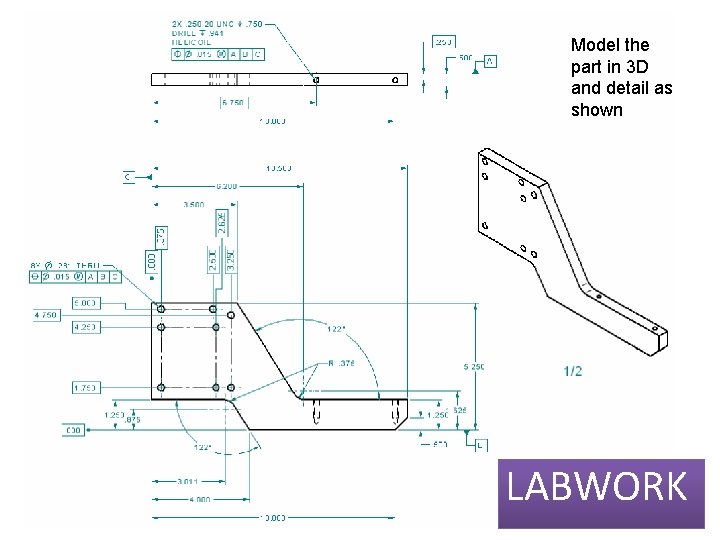
Model the part in 3 D and detail as shown LABWORK

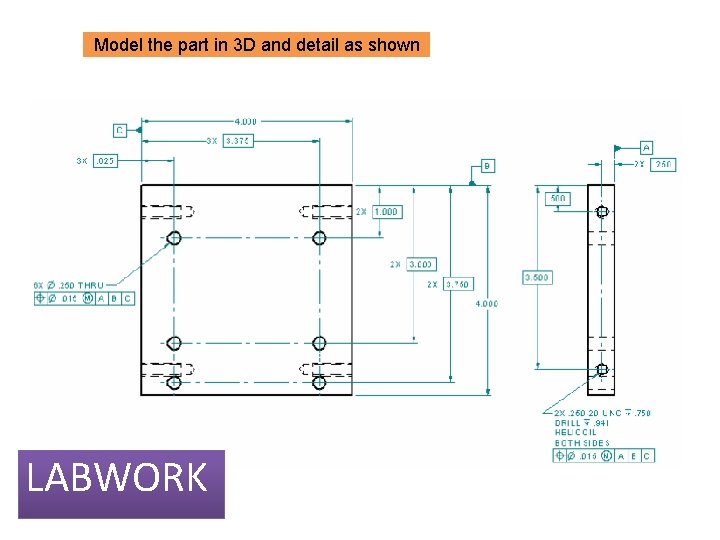
Model the part in 3 D and detail as shown LABWORK