American University of Sharjah College of Engineering Department




- Slides: 63

American University of Sharjah College of Engineering Department of Civil Engineering Non-linear Finite Element Analysis of Steel Base Plates on Leveling Nuts Dr. Sami W. Tabsh (Supervisor) Abdul Wahab Kayani MS Thesis defense - January 17 th, 2012

Outline Introduction Statement of Problem Objectives Background Scope Laboratory Testing Finite Element Modeling Results Conclusions Recommendations

Introduction Highway signs, Traffic signals, and Luminaries in parks, stadiums and transport facilities all require base plates on leveling nuts for support to foundation.

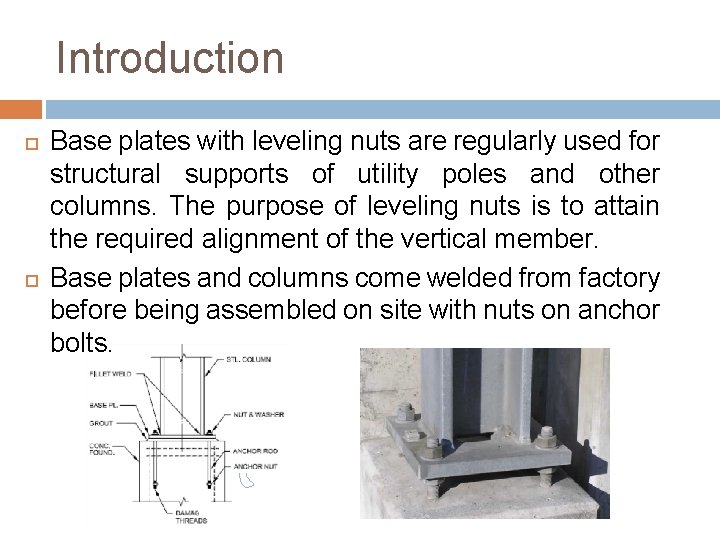
Introduction Base plates with leveling nuts are regularly used for structural supports of utility poles and other columns. The purpose of leveling nuts is to attain the required alignment of the vertical member. Base plates and columns come welded from factory before being assembled on site with nuts on anchor bolts.

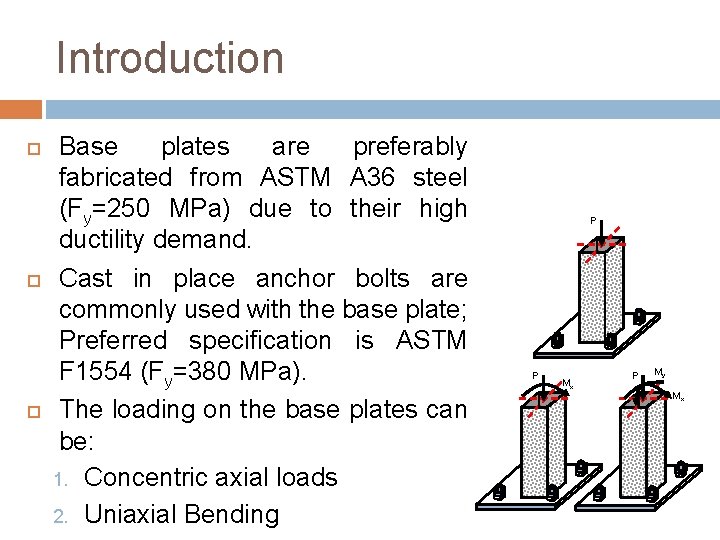
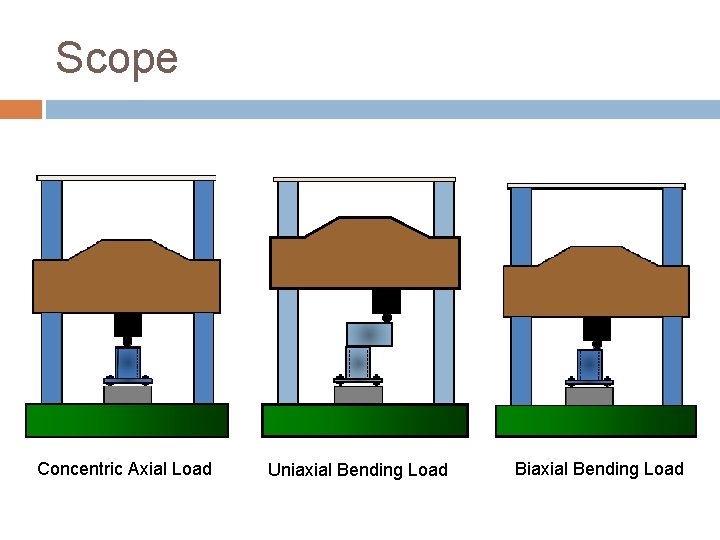
Introduction Base plates are preferably fabricated from ASTM A 36 steel (Fy=250 MPa) due to their high ductility demand. Cast in place anchor bolts are commonly used with the base plate; Preferred specification is ASTM F 1554 (Fy=380 MPa). The loading on the base plates can be: 1. Concentric axial loads 2. Uniaxial Bending P P Mx P My Mx

Introduction The loading from the column into the connection mainly induces: Flexural stresses in the steel base plate Axial forces (compression or tension) in the anchor bolts. Bolt reactions can be approximately obtained with reasonable accuracy by assuming the base plate to be infinitely rigid on elastic supports (i. e. as a pile cap). Shear stresses in the base plate are negligibly small.

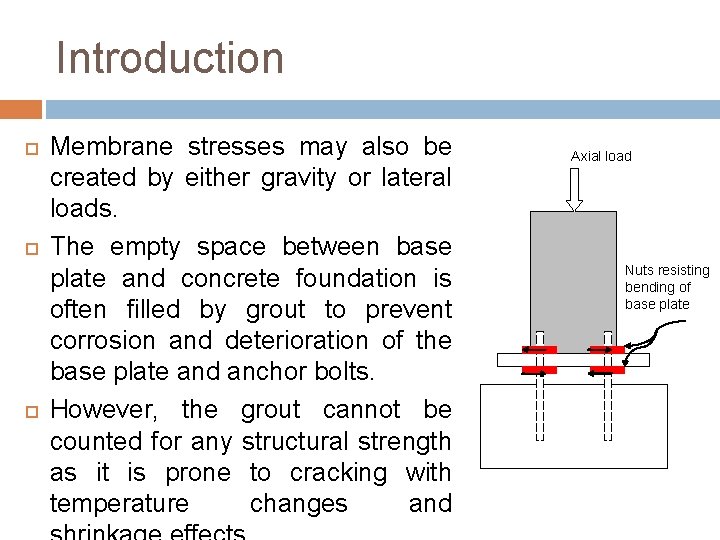
Introduction Membrane stresses may also be created by either gravity or lateral loads. The empty space between base plate and concrete foundation is often filled by grout to prevent corrosion and deterioration of the base plate and anchor bolts. However, the grout cannot be counted for any structural strength as it is prone to cracking with temperature changes and Axial load Nuts resisting bending of base plate

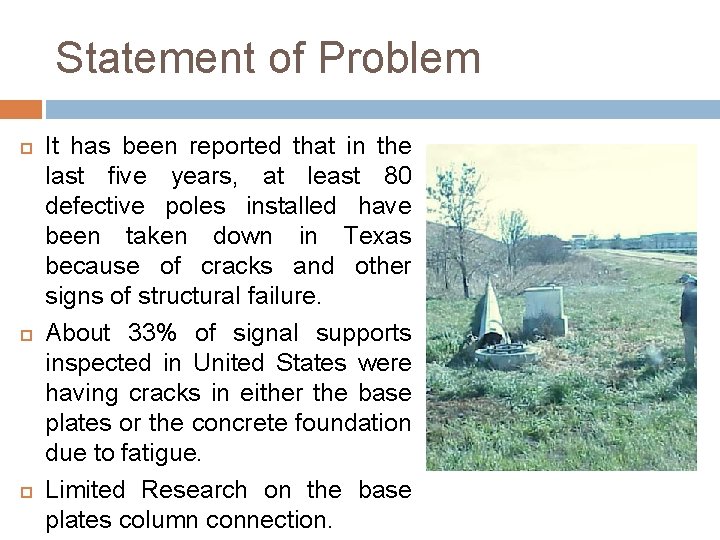
Statement of Problem It has been reported that in the last five years, at least 80 defective poles installed have been taken down in Texas because of cracks and other signs of structural failure. About 33% of signal supports inspected in United States were having cracks in either the base plates or the concrete foundation due to fatigue. Limited Research on the base plates column connection.

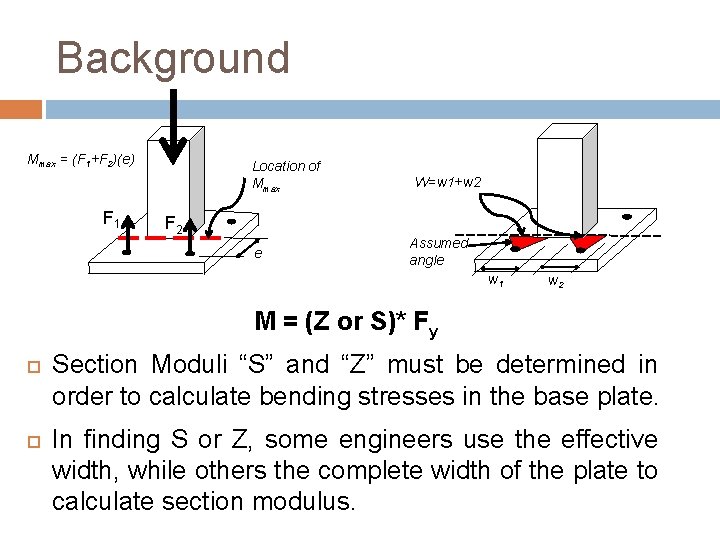
Background Mmax = (F 1+F 2)(e) F 1 Location of Mmax F 2 e W=w 1+w 2 Assumed angle w 1 w 2 M = (Z or S)* Fy Section Moduli “S” and “Z” must be determined in order to calculate bending stresses in the base plate. In finding S or Z, some engineers use the effective width, while others the complete width of the plate to calculate section modulus.

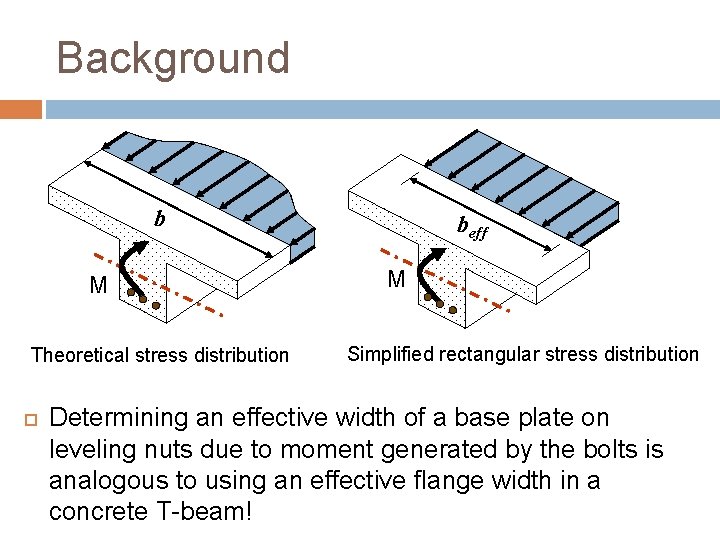
Background b M Theoretical stress distribution beff M Simplified rectangular stress distribution Determining an effective width of a base plate on leveling nuts due to moment generated by the bolts is analogous to using an effective flange width in a concrete T-beam!

Objectives The main objective of this study is to develop a procedure, based on the Load and Resistance Factor Design format, that can help structural engineers in the utility industry proportion and size base plates on leveling nuts. Nonlinear finite element structural analysis will be used as the basis behind the development of the procedure.

Objectives To accomplish the stated objective, we will: Research the published literature on steel base plates on leveling nuts. Carry out laboratory testing of steel base plates on leveling nuts. Conduct a parametric analysis on base plates to better understand the structural behavior. Develop simple expressions of the influence angle that help in computing an effective width of the base plate when the connection is subjected to

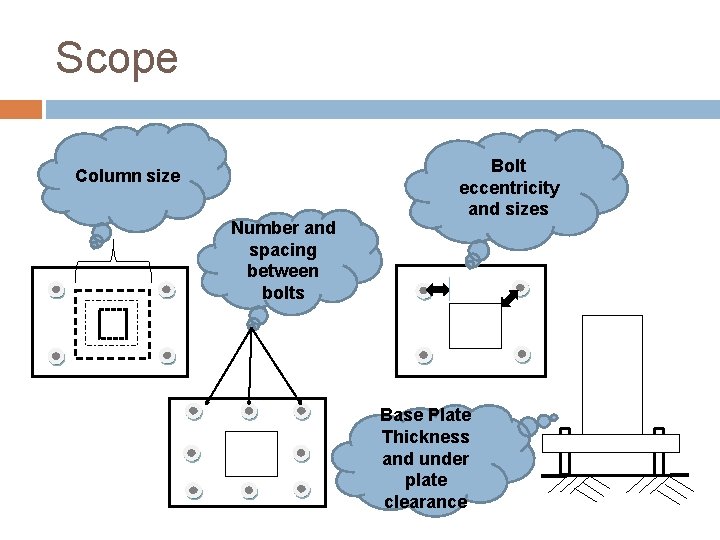
Scope Column size Number and spacing between bolts Bolt eccentricity and sizes Base Plate Thickness and under plate clearance

Scope Concentric Axial Load Uniaxial Bending Load Biaxial Bending Load

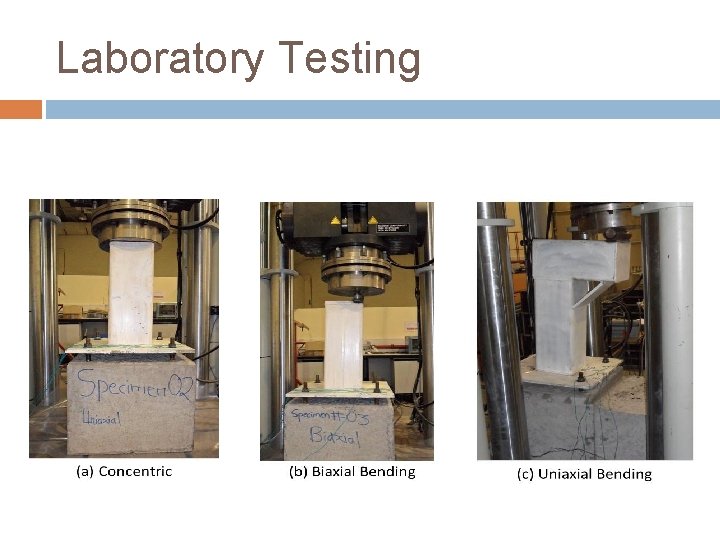
Laboratory Testing

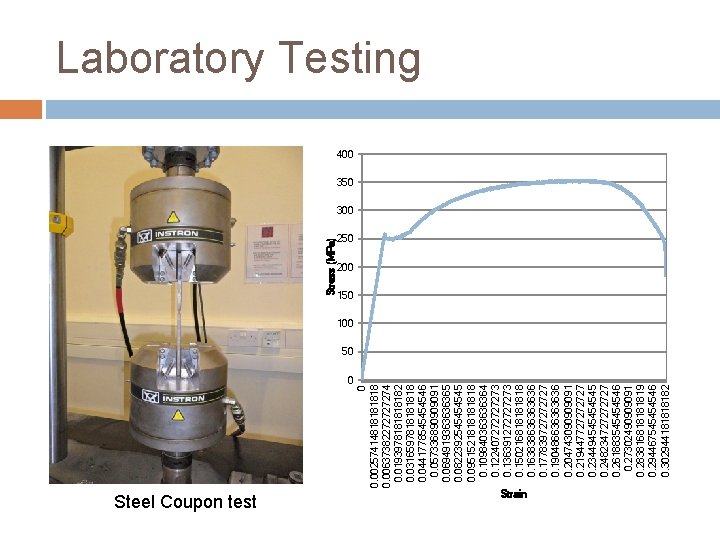
0 Steel Coupon test 0 0. 0025741481818 0. 0063738227274 0. 019397818182 0. 031659781818 0. 044177854546 0. 057336890909091 0. 069491936365 0. 082239254545 0. 095152181818 0. 10984036364 0. 12240727273 0. 13639127273 0. 15021681818 0. 16383863636 0. 17783972727 0. 19048663636 0. 20474309091 0. 21944772727 0. 23449454545 0. 24823472727 0. 26188354546 0. 27302490909091 0. 28381681819 0. 29446754546 0. 30294418182 Stress (MPa) Laboratory Testing 400 350 300 250 200 150 100 50 Strain

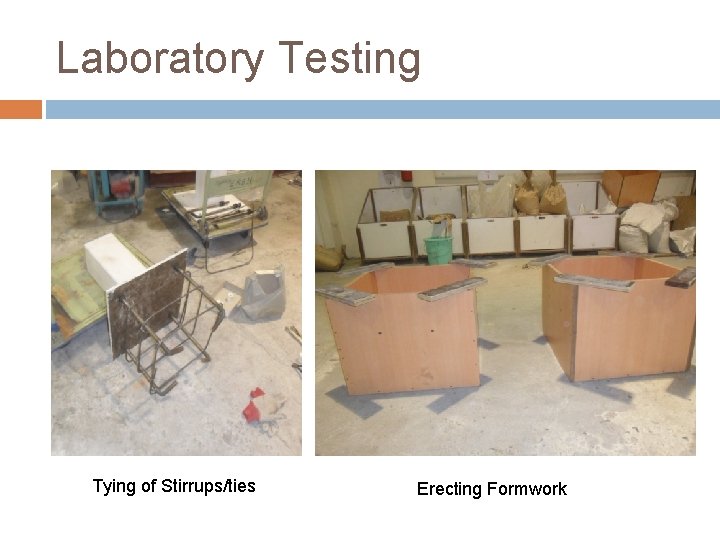
Laboratory Testing Tying of Stirrups/ties Erecting Formwork

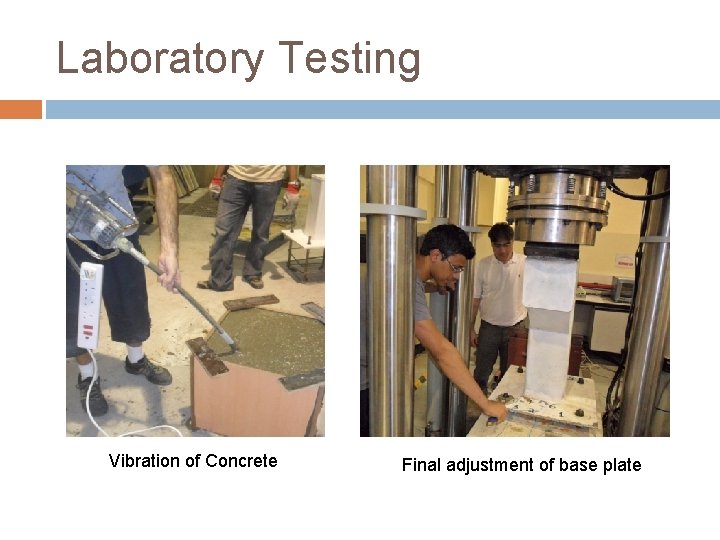
Laboratory Testing Vibration of Concrete Final adjustment of base plate

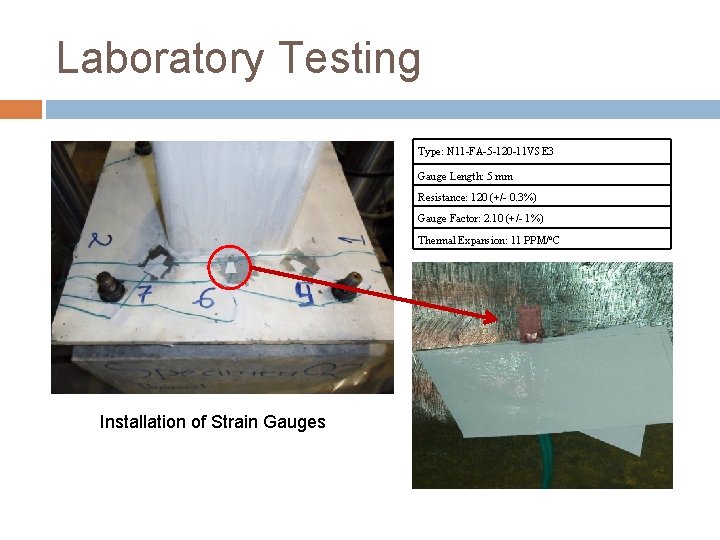
Laboratory Testing Type: N 11 -FA-5 -120 -11 VSE 3 Gauge Length: 5 mm Resistance: 120 (+/- 0. 3%) Gauge Factor: 2. 10 (+/- 1%) Thermal Expansion: 11 PPM/o. C Installation of Strain Gauges

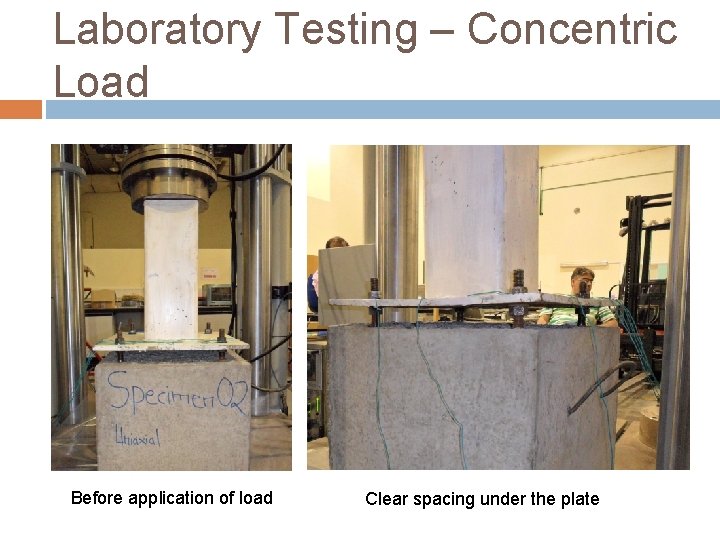
Laboratory Testing – Concentric Load Before application of load Clear spacing under the plate

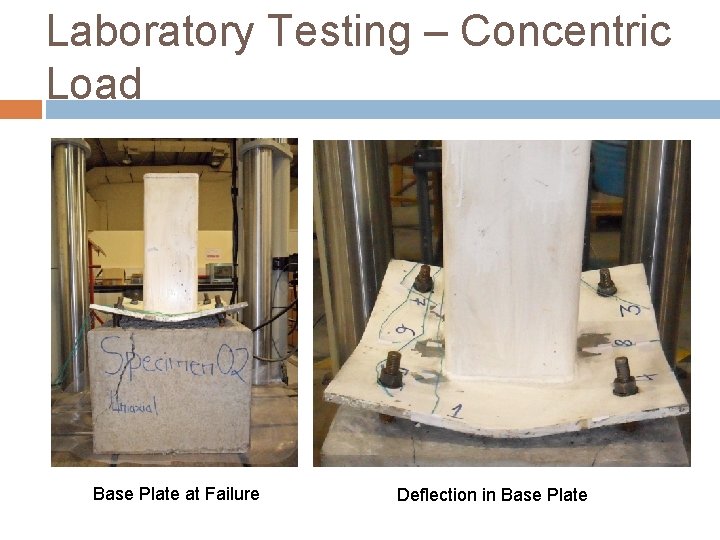
Laboratory Testing – Concentric Load Base Plate at Failure Deflection in Base Plate

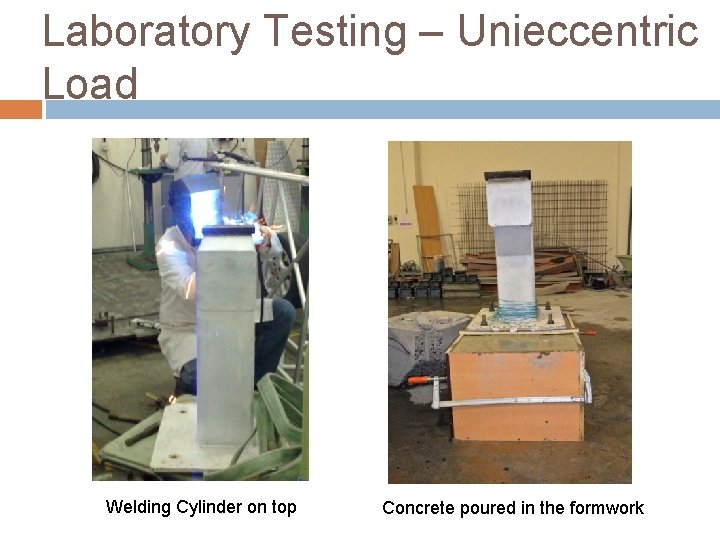
Laboratory Testing – Unieccentric Load Welding Cylinder on top Concrete poured in the formwork

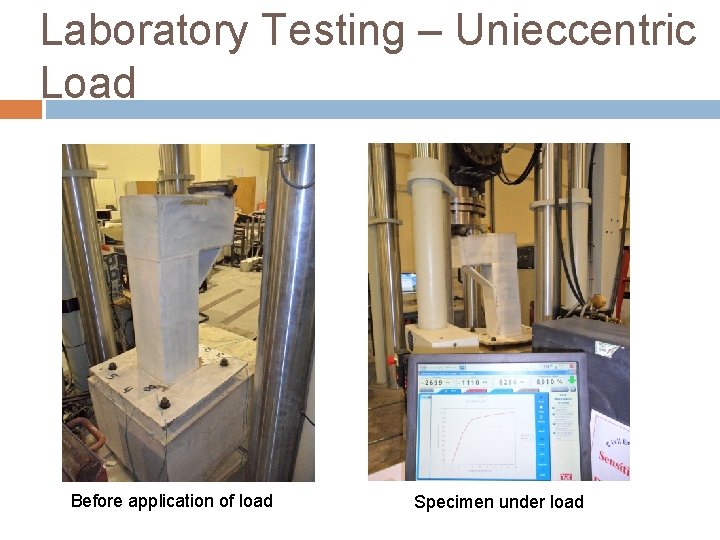
Laboratory Testing – Unieccentric Load Before application of load Specimen under load

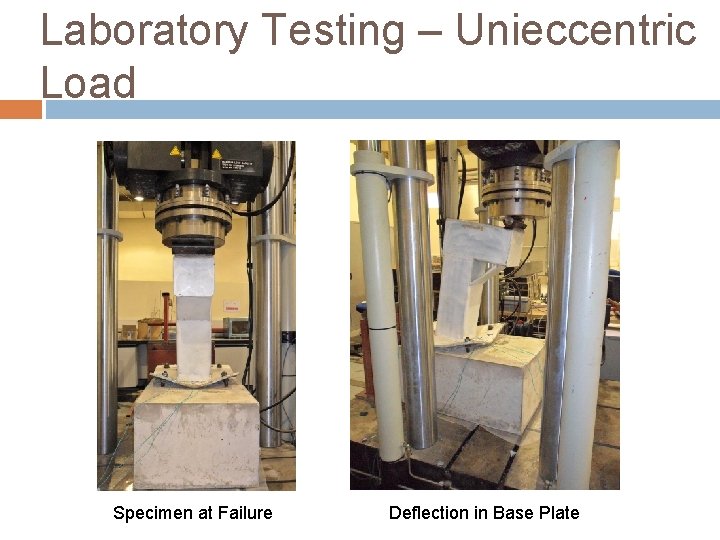
Laboratory Testing – Unieccentric Load Specimen at Failure Deflection in Base Plate

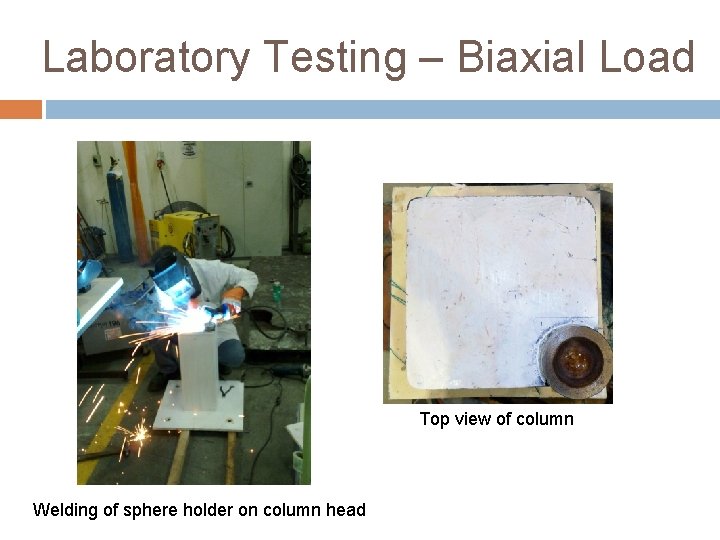
Laboratory Testing – Biaxial Load Top view of column Welding of sphere holder on column head

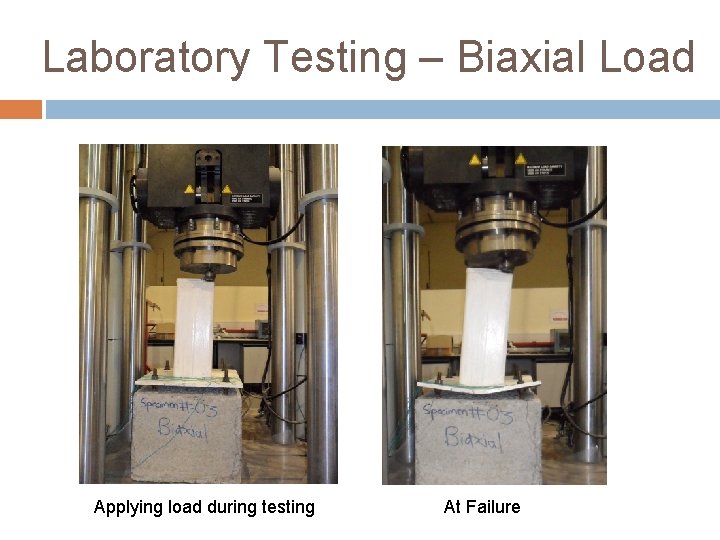
Laboratory Testing – Biaxial Load Applying load during testing At Failure

Finite Element Modeling The Concept The object is divided into many smaller bodies or elements interconnected at common points called nodes or boundary lines. Nodal Displacements In structural cases, the unknowns are nodal displacements or stresses created by the applied force. These stresses and displacements are found at each node constituting the element. Equilibrium Equations Algebraic equations are expressed in terms of nodal displacements using the equations of equilibrium.

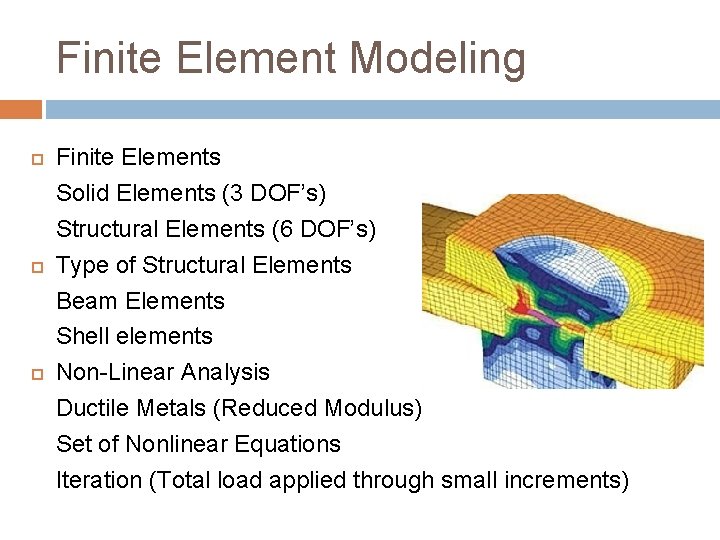
Finite Element Modeling Finite Elements Solid Elements (3 DOF’s) Structural Elements (6 DOF’s) Type of Structural Elements Beam Elements Shell elements Non-Linear Analysis Ductile Metals (Reduced Modulus) Set of Nonlinear Equations Iteration (Total load applied through small increments)

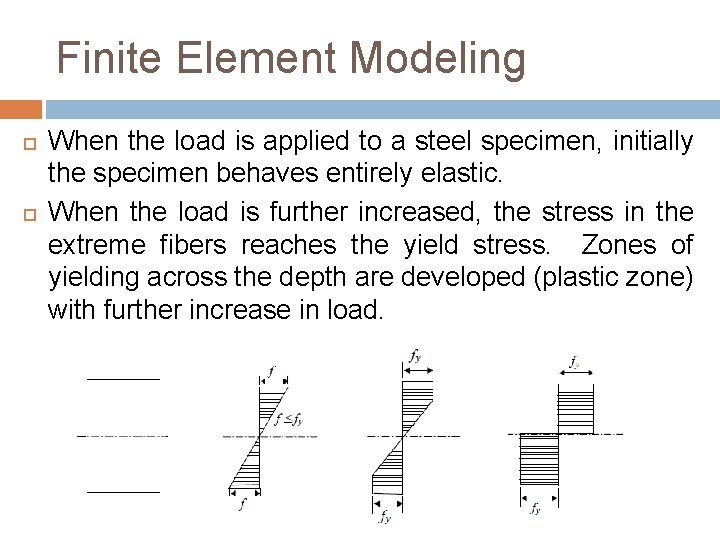
Finite Element Modeling When the load is applied to a steel specimen, initially the specimen behaves entirely elastic. When the load is further increased, the stress in the extreme fibers reaches the yield stress. Zones of yielding across the depth are developed (plastic zone) with further increase in load.

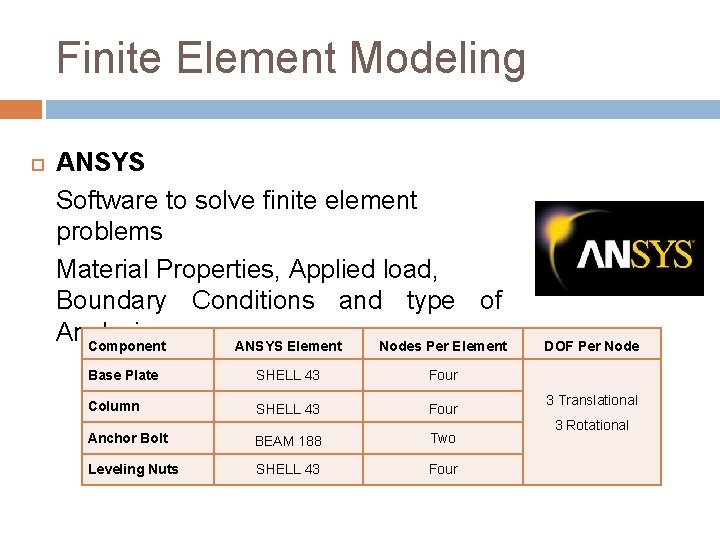
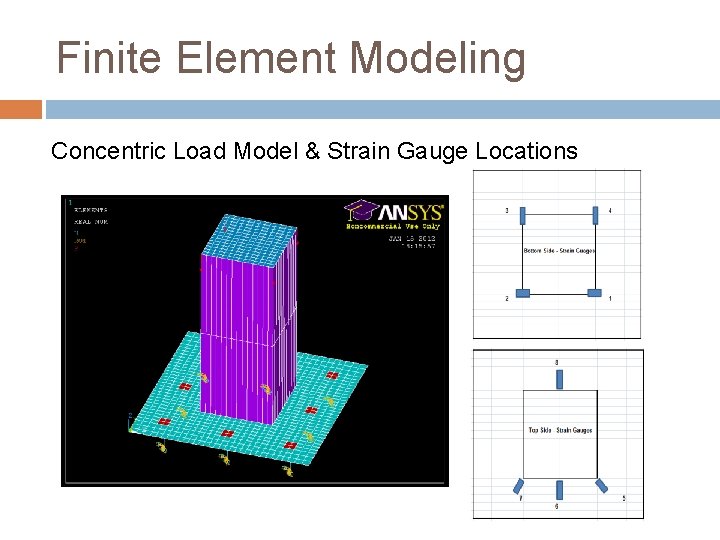
Finite Element Modeling ANSYS Software to solve finite element problems Material Properties, Applied load, Boundary Conditions and type of Analysis. Component ANSYS Element Nodes Per Element Base Plate SHELL 43 Four Column SHELL 43 Four Anchor Bolt BEAM 188 Two Leveling Nuts SHELL 43 Four DOF Per Node 3 Translational 3 Rotational

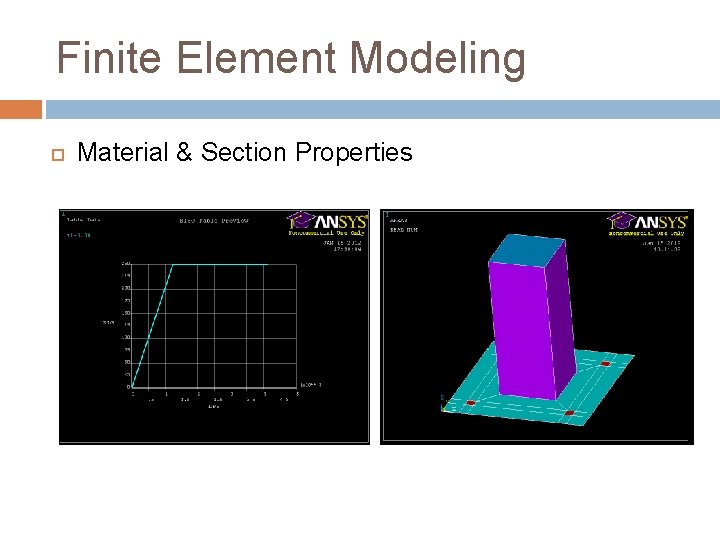
Finite Element Modeling Material & Section Properties

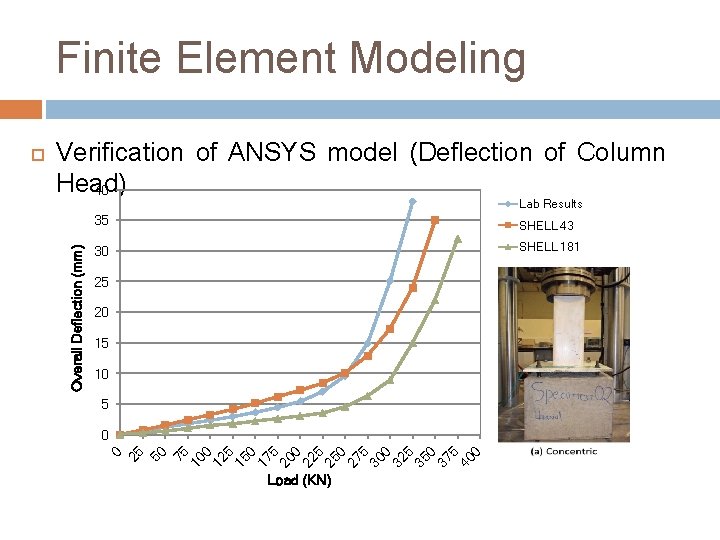
Finite Element Modeling Verification of ANSYS model (Deflection of Column Head) 40 Lab Results 35 SHELL 43 30 SHELL 181 25 20 15 10 5 75 10 0 12 5 15 0 17 5 20 0 22 5 25 0 27 5 30 0 32 5 35 0 37 5 40 0 25 50 0 0 Overall Deflection (mm) Load (KN)

Finite Element Modeling Concentric Load Model & Strain Gauge Locations

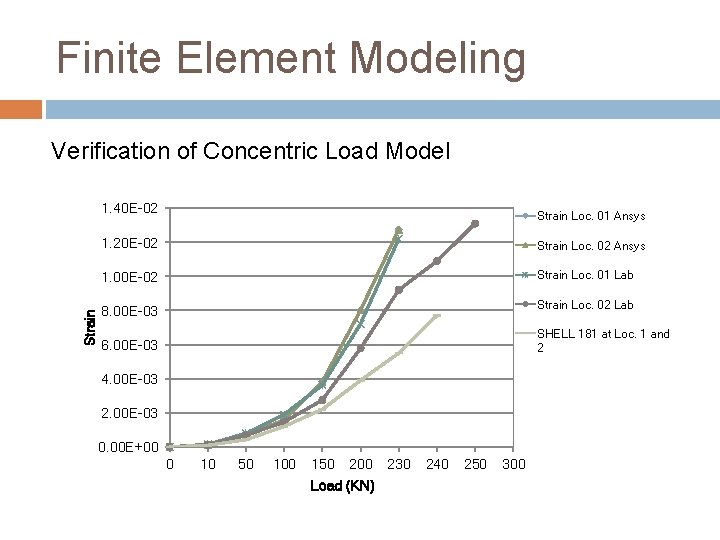
Finite Element Modeling Verification of Concentric Load Model Strain 1. 40 E-02 Strain Loc. 01 Ansys 1. 20 E-02 Strain Loc. 02 Ansys 1. 00 E-02 Strain Loc. 01 Lab 8. 00 E-03 Strain Loc. 02 Lab SHELL 181 at Loc. 1 and 2 6. 00 E-03 4. 00 E-03 2. 00 E-03 0. 00 E+00 0 10 50 100 150 200 Load (KN) 230 240 250 300

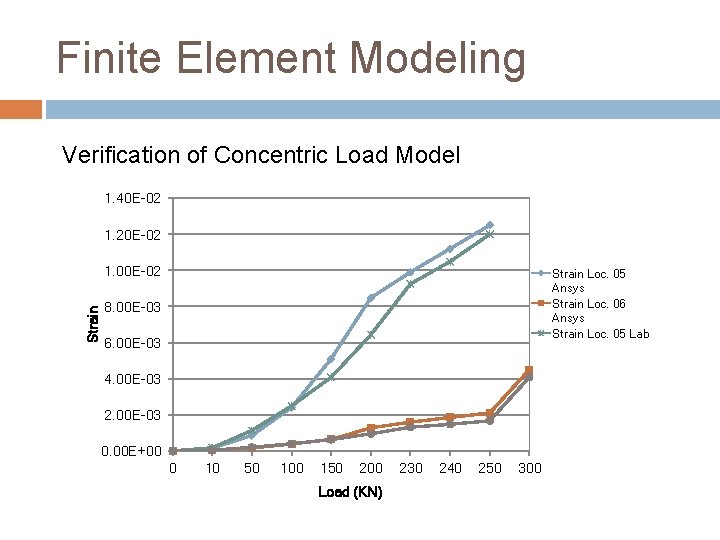
Finite Element Modeling Verification of Concentric Load Model 1. 40 E-02 1. 20 E-02 Strain 1. 00 E-02 Strain Loc. 05 Ansys Strain Loc. 06 Ansys Strain Loc. 05 Lab 8. 00 E-03 6. 00 E-03 4. 00 E-03 2. 00 E-03 0. 00 E+00 0 10 50 100 150 200 Load (KN) 230 240 250 300

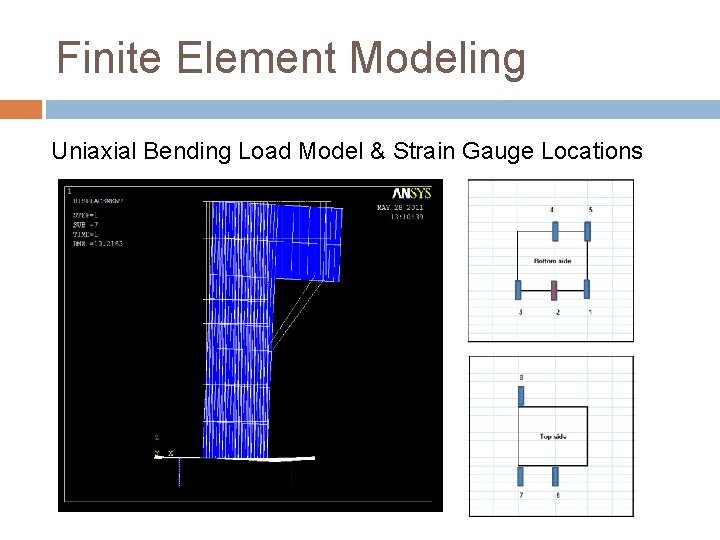
Finite Element Modeling Uniaxial Bending Load Model & Strain Gauge Locations

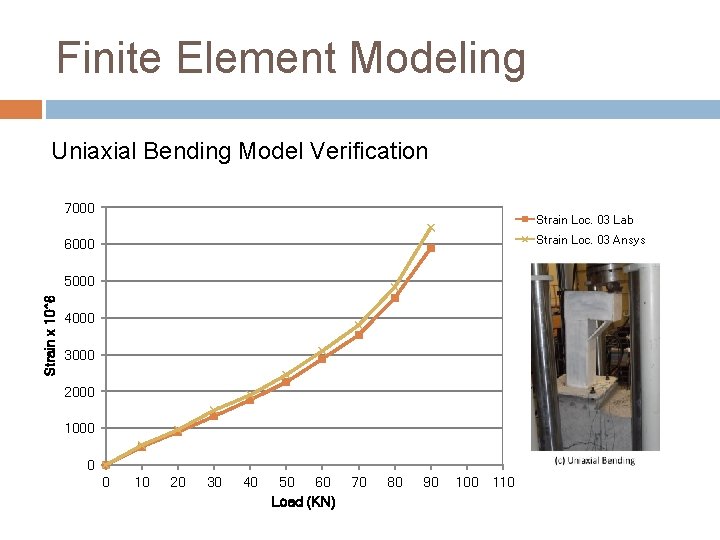
Finite Element Modeling Uniaxial Bending Model Verification 7000 Strain Loc. 03 Lab Strain Loc. 03 Ansys 6000 Strain x 10^6 5000 4000 3000 2000 1000 0 0 10 20 30 40 50 60 Load (KN) 70 80 90 100 110

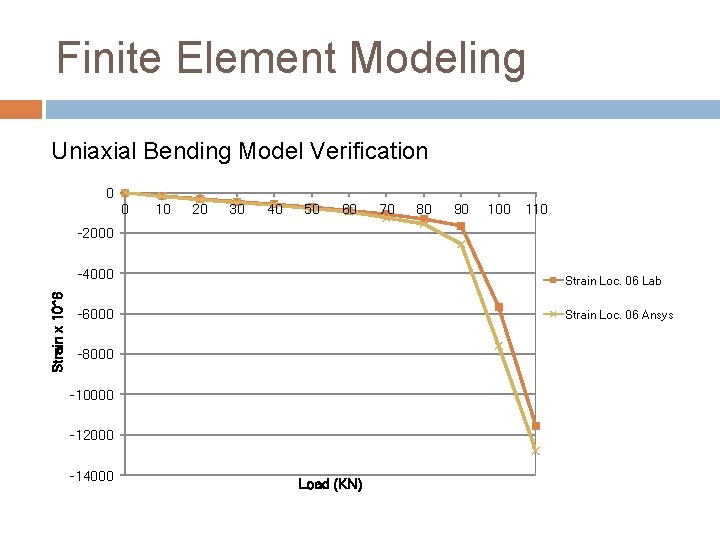
Finite Element Modeling Uniaxial Bending Model Verification 0 0 10 20 30 40 50 60 70 80 90 100 110 Strain x 10^6 -2000 -4000 Strain Loc. 06 Lab -6000 Strain Loc. 06 Ansys -8000 -10000 -12000 -14000 Load (KN)

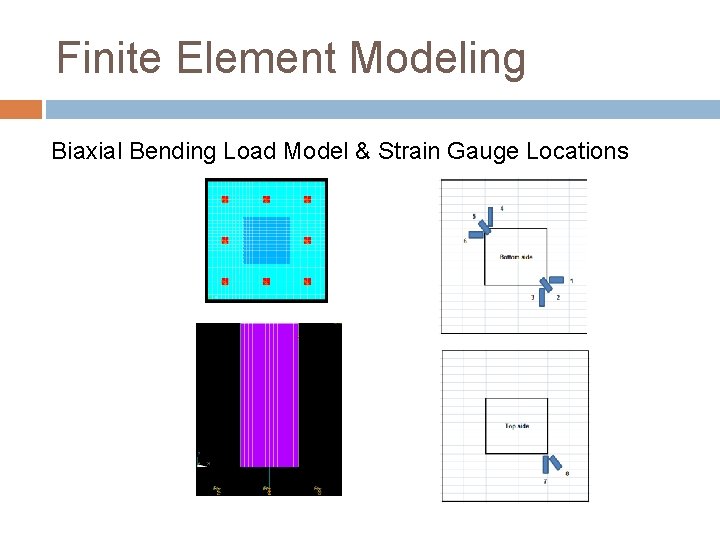
Finite Element Modeling Biaxial Bending Load Model & Strain Gauge Locations

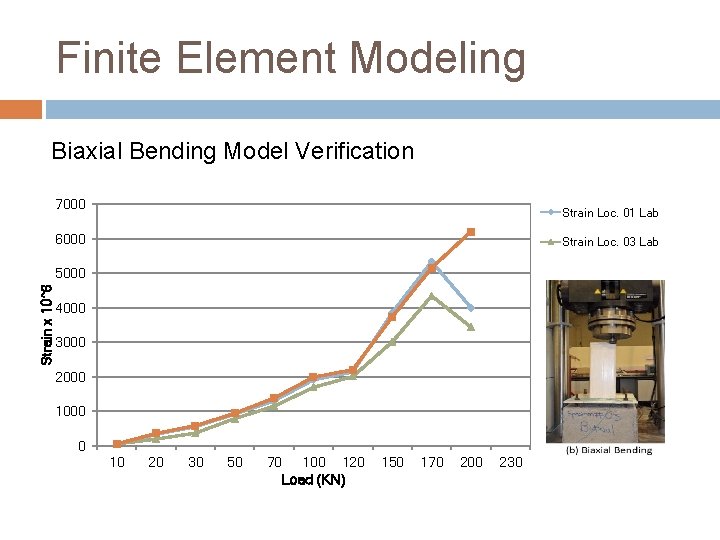
Finite Element Modeling Biaxial Bending Model Verification 7000 Strain Loc. 01 Lab 6000 Strain Loc. 03 Lab Strain x 10^6 5000 4000 3000 2000 1000 0 10 20 30 50 70 100 120 Load (KN) 150 170 200 230

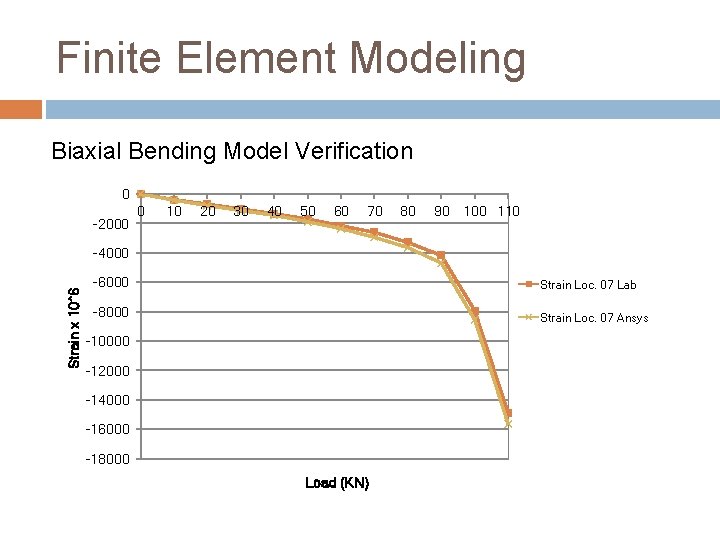
Finite Element Modeling Biaxial Bending Model Verification 0 -2000 0 10 20 30 40 50 60 70 80 90 100 110 Strain x 10^6 -4000 -6000 Strain Loc. 07 Lab -8000 Strain Loc. 07 Ansys -10000 -12000 -14000 -16000 -18000 Load (KN)

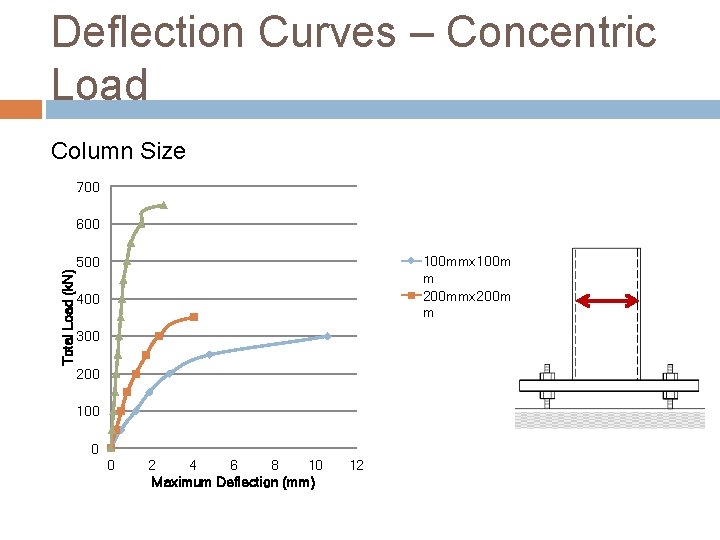
Deflection Curves – Concentric Load Column Size 700 Total Load (k. N) 600 100 mmx 100 m m 200 mmx 200 m m 500 400 300 200 100 0 0 2 4 6 8 10 Maximum Deflection (mm) 12

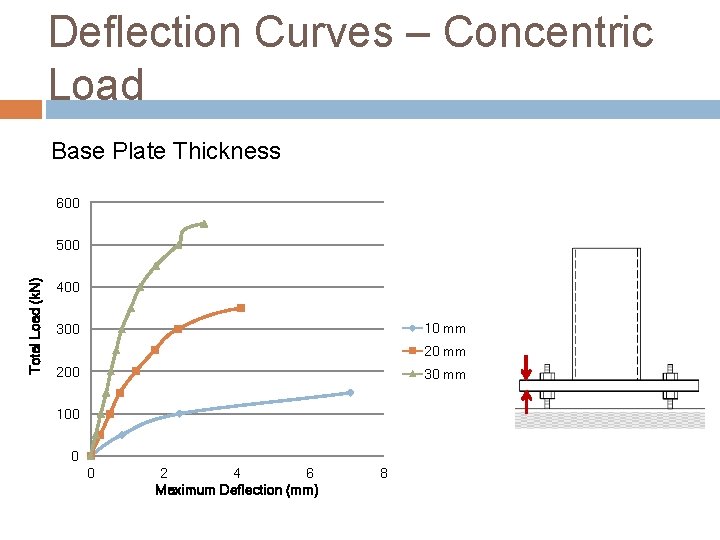
Deflection Curves – Concentric Load Base Plate Thickness 600 Total Load (k. N) 500 400 10 mm 300 20 mm 200 30 mm 100 0 0 2 4 6 Maximum Deflection (mm) 8

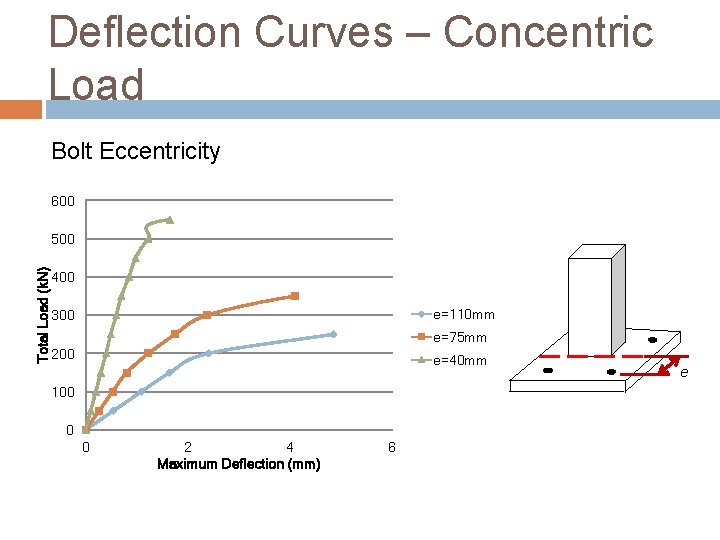
Deflection Curves – Concentric Load Bolt Eccentricity 600 Total Load (k. N) 500 400 e=110 mm 300 e=75 mm 200 e=40 mm 100 0 0 2 4 Maximum Deflection (mm) 6 e

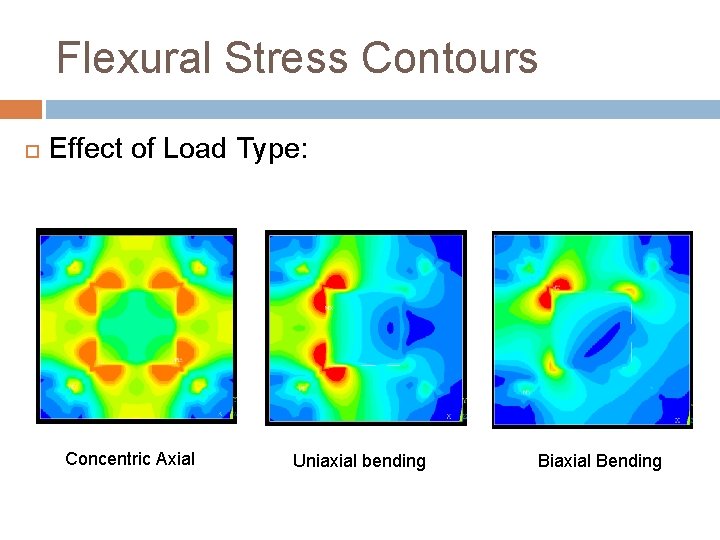
Flexural Stress Contours Effect of Load Type: Concentric Axial Uniaxial bending Biaxial Bending

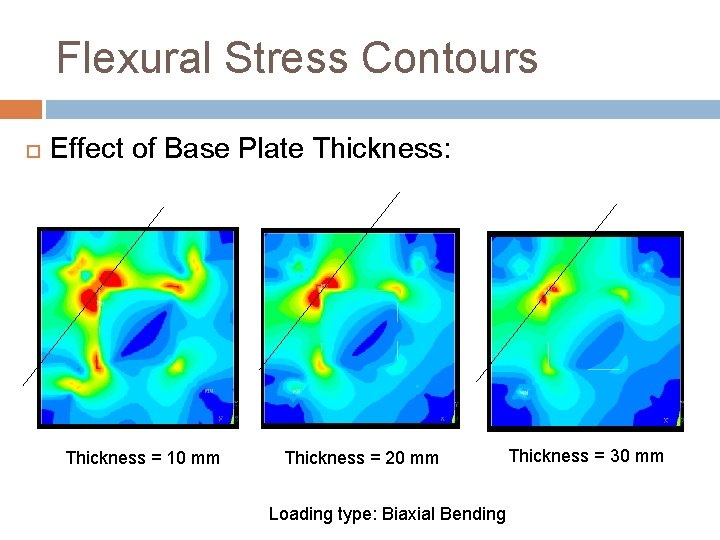
Flexural Stress Contours Effect of Base Plate Thickness: Thickness = 10 mm Thickness = 20 mm Loading type: Biaxial Bending Thickness = 30 mm

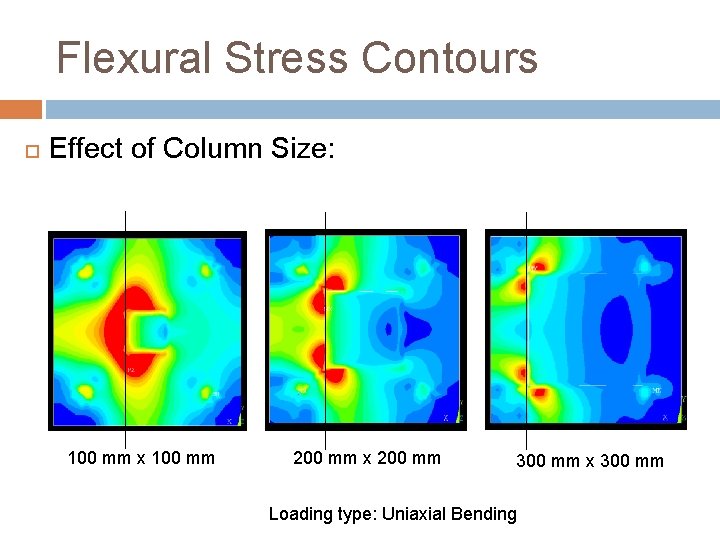
Flexural Stress Contours Effect of Column Size: 100 mm x 100 mm 200 mm x 200 mm 300 mm x 300 mm Loading type: Uniaxial Bending

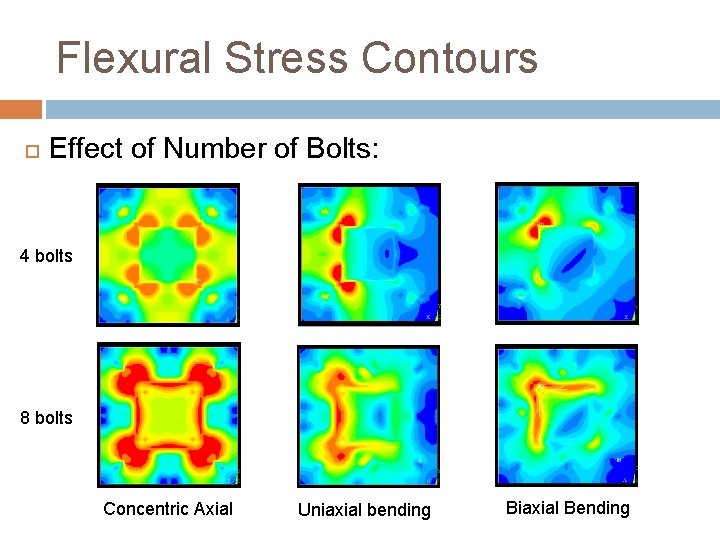
Flexural Stress Contours Effect of Number of Bolts: 4 bolts 8 bolts Concentric Axial Uniaxial bending Biaxial Bending

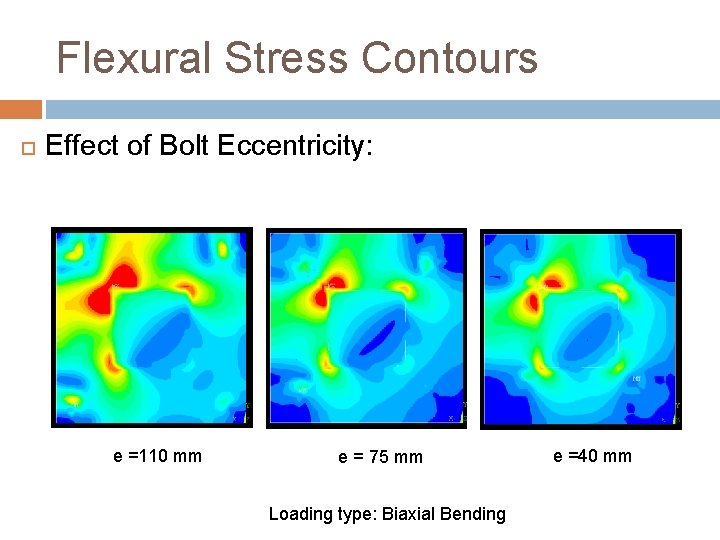
Flexural Stress Contours Effect of Bolt Eccentricity: e =110 mm e = 75 mm Loading type: Biaxial Bending e =40 mm

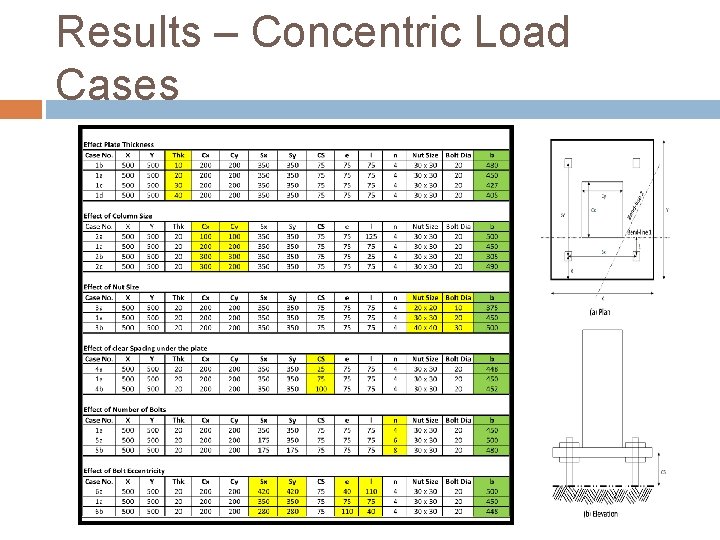
Results – Concentric Load Cases

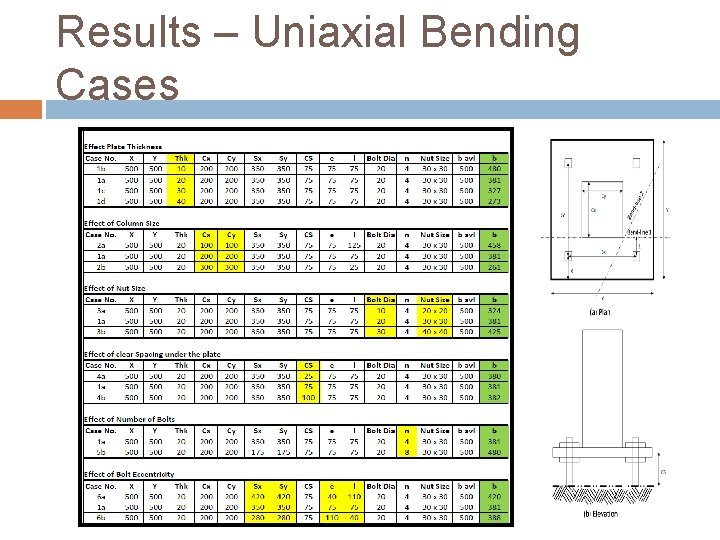
Results – Uniaxial Bending Cases

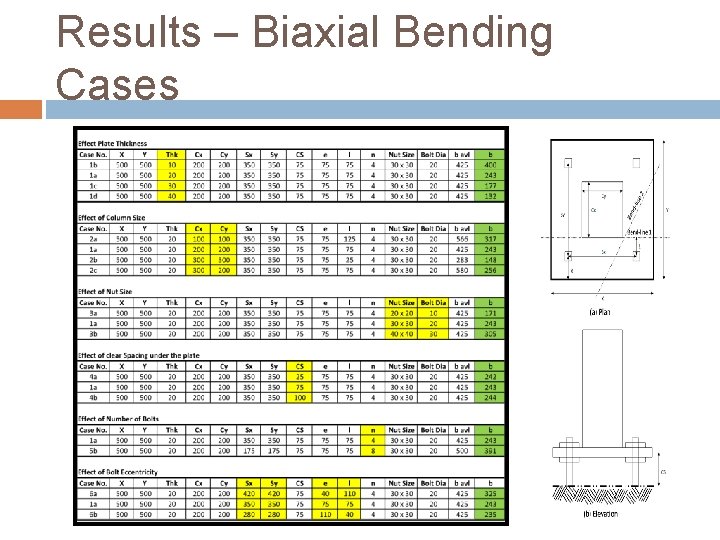
Results – Biaxial Bending Cases

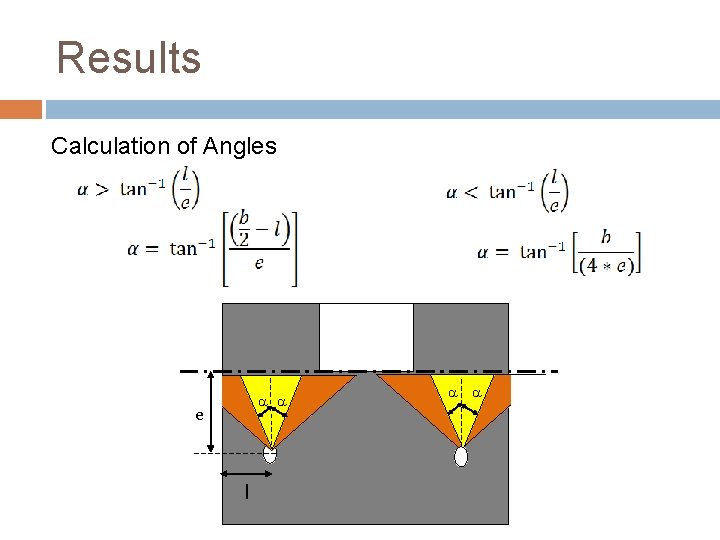
Results Calculation of Angles a a e l a a

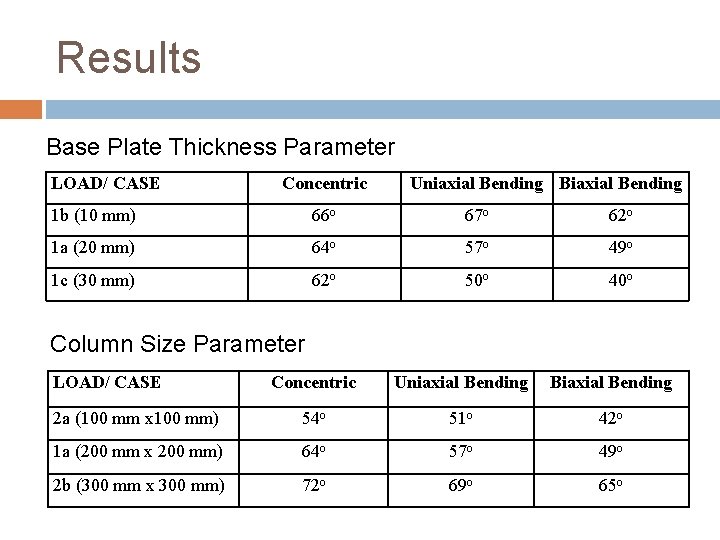
Results Base Plate Thickness Parameter LOAD/ CASE Concentric Uniaxial Bending Biaxial Bending 1 b (10 mm) 66 o 67 o 62 o 1 a (20 mm) 64 o 57 o 49 o 1 c (30 mm) 62 o 50 o 40 o Column Size Parameter LOAD/ CASE Concentric Uniaxial Bending Biaxial Bending 2 a (100 mm x 100 mm) 54 o 51 o 42 o 1 a (200 mm x 200 mm) 64 o 57 o 49 o 2 b (300 mm x 300 mm) 72 o 69 o 65 o

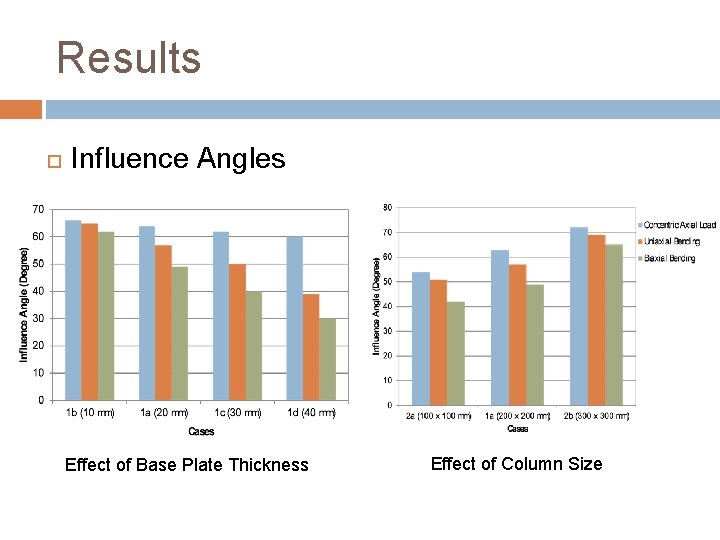
Results Influence Angles Effect of Base Plate Thickness Effect of Column Size

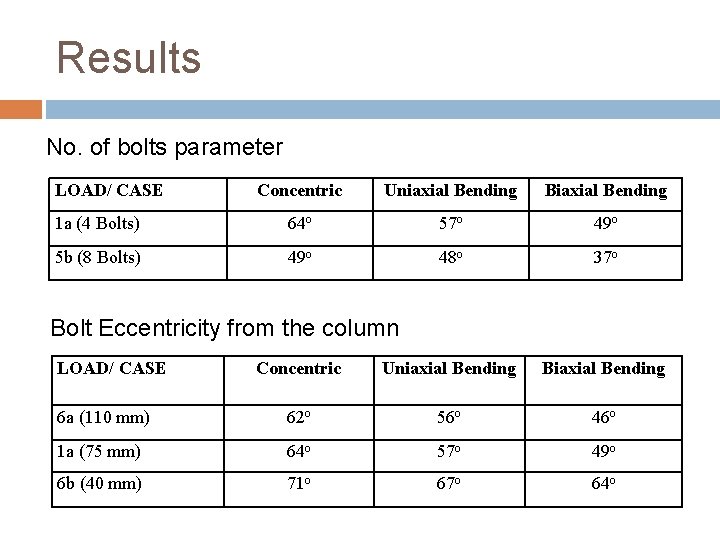
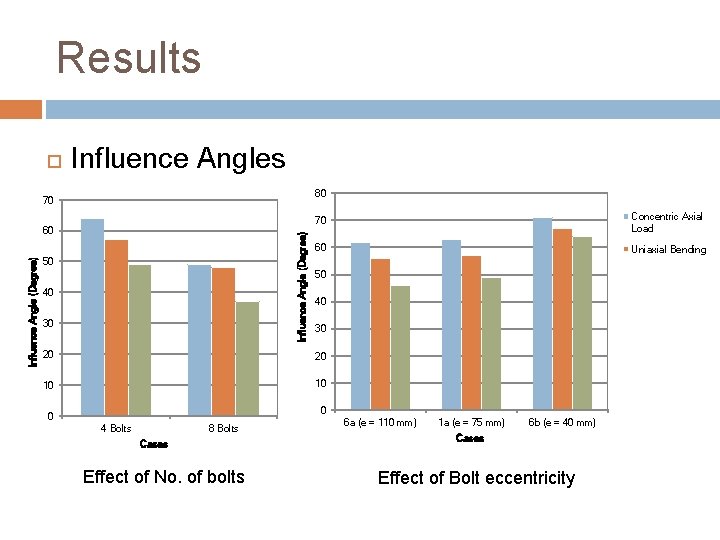
Results No. of bolts parameter LOAD/ CASE Concentric Uniaxial Bending Biaxial Bending 1 a (4 Bolts) 64 o 57 o 49 o 5 b (8 Bolts) 49 o 48 o 37 o Concentric Uniaxial Bending Biaxial Bending 6 a (110 mm) 62 o 56 o 46 o 1 a (75 mm) 64 o 57 o 49 o 6 b (40 mm) 71 o 67 o 64 o Bolt Eccentricity from the column LOAD/ CASE

Results Influence Angles 80 70 Influence Angle (Degree) 60 50 40 30 70 Concentric Axial Load 60 Uniaxial Bending 50 40 30 20 20 10 10 0 0 4 Bolts 8 Bolts Cases Effect of No. of bolts 6 a (e = 110 mm) 1 a (e = 75 mm) 6 b (e = 40 mm) Cases Effect of Bolt eccentricity

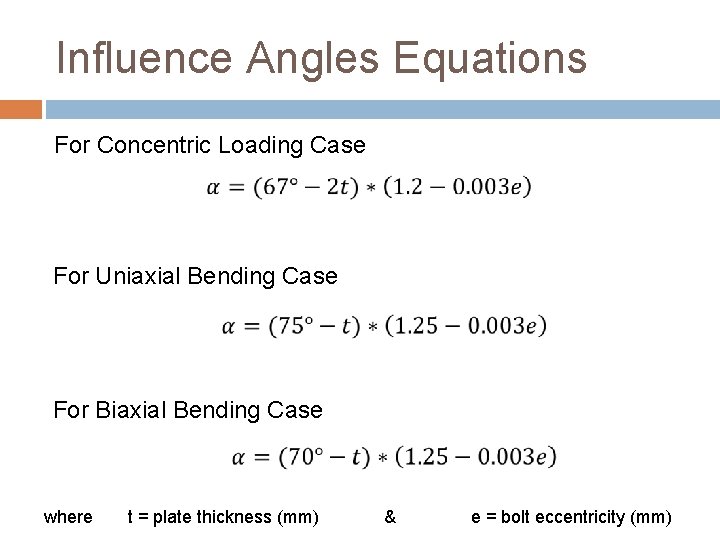
Influence Angles Equations For Concentric Loading Case For Uniaxial Bending Case For Biaxial Bending Case where t = plate thickness (mm) & e = bolt eccentricity (mm)

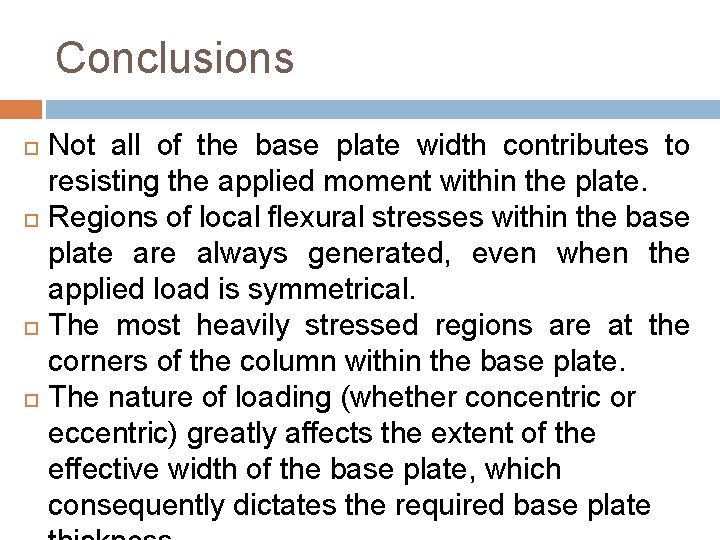
Conclusions Not all of the base plate width contributes to resisting the applied moment within the plate. Regions of local flexural stresses within the base plate are always generated, even when the applied load is symmetrical. The most heavily stressed regions are at the corners of the column within the base plate. The nature of loading (whether concentric or eccentric) greatly affects the extent of the effective width of the base plate, which consequently dictates the required base plate

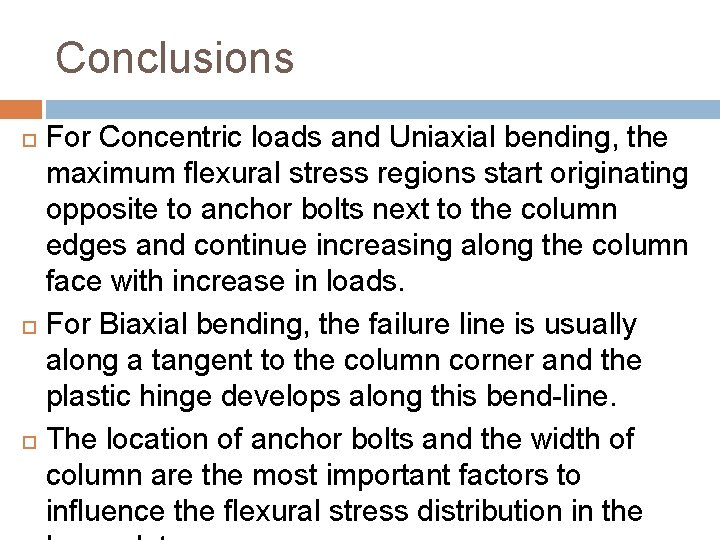
Conclusions For Concentric loads and Uniaxial bending, the maximum flexural stress regions start originating opposite to anchor bolts next to the column edges and continue increasing along the column face with increase in loads. For Biaxial bending, the failure line is usually along a tangent to the column corner and the plastic hinge develops along this bend-line. The location of anchor bolts and the width of column are the most important factors to influence the flexural stress distribution in the

Conclusions The clear spacing under the base plate and the size of nuts and bolts do not greatly affect the flexural stresses. Preliminary sizing of base plates using simple equations that are based on finite element results is possible. The equations derived in this study give adequate results if all possible failures at bendlines are investigated.

Future Work Future research in the area of base plates on leveling nuts may consider the effects of: Various shapes of columns Effect of stiffeners Dynamic loads Fatigue strength

Questions?