Airway Management Anatomy Review Anatomy of the Upper


 ◦")


- Slides: 68
Airway Management
Anatomy Review
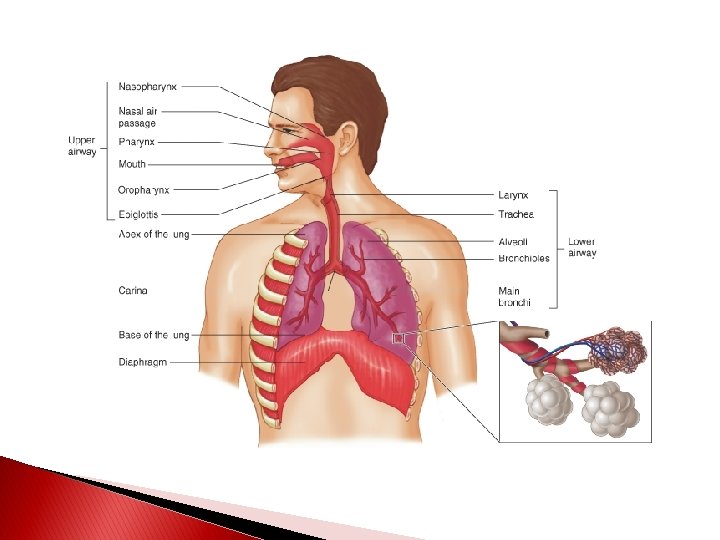
Anatomy of the Upper Airway
Internal Anatomy-Upper Airway
Internal Anatomy-Upper Airway
Start with the Basics �Start with the simple steps ◦ Positioning - Clear the airway ◦ Nasal adjuncts ◦ Oral adjuncts ◦ BIAD (AKA: Blind Insertion Airway Devices) ◦ Intubation ◦ Cricothyrotomy
Airway Maneuvers
Head-Tilt Chin-Lift
Head-Tilt Chin-Lift �Indication ◦ Without suspected spinal injury ◦ Unresponsive patient that can not protect their own airway ◦ Simple, safe and non-invasive ◦ Does not protect from aspiration
Head-Tilt Chin-Lift �Method ◦ Tilt head back with hand on patient’s forehead ◦ Fingers of other hand under bony part of lower jaw and lift chin forward ◦ AHA standard for non-injury patient
Head-Tilt Chin-Lift Maneuver
Jaw Thrust
Jaw Thrust �Indication ◦ Used in suspected spinal injury/history of cervical injury or fusion, etc �Method ◦ Grasp angle of lower jaw ◦ Lift with both hands and displace mandible forward while tilting the head back
Jaw Thrust Maneuver
Airway Adjuncts
OPA �Indications ◦ Hold tongue away from the posterior wall of the pharynx ◦ Unconscious, semi-conscious without a gag ◦ Infant to adult sizes
Oropharyngeal Airway
OPA �Method ◦ Measure ◦ Clear airway ◦ Upside-down or at 90 -degree angle ◦ Rotate until against posterior wall of oropharynx ◦ Confirm placement
OPA �Disadvantages ◦ Does not protect from aspiration ◦ May stimulate vomiting and laryngospasm if gag present ◦ If not inserted properly, pushes tongue back and causes airway obstruction
Measuring an OPA
Inserting OPA
Nasopharyngeal Airways
NPA �Indications ◦ Semiconscious or patient unable to maintain own airway ◦ Unconscious where OPA not used ◦ Seizures ◦ C-spine Injury ◦ Before nasotracheal intubation ◦ Guide for inserting a nasogastric tube
NPA �Advantages ◦ Well tolerated in those with a gag reflex ◦ Inserted rapidly ◦ Used when OPA is contraindicated (facial trauma, gag reflex)
NPA �Disadvantages ◦ Longer length may enter esophagus ◦ Laryngospasm and vomiting ◦ Injury to nasal mucosa, bleeding, or obstruction ◦ Small diameters can become obstructed with vomit, mucus, or blood ◦ Does not protect from aspiration ◦ Can’t suction through
NPA �Method ◦ Measure ◦ Lubricate with water-soluble lubricant ◦ Bevel tip toward nasal septum ◦ Use natural curvature of nasal passage ◦ Should rest in posterior pharynx
Measuring a Nasal Airway
Bag-Valve Mask
BVM �Indications and Advantages ◦ Self-inflating and non-rebreathing ◦ Use with airway maintenance device ◦ Use with apnea or ineffective effort ◦ Provides blood/body fluid barrier ◦ Room air (21%) to 100% Fi. O 2 ◦ Sense of lung compliance
BVM �Disadvantages ◦ Difficult to master – tidal volume dependent on mask seal ◦ Inadequate tidal volume from poor technique, poor mask seal, and gastric distention
BVM �Method ◦ Position at patient’s head ◦ Clear airway ◦ Head tilt chin lift or jaw thrust ◦ BLS or ALS airway ◦ Tight seal on mouth with E-C positioning ◦ One and two person options
BIADs
Laryngeal Mask Airway: LMA Forms low pressure seal over laryngeal inlet
LMA �Indications ◦ Situations involving a difficult mask fit ◦ Cannot be intubated, can be ventilated ◦ ETT can be passed through LMA ◦ May be used as a “second-last-ditch” airway where a surgical airway is the only remaining option
LMA �Contraindications ◦ Cannot open mouth ◦ Airway obstruction or abnormalities ◦ High risk of aspiration (obesity, late pregnancy, not NPO, etc)
LMA �Method ◦ Have all equipment ready, select appropriate size (sizes 1 -5) ◦ Test cuff inflation/deflation system (reference point: Size 4 (adult)-30 ml) ◦ Apply a water-soluble lubricant to the back of the mask
LMA � Method ◦ Grasp the LMA by the tube, holding it like a pen as near as possible to the mask end. ◦ Place the tip of the LMA against the inner surface of the patient’s upper teeth
LMA � Method ◦ Under direct vision press the mask tip upwards against the hard palate to flatten it out ◦ Using the index finger, keep pressing upwards as you advance the mask into the pharynx to ensure the tip remains flattened and avoids the tongue
LMA � Method ◦ Keeping the neck flexed and head extended, press the mask into the posterior pharyngeal wall using the index finger
LMA � Method ◦ Continue pushing with your index finger and guide the mask downward into position.
LMA � Method ◦ Grasp the tube firmly with the other hand then withdraw your index finger from the pharynx ◦ Press gently downward with your other hand to ensure the mask is fully inserted
LMA � Method ◦ Inflate the mask with the recommended volume of air ◦ Do not touch the LMA tube while inflating unless the position is unstable ◦ The mask can rise up slightly out of the hypopharynx as it is inflated to find its correct position
LMA Placement
LMA �Method ◦ Attach to BVM ◦ Perform standard evaluation of lung sounds ◦ Insert a bite-block or roll of gauze to prevent occlusion of the tube should the patient bite down ◦ Secure with tape or ET tube holder
LMA �Helpful Tidbits ◦ If you can’t ventilate, remove it ◦ Avoid excessive lubricant on anterior surfaces ◦ Avoid LMA fold over
King Airway
Proximal Opening of Gastric Access Lumen Pilot Balloon Primary Ventilatory Opening Proximal Cuff Stabilizes tube & seals oropharynx Multiple Distal Ventilatory Openings Distal Opening of Gastric Access Lumen Bilateral Ventilation Eyelets Distal Tip & Cuff Anatomically shaped to assist in passage behind larynx and normally collapsed esophagus
King Airway Comes in 3 sizes: �#3: 4– 5 ft �#4: 5– 6 ft �#5: > than 6 ft
King Airway �Indications ◦ When tracheal intubation indicated, but unsuccessful or unavailable. ◦ Access to the patient is limited (e. g. , trauma patients, entrapment, etc. ). ◦ Difficult or emergent airways ◦ Cardiopulmonary arrest (optional).
King Airway �Contraindications ◦ Presence of gag reflex ◦ Caustic ingestion ◦ Obstructed airway ◦ Esophageal trauma or disease
King Airway �Method ◦ Have all equipment ready, select appropriate size (#3, #4, or #5) ◦ Test cuff inflation system for leaks ◦ Apply a water-soluble lubricant to the posterior distal tip of the device
King Airway �Method ◦ Hold King Airway in dominant hand at proximal connector ◦ Perform tongue-jaw lift while keeping head in a neutral position
King Airway �Method ◦ Rotate King laterally 45 -90 degrees (blue orientation line is touching the corner of the mouth) ◦ Introduce tip into mouth and advance behind base of the tongue ◦ As the tube passes under the tongue, rotate the tube back to midline (blue orientation line faces chin)
King Airway �Method ◦ Advance tube until connector is aligned with teeth and/or gums.
King Airway �Method ◦ Using a syringe, inflate the cuffs with the appropriate volume of air. �#3: 45 -60 ml �#4: 60 -80 ml �#5: 70 -90 ml
King Airway �Method ◦ Attach BVM ◦ While ventilating, simultaneously withdraw until ventilation is easy and free-flowing. ◦ There should be good tidal volume with minimal resistance.
King Airway �Method ◦ Perform standard evaluation of lung ◦ sounds ◦ Attach and utilize end-tidal CO 2 monitoring ◦ Readjust cuff inflation as needed ◦ Consider securing with tape or ET tube holder
King Airway �Helpful Tidbits ◦ If you can’t ventilate, remove it ◦ If water soluble lubricant used, do not apply near ventilatory openings ◦ Be prepared to add another 10– 15 cc in the event of air leakage ◦ Insertion depth is critical
King Airway
ETTs
Endotracheal Intubation �Indications ◦ Respiratory or cardiac arrest ◦ GCS < 8 ◦ Risk of aspiration ◦ Obstruction due to foreign bodies, trauma, burns, or anaphylaxis. ◦ PTX or hemothorax with distress ◦ Need for mechanical ventilation
Endotracheal Intubation �Complications ◦ Equipment malfunction ◦ Teeth breakage and soft tissue lacerations ◦ Hypoxia ◦ Esophageal intubation ◦ Endobronchial intubation (right mainstem) ◦ Tension pneumothorax
Endotracheal Intubation �Advantages ◦ Isolates trachea and permits complete control of airway ◦ Impedes gastric distention ◦ Eliminates need to maintain a mask seal ◦ Offers direct route for suctioning ◦ Permits administration of some medications
Endotracheal Intubation �Disadvantages ◦ Requires training and experience ◦ Requires specialized equipment ◦ Requires direct visualization of vocal cords ◦ Bypasses upper airway’s functions of warming, filtering, and humidifying the inhaled air
Endotracheal Intubation �Method ◦ Pre-ventilate patient ◦ Position patient ◦ Assemble and check equipment ◦ Insert laryngoscope ◦ Visualize larynx and insert ETT ◦ Confirm placement ◦ Secure ETT