Agenda August 14 th 15 th Topic Word

")


- Slides: 49
Agenda August 14 th /15 th – Topic: Word Module 1: Creating, Formatting, and Editing a Word Document with a picture – Homework: Assigned: – Work with your group to complete the Super Computer Project – 2 hours of Gmetrix practice this week – 15 vocabulary words – Word Module 1 – due Monday, Aug. 21 / Tuesday, Aug. 22 nd – Homework Due:
Presentation – All Group Members Must Present – Presentation Dates: (A-Day: 08/28; B-Day: 08/29) – Presentation (8 -10 minutes) – Title Slide – Individual Needs slides (one for each member) – Comparisons and Compromises (explain how you came to final product choices) – Super-Computer – Description/Specification – Final Cost (not to exceed $1, 500) – Retailer – Conclusion – What challenges did you face as an individual and as a team? – What did you learn from this assignment?
August 14 th / 15 th Agenda – Announcements Objectives – Typing – We Will: create a document Flyer for advertisement. – Office 2016 review SAM training – I Will: edit and format a flyer. – Lecture: Word Module 1: Creating a flyer
Announcements – BPA informational meeting Tuesday @ lunch
Office 2016 Review SAM training
Word Module 1
This Weeks Objectives – Enter text in a Word document – Check spelling as you type – Insert digital pictures in a Word document – Format paragraphs – Format pictures – Format text – Add a page border – Undo and redo commands or actions – Adjust spacing – Correct errors and revise a document – Change theme colors
Project – Flyer with a Picture
Follow along – Log on to Cengage – Click on Word Module 1: Creating, formatting, and…. – Click on Word Module 1 SAM Text Book Project – Click start – Download and save both files (start and support) on your USB. – Save word document as Surf. Flyer_Firstandlastname_Classperiod
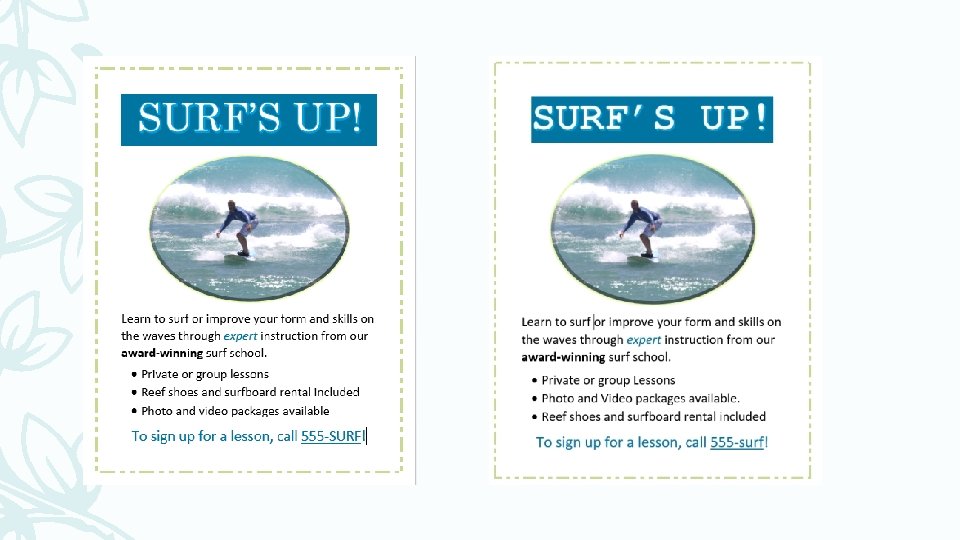
On your Word Document Step 1: Type Surf’s Up! as the headline Step 2: Press the ENTER key to move the insertion point to the beginning of the next line
ISN Lecture notes To Display Formatting Marks – If the HOME tab is not the active tab, 1. click HOME on the ribbon to display the HOME tab 2. click the Show/Hide ¶ button to display formatting marks on the screen
– enter a blank line in a document Step 3: press the ENTER key without typing any text on the line. Step 4: Type the first sentence of the body copy: Learn to surf or improve your form and skills on the waves through expert instruction from our award-winning surf school. Press enter
Step 5: Type Private or group lessons and then press the ENTER key. Step 6: Type Photo and video packages available and then press the ENTER key. Step 7: Type Reef shoes and surfboard rental included and then press the ENTER key. Step 8: Type To sign up for a lesson, call 555 -SURF!
ISN Lecture notes To Center a Paragraph Step 9: 1. Click Home on the ribbon to display the Home tab. 2. Click somewhere in the paragraph to be centered (in this case, Surf’s Up!) to position the insertion point in the paragraph to be centered 3. Click the Center button o Home tab o Paragraph group o Click on the center button
ISN Lecture notes Change Font Size of Selected Text Step 10: 1. With the text selected, click the Font Size arrow 2. Home tab 3. Font group- to display the Font Size gallery - Point to 72 in the Font Size gallery (to display a live preview of the selected text at the selected point size)
Step 11: 1. With the text selected, click the Font arrow 2. Home tab 3. Font group- to display the Font gallery 4. Click ‘Rockwell Extra Bold’ (or a similar font) in the Font gallery to change the font of the selected text.
ISN Lecture notes To Change the Case of Selected Text Step 12: 1. With the text selected, click the Change Case button Home tab Font group- to display the Change Case gallery
ISN Lecture notes To Apply a Text Effect to Selected Text Step 13: 1. With the text selected, click the ‘Text Effects and Typography’ button Home tab Font group - to display the Text Effects and Typography gallery
ISN Lecture notes To Apply a Text Effect to Selected Text Continued 2. Point to ‘Fill - White, Outline - Accent 2, Hard Shadow - Accent 2’ (fourth text effect in third row) to display a live preview of the selected text with the selected text effect
ISN Lecture notes To Shade a Paragraph Step 14: 1. Click somewhere in the paragraph to be shaded (in this case, Surf’s Up!) 2. Click the Shading arrow Home tab Paragraph group- to display the Shading gallery 3. Click ‘Orange, Accent 2, Darker 25%’ (sixth color in fifth row) to shade the current paragraph
To Select Multiple Lines
To Change the Font Size of Selected Text Step 15: 1. With the text selected, click the Font Size arrow Home tab Font group- to display the Font Size gallery. 2. Click 24 in the Font Size gallery to increase the font size of the selected text.
To Bullet a List of Paragraphs Step 16 1. Click the Bullets button Home tab Paragraph group- to place a bullet character at the beginning of each selected paragraph
ISN Lecture notes To Undo and Redo an Action – Click the Undo button on the Quick Access Toolbar to reverse your most recent action – (in this case, remove the bullets from the paragraphs) – Click the Redo button on the Quick Access Toolbar to reverse your most recent undo – (in this case, place a bullet character on the paragraphs again)
To Italicize Text Step 17: 1. Click somewhere in the word to be italicized (expert, in this case) to position the insertion point in the word to be formatted. 2. Click the Italic button Home tab Font group- to italicize the word containing the insertion point
To Color Text Step 18: The following steps change the color of the word, expert. 1. With the insertion point in the word to format, click the Font Color arrow Home tab Font group- to display the Font Color gallery 2. Click ‘Orange, Accent 2, Darker 25%’ (sixth color in fifth row) to change the color of the text
To Use the Mini Toolbar to Format Text Step 19: 1. Select text - To sign up for a lesson, call 555 -surf ! 2. Click 28 in the Font Size gallery to increase the font size of the selected text. 3. Click ‘Orange, Accent 2, Darker 25%’ to change the color of the selected text. 4. Click anywhere in the document window to remove the selection from the text.
To Select a Group of Words, Underline Text, and to bold text Step 20: 1. Select - 555 -surf 2. click the Underline button Home tab Font group - to underline the selected text 3. Select the text to be formatted - award-winning Bold text
ISN Lecture notes To Change Theme Colors Step 21: 1. Click Design on the ribbon to display the Design tab. 2. Click the Theme Colors button Design tab Document Formatting group- to display the Theme Colors gallery. 3. Point to Blue in the Theme Colors gallery to display a live preview of the selected theme color and select.
Agenda August 16 th / 17 th – Topic: Word Module 1: Creating, Formatting, and Editing a Word Document with a picture – Homework: Assigned: – Work with your group to complete the Super Computer Project – 2 hours of Gmetrix practice this week – 15 vocabulary words – Word Module 1 – due Monday, Aug. 21 / Tuesday, Aug. 22 nd – Homework Due:
August 16 th / 17 th Agenda – Typing Objectives – We Will: create a document Flyer for advertisement. – ECC Quiz – Finish Word Module 1 Lecture – I Will: insert, edit, and format a digital picture in a word document.
Text in a flyer typically is organized into three areas 1. The headline is the first line of text on the flyer. It conveys the product or service being offered 2. The body copy consists of text between the headline and the signature line. This text highlights the key points of the message in as few words as possible. 3. The signature line, which is the last line of text on the flyer, contains contact information or identifies a call to action.
Center Another Paragraph – the digital picture of a surfer should be centered on the blank line below the headline, Surf’s Up!. – The blank paragraph below the headline currently is left-aligned. – The following steps center this paragraph. – Click the Home tab – Click somewhere in the paragraph to be centered (in this case, the blank line below the headline) to position the insertion point in the paragraph to be formatted. – Click the Center button – Home tab – paragraph group
ISN Lecture notes To Insert a Picture – Insert a digital picture of a surfer in the flyer, on the blank line below the headline 1. Click the Insert tab 2. Click the Picture Icon in the illustration group, to display the Insert Picture dialog box 3. click Surfing to select the file 4. Click the Insert button
To Zoom the Document – Click the Zoom Out or Zoom In button as many times as necessary until the Zoom button on the status bar displays 40% on its face
ISN Lecture notes To Resize a Graphic The next step is to resize the picture so that it is smaller in the flyer. 1. Point to the lower-left corner sizing handle on the picture so that the pointer shape changes to a two-headed arrow. 2. Drag the sizing handle diagonally inward 3. Release the mouse button to resize the graphic, which, in this case, should have a height of about 3. 7” and a width of about 5. 06”. 1. Picture Tools Format Tab 2. Size group
To Zoom 100% 1. Click View tab 2. Zoom group 3 click 100% (Zoom dialog box)
ISN Lecture notes To Apply a Picture Style 1. Ensure the graphic is selected and then click Picture Tools Format tab 2. In the Picture Styles Group Click the More button in the Picture Styles gallery 3. Point to ‘Soft Edge Oval’ in the Picture Styles gallery (sixth style in third row)
ISN Lecture notes To Apply Picture Effects 1. With the picture still selected click the Picture Effects button Picture Tools Format tab Picture Styles group to display the Picture Effects menu. 2. Point to Glow on the Picture Effects menu to display the Glow gallery. 3. Point to ‘Lime, 5 pt glow, Accent color 6’ (first row, 6 th style) 4. Click the Picture Effects button, to display the Picture Effects menu again. 5. Point to Bevel on the Picture Effects menu to display the Bevel gallery. 6. Point to Angle in the Bevel area (first effect in second row)
ISN Lecture notes To Add a Page Border 1. Click the Design tab. 2. Click the ‘Borders and Shading’ button Design tab Page Background group 3. click the sixth border style in the Style list 4. Click the Color arrow to display a Color palette 5. Click ‘Lime, Accent 6, Lighter 40%’ (rightmost color in fourth row) in the Color palette to select the color for the page border. 6. Click the Width arrow to display the Width list and then click 4 ½ pt to select the thickness of the page border 7. Click the OK button to add the border to the page
To Zoom One Page 1. Click the View tab. 2. Click the One Page button View tab Zoom group
ISN Lecture notes To Change Spacing before and after Paragraphs 1. Position the insertion point in the paragraph to be adjusted, in this case, the paragraph containing the headline. 2. Click on the Layout tab. 3. In the Paragraph group, Click the up arrow for Before to 12 pt
To Change Spacing before and after Paragraphs 1. Position the insertion point in the paragraph to be adjusted, in this case, the paragraph containing the signature line. 2. In the Paragraph group, Click the up arrow for Before to 12 pt
ISN Lecture notes To Center Page Contents Vertically 1. click Layout tab. 2. Click the Page Setup Dialog Box Launcher in the Page Setup group) 3. Click the Layout tab (Page Setup dialog box) to display the Layout sheet 4. Click the Vertical alignment arrow, to display the list of alignment options and then click Center in the list 5. Click the OK button to center the page contents vertically on the screen
Friday, August 18, 2017 Agenda – Typing – Agenda – Finish Word Module 1 lecture – SAM Project for Word Module 1 Objectives – We Will: format our flyer. – I Will: upload my SAM project to Cengage
Agenda Topic: Word Module 1: Creating, Formatting, and Editing a Word Document with a picture Homework Assigned: – Work with your group to complete the Super Computer Project – 2 hours of Gmetrix practice this week – 15 vocabulary words – Word Module 1 – due Wednesday, Aug. 23 rd / Thursday, Aug. 24 th – Sam Project for Word Module 1 – Due Sunday, August 20 th @ midnight, submit on cengage
SAM Project for Word Module 1 – Create a folders on your USB – BIM – SAM Projects – Word Module 1 – Project One
Save SAM Project Files Word Module 1 SAM project Download and save Instructions to your USB Save the SC document file Save the Support png file