Adobe Audition Beginners Guide What is Adobe Audition

Adobe Audition Beginner’s Guide
")
What is Adobe Audition? ● Adobe Audition is a powerful DAW (Digital Audio Workspace) that is great for editing audio for video, music production, podcasts, etc. It is a comprehensive toolset that includes multitrack, waveform, and spectral display for creating, mixing, editing, and restoring audio content. With these tools, you can create amazing sound compositions, whether it is detailed sound design and soundscapes, or rich-sounding podcasts

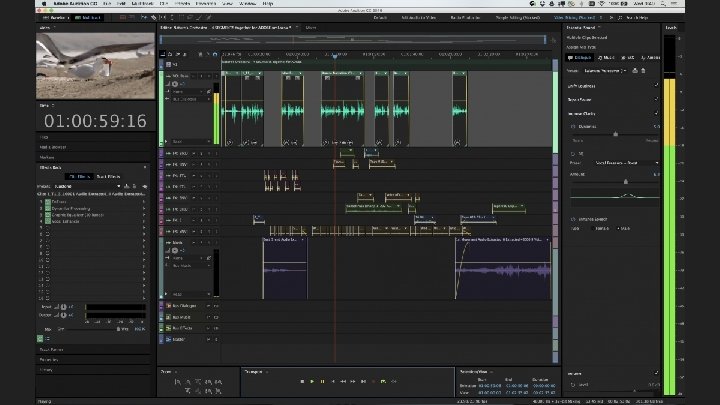
Workspaces ● ● There are many different workspaces within Adobe Audition, which are used for different purposes and hence have different tools and layouts, which make different tools more easily accessible. ○ Some of these workspaces include: Classic, Default, Edit Audio to Video, Essential Video Mixing, Loudness, Mastering and Analysis, Maximum Editing (Dual Monitor), Radio Production, Restoration, and Simple Editing. ○ Depending on your reasons for using the software, we suggest you change to its suggested layout within Audition ■ To switch workspaces: Window -> Workspace -> SELECT desired workspace For the sake of SCTV and its purposes, we will be focusing on “Editing Audio to Video”!

Understanding the Panels ● ● ● In the top left, we can see the VIDEO PANEL, which will display your video composition. Below this, we can see the MEDIA BROWSER, which allows you to browse your hard drive to import sound effects, music, etc. ○ The Effects Rack, Markers, and Properties! Below this is the HISTORY PANEL. Make a mistake? Look in the history panel and click to point before you made your error! In the center of the screen you will find the WAVEFORM PANEL or the MULTITRACK, depending on which mode of editing you are in. On the right, we can see the ESSENTIAL SOUND PANEL, which will have preset sound effects and sound restoration tools.

Two Modes of Editing: ● This software includes two different forms of editing: ○ Waveform: editing specific clips and recording ■ “Destructive” form of editing. Whatever edits you make in this mode will be permanent when you move into the Multitrack mode. Press COMMAND +Z to undo edits. ○ Multitrack: assembling different tracks to create an audio composition. ■ Non-destructive form of editing. Edits are not permanent!

Let’s start! ● To begin, click on “Edit Audio to Video” in the top right corner. This handy feature within audition helps you create vivid soundscapes in perfect sync with your video composition! ○ Import clip. ■ File -> Import -> File ○ OR click and drag a video from a FINDER WINDOW into a desired track.

Waveform Mode ● ● Waveforms display the amplitudes of sound waves in a file along its vertical axis. Essentially, the larger the waves are, the louder the sound will be. ○ Amplitude Definition: the fluctuation or displacement of a wave from its mean value. With sound waves, it is the extent to which air particles are displaced, and this amplitude of sound or sound amplitude is experienced as the loudness of sound. You can record sounds within Audition using the RECORD button (red button). ○ To change your microphone go to Audition CC -> Preferences -> Audio Hardware -> Default Input -> Select Desired microphone ■ Default Output -> Select desired speakers or headphones ○ To start recording in Waveform view: File -> New -> Audio File ■ Give your audio file a name ■ The program will then ask you to select a Sample Rate, Channels, and Bit Depth. Let’s define these so that you can make an informed decision based on your project!

Sample Rate ● ● ● Definition: defines how many times per second a sound is sampled. Technically speaking, it is the frequency of samples used in a digital recording. It is measured in Hz or k. Hz (one k. Hz being 1000 Hz). For example, 44100 samples per second can be expressed as either 44100 Hz, or 44. 1 k. Hz Will usually want to be at 44100 hertz ○ Standard for audio recordings! If you are recording for video, you will usually want to record at 48000 hertz ○ Maybe go higher if you are working with high-fidelity music ■ High-fidelity music (or hifi) refers to high quality reproduction of sounds. Ideally, highfidelity equipment has inaudible noise and distortion, and a flat (neutral, uncolored) frequency response within the human hearing range.

Channels ● Audition gives you the option to work with either Mono or Stereo channels, which differ in the amount of channels (signals) that they employ. ○ Mono uses one channel while Stereo uses several. With this, multiple speakers can reproduce sounds in stereo and hence sounds coming from individual channels. Multiple speakers can reproduce sounds in mono, but they replay the same signal, so it sounds like one audio source. ■ If you are recording music or jingles, stereo is a good option ■ If you are recording a voiceover, mono is a good option

Bit Depth ● Definition: describes the resolution of the sound data that is captured and stored in an audio file. A higher bit depth indicates a more detailed sound recording. ○ Bit depth: can be left at 32 (float) bits, which will allow you to distort your audio without clipping. ■ There are other bit settings, but 32 is recommended, especially for beginners

Almost Ready to Record! ● Before we start recording, it’s important to understand what a DECIBEL is” ○ Decibel definition: The decibel (abbreviated d. B) is the unit used to measure the intensity of a sound. On the decibel scale, the smallest audible sound (near total silence) is 0 d. B. A sound 10 times more powerful is 10 d. B. A sound 100 times more powerful than near total silence is 20 d. B. A sound 1, 000 times more powerful than near total silence is 30 d. B. In other words, d. B is logarithmic! ○ When you record dialogue on set, for example, you should shoot for recording dialogue between -6 and -12 decibels. You may be wondering why sound is measured in positive decibels, but when we record it, we record at negative decibels. Common amplifiers use 0 db as a reference for how much volume they can output before distortion becomes audible, or when the loud parts of the sound wave are clipped. 0 db, when recording, is the highest safe power level, and we can make adjustments to our sounds based on that reference point - it is something easily quantifiable. ○ For voiceovers, try to record between -6 Db and -3 Db

Let’s Record! ● ● ● To select a different microphone: Edit -> Preferences -> Default Input -> Select desired microphone Click the red button to start recording and record your sounds Click square STOP button when you’re done ○ Can also hit space bar to stop recording ■ Can hit space bar or play button to replay audio ○ If you feel like it’s too quiet, go to the volume wheel at the top of the waveform and increase the amplitude ○ OR Favorites -> Normalize to 0. 1 ■ Will make your clip the loudest it can possibly be without major distortions ○ To zoom in, go to time bar above waveform, and use the scroll wheel of your mouse (will zoom in and out) ■ You can use the additional playback buttons that are around this button

Editing Parts of a Waveform ● ● You may edit specific parts of a waveform - you can change the volume in specific areas, add effects to specific areas, etc. ○ To do so, click and drag within the waveform to select a desired area ■ To delete, drag over desired area and hit DELETE key. Remember, whatever edits you make to a clip in waveform mode are PERMANENT, making it a destructive mode of editing. ○ If you wish to undo an edit, hit COMMAND + Z before switching modes.
 across it’s y-axis,")
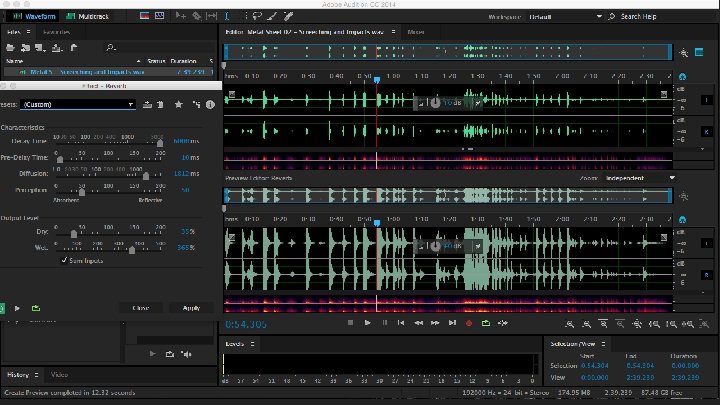
Spectral Frequency Editing Opposed to the waveform, which depicts amplitude (volume) across it’s y-axis, a spectral frequency displays pitches across the y-axis. Both are read left to right with respect to time. ● Using the Spectral Frequency display option, you can view, select, remove, and edit sound using tools and techniques similar to those found in paint and imageediting applications, such as Adobe Photoshop. ● Click the Spectral Frequency display button in the toolbar to view your audio in a different manner. ● Click the Marquee Selection tool in the toolbar to activate it. Use this tool to select a piece of the audio in the Spectral Frequency display, then press the spacebar to preview only the selected frequencies within the selection duration. ●

Waveform Spectral Frequency

Multitrack View ● ● ● ● Multitrack view is the editing environment designed for placing multiple audio clips on a timeline to mix them together into a new file. For example, you can combine voiceovers, interviews, and background music to make a podcast, or you can add sound effects and narration to a video. Switch to Multitrack view by clicking the Multitrack button in the toolbar, and then click OK to accept the default settings. The multitrack is not a destructive editing platform in the same way that the waveform is. The edits that are made are not permanent and can be undone easily! You can use a preset, but it is recommended that you start from scratch. Change the sample rate to the sample rate that you recorded your audio in. Otherwise, you will have to change the sample rate of your clips to the one within Audition, which can lead to some issues. Set bit depth to 32 (float) Recommended to use Stereo instead of mono if you are mixing within the Multitrack view, but this can be changed based on user discretion and what the project calls for.

Placing Clips in Timeline ● ● You can drag audio and video clips from the Files panel to the timeline in the Editor panel. To add clips to the Files panel, you can use the Open and Import commands in the File menu, or you can drag files from your operating system's file browser.

Editing Tools! ● The editing tools that are featured in this software very similar to the ones that are available within Premiere Pro. ○ Move Tool (V) ○ Razor Tool (R) ○ Slip Tool (Y)

Editing in Multitrack ● If you want to trim down the ends of any audio track, hover its edges until you see a red cursor. Click on it and drag it to the desired length. To recover parts of the audio (even if they have been cut using the razor tool), click on the ends and extend the clip - the data will be recovered! ● If you want to bring audio you have just recorded into the multitrack, find it in the library panel (top left), and drag it into one of the tracks ○ Pre Recorded sounds can be imported from the media browser, which is the panel on the bottom left. This panel will let you search your hard drive for specific files.
 ● ● ● There are two triangles in the upper")
Editing in Multitrack (Continued) ● ● ● There are two triangles in the upper left and right corners of each track which are used to fade clips in and out. Click and drag each of these into different positions to create a fade curve, which can be oriented in upwards or downwards curves. Upwards curves will create more sudden, jarring fades while downwards curves will be much more gradual Volume can be increased/decreased using the yellow horizontal lines that run through any given audio track, which are marked “VOLUME” when you hover them. Click and drag this line up or down to increase/decrease the intensity. ○ You can click on it to add a point, then click in a different part of the line to add a second point. From here, you can move each of the points higher or lower to get a gradual increase or decrease in volume! You may copy/paste a portion of a clip by highlighting the desired portion, then hitting COMMAND + C. Then, click on the desired track you want the copied clip to go into and hit COMMAND + V.

Adding Effects ● ● Adobe Audition offers around 50 fully customizable effects! You can access favorites in the Favorites panel and the Favorites menu. To add effects, click on a track that you wish to the effects to then go to the media browser panel and click on “EFFECTS RACK. ” ○ Will tell you which track you are adding an effect to and empty slot to add effects to ○ Click on an empty effect slot. This will give you a drop-down menu for the effects. ○ The tools included in these categories: ■ Amplitude and Compression ■ Delay and Echo ■ Filter and EQ ■ Modulation ■ Noise Reduction/ Restoration ■ Reverb ■ Special ■ Stereo Imagery (Advanced) ■ Time and Pitch ● Each of these categories branch off into more specific tools! After you’ve added your effects in the Effects Rack, hit APPLY at the bottom of the panel. Otherwise, your clip will your changes will not be applied and will remain unchanged.

Amplitude & Compression ● Let’s learn how to use some of these tools by going into one effect from each of these categories! ● Let’s use a simple tool: the Amplifier. ● To use this tool, simply click on your recording, go to your Effects Rack -> Amplitude and Compression -> Amplify ○ Will give you presets such as boosts or cuts in different values, which will make your clip louder or quieter respectively. ● For this next clip, I simply raised the Amplitude to 3. 27 d. B.

Amplitude and Compression Original Amplified

Delay and Echo ● There are three tools under this category: Analog Delay, and Echo. For this demonstration, let’s use the Echo tool! ○ Select the clip you wish to use the effect on. ○ Effects Rack -> Delay & Echo -> Echo ○ You will be presented with three different sliders beside the Successive Equalization sliders ■ Delay Time - determines the timing of the echos. Can be more attached or detached from original audio. ■ Feedback - Determines the loudness of the echos in comparison to the original audio. ■ Echo Level - determines the frequency of the echos. The lower the echo level, the less it will loop. The higher the echo level, there will be more echos. ○ Successive equalization sliders give you the option to put more emphasis on echos in different frequencies. ■ Go higher in five categories, ranging from lower to higher frequencies ■ Be careful using this tool, as the software can produce a very loud, potentially painful sound if you’re wearing headphones if you’re not careful.

Delay and Echo Example Original Echos

Filter and EQ ● The Filter and EQ comes with a variety of tools that alter compression of files to make them sound more clear or coming from a different source ○ For example, let’s use the FFT Filter! ■ Select the clip you would like to edit. Effects Rack -> Filter and EQ -> FFT Filter ● Provides presets that will manipulate the provided curve to sound differently, such as a radio, television, etc. ● To customize the sound, click on the blue horizontal line and create points. Adjust these across the horizontal and vertical axis to create a different sound!

Filter and EQ Original Filtered

Modulation comes with four different tools, and for now, we will be focusing on the Chorus Tool, which allows you to easily clone your voice and modulate it to make it sound like multiple people speaking in unison! ○ You can get some beautiful choral sounds or creepy sounds from this! ● To use this tool, select your clip then Effects Rack -> Modulation -> Chorus ● You will be presented with a variety of sliders whose functionality we already discussed, as well as presets regarding how many voices you would like or other sounds such as Acoustic Duet or Robotic Bee sounds (a strange variety). ○ Some of the most important sliders in this panel are the WET and DRY panels, which you can use to mix the level at which the effect modulates your sound. Slide the WET slider to make your effect pop more and slide the DRY slider to make your effect less pronounced. ●

Modulation Original Modulation

Noise Reduction/Restoration ● For this category, we will be looking into the uses of the De. Noise tool. ○ Noise, in audio, is the background static that can be heard when recording audio, especially if the microphone is not close enough to the source of the sound. ○ The De. Noise tool helps get rid of this sound, but it must be used carefully. Depending on your clip, you may inadvertently affect some frequencies in the wanted sound and make it sound unnatural! ○ To use this tool, Select Clip -> Effects Rack -> Noise Reduction/Restoration -> De. Noise. ■ You will be presented with another panel to customize the level of De. Noising. ● You will be given the option to choose between presets of heavy De. Noise and light De. Noise. ● Otherwise, you can use the slider on the bottom to manipulate the intensity of the tool! ● You may also select to change the PROCESSING FOCUS, which has options to focus on: ○ All frequencies ○ Lower frequencies ○ Mid frequencies ○ Lower and higher frequencies ○ Higher frequencies

Noise Reduction/Restoration Original De. Noise

Reverb ● Reverb is an excellent tool that can be used to create a sense of space in your scenes. Reverberations are defined as the pattern of echoes and reflections that occur when a sound is heard in a space, for example, in a concert hall. ○ The Reverb tool allows you to digitally recreate this, so that you can create space with sounds without needing to record in large rooms (and potentially sacrificing sound quality)! Let’s go ahead and look into the Studio Reverb Tool. ● To use this tool, Select Clip -> Effects Rack -> Reverb Studio Reverb ○ You will be presented with Presets as well as different sliders to customize your reverb.
 ● The first slider you will be presented with is the ROOM")
Reverb (Continued) ● The first slider you will be presented with is the ROOM SIZE Slider, which will let you customize how large you want your room to sound. This will affect the decay of the sounds in the clip, making it seem like a larger room. ● The DECAY tool will either amplify or diminish the effect of the Room Size slider. The higher the value in the Decay slider, the longer the decay will be, making the room seem larger. ● You can use the HIGH FREQUENCY CUT and LOW FREQUENCY CUT to omit or or amplify specific frequencies in the clip! ● Use the DIFFUSION Slider to digitally scatter the sound waves in your clip. This will reduce the sense of localization of your audio, making it more difficult to conceptualize where it’s coming from.
 Original Studio Reverb")
Reverb (Continued) Original Studio Reverb

Special ● The Special category has quite a few tools, some that deal with distortion, some that deal with vocal enhancement, and some that deal with more music-specialized tools. ○ Be careful using the distortion presets - they can blow out your clips and make very loud, painful sounds if used incorrectly. ● Let’s focus on the Vocal Enhancer Tool! ○ Select Clip -> Effects Rack -> Special -> Vocal Enhancer ■ Select which sex belongs to the voice you are attempting to enhance. ● You will be given an option for MALE, FEMALE, OR MUSIC (for singing).

Special Original Vocal Enhancer

Time and Pitch ● ● The Pitch Shifter tool within the Time and Pitch category allows you to manually manipulate the tones in an audio recording to make them either sound lower or higher pitched than originally recorded! ○ You can make a voice sound like a squirrel or an ogre! To use this tool, Select Clip -> Effects Rack -> Time and Pitch -> Pitch Shifter ○ You will be presented with two sliders: ■ The Semitones slider will allow you to manipulate most frequencies within your clip. Sliding this one will have the most noticeable impact. ■ The Cents slider will allow you to manipulate a small portion of the frequencies and is more subtle. ■ Note that you can’t set their values all the way in the same extreme. ● If you slide the semitones to -12 or 12, the cents slider will only be able to move in the opposite direction of where the semitones slider is set.

Time and Pitch Original Pitch Shifter

The Mixer Panel ● Switch to the Mixer by clicking “MIXER” next to the “EDITOR” tab. Can switch back and forth from the multitrack view and the mixer with a single click. ○ Can adjust levels - important to distinguish between important tracks and background! Don’t let your story be drowned out by the rest of your composition! ○ You can also adjust the MASTER VOLUME - which is the volume of the entire composition with all its tracks. ■ Use the sliders that run the length of each track to adjust their levels, which are presented in their individual meters. ● When the tip of the meters turn red, it means your audio is peaking. ○ EQ (Equalization) - boosting or reducing of different frequencies within a signal. ○ For example, treble/bass control on home audio systems. ■ Treble control adjusts high frequencies, bass control adjusts low frequencies. ○ Can also add effects to an entire track and the clips that sit within that track! To do this, go into Mixer mode, then click on a slot in the mini effects rack at the top of each individual track.

")
That’s all for now, folks! : )
- Slides: 43