ACCURACY Accuracy is the closeness of a measured
- Slides: 15

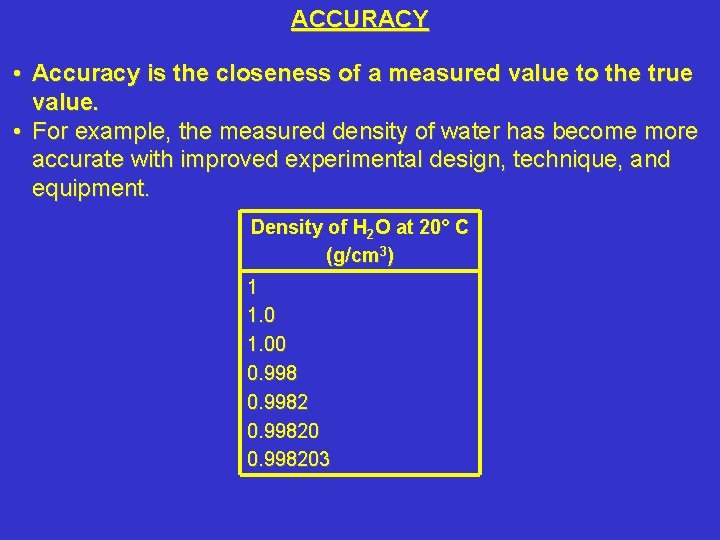
ACCURACY • Accuracy is the closeness of a measured value to the true value. • For example, the measured density of water has become more accurate with improved experimental design, technique, and equipment. Density of H 2 O at 20° C (g/cm 3) 1 1. 00 0. 998203

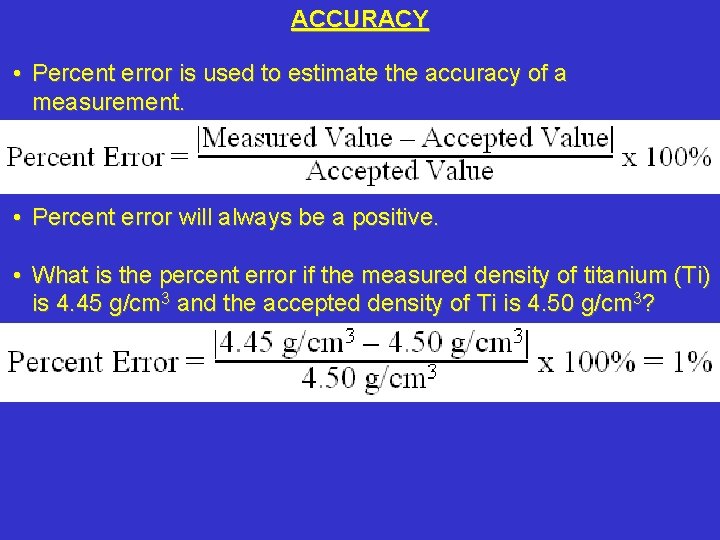
ACCURACY • Percent error is used to estimate the accuracy of a measurement. • Percent error will always be a positive. • What is the percent error if the measured density of titanium (Ti) is 4. 45 g/cm 3 and the accepted density of Ti is 4. 50 g/cm 3?

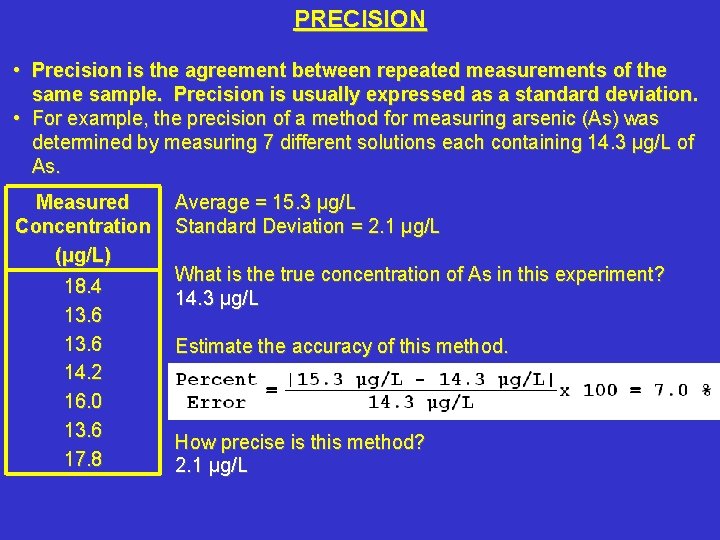
PRECISION • Precision is the agreement between repeated measurements of the sample. Precision is usually expressed as a standard deviation. • For example, the precision of a method for measuring arsenic (As) was determined by measuring 7 different solutions each containing 14. 3 μg/L of As. Measured Concentration (μg/L) 18. 4 13. 6 14. 2 16. 0 13. 6 17. 8 Average = 15. 3 μg/L Standard Deviation = 2. 1 μg/L What is the true concentration of As in this experiment? 14. 3 μg/L Estimate the accuracy of this method. How precise is this method? 2. 1 μg/L

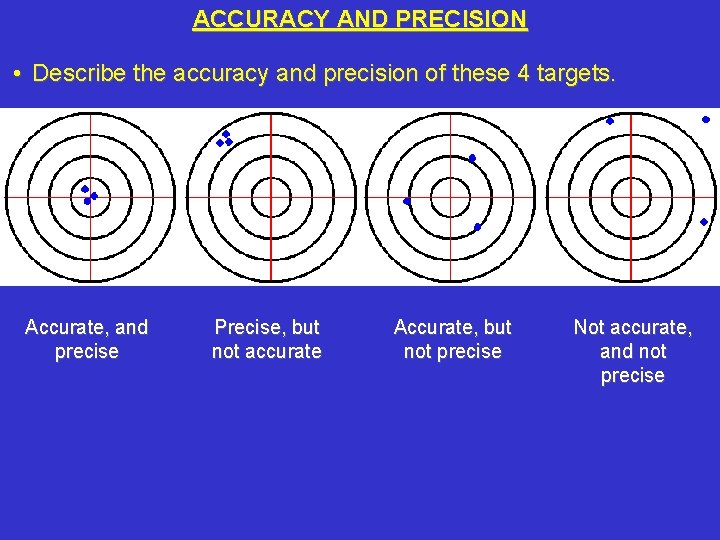
ACCURACY AND PRECISION • Describe the accuracy and precision of these 4 targets. Accurate, and precise Precise, but not accurate Accurate, but not precise Not accurate, and not precise

ERRORS • Systematic (or determinate) errors are reproducible and cause a bias in the same direction for each measurement. • For example, a poorly trained operator that consistently makes the same mistake will cause systematic error. Systematic error can be corrected. • Random (or indeterminate) errors are caused by the natural uncertainty that occurs with any measurement. • Random errors obey the laws of probability. That is, random error might cause a value to be over predicted during its first measurement and under predicted during its second measurement. Random error cannot be corrected.

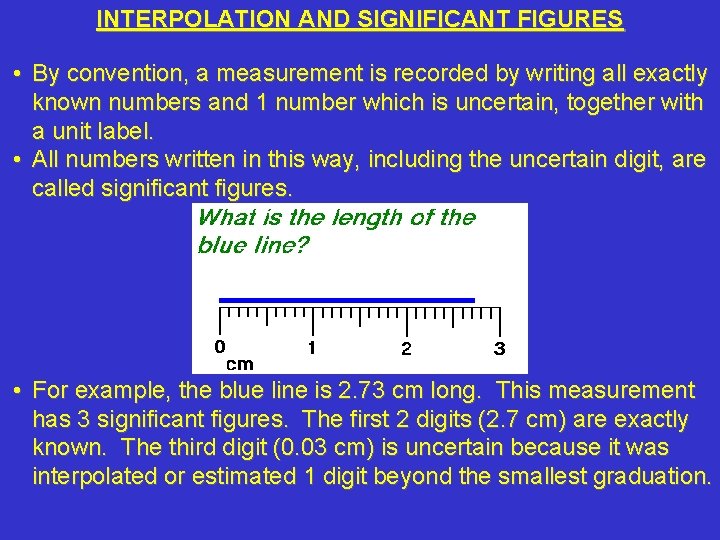
INTERPOLATION AND SIGNIFICANT FIGURES • By convention, a measurement is recorded by writing all exactly known numbers and 1 number which is uncertain, together with a unit label. • All numbers written in this way, including the uncertain digit, are called significant figures. • For example, the blue line is 2. 73 cm long. This measurement has 3 significant figures. The first 2 digits (2. 7 cm) are exactly known. The third digit (0. 03 cm) is uncertain because it was interpolated or estimated 1 digit beyond the smallest graduation.

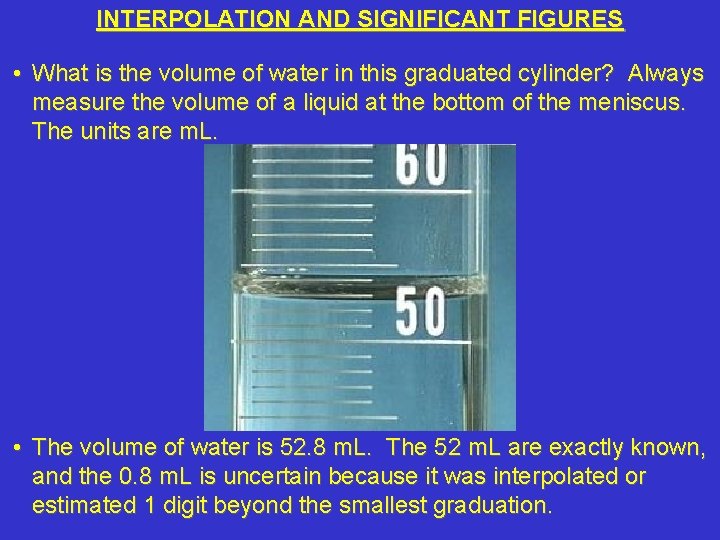
INTERPOLATION AND SIGNIFICANT FIGURES • What is the volume of water in this graduated cylinder? Always measure the volume of a liquid at the bottom of the meniscus. The units are m. L. • The volume of water is 52. 8 m. L. The 52 m. L are exactly known, and the 0. 8 m. L is uncertain because it was interpolated or estimated 1 digit beyond the smallest graduation.

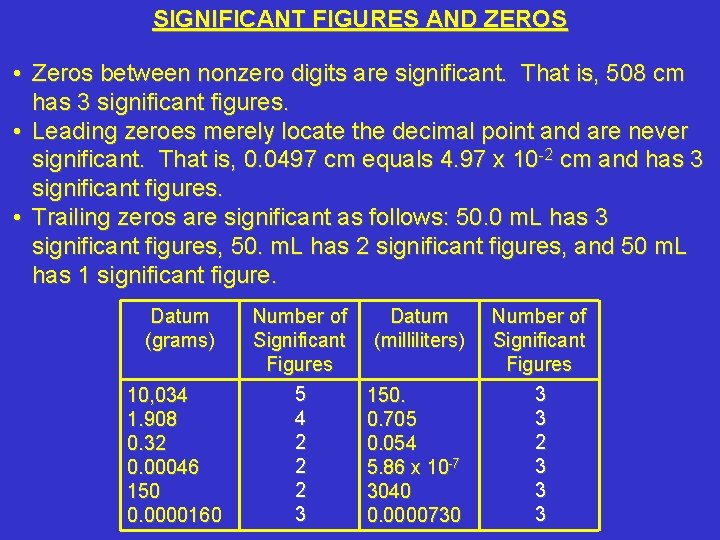
SIGNIFICANT FIGURES AND ZEROS • Zeros between nonzero digits are significant. That is, 508 cm has 3 significant figures. • Leading zeroes merely locate the decimal point and are never significant. That is, 0. 0497 cm equals 4. 97 x 10 -2 cm and has 3 significant figures. • Trailing zeros are significant as follows: 50. 0 m. L has 3 significant figures, 50. m. L has 2 significant figures, and 50 m. L has 1 significant figure. Datum (grams) 10, 034 1. 908 0. 32 0. 00046 150 0. 0000160 Number of Significant Figures 5 4 2 2 2 3 Datum (milliliters) 150. 0. 705 0. 054 5. 86 x 10 -7 3040 0. 0000730 Number of Significant Figures 3 3 2 3 3 3

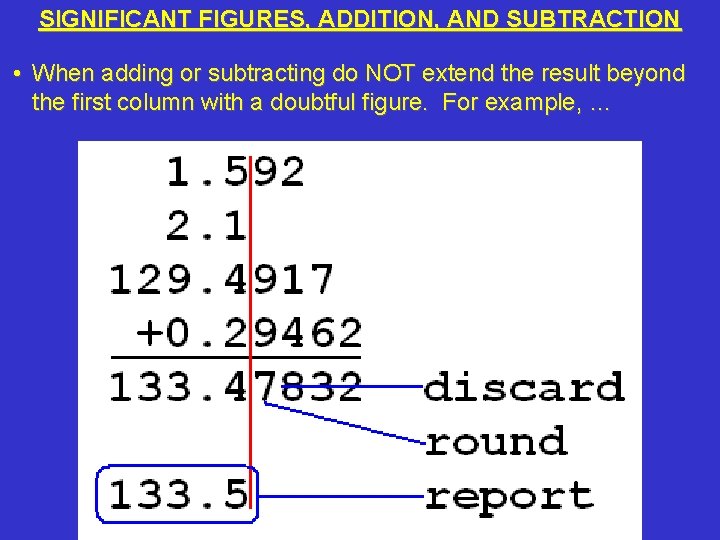
SIGNIFICANT FIGURES, ADDITION, AND SUBTRACTION • When adding or subtracting do NOT extend the result beyond the first column with a doubtful figure. For example, …

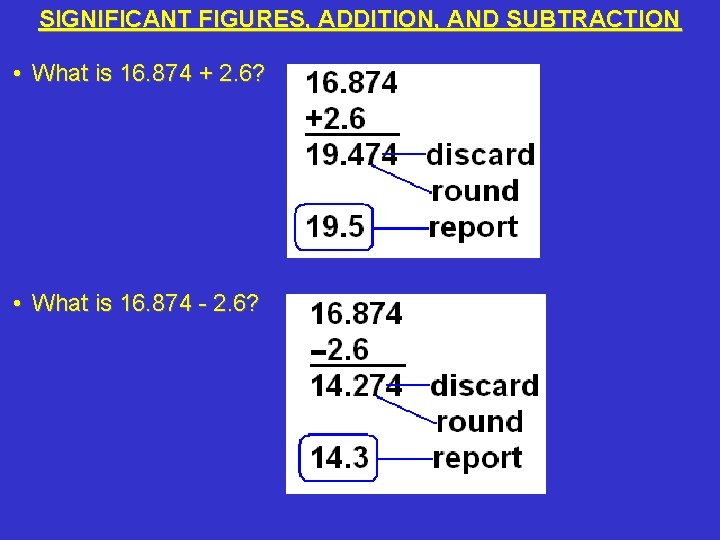
SIGNIFICANT FIGURES, ADDITION, AND SUBTRACTION • What is 16. 874 + 2. 6? • What is 16. 874 - 2. 6?

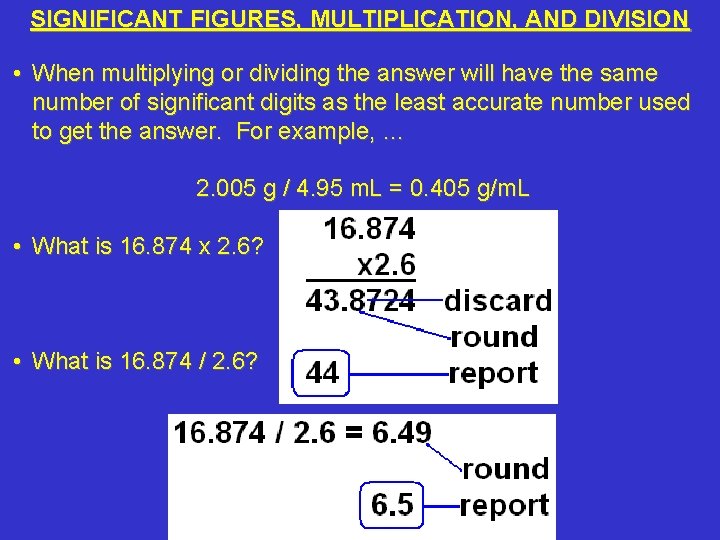
SIGNIFICANT FIGURES, MULTIPLICATION, AND DIVISION • When multiplying or dividing the answer will have the same number of significant digits as the least accurate number used to get the answer. For example, … 2. 005 g / 4. 95 m. L = 0. 405 g/m. L • What is 16. 874 x 2. 6? • What is 16. 874 / 2. 6?

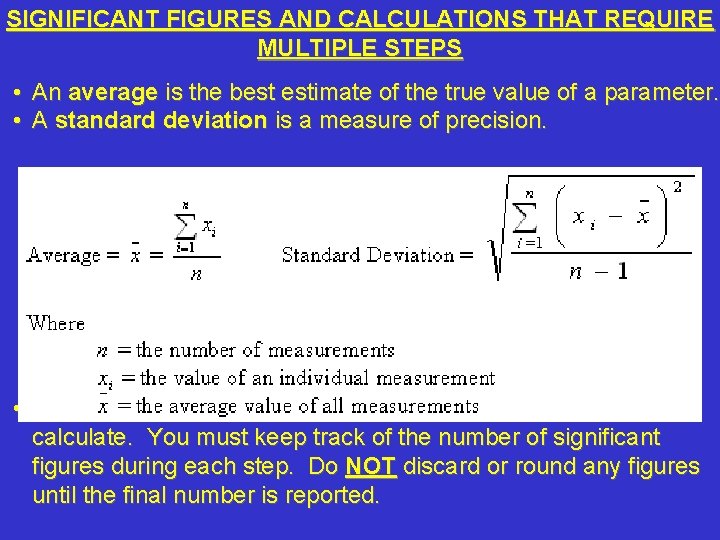
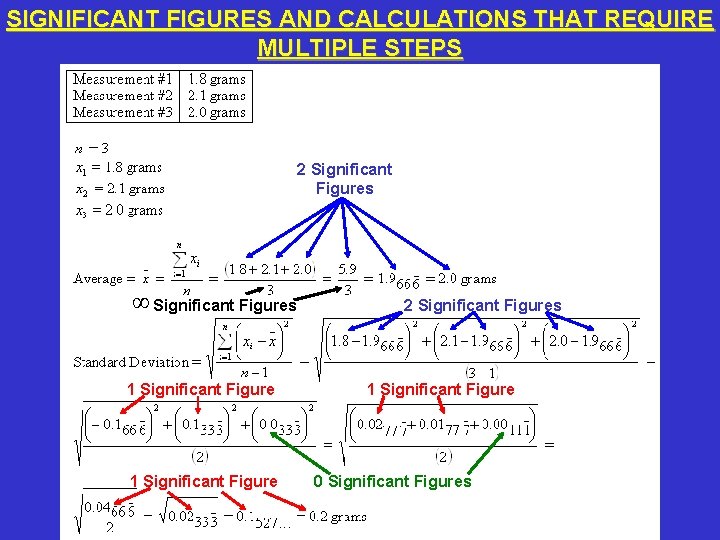
SIGNIFICANT FIGURES AND CALCULATIONS THAT REQUIRE MULTIPLE STEPS • An average is the best estimate of the true value of a parameter. • A standard deviation is a measure of precision. • Averages and standard deviations require several steps to calculate. You must keep track of the number of significant figures during each step. Do NOT discard or round any figures until the final number is reported.

SIGNIFICANT FIGURES AND CALCULATIONS THAT REQUIRE MULTIPLE STEPS 2 Significant Figures ∞ Significant Figures 1 Significant Figure 2 Significant Figures 1 Significant Figure 0 Significant Figures

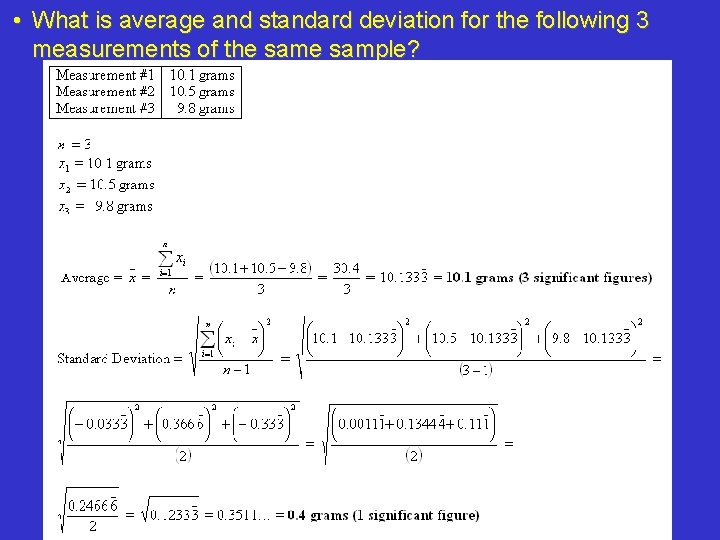
• What is average and standard deviation for the following 3 measurements of the sample?

SOURCES • American Public Health Association, American Water Works Association, Water Environment Federation. 1995. Standard Methods for the Examination of Water and Wastewater. 19 th ed. Washington, DC: American Public Health Association. • Barnes, D. S. , J. A. Chandler. 1982. Chemistry 111 -112 Workbook and Laboratory Manual. Amherst, MA: University of Massachusetts. • Christian, G. D. 1986. Analytical Chemistry, 3 rd ed. New York, NY: John Wiley & Sons, Inc. • Frisbie, S. H. , E. J. Mitchell, A. Z. Yusuf, M. Y. Siddiq, R. E. Sanchez, R. Ortega, D. M. Maynard, B. Sarkar. 2005. The development and use of an innovative laboratory method for measuring arsenic in drinking water from western Bangladesh. Environmental Health Perspectives. 113(9): 1196 -1204. • Morrison Laboratories. 2006. Meniscus Madness. Available: http: //www. morrisonlabs. com/meniscus. htm [accessed 25 August 2006].