A Statistical Approach to Method Validation and Out
- Slides: 23

A Statistical Approach to Method Validation and Out of Specification Data

Outline of talk • Basic statistics – Averaging, confidence intervals • Fitness-for-purpose and analytical capability. • Quantifying variability and producing a capable method. • Out-of-specification results. • Conclusions.

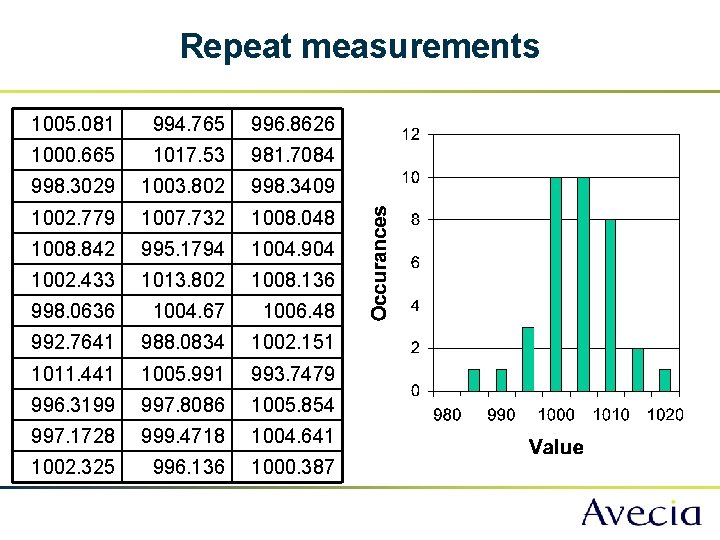
Repeat measurements 1005. 081 994. 765 996. 8626 1000. 665 1017. 53 981. 7084 998. 3029 1003. 802 998. 3409 1002. 779 1007. 732 1008. 048 1008. 842 995. 1794 1004. 904 1002. 433 1013. 802 1008. 136 998. 0636 1004. 67 1006. 48 992. 7641 988. 0834 1002. 151 1011. 441 1005. 991 993. 7479 996. 3199 997. 8086 1005. 854 997. 1728 999. 4718 1004. 641 1002. 325 996. 136 1000. 387

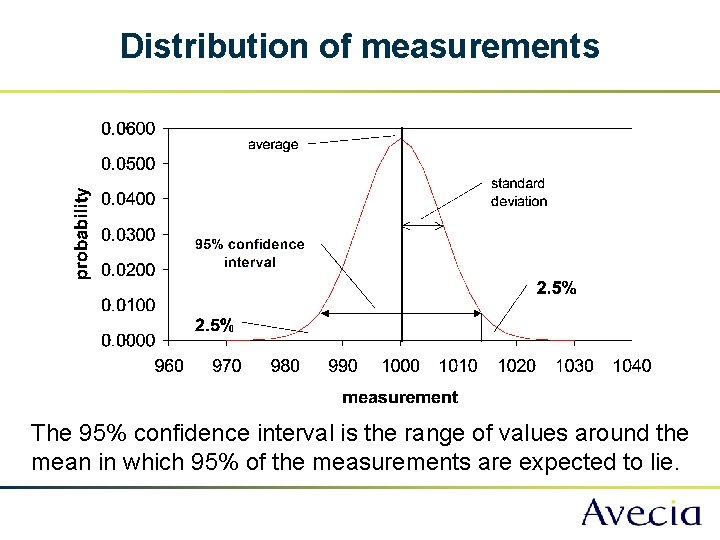
Distribution of measurements The 95% confidence interval is the range of values around the mean in which 95% of the measurements are expected to lie.

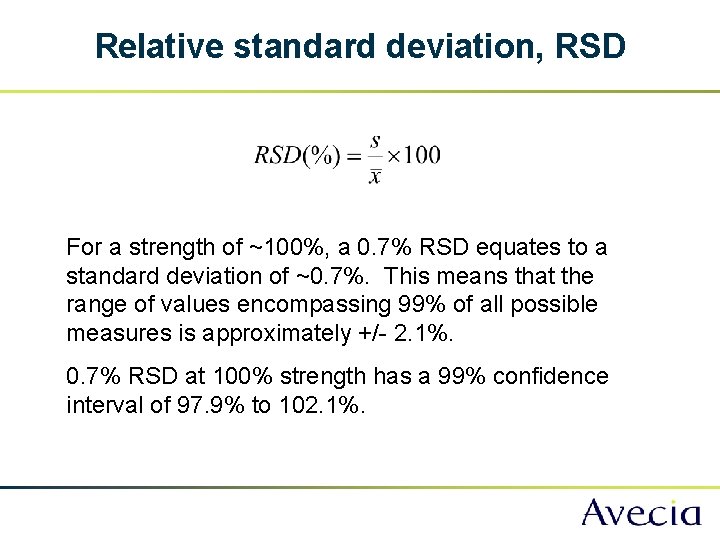
Relative standard deviation, RSD For a strength of ~100%, a 0. 7% RSD equates to a standard deviation of ~0. 7%. This means that the range of values encompassing 99% of all possible measures is approximately +/- 2. 1%. 0. 7% RSD at 100% strength has a 99% confidence interval of 97. 9% to 102. 1%.

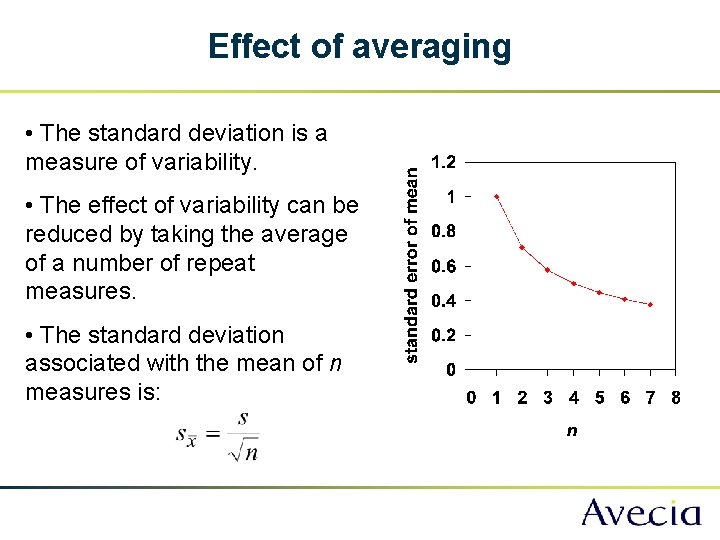
Effect of averaging • The standard deviation is a measure of variability. • The effect of variability can be reduced by taking the average of a number of repeat measures. • The standard deviation associated with the mean of n measures is:

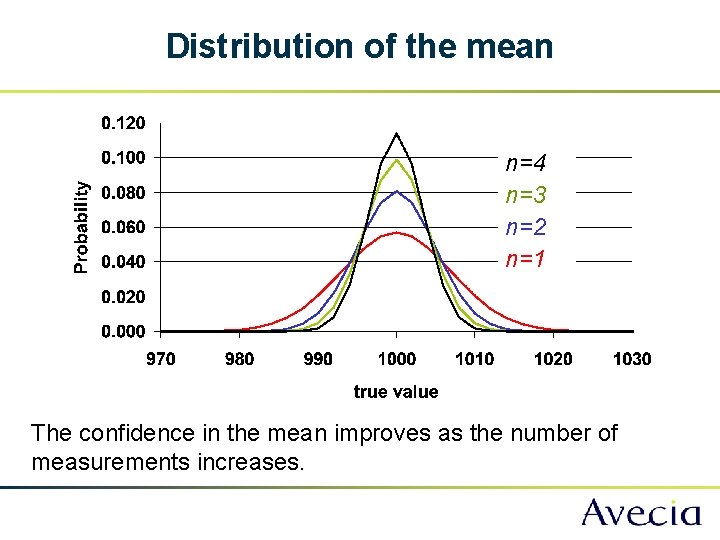
Distribution of the mean n=4 n=3 n=2 n=1 The confidence in the mean improves as the number of measurements increases.

How many measurements should I average? • Depends upon: – The amount of variability present in the measurements. – The degree of confidence I wish to achieve. WHAT IS FITNESS FOR PURPOSE?

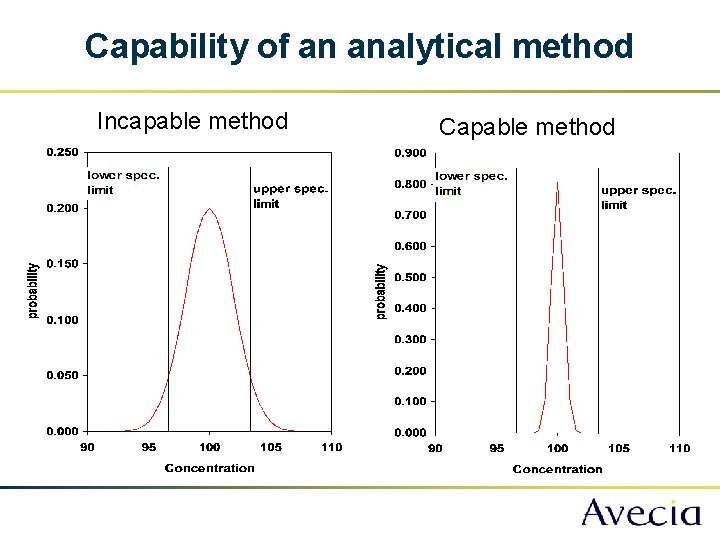
Capability of an analytical method Incapable method Capable method

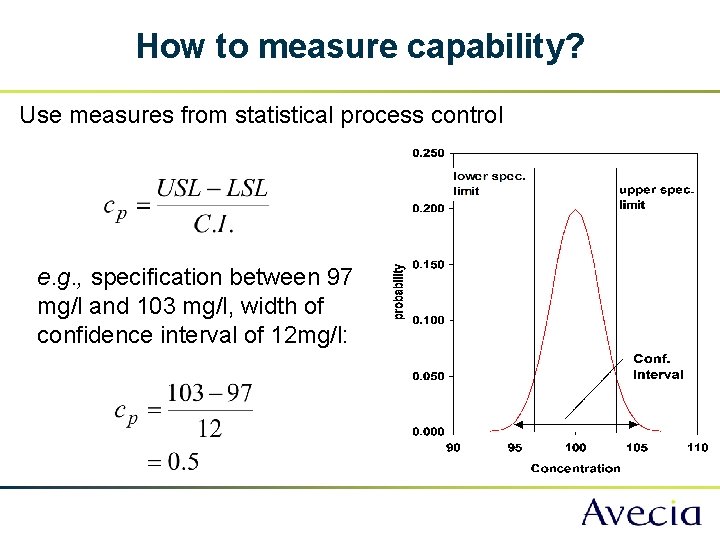
How to measure capability? Use measures from statistical process control e. g. , specification between 97 mg/l and 103 mg/l, width of confidence interval of 12 mg/l:

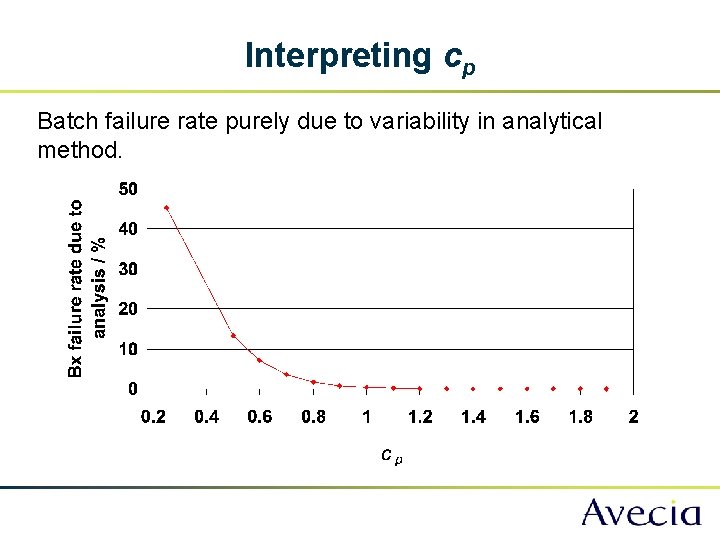
Interpreting cp Batch failure rate purely due to variability in analytical method.

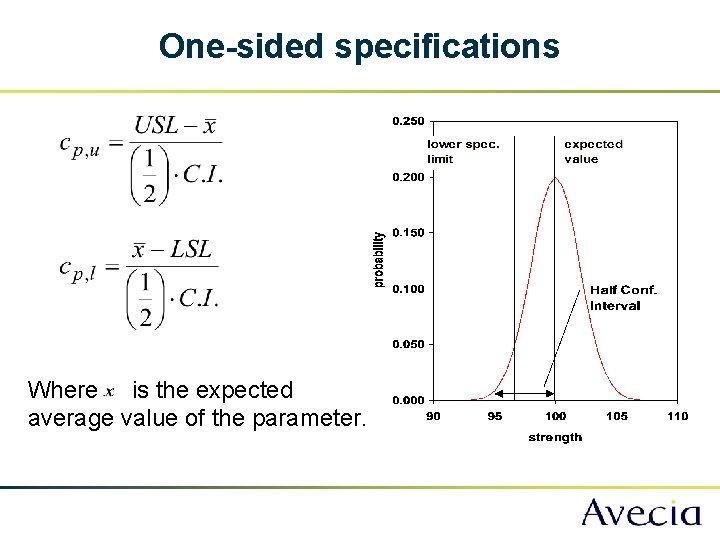
One-sided specifications Where is the expected average value of the parameter.

Method development/validation • To determine the number of repeat measurements to ensure that the analytical capability is acceptable, for example >1. • Acceptance criteria are then product dependent, rather than technique specific. • How do I determine the amount of variability? • How do I determine the number of repeat measurements required?

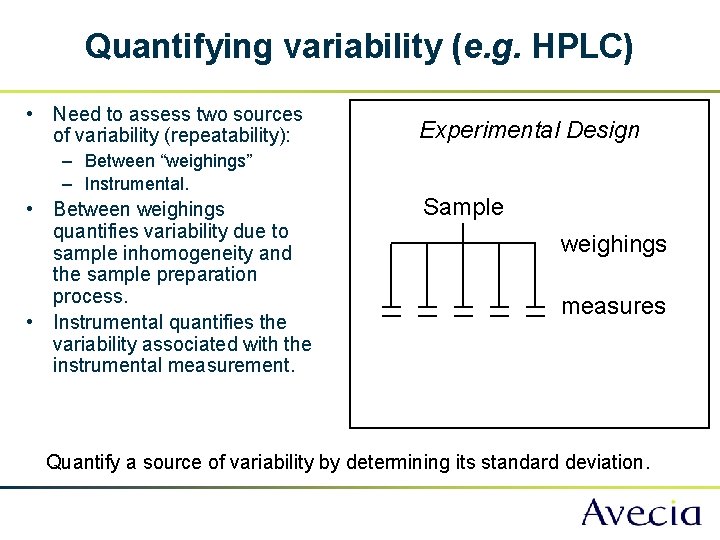
Quantifying variability (e. g. HPLC) • Need to assess two sources of variability (repeatability): – Between “weighings” – Instrumental. • Between weighings quantifies variability due to sample inhomogeneity and the sample preparation process. • Instrumental quantifies the variability associated with the instrumental measurement. Experimental Design Sample weighings measures Quantify a source of variability by determining its standard deviation.

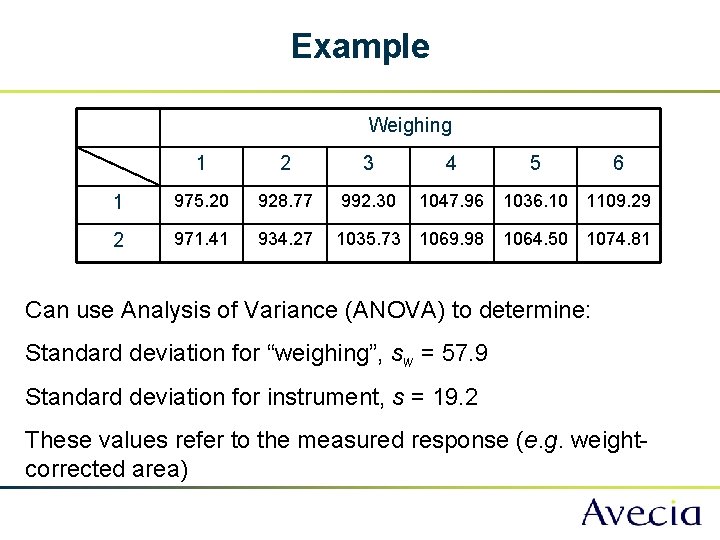
Example Weighing 1 2 3 4 5 6 1 975. 20 928. 77 992. 30 1047. 96 1036. 10 1109. 29 2 971. 41 934. 27 1035. 73 1069. 98 1064. 50 1074. 81 Can use Analysis of Variance (ANOVA) to determine: Standard deviation for “weighing”, sw = 57. 9 Standard deviation for instrument, s = 19. 2 These values refer to the measured response (e. g. weightcorrected area)

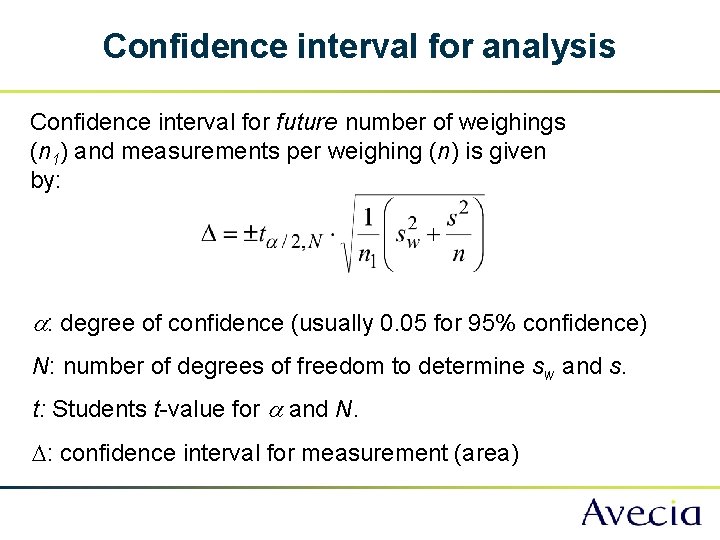
Confidence interval for analysis Confidence interval for future number of weighings (n 1) and measurements per weighing (n) is given by: a: degree of confidence (usually 0. 05 for 95% confidence) N: number of degrees of freedom to determine sw and s. t: Students t-value for a and N. D: confidence interval for measurement (area)

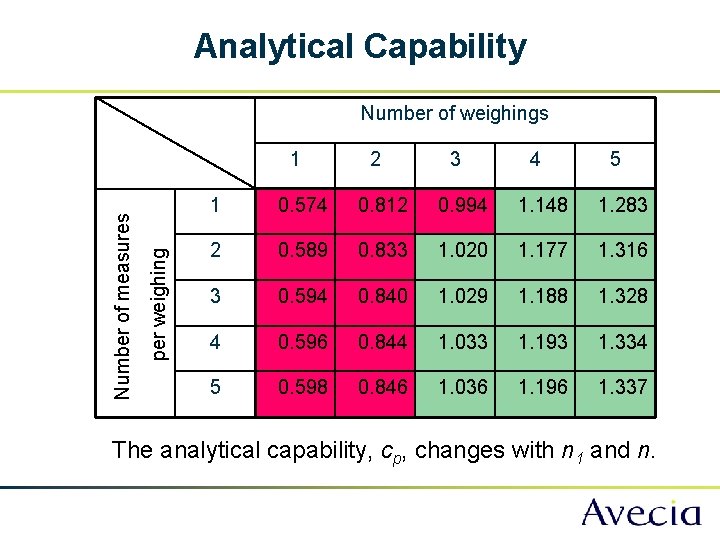
Analytical Capability Number of weighings per weighing Number of measures 1 2 3 4 5 1 0. 574 0. 812 0. 994 1. 148 1. 283 2 0. 589 0. 833 1. 020 1. 177 1. 316 3 0. 594 0. 840 1. 029 1. 188 1. 328 4 0. 596 0. 844 1. 033 1. 193 1. 334 5 0. 598 0. 846 1. 036 1. 196 1. 337 The analytical capability, cp, changes with n 1 and n.

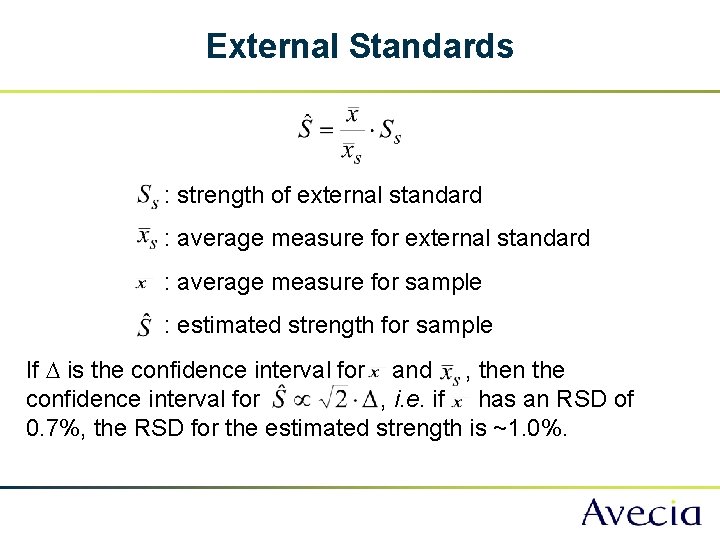
External Standards : strength of external standard : average measure for sample : estimated strength for sample If D is the confidence interval for and , then the confidence interval for , i. e. if has an RSD of 0. 7%, the RSD for the estimated strength is ~1. 0%.

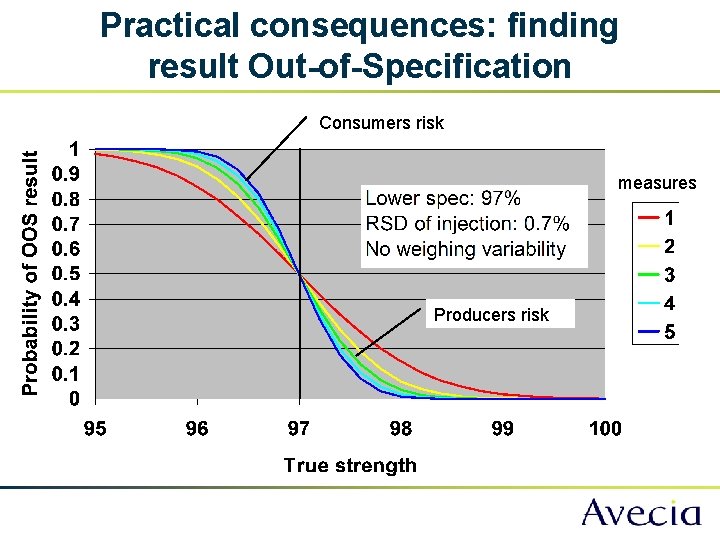
Practical consequences: finding result Out-of-Specification Consumers risk measures Producers risk

Dealing with OOS results • Can re-test samples. • On re-testing, FDA guidelines for industry state “if no …errors are identified in the first test, there is no scientific basis for invalidating OOS results in favour of passing re-test results. ” • Scientifically, the issue of whether the re-test results “pass” or “fail” is of little consequence. The issue is whether the re-test results are statistically the same as the original OOS result. • Can use the t-test to assess the similarity between OOS and retest.

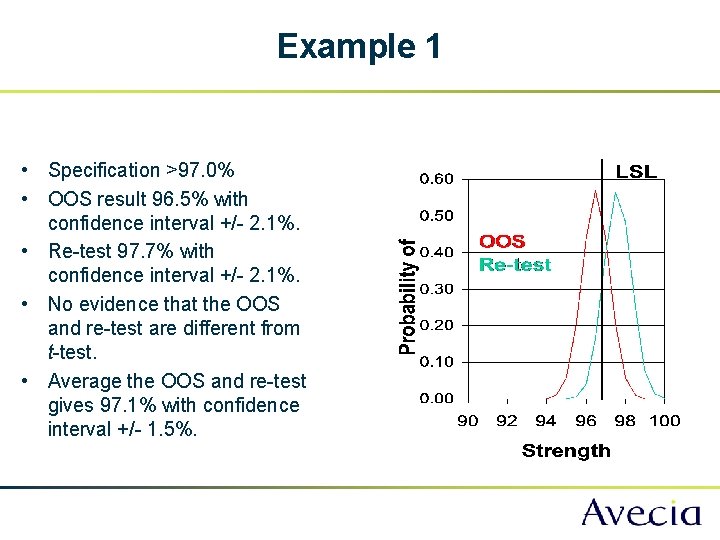
Example 1 • Specification >97. 0% • OOS result 96. 5% with confidence interval +/- 2. 1%. • Re-test 97. 7% with confidence interval +/- 2. 1%. • No evidence that the OOS and re-test are different from t-test. • Average the OOS and re-test gives 97. 1% with confidence interval +/- 1. 5%.

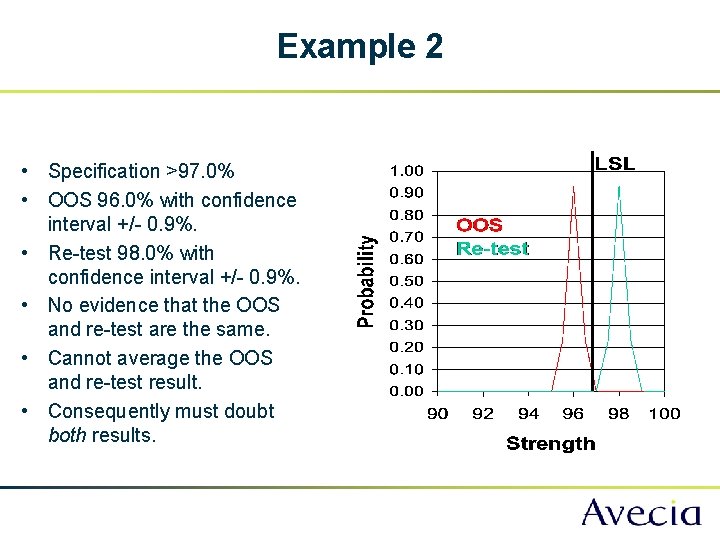
Example 2 • Specification >97. 0% • OOS 96. 0% with confidence interval +/- 0. 9%. • Re-test 98. 0% with confidence interval +/- 0. 9%. • No evidence that the OOS and re-test are the same. • Cannot average the OOS and re-test result. • Consequently must doubt both results.

Conclusions • Understanding and determining the confidence interval associated with an analytical result is an important part of method development/validation. • The relationship between the confidence interval and the product specification is an important aspect of defining method fitness-for-purpose. • The analytical capability is quantifiable measure of fitness-for-purpose for precision. • Understanding the confidence interval is important during out-of-specification investigations.