A LEVEL PHYSICS Year 1 Young Modulus Assessed


- Slides: 13

A LEVEL PHYSICS Year 1 Young Modulus Assessed Practical

Title: Aim: Underlying Physics: Prediction:

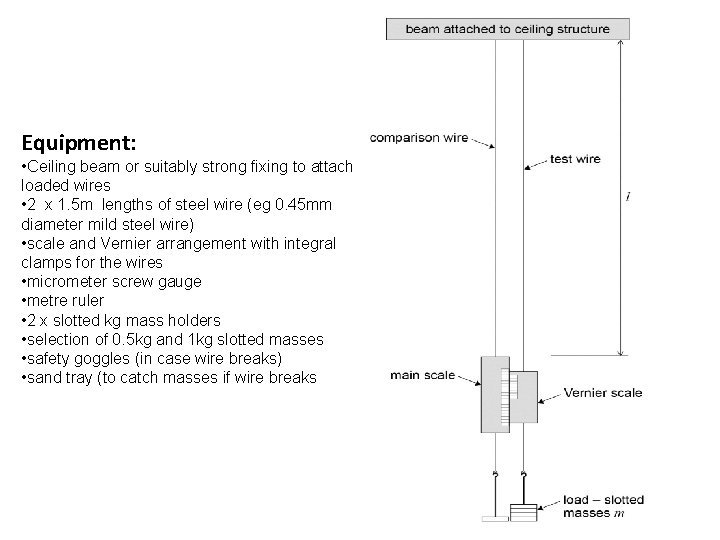
Equipment: • Ceiling beam or suitably strong fixing to attach loaded wires • 2 x 1. 5 m lengths of steel wire (eg 0. 45 mm diameter mild steel wire) • scale and Vernier arrangement with integral clamps for the wires • micrometer screw gauge • metre ruler • 2 x slotted kg mass holders • selection of 0. 5 kg and 1 kg slotted masses • safety goggles (in case wire breaks) • sand tray (to catch masses if wire breaks

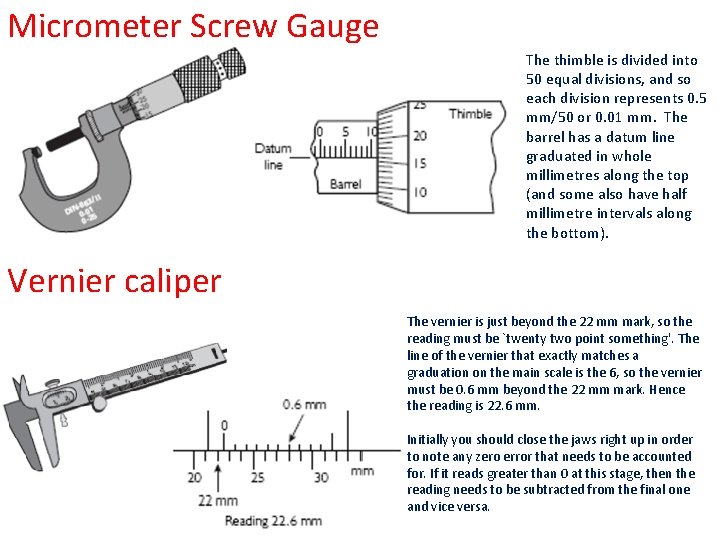
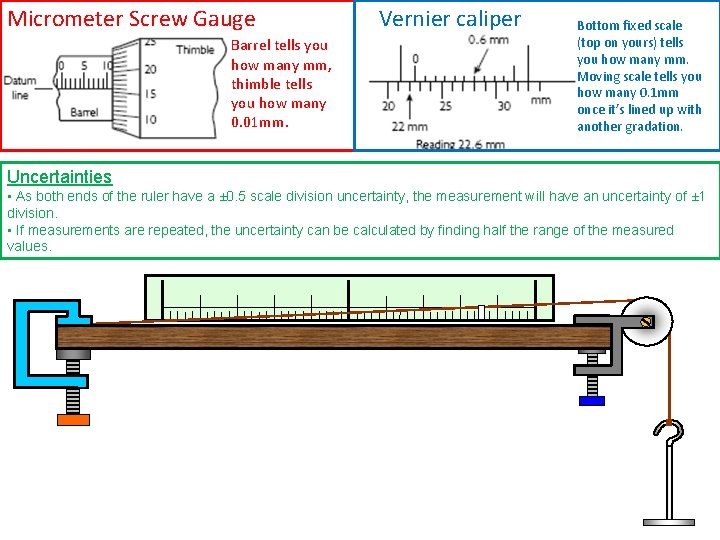
Micrometer Screw Gauge The thimble is divided into 50 equal divisions, and so each division represents 0. 5 mm/50 or 0. 01 mm. The barrel has a datum line graduated in whole millimetres along the top (and some also have half millimetre intervals along the bottom). Vernier caliper The vernier is just beyond the 22 mm mark, so the reading must be `twenty two point something'. The line of the vernier that exactly matches a graduation on the main scale is the 6, so the vernier must be 0. 6 mm beyond the 22 mm mark. Hence the reading is 22. 6 mm. Initially you should close the jaws right up in order to note any zero error that needs to be accounted for. If it reads greater than 0 at this stage, then the reading needs to be subtracted from the final one and vice versa.

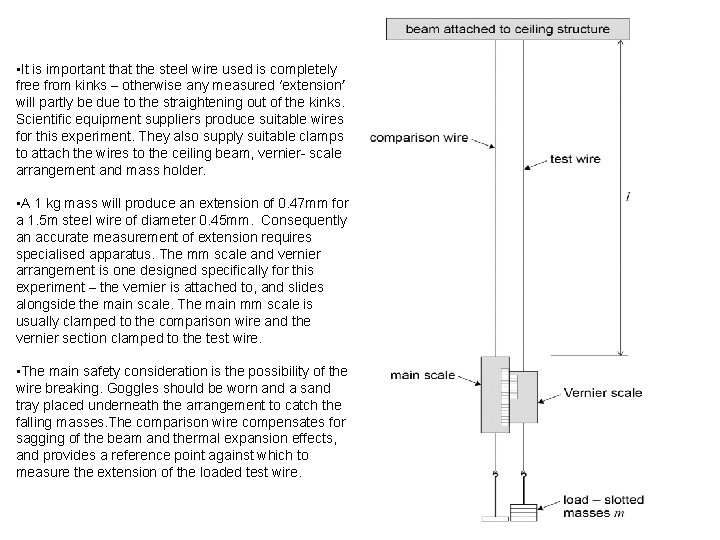
• It is important that the steel wire used is completely free from kinks – otherwise any measured ‘extension’ will partly be due to the straightening out of the kinks. Scientific equipment suppliers produce suitable wires for this experiment. They also supply suitable clamps to attach the wires to the ceiling beam, vernier- scale arrangement and mass holder. • A 1 kg mass will produce an extension of 0. 47 mm for a 1. 5 m steel wire of diameter 0. 45 mm. Consequently an accurate measurement of extension requires specialised apparatus. The mm scale and vernier arrangement is one designed specifically for this experiment – the vernier is attached to, and slides alongside the main scale. The main mm scale is usually clamped to the comparison wire and the vernier section clamped to the test wire. • The main safety consideration is the possibility of the wire breaking. Goggles should be worn and a sand tray placed underneath the arrangement to catch the falling masses. The comparison wire compensates for sagging of the beam and thermal expansion effects, and provides a reference point against which to measure the extension of the loaded test wire.

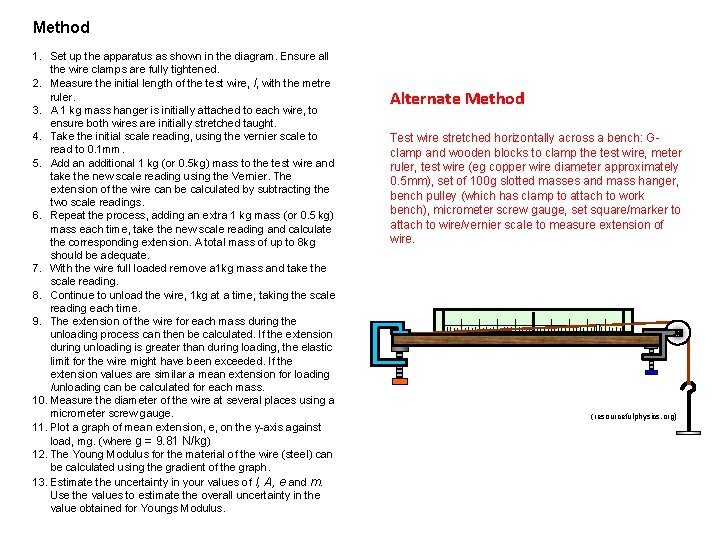
Method 1. Set up the apparatus as shown in the diagram. Ensure all the wire clamps are fully tightened. 2. Measure the initial length of the test wire, l, with the metre ruler. 3. A 1 kg mass hanger is initially attached to each wire, to ensure both wires are initially stretched taught. 4. Take the initial scale reading, using the vernier scale to read to 0. 1 mm. 5. Add an additional 1 kg (or 0. 5 kg) mass to the test wire and take the new scale reading using the Vernier. The extension of the wire can be calculated by subtracting the two scale readings. 6. Repeat the process, adding an extra 1 kg mass (or 0. 5 kg) mass each time, take the new scale reading and calculate the corresponding extension. A total mass of up to 8 kg should be adequate. 7. With the wire full loaded remove a 1 kg mass and take the scale reading. 8. Continue to unload the wire, 1 kg at a time, taking the scale reading each time. 9. The extension of the wire for each mass during the unloading process can then be calculated. If the extension during unloading is greater than during loading, the elastic limit for the wire might have been exceeded. If the extension values are similar a mean extension for loading /unloading can be calculated for each mass. 10. Measure the diameter of the wire at several places using a micrometer screw gauge. 11. Plot a graph of mean extension, e, on the y-axis against load, mg. (where g = 9. 81 N/kg) 12. The Young Modulus for the material of the wire (steel) can be calculated using the gradient of the graph. 13. Estimate the uncertainty in your values of l, A, e and m. Use the values to estimate the overall uncertainty in the value obtained for Youngs Modulus. Alternate Method Test wire stretched horizontally across a bench: Gclamp and wooden blocks to clamp the test wire, meter ruler, test wire (eg copper wire diameter approximately 0. 5 mm), set of 100 g slotted masses and mass hanger, bench pulley (which has clamp to attach to work bench), micrometer screw gauge, set square/marker to attach to wire/vernier scale to measure extension of wire. (resourcefulphysics. org)

Risk Assessment: Hazard Risk Precaution

Uncertainty or Error Impact on Experiment How to Minimise Uncertainty The uncertainty in a measurement using a particular instrument is no smaller than plus or minus half of the smallest division or greater. For example, a temperature measured with a thermometer is likely to have an uncertainty of ± 0. 5 °C if the graduations are 1 °C apart. Measurements are written with the uncertainty, for example: (2. 40 ± 0. 005) V.

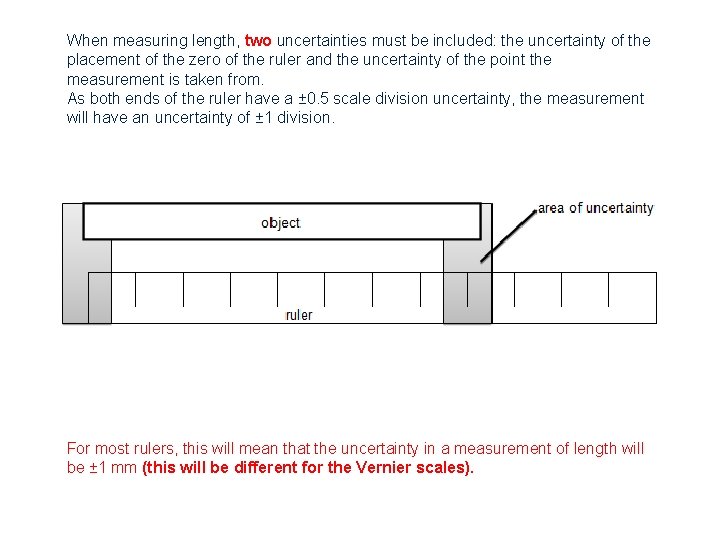
When measuring length, two uncertainties must be included: the uncertainty of the placement of the zero of the ruler and the uncertainty of the point the measurement is taken from. As both ends of the ruler have a ± 0. 5 scale division uncertainty, the measurement will have an uncertainty of ± 1 division. For most rulers, this will mean that the uncertainty in a measurement of length will be ± 1 mm (this will be different for the Vernier scales).

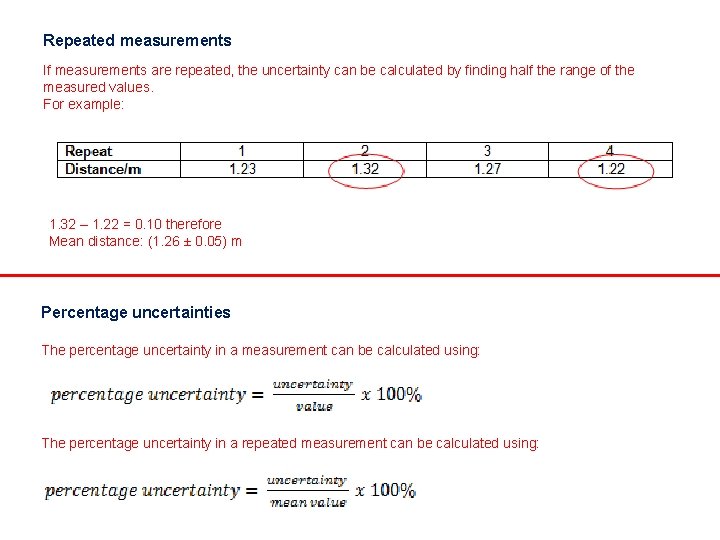
Repeated measurements If measurements are repeated, the uncertainty can be calculated by finding half the range of the measured values. For example: 1. 32 – 1. 22 = 0. 10 therefore Mean distance: (1. 26 ± 0. 05) m Percentage uncertainties The percentage uncertainty in a measurement can be calculated using: The percentage uncertainty in a repeated measurement can be calculated using:

Results: Graph(s) (state which graphs you should plot and why):

Analysis (trends, physics, further analysis of gradients, calculations of uncertainties, anomalies, errors and uncertainties contributing to imperfect results, improvements to minimise these + improve method, conclusion regarding accuracy):

Micrometer Screw Gauge Barrel tells you how many mm, thimble tells you how many 0. 01 mm. Vernier caliper Bottom fixed scale (top on yours) tells you how many mm. Moving scale tells you how many 0. 1 mm once it’s lined up with another gradation. Uncertainties • As both ends of the ruler have a ± 0. 5 scale division uncertainty, the measurement will have an uncertainty of ± 1 division. • If measurements are repeated, the uncertainty can be calculated by finding half the range of the measured values.